Reading Response: Computer Vision for Artists and Designers, #Week5

Reflection: After reading the article on “Computer Vision for Artists and Designers,” I find myself intrigued by the democratization of computer vision technologies and their increasing integration into various artistic and interactive mediums. The examples provided, such as Myron Krueger’s Videoplace and Rafael Lozano-Hemmer’s Standards and Double Standards, showcase the diverse ways in which computer vision is being employed to create immersive and thought-provoking experiences. However, I couldn’t help but wonder: What are the potential ethical implications of surveillance-themed artworks like Suicide Box by the Bureau of Inverse Technology? While these projects aim to shed light on societal issues, do they also raise questions about privacy and consent?

Regarding the author’s bias, it’s evident that they have a deep appreciation for the potential of computer vision in the arts. The article primarily focuses on the positive impact of these technologies, emphasizing their accessibility to novice programmers and the creative possibilities they offer. However, I would have appreciated a more nuanced discussion: What are the potential drawbacks or limitations of using computer vision in art? How might artists address ethical concerns such as privacy and consent when incorporating surveillance-themed elements into their work? Additionally, I’m left wondering about the broader societal implications: What are the implications of widespread adoption of these technologies, particularly in terms of surveillance and data privacy? Overall, the reading has prompted me to critically examine the intersection of technology and art, and consider the ethical implications of incorporating advanced technologies like computer vision into creative practices.

Week 5 & 6: (Midterm Progress) Image Processing and Sounds

Concept: Recreating one of my favorite childhood game – The Brick Breaker

So I chose to have the concept for this project, is to create a musical soothing classical Brick Breaker game using the p5.js library. The game involves controlling a paddle to bounce a ball and break bricks at the top of the screen. The user interacts with the game by moving the paddle horizontally using the left and right arrow keys. The goal is to break all the bricks without letting the ball fall below the paddle. The game provides feedback through visual cues such as the ball bouncing off objects, disappearing bricks, and a scoring system. Moreover, sound effects further enhance the user experience.

Designing the Code: Elaborating important areas

1) Ball Behavior: Within the Ball class, I define the behavior of the ball. This includes its movement across the screen, detection of collisions with other objects (such as the paddle and bricks), and rendering on the canvas. This encapsulation allows for clear organization and modularization of ball-related functionality.

2) Paddle Control: The Paddle class covers the movement and display of the paddle. It handles user input from the keyboard to move the paddle horizontally across the screen, ensuring precise control for the player.

3) Brick Management: Each brick in the game is represented by the Brick class. This class manages the display of individual bricks on the canvas and provides methods for their creation, rendering, and removal during gameplay.

4) User Interaction: The mousePressed function responds to user input by triggering specific game actions, such as starting or resetting the game. This function enhances the interactivity of the game and provides a seamless user experience.

Additional functions, such as createBricks and resetGame, are responsible for initializing game elements (such as bricks) and resetting the game state, respectively. These functions streamline the codebase and improve readability by encapsulating repetitive tasks.

By breaking down the code into these specific components, I ensure a clear and organized structure, facilitating easier maintenance and future development of the game for the midterm project.

Minimizing Risk: Code I’m proud of,

display() {
    fill(255, 0, 0);
    ellipse(this.x, this.y, this.radius * 2);
  }
  
  checkCollision() {
    if (this.x > paddle.x && this.x < paddle.x + paddle.width && this.y + this.radius > paddle.y) {
      this.speedY *= -1;
      paddleHitSound.play();
    }
  }
  
  bounce() {
    this.speedY *= -1;
    ballHitSound.play();
  }
  
  hits(brick) {
    let closestX = constrain(this.x, brick.x, brick.x + brick.width);
    let closestY = constrain(this.y, brick.y, brick.y + brick.height);
    let distance = dist(this.x, this.y, closestX, closestY);
    return distance < this.radius;
  }
}

One major complex aspect of the project is implementing collision detection between the ball and other game objects (paddle, bricks, walls). Ensuring accurate collision detection is crucial for the game’s mechanics and overall user experience. To minimize the risk of errors in this area, I employed two  strategies:

1) Collision Detection Algorithm: Implementing this collision detection algorithms is essential because, for example in the Ball class, I used a method called hits(brick) to check if the ball collided with a brick. This method calculates the distance between the ball and the brick’s edges to determine if a collision occurred. Moreover, By using the dist() function in favor with appropriate ball coordinates, I ensured this accurate collision detection is perfectly executed.

2) Testing with Edge Cases: To validate the accuracy of this collision detection algorithm, I conducted repeated testing with various edge cases. This includes scenarios where the ball collides with the corners of bricks or with multiple objects simultaneously. By systematically testing these cases and analyzing the results, I came to conclusion that the collision detection behaves as expected under different conditions.
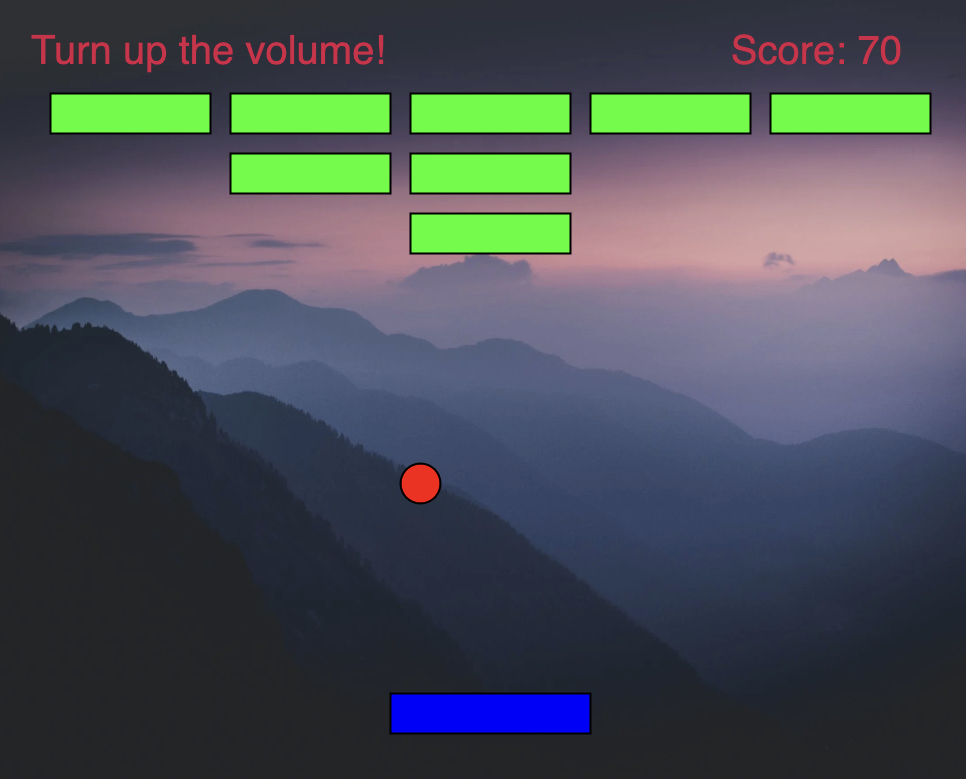
Here’s the Game:

Features & Game Mechanics:
– Game initializes with a start screen displaying “Brick Breaker” and “Click to start” message.
– The player controls the paddle using the left and right arrow keys.
– The ball bounces off the paddle, walls, and bricks.
– When the ball hits a brick, it disappears, and the player earns points.
– If the ball falls below the paddle, the game ends.
– Once game ends, it displays the “Game Over” message along with the score and “Click to replay” option.
– Clicking on the canvas after the game ends resets the game, allowing the player to replay.

Additional Features:
– Sound effects are played when the ball hits the paddle and when it hits a brick.
– The player earns points for each brick broken, and the score is displayed on the screen.
– Background music plays throughout the game to enhance the gaming experience.

Here’s a snapshot taken during the game-play:

Complete Code Snippet (With Comments):

// Define global variables
let backgroundImage;
let ball;
let paddle;
let bricks = [];
let brickRowCount = 3;
let brickColumnCount = 5;
let brickWidth = 80;
let brickHeight = 20;
let brickPadding = 10;
let brickOffsetTop = 50; // Adjusted value
let brickOffsetLeft = 30;
let score = 0;

let ballHitSound;
let paddleHitSound;
let backgroundMusic;

let gameStarted = false;
let gameOver = false;

// Preload function to load external assets
function preload() {
  backgroundImage = loadImage('background_image.jpg'); // Replace 'background_image.jpg' with the path to your image file
  ballHitSound = loadSound('ball_hit.mp3');
  paddleHitSound = loadSound('paddle_hit.mp3');
  backgroundMusic = loadSound('background_music.mp3');
}

// Setup function to initialize canvas and objects
function setup() {
  createCanvas(500, 400); // Set the canvas size to match the background image size
  paddle = new Paddle();
  ball = new Ball();
  createBricks();
  backgroundMusic.loop();
  // resetGame(); // Commented out, not needed here
}

// Draw function to render graphics
function draw() {
  background(backgroundImage); // Draw the background image
  
  // Display "Click to start" only when game hasn't started and isn't over
  if (!gameStarted && !gameOver) {
    textSize(32);
    textAlign(CENTER, CENTER);
    text("Brick Breaker", width / 2, height / 2 - 40);
    textSize(20);
    text("Click to start", width / 2, height / 2);
  } else { // Game running
    if (gameStarted && !gameOver) { // Run game logic only when game is started and not over
      ball.update();
      ball.checkCollision();
      ball.display();
      
      paddle.display();
      paddle.update();
      
      // Display and handle collisions with bricks
      for (let i = bricks.length - 1; i >= 0; i--) {
        bricks[i].display();
        if (ball.hits(bricks[i])) {
          ball.bounce();
          bricks.splice(i, 1);
          score += 10;
        }
      }
      
      // Check if all bricks are destroyed
      if (bricks.length === 0) {
        gameOver = true;
      }
      
      // Display score
      fill('rgb(216,32,71)')
      textSize(20);
      textAlign(LEFT);
      text("Turn up the volume!                               Score: " + score, 20, 30);
    }
    
    // Display game over message
    if (gameOver) {
      fill('rgb(32,213,32)')
      textSize(32);
      textAlign(CENTER, CENTER);
      text("Game Over! Score: " + score, width / 2, height / 2);
      text("Click to replay", width / 2, height / 2 + 40);
    }
  }
}

// Mouse pressed function to start/restart the game
function mousePressed() {
  if (!gameStarted || gameOver) {
    resetGame();
  }
}

// Reset game state and objects
function resetGame() {
  gameStarted = true;
  gameOver = false;
  score = 0;
  ball.reset();
  createBricks();
}

// Function to create bricks
function createBricks() {
  bricks = [];
  for (let c = 0; c < brickColumnCount; c++) {
    for (let r = 0; r < brickRowCount; r++) {
      let x = c * (brickWidth + brickPadding) + brickOffsetLeft;
      let y = r * (brickHeight + brickPadding) + brickOffsetTop;
      bricks.push(new Brick(x, y));
    }
  }
}

// Ball class
class Ball {
  constructor() {
    this.reset();
  }
  
  // Reset ball position and speed
  reset() {
    this.x = paddle.x + paddle.width / 2;
    this.y = paddle.y - this.radius;
    this.speedX = 5;
    this.speedY = -5;
    this.radius = 10;
  }
  
  // Update ball position
  update() {
    this.x += this.speedX;
    this.y += this.speedY;
    
    // Reflect ball off walls
    if (this.x < this.radius || this.x > width - this.radius) {
      this.speedX *= -1;
    }
    if (this.y < this.radius) {
      this.speedY *= -1;
    } else if (this.y > height - this.radius) {
      gameOver = true; // Game over if ball reaches bottom
    }
  }
  
  // Display ball
  display() {
    fill(255, 0, 0);
    ellipse(this.x, this.y, this.radius * 2);
  }
  
  // Check collision with paddle
  checkCollision() {
    if (this.x > paddle.x && this.x < paddle.x + paddle.width && this.y + this.radius > paddle.y) {
      this.speedY *= -1;
      paddleHitSound.play(); // Play paddle hit sound
    }
  }
  
  // Bounce ball off objects
  bounce() {
    this.speedY *= -1;
    ballHitSound.play(); // Play ball hit sound
  }
  
  // Check collision with a brick
  hits(brick) {
    let closestX = constrain(this.x, brick.x, brick.x + brick.width);
    let closestY = constrain(this.y, brick.y, brick.y + brick.height);
    let distance = dist(this.x, this.y, closestX, closestY);
    return distance < this.radius;
  }
}

// Paddle class
class Paddle {
  constructor() {
    this.width = 100;
    this.height = 20;
    this.x = width / 2 - this.width / 2;
    this.y = height - 50;
    this.speed = 10;
  }
  
  // Display paddle
  display() {
    fill(0, 0, 255);
    rect(this.x, this.y, this.width, this.height);
  }
  
  // Update paddle position based on user input
  update() {
    if (keyIsDown(LEFT_ARROW)) {
      this.x -= this.speed;
    }
    if (keyIsDown(RIGHT_ARROW)) {
      this.x += this.speed;
    }
    this.x = constrain(this.x, 0, width - this.width);
  }
}

// Brick class
class Brick {
  constructor(x, y) {
    this.x = x;
    this.y = y;
    this.width = brickWidth;
    this.height = brickHeight;
  }
  
  // Display brick
  display() {
    fill(0, 255, 0);
    rect(this.x, this.y, this.width, this.height);
  }
}

Ideas to improve this project for the midterm:

1) User Experience: I’m thinking to enhance the user experience by adding features such as visual effects, animations, difficulty levels, and more interactive elements (themes) can make the game more engaging and enjoyable for players.

2) Saving High Scores  Implement functionality to allow players to save the player’s progress (high scores) and comparing them with their present and previous scores.

3) Immersive Audio Design: Enhancing more immersion by adding immersive audio effects or soundscapes to game play events and interactions. This features could adds more engaging and immersive audiovisual experience for the user.

Reading Response – Computer Vision

The overview on using computer vision in interactive art really sparked my imagination. Of course algorithms can analyze images – but creating immersive experiences that actually respond to someone’s real-time presence? The possibilities seem endless. Still, I wonder – at what point could systems become too reactive? Krueger’s Videoplace reacted whimsically, but always ethically. The line between delight and dystopia likely needs careful watching.

Even with today’s exponential tech growth, restraint remains critical in design. Amidst the complexity, what separates a seamless experience from one that’s cluttered and confusing is knowing when enough is enough. But making those calls is an art, not a science. The LimboTime game showed how a playful vision system could emerge from simple building blocks. Yet its limitations in changing lighting reveal the fluid and adaptable intuitions still required.

Overall this piece brought great food for thought on computer vision’s creative possibilities. The blend of concrete examples and big picture analysis kept an engaging pace. I appreciated the framing of challenges creatively rather than just technically. This hit a sweet spot between grounding me conceptually and sparking curiosity to apply these ideas further. The writing style created enjoyable momentum.

Week 5: Response on Computer Vision for Artists

Reflecting on David Rokeby’s “Sorting Daemon,” this piece made me think about how technology watches us and what that means. It offers a commentary on the intricacies and ethical considerations of surveillance technology within contemporary art. Rokeby used cameras and computers to watch people on the street, then changed their images based on color and movement. This gets us asking big questions about privacy and how we’re judged by machines. Although Rokeby’s installation, is motivated by the increasing indulgence of surveillance in the guise of national security, it cleverly navigates the balance between artistic expression and the critical examination of automated profiling’s social and racial implications. What makes this project stand out is its ability to turn a public space into an interactive scene, where people, without realizing it, become part of an artwork that dissects and reconstructs them based on superficial traits like color and movement. This raises significant questions about our identity and privacy in an era dominated by digital surveillance.

The installation makes us consider the complex algorithms that allow “Sorting Daemon” to capture and process the ways of human motion and color. The project’s reliance on computer vision to segregate and categorize individuals echoes broader concerns about the ‘black box’ nature of surveillance technologies—opaque systems whose often inscrutable decisions bear significant consequences. This opacity, coupled with the potential for algorithmic bias, underscores the ethical quandary of using such technologies to distill complex human behaviors into simplistic, quantifiable metrics. The artistic intention behind Rokeby’s work is clear, yet the methodology invites scrutiny, particularly regarding how these technologies interpret and represent human diversity.

Turning to the broader application of computer vision in multimedia authoring tools, Rokeby’s project illuminates the dual-edged sword of technological advancement. On one hand, artists have at their disposal increasingly sophisticated tools to push the boundaries of creativity and interaction. On the other, the complexity of these tools raises questions about accessibility and the potential for a disconnect between the artist’s vision and the audience’s experience. As multimedia authoring evolves, embracing languages and platforms that offer live video input and dynamic pixel manipulation, the dialogue between artist, artwork, and observer becomes ever more intricate. This evolution, while exciting, necessitates careful consideration of user interface design to ensure that the essence of the artistic message is not lost in translation.

The installation makes us to consider the ethical considerations of our increasingly monitored lives, urging us to reconsider our connection with technology, privacy, and one another. As the boundaries between the public and private realms continue to blur, projects like Rokeby’s remind us of the crucial role art plays in questioning, provoking, and fostering dialogue about the critical issues facing us today.

Midterm Progress 1(Space Navigators) by Sihyun Kim

Concept

The image shown above is my little brainstorming for the midterm project. Inspired by my childhood favorite game Flappy Bird (image shown below), I decided to create a game that has similar mechanics to Flappy Bird. However, I made my game distinct from Flappy Bird by having a different theme and a different way to play it. The theme of my game would be “Space”. More specifically, the concept of the game is a rocket sent from the Earth to explore space avoiding meteoroids of different sizes in space to prevent the destruction of the rocket.

Recreate Flappy Bird's flight mechanic | Wireframe #29 - Raspberry Pi

Flappy Bird

The user can control the rocket through his or her voice volume. The rocket will be controlled by getting the microphone level of the microphone input. 

Design 

The drawing above is the drawing I drew when conceptualizing this game. This game will consist of two key features: rockets and meteoroids of different sizes. As of now, I am planning to find an image with this kind of illustration. However, if I could not find any of which I could satisfy, I might draw the rocket and the meteoroids for the game by myself. For the background music, I found this playlist (shown below) of background music on YouTube. 

As of now, I am planning to use one of these songs in the game as the background music.


Challenges:

Intentionally, I started working on the parts of the game that I thought would be the most complicated and frightening features to code. Which were: 

Controlling the rocket through the mic input

function setup() {
  createCanvas(400, 400);
  mic = new p5.AudioIn();//initializing microphone input
  mic.start();//starting microphone input
  rocket = new Rocket(50, 200, 200);//creating a new rocket object
}

function draw() {
  background(220);
  //getting microphone input level
  let vol = mic.getLevel();
move(vol) {
  let adjustment = map(vol, 0, 1, 0, -20);// mapping the volume to an adjustment in velocity
  this.vy += adjustment;//// applying the adjustment to the vertical velocity
}

The shown above are the code snippets for implementing the control for the rocket through mic input. Implementing this part was easier than I expected because we have been introduced to how to code such an implementation in p5.js. I have used the p5.AudioIn() and getLevel() to access the microphone input and the volume level of the microphone input. Then, I utilized the map() to map the volume to an adjustment in (vertical) velocity. 


Moving Obstacles: 

After watching some videos of people playing the Flappy Bird, I have noticed that the x position of the bird maintains to be the same. It just looked like it was moving because the obstacles were moving! So, I decided to make my obstacles(meteoroids) move as well. Creating the instances and letting the instances move were not difficult. It was the timing that was challenging. I first tried to use random() for all the parameters. Then, I realized that this would result in overlapping obstacles. 

So, I contemplated How I could make one meteoroid at a time. It was quite challenging to figure out how as I took around 30 minutes. Then, I came out with the idea of using frameCount() and some variables. 

if (frameCount - lastMeteoroidTime >= meteoroidInterval) {
  // creating a new meteoroid
  let x = width; // starting the meteoroid from the right side of the canvas
  let y = random(50,350); // random y-position between 50 and 350
  let size = random(50, 100); // random size between 50 and 100
  //adding the created new Meteoroid object to the array
  meteoroids.push(new Meteoroids(x, y, size));

  // updating the last meteoroid creation time
  lastMeteoroidTime = frameCount;
}


So, what I have done is that I first set the interval to be 60 frame count, and if the time difference of frameCount and the last time that the meteoroid was generated is greater than the interval, then the new meteoroid will be generated.

Collision detection

Collision detection with the boundaries was easy since I just had to check if the y position of the rocket was greater than 400 or less than 0. 

However, letting the collision between any of the meteoroids and the rocket be detectable was essentially the most frightening part of this project (so far). Honestly, I did not think this would be one of the hardest parts as I had similar coding experience in Introduction to Computer Science. However, letting the collisions detectable when both are “circles” was different from letting the collisions detectable when both are “rectangles”. But, after all, I was able to figure out how to code for this as well! 

  //checking collision with the rocket using the equation of the circle 
checkCollision(other) {
    let distX = this.position.x - other.position.x;
    let distY = this.position.y - other.position.y;
    let distance = sqrt((distX * distX) + (distY * distY));
    if (distance <(this.radius + other.radius) ) {
      noLoop();
    }

After all, I was able to figure out how to do collision detection between two circles by utilizing the equation of the circle I learned back in middle school. AND IT WORKED! So, basically, I have gotten the distance between the center of the meteoroid and the rocket, then checked if the calculated distance between the two objects is less than the sum of their radii. If this condition is true, it means the two objects are overlapping or colliding. This is because the sum of their radii represents the distance at which their boundaries touch if they are just barely colliding.

Conclusion

Fortunately, I was able to overcome the challenges I encountered so far. In fact, I was able to resolve the most frightening problem of this project- collision detection. Now, I am done with the main features of the game. I just have to implement the images and sound, create the starting page, implement the scoring system, define game-ending conditions, and enable the restarting of the game. 

Progress so far…

!! It just stops if it is on the ground or if it is touching the ceiling for now because I have put noLoop() for all the if -statements involving collision check. 😊

Luke Nguyen – Week 5 Reading

I find the Suicide Box project that surveyed the suicide jumpers from the Golden Gate Bridge to be very intriguing. Jeremijenko stated that the project was able to monitor real data and formulate a database for this. What I, as well as other people who thought the project was controversial, would like to know is how it was programmed to capture such data to the point where it could be called “real.” Usually machines/softwares are prone to the black box issue, which makes them very susceptible to making inexplicable mistakes while they are working. Obviously, this project faced the controversy for the right reason regarding the ethics of technology, that is using it to measure something very tragic. Nevertheless, the authors had good intention, but the way the data was recorded needed to be examined carefully.

In regard to computer vision techniques, detection through brightness thresholding mainly deals with illumination or contrast. The computer does some very simple comparison to figure out if objects are darker or lighter than the surroundings. But I would like to learn more about this aspect in terms of color vibrance and saturation. Say for example, can the computer compare the vibrance in at least 8-bit RGB color between a given object and the surrounding? Or between different objects?

As for computer vision in multimedia authoring tools, in addition to Java-based scripting, live video input and fast pixel manipulation these days can also be done with other languages. Art-based softwares are having a prime time given how much these languages are being developed. However, the more advanced processing a software is written in, the more complicated the interaction between users and computers will become, which entails a detailed and almost error-free instruction designs.

Reading Reflection – Week 5

An insight that I got from this reading is that you do not need to be a total tech person to use computer vision. Going through different examples of how artists and designers are mixing tech with creativity, it was eye-opening to see tech being used in such fun and engaging ways to make art and media more interactive. Back in the day, Marvin Minsky thought computer vision could be a quick summer project. It turns out it is a huge field with lots to figure out, but the journey from then to now shows just how much more approachable tech has become. Today, if you have an idea and the internet, you are pretty much set to dive into learning about anything, including computer vision.

Seeing different examples of projects, where technology and creativity create digital art pieces, really drives the point that tech and art can come together in some pretty amazing ways. It is not just about coding; it is about imagining how to make experiences that pull people into a creative world where their movements and actions matter. What amazes me is how easy it is to start playing around with computer vision nowadays. There are a ton of free resources, tutorials, and communities online where anyone can start learning how to blend tech with their creative projects.

This whole thing makes me think about how technology, especially computer vision, is becoming a tool that is not just for the few. It is for anyone with a curious mind and a creative heart, ready to explore how to bring their ideas to life in new and interactive ways. It was pretty inspiring to see how breaking down the barriers to tech is opening up a world where art and interaction go hand in hand, making for some really cool experiences.

Midterm Project Progress: Brick Breaker Game

Concept

The concept of the game is breaking the brick wall of the house of three little pigs. As of the original story, the wolf fails to break into the house of the youngest pig because brick walls are too strong. However, through my game, the wolf is able to break into the house and meet the pigs. Therefore, as the user breaks the bricks, an image of three little pigs that were hiding behind the bricks will be visible.

Design

So far, I have worked on creating the code for the bricks, bouncing ball, and the paddle. Using classes and functions, I organized the code and tried to make it look “neat”. However, I have not added any details or aesthetic to the game. Therefore, as it is shown below, the outlook of the game is quite dull.

Regarding the aesthetics, I am planning to add color and use brick png in place of the rectangles. The background will be decorated to look like the house of the three little pigs. Also, I am going to add sound effects to make the game more interesting. For the home page, I will use text for the title and create a button to start the game. I will also create an end page that allows the user to replay the game.

Difficulty 

The most difficult part in the coding process was figuring out how to make the bricks in rows and columns and make them disappear when collided with the ball. I watched and referenced this video and it was confusing for me to use the “if statements” to create various conditions. The code I used to create class brick is shown below.

class Brick {
  constructor (x, y, w, h){
    this.x = x;
    this.y = y;
    this.w = w;
    this.h = h;
    this.collide = false;
    this.val = 0;
  }
  
  drawBrick(){
    if (this.collide){
      fill(255, 255, 0);
    } else {
      fill (255);
    }
    rect(this.x, this.y, this.w, this.h);
  }
  
  
  collided(ball){
    //x and y cordinate of the edges of the brick to detect when the ball collides with the bricks
    let closeX = ball.x;
    let closeY = ball.y;
    
    //detecting right and left side of the brick
    if (ball.x > this.x + this.w){
      closeX = this.x + this.w;
    } else if (ball.x < this.x){
      closeX = this.x;
    }
    
    //detecting top and bottom side of the brick
    if (ball.y > this.y + this.h){
      closeY = this.y + this.h;
    } else if (ball.y < this.y){
      closeY = this.y;
    }
    
    //testing if the ball and the brick collided
    let distance = dist(closeX, closeY, ball.x, ball.y);
    
    if (distance <= ball.r){
      this.collide = true;
      this.val = 1;
      ball.dy = ball.dy * -1;
    } else {
      this.collide = false;
    }
    
  }
  
}

This is the code in the main sketch that creates the bricks in rows and columns by using arrays.

function setup() {
  createCanvas(400, 400);

  //nested loop for creating rows and columns of bricks
  for (let i=0; i<cols; i++){
    bricks[i] = [];
    for (let j=0; j<rows; j++) {
      bricks[i][j] = new Brick(i*size, j*size, size, size);
    }
  }

This is the code in the main sketch that makes the bricks appear when not collided, hence making them disappear when collided.

function draw() {

 //nested loop for creating bricks when not collided with the ball
  for (let i=0; i<cols; i++){
    for (let j=0; j<rows; j++){
      if (bricks[i][j].val == 0){
        bricks[i][j].drawBrick();
        bricks[i][j].collided(ball);        
      }
    }
  }

Other parts of the project that I am concerned about is creating the buttons for “play” and “reset”.  I have never created a button for other assignments and I will be challenging myself to create several buttons to add user interaction.

The only user interaction that is possible so far is moving the paddle with mouseX function. This is why I want to add the buttons to add more interaction and user experience.

Reading Reflection: Week 5

I was surprised by the ways in which computer vision works with interactive art. Recently, I have been interested in public surveillance and curious about the use of technology in the field. The Suicide Box was the one I thought was meaningful and useful. Recognizing suicide attempts in the Golden Gate Bridge, humans devised a machine to detect the vertical motion of people and hence make a guess on whether or not the person is about to jump off the bridge.

The debate that arose around the Suicide Box was interesting as well. The question of “is it ethically okay to record suicides” and “are the recordings real” make us think if the invention of such technology is necessary or useful. As of I know, there are still a lot of questions regarding the topic of public surveillance and the use of technology for face recognition and video recording. While I think these tools are very useful, I also understand the ethical concerns that comes with the uses of the tools.

To continue, computer vision is quite difficult to use considering the setting in which it works best. For example, background subtraction and brightness thresholding could fail if the person in the scene have similar color or brightness to his surroundings. The fact that we have to design the physical conditions in which computer visions will be used is bothering. Although computer visions in their perfect setting works well and abstracts useful information, figuring out ways to use computer vision in any setting would be even more useful and beneficial to the society.

In short, the intersectional study and use of computer vision and interactive media seems to have great potential in the coming future. Computer vision and interactive media have areas in which they can be used and the developments made so far show how life in general can advance.

Luke Nguyen – Week 5 Mid-term Progress

Concept and design:

When I was a kid, I was obsessed with the game Chicken Invaders. I remembered spending 2-3 hours playing it every time I was free from school and homework. It was a way of life for my PC back then. And so, I wanted to emulate the engine of that game for this mid-term project and have fun creating it. I call my interactive game “Alien Slayer.”

Here’s my design:

Here’s the overall structure of the code design:

let spritesheet;
// example spritesheet: https://png.toolxox.com/vhv?p=imRwRx_top-down-spaceship-sprite-hd-png-download/
// i'll edit the spritesheet so that the spaceship can only move left, right, up, down
let sprites = [];
let direction = 1;
let step = 0;
let x; //the spaceship's x position
let y; //the spaceship's y position
let speed = 4; //the animation speed, image moving on canvas

function setup() {
  createCanvas(400, 400);
}

function preload()
  loadImage()
  spaceship = loadImage ("spaceship.png")
//   or create a pixelated spaceship

function draw() {
  background(220);
  
// create a cosmos background
// 1. gradient color
// 2. use loops (for/while loops) to create stars scattered across the space
  
// create evil aliens
// 1. create a class for show() and move() the evil aliens, with loops (for/while loops). The number of evil aliens is random, from 2 to 10. They will appear at the top of the canvas
// 2. use loops (for/while loops) to make the evil aliens start moving down 5 steps every time the frame is refreshed.
// 3. the evil aliens will randomly drop bombs.

//   use sprite sheet animation for the spaceship
//   1. use (for loops) to create a nested array for the spaceship sprite sheet
//   2. use get() to get different tiles of the sprite sheet
//   3. use function keyPressed() and if conditions to make the spaceship move each step
  
// create a laser beam attack for the spaceship
//   1. create a class to draw the laser beam and use the show() to call out the beam
//   2. use function mousePressed() {} to shoot the laser beam that can only go up
  
// gameplay
// game screen gives instructions and waits for user input
// The spaceship needs to be moved around using the keys on the keyboard, to the location vertically under an evil alien to attack it (sprite sheet animation)
// if (){} the laser beam hits the evil alien, the alien is obliterated
// if (){} the bombs dropped by the evil alien hit the spaceship, it will lose one life.
// keep playing until all evil aliens are obliterated.
// if (){} one evil alien touches the spaceship, the player loses.
  
// displaying score
// user gets one score everytime an evil alien is obliterated.
// user receives 5 lives per game. if the number of lives == 0, the user loses and the game will end.
}

The most frightening or complex part of the project is to match the coordinate of the aliens’ bombs so that when they touch the spaceship, it will lose one life. Similarly, the laser beam’s coordinate has to match that of the alien so that the spaceship can kill it. Also, I still need to figure out how to make the aliens erratically drop bombs for the spaceship to dodge. I also still need to figure out how to display the score and the spaceship’s lives in a translucent board at the top of the canvas.

What I’ve been doing is I’ve been trying to write the algorithm for matching coordinates. It’s mostly about using the if function. I’ve also been testing the algorithm for randomly creating bombs from the aliens. This game is essentially about two objects having the same coordinates and randomness.

I’m also going to implement a sound library into the project (for example, a laser beam sounds, the alien dropping a bomb, the sound of the spaceship’s moving, etc.).