This reading totally shifted my thinking on what interactivity really means. The metaphor of a back-and-forth conversation was a lightbulb moment for me. Like two people listening and responding to each other. It clearly shows why a book isn’t truly interactive even when it fully engages me. A book just conveys information, oblivious to my reactions. It doesn’t necessarily tailor itself to me.
Framing interactivity as a spectrum rather than a yes/no thing landed perfectly too. It’s like turning the volume up and down – experiences can be more or less interactive. A video game responds more to me than a cooking show I passively watch. And good graphics or UI design is only part of the equation – you have to build in that two-way communication. Looks alone don’t cut it.
I’ll admit some sections felt dense on first read. But the big takeaway was that interactivity isn’t just about engagement, it’s about a back-and-forth exchange where both parties actively listen and speak. Measuring where something falls on that spectrum makes me evaluate all kinds of media differently now. How much am I conversing rather than just being “spoken to”? Food for thought as I wrap my head around design. Overall, this was a solid, informative read.
We often overlook the audience for whom we create something, a tendency especially noticeable in the tech sphere. The primary focus tends to be on making the code function well, while the ‘thinking’ process is neglected, as the author points out. This mirrors human interaction; understanding the person you are talking with is similar to the concept of being interactive. You should know their personality and truly grasp what they want and like to foster meaningful conversation. I believe the true essence of being ‘interactive’ lies in the ability to engage people by understanding their preferences.
Initially, my view of interactive media was merely as a course that merges art and technology. However, after further reflection, my understanding of interactive media has deepened. Now, I see interactive media as something beyond merely delivering impressive outputs; it is about conveying a message and touching someone’s heart, whether by making them feel happy, interested, or impressed. It gains true significance through the “thinking” process between inputs and outputs. My decision to major in business was driven by a desire to create something meaningful for people. Realizing that interactive media can achieve this objective has made it increasingly appealing to me.
While brainstorming for my assignment, my initial thoughts centered around creating an art piece featuring several repetitive elements in motion. Suddenly, I recalled an image of Turkey I had seen before, specifically a picture of hot air balloons in Cappadocia.
The sight of these balloons, each a different color, struck me as particularly appealing, and I decided to base my art on the concept of hot air balloons moving upwards. This idea aligned perfectly with my original concept of incorporating moving, repetitive elements.
Upon completing the hot air balloon portion of my project, I noticed the background felt somewhat empty, so I decided to make moving clouds in the background. Thus, the combination of clouds and hot air balloons became my final concept.
I started with the hot air balloons by creating a Balloon Class, aiming to generate several balloons simultaneously using the same code. Within this class, I implemented a move() function to enable the balloons to move upwards.
//move Hot Air Balloons
move() {
  this.x = this.x + this.xspeed;
  this.y = this.y + this.yspeed;
}
Next, I used the show() function to draw the hot air balloon.
To ensure each hot air balloon displayed different colors, I introduced variables like “balloonColor” and “highlightColor,” assigning them random RGB colors. The balloon featured two colors: a primary color and a “highlightColor,” which was derived by adjusting the blue component of the RGB value to complement the primary color.
//Randomize Balloon colors
   let red = random(255);
   let blue = random(255);
   let green = random(255);
   this.balloonColor = color(red, green, blue);
   //Highlight Color in the middle which is similar to the sum of R and B of the main color
   let b = (red + blue / 1.3)
   this.highlightColor = color(red, green, b)
To continually regenerate hot air balloons and ensure upward movement, keeping the canvas filled, I created a reset() function.
//create a new balloon and reset the animation if the hot air balloon reaches the end of the canvas
 reset() {
   if (this.y < -250) {
     this.y = height + 100
     this.yspeed = random(-2, -5)
     this.x = random(width)
     this.xspeed = 0

   }
As mentioned earlier, I wanted to include clouds in the background. Thus, I crafted a separate Cloud Class and utilized similar methods to those in the Balloon Class for showCloud(), moveCloud(), and resetCloud(). The clouds moved from left to right, and their reset function triggered upon reaching the canvas’s right edge. Cloud sizes varied randomly.
I then utilized “this.cloudsize” within the showCloud() function to render a cloud.
To populate the scene with multiple clouds and hot air balloons, I established arrays for each, allowing for automated element addition up to a predefined number.
let balloons = []; //create balloons array
let clouds = []; //create clouds array

function setup() {
  createCanvas(1000, 1000);
  //create 7 hot air balloons positioned randomly in the canvas with random speed (moving up) and add them to the balloons array
  for (let i = 0; i < 8; i++)
  balloons[i] = new Balloon(random(width), random(height), 0, random (-2, -5))

  //create 9 clouds positioned randomly in the canvas with random speed (moving from left to right) and add them to the clouds array
  for (let i1 = 0; i1 < 10; i1++)
  clouds[i1] = new Cloud(random(width), random(height), random(2, 5), 0)
}
It was very interesting to learn how to use arrays and classes together to create elements. The process of simultaneously producing multiple elements became significantly simpler. One challenge I encountered while crafting the art piece involved randomizing colors for each air balloon. Initially, I placed the code for randomizing colors in the sketch.js file within the “new Balloon” constructor, which resulted in the color of a single balloon changing randomly each frame. I then realized that I should incorporate this code inside the Balloon Class, utilizing `this.balloonColor` to ensure the randomness of color could be applied specifically to each balloon. Overall, this assignment was highly engaging, and I feel like I gained a considerable amount of knowledge.
Reflecting on “The Art of Interactive Design,” it feels like embarking on a spirited journey through what makes technology engaging. The author presents a world where interactivity is about the clicks and taps on our devices and the conversation between humans and machines. Imagine sitting with a good friend over coffee, where the exchange of thoughts and ideas flows freely. This book suggests that our gadgets should offer a similar two-way street of communication, a concept that feels revolutionary and glaringly obvious.
There’s a playful yet earnest tone in the author’s argument that nudges us to question the authenticity of our digital interactions. Are we merely following a script laid out by designers, or are we genuinely engaging in a dialogue? This perspective might tilt towards a bias for more profound, meaningful connections over superficial tech encounters, but it’s hard not to be swayed by such a compelling case. It leaves you pondering about the true essence of interactivity and whether our current technology meets that mark or acts as interactive. It’s an invitation to dream up a world where every interaction with technology enriches our lives, making us users and participants in a digital dance of ideas.
The concept of using Perlin noise to simulate natural, fluid motion in the particles is inspired. Perlin noise generates a more natural and organic flow compared to purely random movement, as it ensures smooth transitions and variations. This approach is commonly used in generative art and simulations to mimic natural phenomena like smoke, fire, and flowing water.
Code Highlight
// Update the particle's position
move() {
  // Calculate a noise value for organic movement
  let noiseValue = noise(this.noiseOffset);
  this.pos.x += map(noiseValue, 0, 1, -1, 1) * this.rate;
  this.pos.y += map(noiseValue, 0, 1, -1, 1) * this.vertRate;

  // Wrap the particle around edges to make it looks like space
  if (this.pos.x > width) this.pos.x = 0;
  if (this.pos.x < 0) this.pos.x = width;
  if (this.pos.y > height) this.pos.y = 0;
  if (this.pos.y < 0) this.pos.y = height;

  // Increment the noise offset for the next frame
  this.noiseOffset += 0.01;
}
The move() function in the particle system utilizes Perlin noise to simulate organic and fluid motion, creating a natural, lifelike behavior in each particle. By calculating a smoothly varying noise value and mapping it to influence the particle’s velocity, the function ensures each particle moves in a unique, seamless manner that mimics natural phenomena. Additionally, the function incorporates edge wrapping to create a continuous, boundless effect on the canvas, enhancing the illusion of a natural, endless environment. This innovative use of Perlin noise, combined with the edge wrapping technique, sets the function apart by providing a sophisticated method to generate complex, visually appealing animations that evoke the randomness and elegance of the natural world.
Embedded Sketch
Code
let particles = [];

function setup() {
  createCanvas(600, 600);
    // Initialize particles and add them to array
  for (let i = 0; i < 400; i++) {
    particles.push(new Particle());
  }
}

function draw() {
  background(0);
    // Loop through all particles to display and move them
    for (let particle of particles) {
        particle.display();
        particle.move();
    }
}

// Define the Particle class
class Particle {
  constructor() {
    // Set initial position to a random point within the canvas
    this.pos = createVector(random(width), random(height));
    this.size = random(0.5, 2);
    //Set random transparency value
    this.alpha = random(150, 255);
    this.noiseOffset = random(0, 1000);
    this.rate = random(-1, 1);
    this.vertRate = random(-1, 1);
  }

  // Display the particle on the canvas
  display() {
    noStroke();
    fill(255, this.alpha);
    ellipse(this.pos.x, this.pos.y, this.size);
  }

  // Update the particle's position
  move() {
    // Calculate a noise value for organic movement
    let noiseValue = noise(this.noiseOffset);
    this.pos.x += map(noiseValue, 0, 1, -1, 1) * this.rate;
    this.pos.y += map(noiseValue, 0, 1, -1, 1) * this.vertRate;

    // Wrap the particle around edges to make it looks like space
    if (this.pos.x > width) this.pos.x = 0;
    if (this.pos.x < 0) this.pos.x = width;
    if (this.pos.y > height) this.pos.y = 0;
    if (this.pos.y < 0) this.pos.y = height;

    // Increment the noise offset for the next frame
    this.noiseOffset += 0.01;
  }
}
Reflection
I was creating this particle system with p5.js, especially using Perlin noise for fluid motion. This approach transformed a basic animation into a mesmerizing display that closely mirrors the elegance of natural phenomena. The seamless movement and edge wrapping created an endless, captivating visual experience. This project pushed the boundaries of what I thought possible with code and deepened my appreciation for programming as a form of creative expression.
Future work
Looking ahead, I’m excited to explore further possibilities with this particle system, such as introducing interactions between particles to simulate forces like attraction and repulsion, adding color gradients for a more dynamic visual effect, and experimenting with different noise algorithms to vary the motion patterns.
In “What Exactly Is Interactivity?”, the first Chapter of Chris Crawford’s book, “The Art of Interactive Design,” Crawford attempts to lay down a definition of what interactivity entails from which certain guidelines for interactive design could be extrapolated. He essentially posits that interactivity is a cyclic process of listening, thinking, and speaking that involves two or more actors – much like the process of conversating with other human beings. Going off this definition, Crawford weeds out certain activities as “non-interactive,” from reading books and watching movies to dancing and attending theatrical performances. By arguing that participation in these activities involves a “strong reaction,” which is qualitatively different from strong interaction, he excludes these forms of activities which may be labeled by some as interactive as strictly devoid of the necessary back-and-forth between actors that characterizes high levels of interactivity.
One of the things I appreciated about Crawford’s discursive thought process as he distills what makes things interactive, in addition to his humor and the use of examples to illustrate his points, was the idea that interactivity does not have to be an exclusive binary, but could be assigned a value on a spectrum from low to high. Based on this approach, people subjectively assign degrees of interactivity to certain activities. It did, however, strike me as a little contradictory to go on to adjudicate that some activities were definitively non-interactive, even though some may experientially feel like they were. It also begs the question of whether different people were unified in their understanding of what interactivity is when assigning values to the degree of interactivity they experienced.
Crawford then goes on to theorize the differences between user interface and interactivity designers. While the former mainly considers structure and form, the latter is more concerned with how a given target function is best served by one form over the other. He also makes the observation that interactivity designers come from a less technical background and are often underserved by their inability to match the more established knowledge, frameworks, and technical expertise employed by their counterparts in the user interface domain.
The definition of interactivity as a recurring process of listening, thinking, and speaking stuck with me as I contemplated the forms of interactivity that people claim to have incorporated into their work when making web applications or digital artworks. While conversations are dynamic, forward-moving, and seldom repeating, many of the interactive elements embedded in digital creations are rarely so. In conversation, actors have a large space of sentences to choose from when speaking and an almost infinite thought space from which a thought could form. This leads to conversations that are new and fresh every time. In the digital space, this is less likely as user interaction is restricted to a small set of defined actions (e.g. clicks or movements) that are mapped to algorithmically consistent behaviors. How do we then emulate the full range of fluidity that true interactivity entails, given that we are sometimes restricted by computational resources? I think the rise in generative AI tools is definitely getting us closer to actualizing Crawford’s interactivity. I am, however, left wondering if Crawford’s definition of interactivity is restrictive. It seems to place high expectations on designers to equip themselves with higher-end technologies to satisfy Crawford’s interactivity guidelines, which may counteractively act as a deterrent.
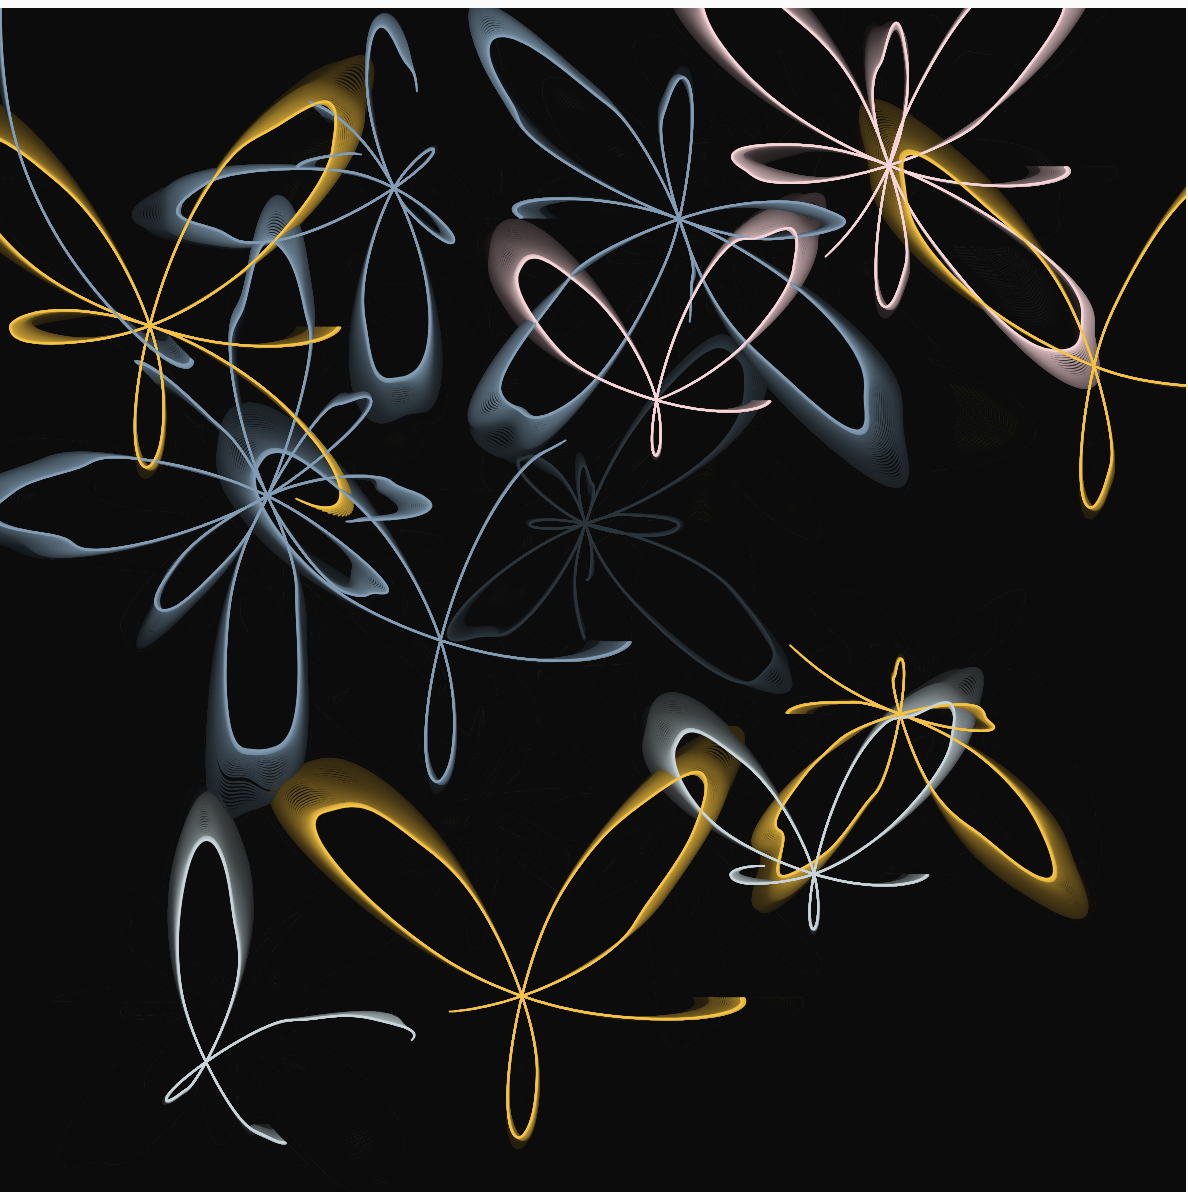
For this assignment, I wanted to build on top of ideas I thought of last week, particularly leveraging organic shapes in nature to produce generative, and *somewhat* interactive art. I especially wanted to dabble with mathematics and its ability to generate aesthetic abstractions and animations. To that latter point, my mind immediately shifted to the complex and patterned loops defined by parametric equations. I came across Re-generate, a work by Akshan Ish, that utilizes shapes governed by parametric relations, and was immediately inspired to adopt the concept. As I thought about possible shapes I wanted to recreate, I thought of butterfly shapes, and just as I hoped, I found a parametric curve that modeled them. With the mathematics by my side, I was now ready to translate it into a p5.js animated, generative sketch.
Process, Challenges, and Implementation
I created a butterfly class from which butterfly objects would be instantiated. The main attributes specified the starting point coordinates, the angle from the x-axis in the Cartesian plane used to control the drawing of the wings, the parameters that control the magnitude of the radius, the color of the stroke (which is randomized from a given color palette, and the angle that controls the rotation of the Cartesian plane so that different objects will be drawn from a different starting point. Having the explicit equations for the x and the y parameters facilitated things for me as I would have had to derive them myself otherwise. One thing I had struggled with a little bit here was making the curve draw incrementally over time. After realizing that the angle determines how much of the curve is drawn, it became evident that incrementing the angle in every frame by a little bit and drawing up to that point would essentially produce that effect.
class Butterfly {
  constructor(x, y) {
    this.x = x; // starting x location
    this.y = y; // starting y location
    this.theta = 0; // current drawing angle
    // choose a random color from the color palette for the butterfly animation
    this.color = random([
      color("#7c9eb7"),
      color("#c5d6db"),
      color("#ffd3d7"),
      color("#ffc20c"),
    ]);
    // controlling hyperparameters for the butterfly shape
    this.b = random(3, 6);
    this.a = random([4, 6]);
    // variable controlling the rotation of the object
    this.angleRot = random([-1, 1]) * random([0, 1, 2, 3, 4]);
  }

  drawButterfly() {
    push(); // save the current drawing state
    translate(this.x, this.y); // move the origin to the object's position
    stroke(this.color); // set the stroke color based on the chosen color
    rotate((this.angleRot * PI) / 4); // rotate the object
    noFill();
    strokeWeight(1);
    beginShape();
    // draw the curve
    for (let i = 0; i <= this.theta; i += 0.1) {
      // calculate the radius based on the parameteric equation for the butterfly curve
      let r =
        exp(sin(i)) -
         this.a * cos(4 * i) +
        pow(sin((1 / this.b) * 12 * (2 * i - PI)), 5);
      // calculate x and y position of the curve
      let x = r * cos(i) * random(10, 20);
      let y = r * sin(i) * random(10, 20);
      // draw circle
      curveVertex(x, y, r);
    }
    endShape();
    this.theta += 0.01; // increment theta for animation

    pop(); // restore original sketch state
  }

  finished() {
    return this.theta > TWO_PI; // to indicate that the drawing of the shape has ended
  }
}
When the sketch is played, a Butterfly object is inserted into a global array of butterflies. The user can add objects to the sketch at any location by pressing the mouse. Once a butterfly object is drawn in full, it is deleted and another object is instantiated in its place at a random location. One issue I encountered was that the more objects I created by pressing the mouse, the more overcrowded the sketch became. I tackled the issue by placing bounds on the length of the butterfly array so that objects are only re-instantiated only if the array size does not hit a certain maximum size.
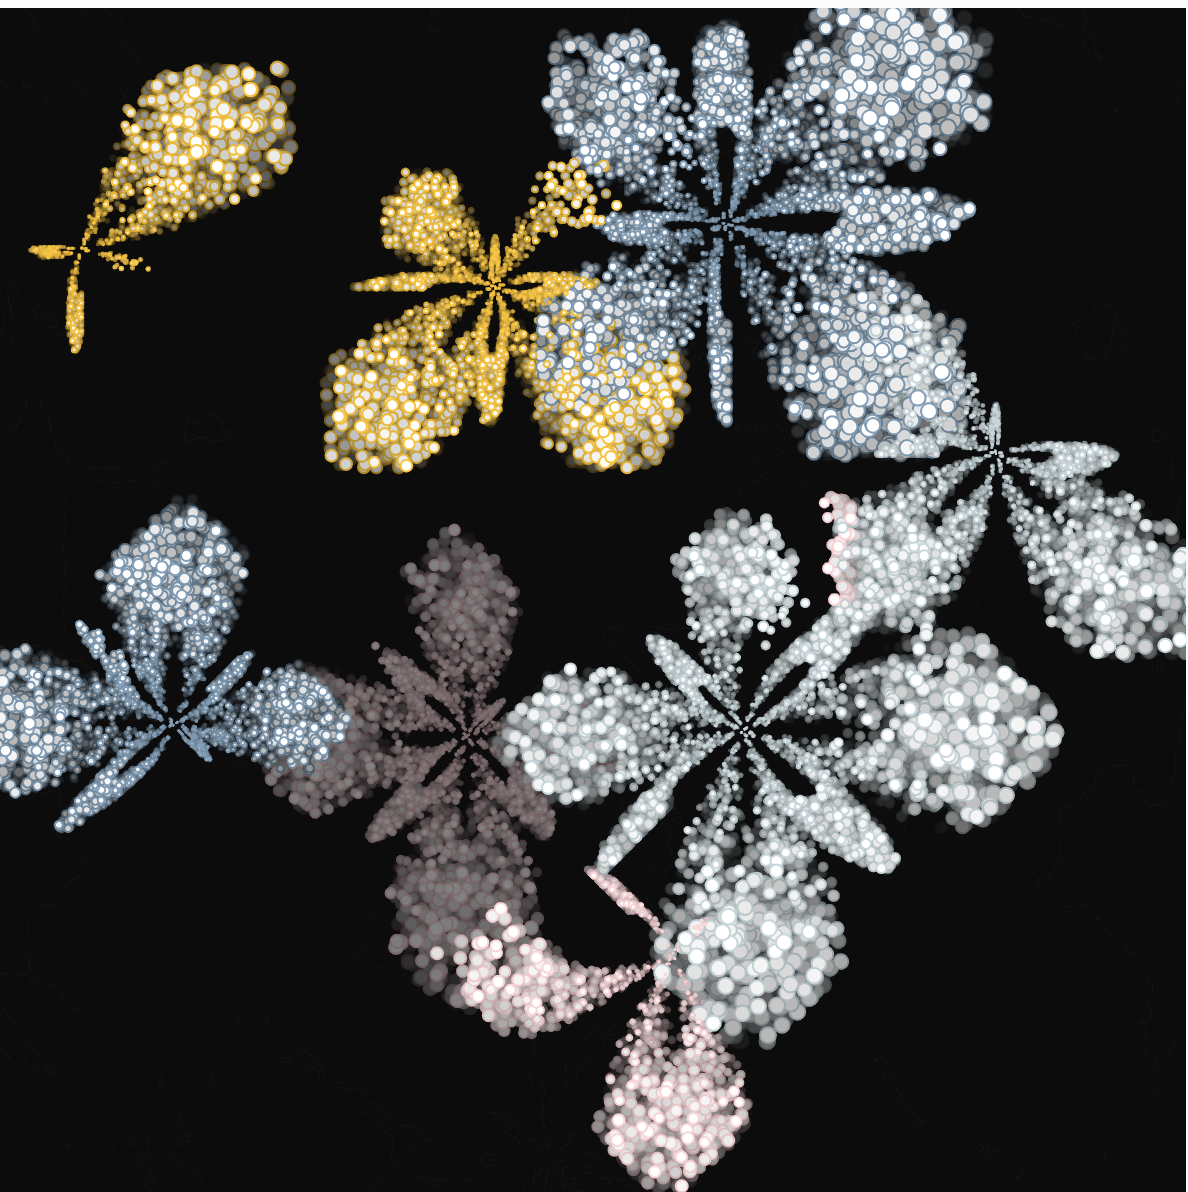
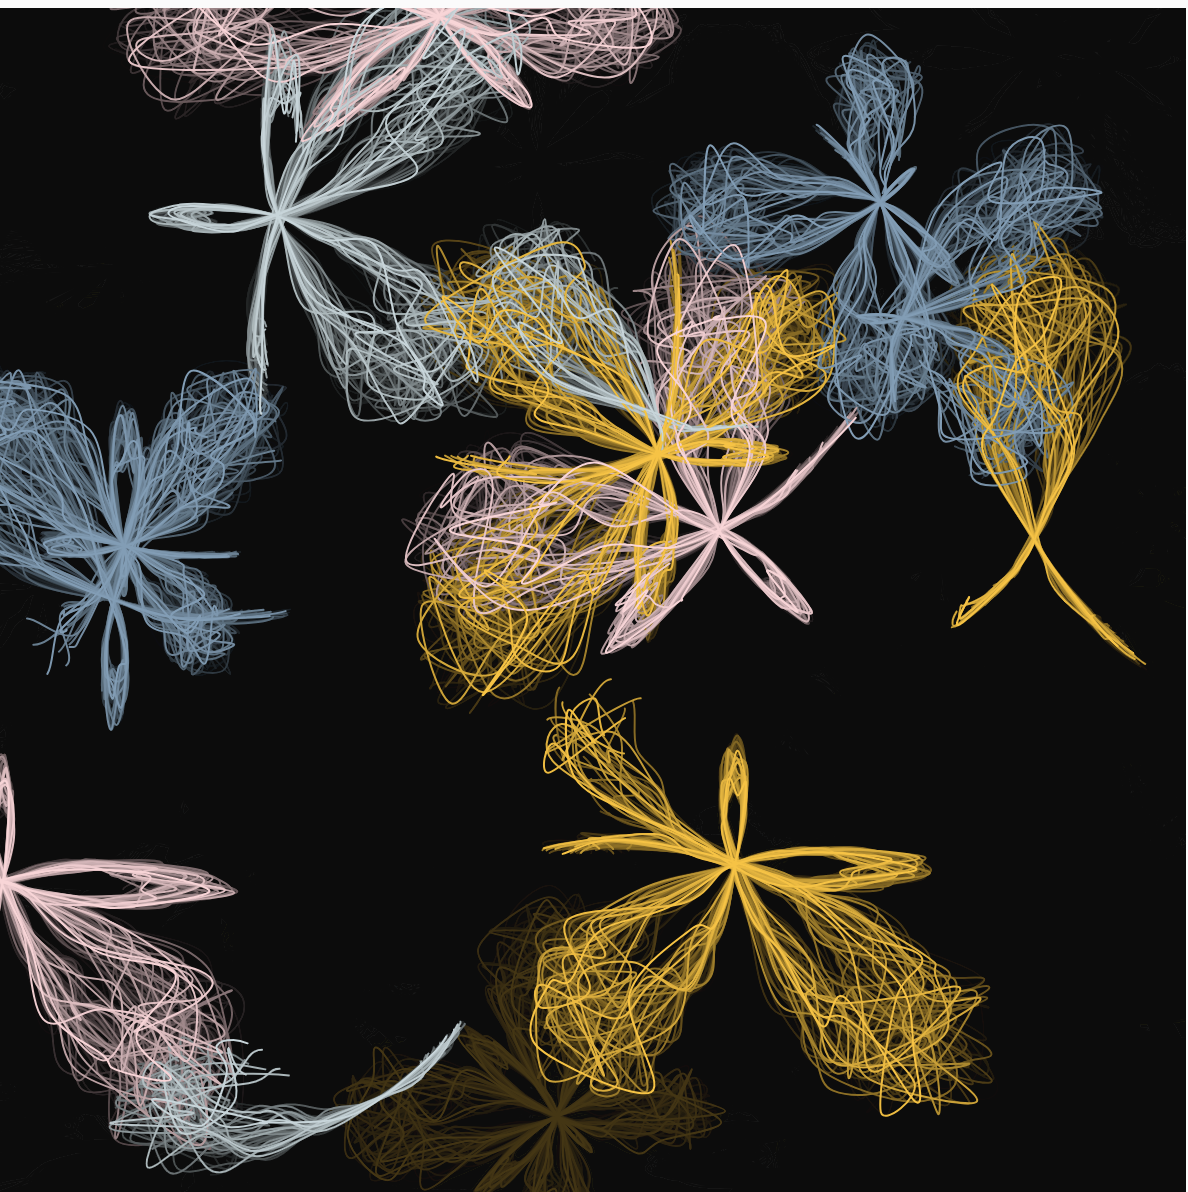
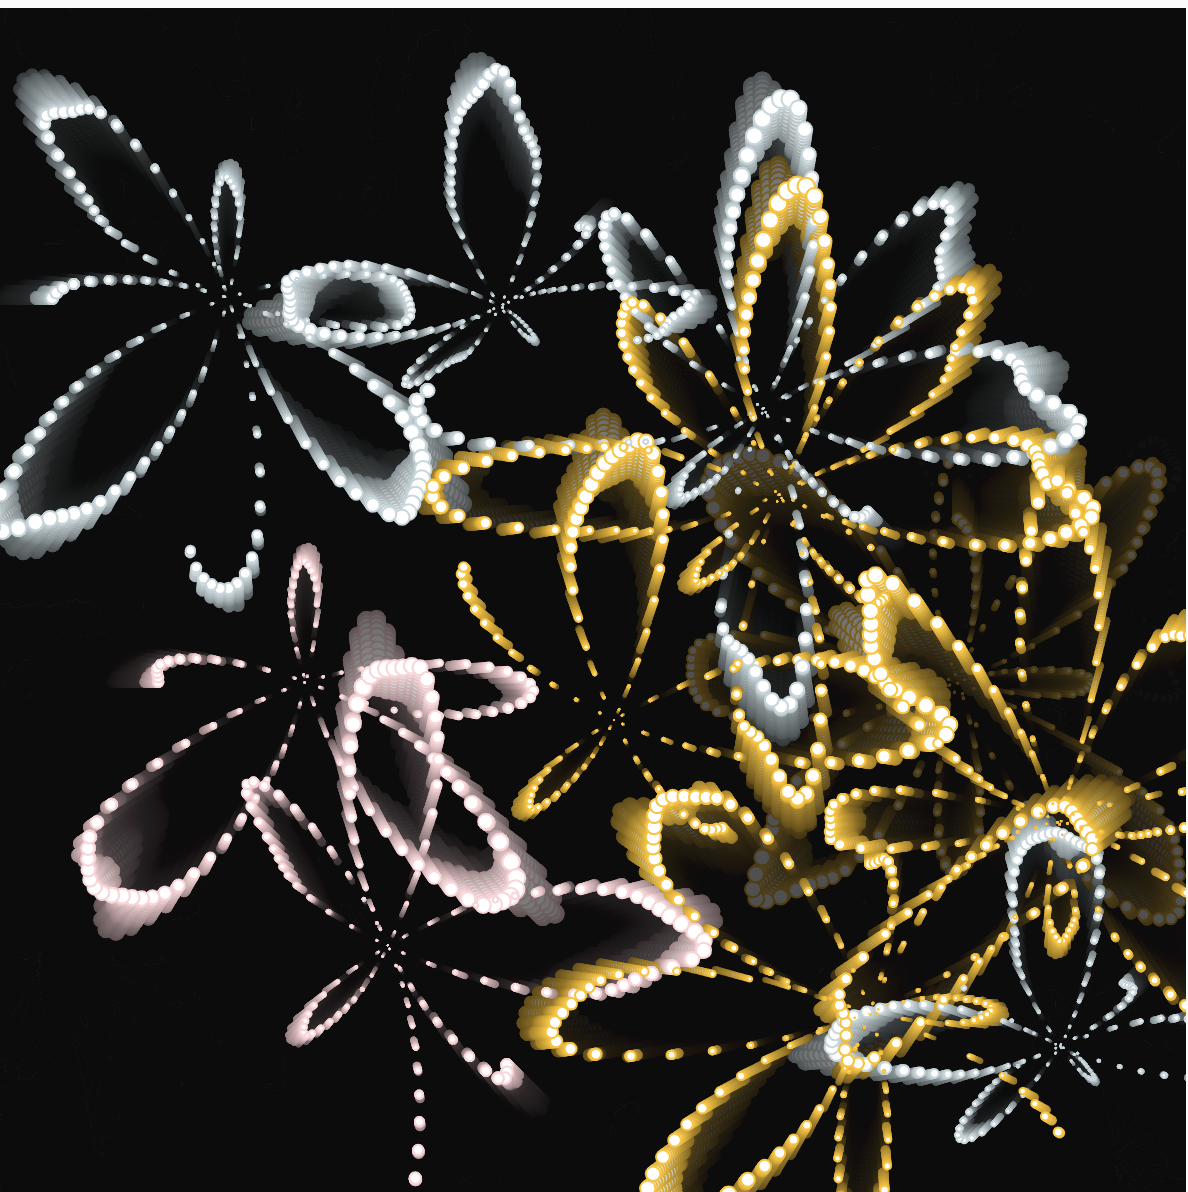
Admittedly, I had a lot of fun playing with different shapes and introducing randomness and Perlin noise into the sketch. I found that different methods produced different emergent qualities. For instance, curves with randomness were akin to children’s drawings on a blackboard, but with Perlin noise, they were more seamless and refined. Circles with randomness had a glowing radiance that reminded me of fireworks or diamonds. The use of circles with Perlin noise, however, elicited a more abstract effect and almost had a level of depth to it that I liked. Here are images from the four experiments below.
I am embedding the sketch that I liked the most. The p5.js sketch for each of these can be found by clicking the URL linked with the caption below each one of the images above.
Reflections and Ideas for the Future
What I loved about the process of creating these sketches was how it naturally flowed from my earlier projects and how it amalgamated the power of mathematics to create something generative and abstract yet still organic and nature-inspired. I want to continue experimenting with different polar curves and to continue abstracting my work and learning more advanced animation strategies.
This reading showed me a perspective of interactivity that I had never thought of before. Crawford has given me a new viewpoint that interactivity has certain categories that need to be there for the piece to really be interactive.
The way that Crawford reiterates on the conversation example makes it seem very relatable and made my understanding of interactivity clearer. He also proceeds to give us examples of interactivity and scales them on his “10-point Crawford scale of interactivity”, which shows us how interactive of a piece it is.
Concept: My generative art created using P5.js presents a captivating display of colorful circles arranged in a dynamic pattern using OOPS, Arrays and Functions. I have integrated few interactive functions to make it more interesting. Inspired by the interplay of randomness and user interaction as discussed in class, this artwork embodies the concept of controlled chaos.
Main Inspiration:
At initial phase: At first, I had the idea to create artwork like the one in the video, but instead of using curves, I wanted to use circles. Each circle in my artwork has its own size, color gradient, and movement, which all come together to make the overall picture interesting. I added an interactive feature so people can join in and make the artwork themselves by clicking the mouse to add new circles. This makes the artwork more dynamic and engaging. The colors of the circles change gradually based on their position on the screen, which gives the artwork depth and liveliness. Additionally, each circle rotates at its own speed, adding a sense of flow and motion. Overall, my artwork demonstrates how randomness can be controlled to create harmony, inviting viewers to appreciate the beauty of unpredictability.
[Initial Output] This is how it looks! Try tapping anywhere in canvas to create more fun circles..
Initial Art Code:
let circles = [];

function setup() {
  createCanvas(600, 600);

  // Create an initial set of circles
  for (let i = 0; i < 50; i++) {
    let circle = new Circle(random(width), random(height), random(10, 50));
    circles.push(circle);
  }
}

function draw() {
  background(255);

  // Update and display each circle
  for (let circle of circles) {
    circle.update();
    circle.display();
  }
}

function mousePressed() {
  // Add a new circle at the mouse position when clicked
  let newCircle = new Circle(mouseX, mouseY, random(10, 50));
  circles.push(newCircle);
}

// Circle class definition
class Circle {
  constructor(x, y, diameter) {
    this.x = x;
    this.y = y;
    this.diameter = diameter;
    this.color1 = color(random(255), random(255), random(255));
    this.color2 = color(random(255), random(255), random(255));
    this.speedX = random(-2, 2);
    this.speedY = random(-2, 2);
    this.rotation = random(TWO_PI); // Random initial rotation
    this.rotationSpeed = random(-0.05, 0.05); // Random rotation speed
  }

  update() {
    // Move the circle
    this.x += this.speedX;
    this.y += this.speedY;

    // Bounce off the walls
    if (this.x > width || this.x < 0) {
      this.speedX *= -1;
    }
    if (this.y > height || this.y < 0) {
      this.speedY *= -1;
    }

    // Update rotation
    this.rotation += this.rotationSpeed;
  }

  display() {
    // Draw the circle with color gradient and rotation
    let gradientColor = lerpColor(this.color1, this.color2, map(this.y, 0, height, 0, 1));
    fill(gradientColor);
    noStroke();
    push();
    translate(this.x, this.y);
    rotate(this.rotation);
    ellipse(0, 0, this.diameter, this.diameter);
    pop();
  }
}
I felt that my artwork needed some additional features to make it more engaging, so I decided to incorporate three new elements:
1. Interactive Drawing: Now, users can click and drag their mouse to draw colorful circles directly onto the canvas. This adds an interactive dimension to the artwork, allowing people to actively participate in its creation.
2.Dynamic Color Palette: To enhance visual appeal, I introduced a dynamic color palette. Each circle is filled with colors randomly selected from a predefined palette, adding variety and vibrancy to the overall composition.
3.Transparency Effect: To create a sense of depth and visual interest, I implemented a transparency effect. The transparency of each circle varies based on its diameter, resulting in a captivating depth effect as circles overlap on the canvas.
Final Output (Tap and drag the mouse anywhere in the canvas)
This is how it looks if the user added more circles: Final Code:
let circles = [];
let colorPalette = ['#FFC857', '#F4A35F', '#EE6C4D', '#F95738', '#FF5733', '#FF355E', '#D40C6B', '#7A00FF', '#0045FF', '#0088FF']; //Creating an array filled with color palettes.

function setup() {
  createCanvas(800, 600);

  // Creating an initial set of circles
  for (let i = 0; i < 100; i++) {
    let x = random(width);
    let y = random(height);
    let diameter = random(10, 50);
    let colorIndex = floor(random(colorPalette.length));
    let circle = new Circle(x, y, diameter, colorPalette[colorIndex]);
    circles.push(circle);
  }

  // Adding interactive features (just need to tap and drag)
  background(0);
  textAlign(CENTER, CENTER);
  textSize(36);
  fill(255);
  text("Click and drag to draw!", width / 2, height / 2);
}

function draw() {
  // Updating and displaying each circle
  for (let circle of circles) {
    circle.update();
    circle.display();
  }
}

function mouseDragged() {
  // Add a new circle at the mouse position when dragged
  let diameter = random(10, 50);
  let colorIndex = floor(random(colorPalette.length));
  let circle = new Circle(mouseX, mouseY, diameter, colorPalette[colorIndex]);
  circles.push(circle);
}

// Defining Circle class
class Circle {
  constructor(x, y, diameter, color) {
    this.x = x;
    this.y = y;
    this.diameter = diameter;
    this.color = color;
    this.speedX = random(-2, 2);
    this.speedY = random(-2, 2);
    this.rotation = random(TWO_PI); // Random initial rotation
    this.rotationSpeed = random(-0.05, 0.05); // Random rotation speed
  }

  update() {
    // Moving the circle
    this.x += this.speedX;
    this.y += this.speedY;

    // Bouncing off the walls
    if (this.x > width || this.x < 0) {
      this.speedX *= -1;
    }
    if (this.y > height || this.y < 0) {
      this.speedY *= -1;
    }

    // Updating rotaion
    this.rotation += this.rotationSpeed;
  }

  display() {
    // Drawing the circle with rotation and transparency effect
    push();
    translate(this.x, this.y);
    rotate(this.rotation);
    fill(this.color);
    noStroke();
    let alpha = map(this.diameter, 10, 50, 50, 200);
    // Varrying transparency based on diameter
    fill(red(this.color), green(this.color), blue(this.color), alpha);
    ellipse(0, 0, this.diameter, this.diameter);
    pop();
  }
}
Code I’m proud of: Initially, I found implementing the transparency effect challenging in my artwork. Understanding how to vary the transparency based on the diameter of each circle was tricky. However, I managed to overcome this difficulty by experimenting with the map() function in the display() method of the Circle class. By mapping the diameter of each circle to a range of transparency values, I was able to achieve the desired effect. This involved adjusting the parameters of the map() function until I achieved the desired transparency levels, ultimately resulting in a visually appealing depth effect as circles overlapped on the canvas. Overall, successfully implementing this feature added an extra dimension to my artwork that I’m proud of.
Additional Art Work: With Valentine’s Day approaching, I decided to enhance my artwork by making some adjustments to the code. Here’s the updated look!
Here’s the code for the Valentine’s Day themed artwork:
let hearts = [];
let colorPalette = ['#FF4D6D', '#FF6381', '#FF7992', '#FF8BA3', '#FFA3B5', '#FFBFC7', '#FFD1D9', '#FFEDF2'];

function setup() {
  createCanvas(800, 600);

  // Addinng a sweet message
  background(255);
  textAlign(CENTER, CENTER);
  textSize(36);
  fill(150);
  text("Happy Valentine's Day!", width / 2, height / 2 - 50);
  text("Click and drag to create love!", width / 2, height / 2 + 50);
}

function draw() {
  // Updating and displaying each heart
  for (let heart of hearts) {
    heart.update();
    heart.display();
  }
}

function mouseDragged() {
  // Adding a new heart at the mouse position when dragged
  let size = random(30, 100);
  let colorIndex = floor(random(colorPalette.length));
  let heart = new Heart(mouseX, mouseY, size, colorPalette[colorIndex]);
  hearts.push(heart);
}

// Heart class definition
class Heart {
  constructor(x, y, size, color) {
    this.x = x;
    this.y = y;
    this.size = size;
    this.color = color;
    this.speedX = random(-2, 2);
    this.speedY = random(-2, 2);
    this.rotation = random(TWO_PI); // Random initial rotation
    this.rotationSpeed = random(-0.05, 0.05); // Random rotation speed
  }

  update() {
    // Moving the heart
    this.x += this.speedX;
    this.y += this.speedY;

    // Bounce off the walls
    if (this.x > width || this.x < 0) {
      this.speedX *= -1;
    }
    if (this.y > height || this.y < 0) {
      this.speedY *= -1;
    }

    // Update rotation
    this.rotation += this.rotationSpeed;
  }

  display() {
    // Drawing the heart with rotation and transparency effect
    push();
    translate(this.x, this.y);
    rotate(this.rotation);
    fill(this.color);
    noStroke();
    let alpha = map(this.size, 30, 100, 50, 200); // Vary transparency based on size
    fill(red(this.color), green(this.color), blue(this.color), alpha);
    beginShape();
    vertex(0, -this.size / 2);
    bezierVertex(this.size / 2, -this.size / 2, this.size, 0, 0, this.size);
    bezierVertex(-this.size, 0, -this.size / 2, -this.size / 2, 0, -this.size / 2);
    endShape(CLOSE);
    pop();
  }
}
Conclusion: In conclusion, my inspired Bouncing Circles Art and Valentine’s Day-artwork successfully integrates the principles of generative art, interactive elements, and dynamic features using circles. The addition of an interactive drawing feature, a dynamic color palette, and a transparency effect enhances the overall aesthetic appeal, allowing users to engage with the artwork in a meaningful way. To speak more about the Valentines artwork, the fusion of vibrant colors and interactive drawing adds a festive touch, making it suitable for the Valentine’s Day theme.
While I am pleased with the outcome, there are areas for potential improvement. One aspect to consider is enhancing user interaction further by introducing additional interactive features or refining existing ones to make the artwork even more engaging. Additionally, exploring different color palettes and experimenting with more complex patterns could elevate the visual impact of the artwork. Overall, this project has provided valuable insights and opportunities for growth, and I look forward to continuing to refine my skills and expand my creative horizons in future projects.
In this chapter, Chris Crawford sets about to define the murky concept of ‘interactivity’. As Crawford rightly mentions, interactivity has become the buzzword of the Web age, prompting much corporate marketing based on the notion of interactivity, even when it doesn’t make sense. Thus, it is important to set a clear definition of interactivity and what constitutes as interactive.
I feel Crawford’s “Listening, Thinking, Speaking” definition is definitely a good place to start, but while trying to exclude things that are definitely not interactive, it may exclude things that are conventionally seen as interactive. After all, so-called smart lamps, for example, do not “think” much (I am talking about the most basic ones, such as the ones that respond to clapping), yet they could be classified as interactive. The argument can be made that there is some level of signal processing to differentiate a clap from background noise, and I won’t claim to be an expert on the matter, but I believe that it is still simpler than the thinking that Crawford calls for. This definition also excludes things like “interactive fiction”, because no thinking goes on in deciding between pre-coded paths in an interactive novel, and the reader doesn’t have free reign over the responses they can communicate to the characters of the story.
In this regard, I found that looking through the lens of degrees of interactivity makes more sense. Thus, things like refrigerator doors are low on the interactivity scale. Smart lamps, as well as many beginner Interactive Art projects, could be classified as medium interactive. Medium-high interactivity might include video games. And the highest tiers of interactivity are relegated to AI LLM chatbots and actual people. Thus, interactivity is a spectrum, and much to Crawford’s dislike, is inherently subjective.