
Below is the p5 sketch, hover 👆 anywhere to interact with the robot.
In case p5js Editor website is down, below is the recording of working demo on YouTube.
TL;DR : Conceptualization
Pi’s Practicality Walker is an Inverse Kinematics powered procedurally animated simulation of a giant mechanical walker in p5.js. All the animations are not hard coded by Pi, but are calculated on the spot on demand. You can hover the mouse pointer to move around the body of the walker robot, and the leg movements will adjust to how it should be.
1) 🤔 Long-Winded Conceptualization
I was watching Doctor Strange in the Multiverse of Madness, and having a good time fantasizing myself deep in the movie…as Dr. Stephen Strange Pi , the Sorcerer Engineer Supreme , the Master of the Mystic Arts Engineering Arts.
The only difference is that unlike Doctor Strange, I am the perfect boyfriend to all my ex-girlfriends.
And then I suddenly saw this delicious octopus.

In the class, we are learning Object Oriented Programming, and I am feeling the urge to write my own little mini game engine in p5js (in preparation for my midterm project). And I love mechanical things soooo sooo much. Hence, a giant mechanical octopus walking over the land, controllable with the mouse is a perfect idea.
Hence the piece “Pi’s Practicality Walker” is born.
To get such walking animation, Japanese Animation master Hayao Miyazaki will pour his heart and soul to his artwork and draw all the frames of the animation (that is 24 frames for 1 second of motion). But I am not Hayao Miyazaki.
But I am not Hayao Miyazaki.
~ Pi (2024)
Hence, I need to utilize my super lazy sneaky hacks to make this happen. Luckily, if you have a robotics background, the Inverse Kinematics and Procedural Animation techniques come in handy. Instead of going through the blood, sweat and tears of drawing/hard coding the animations, we can automatically generate animation in real-time to allow for a more diverse series of actions than would otherwise be tedious using predefined animations using these mathematical goodies.
2) ⚙️ Technical Plan of Attack & Implementation
The part of the code I am very proud of is of course, objectifying my octopus/spider 🕷️. Since they have a central body, which is composed of multiple legs, I can easily define the Mechanical Leg class, and the Body class as follows.
//This is the class for the individual legs
class MechanicalLeg {
  constructor(numSegments, segmentLength, isRightFacing = true) {
    this.numSegments = numSegments;
    this.segmentLength = segmentLength;
    this.isRightFacing = isRightFacing; // New parameter to determine the facing direction
    this.angleX = 0;
    this.angleY = 0;
    this.points = [];
    this.totalLength = this.segmentLength * (this.numSegments - 1);
  }

  update(targetX, targetY, canvasWidth, canvasHeight) {
    this.totalLength = this.segmentLength * (this.numSegments - 1);
    this.angleX = 0;
    this.angleY = 0;
    this.legLength = max(
      dist(targetX, targetY, canvasWidth / 2, canvasHeight / 2),
      2
    );

    let initialRotation = atan2(
      targetY - canvasHeight / 2,
      targetX - canvasWidth / 2
    );
    let rotation
// ... and so on
Then you just spawn the legs on the body, fulfilling the object and instance creation.
//Then, attach the legs to the body instance from the body class below
//Spider is walking and draggable
class SpiderBody {
  constructor(x, y) {
    this.position = createVector(x, y);
    this.baseY = y; // Base y-position to oscillate around
    this.dragging = false;
    this.dragOffset = createVector(0, 0);
    this.oscillationAmplitude = 30; // Amplitude of the up-and-down movement
    this.oscillationSpeed = 0.05; // Speed of the up-and-down movement
  }

  update() {
    this.position.x = mouseX - 50;
    // Apply a sin motion when not dragging
    this.position.y =
      mouseY +
      sin(frameCount * this.oscillationSpeed) * this.oscillationAmplitude;
  }
//...
As per project requirement, the arrays were used to hold the leg objects within the walker robot body instance.
// Line 436
function setup() {
  createCanvas(windowWidth, windowHeight);
  gaitHorizontalDistance = windowWidth / 0.7;
  spiderBody = new SpiderBody(width / 2, height / 2 + 100);
  // Initialize leg instances and add them to the legs array
  legs.push(new MechanicalLeg(4, 180, true)); // Right-facing leg
  legs.push(new MechanicalLeg(4, 180, false)); // Left-facing leg
  legs.push(new MechanicalLeg(5, 150, true)); // Another right-facing leg
  legs.push(new MechanicalLeg(5, 150, false)); // Another left-facing leg
  legs.push(new MechanicalLeg(4, 200, true)); // And so on...
  legs.push(new MechanicalLeg(4, 200, false));
Now we have a giant machine with legs, and the code is reusable and modular, but it is not moving yet. Inverse Kinematics is the art of calculating the joint angles so that given a particular end-effector coordinate in 3D space, the robot knows which joint angles it should move to to get to that target point. Hence, the animations can be automated thsi way.
Inverse Kinematics & Procedural Animation
I stole the mathematical model from the University of Illinois lecture slides here : Introduction to Robotics Lecture 11: Inverse Kinematics (https://publish.illinois.edu/ece470-intro-robotics/files/2021/10/ECE470Lec11-2.pdf)
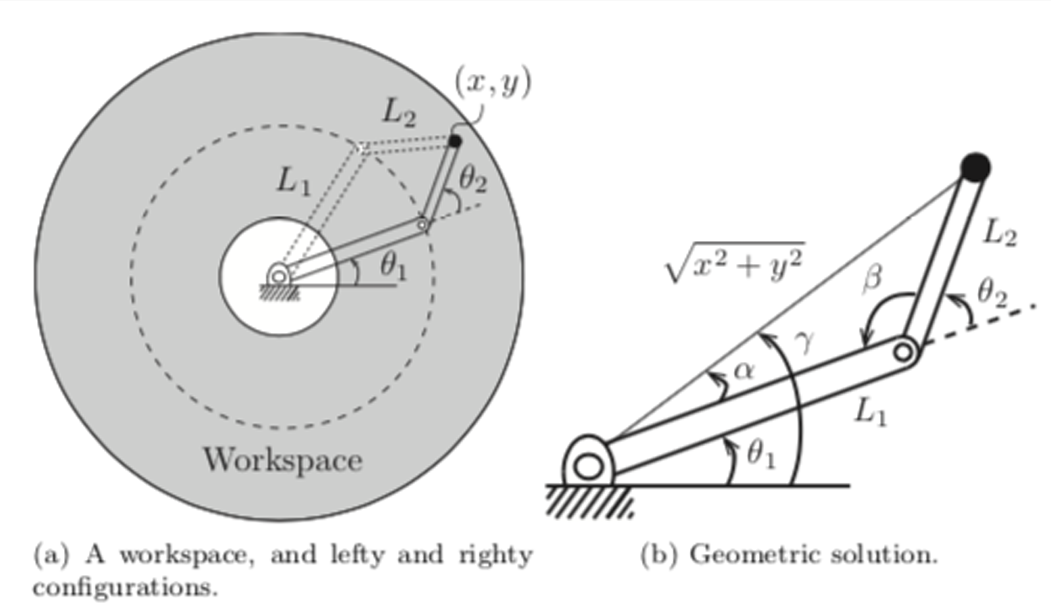
The key idea is to have an algorithm which will iteratively adjusts the angles of each segment to ensure the end effector reaches or points towards the target. The mathematics primarily involves trigonometry to calculate angles and positions of each segment in 2D space. The model I am using is below.
Step 1 : Initial Tangent Alignment
Step 2 : Desired Leg Length Calculation
Step 3 : Iterative Angle Adjustments
-
- Initialize for all segments.
- Iteratively adjust to stretch or contract the leg.
- Incremental angle change:
- Updatefor each segment.
Step 4 : Segment Position Calculation
Step 5 : Check Total Leg Length
The iterative process continues until the total length of the leg aligns with the desired length L, hence we keep checking. This is the stopping condition.
Step 6 : Rotation Adjustment
If the legs are at the back, we have to measure the angle in the mirrored way, so mirror the angles.
The formal definitions of funky symbols above are
Number of segments in the leg (numSegments). |
|
Length of each segment (segmentLength). |
|
| Angle of the th segment. | |
| Coordinates of the end of the th segment. | |
| Target coordinates (mouse position). | |
Width and height of the canvas (canvasWidth, canvasHeight). |
|
Desired total length of the leg (legLength). |
|
| Initial rotation angle to point towards the target. | |
| Total rotation angle of the leg. | |
| Incremental angle change per iteration. |
3) 🎨 Artistic Plan of Attack & Implementation
Once the robot is working, we enhance the aesthetics through adding a parallax grass, adding the previous swarms and gears, and playing a good old western slide guitar cowboy song and visualizing it through fast Fourier transform (FFT) in the style of Ryoichi Kurokawa .
4) 💪 Challenges
Again, no challenge. This was an enjoyable exercise.
5) 💡 Potential Improvements
To make the movements of the walker more realistic, as always, I could have used proportional–integral–derivative (PID) controllers. My current model goes with constant speed:
6) 🖥️ Source code
🖥️ Source code is just a single sketch.js file at : https://github.com/Pi-31415/Intro-To-IM/blob/main/Assignment-3/assignment3.js
📖 References :
Good artists copy, great artists steal. Of course, I stole everything by googling these publicly available stuff below 🤫😉.
- Introduction to Robotics Lecture 11: Inverse Kinematics (https://publish.illinois.edu/ece470-intro-robotics/files/2021/10/ECE470Lec11-2.pdf)
- Ernst Schmidt’s Swarm Implementation (https://editor.p5js.org/Kubi/sketches/7U1KhS5S6)
- Ronik Bhattacharjee’s Music Visualizer (https://github.com/Ronik22/Audio-Visualizer/blob/main/examples/circular%20waveform%203/app.js)
- Music Used – Gunnin’ for You by Nick Nolan (https://www.youtube.com/watch?v=0fMQRw4IxOQ)