When starting this assignment I set the goal of creating classes which behaved differently to each other. In my previous assignment I had a similar goal but wasn’t able to achieve it so I thought I would try again. When it came to the code I took inspiration from the car sketch, where the location of each car was stored as posX and posY. I also wanted to make something similar to what some of my other classmates were making without looking at their code and spending as much time figuring it out myself. I tried to replicate Snehil’s design with the use of what looked like snakes but I wanted a different color scheme. I found Darko’s color scheme more appealing. Then lastly, I wanted to make a class which I could easily repurpose or re-use if I wanted to make shapes which could move around almost randomly.
class snake {

  constructor(posX, posY, radius, magnitude, coefficient) {

    this.posX = posX;               // x-position of the shape
    this.posY = posY;               // y-position of the shape
    this.radius = radius;           // radius of the circle, could be changed if the shape is different
    this.magnitude = magnitude;     // magnitude refers to the amount the shape moves every frame
    this.coefficient = coefficient; // coefficient is the number that multiplies the frameCount in the noise function, I prefer it when it is the same for all snakes but it is a variable that can be changed regardless

  }

  // This class sets a new posX and posY based on a randomly generated heading
  update() {
    // update random heading

    let noiseRandom = noise(this.coefficient * frameCount);

    angleMode(RADIANS);

    let randomHeading = map(noiseRandom, 0, 1, -2*PI, 2*PI); //random heading

    // setting new posX, and posY based on the magnitude

    this.posX = this.posX + cos(randomHeading) * this.magnitude;
    this.posY = this.posY + sin(randomHeading) * this.magnitude;

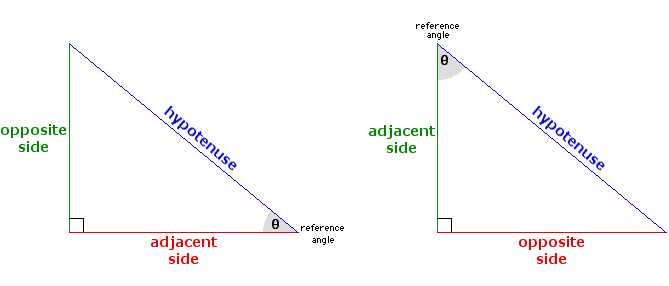
    // The reason I used sin and cos is because setting the new values is similar to a right angle triangle: The magnitude can be represented as the hypotenuse, and the random heading an angle, then the adjacent value is the change in x, the opposite value is the change in y, then add said changes to the posX and posY respectively. Of course to calculate the new aformentioned values the formula sin(randomHeading) = x / magnitude has to be rearranged, and the same for cosine.

  }

  // this class just draws the shape, it could really be anything, it could even be modified to be a rectangle or an ellipse or anything else you can think of.
  drawShape() {

    circle(this.posX,this.posY,this.radius);

  }

}
Above is the entire class which I named snake. I only used 2 functions not including the constructor which was update and drawShape. the update function’s purpose was to create a new heading, and update the posX and posY variables based on the heading and the magnitude inputed when creating the class. I tried to explain how it’s done but I feel the long comment does not do it justice. Before I explain, originally I tried to use vectors and the translate method. What I realized was that the translate function could also move other shapes on the screen, and instead of trial and error-ing my way around, I decided to use posX and posY like what I remembered from the car-sketch.
To do this I thought of a right angled triangle and using the trigonometric equations to find what the new coordinates for the shape would be.
While the math isn’t very complicated I felt it was worth explaining and documenting regardless. The hypotenuse is in this case the magnitude, the adjacent side (see left triangle) is the change in x, and the opposite side (left triangle) is the change in y, and theta is the randomHeading variable I generated in the update function. I knew the equations sin and cosine could be used as they had all the variables I needed and so by rearranging for x and y respectively, then adding the new values I got to the pre-existing posX and posY variables I could get the new posX and posY variables. This was the main problem I had, and it was what took me the most time to figure out since at the beginning I chose not to look directly into the code of others and to use what I knew already or what I remembered from class.
Below is the finished product:
Click to reset the circles.

