Assignment 1 – Self Portrait

For the first assignment I decided to go for a simple self portrait. Not knowing how to code a lot, I went with the flow and took it easy.

I started with a beige ellipse and from there slowly created the whole face. After that, I went for a rectangle for the hair.

This was the end result!

Assignment 1- Self Portrait (Me Before and After Hiking) by Sihyun Kim

One trivia about me is that I really love hiking, but I’m not very good at it. For most of my life, I’ve lived in a mountainous area in the Philippines, providing me with ample opportunities to go hiking. While I love the activity, I easily get tired and take hours to reach the top of a mountain. I thought it would be nice to create a self-portrait about my hiking experiences. Inspired by Pauline Wee’s Koala portrait from the examples provided, I decided to add some interactive elements when the mouse is pressed.

The concept is ‘Me  Before and After Hiking.’ I have created changes in facial expression and background color that occur when the mouse is pressed. Specifically, when the mouse is not pressed, you can see me with a happy face with blushes, indicating excitement before hiking. And, when the mouse is pressed, you can see me sweating with an exhausted face and a change of background color to indicate the exhaustion after hiking and the passage of time.

The section of code that I am particularly proud of is presented below. I was particularly proud of this section of code made for the change of facial expression when the mouse is pressed because I felt like I did a great job in making my code concise. Originally, I had multiple if-statements for each of the changes. However, I realized that I could just combine all these if-statements into one! It was quite challenging to combine the if-statements because I had to consider all the orders of the shapes to make a great-looking self-portrait.

// change of facial expression when mouse is pressed
  if (mouseIsPressed) {
    //left eye
    line(146, 193, 168, 203);
    line(146, 209, 166, 203);
    //right eye
    line(256, 193, 233, 203);
    line(256, 209, 233, 203);

    // mouth
    fill("red");
    arc(faceX, faceY + 73, 40, 40, PI, 0);
    line(faceX - 20, faceY + 73, faceX + 20, faceY + 73);

    // sweat drops
    sweatdrops(0);
    sweatdrops(30);
    sweatdrops(60);
  }
  //when mouse is not pressed
  else {
    //eyes
    fill(0);
    ellipse(160, 200, 15, 18); //left eye
    ellipse(242, 200, 15, 18); //right eye

    // eyelashes
    line(146, 193, 154, 197); //left eyelash
    line(256, 193, 250, 197); //right eyelash

    // mouth
    fill("red");
    arc(faceX, faceY + 53, 40, 40, 0, PI);
    line(faceX - 20, faceY + 53, faceX + 20, faceY + 53);

    // blush
    stroke("#FE847E");
    fill("#FE847E");
    ellipse(faceX - 60, 245, 20, 15);
    ellipse(faceX + 60, 245, 20, 15);
  }

Overall, I am very satisfied with the outcome of this assignment, although it may not be perfect. I find my self-portrait quite cute. This was my first time working with P5.js, and I found it very fun. Actually, I found this experience to be  similar to my experiences with Python and Processing. For improvements, I think adding animations like pouring rain or dripping sweat to my self-portrait would have made it more interesting. Also, it would have been more engaging to add additional interactions, like the body moving in response to cursor position.

Assignment 1 Self Portrait by Dachi Tarughishvili

For this assignment, I wanted to create a self portrait that not only resembled the way I looked like but also had an alternative appearance which would be activated using interactive component. Last year, I went to Halloween party where I dressed as character called Walter White from a TV show called Breaking Bad. I added a button (titled “Say My Name”) which repeats the iconic dialogue from one of the show’s most important episodes . This button also acts as a toggle for transformation between enlarging strokes, as well as changing the background color, shirt color, adding glasses, a hat, removing hair, adding a beard etc. It also activates iconic music from the show as soon as it’s pressed.

This is the part where everything happens and all the classes are activated from. As such, it is the most important part of my code and also handles the audio (it is a toggle button hence I want it to toggle between two states, and therefore I need several checks and booleans). Although I would say getting the shapes right and drawing them proportionally was equally hard to do. Fortunately, I had experience with P5 before which is why I wanted to add more stuff than it was initially proposed in the assignment. Overall, I really enjoyed making this portrait and hope you like it. In the future, I could potentially add more interactive components in the background or some dynamic elements like eyes that follow a mouse cursor.

function toggleTransform() {
  hatvisible = !hatvisible;
  toggleGlasses();
  toggleHair();
  toggleBeard();
  toggleShirtColor();
  toggleBackgroundcolor();
  displaytext = !displaytext; 
  if (songcheck == false) {
    song.play();
    songcheck = true;
  } else {
    songcheck = false;
    song.stop();
  }
}


Assigment 1 – Self-portrait – Eli’s Aquatic Dreamscape

CONCEPT:

I find myself retreating into my thoughts as the first week of school comes to an end, returning to my cherished summer home in Cadaqués, a charming community hidden away on Spain’s coast. “Eli’s Aquatic Dreamscape,” this piece of art, is more than simply a self-portrait; it’s a glimpse into my calm world, where the water is a constant companion that reflects my calmest desires.

My refuge has always been Cadaqués, with its picturesque streets and peaceful Mediterranean. Here, the world above seems to fade away as I plunge into the glistening clean waters, making time seem to stop.

As we sail alongside friends during the golden sunsets, the sea serves as a brilliant backdrop for our companionship as we tell stories and laugh together. And then there’s windsurfing, an exhilarating dance with the wind and waves that embodies both my spirit of adventure and the wild beauty of the village.

“Eli’s Aquatic Dreamscape” is a painting that pays homage to these times and embodies my passion for the ocean and Cadaqués. This piece serves as a reminder of my favorite place amidst the chaos of academic life and is evidence of the serenity that Cadaqués instills in me. It serves as a reminder that there is peace waiting in the embrace of the water, no matter how hectic life becomes.


  // Hair
  fill(102, 51, 0); // Brown hair color
  arc(200, 155, 200, 100, radians(150), radians(30)); // arch hair
  
  // hair length
  fill(102, 51, 0); // brown hair 
  noStroke();
  rect(110, 160, 40, 150); // left rectangle hair 
  rect(250, 160, 40, 150); // right rectangle hair 

  // Eyes
  fill(255); // White part of the eyes
  ellipse(170, 190, 30, 20); // Left eye
  ellipse(230, 190, 30, 20); // Right eye

  fill(77, 38, 0); // Brown color for the iris
  circle(170, 190, 10); // Left iris
  circle(230, 190, 10); // Right iris

  // Tshirt
  fill('lightgreen'); 
  arc(200, 600, 300, 650, PI, 0, OPEN); // shoulders

  // Mouth
  fill('pink'); // 
  arc(200, 240, 30, 10, 0, PI, CHORD); // smile arch
  
}

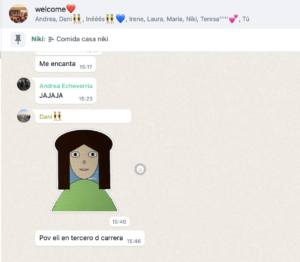
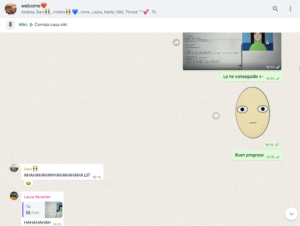
Memes from my group of friends. 


IMPROVEMENTS:

Future developments could benefit from concentrating on the textural elements in order to more accurately convey the dynamic character of water.

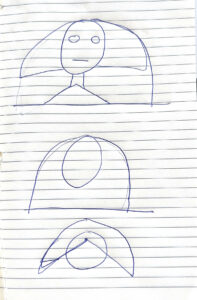
Making hair in my artwork was especially difficult for me. I tried using an arch at first, but I could not figure it out. I finally decided on an arch and two descending rectangles. Incorporating marine life or sports like windsurfing or diving would give my work a more vivid and personal touch, emphasizing my strong bond with the sea and my memories of Cadaqués. This way, the artwork could become more meaningful and realistic.

Assignment 1 – Self Portrait | Ahmad Hafizh

This is our first assignment for the Intro to IM Spring 2024 class. We are introduced to p5js in the class, and after messing around with it for a while, I began to grasp hold of the program.


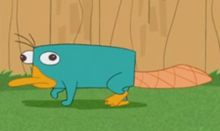
The assignment focuses on creating a self-portrait using p5js. I was heavily inspired by Perry the Platypus when creating this because of the simple shape that can be translated using the program.

Perry the Platypus - Wikipedia

Perry the Platypus. Disney

The code that I used for the portrait is posted below. I am still confused about the arc shape, which requires a lot of planning before using. As you can see, the hat in my code is not perfectly hat-shaped enough. Nonetheless, this exercise encouraged me to practice using it more.

function setup() {
  createCanvas(400, 400);
}

function draw() {
  background(178, 216, 216);
  rectMode(RADIUS);
  fill(255, 234, 0);
  rect(200, 320, 100, 30, 20);

  //mustache
  rectMode(CENTER);
  fill(132, 90, 27);
  rect(200, 300, 100, 30, 20);

  //eyes
  ellipseMode(RADIUS);
  fill(255);
  ellipse(50, 200, 30, 30);
  ellipseMode(CENTER);
  fill(100);
  ellipse(50, 200, 30, 30);

  //eyes
  ellipseMode(RADIUS);
  fill(255);
  ellipse(350, 200, 30, 30);
  ellipseMode(CENTER);
  fill(100);
  ellipse(350, 200, 30, 30);

  //hat
  fill(132, 90, 27);
  ellipse(200, 120, 300, 30);
  arc(200, 50, 130, 200, -3.95, QUARTER_PI, OPEN);
}


Assignment #1 – Self Portrait

For this portrait assignment, I decided to include the thing that I love the most, Basketball. My idea was to draw something that represents who I am as well as to add some cool animations which would further enhance the portrait.

It all started of as a simple sketch on a piece of paper where I drew up a rough portrait of me. Then I decided that I wanted to add some personal element to it, so I drew a basketball which I wanted to spin around my hand. This is where I faced my first challenge trying to transfer my idea onto the canvas. Even though it was the hardest thing to do this project, the rotation of the basketball was the most rewarding thing and for that reason I will include it as the piece of code I am most proud of. It can be seen below 🙂

...
  push();
  translate(90, 150);
  rotate(angle);
  drawBasketball();
  angle += 0.04;
  pop();
}

function drawBasketball() {
  fill(255, 165, 0);
  ellipse(0, 0, 100, 100);

  stroke(255);
  strokeWeight(3);
  for (let i = 0; i < 8; i++) {
    let angle = (TWO_PI / 8) * i;
    let x1 = cos(angle) * 45;
    let y1 = sin(angle) * 45;
    let x2 = cos(angle) * 55;
    let y2 = sin(angle) * 55;
    line(x1, y1, x2, y2);
  }
}

After solving the basketball “situation” the process was pretty straightforward and included me just carrying on with the drawing of the face and the facial features, hands and I added a jersey which represents the real jersey I use to play in basketball matches (I wear the number 17).

Before finishing up, I added a little bit of an “NYU Element” where I painted the canvas with the original NYU violet color and added a fun text animation representing the name of our Basketball team.

Overall I felt the process of creating my first project in p5.js was very rewarding and I learnt a lot of things along the way. There is certainly a long way to go and I am pretty excited of what the future holds.

My final portrait can be seen below 🙂

Assignment 1 – Self Portrait

My initial idea was to make a simple self-portrait however after playing around with the options p5 provides, I settled on using 3D shapes to complete my project.

I quickly realized that making a human head would look very odd and uncanny in 3D, so instead I chose to make an animal, specifically a chimp, as it was easier to abstract it into basic shapes.

Most of the structure is composed of ellipsoids. Ellipsoids offered me the most amount of options. Alternatively, I considered using custom geometry however that proved too difficult to create. I also considered using Bezier curves for certain shapes, but the same issue of complexity, as well as their limitation of being exclusively a plane discouraged me from pursuing that route.  To shorten the code, I encapsulated the process of drawing an ellipsoid into it’s own function.


  // Function to draw ellipsoid with specified colors
  function drawEllipsoid(rx, ry, rz, fillColor, translateParams) {
    fill(fillColor);
    push();
    translate(...translateParams);
    ellipsoid(rx, ry, rz);
    pop();
  }

I am happy that I was able to add directional lighting. Without the lighting, I had to display the wireframe of the shapes which made the project look unpolished.

There are many improvements I can make, like tweaking the proportions of the shapes. I really wanted to add a texture file for the fur of the monkey, but I couldn’t figure out how to make it compatible with an online compiler.

Assignment 1: Self-Portrait

When working on this assignment, my goal was to create an image of myself with round figures. Therefore, I tried to use ellipse, circle, and arc for most of the design and limit the use of shapes with sharp or straight edges. Even when I used shapes such as rectangle, I made the corners round so that they are not sharp. To add on, another concept of this assignment was using pastel colors. Except black, all colors aren’t vibrant and I aimed to use “soft” colors throughout coding.

A section of code is provided below and I am particularly proud of them because it was my first time using ‘arc’ and ‘text’ codes. With ‘arc’ code, I initially struggled to use it because I wasn’t sure how to use PI in the code. However, with trial and error, I was able to get a grasp of it and utilize it throughout the assignment. Also, after I finished coding for the self-portrait, the upper part of the canvas was empty and I used the ‘text’ code to fill in the spaces.

Overall, I am satisfied with the outcome of the code. Although it doesn’t necessarily look like me, I am happy that my code generated a picture of a person. For improvements, I would like to learn how to code so that the eyeballs move with the mouse. Also, I think it would be interesting to let the color of the shirt change when the user clicks on the shirt. In general, making the product more interactive would make it more entertaining and dynamic.

//bang
fill('black');
arc(250, 230, 180, 175, PI, PI+PI);

// left eye
fill('white');
circle(210, 260, 40);
noStroke();
fill('black');
circle(210, 260, 22);

//left eyebrow
stroke('black');
noFill();
arc(210, 237, 30, 10, PI, 0, OPEN);

//text
textSize(50);
text('self-portrait', 125, 90);
textSize(70);
text('☀️', 30, 100);
text('🌿', 400, 100);