
CONCEPT
As I mentioned before, for my final project I decided to create an engaging experience for anyone on our campus at NYUAD to design their new ID card. This is supposed to tackle two aims: 1) bring joy and fun to people who are using the program; 2) allow people to be creative and design a card that suits their character.
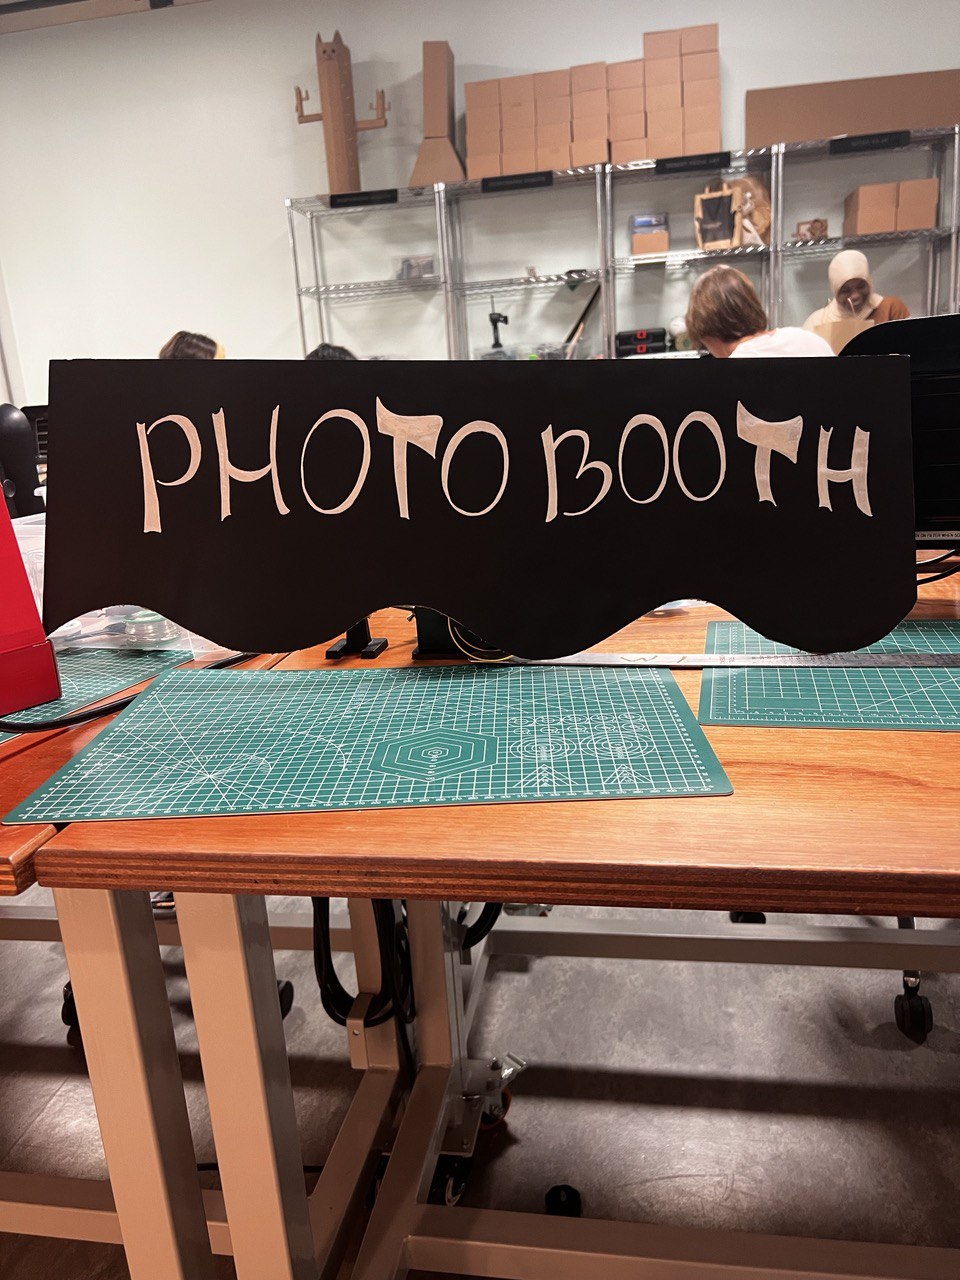
At the very beginning, during the development of the idea, one of my classmates mentioned that my idea reminded them of a photo booth. This became the main concept of the experience. I constructed a real photo booth, to which people can come, sit down and take their selfies, as they like. If they do not like the picture, they can take it again as many times as they want, until they are satisfied with the result. So, this project would address the issue of dissatisfaction with ID card photos through the feature of capturing their images in real-time.
Then, participants can write whatever name they want on their new ID card. Sometimes people do not like the name that appears on their passport, which unfortunately they cannot change. However, in this project, I am giving them this opportunity.
Then, the fun part begins. Users can choose from a variety of images to be displayed on their ID. I have two categories: ANIMALS and HATS. They can choose whatever image they want by pressing buttons. Moreover, they can position them anywhere on their ID badge. This aims to enhance the individuality of their IDs.
Finally, they can save an image of their ID, which I will, of course, send to them afterward. So, this project seeks to not only address practical concerns but also provide a unique and enjoyable experience for users.
IMPLEMENTATION
This is a P5 setup in the beginning: 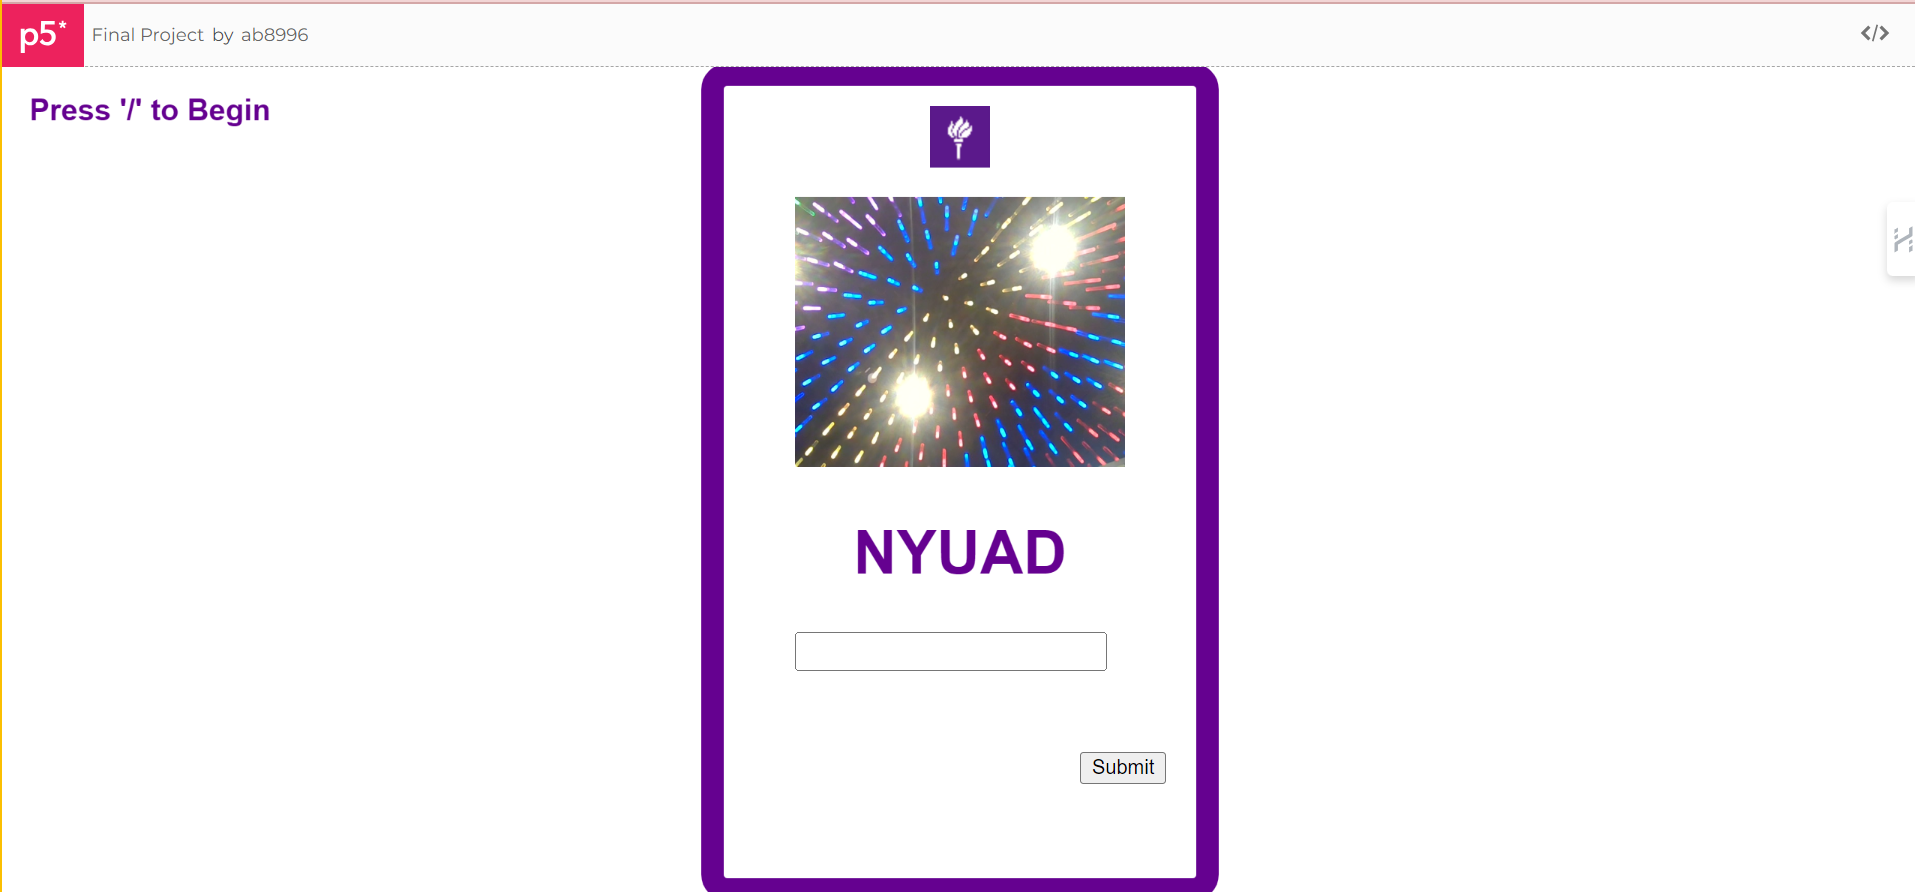
After you connect to the port by pressing the “/” key, and you press ENTER to take a snapshot, two images appear (animal and hat images).
You can go through an array of images by pressing the red buttons and choosing the hat and animal that you like. Further, you can adjust their position with potentiometer knobs. You can write your name in the input text box and SUBMIT it by clicking the button, so it appears as usual text on the ID badge. Finally, if you are satisfied with everything, you can click the CAPTURE button and save the ID badge.
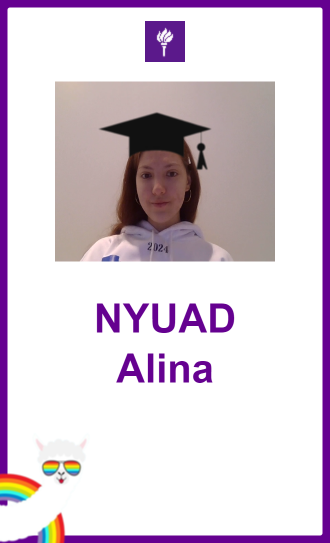
The final ID badge image looks like this:
Set up during the show:
I have developed my concept further and designed a photobooth from cardboard. I printed out instructions and the table for people to fill in (where they would write their name and net ID, so I can send them the image of the ID badge later). I have designed this box from large cardboard pieces that I found in the lab. Painted the front with black acrylic paint and printed a design that reminds me of the film. 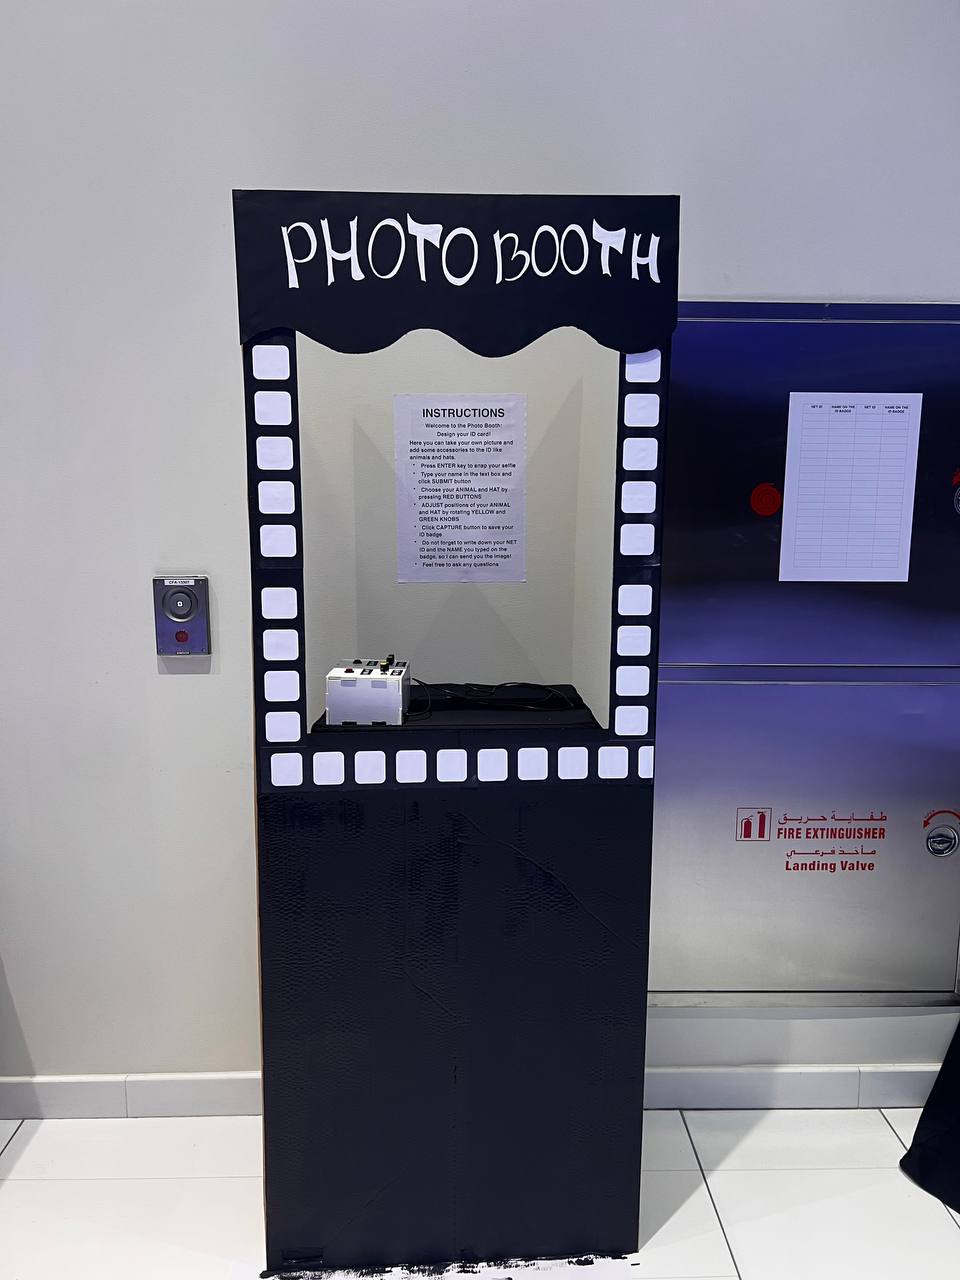
Process: 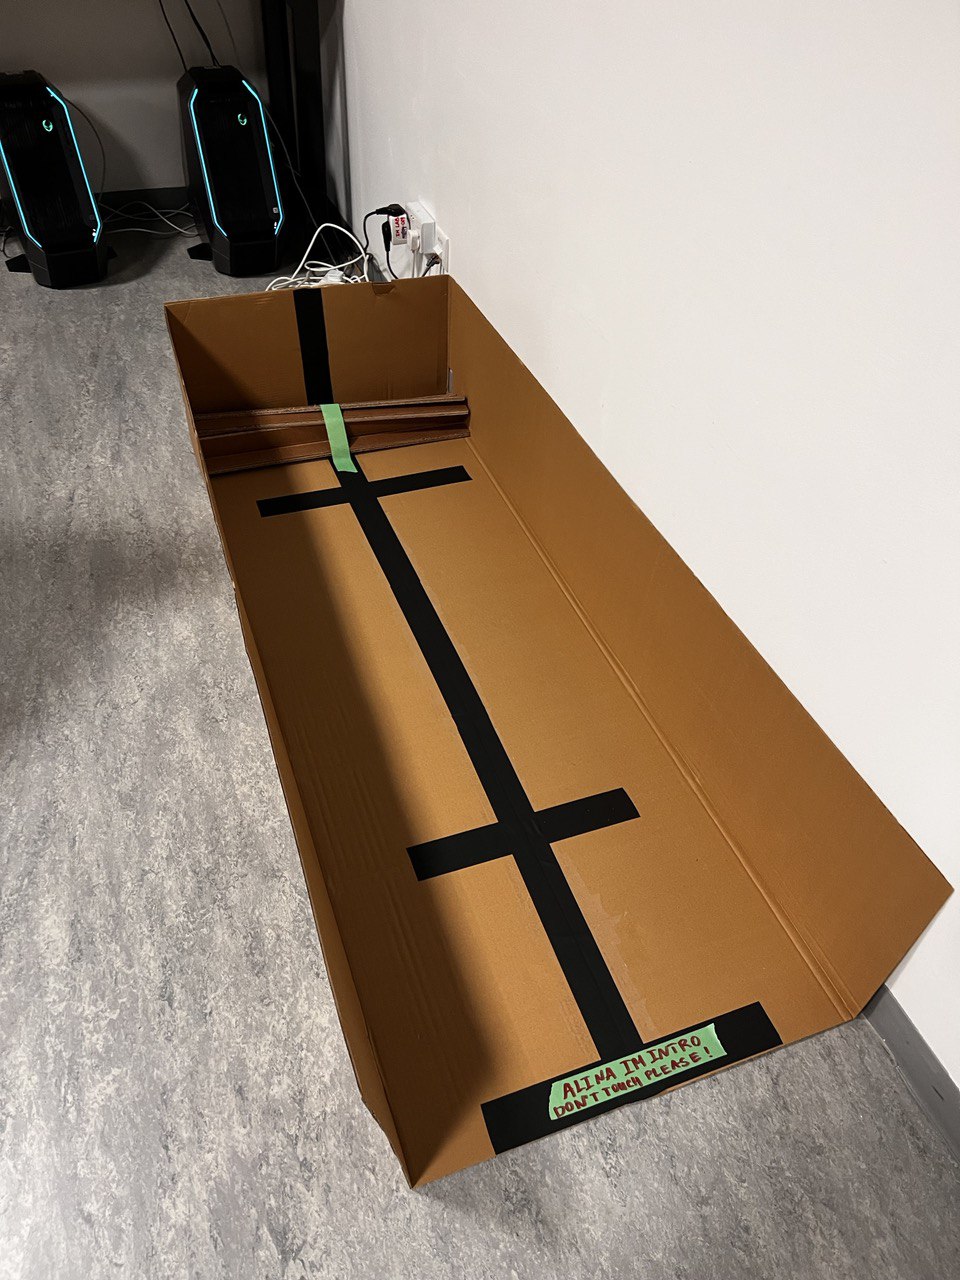
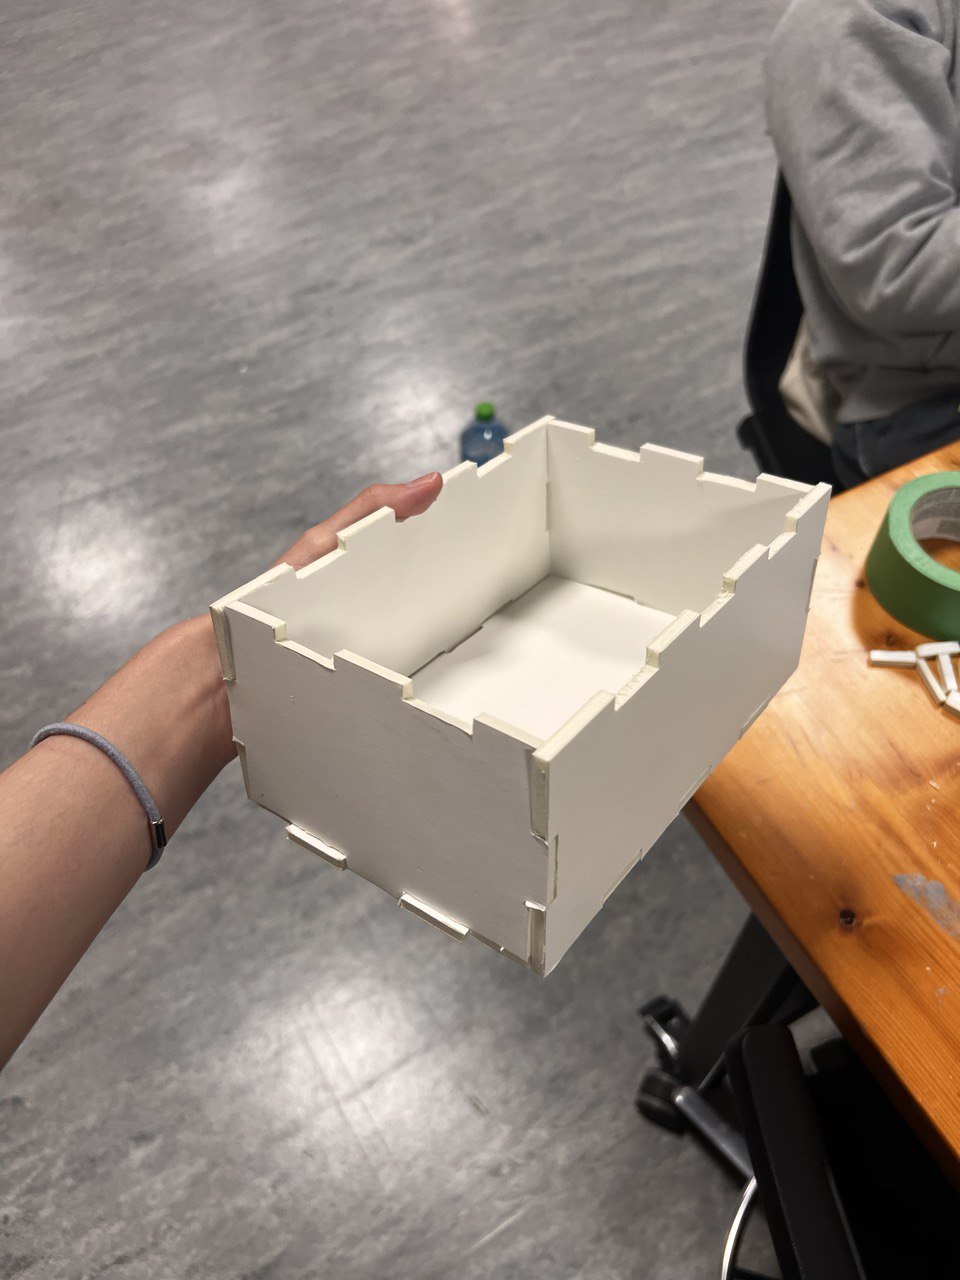
Another part of my project is a small white box that I built from foamboard, which holds two red buttons, 4 potentiometer knobs (yellow for the X axis and green for the Y axis), and labels for them. I have designed this box in the Maker Case. Then I used a ruler and box cutter to cut all the parts and assemble them. They fit nicely, but I additionally used some glue to be sure the box can hold the pressure from pressing buttons and rotating knobs. 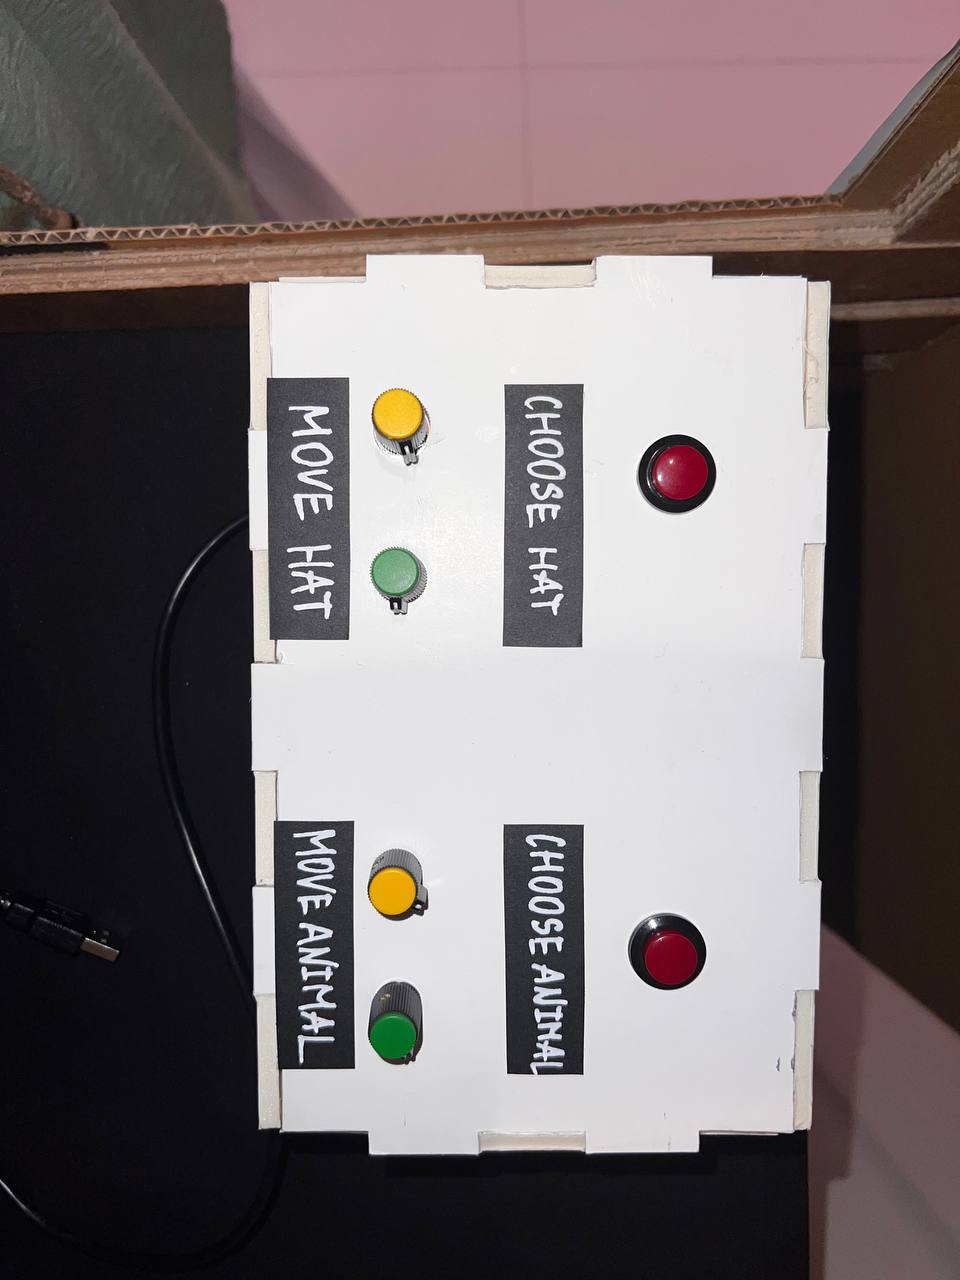

Process:
During the process of building these parts, the biggest challenge was cutting the elements. I did not have an opportunity to use a laser cutter, therefore I spent lots of time cutting and taping everything by hand.
P5 code
Most of the time was spent setting up the P5 sketch. What does it do? The P5 program starts with a display of an ID badge. I design these with primitive rectangular shapes and text. I wanted to include instructions on the screen. however, I did not want to overcomplicate the appearance of the sketch, so I decided to do it on an A3 paper. However, as I noticed not many were reading instructions presented behind the laptop, therefore, it would be better to present them on the screen.
On the P5, participants were presented with a live video which is the size of a snapshot they are about to make. As they press ENTER, the snapshot selfie replaces the live video. This was a very challenging part of the code. However, with some help, I was able to do this. Here is the portion of the code that I used as an example:
let capture;

function setup() {
  createCanvas(500, 500);
  capture = createCapture(VIDEO);
  capture.hide();
}

function draw() {
  let aspectRatio = capture.height/capture.width;

  image(capture, 0, 0, width, width * aspectRatio);
  filter(INVERT);
}
As soon as the photograph is taken, and if it is taken, the signal to Arduino is sent, so it can now send communication to P5. P5 then acts as a receiver and displays different images of hats and animals. Moreover, participants can type their name in the input box and submit it to be displayed on the screen. Finally, by clicking capture they can save their ID cards. This is all done with built-in boxes and buttons in P5.
It was hard to figure out the logic that I wanted my program to have. But finally, I managed to do a set of nested if statements which I am very proud of. This is a part of the code that allows you to go in an array of images and select their position.
 if (snapshot) {
    // Display a captured selfie in place of the live video
    // resizing to the same parameters as video

    image(snapshot, width / 2, height / 2 - 100, 220, 180);

    // A nested if statement:
    // if -1 then no hat image is selected, otherwise the statement is true.
    // If a hat image is selected, then display the image at the index selectedHat from the array of hatImages.
    // The image is placed at coordinates (hatX, hatY).

    if (selectedHat !== -1) {
      image(hatImages[selectedHat], hatX, hatY);
    }

    // A nested if statement:
    // if -1 then no animal image is selected, otherwise the statement is true.
    // If an animal image is selected, then display the image at the index selectedAnimal from the array of animalImages.
    // The image is placed at coordinates (animalX, animalY).

    if (selectedAnimal !== -1) {
      image(animalImages[selectedAnimal], animalX, animalY);
    }
  }
}
Arduino Code
Setting up the Arduino code was pretty easy. I used only the information we learned in class. The code consists of the declaration of 2 buttons, 4 potentiometers, and their states. The state of each button and the potentiometer is read and sent to p5. The part that I am proud of is mapping the potentiometer values to the desired range of the canvas. This was a very important part of the Arduino code because, with this, users were able to adjust the position of hat and animal images.
- When pressing the HAT button, which is a digital input on pin 2, participants will see an image of a hat. They can choose their hat by pressing the button again.
- Then participants will need to adjust the position of a hat using 2 potentiometers that also operate on 2 potentiometers, which are analog inputs and located on pins A0 and A1.
- They can also do the same actions to choose their favorite animal by pressing the ANIMAL button. They can also select an appropriate location using two potentiometers, which are analog inputs and located on pins A2 and A3.
const int buttonHatPin = 2;        // Pin for the hat button
const int buttonAnimalPin = 3;     // Pin for the animal button
const int potentiometerHatXPin = A0;  // Pin for the X-axis potentiometer for hat
const int potentiometerHatYPin = A1;  // Pin for the Y-axis potentiometer for hat
const int potentiometerAnimalXPin = A2;  // Pin for the X-axis potentiometer for animal
const int potentiometerAnimalYPin = A3;  // Pin for the Y-axis potentiometer for animal

int buttonHatState = 0;       // Current state of the hat button
int buttonAnimalState = 0;    // Current state of the animal button
int potentiometerHatXValue = 0;  // Current value of the X-axis potentiometer hat
int potentiometerHatYValue = 0;  // Current value of the Y-axis potentiometer hat
int potentiometerAnimalXValue = 0;  // Current value of the X-axis potentiometer animal

int potentiometerAnimalYValue = 0;  // Current value of the Y-axis potentiometer animal

void setup() {
  Serial.begin(9600);               // Initialize the serial communication
  pinMode(buttonHatPin, INPUT);     // Setting up the button pin as input
  pinMode(buttonAnimalPin, INPUT);  // Setting up the button pin as input


  // START THE HANDSHAKE TO SEND 6 VALUES FROM ARDUINO TO P5
  while (Serial.available() <= 0) {
    digitalWrite(LED_BUILTIN, HIGH);  // on/blink while waiting for serial data
    Serial.println("0,0,0,0,0,0");    // send a starting message
    delay(300);                       // wait 1/3 second
    digitalWrite(LED_BUILTIN, LOW);
    delay(50);
  }
}

void loop() {
  buttonHatState = digitalRead(buttonHatPin);           // Read the state of the hat button
  buttonAnimalState = digitalRead(buttonAnimalPin);     // Read the state of the animal button
  potentiometerHatXValue = analogRead(potentiometerHatXPin);  // Read the value of the X-axis potentiometer for hat image
  potentiometerHatYValue = analogRead(potentiometerHatYPin);  // Read the value of the Y-axis potentiometer for hat image
  potentiometerAnimalXValue = analogRead(potentiometerAnimalXPin);  // Read the value of the X-axis potentiometer for animal image
  potentiometerAnimalYValue = analogRead(potentiometerAnimalYPin);  // Read the value of the Y-axis potentiometer for animal image


  // Map the potentiometer values to the desired range
  int hatX = map(potentiometerHatXValue, 0, 1023, 0, 900);  // Map X-axis potentiometer value to the canvas width
  int hatY = map(potentiometerHatYValue, 0, 1023, 0, 900);  // Map Y-axis potentiometer value to the canvas height

  int animalX = map(potentiometerAnimalXValue, 0, 1023, 0, 900);  // Map X-axis potentiometer value to the canvas width
  int animalY = map(potentiometerAnimalYValue, 0, 1023, 0, 900);  // Map Y-axis potentiometer value to the canvas height

  // Send the button states and potentiometer values to p5.js
  Serial.print(buttonHatState);
  Serial.print(",");
  Serial.print(buttonAnimalState);
  Serial.print(",");
  Serial.print(hatX);
  Serial.print(",");
  Serial.print(hatY);
  Serial.print(",");
  Serial.print(animalX);
  Serial.print(",");
  Serial.println(animalY);

  delay(100);  // Delay for stability
}
Communication between Arduino and P5
FUTURE IMPROVEMENTS AND REFLECTIONS
Overall, I am very proud of the fact that I was able to do this project at all. Given the fact that I have never coded before, and I was not very successful in my midterm project, I am very happy that I was able to finish the final project and it was functioning nicely during the 2 hours of the IM showcase.
ACKNOWLEDGEMENT AND SOURCES
- Fox: https://pin.it/20JjlYq
- Zebra: https://pin.it/aEQCg0y
- Horse: https://pin.it/24mqc94
- Snail: https://pin.it/4wxrYgG
- Chicken: https://pin.it/17vdTTr
- Snake: https://pin.it/7q03SLi
- Elephant: https://pin.it/3MTOFdn
- Sheep: https://pin.it/42PWV3A
- Hedgehog: https://pin.it/2NW68K8
- Alpaca: https://pin.it/29VzjJ8
- Penguin: https://pin.it/6nq0Gnv
- Cat: https://lovepik.com/image-400441974/poor-little-black-cat-cell-phone-wallpaper.html
- Lion: https://www.everypixel.com/image-15458821448575658589
- https://banner2.cleanpng.com/20180206/suq/kisspng-witch-hat-witchcraft-clip-art-witches-hat-5a79691aeeea39.5466725215179062029786.jpg
- https://www.everypixel.com/image-15458821448575658589
- https://pin.it/3H1w2Sb
- https://pin.it/3aMdTj4
- https://pin.it/1KDsYLw
- https://pin.it/3Nl0AH9
- https://pin.it/2acHL0g
- https://www.pngkey.com/detail/u2w7i1y3r5i1w7o0_party-hat-photo-booth-prop/
- https://www.stickpng.com/img/holidays/christmas/christmas-santa-claus-hat-little-bell