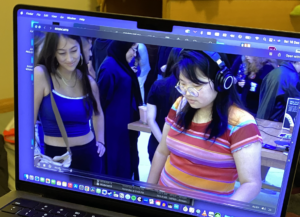
Mega trying out my project at the Showcase.
Concept:
My primary source of inspiration was Andrew Schneider’s ‘Stars’ exhibit, as it would not be an overstatement to say that it changed my life. His method of combining technology with poetry resonated with me because he allowed me to see that what I wanted to do was possible. I also want to acknowledge how much his approach of jumping into the project before sorting out the functional technicalities inspired me. Too often, I get discouraged from starting projects because of my insecurities surrounding my computational knowledge. Schneider reminded me to approach creating the way a child would–prioritizing fun over understanding. I didn’t have to be an expert to have a vision, or to create something great.
My second source of inspiration was my favorite installation at Manar Abu Dhabi, which detected your pulse in order to make a field of light glow with your heartbeat. Both this installation and Schneider’s used technology that evoked breathtaking, light-filled phenomena. But somehow, through either words or your heartbeat, they connected these surroundings back to you, indicating a kind of macro-micro spiritual connection. I wanted my project to accomplish an effect along these lines.
A more tangential inspiration was Tiktok. Most people my age consume a large amount of reels day to day, but every once in a while, a deeper, more meaningful video will appear from the usual, mind numbing congelation that is Tiktok and Instagram reels. I would find myself being surprisingly moved, and thought it was interesting how a lot of our generation must connect to inspiration or meditative clarity through these short-form videos. Because of the small scale of my project, I wanted to achieve an emotional effect closer to that of a meditative Tiktok–short, sweet, but profound enough to make you pause and feel something before resuming daily life.
The Process, Beginning With Arduino:
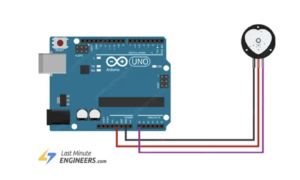
I started by tackling the Arduino part of the project. I followed a page linked here, which, thankfully, contained the exact instructions I needed. I followed the schematic they displayed, see below:
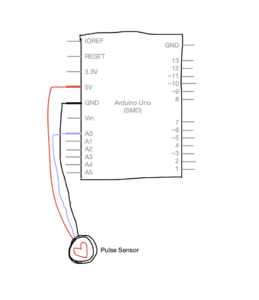
But I also drew my own schematic, here:
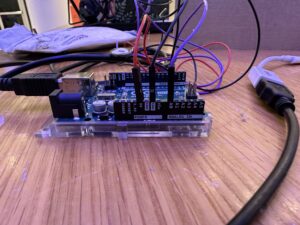
But here is an actual photograph, just to be sure:
The Arduino wiring couldn’t have been more simple. And frankly, the Arduino coding wasn’t that much more difficult either. I downloaded a PulseSensor library that I found on the page and made modifications to format the code for my own objectives. Here’s the code below:
void setup() {
  Serial.begin(9600);
  pinMode(LED_BUILTIN, OUTPUT);
  // Arduino sending data to component, the green light, to light up

  // start the handshake
  while (Serial.available() <= 0) {
    digitalWrite(LED_BUILTIN, HIGH);
    Serial.println("0,0");
    delay(300);
    digitalWrite(LED_BUILTIN, LOW);
    delay(50);
  }
}

void loop() {
  while (Serial.available()) {
    digitalWrite(LED_BUILTIN, HIGH);
    int left = Serial.parseInt();
    int right = Serial.parseInt();
 // Example of parsing, where Arduino breaks down left and right components so that when it sends the code to P5JS, P5JS interprets the left and right as one so that the code can be executed smoothly
    if (Serial.read() == '\n') {
      int pulseSensor = analogRead(A0);
// Mapping analog values to digital values so pulse sensor can be read and show up on P5JS
      int mappedPulseSensor = map(pulseSensor, 0, 1023, 0, 255);
      delay(5);
      Serial.print(mappedPulseSensor);
      Serial.print(',');
      Serial.println(mappedPulseSensor);
    }
  }
  digitalWrite(LED_BUILTIN, LOW);
}
The most important section worthy of mention is the mapping of the pulse sensor to a digital range. Apart from the voltage and ground wires, because the pulse sensor reads analog signals, I plugged the last wire into A0 and then mapped its 0 to 1023 range to 0 to 255, so that P5JS could read its detections and convert them into the pulses of the ellipse on the screen.
The Process, Continuing With P5JS:
The most challenging section of this project was the coding regarding P5JS. I started by coding a glowing ellipse and making sure that it pulsed with the readings of the sensor, linked here, but also shown below:
let rVal = 0;
let pulse = 255;
let left = 0;
let right = 0;


function setup() {
  createCanvas(600,600);
  textSize(18);
}

function draw() {
  // one value from Arduino controls the background's red color
  background(0);

  // the other value controls the text's transparency value
  fill(255, 255, 255);
  strokeWeight(0);

  if (!serialActive) {
    text("Press Space Bar to select Serial Port", 20, 30);
  } else {
    text("Connected", 20, 30);
  }


  drawingContext.shadowBlur = 80;
  drawingContext.shadowColor = color(255);
  ellipse(width/2, height/2, map(pulse, 0, 255, 10, 100))


}


function keyPressed() {
  if (key == " ") {
    // important to have in order to start the serial connection!!
    setUpSerial();
  }
}

// This function will be called by the web-serial library
// with each new *line* of data. The serial library reads
// the data until the newline and then gives it to us through
// this callback function
function readSerial(data) {
  ////////////////////////////////////
  //READ FROM ARDUINO HERE
  ////////////////////////////////////

  if (data != null) {
    // make sure there is actually a message
    // split the message
    let fromArduino = split(trim(data), ",");
    // if the right length, then proceed
    if (fromArduino.length == 2) {
      // only store values here
      // do everything with those values in the main draw loop
      rVal = fromArduino[0];
      pulse = fromArduino[1];
      print(pulse);
    }

    //////////////////////////////////
    //SEND TO ARDUINO HERE (handshake)
    //////////////////////////////////
    let sendToArduino = left + "," + right + "\n";
    writeSerial(sendToArduino);
  }
}
I coded the ellipse in the above section, making sure to map the diameter of the ellipse to the signals of the sensor, causing the pulsing effect. The section regarding how P5JS read the information from Arduino, but also sent information back to Arduino (see Handshake), so that Arduino and P5JS worked in tandem to make the ellipse pulse.
The Process, Continuing With P5JS:
After sorting out the ellipse pulsing, which was the main component, I began coding the stars and words I wanted to go along with the pulsing ellipse. I was really inspired by Pierre’s midterm project, because it gave that same all-encompassing starry night effect that Schneider’s installation did. I began by trying to make modifications to Pierre’s code, seen here, but I quickly realized after trying to insert the ellipse into it that coding within the constraints of WEBGL would be too difficult for me for the purposes of this project. While experimenting, I accidentally created this, which might be one of the coolest things I’ve ever made. I plan to pursue WEBGL on my own time, but I acknowledged that working within a two-dimensional realm for this project would suffice.
So, I began by coding the stars, linked here. I’ve attached the most difficult section of the code below:
function createStars() {
  for (let i = 0; i < 100; i++) {
    let x = random(width);
    let y = random(height);
    let radius = random(1, 3);
// I made the radius random within these constraints so the ellipses weren't all the same size, giving that 'starry night' effect and the illusion of distance, since I couldn't hack WEBGL
    let speedX = random(1, 3) * (random() > 0.5 ? 1 : -1); // So that the stars randomly go left and right
    let speedY = random(1, 3) * (random() > 0.5 ? 1 : -1); // So that the stars randomly go up or down
    stars.push({ x, y, radius, speedX, speedY });
  }
}

function moveStars() {
  for (let star of stars) {
    star.x += star.speedX;
    star.y += star.speedY;

    // Makes the stars stay within the constraints of the display screen
    if (star.x < 0 || star.x > width || star.y < 0 || star.y > height) {
      star.x = random(width);
      star.y = random(height);
    }
I wanted the size to be random within the constraints of 1 and 3 so that I could give the ellipses that ‘starry night’ effect. Making their radiuses vary also gave the illusion of depth and distance, since I couldn’t hack WEBGL. I made their movement as random as I could, making them go in different directions so I could add as much dynamism to the project as possible. The focus of the project, the fixed ellipse, is not that moving and stimulating, so I knew I needed to make the stars add that layer of movement to make sure the project would be engaging.
After coding the stars, I combined the code of that with the pulsing ellipse so that I could begin adding the words.
The Result!!!!
And this was the result! Linked here, but also seen below!
let rVal = 0;
let pulse = 255;
let left = 0;
let right = 0;
let stars = [];
let ellipseVisible = false;
let starsVisible = false;
let keyPressedOnce = false;
let showAdditionalText = false;
let mPressed = false;

function setup() {
  createCanvas(2000, 1300);
  textSize(34);
  createStars();
}

function draw() {
  background(0);
  fill(255);
  textAlign(CENTER, CENTER);


//Code that ensures that the instructions for the interaction, and the serial port appear before the ellipse and stars appear
  if (!serialActive) {
    text("PRESS SPACE TO SELECT SERIAL PORT", width / 2, height / 2);
  } else if (!ellipseVisible && !starsVisible) {
    text("LIGHTLY TOUCH YOUR FINGER TO THE PULSE SENSOR", width / 2, height / 2);
  } else if (ellipseVisible || starsVisible) {

//Responsible for making the ellipse glow
    drawingContext.shadowBlur = 80;
    drawingContext.shadowColor = color(255);
// Maps ellipse to arduino board, making it pulse
    let ellipseSize = map(pulse, 0, 255, 10, 300);
// Determines dimensions of ellipse
    ellipse(width / 2, height / 2, ellipseSize);
  }

// Once the ellipse and stars appear, the text taking you through the interaction appears too
  if (ellipseVisible && !starsVisible) {
    text("GIVE THE SENSOR TIME TO PICK UP ON YOUR PULSE\nBUT ONCE YOU SEE YOUR HEART BEATING, ACKNOWLEDGE\nTHAT THIS PULSE IS YOU, ALIVE AND BREATHING\n\nPress 'n'", width / 2, height - 180);
  } else if (starsVisible && !keyPressedOnce) {
// ensures that the stars appear and keep moving with each frame
    moveStars();
    displayStars();
    text("YOU ARE ALIVE AND BREATHING IN THE UNIVERSE\nLOOK AT AT ALL THE STARS\nBUT SOMETIMES, THE UNIVERSE SEEMS SO BIG\n IT'S EASY TO FEEL SMALL\n\nPress 'm'", width / 2, height - 180);
  } else if (starsVisible && !showAdditionalText) {
    moveStars();
    displayStars();
    text("BUT THE UNIVERSE IS ALIVE WITH YOU TOO\n\nPress 'v'", width / 2, height - 180);
  } else if (showAdditionalText) {
    moveStars();
    displayStars();
    text("TELL YOUR FRIENDS YOU LOVE THEM\nREMEMBER TO FEEL YOUR HEARTBEAT WHEN YOU\n LOOK UP AT THE SKY, BECAUSE SOMEDAY\nYOU'LL WISH YOU COULD'VE LIVED IT ALL OVER AGAIN", width / 2, height - 180);
  }
}

function createStars() {
// Defines speed and number of stars
  for (let i = 0; i < 100; i++) {
    let x = random(width);
    let y = random(height);
// Makes sure the stars are randomly different sizes within these constraints to give them that 'starry sky' effect
    let radius = random(1, 3);
// Defines random speed of stars within these constraints
    let speedX = random(1, 3) * (random() > 0.5 ? 1 : -1);
    let speedY = random(1, 3) * (random() > 0.5 ? 1 : -1);
    stars.push({ x, y, radius, speedX, speedY });
  }
}

function moveStars() {
  for (let star of stars) {
// After the speed of the stars has been defined, use moveStars to make sure they keep moving through the entire project
    star.x += star.speedX;
    star.y += star.speedY;

// Makes sure stars move within the display screen
    if (star.x < 0 || star.x > width || star.y < 0 || star.y > height) {
      star.x = random(width);
      star.y = random(height);
    }
  }
}

// Ensures the stars never disappear with each changing slide
function displayStars() {
  noStroke();
  for (let star of stars) {
// Makes stars glow after key 'm' is pressed
    if (mPressed) {
      fill(255, 255, 255, 180);
// Defines the size of the shadow that gives the stars their 'glow' effect
      ellipse(star.x, star.y, star.radius * 7);
      // for (i = 0; i < 100; i++) {
      //   ellipse(star.x, star.y, (star.radius * i * 1) / 20);
      // }
    }
    fill(255);
    ellipse(star.x, star.y, star.radius * 2, star.radius * 2);
  }
}

// My attempt to make the stars pulse, but I was okay with them simply glowing, so I never used updateStars but I kept it just in case
function updateStars() {
  let rValMapped = map(rVal, 0, 255, -0.1, 0.1);
  let pulseMapped = map(pulse, 0, 255, 1, 3);
  let pulsingFactor = map(pulse, 0, 255, 0.5, 2);

  for (let star of stars) {
    star.speedX += rValMapped;
    star.speedY += rValMapped;

    star.radius = pulseMapped * pulsingFactor;
  }
}


// These are all the instructions so that the project knows to move to the next slide when certain kets are pressed
function keyPressed() {
  if (key == " " && !serialActive) {
    setUpSerial();
  } else if (key == "n" && ellipseVisible && !starsVisible) {
    starsVisible = true;
  } else if (key == "m" && starsVisible && !mPressed) {
    keyPressedOnce = true;
    mPressed = true;
  } else if (key == "m" && starsVisible && mPressed) {
    mPressed = false;
  } else if (key == "v" && starsVisible && keyPressedOnce) {
    showAdditionalText = true;
//Code that allows one to exit our of and enter fullscreen by pressing the key 'f'
  } else if (key == "f") {
    if (!fullscreen()) {
      fullscreen(true);
    } else {
      fullscreen(false);
    }
  }
}

// How P5JS knows to read from Arduino in order to give the ellipse the pulse
function readSerial(data) {
  if (data != null) {
    let fromArduino = split(trim(data), ",");
    if (fromArduino.length == 2) {
      rVal = fromArduino[0];
//The pulse from Arduino that P5JS was able to read to make the ellipse pulse
      pulse = fromArduino[1];
    }

    let sendToArduino = left + "," + right + "\n";
    writeSerial(sendToArduino);
// If a pulse greater than 0 is detected from the sensor and the ellipse is visible, then the pulsing begins
    if (pulse > 0 && !ellipseVisible) {
      ellipseVisible = true;
    }
  }
}


// Ensures stars and ellipse stay visible when mouse is pressed
function mousePressed() {
  if (!starsVisible && ellipseVisible) {
    keyPressedOnce = true;
    starsVisible = true;
  }
}
I commented everything, but the most difficult part of the code was definitely this section:
// Once the ellipse and stars appear, the text taking you through the interaction appears too
  if (ellipseVisible && !starsVisible) {
    text("GIVE THE SENSOR TIME TO PICK UP ON YOUR PULSE\nBUT ONCE YOU SEE YOUR HEART BEATING, ACKNOWLEDGE\nTHAT THIS PULSE IS YOU, ALIVE AND BREATHING\n\nPress 'n'", width / 2, height - 180);
  } else if (starsVisible && !keyPressedOnce) {
// ensures that the stars appear and keep moving with each frame
    moveStars();
    displayStars();
    text("YOU ARE ALIVE AND BREATHING IN THE UNIVERSE\nLOOK AT AT ALL THE STARS\nBUT SOMETIMES, THE UNIVERSE SEEMS SO BIG\n IT'S EASY TO FEEL SMALL\n\nPress 'm'", width / 2, height - 180);
  } else if (starsVisible && !showAdditionalText) {
    moveStars();
    displayStars();
    text("BUT THE UNIVERSE IS ALIVE WITH YOU TOO\n\nPress 'v'", width / 2, height - 180);
  } else if (showAdditionalText) {
    moveStars();
    displayStars();
    text("TELL YOUR FRIENDS YOU LOVE THEM\nREMEMBER TO FEEL YOUR HEARTBEAT WHEN YOU\n LOOK UP AT THE SKY, BECAUSE SOMEDAY\nYOU'LL WISH YOU COULD'VE LIVED IT ALL OVER AGAIN", width / 2, height - 180);
  }
Making the words appear in the order I wanted, without the ellipse or stars disappearing was difficult and something I had to work at for a while. I solved this by coding successive “if, else” statements and establishing this:
let starsVisible = false;
let keyPressedOnce = false;
let showAdditionalText = false;
at the beginning of the code. My friend Zion helped me extensively through this part of the coding, so thank you Zion.
After that, I just had to make the small adjustments of making the text the size I wanted, adjusting the stars to full screen, and the project was good to go. I didn’t know how to upload the song I wanted, “Stone in Focus” by Aphex Twin, as a file to P5JS, so I just played it in a Youtube tab while the project was going on.
I also made the stars glow with the ellipse when the line “BUT THE UNIVERSE IS ALIVE WITH YOU TOO” to give a sense of connection with the universe. The stars got triggered to glow after pressing the ‘m’ key.
Showcase Day:
On the day of the showcase, I constructed my setup, seen here: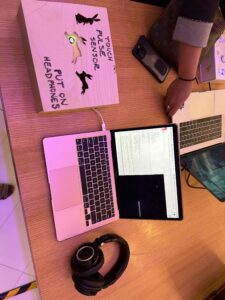
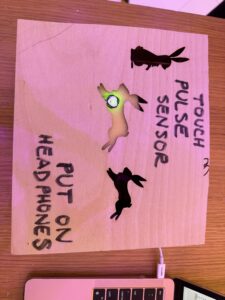
You can see the headphones that people put on to hear the music, but I want to bring special attention to the box:
One of my biggest concerns developing the project was the unreliability of the pulse sensor itself. It would reliably pick up on a pulse but also pick up on any extra movement of your hand, making the pulse look wonky. It’s because the pulse sensor works by shining a light on your finger, and reading your pulse by the way it affects the light. So if you move your finger too much, it disrupts the pulse sensors ability to pick up on your heartbeat. At Manar Abu Dhabi, even that pulse sensor had to wait up to a few minutes before being able to get a stable reading. So, creating better pulse sensors for future interactive installations is a concern. But in order to counteract this problem, I constructed a box that the audience member could naturally rest their hands on so that the pulse sensor could pick up a more stable reading. It also looked more approachable and finished as an interactive installation.
One concern I left with though, from a design point of view, was that people tended to put their their right hand on the sensor, causing them to have to reach over with their left hand to press the keys to go through the project. I would want to make my project more convenient and interactive by fixing this issue.
Takeaways:
In the end, I am so proud of what I made, because I was able to capture an, albeit small, portion of the feeling that I experienced when at Schneider’s installation and Manar Abu Dhabi. Here are some people interacting with my project:
What they’re going through, is seeing their pulse on the screen and then reading successive phrases that remind them of their connection with the universe, giving them that same macro-micro spiritual connection that Andrew Schneider’s installation gave me. One of my favorite moments was when Linda, an audience member, saw her pulse on the screen and gasped, “It’s me!” That’s the exact effect I wanted to provide.
At the beginning of this post, I posted a picture of Mega and me. After she had completed the project, she turned to me and said, “Elora, I love you.” Even though the effect was small, I had emotionally achieved what I set out to do with this project, and I am so grateful.

