Exercise 1:
make something that uses only one sensor on Arduino and makes the ellipse in p5 move on the horizontal axis, in the middle of the screen, and nothing on Arduino is controlled by p5
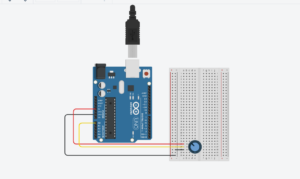
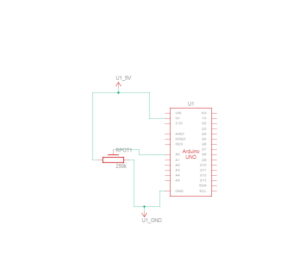
For Arduino, I used a potentiometer to change the position of the ellipse in the p5js sketch. The ellipse starts from the left of the canvas, and it moves horizontally as the values from the potentiometer increase. The values from the potentiometer are mapped to the x coordinates of the ellipse, moving it across the horizontal axis in the middle of the screen.
//// Arduino Code


//void setup() {
  // put your setup code here, to run once:
  Serial.begin(9600);

//}

//void loop() {
  // put your main code here, to run repeatedly:
  int sensor = analogRead(A0);
  delay(5);
  Serial.println(sensor);

//}


let left = 0;

function setup() {
  createCanvas(400, 400);
}

function draw() {
  background(220,110,250);
  fill("green");
  ellipse(left, 50, 50, 50);
}

function keyPressed() {
  if (key == " ") {
    // important to have in order to start the serial connection!!
    setUpSerial();
  }
}

function readSerial(data) {
  left = map(data, 0, 1023, 0, 400);
}
Exercise 2:
make something that controls the LED brightness from p5
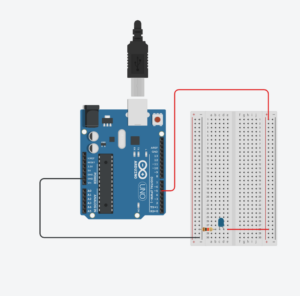
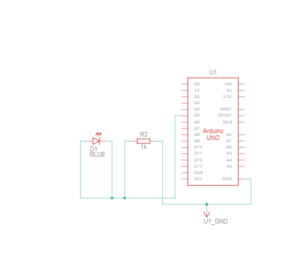
In this p5.js sketch, moving the mouse horizontally controls the brightness of an LED, represented by the variable `mybrightness`. The canvas background changes in shades of blue with the mouse’s x-position. Pressing the space bar initiates a serial connection to the Arduino, enabling real-time communication. The `readSerial` function reads data from the Arduino, and the current brightness value is sent back by appending a new line character. This simple interaction allows the LED brightness to respond in real time to the horizontal mouse movement on the canvas.
Arduino Code:
// - 5 - LED
int ledpin=5;//pin for led to be used

void setup() {
  // Start serial communication so we can send data
  // over the USB connection to our p5js sketch
  Serial.begin(9600);

  pinMode(5,OUTPUT);//setting mode as output
  pinMode(LED_BUILTIN, OUTPUT);
}

void loop() {
  // wait for data from p5 before doing something
  while (Serial.available()) {//while we read from serial
    digitalWrite(LED_BUILTIN, HIGH); // led on while receiving data
    int brightness=Serial.parseInt();//the brightness is gotten from data from p5
    if (Serial.read() == '\n') {//if we read \n,
      analogWrite(ledpin, brightness);//turn on the led based on the intensity gotten from p5
      Serial.println();//send \n
    }
  }
  digitalWrite(LED_BUILTIN, LOW);//if it is not reading, turn of checker light
}
P5 js Code:
let mybrightness=0;
function setup() {
  createCanvas(255,255);//make the canvas size 255 by 255
  textSize(18);//set text size to 18
}

function draw() {

  background(0,0,mouseX);//background be shades of blue
  fill(255);//text be white

  if (!serialActive) {
    text("Press Space Bar to select Serial Port", 20, 30);
  } else {
    text("Connected", 20, 30);

  }
  mybrightness=mouseX;//equate the mouseX to mybrightness
}

function keyPressed() {
  if (key == " ") {
    // important to have in order to start the serial connection!!
    setUpSerial();//when space is pressed connect to arduino
  }
}

// This function will be called by the web-serial library
// with each new line of data. The serial library reads
// the data until the newline and then gives it to us through
// this callback function

function readSerial(data) {
    let sendToArduino = mybrightness+'\n';
    writeSerial(sendToArduino);//send mybrightness to arduino
}
Exercise 3:
take the gravity wind example and make it so every time the ball bounces one led lights up and then turns off, and you can control the wind from one analog sensor
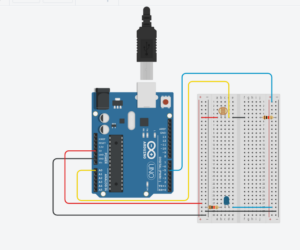
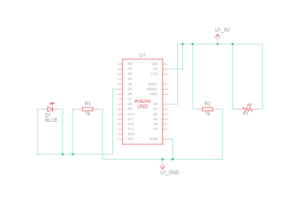
The p5.js sketch features a blue ball that bounces on the canvas, and a corresponding LED turns on whenever the ball hits the floor. The wind effect on the ball’s movement is controlled by an analog sensor connected to the Arduino. When a ‘d’ key is pressed, a serial connection is established between p5.js and the Arduino. Pressing the space bar creates a new bouncing ball with a random mass and resets its position. The Arduino reads the wind intensity from an analog light sensor, and the LED is turned on or off based on the received brightness value from p5.js. The wind strength is then sent back to p5.js, completing the real-time interaction between the bouncing ball simulation and the Arduino-controlled LED.
Arduino Code:
int LedPin = 5;//pin to display light

void setup() {
  // Start serial communication so we can send data
  // over the USB connection to our p5js sketch
  Serial.begin(9600);

  // We'll use the builtin LED as a status output.
  // We can't use the serial monitor since the serial connection is
  // used to communicate to p5js and only one application on the computer
  // can use a serial port at once.
  pinMode(LED_BUILTIN, OUTPUT);

  // Outputs on these pins
  pinMode(LedPin, OUTPUT);//set pin as output

}

void loop() {
  // wait for data from p5 before doing something
  while (Serial.available()) {//while we read from serial
    digitalWrite(LED_BUILTIN, HIGH); // led on while receiving data for checker
    int bright = Serial.parseInt();//read data from p5 and store in bright
    if (Serial.read() == '\n') {//if the serial read is \n,
      digitalWrite(LedPin, bright);//turn on or off led depending on the value of bright
      int windsens=analogRead(A0);//read the windspeed from lightsensor
      delay(5);//wait small to get reading
      Serial.println(windsens);//send windspeed to p5
    }
  }
  digitalWrite(LED_BUILTIN, LOW);//if not active turn checker led off
}
P5 js Code:
let velocity;
let gravity;
let position;
let acceleration;
let wind;
let drag = 0.99;
let mass = 50;
let led=0;//variable controlling the led

function setup() {
  createCanvas(640, 360);
  fill(0,0,255);//ball to be blue
  position = createVector(width/2, 0);
  velocity = createVector(0,0);
  acceleration = createVector(0,0);
  gravity = createVector(0, 0.5*mass);
  wind = createVector(0,0);
}

function draw() {
  background(0,50);//background black with transperacy 50
  applyForce(wind);
  applyForce(gravity);
  velocity.add(acceleration);
  velocity.mult(drag);
  position.add(velocity);
  acceleration.mult(0);
  ellipse(position.x,position.y,mass,mass);
  if (position.y > height-mass/2) {
      velocity.y *= -0.9;  // A little dampening when hitting the bottom
      position.y = height-mass/2;
    }
  if(position.y==height-mass/2){led=1;}//if the ball touches the floor, turn on led
  else{led=0;}//otherwise turn led off
}

function applyForce(force){
  // Newton's 2nd law: F = M * A
  // or A = F / M
  let f = p5.Vector.div(force, mass);
  acceleration.add(f);
}

function keyPressed() {
  if (key == "d") {//when d is pressed create connection
    // important to have in order to start the serial connection!!
    setUpSerial();
  }
  if (key==' '){//when space is pressed create new ball and call bounce effect
    mass=random(15,80);
    position.y=-mass;
    velocity.mult(0);
  }
}
function readSerial(data) {
    wind.x=map(int(data),0,1023,-2,2);//map the value gotten from the arduino to wind.x
    let sendToArduino = led+'\n';
    writeSerial(sendToArduino);//send the value of led to the srduino
}

