
EXERCISE 01: ARDUINO TO P5 COMMUNICATION
Make something that uses only one sensor on Arduino and makes the ellipse in p5 move on the horizontal axis, in the middle of the screen, and nothing on Arduino is controlled by p5.
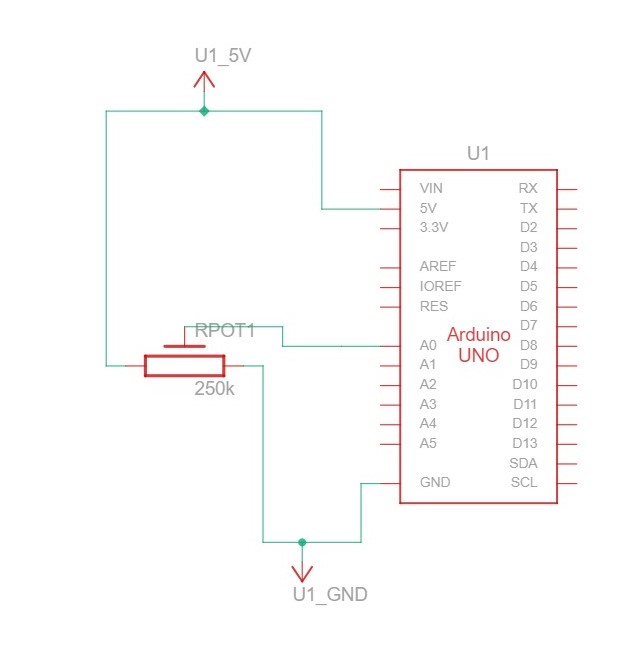
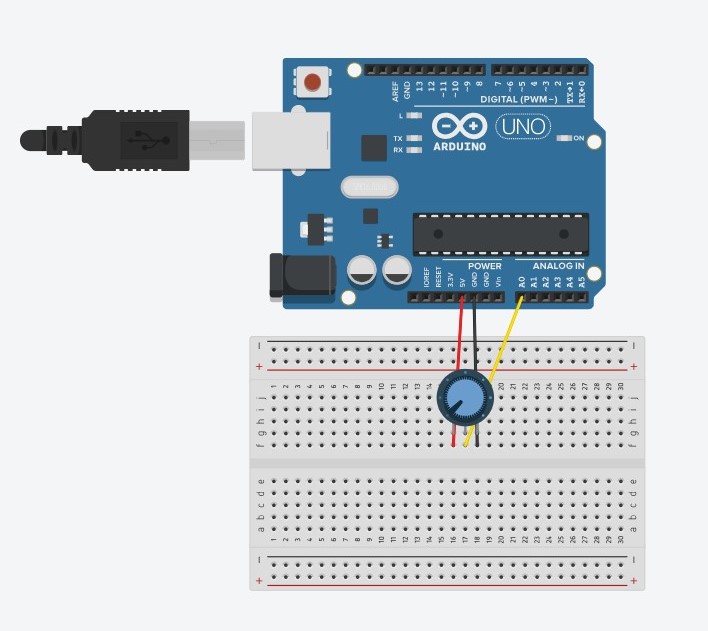
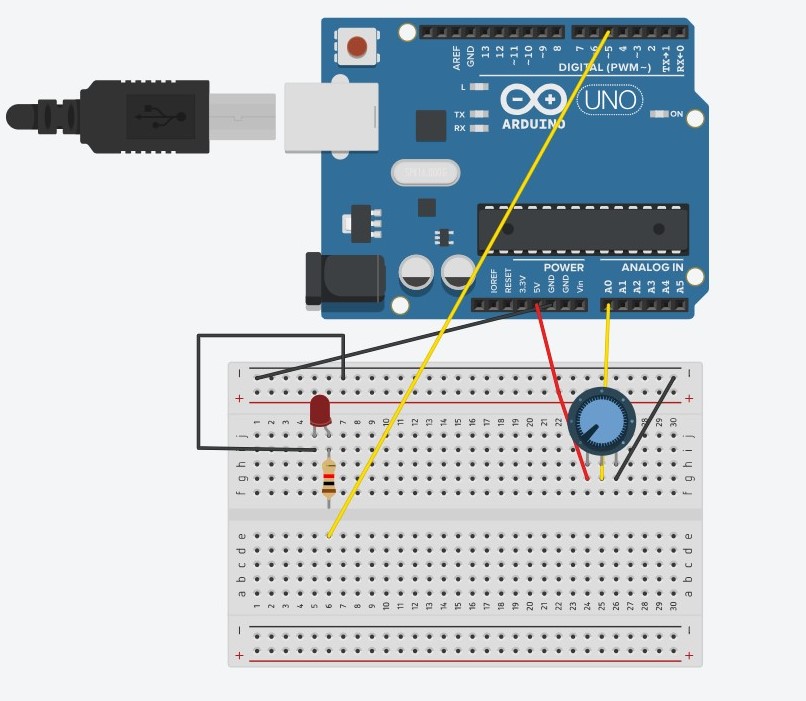
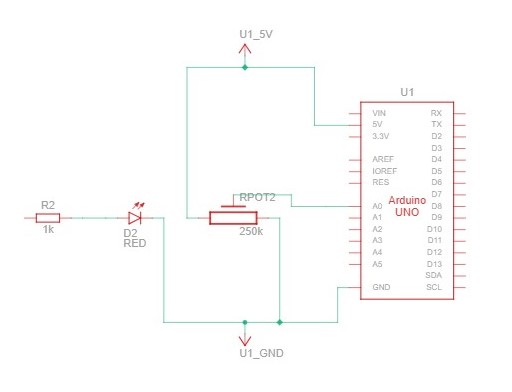
SCHEMATIC AND MODELLING:
P5 CODE:
let circleX = 0;
function setup() {
  createCanvas(640, 480);
  textSize(18);
}

function draw() {
  background(255);
  stroke(0);

  fill("pink");
  circle(map(circleX,0, 1023, 0, width), height/2, 50);

  if (!serialActive) {
    text("Press Space Bar to select Serial Port", 20, 30);
  } else {
    text("Connected", 20, 30);
  }

}

function keyPressed() {
  if (key == " ") {
    // important to have in order to start the serial connection!!
    setUpSerial();
  }
}

// This function will be called by the web-serial library
// with each new *line* of data. The serial library reads
// the data until the newline and then gives it to us through
// this callback function
function readSerial(data) {
  ////////////////////////////////////
  //READ FROM ARDUINO HERE
  ////////////////////////////////////

  if (data != null) {
    circleX = int(trim(data));

  }
  print(circleX);
}
ARDUINO CODE:
void setup() {
  // Start serial communication so we can send data
  // over the USB connection to our p5js sketch
  Serial.begin(9600);

  // We'll use the builtin LED as a status output.
  // We can't use the serial monitor since the serial connection is
  // used to communicate to p5js and only one application on the computer
  // can use a serial port at once.
  pinMode(LED_BUILTIN, OUTPUT);

}

void loop() {

  int sensor = analogRead(A0);
  delay(5);
  digitalWrite(LED_BUILTIN, HIGH);
  Serial.println(sensor);

  digitalWrite(LED_BUILTIN,LOW);
}
PROTOTYPE:
EXERCISE 02: P5 TO ARDUINO COMMUNICATION
Make something that controls the LED brightness from p5.
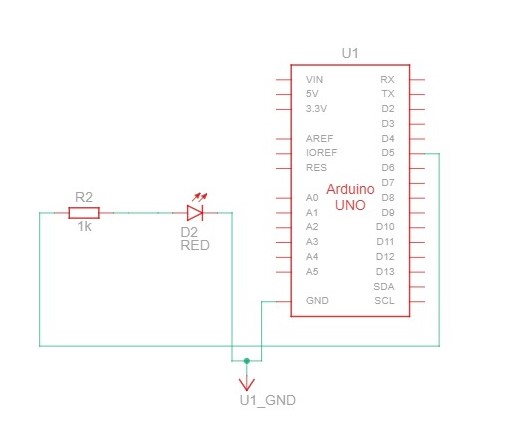
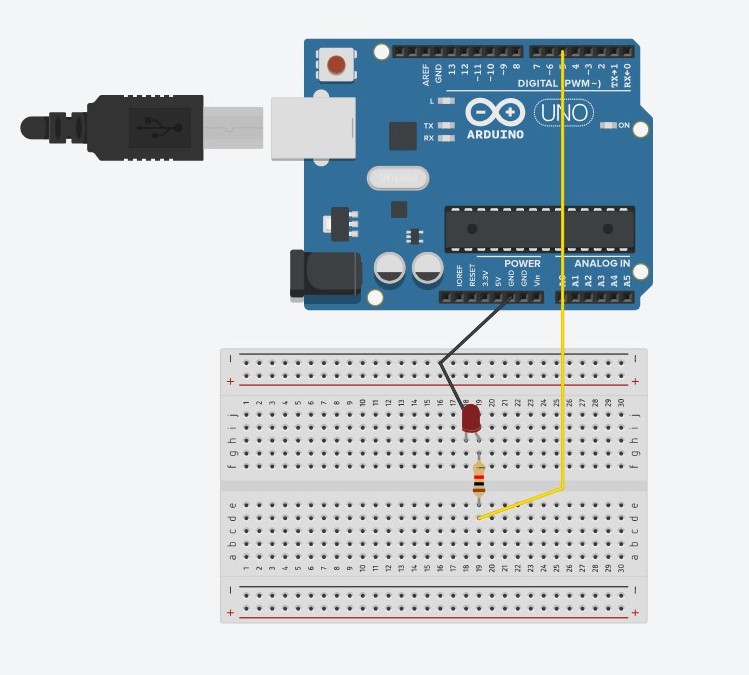
SCHEMATIC AND MODELLING:
P5 CODE:
let value = 0;

function setup() {
  createCanvas(640, 480);
  textSize(18);
}

function draw() {
  background(0);
  stroke(255);
  fill(255);

  if (!serialActive) {
    text("Press Space Bar to select Serial Port", 20, 30);
  } else {
    text("Connected", 20, 30);
  }
}

function keyPressed() {
  if (key == " ") {
    // important to have in order to start the serial connection!!
    setUpSerial();
  }
}

// This function will be called by the web-serial library
// with each new *line* of data. The serial library reads
// the data until the newline and then gives it to us through
// this callback function
function readSerial(data) {
  if (data != null) {
    //////////////////////////////////
  //SEND TO ARDUINO HERE (handshake)
  //////////////////////////////////
    value = int(map(mouseX, 0, width, 0, 255));
  let sendToArduino = value + "\n";
  writeSerial(sendToArduino);
  print(value);


  }


}
ARDUINO CODE:
int ledPin = 5;

void setup() {
  // Start serial communication so we can send data
  // over the USB connection to our p5js sketch
  Serial.begin(9600);

  // We'll use the builtin LED as a status output.
  // We can't use the serial monitor since the serial connection is
  // used to communicate to p5js and only one application on the computer
  // can use a serial port at once.
  pinMode(LED_BUILTIN, OUTPUT);
  pinMode(ledPin, OUTPUT);

  digitalWrite(ledPin, HIGH);
  delay(1000);
  digitalWrite(ledPin, LOW);

  // start the handshake
  while (Serial.available() <= 0) {
    digitalWrite(LED_BUILTIN, HIGH); // on/blink while waiting for serial data
    Serial.println("0,0"); // send a starting message
    delay(300);            // wait 1/3 second
    digitalWrite(LED_BUILTIN, LOW);
    delay(50);
  }

}

void loop() {


  // wait for data from p5 before doing something
  while (Serial.available()) {
    Serial.println("0,0");
    digitalWrite(LED_BUILTIN, HIGH); // led on while receiving data

    int value = Serial.parseInt();

    if (Serial.read() == '\n') {
      analogWrite(ledPin, value);
    }
  }
  digitalWrite(LED_BUILTIN, LOW);


}
PROTOTYPE:
EXERCISE 03: BI-DIRECTIONAL COMMUNICATION
Take the gravity wind example and make it so: every time the ball bounces one led lights up and then turns off, and you can control the wind from one analog sensor.
SCHEMATIC AND MODELLING:
P5 CODE:
let velocity;
let gravity;
let position;
let acceleration;
let wind;
let value = 0;
let drag = 1;
let mass = 50;

function setup() {
  createCanvas(640, 360);
  noFill();
  position = createVector(width/2, 0);
  velocity = createVector(0,0);
  acceleration = createVector(0,0);
  gravity = createVector(0, 0.5*mass);
  wind = createVector(0,0);
}

function draw() {
  background(255);
  stroke(0);
  fill(0);
  if (!serialActive) {
    text("Press Space Bar to select Serial Port", 20, 30);
  } else {
    text("Connected", 20, 30);

    applyForce(wind);
    applyForce(gravity);
    velocity.add(acceleration);
    velocity.mult(drag);
    position.add(velocity);
    acceleration.mult(0);
    ellipse(position.x,position.y,mass,mass);

    if (position.y > height-mass/2) {
        velocity.y *= -0.9;  // A little dampening when hitting the bottom
        position.y = height-mass/2;
        value = 1;
      }
    else {
      value = 0;
    }

  }


}

function applyForce(force){
  // Newton's 2nd law: F = M * A
  // or A = F / M
  let f = p5.Vector.div(force, mass);
  acceleration.add(f);
}

function keyPressed(){

  if (key==UP_ARROW){
    mass=random(15,80);
    position.y=-mass;
    velocity.mult(0);
  }
  if (key == " ") {
    // important to have in order to start the serial connection!!
    setUpSerial();
  }
}


// This function will be called by the web-serial library
// with each new *line* of data. The serial library reads
// the data until the newline and then gives it to us through
// this callback function
function readSerial(data) {
  ////////////////////////////////////
  //READ FROM ARDUINO HERE
  ////////////////////////////////////

  if (data != null) {

    if (int(trim(data)) >= 511) {
      wind.x = 3;
    }
    else {
      wind.x = -3;
    }

    //////////////////////////////////
    //SEND TO ARDUINO HERE (handshake)
    //////////////////////////////////
    let sendToArduino = value + "\n";
    writeSerial(sendToArduino);
  }
}
ARDUINO CODE:
int ledPin = 5;

void setup() {
  // Start serial communication so we can send data
  // over the USB connection to our p5js sketch
  Serial.begin(9600);

  // We'll use the builtin LED as a status output.
  // We can't use the serial monitor since the serial connection is
  // used to communicate to p5js and only one application on the computer
  // can use a serial port at once.
  pinMode(LED_BUILTIN, OUTPUT);
  pinMode(ledPin, OUTPUT);

  // start the handshake
  while (Serial.available() <= 0) {
    digitalWrite(LED_BUILTIN, HIGH); // on/blink while waiting for serial data
    Serial.println("0"); // send a starting message
    delay(300);            // wait 1/3 second
    digitalWrite(LED_BUILTIN, LOW);
    delay(50);
  }

}

void loop() {


  digitalWrite(LED_BUILTIN, LOW);

  // wait for data from p5 before doing something
  while (Serial.available()) {
    digitalWrite(LED_BUILTIN, HIGH); // led on while receiving data

    int value = Serial.parseInt();

    if (Serial.read() == '\n') {
      if (value == 1) {
        digitalWrite(ledPin, HIGH);
      }
      else {
        digitalWrite(ledPin, LOW);
      }

      int sensor = analogRead(A0);
      delay(5);
      Serial.println(sensor);
    }
  }
  digitalWrite(LED_BUILTIN, LOW);


}
PROTOTYPE: