
Midterm Project Link: https://editor.p5js.org/jiho.choi/full/Iz4oCo4Lf
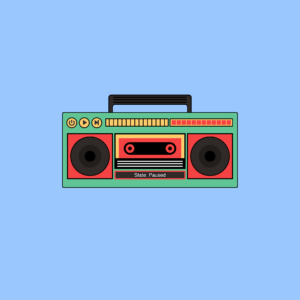
I wanted to make my Midterm project personal and the first thing that naturally popped into my mind was music. Music is such a big part of my life and I can confidently say that I probably will never be seen anywhere without my earphones. The original plan was to incorporate illustrations to use as music backgrounds, but I was experiencing an art block after my comlab webcomic assignment. I physically couldn’t get myself to draw again so instead I decided to code and make use of my knowledge thus far. Essentially, different songs would show different illustrated backgrounds that corresponded to my most profoundly remaining memory of that music. Whilst the backgrounds came off a bit cliche, it was still an honest memory so I was somewhat fine with it. Because my past assignments lacked a clear focus on aesthetic appearance I tried my best to achieve that particular quality. I thought a vintage radio graphic would look more visually pleasing and doable to code so that was the path I stuck with.
The way it works:
1) press play ==> music plays.
2) pause music ==> background changes to default.
3) skip button + play button ==> plays next song.
This process wasn’t at all a fond memory but instead was incredibly taxing, stressful and frustrating. Up until coding the vintage radio, things were going very smoothly and I was having so much fun… but once it got to coding the backgrounds, there was rapidly building friction. I was unfortunate enough to experience first-hand the importance of manually saving your code every 10secs. I had spent 6 hours coding my bg#1 and I thought it was autosaving as I went. Clearly I was wrong and the webpage malfunctioned and gave me the: “something went wrong” page…
But overall I’m proud that I was able to pull off what I would consider in my books a complex piece. Again, I used assignment#3 as a a guiding reference to creating my own version of this piece.
Parts I am most proud of:
function mouseClicked() {
  let x = 337; // x-coordinate of the second ellipse
  let x2 = 387; // x-coordinate of the third ellipse

  if (mouseX >= x - 20 && mouseX <= x + 20 && mouseY >= 471 && mouseY <= 511) {
    if (song.isPlaying()) {
      song.pause();
    } else {
      song.play();
    }
  } else if (mouseX >= x2 - 20 && mouseX <= x2 + 20 && mouseY >= 471 && mouseY <= 511) {
    if (playButtonCount === 0 || playButtonCount === 2) {
      currentSongIndex = (currentSongIndex + 1) % songs.length;
      song.stop();
      song = loadSound(songs[currentSongIndex]);
      if (playButtonCount === 0) {
        song.play();
        playState = 1;
        playButtonCount = 1;
      }
    }
  }
}
1) mouse click function to control when the music plays and pauses and skips to the next song. This I really had to sit down and think and for some parts, especially those requiring maths (marking down the boundaries of buttons) it was more trial and error and once again hardcore searching on google.
class Wave {
  constructor(xIncrement, yIncrement, xoff, yoff, color) {
    this.xoff = xoff;
    this.yoff = yoff;
    this.xIncrement = xIncrement;
    this.yIncrement = yIncrement;
    this.color = color;
  }
  displayWave(yOffset) {
    fill(this.color);
    stroke(255);
    strokeWeight(3);
    beginShape(); //creating wave shapes in variation
    for (let x = 0; x <= width; x += 3) {
      let y = map(noise(this.xoff, this.yoff), 0, 1, 600 + yOffset, 700 + yOffset); //determining minimum/ maximum height of waves
      vertex(x, y);
      this.xoff += this.xIncrement; //increments this.xoff by this.xIncrement
    }
    this.yoff += this.yIncrement; //increments this.yoff by this.yIncrement
    vertex(width, height + yOffset);
    vertex(0, height + yOffset);
    endShape(CLOSE); //
  }
}
2) I had been googling different ways people had used p5.js to embody beach art and I spontaneously came across the noise function used by someone with really high qualifications. Of course the code was way too complicated for me to understand fully let alone use so I continued browsing but found another more helpful link, by p5.js. I used the code provided and tweaked around with numbers to understand what each line of code did and what role of the numbers were, since there were a lot… Similar to the one above this also required a lot, A LOT of trial and error, especially with creating multiple wave layers(?) which took up half my day.
IMPROVEMENTS: There is a lot I’d like to mention for improvements…
1) firstly, I didn’t realise the space in the radio handle was opaque. I was on a race against time and so couldn’t afford to really observe the drawing. This is especially such a shame since it really cuts back on the aesthetics.
2) Another thing I’d like to mention is the fact that the details of the background aren’t quite clear because the radio size is too big. Of course I already went through a prior episode and so didn’t think it wise to change all the numbers relating to class: radio. Instead I opted to make the canvas bigger, originally it had been 800, 800. (prior episode==>) This too was an incredibly onerous process because every positioning detail relies on coordinates. So I had to go through each line of code to adjust the numbers, of course I’d like to believe that there is a much better solution but again, with my current knowledge on coding, this was the best I could come up with.
3) the requirement for this project was that a loop is required, a way to reset the experience. That was what my on/ off button was for. My plan was that when the on/off button was pressed when music was playing, music would pause. But if button was pressed when no music was playing, song would restart and automatically play. This for the life of me would not work. Somehow I got the last 2 buttons to work yet the first one was refusing to cooperate. If I tried to implement some code targeting the first button, then the interaction for the last button would not work. Of course I still have not been able to conquer this specific part of the code…
4) music backgrounds… This gave me such a headache I spent almost 5-6 hours trying to look for a solution but came up with zilch. When I tried to integrate the codes from e.g., sunset.js to sketch.js (my main sketch file), for some reason which to this day I still don’t know, the positioning, stroke weight and order of shapes went haywire. I really cannot think of a reason why since the backgrounds were created on a same-sized canvas. Because I couldn’t present a blank, half finished project, I had to compromise by uploading the png form of these javascript files, which didn’t look too bad. It just looked a bit dull since everything was static.
5) another thing relating to background, I felt like there was a big quality difference in bg#1 and bg#2 which still really irks me and leaves me feeling dubious about the quality of my project. For next time, I’d like to really delve into and experiment with the cool p5.js effects before contemplating a design because that’s how I discovered the noise function. Through serendipitous search!
6) finally along the way a part of my code ceased to work: click radio = radio change colour. There was too much to keep track of and if one thing worked, another didn’t, so I don’t even know at what point it stopped working. I ran out of time at the end and I am planning to go through to try and solve the issue.
Links and images to separate relating javascript files:
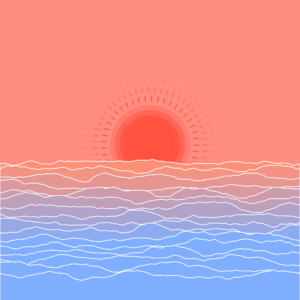
background#1 – “rises_the_moon”:
https://editor.p5js.org/jiho.choi/full/G8s6Rfgxn
background#2 “in_my_room”:
https://editor.p5js.org/jiho.choi/full/koRh51OvD