Assignment 1 – AakifR

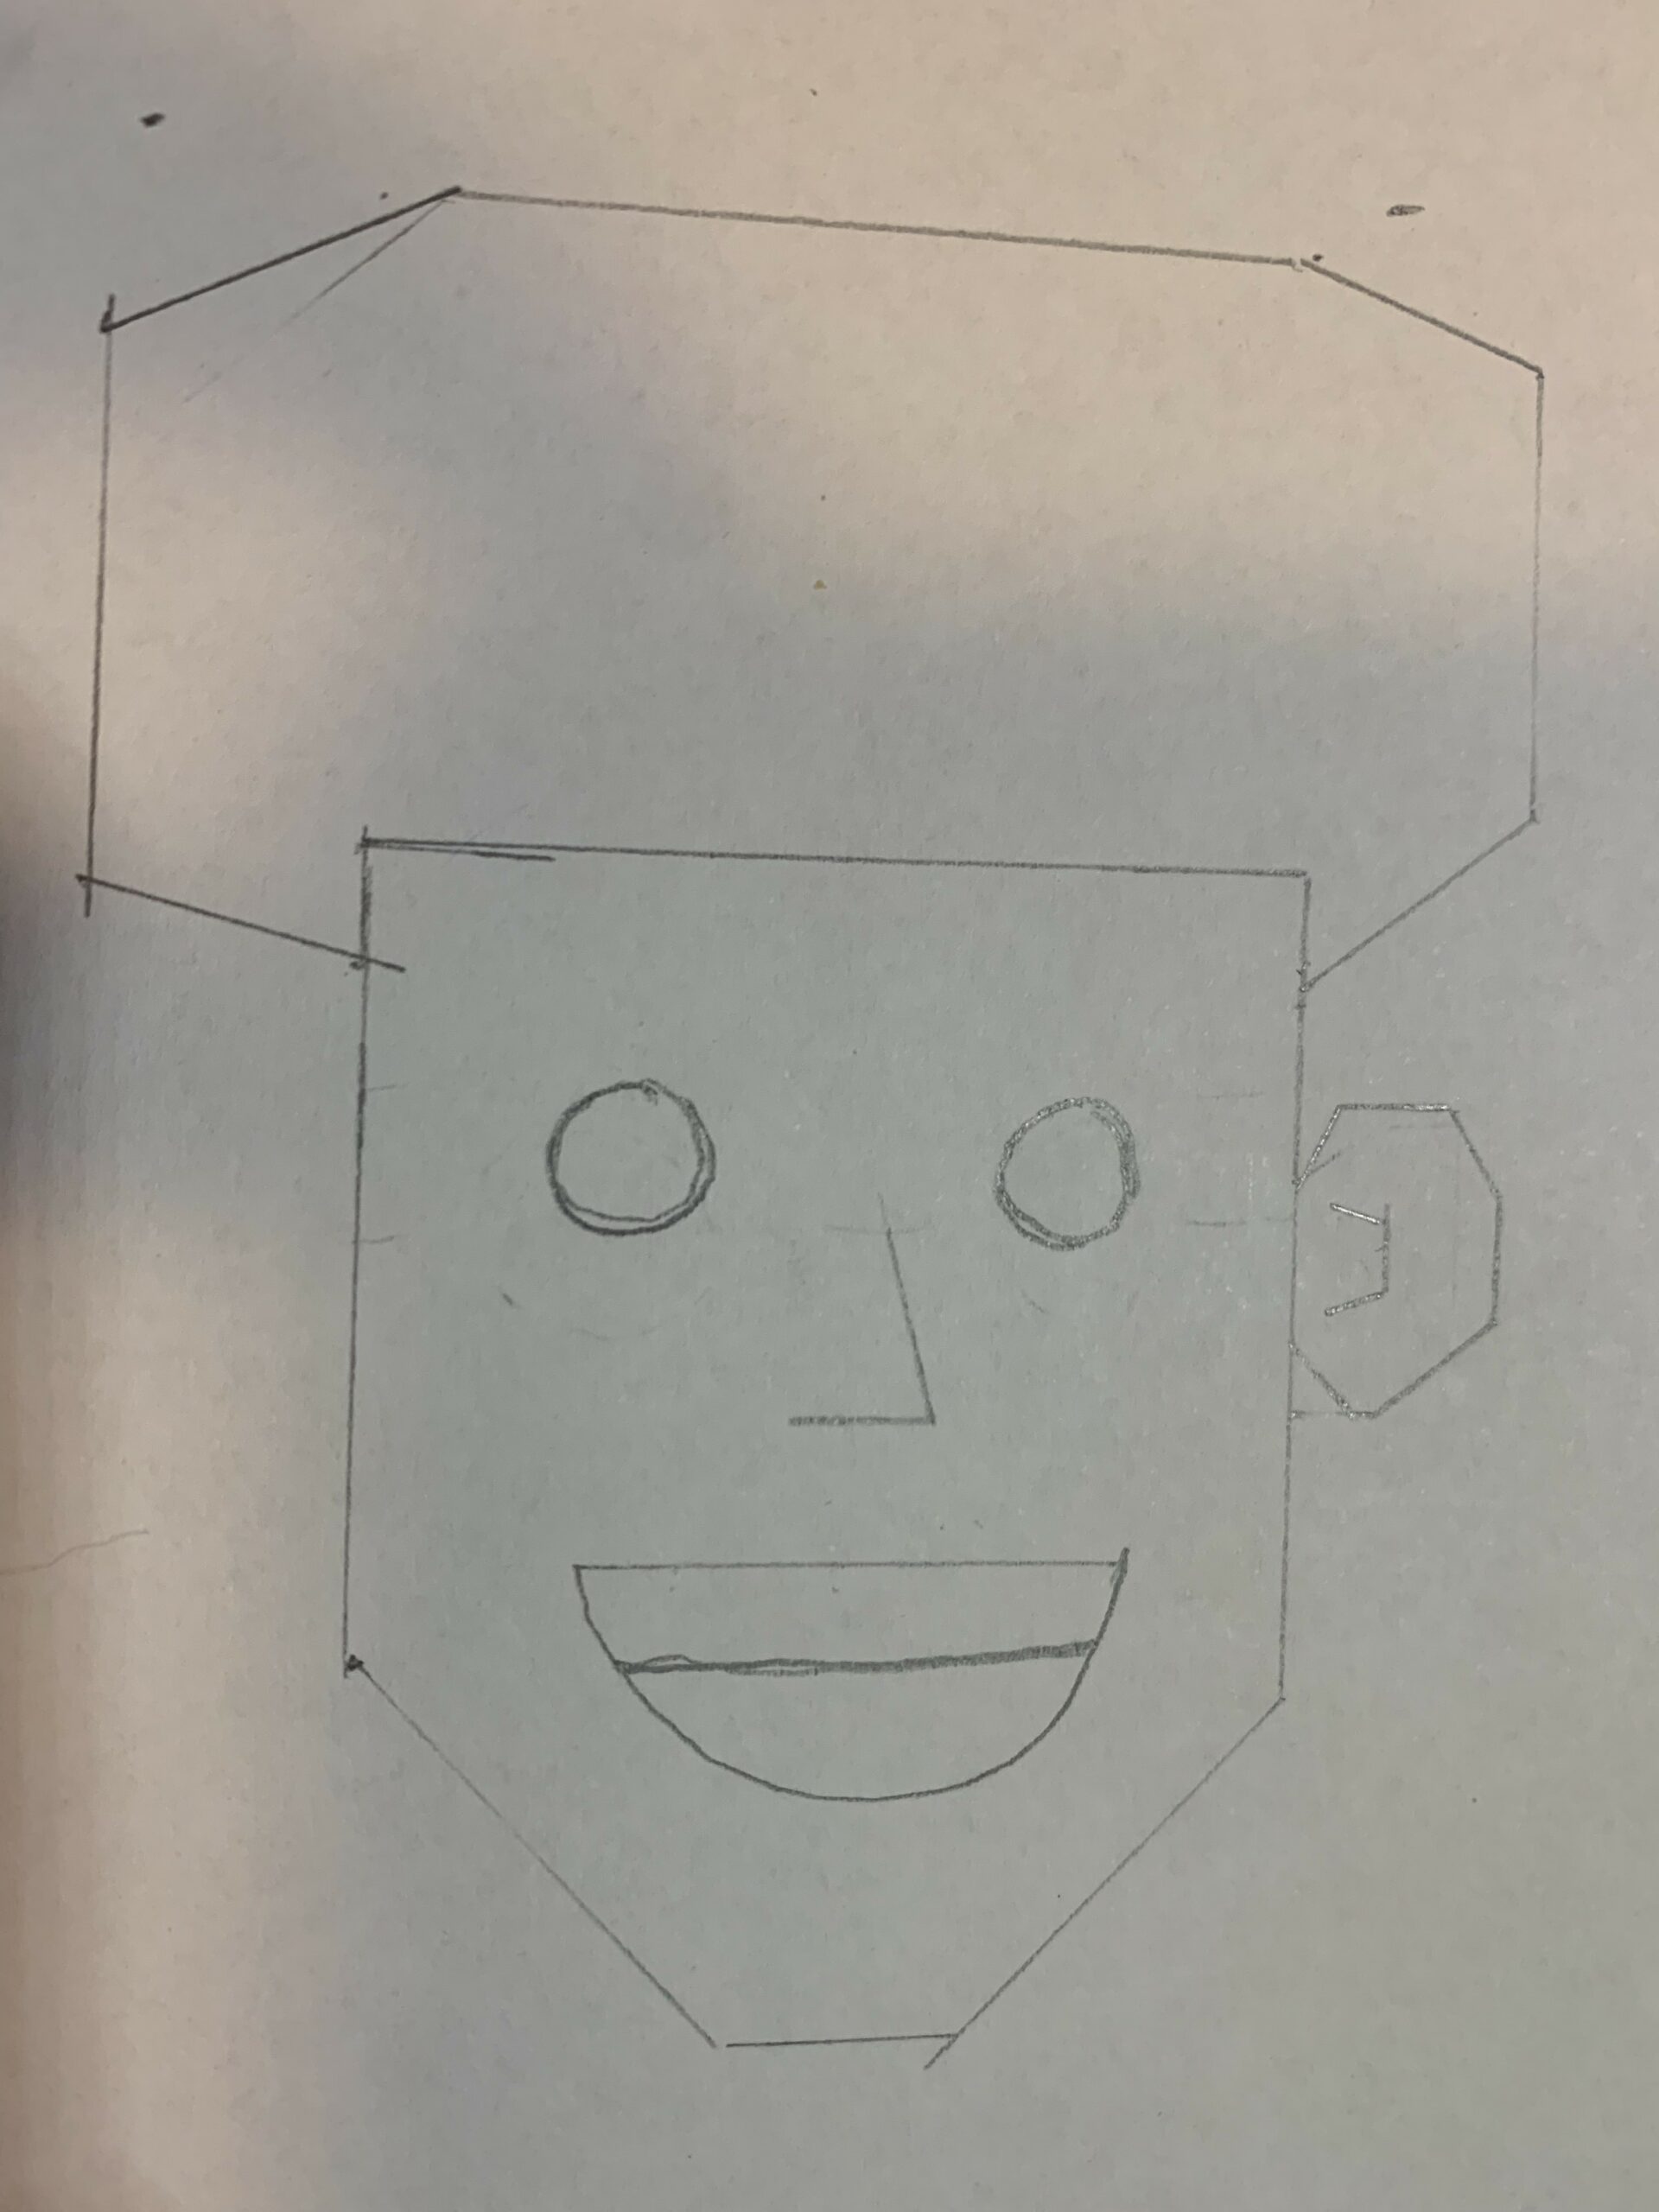
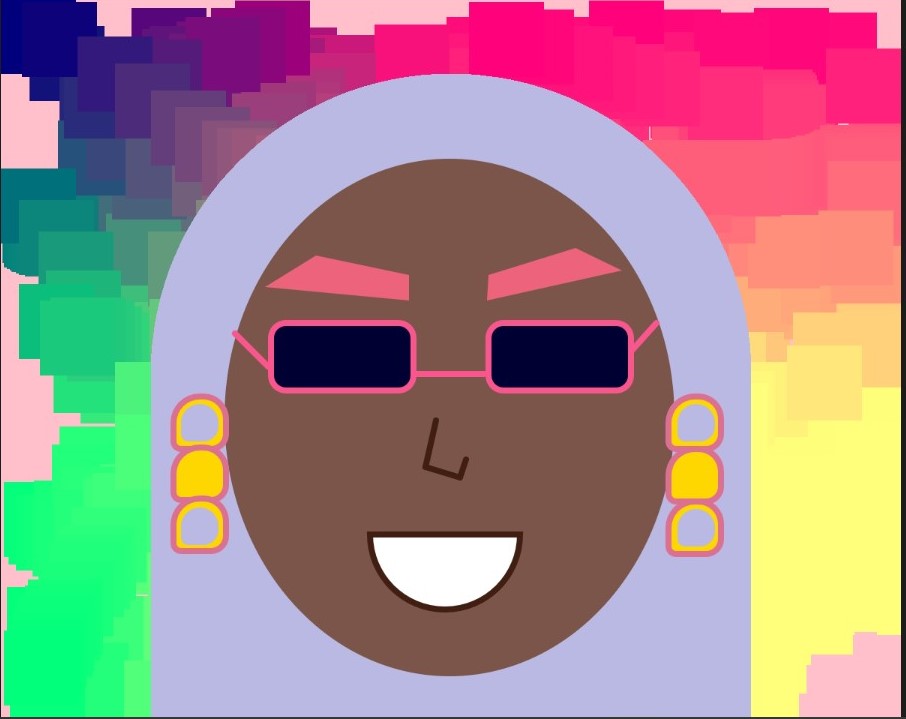
For the first assignment, I wanted to create a character that represents me in some way. I used a simple pencil sketch to figure out which shapes go where and then started coding. The final sketch turned out to be different than what I originally planned for as the fluffy hair was quite difficult to achieve.

Highlight:

I think something that stood out to me was figuring out the semicircles by browsing the reference library. I think it gave my portrait more dimensionality instead of being all circles.

Future:

I think I would like to add some animations – like blinking eyes or moving mouth. Or some interactive elements where the user could change the portrait’s mood by clicking, or change the hat.

Code:


function setup() {
  createCanvas(600, 600);
  background(254, 226, 221);
  
   //body
  fill(10);
  rect(140, 460, 325, 250, 100);
  
  fill(255, 219, 172);
  
  ellipse(145, 293, 50, 50 ); //left ear
  ellipse(454, 290, 50, 50 ); // right ear
  
  arc(300, 240, 325, 450, 0, 3.14, [OPEN]);
  //ellipse(300, 300, 300, 400); // face
  
  fill(255);
  arc(230, 280, 60, 40, 0, 3.14, [OPEN]);
  fill(0);
  circle(220, 290, 15);
  //circle(230, 273, 60); // left eye
  
  fill(255);
  arc(354, 280, 60, 40, 0, 3.14, [OPEN]);
  fill(0);
  circle(342, 290, 15);
  //circle(354, 273, 60); // right eye
  //circle(294, 410, 60);


  fill(0, 0, 0)
  arc(295, 380, 60, 45, 0, 3.14, [OPEN]) //mouth
  
  arc(162, 238, 60, 45, 0, 3.14, [OPEN]);
  arc(192, 238, 60, 45, 0, 3.14, [OPEN]);
  arc(220, 238, 60, 45, 0, 3.14, [OPEN]);
  arc(260, 238, 60, 45, 0, 3.14, [OPEN]);
  arc(290, 238, 60, 45, 0, 3.14, [OPEN]);
  arc(320, 238, 60, 45, 0, 3.14, [OPEN]);
  arc(350, 238, 60, 45, 0, 3.14, [OPEN]);
  arc(390, 238, 60, 45, 0, 3.14, [OPEN]);
  arc(420, 238, 60, 45, 0, 3.14, [OPEN]);
  arc(436, 238, 60, 45, 0, 3.14, [OPEN]);
  
  
  //hat
  fill(111, 78, 55);
  rect(110, 230, 375, 10);
  arc(300, 230, 340, 300, 3.14, 0, [OPEN])
  
  //nose
  line(293, 308, 282, 347);
  line(282, 347, 301, 348);


}

function draw() {

  print(mouseX + "," + mouseY);
  
}


Assignment 1: Self Portrait

Concept

The task was to make a self-portrait using the p5.js library in an online code editor. No manual drawing or interaction was allowed. To tackle this, I decided to add a touch of my personality to the sketch. I drew inspiration from the Matrix and a bit of my fondness for quirky stuff.

[Initial sketch]

The final sketch turned out quite different from my initial drawing. Getting there involved diving deep into the p5.js library’s online documentation, watching YouTube tutorials, and debugging. I used bezier curves, adjusted stroke weights, dabbled with two-dimensional arrays, made random choices, and drew lines to create the final piece. To me, the final sketch represents a computer’s reaction to my coding blunders, even when I clearly stare at my mistakes in the code I write.

Highlight of Code

One of the many aspects of my code that I am proud of out of the many is creating the Matrix-like background. I had to figure out how to deal with two-dimensional arrays in javascript, how to perfectly align the 0s and 1s in the cells, and how to adjust the frame rate to give the desired effect that I was looking for.

[Before debugging]

// declaration of variables to be used to be 
// used to create the background
const CELL_SIZE_H = 20; 
const CELL_SIZE_V = 20; 
let col_dim;
let row_dim;
let rows;
let cols;
const twoDArray = [];
let nums = ['0', '1'];

function setup() {
  frameRate(20);        // reducing the frame rate to make the animation more appealing
  createCanvas(800, 800);
  
  // calculating the number of rows and columns from the canvas width and height
  col_dim = width;
  row_dim = height;
  rows = row_dim / CELL_SIZE_V;
  cols = col_dim / CELL_SIZE_H;  
  
  
  // creating a two dimensional array to hold either 0s or 1s
  for (let i = 0; i < rows; i++) {
    twoDArray[i] = []; 
    for (let j = 0; j < cols; j++) {
      twoDArray[i][j] = random(nums); 
    }
  }
 
  
  // centering the value in its cell and setting color to green
  textAlign(CENTER, CENTER);
  fill(0,255,0);
  
  // printing text to screen
  for (let i = 0; i < rows; i++) {
    for (let j = 0; j < cols; j++) {
      text(twoDArray[i][j], (CELL_SIZE_H / 2) + (j*CELL_SIZE_H), (CELL_SIZE_H / 2) + (i*CELL_SIZE_H));
    }
  }
}

function draw() {
  // setting the background to black
  background(0);
  
  // reassigning the values of each cell to create illusion and printing value to screen
  for (let i = 0; i < rows; i++) {
    for (let j = 0; j < cols; j++) {
      twoDArray[i][j] = random(nums); 
      text(twoDArray[i][j], (CELL_SIZE_H / 2) + (j*CELL_SIZE_H), (CELL_SIZE_H / 2) + (i*CELL_SIZE_H));
    }
  }
}

[After debugging]

Reflection and Ideas for Future of Improvement

As the first program created with the p5.js editor, I am proud of the outcome, especially of the background. I wasn’t able to fully recreate the image I had in mind which is disappointing for me. I believe that with constant engagement with the p5.js library, I’d be able to more captivating pieces than what I’ve done for this assignment. I’m also proud of the advancement I’ve made towards understanding how bezier curves work. I was clueless about bezier curves before this assignment but it has served as an avenue to explore what they are and how they can be used to create small curves. In future engagements I hope to be able to create more interactive and captivating pieces.


Week 1 – Self – Portrait

Concept

For my personal portrait, I attempted to neglect facial details and focus on skeleton shapes. Therefore, I choose to create a simple Wooden Manikin Model to present myself with some primitive shapes. The whole image is about the model sitting on a beach watching the ocean and the sky while enjoying a cup of hot coffee. It is (or I am) having a wonder vacation!

I decided to use a manikin model because I want my self-portrait to focus less on my face and more on a lifestyle of mine (or at least a desired lifestyle of mine). Therefore, I decided to zoom out and give more space to the environment. In this portrait, the clouds are moving and the coffee is giving out heat. But try to drink the coffee? The coffee cup will move away! This adds a bit more fun to my vacation on the beach!

Highlight of my code

I am particularly proud of the coffee cup and its tray and its interaction. I used mouseX and mouseY to see if the mouse is on the coffee cup. If it is, the cup and the tray will move a bit to the left; if not, it will move back to the start position. Here’s the code:

let tray = 10;
// draw the coffee tray
stroke(255);

if (246 < mouseX && mouseX < 266 && 400 < mouseY && mouseY < 414) {
  beginShape();
  curveVertex(220, 414);
  curveVertex(220 - tray, 414);
  curveVertex(228 - tray, 418);
  curveVertex(247 - tray, 418);
  curveVertex(257 - tray, 418);
  curveVertex(265 - tray, 414);
  curveVertex(265 - tray, 414);
  endShape();
  stroke(0);

  stroke(255);
  rect(224, 400, 20, 14);

  heat(230);
  heat(240);
  heat(250);
} else {
  beginShape();
  curveVertex(233, 414);
  curveVertex(233, 414);
  curveVertex(241, 418);
  curveVertex(260, 418);
  curveVertex(270, 418);
  curveVertex(278, 414);
  curveVertex(278, 414);
  endShape();
  stroke(0);

  stroke(255);
  rect(246, 400, 20, 14);

  heat(250);
  heat(260);
  heat(270);
}

In the meantime, I created a function called heat() to draw the heat. It simplifies my code to some extent.

function heat(xcoord) {
  noFill();
  beginShape();
  curveVertex(xcoord, 370);
  curveVertex(xcoord, 370);
  curveVertex(xcoord - 5, 380);
  curveVertex(xcoord, 390);
  curveVertex(xcoord - 5, 395);
  curveVertex(xcoord - 5, 395);
  endShape();
}

Reflections and future considerations

I could better improve my work by adding more details to the background, such as waves, mountains, shells, etc, to better create an atmosphere of a vacation by the ocean. This could potentially strengthen the visual appeal of my work.

In terms of interactivity, I tried to make the arm of the model to move and to always look at the mouse. I tried different ways and functions such as atan2() and rotate(), but none of them worked. I look forward to learning more about how to do it.

Here’s the link to the full version of my code: https://github.com/Yupu-Chen/Intro-to-IM-Fall-2023/blob/main/selfportrait.js

Resources: p5.js reference page

Self Portrait- Assignment 1

Concept:

In the program, I crafted a self-portrait that reflects my desired features, such as long hair. To achieve a whimsical look, I employed a combination of basic shapes, including ellipses, rectangles, and circles. Additionally, I paid attention to detail by adjusting the stroke thickness to give specific elements, like my eyebrows, a darker and more realistic appearance that matched my actual features. I also implemented a dynamic feature- as the mouse cursor hovers to the mouth, it creates another arc on top of the mouth, giving it more of an open mouth or a shocked look overall.

A highlight of some code that you’re particularly proud of:

One aspect of the code I’m well content with is the dynamic feature of the mouth and how it adds an arc to it as the mouse gets within the specified region around the mouth. The simple placement of an arc to the mouth ultimately changes the entire expression on the face and the impression it overall gives.

//mouth
arc(width / 2, height / 2 + 70, 80, 40, 0, PI);
 if(mouseX>width/2-50 && mouseX< width/2+30){
   if(mouseY>height/2+30 && mouseY<height/2+80){
   arc(width / 2, height / 2 + 70, 80, 40, PI, 0);
 }}

Reflection/Improvements:

I am confident that I can further refine my creative skills and explore ways to not only enhance engagement but also elevate the visual appeal of my work. Moreover, I aspire to expand my proficiency in the extensive realm of coding and functions available to me, enabling me to create an even more compelling self-portrait than the current one.

Throughout the process of creating my self-portrait, I encountered challenges related to pinpointing the precise coordinates within the canvas. Despite implementing code to display the mouse cursor’s position, I spent a significant amount of time fine-tuning the positioning of elements to achieve the desired balance. I look forward to acquiring more efficient techniques to address this issue, ultimately leading to more streamlined and aesthetically pleasing artwork in the future. On top of that, I could have also worked on the colors to make it pop out more and more visually appealing, but overall, I believe that this is a good start.

Assignment 1 – Self Portrait

Concept

After learning more about coding shapes in class using p5.js, I was eager to push the boundaries and explore the artistic and creative possibilities it offered, which I aimed to demonstrate in this assignment. My goal was to create a cartoon-like representation of a self-portrait, allowing for the smooth application of various shapes. This portrait is a reflection of my moments of solitude when I enjoy listening to music and savoring my day. To represent my personality, I chose my favorite color as the background. In an effort to infuse interactivity, I experimented with adding movement to the portrait, where elements respond dynamically as the mouse interacts with the canvas. This exploration allowed me to combine code, art, and personal expression into a single creative assignment.

Highlight of my Code

The addition of interactivity in my codes is one feature that makes me proud. I have two personal favorites, and I find it difficult to choose between them. The first is the way the eyes respond when you interact with them using the mouse – they close, adding an engaging and lifelike dimension to the portrait. The second highlight is the implementation of headphones; when you move your mouse over the ears, a set of headphones magically appears. Below, you can find the relevant sections of code for both interactions:

Eyes Interaction:

// Eyes open
noStroke();
fill(255);
ellipse(240, 260, 60, 60);
ellipse(360, 260, 60, 60);

// Left eye closed
if(mouseX > 210 && mouseX < 270) {
  if(mouseY > 230 && mouseY < 290) {
    noStroke();
    fill(255, 225, 190);
    ellipse(240, 260, 61, 61);
    strokeWeight(10);
    stroke(0);
    noFill();
    bezier(210, 260, 210, 305, 270, 305, 270, 260);
  }
}

Headphones Interaction:

// Headphones
if(mouseX > 120 && mouseX < 160) {
  if(mouseY > 270 && mouseY < 330) {
    noStroke();
    fill(0);
    ellipse(150, 300, 120, 120);
    ellipse(450, 300, 120, 120);
    strokeWeight(17);
    stroke(0);
    noFill();
    ellipse(300, 210, 350, 268);
  }
}

Reflection/Improvements 

Although I’m proud of how my self-portrait turned out, I know that I can always do better and improve my knowledge of coding. One avenue for exploration is the realm of interactive elements. Instead of focusing on specific features like eyes and headphones, I could create more interactive elements that enrich the overall experience. For instance, I could have experimented with the background’s interactivity. Rather than having a static color, I could have implemented dynamic changes in response to user interactions. This could involve background color shifts or even more captivating visual effects to make the portrait engaging and visually stimulating.

Edit Link

Assignment-1: Self-portrait

Concept:

In this p5.js sketch, I’ve created a simple character portrait with a friendly and approachable appearance. The character features a smiling face with brown hair, glasses, and a blue shirt. The goal was to craft a basic, yet visually appealing representation of a character.

Highlight of Code:

One of the noteworthy aspects of this code is the implementation of interactive eye motion. By tracking the mouse cursor’s position, the character’s eyes elegantly follow the cursor’s movement. This interactive feature adds a sense of engagement and liveliness to the character, creating a connection with the viewer. It transforms a static portrait into a dynamic representation, enhancing the overall user experience.

let eyeX1 = 175;
let eyeY1 = 200;
let eyeX2 = 225;
let eyeY2 = 200;

function setup() {
createCanvas(400, 400);
frameRate(30)
}

function draw() {
background(220);

// eye positions to follow the mouse
eyeX1 = mouseX – 25;
eyeY1 = mouseY – 20;
eyeX2 = mouseX + 25;
eyeY2 = mouseY – 20;

Reflection and Ideas for Future Work or Improvements:

This project served as an introductory exploration of character design in p5.js. However, there are opportunities for further enhancements and refinements:

  • Variety: Experimenting with different hairstyles, clothing options, and facial expressions can lead to a broader range of characters with unique personalities.
  • Customization: Providing user-customizable features, like changing hair color or glasses style, can enhance user engagement and personalization.
  • Background: Incorporating a background or scene can provide context and depth to the character’s portrayal.

Self-Portrait Assignment 1

The first class of the semester kicked off with an interesting challenge: creating a self-portrait using basic shapes. This task was not only a great way to start our Introduction to Interactive Media (IM) course but also showed us how this field can be applied in practical work.

For this assignment, I decided to explore how simple shapes could represent different aspects of myself. Since we could only use primitive shapes, I had to get creative to turn a square or a circle into something like an eyebrow. Before diving into coding with P5.js, I spent some time brainstorming and sketching out a rough idea of how I wanted to convey my self-portrait through these basic shapes.

The first challenge was figuring out how to represent myself wearing a hijab using 2D shapes. After some trial and error, I settled on using an arc connected to a quadrangle, which, after removing the outline, looked like a hijab to me. Once that was in place, the rest of the project flowed smoothly as I added details and brought my sketch to life.

The most challenging part for me was trying to recreate my eyebrows using quadrangles. It seemed straightforward in theory, but when I tried it, the brows looked off, and I had to experiment a lot to get the right dimensions that resembled real eyebrows. To help with this, I used the “Print mouseX and mouseY” function throughout the process. It made it easier to understand how to scale things properly because I was struggling to figure out which parameter corresponded to what size.

Even though the assignment didn’t require interactivity, I decided to give it a try. After watching a YouTube video about mouseClicked on p5.js here, I managed to create two global variables that responded to user clicks. This is the part of the code that I’m particularly proud of:

let brow = '#694133';
let smile='#694133';

function mouseClicked(){
  if (brow == '#694133'){
    brow='rgb(236,99,123)';
  }else{
   brow='#694133';
  }
  if (smile == '#694133'){
    smile='white';
  }else{
    smile='#694133';
  }
  
}

It added an extra layer of engagement to my self-portrait, and I found it quite satisfying to implement. It was a pleasant surprise to find out that this function was already built into the program. By using some simple if statements, I managed to change the color of my eyebrows and make my sketch smile whenever the mouse was clicked.

After putting in the effort, I’m proud of my first sketch. Here’s an embedded sketch of my work.

However, for future improvements, I want to add more interactive elements, like maybe a sticking-out tongue or something fun and quirky. I also want to experiment with dimensions and shadows to make the sketch look more realistic.

In any case, this project made me realize the potential of using interactive media to express ideas and identities in creative ways, setting the tone for what we would explore throughout the semester.