Concept
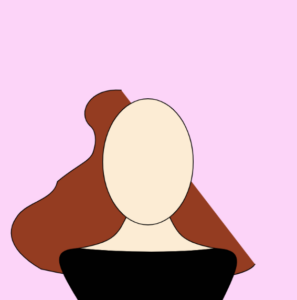
For this first assignment, I had a clear idea to create a cartoonish/fashion-styled sketch using coding. My goal was to create a visual card, which can be comprehensive and rememberable for the audience. With simple shapes and colors, I wanted to show something specific to me, for instance, ginger hair, interest in fashion sketching ( e.g. many curved lines used to draw body and hair), and two of my favorite colors used in the background. You can see the second color by clicking on the mouse 🙂
Approach and Code Highlights
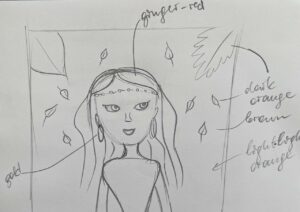
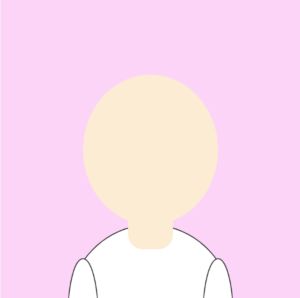
As I was initially drawing out some sketches, I thought that I’d use pretty basic, easy-to-do shapes. However, as I began coding, I immediately understood that I couldn’t do things I drew, as I was only aware of how to use ellipses, circles, and other functions of basic shapes we learned during our first class. At first, I decided not to worry about it and tried my best to do a portrait with those basic functions, however, it led me to a huge disappointment in both the work and myself. Below are my initial sketch vs. my first attempts to do a self-portrait:
I decided to challenge myself and take a risk in doing something I’d never done before. After a couple of videos, readings, and attempts to understand how different functions work, I decided to try out the beginShape(), and bezierVertex() functions to create more complex shapes and curved lines. I spent a lot of time trying to understand which points to choose and how to make smoothly curved shapes. The most time-consuming was to create a shape of wavy hair, which I am very proud of! Below you can see one of my failed attempts and the code I used to create the final result:
//hair

  fill(148, 60, 33);
  beginShape();
  vertex(166, 123);
  bezierVertex(125, 120, 110, 152, 126, 168);
  bezierVertex(133, 173, 136, 186, 130, 203);
  bezierVertex(124, 215, 110, 225, 89, 240);
  bezierVertex(48, 266, 29, 286, 19, 306);
  bezierVertex(12, 338, 26, 370, 85, 385);
  bezierVertex(328, 398, 365, 374, 360, 338);
  bezierVertex(348, 310, 280, 290, 287, 258);
  bezierVertex(294, 230, 323, 206, 316, 176);
  bezierVertex(304, 148, 274, 146, 254, 138);
  bezierVertex(242, 131, 240, 118, 238, 110);
  bezierVertex(236, 100, 229, 86, 198, 87);
  bezierVertex(186, 88, 173, 98, 166, 123);

  endShape();
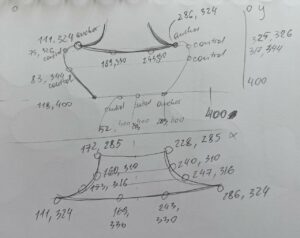
The biggest problem when using these functions was identifying what anchor and control points are and how they work to create a certain shape I want. For better understanding, in the beginning, I separately drew out every shape and recorded every point with its coordinates in my sketchbook. It is a method I used mostly in creating my portrait:
As I was looking through other students’ portraits, I was curious about how to incorporate interactive elements into my work. Initially, I was planning to have falling leaves behind my portrait in the background, as a way to show that my favorite season is Autumn + I was born during this season. After watching a couple of videos on how to create an array of falling points (you can find this resource at the end of the post) and multiple attempts at doing this, I couldn’t figure out a way to manipulate a bezierVertex function with animation, so I wasn’t able to achieve that. However, I’m planning to learn how to do it next time. Nevertheless, I wanted to include some interactive components, therefore I changed my concept a little bit to include another aspect of myself, which is two of my favorite colors: light pink and light blue. To execute this, I used the following part of the code, which I am particularly proud of:
function draw() {

  //change background color when mouse is pressed

  background(246, 215, 230);
  if (mouseIsPressed) {
    background(215, 233, 246);
  }
Reflection and Future Thoughts
I am proud of my first attempt to code an artistic sketch using JavaScript language. I understand now how learning how to code can be helpful for the design of posters and animations, which I would like to make one day. As I think about what could I have done better the first idea is to use variables. After learning how to create variables during our second class, I understood how easy it would be to utilize the bezierVertex() functions that I used a lot in my code. Instead of hardcoding and constantly changing every single coordinate point in bezierVertex(), I would have saved time and energy by using the Weight and Height variables, adding or subtracting as much as I wanted. So, it’s a note for myself for future projects. Also, as I mentioned previously in this post, I would love to learn how to code animations like falling stars/snowflakes/leaves, etc. Unfortunately, this was out of my league for this first project, but as I learn new functions in P5JS, I definitely can learn how to do these cool things too!
Resources used for this project
- The most important one: https://p5js.org/reference/#/p5/
- Somewhere to choose the RGB colors: https://imagecolorpicker.com/color-code/d7e9f6
- Snowfall: https://www.youtube.com/watch?v=cl-mHFCGzYk&t=258s
- TheCodingTrain channel: https://www.youtube.com/@TheCodingTrain
- Book by Rune Madsen called Programming Design Systems: https://programmingdesignsystems.com/shape/custom-shapes/index.html#custom-shapes-pANLh0l


