Final Project

Aaron, Majid, Hassan.

CONCEPT

How would someone virtually learn how complicated it is to drive a car? Would teaching someone how to drive a car virtually save a lot of money and decrease potential accidents associated with driving? These questions inspired our project, which is to create a remote-controlled car that can be controlled using hand gestures (that imitate the driving steering wheel movements), specifically by tracking the user’s hand position and a foot pedal. The foot pedal will be used to control the acceleration, braking, and reversing. We will achieve all these by integrating a P5JS tracking system into the car, which will interpret the user’s hand gestures and translate them into commands that control the car’s movements. The hand gestures and pedal control will be synced together via two serial ports that will communicate with the microcontroller of the car.

Experience

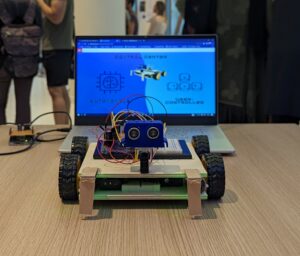
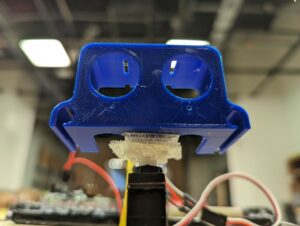
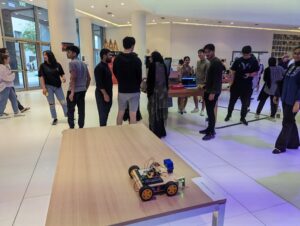
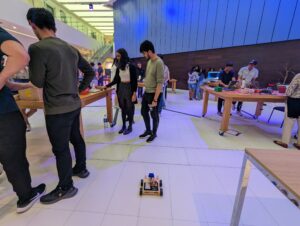
The entire concept is not based only on a driving experience. We introduce a racing experience by creating a race circuit. The idea is for a user to complete a lap in the fastest time possible. Before you begin the experience, you can view the leaderboard. After your time has been recorded, a pop-up appears for you to input your name to be added to the leaderboard. For this, we created a new user interface on a separate laptop. This laptop powers an Arduino circuit connection which features an ultrasonic sensor. The ultrasonic sensor checks when the car has crossed the start line and begins a timer, and detects when the user ends the circuit. After this, it records the time it took a user to complete the track and sends this data to the leaderboard.

This piece of code is how we’re able to load and show the leaderboard.

function loadScores() {
  let storedScores = getItem("leaderboard");
  if (storedScores) {
    highscores = storedScores;
    console.log("Highscores loaded:", highscores);
  } else {
    console.log("No highscores found.");
  }
}

function saveScores() {
  // make changes to the highscores array here...
  storeItem("leaderboard", highscores);
  console.log("Highscores saved:", highscores);
}


IMPLEMENTATION(The Car & Foot Pedal)

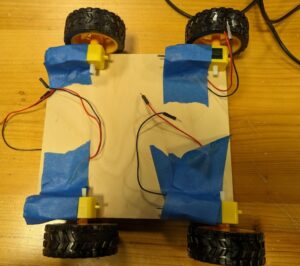
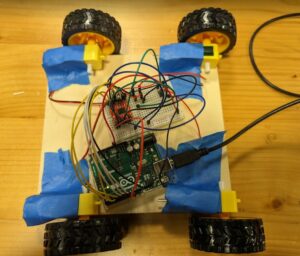
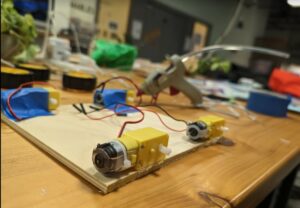
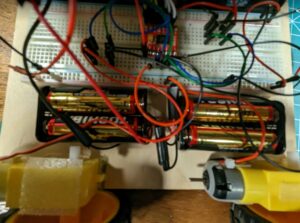
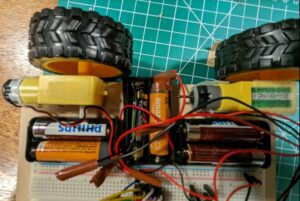
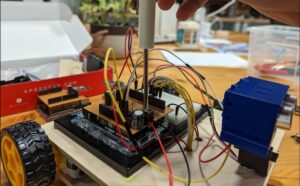
We first built the remote-controlled car using an Arduino Uno board, a servo motor, a Motor Shield 4 Channel L293D, an ultrasonic sensor, 4 DC motors, and other peripheral components. Using the Motor Shield 4 Channel L293D decreased numerous wired connections and allowed us space on the board on which we mounted all other components. After, we created a new Arduino circuit connection to use the foot pedal.

The foot pedal sends signals to the car by rotating a potentiometer whenever the pedal is engaged. The potentiometer value is converted into forward/backward movement before it reaches p5.js via serial communication.

P5/Arduino Communication

At first, a handshake is established to ensure communication exists before proceeding with the program:

//////////////VarCar/////
// Define Serial port
let serial;
let keyVal;
//////////////////////////
const HANDTRACKW = 432;
const HANDTRACKH = 34;

const VIDEOW = 320;
const VIDEOH = 240;

const XINC = 5;
const CLR = "rgba(200, 63, 84, 0.5)";

let smooth = false;
let recentXs = [];
let numXs = 0;

// Posenet variables
let video;
let poseNet;

// Variables to hold poses
let myPose = {};
let myRHand;

let movement;
////////////////////////

let Acceleration = 0;
let Brake = 0;
let data1 = 0;
let data2 = 0;

let s2_comp=false;

function setup() {
 // Create a canvas
  //createCanvas(400, 400);

  // // Open Serial port
  // serial = new p5.SerialPort();
  // serial.open("COM3"); // Replace with the correct port for your Arduino board
  // serial.on("open", serialReady);

  ///////////////////////////
  // Create p5 canvas


The Hand Gestures

Two resources that helped detect the user’s hand position were PoseNet and Teachable Machine. We used these two resources to create a camera tracking system which was then programmed to interpret specific hand gestures, such as moving the hand right or left to move the car in those directions. This aspect of our code handles the hand tracking and gestures.

if (myPose) {
    try {
      // Get right hand from pose
      myRHand = getHand(myPose, false);
      myRHand = mapHand(myRHand);

      const rangeLeft2 = [0, 0.2 * HANDTRACKW];
      const rangeLeft1 = [0.2 * HANDTRACKW, 0.4 * HANDTRACKW];
      const rangeCenter = [0.4 * HANDTRACKW, 0.6 * HANDTRACKW];
      const rangeRight1 = [0.6 * HANDTRACKW, 0.8 * HANDTRACKW];
      const rangeRight2 = [0.8 * HANDTRACKW, HANDTRACKW];

      // Check which range the hand is in and print out the corresponding data
      if (myRHand.x >= rangeLeft2[0] && myRHand.x < rangeLeft2[1]) {
        print("LEFT2");
        movement = -1;
      } else if (myRHand.x >= rangeLeft1[0] && myRHand.x < rangeLeft1[1]) {
        print("LEFT1");
        movement = -0.5;
      } else if (myRHand.x >= rangeCenter[0] && myRHand.x < rangeCenter[1]) {
        print("CENTER");
        movement = 0;
      } else if (myRHand.x >= rangeRight1[0] && myRHand.x < rangeRight1[1]) {
        print("RIGHT1");
        movement = 0.5;
      } else if (myRHand.x >= rangeRight2[0] && myRHand.x <= rangeRight2[1]) {
        print("RIGHT2");
        movement = 1;
      }
      // Draw hand
      push();
      const offsetX = (width - HANDTRACKW) / 2;
      const offsetY = (height - HANDTRACKH) / 2;
      translate(offsetX, offsetY);
      noStroke();
      fill(CLR);
      ellipse(myRHand.x, HANDTRACKH / 2, 50);
      pop();
    } catch (err) {
      print("Right Hand not Detected");
    }
    print(keyVal)


The Final Result & Car Control

The final result was an integrated system consisting of the car, the pedal, and gesture control in P5.JS. When the code is run in p5.js, the camera detects a user’s hand position and translates it into movement commands for the car.

The entire code for controlling the car.

//////////////VarCar/////
// Define Serial port
let serial;
let keyVal;
//////////////////////////
const HANDTRACKW = 432;
const HANDTRACKH = 34;

const VIDEOW = 320;
const VIDEOH = 240;

const XINC = 5;
const CLR = "rgba(200, 63, 84, 0.5)";

let smooth = false;
let recentXs = [];
let numXs = 0;

// Posenet variables
let video;
let poseNet;

// Variables to hold poses
let myPose = {};
let myRHand;

let movement;
////////////////////////

let Acceleration = 0;
let Brake = 0;
let data1 = 0;
let data2 = 0;

let s2_comp=false;

function setup() {
 // Create a canvas
  //createCanvas(400, 400);

  // // Open Serial port
  // serial = new p5.SerialPort();
  // serial.open("COM3"); // Replace with the correct port for your Arduino board
  // serial.on("open", serialReady);

  ///////////////////////////
  // Create p5 canvas
  createCanvas(600, 600);
  rectMode(CENTER);

  // Create webcam capture for posenet
  video = createCapture(VIDEO);
  video.size(VIDEOW, VIDEOH);
  // Hide the webcam element, and just show the canvas
  video.hide();

  // Posenet option to make posenet mirror user
  const options = {
    flipHorizontal: true,
  };

  // Create poseNet to run on webcam and call 'modelReady' when model loaded
  poseNet = ml5.poseNet(video, options, modelReady);

  // Everytime we get a pose from posenet, call "getPose"
  // and pass in the results
  poseNet.on("pose", (results) => getPose(results));
}

function draw() {
  // one value from Arduino controls the background's red color
  //background(0, 255, 255);
 
  /////////////////CAR///////
  background(0);

  strokeWeight(2);
  stroke(100, 100, 0);
  line(0.2 * HANDTRACKW, 0, 0.2 * HANDTRACKW, height);
  line(0.4 * HANDTRACKW, 0, 0.4 * HANDTRACKW, height);
  line(0.6 * HANDTRACKW, 0, 0.6 * HANDTRACKW, height);
  line(0.8 * HANDTRACKW, 0, 0.8 * HANDTRACKW, height);
  line(HANDTRACKW, 0, HANDTRACKW, height);
  line(1.2 * HANDTRACKW, 0, 1.2 * HANDTRACKW, height);

  if (myPose) {
    try {
      // Get right hand from pose
      myRHand = getHand(myPose, false);
      myRHand = mapHand(myRHand);

      const rangeLeft2 = [0, 0.2 * HANDTRACKW];
      const rangeLeft1 = [0.2 * HANDTRACKW, 0.4 * HANDTRACKW];
      const rangeCenter = [0.4 * HANDTRACKW, 0.6 * HANDTRACKW];
      const rangeRight1 = [0.6 * HANDTRACKW, 0.8 * HANDTRACKW];
      const rangeRight2 = [0.8 * HANDTRACKW, HANDTRACKW];

      // Check which range the hand is in and print out the corresponding data
      if (myRHand.x >= rangeLeft2[0] && myRHand.x < rangeLeft2[1]) {
        print("LEFT2");
        movement = -1;
      } else if (myRHand.x >= rangeLeft1[0] && myRHand.x < rangeLeft1[1]) {
        print("LEFT1");
        movement = -0.5;
      } else if (myRHand.x >= rangeCenter[0] && myRHand.x < rangeCenter[1]) {
        print("CENTER");
        movement = 0;
      } else if (myRHand.x >= rangeRight1[0] && myRHand.x < rangeRight1[1]) {
        print("RIGHT1");
        movement = 0.5;
      } else if (myRHand.x >= rangeRight2[0] && myRHand.x <= rangeRight2[1]) {
        print("RIGHT2");
        movement = 1;
      }
      // Draw hand
      push();
      const offsetX = (width - HANDTRACKW) / 2;
      const offsetY = (height - HANDTRACKH) / 2;
      translate(offsetX, offsetY);
      noStroke();
      fill(CLR);
      ellipse(myRHand.x, HANDTRACKH / 2, 50);
      pop();
    } catch (err) {
      print("Right Hand not Detected");
    }
    print(keyVal)


    //print(movement);
   // print("here")
    //print(writers);
  }
  //////////////////////////

  if (!serialActive1 && !serialActive2) {
    text("Press Space Bar to select Serial Port", 20, 30);
  } else if (serialActive1 && serialActive2) {
    text("Connected", 20, 30);

    // Print the current values
    text("Acceleration = " + str(Acceleration), 20, 50);
    text("Brake = " + str(Brake), 20, 70);
    mover();
  }

}

function keyPressed() {
  if (key == " ") {
    // important to have in order to start the serial connection!!
    setUpSerial1();
  } else if (key == "x") {
    // important to have in order to start the serial connection!!
    setUpSerial2();
    s2_comp=true
  }
}

/////////////CAR/////////
function serialReady() {
  // Send initial command to stop the car
  serial.write("S",0);
  print("serialrdy");
}

function mover() {
    print("mover");

  // Send commands to the car based wwon keyboard input
  if (Acceleration==1) {
    writeSerial('S',0);
   
    //print(typeof msg1)
   
  }else if (Brake==1) {
    writeSerial('W',0);
  }else if ( movement < 0) {
    print("left")
    writeSerial('A',0);
  }else if ( movement > 0) {
        print("right")

    writeSerial('D',0);
  }else if (movement== 0) {
    print("stop");
    writeSerial('B',0);
  }
}

// When posenet model is ready, let us know!
function modelReady() {
  console.log("Model Loaded");
}

// Function to get and send pose from posenet
function getPose(poses) {
  // We're using single detection so we'll only have one pose
  // which will be at [0] in the array
  myPose = poses[0];
}

// Function to get hand out of the pose
function getHand(pose, mirror) {
  // Return the wrist
  return pose.pose.rightWrist;
}

// function mapHand(hand) {
//   let tempHand = {};
//   tempHand.x = map(hand.x, 0, VIDEOW, 0, HANDTRACKW);
//   tempHand.y = map(hand.y, 0, VIDEOH, 0, HANDTRACKH);

//   if (smooth) tempHand.x = averageX(tempHand.x);

//   return tempHand;
// }
function mapHand(hand) {
  let tempHand = {};
  // Only add hand.x to recentXs if the confidence score is greater than 0.5
  if (hand.confidence > 0.2) {
    tempHand.x = map(hand.x, 0, VIDEOW, 0, HANDTRACKW);

    if (smooth) tempHand.x = averageX(tempHand.x);
  }

  tempHand.y = map(hand.y, 0, VIDEOH, 0, HANDTRACKH);

  return tempHand;
}

function averageX(x) {
  // the first time this runs we add the current x to the array n number of times
  if (recentXs.length < 1) {
    console.log("this should only run once");
    for (let i = 0; i < numXs; i++) {
      recentXs.push(x);
    }
    // if the number of frames to average is increased, add more to the array
  } else if (recentXs.length < numXs) {
    console.log("adding more xs");
    const moreXs = numXs - recentXs.length;
    for (let i = 0; i < moreXs; i++) {
      recentXs.push(x);
    }
    // otherwise update only the most recent number
  } else {
    recentXs.shift(); // removes first item from array
    recentXs.push(x); // adds new x to end of array
  }

  let sum = 0;
  for (let i = 0; i < recentXs.length; i++) {
    sum += recentXs[i];
  }

  // return the average x value
  return sum / recentXs.length;
}

////////////////////////

// This function will be called by the web-serial library
// with each new *line* of data. The serial library reads
// the data until the newline and then gives it to us through
// this callback function
function readSerial(data) {
  ////////////////////////////////////
  //READ FROM ARDUINO HERE
  ////////////////////////////////////

  if (data != null) {
   // print(data.value);
    let fromArduino = data.value.split(",");
    if (fromArduino.length == 2) {
      //print(int(fromArduino[0]));
      //print(int(fromArduino[1]));
      Acceleration = int(fromArduino[0]);
      Brake  = int(fromArduino[1])
     
    }

    //////////////////////////////////
    //SEND TO ARDUINO HERE (handshake)
    //////////////////////////////////
    if(s2_comp){
    let sendToArduino = Acceleration + "," + Brake + "\n";
      // mover()
    //print("output:");
    //print(sendToArduino);
    //writeSerial(sendToArduino, 0);
    }
  }
}


The car moves forward/backward when a user engages the foot pedals, and steers left/right when the user moves his/her hand left/right. The components of the car system are able to communicate via serial communication in p5.js. To enable this, we created 2 serial ports(one for the car and the other for the foot pedal).


CHALLENGES

One challenge we may face during the implementation is accurately interpreting the user’s hand gestures. The camera tracking system required a lot of experimentation and programming adjustments to ensure that it interprets the user’s hand movements while also being light and responsive. Originally the camera was tracking the X and Y axis, but it caused p5 to be very slow and laggy because of the number of variables that it needs to keep track of. The solution was to simply remove one of the axes, this improved the responsiveness of the program drastically.


The initial plan was to operate the car wirelessly, however, this was not possible due to many factors, such as using the wrong type of Bluetooth board. With limited time, we resorted to working with two serial ports for communication between the car, the pedals, and the hand gesture control. This introduced a new problem- freely moving the car. However, we solved the issue by using an Arduino USB extension cable for the car to be able to move freely.


Another major roadblock was the serial ports in p5js. Since the project uses both a pedal and the car, there was the need to use 2 separate Arduino Uno boards to control both systems. This necessitated the use of 2 serial ports in p5js. The original starter code for connecting p5 to Arduino was only for 1 serial port. A lot of time was spent adjusting the existing code to function with 2 serial ports.


Lessons learned, especially with regard to robots, is be grouped into the following points:

Planning is key: The project can quickly become overwhelming without proper planning. It’s important to define the project goals, select appropriate devices and how to sync the code to those devices and create a detailed project plan.

Test as often as you can before the showcase date: Testing is crucial in robotics projects, especially when dealing with multiple hardware components and sensors. This one was no exception. It’s important to test each component and module separately before combining them into the final project.

Future steps needed to take our project to the next level.

  1. Expand functionality: While the current design allows for movement in various directions, there are other features that could be added to make the car more versatile. We plan on adding cameras and other sensors(LiDar) to detect obstacles to create a mapping of an environment while providing visual feedback to a user.
  2. Optimize hardware and software: We also plan on optimizing the hardware and software components used. This would involve changing the motors to more efficient or powerful motors, using more accurate sensors (not using the ultrasonic sensor), or exploring other microcontrollers that can better handle the project’s requirements. Additionally, optimizing the software code can improve the car’s responsiveness and performance. For example, our software code can detect obstacles but cannot detect the end of a path. Regardless, we believe we can engineer a reverse obstacle-sensing algorithm to create an algorithm that could detect cliffs and pot-holes, and dangerous empty spaces on roads to ultimately reduce road accidents.

User Testing

Final Project

Hassan, Aaron, Majid.

CONCEPT

How would someone virtually learn how complicated it is to drive a car? Would teaching someone how to drive a car virtually save a lot of money and decrease potential accidents associated with driving? These questions inspired our project, which is to create a remote-controlled car that can be controlled using hand gestures (that imitate the driving steering wheel movements), specifically by tracking the user’s hand position and a foot pedal. The foot pedal will be used to control the acceleration, braking, and reversing. We will achieve all these by integrating a P5JS tracking system into the car, which will interpret the user’s hand gestures and translate them into commands that control the car’s movements. The hand gestures and pedal control will be synced together via two serial ports that will communicate with the microcontroller of the car.

Experience

The entire concept is not based only on a driving experience. We introduce a racing experience by creating a race circuit. The idea is for a user to complete a lap in the fastest time possible. Before you begin the experience, you can view the leaderboard. After your time has been recorded, a pop-up appears for you to input your name to be added to the leaderboard. For this, we created a new user interface on a separate laptop. This laptop powers an Arduino circuit connection which features an ultrasonic sensor. The ultrasonic sensor checks when the car has crossed the start line and begins a timer, and detects when the user ends the circuit. After this, it records the time it took a user to complete the track and sends this data to the leaderboard.

This piece of code is how we’re able to load and show the leaderboard.

function loadScores() {
let storedScores = getItem("leaderboard");
if (storedScores) {
highscores = storedScores;
console.log("Highscores loaded:", highscores);
} else {
console.log("No highscores found.");
}
}

function saveScores() {
// make changes to the highscores array here...
storeItem("leaderboard", highscores);
console.log("Highscores saved:", highscores);
}


IMPLEMENTATION(The Car & Foot Pedal)

We first built the remote-controlled car using an Arduino Uno board, a servo motor, a Motor Shield 4 Channel L293D, an ultrasonic sensor, 4 DC motors, and other peripheral components. Using the Motor Shield 4 Channel L293D decreased numerous wired connections and allowed us space on the board on which we mounted all other components. After, we created a new Arduino circuit connection to use the foot pedal. 

The foot pedal sends signals to the car by rotating a potentiometer whenever the pedal is engaged. The potentiometer value is converted into forward/backward movement before it reaches p5.js via serial communication.

P5/Arduino Communication

At first, a handshake is established to ensure communication exists before proceeding with the program:

//////////////VarCar/////
// Define Serial port
let serial;
let keyVal;
//////////////////////////
const HANDTRACKW = 432;
const HANDTRACKH = 34;

const VIDEOW = 320;
const VIDEOH = 240;

const XINC = 5;
const CLR = "rgba(200, 63, 84, 0.5)";

let smooth = false;
let recentXs = [];
let numXs = 0;

// Posenet variables
let video;
let poseNet;

// Variables to hold poses
let myPose = {};
let myRHand;

let movement;
////////////////////////

let Acceleration = 0;
let Brake = 0;
let data1 = 0;
let data2 = 0;

let s2_comp=false;

function setup() {
// Create a canvas
//createCanvas(400, 400);

// // Open Serial port
// serial = new p5.SerialPort();
// serial.open("COM3"); // Replace with the correct port for your Arduino board
// serial.on("open", serialReady);

///////////////////////////
// Create p5 canvas

The Hand Gestures

Two resources that helped detect the user’s hand position were PoseNet and Teachable Machine. We used these two resources to create a camera tracking system which was then programmed to interpret specific hand gestures, such as moving the hand right or left to move the car in those directions. This aspect of our code handles the hand tracking and gestures.

if (myPose) {
try {
// Get right hand from pose
myRHand = getHand(myPose, false);
myRHand = mapHand(myRHand);

const rangeLeft2 = [0, 0.2 * HANDTRACKW];
const rangeLeft1 = [0.2 * HANDTRACKW, 0.4 * HANDTRACKW];
const rangeCenter = [0.4 * HANDTRACKW, 0.6 * HANDTRACKW];
const rangeRight1 = [0.6 * HANDTRACKW, 0.8 * HANDTRACKW];
const rangeRight2 = [0.8 * HANDTRACKW, HANDTRACKW];

// Check which range the hand is in and print out the corresponding data
if (myRHand.x >= rangeLeft2[0] && myRHand.x < rangeLeft2[1]) {
print("LEFT2");
movement = -1;
} else if (myRHand.x >= rangeLeft1[0] && myRHand.x < rangeLeft1[1]) {
print("LEFT1");
movement = -0.5;
} else if (myRHand.x >= rangeCenter[0] && myRHand.x < rangeCenter[1]) {
print("CENTER");
movement = 0;
} else if (myRHand.x >= rangeRight1[0] && myRHand.x < rangeRight1[1]) {
print("RIGHT1");
movement = 0.5;
} else if (myRHand.x >= rangeRight2[0] && myRHand.x <= rangeRight2[1]) {
print("RIGHT2");
movement = 1;
}
// Draw hand
push();
const offsetX = (width - HANDTRACKW) / 2;
const offsetY = (height - HANDTRACKH) / 2;
translate(offsetX, offsetY);
noStroke();
fill(CLR);
ellipse(myRHand.x, HANDTRACKH / 2, 50);
pop();
} catch (err) {
print("Right Hand not Detected");
}
print(keyVal)


The Final Result & Car Control

The final result was an integrated system consisting of the car, the pedal, and gesture control in P5.JS. When the code is run in p5.js, the camera detects a user’s hand position and translates it into movement commands for the car.

The entire code for controlling the car.

//////////////VarCar/////
// Define Serial port
let serial;
let keyVal;
//////////////////////////
const HANDTRACKW = 432;
const HANDTRACKH = 34;

const VIDEOW = 320;
const VIDEOH = 240;

const XINC = 5;
const CLR = "rgba(200, 63, 84, 0.5)";

let smooth = false;
let recentXs = [];
let numXs = 0;

// Posenet variables
let video;
let poseNet;

// Variables to hold poses
let myPose = {};
let myRHand;

let movement;
////////////////////////

let Acceleration = 0;
let Brake = 0;
let data1 = 0;
let data2 = 0;

let s2_comp=false;

function setup() {
// Create a canvas
//createCanvas(400, 400);

// // Open Serial port
// serial = new p5.SerialPort();
// serial.open("COM3"); // Replace with the correct port for your Arduino board
// serial.on("open", serialReady);

///////////////////////////
// Create p5 canvas
createCanvas(600, 600);
rectMode(CENTER);

// Create webcam capture for posenet
video = createCapture(VIDEO);
video.size(VIDEOW, VIDEOH);
// Hide the webcam element, and just show the canvas
video.hide();

// Posenet option to make posenet mirror user
const options = {
flipHorizontal: true,
};

// Create poseNet to run on webcam and call 'modelReady' when model loaded
poseNet = ml5.poseNet(video, options, modelReady);

// Everytime we get a pose from posenet, call "getPose"
// and pass in the results
poseNet.on("pose", (results) => getPose(results));
}

function draw() {
// one value from Arduino controls the background's red color
//background(0, 255, 255);

/////////////////CAR///////
background(0);

strokeWeight(2);
stroke(100, 100, 0);
line(0.2 * HANDTRACKW, 0, 0.2 * HANDTRACKW, height);
line(0.4 * HANDTRACKW, 0, 0.4 * HANDTRACKW, height);
line(0.6 * HANDTRACKW, 0, 0.6 * HANDTRACKW, height);
line(0.8 * HANDTRACKW, 0, 0.8 * HANDTRACKW, height);
line(HANDTRACKW, 0, HANDTRACKW, height);
line(1.2 * HANDTRACKW, 0, 1.2 * HANDTRACKW, height);

if (myPose) {
try {
// Get right hand from pose
myRHand = getHand(myPose, false);
myRHand = mapHand(myRHand);

const rangeLeft2 = [0, 0.2 * HANDTRACKW];
const rangeLeft1 = [0.2 * HANDTRACKW, 0.4 * HANDTRACKW];
const rangeCenter = [0.4 * HANDTRACKW, 0.6 * HANDTRACKW];
const rangeRight1 = [0.6 * HANDTRACKW, 0.8 * HANDTRACKW];
const rangeRight2 = [0.8 * HANDTRACKW, HANDTRACKW];

// Check which range the hand is in and print out the corresponding data
if (myRHand.x >= rangeLeft2[0] && myRHand.x < rangeLeft2[1]) {
print("LEFT2");
movement = -1;
} else if (myRHand.x >= rangeLeft1[0] && myRHand.x < rangeLeft1[1]) {
print("LEFT1");
movement = -0.5;
} else if (myRHand.x >= rangeCenter[0] && myRHand.x < rangeCenter[1]) {
print("CENTER");
movement = 0;
} else if (myRHand.x >= rangeRight1[0] && myRHand.x < rangeRight1[1]) {
print("RIGHT1");
movement = 0.5;
} else if (myRHand.x >= rangeRight2[0] && myRHand.x <= rangeRight2[1]) {
print("RIGHT2");
movement = 1;
}
// Draw hand
push();
const offsetX = (width - HANDTRACKW) / 2;
const offsetY = (height - HANDTRACKH) / 2;
translate(offsetX, offsetY);
noStroke();
fill(CLR);
ellipse(myRHand.x, HANDTRACKH / 2, 50);
pop();
} catch (err) {
print("Right Hand not Detected");
}
print(keyVal)

//print(movement);
// print("here")
//print(writers);
}
//////////////////////////

if (!serialActive1 && !serialActive2) {
text("Press Space Bar to select Serial Port", 20, 30);
} else if (serialActive1 && serialActive2) {
text("Connected", 20, 30);

// Print the current values
text("Acceleration = " + str(Acceleration), 20, 50);
text("Brake = " + str(Brake), 20, 70);
mover();
}

}

function keyPressed() {
if (key == " ") {
// important to have in order to start the serial connection!!
setUpSerial1();
} else if (key == "x") {
// important to have in order to start the serial connection!!
setUpSerial2();
s2_comp=true
}
}

/////////////CAR/////////
function serialReady() {
// Send initial command to stop the car
serial.write("S",0);
print("serialrdy");
}

function mover() {
print("mover");

// Send commands to the car based wwon keyboard input
if (Acceleration==1) {
writeSerial('S',0);

//print(typeof msg1)

}else if (Brake==1) {
writeSerial('W',0);
}else if ( movement < 0) {
print("left")
writeSerial('A',0);
}else if ( movement > 0) {
print("right")

writeSerial('D',0);
}else if (movement== 0) {
print("stop");
writeSerial('B',0);
}
}

// When posenet model is ready, let us know!
function modelReady() {
console.log("Model Loaded");
}

// Function to get and send pose from posenet
function getPose(poses) {
// We're using single detection so we'll only have one pose
// which will be at [0] in the array
myPose = poses[0];
}

// Function to get hand out of the pose
function getHand(pose, mirror) {
// Return the wrist
return pose.pose.rightWrist;
}

// function mapHand(hand) {
//   let tempHand = {};
//   tempHand.x = map(hand.x, 0, VIDEOW, 0, HANDTRACKW);
//   tempHand.y = map(hand.y, 0, VIDEOH, 0, HANDTRACKH);

//   if (smooth) tempHand.x = averageX(tempHand.x);

//   return tempHand;
// }
function mapHand(hand) {
let tempHand = {};
// Only add hand.x to recentXs if the confidence score is greater than 0.5
if (hand.confidence > 0.2) {
tempHand.x = map(hand.x, 0, VIDEOW, 0, HANDTRACKW);

if (smooth) tempHand.x = averageX(tempHand.x);
}

tempHand.y = map(hand.y, 0, VIDEOH, 0, HANDTRACKH);

return tempHand;
}

function averageX(x) {
// the first time this runs we add the current x to the array n number of times
if (recentXs.length < 1) {
console.log("this should only run once");
for (let i = 0; i < numXs; i++) {
recentXs.push(x);
}
// if the number of frames to average is increased, add more to the array
} else if (recentXs.length < numXs) {
console.log("adding more xs");
const moreXs = numXs - recentXs.length;
for (let i = 0; i < moreXs; i++) {
recentXs.push(x);
}
// otherwise update only the most recent number
} else {
recentXs.shift(); // removes first item from array
recentXs.push(x); // adds new x to end of array
}

let sum = 0;
for (let i = 0; i < recentXs.length; i++) {
sum += recentXs[i];
}

// return the average x value
return sum / recentXs.length;
}

////////////////////////

// This function will be called by the web-serial library
// with each new *line* of data. The serial library reads
// the data until the newline and then gives it to us through
// this callback function
function readSerial(data) {
////////////////////////////////////
//READ FROM ARDUINO HERE
////////////////////////////////////

if (data != null) {
// print(data.value);
let fromArduino = data.value.split(",");
if (fromArduino.length == 2) {
//print(int(fromArduino[0]));
//print(int(fromArduino[1]));
Acceleration = int(fromArduino[0]);
Brake  = int(fromArduino[1])

}

//////////////////////////////////
//SEND TO ARDUINO HERE (handshake)
//////////////////////////////////
if(s2_comp){
let sendToArduino = Acceleration + "," + Brake + "\n";
// mover()
//print("output:");
//print(sendToArduino);
//writeSerial(sendToArduino, 0);
}
}
}


The car moves forward/backward when a user engages the foot pedals, and steers left/right when the user moves his/her hand left/right. The components of the car system are able to communicate via serial communication in p5.js. To enable this, we created 2 serial ports(one for the car and the other for the foot pedal). 


CHALLENGES

One challenge we may face during the implementation is accurately interpreting the user’s hand gestures. The camera tracking system required a lot of experimentation and programming adjustments to ensure that it interprets the user’s hand movements while also being light and responsive. Originally the camera was tracking the X and Y axis, but it caused p5 to be very slow and laggy because of the number of variables that it needs to keep track of. The solution was to simply remove one of the axes, this improved the responsiveness of the program drastically.


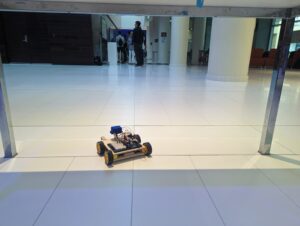
The initial plan was to operate the car wirelessly, however, this was not possible due to many factors, such as using the wrong type of Bluetooth board. With limited time, we resorted to working with two serial ports for communication between the car, the pedals, and the hand gesture control. This introduced a new problem- freely moving the car. However, we solved the issue by using an Arduino USB extension cable for the car to be able to move freely. To allow users at the showcase to be able to move the car around without the car tripping over the wire, we came up with an ingenious solution to tie a fishing line across the pillars of the Art Center where we were set-up, and then use our extended USB cable to basically hang of the fishing line, so it acted like a simulated roof for our setup. This way, the car could freely roam around the circuit and never trip.


Another major roadblock was the serial ports in p5js. Since the project uses both a pedal and the car, there was the need to use 2 separate Arduino Uno boards to control both systems. This necessitated the use of 2 serial ports in p5js. The original starter code for connecting p5 to Arduino was only for 1 serial port. A lot of time was spent adjusting the existing code to function with 2 serial ports. 


Lessons learned, especially with regard to robots, is be grouped into the following points: 

Planning is key: The project can quickly become overwhelming without proper planning. It’s important to define the project goals, select appropriate devices and how to sync the code to those devices and create a detailed project plan. 

Test as often as you can before the showcase date: Testing is crucial in robotics projects, especially when dealing with multiple hardware components and sensors. This one was no exception. It’s important to test each component and module separately before combining them into the final project.

Future steps needed to take our project to the next level.

  1. Expand functionality: While the current design allows for movement in various directions, there are other features that could be added to make the car more versatile. We plan on adding cameras and other sensors(LiDar) to detect obstacles to create a mapping of an environment while providing visual feedback to a user.
  2. Optimize hardware and software: We also plan on optimizing the hardware and software components used. This would involve changing the motors to more efficient or powerful motors, using more accurate sensors (not using the ultrasonic sensor), or exploring other microcontrollers that can better handle the project’s requirements. Additionally, optimizing the software code can improve the car’s responsiveness and performance. For example, our software code can detect obstacles but cannot detect the end of a path.  Regardless, we believe we can engineer a reverse obstacle-sensing algorithm to create an algorithm that could detect cliffs and pot-holes, and dangerous empty spaces on roads to ultimately reduce road accidents.

Demonstration

Final Project: PacXon Premium

Concept

For the purposes of the Final Project of Introduction to Interactive Media, we were presented the challenging task of connecting Software and Hardware. To achieve this, our team of three members, Zunair, Ishmal, and Abraiz, decided to create a game using P5Js as it seemed like a de-stressing activity. We also wanted to bridge it with hardware by producing an Arcade Game Controller. This led us to the creation of PacXon Premium and its accompanying controller.

Pac-Xon Premium is a game that is based on Pac-Man, and it was inspired by one of our team member’s childhood favorites. We started with Pac-Xon Deluxe, the original game, which was fairly simple but had numerous levels of increasing difficulty. However, the gradual increase in difficulty may lead to repetitiveness and lack of challenge, even in the most difficult levels. We also noticed that the classic graphics of the game were outdated, so we decided to give it a modern touch and feel and create a revamped and customized version.

Initially, we thought that coding the game would be a simple task. However, as we delved deeper into the logic and technical requirements of even the smallest details, we realized that it would require a relatively complex algorithmic approach. Simple Object Oriented Programming and Javascript Basics were not enough to achieve our goal of making almost all objects interact with each other. We decided to make it a tile-based game to add to the complexity.

In summary, Pac-Xon Premium is an updated and customized version of Pac-Xon Deluxe, a game inspired by Pac-Man. We added a modern touch and feel to the classic graphics and produced a tile-based game with a complex algorithmic approach. The game features numerous levels with increasing difficulty and challenges players to think strategically to progress through the game.

Link & Video

While there is a need for a Joystick Controller to utilize the Arcade feel of the game, keyboard will just work fine with the W,A,S,D keys at this link.

To cater to the possibility of any issues with the code, we have also recorded a video of the Game with the Joystick Controller that we produced:

Hardware and its Pictures:

For producing the Arcade Controller, we started off by connecting the Arcade Joystick to a breadboard and Arduino, and connecting its movement to corresponding movements in the P5Js Sketch which can be seen in the following picture:
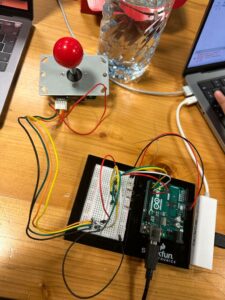
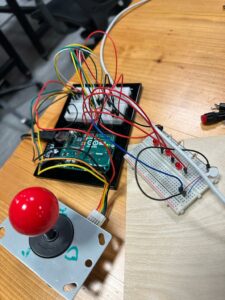
Then, moving on, we added another breadboard with 3 LED Bulbs that demonstrated lights and also a Vibration Motor that gave sense of a Haptic Feedback response when a person died, level was completed or some significant event happened.
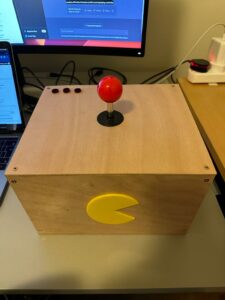
Then, to wrap the content of the Breadboard, we wanted a physically rigid controller, which was large enough to have the Joystick embedded, and also have LED lights and the Vibration Motor stuck inside. The box, in its initial stages, can be seen here:
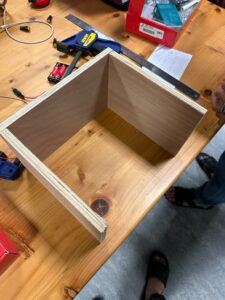
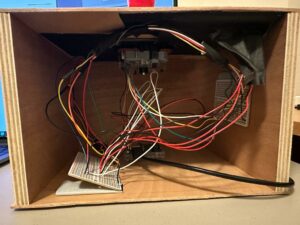
The box is open from one end for debugging purposes, and also does not sway away from the looks of it with the back side being the only open section. We decided to translate our solderless breadboard design onto a soldered breadboard to complete our hardware in a rigid fashion. This was then installed inside the box as can be seen below:
All in all, we produced a controller:
How it Works:

As you have already seen what the project is, let us explain the intricacies of how it was developed and its functionalities (code is added at the very end):

p5.js Description

As our first step, using Javascript, and particularly the p5 JS library, we started off with creating a 2D Array/ List which was technically mapped over the entire canvas, or rather drawn over the area of the canvas, such that each index in the 2D Array/ List represented a 20px by 20px box on the canvas of the game. Then we took an approach such that a value 1 at any index would draw a solid blue tile (20px by 20px) on the canvas at the position corresponding to the index of the 2D Array/ List. Similarly, if the value was to be 0, nothing was to be drawn and if the value was to be -1, a different blue tile representing a ‘line’ would be drawn instead. Then we created functions which handled the filling of the array and included functionalities like initializing the array borders at the beginning of the game and those that checked for if any values in the 2D Array were modified and matched a certain criteria for a tile to be drawn at that position, or even to map the values of the x and y coordinates on the canvas to the array position and the tile at that very location.

Once we were satisfied with the Array functionality, we started off with creating the Player Class that drew the user controlled character on the screen. This was the class that we found to be the most challenging, since we had to incorporate the functionality of an object of a Player class with its movement being in accordance with the functionality of the 2D Array. Drawing, and moving the player was very simple, however when we changed the direction of the Pac-Xon, it was causing the Pac-Xon to be moving between two different tiles as shown below:
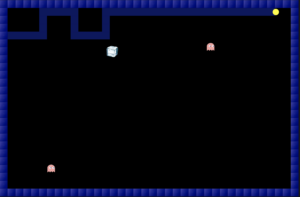
In order to solve this problem, we created a rounding function that checks the player’s position and checks the tile, from the two tiles that it intersects, on which the majority of the player’s body lies and forces the player to be pushed or pulled onto that tile as it changes its direction. We tried other approaches, including the reduction of FrameRate or increasing the speed by the size of the tile, however both of them resulted in reduced game play quality.

Moving on, we allowed for the player to draw connecting lines between two solid blocks. This was done mainly by using the position of the tile that the player is present at and then checking whether the player is at an empty area or a solid position, and then drawing a ‘line’ tile if the condition is fulfilled. We extended this approach to allow for checking the next tile and ensuring the player does not bump into the line that is being formed, we also somewhat extended the same approach to ensure restrict the movements when the player is forming the line or is within the solid block region.

However, the most difficult part of the project was to fill the appropriate ‘boxes’, which are certain enclosed regions in the canvas when the line connects between two solid tiles. A demonstration of this is:
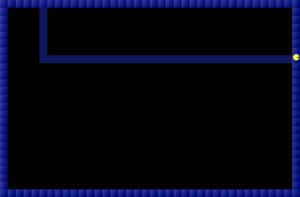
The complications with this was not only the procedure to fill the region, but in fact the considerations to take into account when filling this. A brief overview of them include that the region should not fill if the enemy is present inside of the region, or if multiple regions are created, all of the smallest ones should fill up, and only the largest one and/or the ones including the enemy should remain empty such that:

The approach to solve this was using the following algorithms:

Flood Fill Algorithm
Max Area of an Island (LeetCode Problem)

We used the Max Area of an Island Algorithm, which compares the areas of all the individual regions and finds out the maximum of those, and modified it to instead return x and y coordinates of each of the regions. We then used these coordinates to find the areas of all the regions, with an intermediary step checking if the enemy was present in any of the regions then to not take it into consideration, and then from those areas we excluded the maximum area and used all the other coordinates to fill the smaller areas. In this manner, we were able to achieve the desired result through extensively comprehending the complex recursive algorithms.

After this, we implemented the enemy classes where each type of enemy had a class that inherited from the main enemy class for the features that were common amongst all enemies. The movement of the enemies used a similar approach of checking the tiles around it and reversing its speed if it encountered the solid tile; this was then extended to allow some enemies to eat the solid tiles when they bounced off of them as well. The enemy class interacted with the Player class to check for collisions with the player.

Moving on, we incorporated the Powerups class, where the various power ups were placed at certain positions, like the bomb was to only show up in the region with the solid tiles. The power ups then interacted with the Player and Enemy class both, where either of them could use the power ups effect.

The last complex step was to incorporate the various screens with state variables at certain positions. It produced a lot of variables and seemed like a logic gate problem solved with boolean variables instead of gates. The changing of states and ensuring that the correct screen appears after one another was challenging to keep track of.

The final touches were to add sound, fix any bugs with interactions and movements or any logical errors in the algorithm. With all the effort put in, the end product seemed very satisfactory and came up together better than our initial expectations!

Arduino Description

While most of the complexity was in having the game come together in P5Js, there was a decent amount of effort put into the Hardware connection with p5Js. We wanted to ensure that the game runs fast, to allow for the intended smoothness but also communicates over a Serial connection with the Arduino.

Therefore, we incorporated the vibration of the motor without using any delays and instead making use of timestamp millis, similar to the concept of Blink Without Delay that was taught in class. Moreover, we had a short version of a State Machine in our Arduino code as well which allowed the light up of the number of LED bulbs in correspondence to the number of lives left. Also, the Arduino was keeping track of the point where the lives were lost in order to start the Vibration Motor on its own, without any particular signal from p5Js.

Interaction Design

All in all, as part of our interactive design, we can outline a couple of features:

– Makes use of joystick, keyboard, as well as gestures as input from the user to move the pacman character
– There are LED lights as well as HTML elements that display the lives and progress of the levels
– A particular vibration motor, as well as sound effects, that highlight the different events taking place
– Powerups in the game which can either be utilized by the player, or even the enemies!
– Packaged box controller to utilize a direct interaction with P5Js in real time

What are we proud of:

Overall, we are very proud to have completed a project that saw much attention at the Interactive Media Showcase, and received complements from individuals! It is good to have overcome the difficulties with P5Js, as well as Arduino to create something that looks complete, and at Bug free (at least as of now!). While the game seems simple, if you think of reproducing it, you will begin thinking of the complexities involved, and we are happy to have achieved what we have.

However, in particular, as Computer Science students, we are very glad to bring to life examples from Leetcode and programming competitions, into real life. We had always questioned the necessity for these type of questions and their relevance in the practical world, but we have a live example to showcase the relevance of these complex algorithms now.

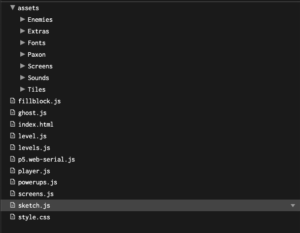
We are also particularly positive and happy about our code organization, commenting and file structure. The code is attached at the very end of this article to allow for better reading of content, however, the way all the images, sound files, and even the different pieces of code were divided into different files and organized for better understanding as well as debugging is something we really enjoyed doing. A quick glimpse into it can be seen below:
Moreover, it was very challenging to produce a detailed ‘menu’ in P5js. Therefore, we are particularly proud of having achieved that. It can be seen in the ‘Screens.js’ files below. This is an example of a very complex state machines, where images are shown depending on different click locations, which then only accepts clicks at certain different locations. For example, the ‘Start Game’ shows different levels which accepts clicks at different levels, and then there is a screen for completion or loss of each level, which then accepts click and then responds appropriately.

If you have played the game, you may have experienced the different types of enemies, or ghosts as we call them. These are created in run time through object oriented programming, as well as inheritance. There is a basic class for the Ghosts, and then there is an extension to it for the different types which builds upon the basic class. This is a proper utilization of the coding principles, and we are proud of having made use of this.

Lastly, as an added interactivity, we decided to use gestures. Initially, we had thought of this option to fail completely, however it did not turn out to be as bad if used very properly!

Difficulties:

In any programming assignment, as well as hardware work, there is always difficulties. The first one was faced by us when we replaced the LED Bulbs in our controller with the Bigger LED Bulbs that could be inserted more appropriately into our Box. These are the ones available in one of the hardware boxes in the IM Lab. However, turned out that they were not working at all with the resistor – and this was after it had been soldered and put together. So we had to improvise and replace them with regular LED bulbs, and then laser cut the red circles to cover the light. Since the brightness of the lights were not that good anyways, we used glue gun on them while sticking the acrylic circles to have a ‘spread’ effect.

Then comes something we have mentioned earlier, and it is the algorithmic complexities in our code where we initially did not know where to begin and were completely stuck. However, determination helped us through!

Another particular challenge that we faced was with a connection of the Vibration Motor while there was a Serial connection with p5Js already happening for the JoyStick. We are still not sure what had happened at then, but eventually, somehow, with trial and error it worked and we did not want to go back and debug the root cause!

Improvements:

We believe the hardware could have been developed further wherein there should be no need for a mouse, even to select the levels. However, this would prove to be very complex in an already complex state machines for the Screens. However, an addition of buttons on our controller box, to replace some functionality of the mouse, could have been a good prospect.

Moreover, improving the gesture control by utilizing more advanced models for detection could also be possible. This is something we could do as an improvement should we choose to take this project further!

Code:

The code is divided into different files, with each file performing the functionality that is intuitive to the name of the file. The files that we have are:

– sketch.js (Brings all functionalities together with setup() and draw())
– screens.js (The state machines for the ‘Menu’)
– player.js (For managing the functionality of the PacMan)
– ghost.js (Handles all the ghosts/enemies)
– levels.js (Outlines the different levels that there are)
– level.js (Manages the common functionalities of each level – player movement, etc)
– fillblock.js (The algorithms that were needed to fill the blocks of the 2D Array)

Each file is separately attached below:

sketch.js

// A 2D list to store the tiles for the game board
let level = [];
// Stores the images
let tile, movingTile, rightPacXon, leftPacXon, upPacXon, downPacXon;
// Variables to store the ghosts/enemies
let redGhost, blueGhost, yellowGhost, pinkGhost;
// Variables to store the powerups
let bomb, ice, bolt, slow;
// Array to store all the powerups
let powerups = [];
// Store the tilesize for use throughout
let tileSize;
// Keeping a track of the area of an enclosed regions
let count = 0;
// Storing the count for a certain region
let c1 = 0;
// Storing the maxArea
let mArea;
// Variables to store the areas, and the coordinates for filling the enclosed regions.
let sVals = [];
let pVals = [];
let areas = [];
let tc;
// Sertting the timer for the game and initializing it to 100
let timer = 100;
// declaring and initializing the levels to be kept track of
let levels = 1;
// For storing all the enemies in the list
let enemy = [];
// Keeping track of the x and y positions of the ghost
let ghostx, ghosty;
// Checking if level should be up or not and initializing to false;
let level_up = false;
// State variables to keep track of the screens
let gamestart;
let checkMenuclick;
let load_level;
let loadhowtoplay;
let selectcontrols;
let joystickActive;
let loadcontrolsscreen;
let checkhowtoplay;
let gamebegin;
let checkforselectlevel;
let checkforStart;
let checkfornextLevel;
let levelupscreen;
let endscreen;
let checkforretry;
let gamecomplete;
let checkforfinish;
let mylevel;
// Variables to store all the images
let level1;
let level2;
let level3;
let level4;
let level5;
let level6;
let main_image;
let controlscreens;
let controlscreensbackup;
let joystickselectedscreen;
let howtoplay;
let clicktostart;
let levelup;
let endimg;
let finish;
let returnto;
// Variables for gesture detection
let video;
let handPose;
let hands;
let gestureActive = "";
let getVideo;
let videoSet;
let gestureDirection;
// Variables to store all the sounds
let gameoversound, movingsound, clickedsound, collectionsound, collisionsound, levelupsound, movement, bg;
// Declaring and initializingthe counter and max counter to calculate the percentage and keep track for the preloader
let counter = 1;;
let maxCounter = 34;
// joysrick variables
let joystickInput = 0;

// Function for initiating the Gesture Detection
function modelReady() {
  console.log('hand pose loaded');
  handpose.on('predict', results => {
    // Storing the result based on hand gestures
    hands = results;
  });
}

// Pre Loading all the assets
// The updateCounter parameter is passed in each loadXYZ() function to call the updateCounter function for progressing the pre-loader
function preload() {
  // Loading the tiles to be drawn
  tile = loadImage('assets/Tiles/tile.png', updateCounter);
  movingTile = loadImage('assets/Tiles/movingTile.png', updateCounter);
  // Loading all Pac-Xon direction gifs
  rightPacXon = loadImage('assets/Paxon/right_paXon.gif', updateCounter);
  leftPacXon = loadImage('assets/Paxon/left_paXon.gif', updateCounter);
  upPacXon = loadImage('assets/Paxon/up_paXon.gif', updateCounter);
  downPacXon = loadImage('assets/Paxon/down_paXon.gif', updateCounter);
  // Loading all the Ghosts/ Enemies
  redGhost = loadImage('assets/Enemies/red-ghost.png', updateCounter);
  blueGhost = loadImage('assets/Enemies/blue-ghost.png', updateCounter);
  yellowGhost = loadImage('assets/Enemies/yellow-ghost.png', updateCounter);
  pinkGhost = loadImage('assets/Enemies/pink-ghost.png', updateCounter);
  // Loading all the screens
  main_image = loadImage('assets/Screens/home.gif', updateCounter);
  level1 = loadImage('assets/Screens/level1.png', updateCounter);
  level2 = loadImage('assets/Screens/level2.png', updateCounter);
  level3 = loadImage('assets/Screens/level3.png', updateCounter);
  level4 = loadImage('assets/Screens/level4.png', updateCounter);
  level5 = loadImage('assets/Screens/level5.png', updateCounter);
  level6 = loadImage('assets/Screens/level6.png', updateCounter);
  controlscreens = loadImage('assets/Screens/controls.png', updateCounter);
  joystickselectedscreen = loadImage('assets/Screens/joystick_selected.png', updateCounter);
  gestureselectedscreen = loadImage('assets/Screens/gestures_selected.png', updateCounter);
  howtoplay = loadImage('assets/Screens/howtoplay.png', updateCounter);
  clicktostart = loadImage('assets/Screens/clicktostart.png', updateCounter);
  levelup = loadImage('assets/Screens/levelcompleted.png', updateCounter);
  endimg = loadImage('assets/Screens/gameover.png', updateCounter);
  finish = loadImage('assets/Screens/congrats.png', updateCounter);
  returnto = loadImage('assets/Screens/returnmenu.png', updateCounter);
  // Loading all the powerups
  bomb = loadImage('assets/Extras/redbomb.png', updateCounter);
  ice = loadImage('assets/Extras/ice.png', updateCounter);
  bolt = loadImage('assets/Extras/lightning-bolt.png', updateCounter);
  slow = loadImage('assets/Extras/snail.png', updateCounter);
  // Loading all the sounds
  gameoversound = loadSound('assets/Sounds/gameover.mp3', updateCounter);
  movingsound = loadSound('assets/Sounds/movingsound.wav', updateCounter);
  clickedsound = loadSound('assets/Sounds/clicked.wav', updateCounter);
  collectionsound = loadSound('assets/Sounds/collection.wav', updateCounter);
  collisionsound = loadSound('assets/Sounds/collision.wav', updateCounter);
  levelupsound = loadSound('assets/Sounds/levelup.wav', updateCounter);
  bg = loadSound('assets/Sounds/bg.mp3', updateCounter);

}

function setup() {
  // initializing the canvas and storing a reference to it
  var canvasMain = createCanvas(760,500);
    // set the ID on the canvas element
  canvasMain.id("p5_mainCanvas");
  // set the parent of the canvas element to the element in the DOM with
  // an ID of "left"
  canvasMain.parent("#center");

  // initializing all the state variables for the screens
  gamestart = false;
  checkMenuclick = false;
  load_level = false;
  loadhowtoplay = false;
  loadcontrolsscreen = false;
  selectcontrols = false;
  gestureActive = false;
  getVideo = false;
  videoSet = false;
  joystickActive = false;
  gesturehighlight = false;
  joystickhighlight=false;
  controlscreensbackup = controlscreens;
  checkhowtoplay =  false;
  gamebegin = false;
  checkforselectlevel =  false;
  checkforStart = false;
  levelupscreen = false;
  checkfornextLevel = false;
  endscreen = false;
  checkforretry = false;
  gamecomplete = false;
  checkforfinish = false;
  // initializing the value of mylevels for the levels to be accessed.
  mylevel = 1;

  // making use of the local storage API and obtaining the stored value of the levels that were previously ever completed by the user
  let user_levels = window.localStorage.getItem('levelsCompleted');
  // Checking if there was any data stored,
  if (user_levels) {
    // If so, the data from the local storage is used, otherwised the above initalized value is used instead.
    mylevel = int(user_levels)
  }
  // Declaring the tilesize
  tileSize = 20;
  // Populates the 2D Array with 0s
  initializeLevel();

  // Places 1s at the borders of the 2D Array
  resetLevel();
  tc = 0;
  player = new Player();
  // powerup = new Powerup();

  // Evening out the perlin noise
  noiseDetail(24);
  // Looping the background music

  bg.loop();
  // Setting the volume of the background music to a minimal value
  bg.setVolume(0.3);


}

function draw(){
  // Gets the User's Video if the Gesture Option is selected
  if((getVideo == true)&& (videoSet==false)){
    video = createCapture(VIDEO);
    video.hide();
    const options = {};
    handpose = ml5.handpose(video, options, modelReady);
    videoSet = true;
  }
  if (gestureActive){
    getGestures();
  }
  // When this is false, the MENU or the Level Selection screen appears
  if(gamestart == false){
    // If this if false, the MENU Screen will appear, which it will initially
    if (load_level == false){
      // If the how to play screen is clicked, the menu screen is not shown and instead the how to play screen is shown in the else {
      // When the how to play screen is closed, the menu screen appears again as the variable becomes false
      if (loadhowtoplay == false && loadcontrolsscreen == false){
        // Clicks for the menu screen are detected
        checkMenuclick = true;
        // The Start Screen is shown
        StartScreen();
      }
      else if (loadhowtoplay == true){
        checkMenuclick=false;
        // The How To Play Screen is shown
        HowToPlayScreen();
        // Clicks for that screen are detected
        checkhowtoplay = true;
      }
      else if (loadcontrolsscreen == true){
        checkMenuclick=false;
        // The How To Play Screen is shown
        SelectControlsScreen();
        // Clicks for that screen are detected
        selectcontrols = true;

        if(serialActive==true){
          controlscreens = joystickselectedscreen;
        }
        if(gestureActive==true){
          getVideo = true;
          controlscreens = gestureselectedscreen;
        }
      }
    }
    // The Load Screen will appear instead of the Menu Screen
    else if(load_level == true){
      // When the load screen is loaded, the clicks for the Menu Screen are not detected
      checkMenuclick = false;
      // The Level Screen is showns
      LevelScreen();
      // Clicks for the Level Screen are detected after setting the next variable to true
      checkforselectlevel = true;
    }
  }
  // If the game start is true, the menu or any of the initial screens are not appearing
  else {
    // Fills the background with a black color
    background(0);
    // Draws the level, which in the first instance only draws the borders
    drawLevel();

    // If the game gets completed,
    if(gamecomplete == true){
      // The game complete screen is shown
      image(finish, 0, 0);
      // CLicks for that screen are detected
      checkforfinish = true;
    }
    else{
      // If the game ends
      if(endscreen == true){
        // The game end screen is shown and
        image(endimg, 0, 0);
        // Clicks for that screen are detected
        checkforretry =  true;
      }
      else{
        // If the level gets incremented,
        if(levelupscreen==true){
          // The level up screen is shown
          image(levelup, 0,0);
          // CLicks for that screen are detected
          checkfornextLevel = true;
        }
        else{
          // If the game has not begun yet, the click to start screen appears
          if(gamebegin==false){
            image(clicktostart, 0, 0);
            // Clicks for that screen are detected
            checkforStart = true;
          }
          if(gamebegin == true){
            // Shows the updated Lives on the HTML Page
            let window_score = document.getElementById('current_lives')
            window_score.innerHTML = player.lives;

            //player
            player.display();
            player.move();

            // If there is an existing powerup, it draws it in every frame and ensures the effect() function runs
            if (powerups.length > 0) {
              powerups[0].display();
              powerups[0].effect();
            }

            //Iterates through all the enemies and then displays and moves them
            for (let i = 0; i < enemy.length; i++){
              enemy[i].display();
              enemy[i].move();
            }

            // Shows the updated Progress on the HTML Page
            let window_progress = document.getElementById('current_progress')
            window_progress.innerHTML = completeLevel() + "%";


            // Shows the updated Levels on the HTML Page
            let window_level = document.getElementById('current_level')
            window_level.innerHTML = levels;


            // Makes the powerups appear after a certain time period and ensures only one powerup can appear at a time
            if (frameCount % 600 == 0 && powerups.length == 0) {
              // Adds a powerup to the list for powerups
              powerups.push(new Powerup())
            }

            // Shows the updated Timer on the HTML Page
            let window_timer = document.getElementById('current_timer');
            window_timer.innerHTML = timer + 's';
            // Decreases the timer every second until the timer is 0
            if (frameCount % 60 == 0 && timer > 0) {
              timer --;
            }
            // Calls the next level function to check if the level is complete, and if so, it increases the level
            nextLevel();
            // If the timer or the player lives become 0, the game ends!
            if (timer == 0 || player.lives == 0){
              // The timer and the lives are updated on the HTML Page
              let window_score = document.getElementById('current_lives')
              window_score.innerHTML = player.lives;
              let window_timer = document.getElementById('current_timer');
              window_timer.innerHTML = timer + 's';
              // The game end screen is trigerred
              endscreen = true;
              // The right image for the Pac Xon is loaded
              player.graphic = rightPacXon;
              // The direction and movement of the Pac-Xon is reset
              player.currKeyCode = 0;
              // The pacXon is repositioned at the first index of the array
              player.x = 0;
              player.y = 0;
              // reset player speed
              player.speed = player.pspeed;
              // The levels are reset
              // levels = 1;
              // powerups are emptied
              powerups = [];
              // The level is reset and only the borders are drawn
              resetLevel();
              // The lives of the player are reset
              player.lives = 3;
              // The timer is reset
              timer = 100;
              // The game over sound is played
              gameoversound.play();
              // The all levels function is called to choose the level
              allLevels();
            }

          }
        }
      }

    }
  }
}

function mousePressed(){
  // Checks for clicks on the Various screens
  if(checkMenuclick == true){
    StartScreenClick();
  }
  else if(checkhowtoplay == true){
    HowToPlayClick();
  }
  else if(selectcontrols == true){
    SelectControlsClick();
  }
  else if(checkforselectlevel == true){
    LevelScreenClick();
  }
  else if(checkforStart == true){
    gamebegin =  true;
  }
  // Checks for clicks on the level up screens
  if(checkfornextLevel == true){
    // If the next option is clicked, the screen disappears
    if(mouseX>400 && mouseX <495 && mouseY>325&& mouseY<363){
      levelupscreen = false;
      clickedsound.play();
      checkfornextLevel == false;
      checkMenuclick = false;
    }
    // If the menu is clicked, the menu screen appears
    else if(mouseX>250 && mouseX <345 && mouseY>325&& mouseY<363){
      levelupscreen = false;
      gamestart = false;
      load_level = false;
      checkforselectlevel = false;
      checkfornextLevel == false;
      checkMenuclick = false;
      clickedsound.play();
    }
  }
  // Almost the same thing happens for the Game over screen
  if(checkforretry == true){
    // If the retry option is pressed
    if(mouseX>400 && mouseX <495 && mouseY>325&& mouseY<363){
      endscreen = false;
      checkforretry =  false;
      checkMenuclick = false;
      clickedsound.play();
    }
    // Or if the menu option is pressed
    else if(mouseX>250 && mouseX <345 && mouseY>325&& mouseY<363){
      // endscreen = false;
      endscreen = false;
      gamestart = false;
      load_level = false;
      checkforselectlevel = false;
      checkforretry =  false;
      checkMenuclick = false;
      clickedsound.play();
    }
  }
  // Checks for clicks on the 'Return to Menu' button on the screen that shows up when the game is completed
  if(checkforfinish == true){
    // rect(279, 318, 190, 45);
    if(mouseX>279 && mouseX <469 && mouseY>318&& mouseY<363){
      gamestart = false;
      gamecomplete = false;
      load_level = false;
      checkforselectlevel = false;
      clickedsound.play();
    }
  }
}

// Update counter function used within preload
function updateCounter() {
  // increase our counter
  counter++;

  // use the counter to set the style on the '#progress_bar' div
  let progress_bar = document.querySelector('#progress_bar');
  // The percentage is calculated
  progress_bar.style.width = int(counter/maxCounter*100) + "%";
}

function getGestures(){
  if (hands && hands.length > 0) {
    for (let hand of hands) {
      let annotations = hand.annotations;
      let thumb = annotations.thumb;

      let tx = thumb[3][0];
      let ty = thumb[3][1];

      let thumbsup = true;
      let thumbsdown = true;
      let thumbsleft = true;
      let thumbsright = true;

      let parts = Object.keys(annotations);
      let count = 0;
      for (let part of parts) {
        for (let position of annotations[part]) {
          let [x, y, z] = position;

          if (part === 'thumb') {
            if (x < tx) {
              thumbsleft = false;
            } else if (x > tx) {
              thumbsright = false;
            }
          } else {
            if (y < ty) {
              thumbsup = false;
            } else if (y > ty) {
              thumbsdown = false;
            }
          }
        }
      }

      if (thumbsup) {
        console.log("UP");
        gestureDirection = "up";
      } 
      else if (thumbsdown) {
        console.log("DOWN");
        gestureDirection = "down";
      } 
      else if (thumbsleft) {
        console.log("RIGHT");
        gestureDirection = "right";
      } 
      else if (thumbsright) {
        console.log("LEFT");
        gestureDirection = "left";
      }
    }
  }
}

screens.js

// Function to load up the MENU Screen
function StartScreen(){
  image(main_image, 0, 0);
  // Pauses the gif on the MENU Screen after 3 seconds
  if (frameCount % 180 == 0){
    main_image.pause();
  }
}
// Function to check for specific clicks on the MENU Screen
function StartScreenClick(){
  // Checks if the rectanglular area around the 'New Game' button is clicked
    if(mouseX>285 && mouseX <475 && mouseY>230&& mouseY<275){
      // Sets the variables for the Levels screen to appear
      load_level = true;
      // Ensures that the positions for the clicks on the MENU page are not being checked
      checkMenuclick == false;
      // Plays the click sound
      clickedsound.play();
    }
    // Checks if the rectanglular area around the 'How To Play' button is clicked
    if(mouseX>285 && mouseX <475 && mouseY>285&& mouseY<330){
      // Sets the variables for the How To Play screen to appear
      loadhowtoplay = true;
      // Ensures that the positions for the clicks on the MENU page are not being checked
      checkMenuclick == false;
      // Plays the click sound
      clickedsound.play();
    }
    // Checks if the rectanglular area around the 'More Games' button is clicked
    if(mouseX>285 && mouseX <475 && mouseY>340&& mouseY<385){
      // Sets the variables for the 'Select Controls' screen to appear
      loadcontrolsscreen = true;
      // Ensures that the positions for the clicks on the MENU page are not being checked
      checkMenuclick == false;
      // Plays the click sound
      clickedsound.play();
    }
}
// Function to load the How To Play screen image
function HowToPlayScreen(){
  image(howtoplay, 0, 0);
}
// Function to check if specific areas on the How to play screen have been clicked
function HowToPlayClick(){
    // Checks if the rectanglular area around the 'Return to Menu button is clicked
    if(mouseX>270 && mouseX <460 && mouseY>408&& mouseY<453){
      // Sets the variables to stop showing the how to play screen
      loadhowtoplay = false;
      // Does not check for click on the areas for the buttons on the how to play screen
      checkhowtoplay = false;
      // Plays the sound
      clickedsound.play();
    }
}

// Function to load the How To Play screen image
function SelectControlsScreen(){
  image(controlscreens, 0, 0);
}
// Function to check if specific areas on the How to play screen have been clicked
function SelectControlsClick(){
  // Checks if the rectanglular area around the 'Return to Menu button is clicked

  if(mouseX>155 && mouseX <340 && mouseY>265&& mouseY<360){
    print("JoyStick Clicked")
    // If a Serial Connection with the Arduino has not been established yet
    if(!serialActive){
      // Initiates the establishment of a Serial connection with the JoyStick
      setUpSerial();
    }
    gestureActive = false;
    joystickActive = true;
    // Plays the sound
    clickedsound.play();
  }

  if(mouseX>400 && mouseX <580 && mouseY>265&& mouseY<360){
    print("Gesture Clicked")
    gestureActive = true;
    joystickActive = false;
    // Plays the sound
    clickedsound.play();
  }
  
  if(mouseX>270 && mouseX <460 && mouseY>410&& mouseY<455){
    // Sets the variables to stop showing the how to play screen
    loadcontrolsscreen = false;
    // Does not check for click on the areas for the buttons on the how to play screen
    selectcontrols = false;
    // Plays the sound
    clickedsound.play();
  }
}

// Shows the appropriateimage according to the number of levels that are completed by a user.
function LevelScreen(){
  // Loads up the level one image if the user is on the first level
  if (mylevel == 1){
    image(level1, 0 ,0);
  }
  else if (mylevel == 2){
    image(level2, 0 ,0);
  }
  else if (mylevel == 3){
    image(level3, 0 ,0);
  }
  else if (mylevel == 4){
    image(level4, 0 ,0);
  }
  else if (mylevel == 5){
    image(level5, 0 ,0);
  }
  else if (mylevel == 6){
    image(level6, 0 ,0);
  }
  // Loads the overlayed image for the 'Return to Menu' option
  image(returnto, 0, 0);
}
// Function to check for any clicks on the Level Screen
function LevelScreenClick(){
    // Checks if the box around 'Return to Menu' is clicked
    if(mouseX>267 && mouseX <457 && mouseY>311&& mouseY<356){
      // Sets up the counters for any other clicks to happen to be false
      // Also sets the counters for the Level Screen to not be displayed anymore
      load_level = false;
      checkforselectlevel == false;
      clickedsound.play();
      checkhowtoplay = false;
      loadhowtoplay = false;
    }
    // The condition checks the number of levels 'unlocked' by the user and so allows for the appropriate number of them to be clicked by the user.
    if(mylevel >0){
      // Checks if the box around a specific level is clicked
      if(mouseX>118 && mouseX <193 && mouseY>215&& mouseY<293){
        // Plays the click sound
        clickedsound.play();
        // Initates the game by changing the state of the game
        gamestart = true;
        // Does not let the level screen to load again
        load_level =  false;
        // Does not allow for any click to work
        checkforselectlevel = false;
        // Sets the level to be displayed to be 1
        levels = 1;
        // Calls the function to load the appropriate enemies for that level
        levelOne();
      }
    }
    if(mylevel >1){
      if(mouseX>205 && mouseX <283 && mouseY>215&& mouseY<293){
        clickedsound.play();
        gamestart = true;
        load_level =  false;
        checkforselectlevel = false;
        levels = 2;
        levelTwo();
      }
    }
    if (mylevel >2){
      if(mouseX>290 && mouseX <368 && mouseY>215&& mouseY<293){
        clickedsound.play();
        gamestart = true;
        load_level =  false;
        checkforselectlevel = false;
        levels = 3;
        levelThree();
      }
    }
    if (mylevel >3){
      if(mouseX>375 && mouseX <453 && mouseY>215&& mouseY<293){
        clickedsound.play();
        gamestart = true;
        load_level =  false;
        checkforselectlevel = false;
        levels = 4;
        levelFour();
      }
    }
    if(mylevel >4){
      if(mouseX>460 && mouseX <538 && mouseY>215&& mouseY<293){
        clickedsound.play();
        gamestart = true;
        load_level =  false;
        checkforselectlevel = false;
        levels = 5;
        levelFive();
      }
    }
    if(mylevel >5){
      if(mouseX>545 && mouseX <623 && mouseY>215&& mouseY<293){
        clickedsound.play();
        gamestart = true;
        load_level =  false;
        checkforselectlevel = false;
        levels = 6;
        levelSix();
      }
    }
}

// This function will be called by the web-serial library
// with each new *line* of data. The serial library reads
// the data until the newline and then gives it to us through
// this callback function
function readSerial(data) {
  if (data != null) {
    console.log(data);
    joystickInput = data;
    let sendToArduino = player.lives + "\n";
    writeSerial(sendToArduino);
  }
}

player.js

//class to draw player
class Player {
  constructor(){
    // set player's position, lives, speed, graphic
    this.x = 0;
    this.y = 0;
    this.startMovingRight = false;
    this.startMovingDown = false;
    this.pKeyPress = 'None';
    this.moving = 'not moving';
    this.lives = 3;
    this.speed = 3;
    this.pspeed = this.speed;
    this.graphic = rightPacXon;
  }
  // display player
  display(){
    image(this.graphic, this.x, this.y, 20,20)
  }

  // move player
  move(){

    // set up middle of player positions
    this.middleX = this.x+tileSize/2;
    this.middleY = this.y+tileSize/2;

    // if a key is pressed
    // if (keyIsPressed==true){
      // when the first key of teh game is pressed, set previous key code
      if (this.pKeyPress == 'None'){
        this.pKeyPress = keyCode;
      }
      // if not first key press
      else {
        // set player to moving state
        this.moving = 'moving';
        // if the previous key press is not equal to the current keycode
        if (this.pKeyPress != this.currKeyCode){
          // prev key code = current
          this.pKeyPress = this.currKeyCode;
          // round the player's movement so it moves box to box only
          // round x position
          let roundx = this.x%20
          if (roundx !=0){
            if (roundx >= 10){
              this.x = this.x + (20 - roundx);
            }
            else if(roundx < 10){
              this.x = this.x - roundx;
            }
          }
          // round y position
          let roundy = this.y%20
          if (roundy !=0){
            if (roundy >= 10){
              this.y = this.y + (20 - roundy);
            }
            else if(roundy < 10){
              this.y = this.y - roundy;
            }
          }
        }
        // get the id of the tile where the middle if the player lies
        let pos = getTile(this.middleX, this.middleY);

        // if it is a solid tile
        if(pos == 1){
          // if keycode is right key (D)
          if (joystickInput ==4 || keyCode ==68 || gestureDirection == "right") {
            // set update keycode and change paxon graphic
            this.currKeyCode = 68;
            this.graphic = rightPacXon;
          }
          // if keycode is left key (A)
          if (joystickInput ==3 || keyCode ==65 || gestureDirection == "left") {
            // set update keycode and change paxon graphic
            this.currKeyCode = 65;
            this.graphic = leftPacXon;
          }
          // if keycode is up key (W)
          if (joystickInput ==2 || keyCode ==87 || gestureDirection == "up") {
            // / set update keycode and change paxon graphic
            this.currKeyCode = 87;
            this.graphic = upPacXon;
          }
          // if keycode is down key (S)
          if (joystickInput ==1 || keyCode ==83 || gestureDirection == "down") {
            // / set update keycode and change paxon graphic
            this.currKeyCode = 83;
            this.graphic = downPacXon;
          }
        }
        // If the playeer is moving and creating blocks in the empty space, basically 'drawing the line'
        else{
          // If the player is going left, it cannot move left
          if ((joystickInput ==4 || keyCode ==68 || gestureDirection == "right") && this.currKeyCode!=65) {
            this.currKeyCode = 68;
            this.graphic = rightPacXon;
          }
          // If the player is going right, it cannot move right
          if ((joystickInput ==3 || keyCode ==65 || gestureDirection == "left") && this.currKeyCode!=68) {
            this.currKeyCode = 65;
            this.graphic = leftPacXon;
          }
          // If the player is going down, it cannot move down
          if ((joystickInput ==2 || keyCode ==87 || gestureDirection == "up") && this.currKeyCode!=83) {
            this.currKeyCode = 87;
            this.graphic = upPacXon;
          }
          // If the player is going up, it cannot move up
          if ((joystickInput ==1 || keyCode ==83 || gestureDirection == "down") && this.currKeyCode!=87) {
            this.currKeyCode = 83;
            this.graphic = downPacXon;
          }
        }
      }

    // }
    // if current key code is 68 and x is less than the width, move right
    if (this.currKeyCode == 68 && this.x < width){
      this.x  += this.speed;
    }
    // if current key code is 65 and x is greater than 0, move left
    if (this.currKeyCode == 65 && this.x > 0){
      this.x  -= this.speed;
    }
    // if current key code is 87 and y is greater than 0, move up
    if (this.currKeyCode == 87 && this.y > 0){
      this.y  -= this.speed;
    }
    // if current key code is 83 and y is less than height, move down
    if (this.currKeyCode == 83 && this.y < height){
      this.y += this.speed;
    }

    // get id middle of tile
    let id = getTile(this.middleX, this.middleY);
    // declare next tile
    let nt;

    // Checks if the player is withing the empty space or is not in the border region
    if((this.middleX>20 && this.middleY>20 && this.middleX<width-20 && this.middleY<height-20)){
      // A few pixels to the right, left, up, and down are detected from the player
      this.sensorLeft = this.x-10;
      this.sensorRight = this.x+tileSize+10;
      this.sensorTop = this.y-10;
      this.sensorBottom = this.y+tileSize+5;

      // If the player is moving right, the next tile to the right of it is checked
      if(this.currKeyCode==68){
        nt = getTile(this.sensorRight,this.middleY);
      }
      // If the player is moving left, the next tile to the left of it is checked
      else if(this.currKeyCode==65){
        nt = getTile(this.sensorLeft,this.middleY);
      }
      // If the player is moving up, the next tile above of it is checked
      else if(this.currKeyCode==87){
        nt = getTile(this.middleX,this.sensorTop);
      }
      // If the player is moving down, the next tile below of it is checked
      else if(this.currKeyCode==83){
        nt = getTile(this.middleX,this.sensorBottom);
      }
    }
    // If the player comes into contact with the line that it is drawing itself
    if(nt == -1){
      // The position is reset
      player.x = 0;
      player.y = 0;
      // The graphic is reset
      player.graphic = rightPacXon;
      // The speed is reset
      player.currKeyCode = 0;
      // A life is lost
      player.lives -= 1;
      // Collision sound is played
      collisionsound.play();
      // The canvas is reset to borders only
      resetDrawing();
    }
    // If there is no tile at it's middle position
    else if (id == 0){
      // A blue tile for drawing the line is drawn
      modifyTile(this.middleX, this.middleY)
    }
    // If a  solid tile is encounter
    else if (id == 1) {
      solidTiles();
      // Checks if a line is created and gets completed.
      // It does this by checking if the player just got stopped
      if (this.moving == 'stopped'){
        // Then it changes the state of moving to be 'not moving' which means it hasnt started creating any lines
        this.moving = 'not moving';
        // Makes a deep copy of the level array
        var xyz = makeDeepCopy(level);
        // Gets all the positions of the enemies and then sets the
        // corresponding id in the Level array to be 2 to ensure that
         // the enemies are not being taken into account
        for (let i = 0; i < enemy.length; i++){
          // Makes sure that the yellow enemy is not taken into account
          if(enemy[i].type != "follow"){
            ghostx = int(enemy[i].middleX/tileSize);
            ghosty = int(enemy[i].middleY/tileSize)
            level[ghosty][ghostx] = 2;
          }
        }
        // Gets one coordinate from all the enclosed regions
        mArea, sVals = maxAreaOfIsland(xyz);
        // Gets a list of all the smaller regions' coordinates/ the ones to be removed
        let vals = smallerPair(sVals);

        // Resets the position where the enemies' corresponding positions were set to 2
        for (let i = 0; i < enemy.length; i++){
          if(enemy[i].type != "follow"){
            ghostx = int(enemy[i].middleX/tileSize);
            ghosty = int(enemy[i].middleY/tileSize)
            level[ghosty][ghostx] = 0;
          }
        }

        // Fills the level array, basically floods the enclosed region that meets the criteria
        for (let i = 0; i < vals.length; i++){
          fill_array(level, vals[i][0], vals[i][1], 1, 0);
        }
      }
    }
    // Contrains the x and y positions of the enemy to remain within the canvas width and onto the border tiles.
    this.x = constrain(this.x, 0, width-20);
    this.y = constrain(this.y, 0, height-20);
    }
  }

ghost.js

// The Ghosts class
class Ghost {
  // constructor to declare ghost x,y,graphic,speed
  constructor(){
    this.x = random(80, width-100);
    this.y = random(80, height-80);
    this.speedX = random(1, 3);
    this.speedY = random(1, 3);
    this.speed = 0.005;
    this.graphic = blueGhost;
    // previous speed so enemies can return to their original speed after being affected by powerups
    this.pspeedX = this.speedX;
    this.pspeedY = this.speedY;
    this.pspeed = this.speed;
  }

  // displays the enemy
  display(){
    image(this.graphic, this.x, this.y, 20,20);
  }

  // detects players collisions with walls, player and powerups
  collision () {
    // set up sensor positions
    this.sensorLeft = this.x-3;
    this.sensorRight = this.x+tileSize+3;
    this.sensorTop = this.y-3;
    this.sensorBottom = this.y+tileSize+3;
    this.middleX = this.x+tileSize/2;
    this.middleY = this.y+tileSize/2;

    // check the id of tiles in the 2d array at the sensor positions
    let id = getTile(this.middleX,this.middleY);
    let lid = getTile(this.sensorLeft,this.middleY);
    let rid = getTile(this.sensorRight,this.middleY);
    let uid = getTile(this.middleX, this.sensorTop);
    let bid = getTile(this.middleX, this.sensorBottom);

    // if enemies touch the walls (blue tiles), they bounce off
    // top sensor 
    if (uid == 1) {
      if(this.type != "follow"){
        this.y += 3;
      }
      this.speedY *= -1;
      this.pspeedY *= -1;
    }
    // bottom sensor
    if (bid == 1) {
      if(this.type != "follow"){
        this.y -= 3;
      }
      this.speedY *= -1;
      this.pspeedY *= -1;
    }
    // left sensor
    if (lid == 1) {
      if(this.type != "follow"){
        this.x += 3;
      }
      this.speedX *= -1;
      this.pspeedX *= -1;
    }
    // right sensor
    if (rid == 1) {
      if(this.type != "follow"){
        this.x -= 3;
      }
      this.speedX *= -1;
      this.pspeedX *= -1;
    }
    // detects collision with the player
    this.playerCollision(rid, lid, uid, bid);
    // detects collision with the snail and ice powerups
    this.powerupCollision();

    // add special wall eating effect of wall collision 
    // if enemy type is blue or red
    if (this.type == "eat" || this.type == "duplicate"){
      this.eat(rid, lid, uid, bid)
    }

  }
  // wall eating effect function for blue and red enemies
  eat(rid, lid, uid, bid) {
    // if right tile is a wall but not a border, delete tile
    if (rid == 1 && this.x < width-tileSize-30){
      deleteTile(this.sensorRight, this.middleY);
    }
    // if left tile is a wall but not a border, delete tile
    else if (lid == 1 && this.x > 30){
      deleteTile(this.sensorLeft, this.middleY);
    }
    // if top tile is a wall but not a border, delete tile
    else if (uid == 1 && this.y > 30){
      deleteTile(this.middleX, this.sensorTop);
    }
    // if bottom tile is a wall but not a border, delete tile
    else if (bid == 1 && this.y < height-tileSize-30){
      deleteTile(this.middleX, this.sensorBottom);
    }
  }
  // if enemy is blue, duplicate enemy when player comes in its radius
  duplicate() {
    // if player is within the radius of the enemy
    if (player.x >= this.x-40 && player.x <= this.x+60 && player.y >= this.y-40 && player.y <= this.y+60) {
      // this if condition is to ensure enemy only duplicates once even if the player stays in the radius
      if (this.dup == true){
        enemy.push(new BlueGhost());
        this.dup = false;
      }
    }
    // if player is out of the radius, and comes within it again, enemy can duplicate again
    else {
      this.dup = true
    }
  }
  // move the enemy by determining all collisions
  move() {
    this.collision();
    // pink enemy or red enemy bounces off walls
    if (this.type == "bounce" || this.type == "eat"){
      this.x += this.speedX;
      this.y += this.speedY;
    }
    // yellow enemy follows player
    else if (this.type == "follow"){
      let distX = player.x - this.x;
      let distY = player.y - this.y;

      this.x += this.speed * distX;
      this.y += this.speed * distY;
    }
    // blue enemy has a ring around it and it bounces
    else if (this.type == "duplicate"){
      noFill();
      stroke(0,255,255);
      ellipse(this.x + 10,this.y + 10, 100);
      this.duplicate();
      this.x += this.speedX;
      this.y += this.speedY;

    }
  }
  // if enemy collides with player
  playerCollision(rid, lid, uid, bid) {
    // if enemy comes in contact with "moving blue" tiles or the player itself
    if(lid == -1 || rid == -1 || uid == -1 || bid == -1 || dist(this.x, this.y, player.x, player.y) < 20){
      // play sound
      collisionsound.play();
      // reset player position, graphic, speed, lives
      player.x = 0;
      player.y = 0;
      player.graphic = rightPacXon;
      player.currKeyCode = 0;
      player.lives -= 1;
      // if it bounces off the left moving blue tiles and right tile is not equal to wall jump off 10 pixels to the right
      if (lid == -1 && rid != 1){
        this.x += 10;
      }
      // if it bounces off the right moving blue tiles and left tile is not equal to wall jump off 10 pixels to the left
      else if (rid == -1 && lid != 1){
        this.x -= 10;
      }
      // if it bounces off the top moving blue tiles and bottom tile is not equal to wall jump off 10 pixels to the bottom
      else if (uid == -1 && bid != 1){
        this.y += 10;
      }
      // if it bounces off the bottom moving blue tiles and top tile is not equal to wall jump off 10 pixels to the top
      else if (bid == -1 && uid != 1){
        this.y -= 10;
      }

      // if comes in contact with player, bounce in opposit direction if possible
      if (dist(this.x, this.y, player.x, player.y) < 20) {
        if (rid != 1 || rid != -1){
          this.x += 10;
        }
        else if (lid != 1 || lid != -1){
          this.x -= 10;
        }
        else if (uid != 1 || uid != -1){
          this.y -= 10;
        }
        else if (bid != 1 || bid != -1){
          this.y += 10;
        }

      }
      // if the lives of player are less than or equal to zero
      if (player.lives <= 0){
        // display lives in html 
        let window_score = document.getElementById('current_lives')
        window_score.innerHTML = player.lives;
        // display lives in html 
        let window_timer = document.getElementById('current_timer');
        window_timer.innerHTML = timer + 's';
        // display game over screen
        endscreen = true;
        // reset player lives
        player.lives = 3;
        // reset player speed
        player.speed = player.pspeed;
        // reset timer
        timer = 100;
        // reset powerups
        powerups = [];
        // remove the blue moving tiles
        resetLevel();
        // reset enemy array
        allLevels();
        // play sound
        gameoversound.play();
      }
      // else if player lives are not yet zero but collision with enemy occurs then just remove the blue moving tiles
      else {
          resetDrawing();
      }
    }
  }

  // detect enemy collsions with powerups
  powerupCollision() {
    // if powerup array is not empty
    // and the powerup is snail or ice
    if (powerups.length != 0 && (powerups[0].graphic == slow || powerups[0].graphic == ice)) {
      // if powerup collision with enemy
      if (dist(this.x, this.y, powerups[0].x, powerups[0].y) < 20) {
        // console.log("enemy touched ice/slow")
        // set previous frame
        this.pframe = frameCount;
        // if the power up is snail, decrease player's speed
        if (powerups[0].graphic == slow) {
          player.speed = 1;
        }
        // if power up is ice, freeze player
        else if (powerups[0].graphic == ice){
          player.speed = 0;
        }
        // stop displaying powerup and change its location to outside canvas
        powerups[0].disp = false;
        powerups[0].x=-100;
        powerups[0].y=-100;
        // play sound
        collectionsound.play();
      }
      // if current frame count - frame count when powerup was picked is 180 (3 sec)
      if (frameCount - this.pframe == 180){
        // return palyer's speed to normal and remove powerup from array
        console.log("return to normal")
        player.speed = player.pspeed;
        powerups.splice(0, 1);
        // this.pframe = 0;
      }

    }
  }
}

// pink ghost class, inherits ghost class
class PinkGhost extends Ghost{
  constructor(){
    super();
    this.speedX = random(1.5, 3);
    this.speedY = random(1.5, 3);
    this.graphic = pinkGhost;
    this.type = "bounce";
  }
}
// blue ghost class, inherits ghost class
class BlueGhost extends Ghost{
  constructor(){
    super();
    this.graphic = blueGhost;
    this.speedX = random(1.5, 3);
    this.speedY = random(1.5, 3);
    this.type = "duplicate";
  }


}
// red ghost class, inherits ghost class
class RedGhost extends Ghost{
  constructor(){
    super();
    this.graphic = redGhost;
    this.type = "eat";
  }
}
// yellow ghost class, inherits ghost class
class YellowGhost extends Ghost{
  constructor(){
    super();
    this.graphic = yellowGhost;
    this.type = "follow";
  }
}

levels.js

// calculate and return the percentage of solid tiles in the array
function completeLevel() {
    let count = 0
    let totalcount = 0;
    for (let i=1; i < (height/20) - 1; i++){
        for (let j=1; j < (width/20) - 1; j++){
          if (level[i][j] == 1){
            count += 1;
          }
        }
    }
    totalcount = ((count/828)* 100);
    return round(totalcount * 100) / 100;
}

// promotes player to next level
function nextLevel() {
    // completeLevel();
    // levelOne();
    if (completeLevel() >= 80) {
        // console.log(completeLevel())
        levelupsound.play();
        // increment level
        levels +=1;
        // if all 6 levels completed,
        if(levels>6){
            // game has been completed
            gamecomplete = true;
        }
        // else increment the number of levels unlocked
        else{
            // Checks if the current reached level has become greater than the user stored level
            if(mylevel < levels){
                mylevel +=1;
                // It then updates the local storage as well
                if(mylevel <7){
                    window.localStorage.setItem('levelsCompleted', mylevel);
                }
            }
        }
        // display lives in html 
        let window_score = document.getElementById('current_lives')
        window_score.innerHTML = player.lives;
        // display lives in html 
        let window_timer = document.getElementById('current_timer');
        window_timer.innerHTML = timer + 's';
        // resetLevel();
        player.x = 0;
        player.y = 0;
        // player.lives = 3;
        player.graphic = rightPacXon;
        player.currKeyCode = 0;
        // timer = 100;
        // allLevels();
        // levelupscreen = true;

        // display game over screen
        levelupscreen = true;
        // reset player lives
        player.lives = 3;
        // reset timer
        timer = 100;
        // reset player speed
        player.speed = player.pspeed;
        // reset powerups
        powerups = [];
        // remove the blue moving tiles
        resetLevel();
        // reset enemy array
        allLevels();
    }
}
// function which contains all levels
function allLevels() {
    // level 2
    if (levels == 2) {
        levelTwo();
    }
    // level 3
    else if (levels == 3) {
        levelThree();
    }
    // level 4
    else if (levels == 4) {
        levelFour();
    }
    // level 5
    else if (levels == 5) {
        levelFive();
    }
    // level 6
    else if (levels == 6) {
        levelSix();
    }
}

// level one enemy array declaration
function levelOne() {
    enemy = [];

    enemy.push(new PinkGhost());
    enemy.push(new PinkGhost());
}

// level two enemy array declaration
function levelTwo() {
    enemy = [];

    enemy.push(new PinkGhost());
    enemy.push(new PinkGhost());
    enemy.push(new RedGhost());
}

// level three enemy array declaration
function levelThree() {
    enemy = [];

    enemy.push(new PinkGhost());
    enemy.push(new RedGhost());
    enemy.push(new RedGhost());
    enemy.push(new YellowGhost());
}
// level four enemy array declaration
function levelFour() {
    enemy = [];

    enemy.push(new PinkGhost());
    enemy.push(new BlueGhost());
    enemy.push(new RedGhost());
    enemy.push(new RedGhost());
    enemy.push(new YellowGhost());
}

// level five enemy array declaration
function levelFive() {
    enemy = [];

    enemy.push(new PinkGhost());
    enemy.push(new RedGhost());
    enemy.push(new RedGhost());
    enemy.push(new BlueGhost());
    enemy.push(new YellowGhost());
    enemy.push(new YellowGhost());
}

// level six enemy array declaration
function levelSix() {
    enemy = [];

    enemy.push(new PinkGhost());
    enemy.push(new PinkGhost());
    enemy.push(new RedGhost());
    enemy.push(new RedGhost());
    enemy.push(new BlueGhost());
    enemy.push(new BlueGhost());
    enemy.push(new YellowGhost());
    enemy.push(new YellowGhost());

}

level.js

// set all the blue moving tiles when the player loses a life to black tiles when the game restarts
function resetDrawing() {
  for (let i=0; i < height/20; i++){
    for (let j=0; j < width/20; j++){
      if (level[i][j] == -1){
        level[i][j] = 0;
      }
    }
  }
}
// The following for loops populate the 2D list, level, dynamically and leaves it blank
function initializeLevel() {
  let rows = []
  for (let i = 0; i < height/20; i++){
    rows = []
    for (let j =0; j < width/20; j++){
      rows.push(0);
    }
    level.push(rows)
  }
}

// The following block populates the fixed borders of the board
function resetLevel() {
  for (let i=0; i < height/20; i++){
    for (let j=0; j < width/20; j++){
      level[i][j] = 0;
      if (i == 0 || i == height/20-1 || j == 0 || j == width/20-1 ){
        level[i][j] = 1;
      }
    }
  }
}

// function to draw the tiles
function drawLevel() {
  for (let r = 0; r < level.length; r++) {
    for (let c = 0; c < level[r].length; c++) {
      if(level[r][c] == 1){
        image(tile,c*20,r*20,20,20);
      }
      if(level[r][c] == -1){
        image(movingTile,c*20,r*20,20,20);
      }
    }
  }
}

// returns the id of the tile in the array
function getTile(x,y) {
  x = int(x/tileSize);
  y = int(y/tileSize);
  return level[y][x];
}
function getCoord(x,y) {
  x = int(x/tileSize);
  y = int(y/tileSize);
  return x,y;
}

// modifies the tile to a blue moving tile
function modifyTile(x,y) {
  x = int(x/tileSize);
  y = int(y/tileSize);
  level[y][x] = -1;
}
// deletes a tile
function deleteTile(x,y) {
  x = int(x/tileSize);
  y = int(y/tileSize);
  level[y][x] = 0;
}
// deletes multiple tiles when a bomb goes off
function deleteTiles(x,y){
  deleteTile(x,y);
  deleteTile(x-20,y);
  deleteTile(x+20,y);
  deleteTile(x,y-20);
  deleteTile(x,y+20);
  deleteTile(x+20,y+20);
  deleteTile(x-20,y+20);
  deleteTile(x,y+40);

}
// when the player reaches the border, tranform moving tiles to solid wall tiles
function solidTiles(){
  let maxRow = 0, maxCol=0;
  for (let r = 0; r < level.length; r++) {
    for (let c = 0; c < level[r].length; c++) {
      if(level[r][c] == -1){
        // When a tile is changed from -1 to 1, it means the player created a line so the moving variable of the player is set to stopped
        player.moving = 'stopped'
        maxRow = max(maxRow, r);
        maxCol = max(maxCol, c);
        level[r][c] = 1;
      }
    }
  }
}

fillblock.js

// A recursive function with inspiration from https://learnersbucket.com/examples/algorithms/flood-fill-algorithm-in-javascript/
// The following function fills an enclosed region, basically some values bordered on all four sides by certain other value,
// with the new values that are provided.
// It basically replicates how the paint bucket system works in photoshop.
// The function is supposed to be given coordinates of a point in the region.
function fill_array(level, r, c, newColor, current){
  // Checks if the values are out of bound
    if(r < 0){
        return;
    }
    // Checks if the values are out of bound
    if(c < 0){
        return;
    }
    // Checks if the values are out of bound
    if(r > level.length){
        return;
    }
    // Checks if the values are out of bound
    if(c > level[r].length){
        return;
    }
    // Checks if there is any enemy inside of the region, if so
    // it increases the area count by a large amount in order to flag interval
    // The value of 2 is placed wherever the enemies are present as this function executes.
    if(level[r][c] === 2){
        count = 10000;
        return;
    }
    // A different value is encountered
    if(level[r][c] !== current){
        return;
    }
    // Changes the value at the array index
     level[r][c] = newColor;
     // Count to keep track of the 'area' of an enclosed region.
     count = count + 1;
     // the function recursivly calls itself t ensure all the neigbors are filled.
     fill_array(level, r - 1, c, newColor, current);
     fill_array(level, r + 1, c, newColor, current);
     fill_array(level, r, c - 1, newColor, current);
     fill_array(level, r, c + 1, newColor, current);
     // Returns the 2D Array
     return level
};
// Function to check all the coordinate pairs that have smaller area
function smallerPair(values){
    // initialize two lists
    areas = [];
    pairs = [];
    let enemfound = false;
    // Loops over all the coordinates
    for (let i = 0; i< values.length; i ++){
      // Calls the fill array function ONLY TO COUNT the area of the region in which the point lies.
      fill_array(level,values[i][0], values[i][1], 3, 0);
      // Stores the count into a local variable
      c1 = count;
      // Calls the fill array function to reset the modified values back to normal in the level array
      fill_array(level, values[i][0], values[i][1], 0, 3);
      // updates the global variable count
      count = 0;
      // Checks if the enemy is present
      if(c1<1000){
        areas.push(c1);
        pairs.push(values[i]);
        // Marks the enemy to not be found
        enemfound = true;
      }
    }
    // If the previous condition was not passed, it means the enemy was present in this block.
    if(enemfound == false){
      // The index with the maximum value, an outlier wtih a value of 10000 is removed from the list
      maxA = max(areas)
      maxIndex = areas.indexOf(maxA);
      pairs.splice(maxIndex,1);
    }
    // returns the pairs by excluding the biggest of the regions
    return pairs;
};
// Inspired from the Leet Code Problem Solution: https://dev.to/seanpgallivan/solution-max-area-of-island-4njk
// It returns one coordinate in each enclosed region
function maxAreaOfIsland(grid) {
  // Sets the maximum area to be very high since we need to take the minimum
    let maxArea = 10000
    // Directions over which to check next
    let compass = [[-1, 0], [0, -1], [1, 0], [0, 1]];
    // Checks the previous row and previous columns
    let prow;
    let pcol;
    // An array to store all the coordinate values
    let smallVals = [];
    // Runs for the entire grid and calls the flood function if each value meets a certain criteria.
    for (let i = 0; i < grid.length; i++) {
        for (let j = 0; j < grid[i].length; j++) {
            if (grid[i][j] === 0) {
                flood([[i, j]])
            }
        }
    }
    // Another flood function built differently for checking the enclosed box
    return maxArea, smallVals
    function flood(stack) {
      // initializes the area
        let currentArea = 0
        while (stack.length) {
            let [row, col] = stack.pop()
            if (row < 0 || col < 0 || row >= grid.length || col >= grid[0].length || grid[row][col] === 1) {
                continue
            }
            // increases the area
            currentArea++
            grid[row][col] = 1
            prow = row;
            pcol = col;
            for (const direction of compass) {
                stack.push([row + direction[0], col + direction[1]])
            }
        }
        // Pushes the row and column onto the list
        smallVals.push([prow,pcol]);
        // Gets the minium of all areas.
        maxArea = Math.min(maxArea, currentArea)
    }
};
// Function to make a deep copy of a 2D Array
function makeDeepCopy(g) {
  // initializes a new list
  var gridCopy = [];
  // Runs for all the lists within the big list
  for (var x = 0; x < g.length; x++) {
    // initializes an intermediary/ temporary row
    var newRow = [];
    // Runs a loop for the length of each list within the bigger list
    for (var y = 0; y < g[x].length; y++) {
      // adds the values to the temporary row
      newRow.push(g[x][y])
    }
    // Pushes the copied row into the new bigger row
    gridCopy.push(newRow);
  }
  // returns a newly created 2D Array/ List with the old list.
  return gridCopy;
};

Arduino Code

// joystick ports
int dirUp = 7;
int dirDown = 6;
int dirRight = 5;
int dirLeft = 4;

// lives lights ports
int lives3Pin = 11;
int lives2Pin = 10;
int lives1Pin = 9;
int lives = 3;
int prevlives = 3;
int vibrate = 0;

// int lives, prevlives = 3;
int motorPin = 3; //motor transistor is connected to pin 10
int motorState = LOW;  // motorState used to set the Motor Vibration
unsigned long previousMillis = 0;  // will store last time LED was updated
const long interval = 1000;  // interval at which to blink (milliseconds)


void setup()
{
  pinMode( dirDown , INPUT);
  pinMode( dirUp , INPUT);
  pinMode( dirLeft , INPUT);
  pinMode( dirRight, INPUT);

  pinMode(motorPin, OUTPUT);
  Serial.begin(9600);

  while (Serial.available() <= 0) {
    digitalWrite(LED_BUILTIN, HIGH); // on/blink while waiting for serial data
    Serial.println("0"); // send a starting message
    delay(300);            // wait 1/3 second
    digitalWrite(LED_BUILTIN, LOW);
    delay(50);
  }
}

void loop(){
  
  while (Serial.available()) {
      prevlives = lives;
      lives = Serial.parseInt();
      if(prevlives != lives){
        vibrate=1;
      }

      if (Serial.read() == '\n') {
        if (digitalRead( dirDown ) == LOW ){
          Serial.println(1);
        }
        else if (digitalRead( dirUp ) == LOW ){
          Serial.println(2);
        }
        else if (digitalRead( dirLeft ) == LOW ){
          Serial.println(3);
        }
        else if (digitalRead( dirRight ) == LOW ){
          Serial.println(4);
          // digitalWrite(motorPin, HIGH); //vibrate
        }
        else {
          Serial.println(0);
      }

      if(vibrate == 1){
        unsigned long currentMillis = millis();
        if (currentMillis - previousMillis >= interval) {
          // save the last time you blinked the LED
          previousMillis = currentMillis;

          // if the LED is off turn it on and vice-versa:
          if (motorState == LOW) {
            motorState = HIGH;
          } else {
            motorState = LOW;
            vibrate=0;
          }

          // set the LED with the ledState of the variable:
          digitalWrite(motorPin, motorState);
        }
        // else{
        //   vibrate=0;
        // }
      }

      if (lives == 3) {
        digitalWrite(lives1Pin, HIGH);
        digitalWrite(lives2Pin, HIGH);
        digitalWrite(lives3Pin, HIGH);
      }
      else if (lives == 2) {
        digitalWrite(lives1Pin, HIGH);
        digitalWrite(lives2Pin, HIGH);
        digitalWrite(lives3Pin, LOW);
        // digitalWrite(motorPin, HIGH); //vibrate
      }
      else if (lives == 1) {
        digitalWrite(lives1Pin, HIGH);
        digitalWrite(lives2Pin, LOW);
        digitalWrite(lives3Pin, LOW);
      }
      else if (lives == 0) {
        digitalWrite(lives1Pin, LOW);
        digitalWrite(lives2Pin, LOW);
        digitalWrite(lives3Pin, LOW);
        // digitalWrite(motorPin, HIGH); //vibrate
      }

    }
    } 

}

FINAL PROJECT PRODUCTION

USER TESTING

During the testing phase of the project, participants found it relatively easy to understand how to control it, primarily thanks to the instructions menu provided on the introduction screen and the clear grid divisions on the control page that explicitly indicated the directions. However, one aspect that caused confusion for many was determining which hand controlled the left movement and which controlled the right movement. This confusion arose because the camera captures a laterally inverted image, which is then processed by the computer. To address this, explaining the control scheme after the initial confusion helped participants grasp the concept of how the handpose.js library maps the tracked hand movements to the car’s controls.

The most successful aspect of my project is undoubtedly the mapping of hand movements to the car’s controls. The serial connection between the Arduino and p5.js worked flawlessly, ensuring smooth communication. However, there is room for improvement in the implementation of the hand tracking model. Optimizing it is necessary to ensure that the regions of the canvas corresponding to the various controls are accurately defined. Also, i realized that the lightning conditions also greatly affects how easily the model is able to track the hands. In an attempt to improve that i will either go back to using posenet because i realized it is more accurate as compared to the handpose.js I am currently using.


ANXIETI-E Robot Car

Cover Photo

Introduction

The ANXIETI-E robot car is a wireless robot designed to perform both autonomous movements using object detection and edge detection, and manual control using radio control. This movement would be both controlled and reversed mapped to an interface in p5. The project aimed to create a robot that is capable of performing these functions while also being a fun and engaging project for me. The name, ANXIETI-E, was inspired by the robot WALL-E and the fact that the robot makes everyone anxious while operating over a table and moving toward the edge just before activating its edge detection.

GitHub Code | P5JS Sketch | Schematic Diagram

Inspiration

The idea of creating ANXIETI-E robot car was born out of my desire to build a robot that could perform both autonomous and manual movements. I was inspired by the character WALL-E. This inspired me to create a robot that could capture the same spirit of adventure and fun while also being functional. Before submitting the proposal for my project, I spent some time watching YouTube videos on the power of Arduino and sensors. I was amazed by the wide range of possibilities that these components provided, and I knew that I could incorporate them into my robot car.

Concept and Interaction Design

The ANXIETI-E robot car is a wireless robot capable of both autonomous and manual control. The project consists of a p5 interface that allows the user to choose between these two modes. The p5 sketch connects to an Arduino using the serial port, and this Arduino communicates with another Arduino attached wirelessly to the robot car through radios. This communication route is also traced back to p5 to allow bidirectional communication.

When the user selects the autonomous mode, all the sensors work together to ensure the smooth and safe movement of the robot car. The robot car is equipped with several sensors and motors all working together to ensure that the robot moves smoothly and safely, avoiding obstacles and edges on its way. When the manual mode is activated, the user can control the robot directly using the arrow keys on their computer.

In both modes, as soon as a mode is selected, the robot enters a playground screen in p5 where p5 receives data back from the robot and then maps its movement on the screen. This allows the user to see the robot’s movement and trajectory in real time, giving them full control and understanding of the robot’s actions.

The project is a unique project that combines creativity, innovation, and technology to create a fun and functional robot car. The integration of p5, Arduino, and sensors allows for seamless communication and control between the user and the robot, making it an exciting and engaging project for anyone interested in robotics and technology.

Implementation  (Challenges included)

The implementation of ANXIETI-E was a journey of constant iteration and improvement. Starting with a rough prototype, I gradually added sensors, integrated bidirectional wireless control, and implemented p5.js for the user interface. In this section, we will go through each component of the project in detail, outlining the challenges and solutions I encountered along the way. I will also outline the challenges I faced and the solutions I found for each, providing valuable insights for those looking to embark on similar projects in the future.

Rapid Prototyping

I found that rapid prototyping is an essential part of any product development process. It involves creating quick, rough versions of a product or system in order to test and refine its design. This approach allowed me to quickly iterate on my ideas and refine my designs based on the results of testing and feedback.

Building Frame

The exterior frame was built with wood. I was going through the materials in the IM lab and I found a piece of wood that felt like a pretty good size for the robot’s exterior. I scouted for another piece and found a little larger than the one I had. I took out the handsaw and made both pieces of the same size.

Sawing wood
Setting Lower Level

After I had both the pieces for the frame, I started setting the lower level by pasting the DC motors using tape and trying out different placements before committing to the final positioning. I even connected a small breadboard and motor driver and unit tested the DC motors by running a small piece of code to check if they were working fine in their placements. The code allowed me to test the movement of the car in different directions using input from the Serial monitor. I had attached 4 DC motors using a single motor driver by connecting the motors on one side together in parallel. This made sure that the robot was able to move in all 4 directions and at the same time ensured adequate current to all the four motors. After I made sure all the motors were working properly, I went forward to secure them in place using hot glue. I also added a bigger breadboard running along the middle of the lower level to facilitate easier connections.

Taped motors
Unit Testing Motors
Securing DC motors
Setting upper level

After setting the lower level, I started attaching the Arduino and another breadboard (smaller). I drilled some holes in the upper layer to let wires pass in easily. between both levels. I then used some velcro on top of the motors to attach both layers. This was essential as it allowed me to open and access the lower layers anytime for adding or changing connections.

Drilling Upper Level
3D printing head

I was just really inclined on giving the robot a face and though about 3D printing a head for the distance sensor. I found this model on Thingiverse, sliced it using Cura and put it to print. I was really happy with the final result and people loved it!

3D printing robot head
Integrating Servo

The next step involved attaching a Servo to the upper layer. I hot glue it to place. I now had to put the 3D-printed head onto it as it also functioned as the case for the distance sensor. This was a really tough job as the top of the servo was barely able to hold the case in place and anything I tried would fall off after a while. Finally, after a lot of failed attempts, I was able to use a combination of hot glue and velcro to securely strap the robot’s head on the servo. I then went on to unit test the servo to look right and left with a small piece of code.

Robot Head

Sensors and Wireless Communication

The next phase of the project was to integrate all the sensors, power, and wireless radios; and unit test them to make sure they are working properly individually. After they worked properly individually, they were combined to work together and then tested.

Integrating Distance Sensor – Collision Detection

To employ the collision detection mechanism, it was essential to use the data from the ultrasonic distance sensor. One challenge with this sensor is that the readings have a lot of noise in them. To filter this noise out, I implemented an exponential moving average filter that takes a weighted average of the new data while also putting in some weight to the previous data available. This made the sensor detect collisions much better.

The collision detection and avoidance mechanism was a -step process. The distance sensor keeps pinging the distance continuously. Whenever a collision is detected (which is when the reading from the distance sensor is less than the threshold set), the robot immediately stops and rolls back a bit. During the same time, the servo looks left and right and the distance sensor pings distance from both sides and evaluates which direction has an object that is farther away. Based on this computation, it decides to turn either left or right and move in that direction. If suppose the distance in both directions is still below the threshold, it continues to move back and re-compute the distance until it becomes more than the threshold set.

This video shows me unit testing the ultrasonic distance sensor and checking for collisions

Integrating Power

All this while, the Robot was running off by taking power from the laptop which provided it with a constant power source. The next step was to make it wireless. I faced a lots of challenges here and tried out a plethora of things before finally finding a proper solution with the guidance of Professor Shiloh. Initially when I had plugged in a 9v battery thinking it would be enough to supply the whole unit. But the robot started behaving eratically even though it felt like it was receiving more power than usual. This led me to shift the servo to a separate power channel of 6V. But the problem still didn’t get solved. Upon checking the power connections with a multimeter we realized that due to a larger internal resistance of the 9v battery, the board was only receiving a current of about 5v or less and was even dropping further. This led to the code getting resetted again and again and making the robot behave erratically. Upon consultation with Professor Shiloh, I decided to replace the 9v batter with 6 AA batteries on top of the 4 AA batteries that were already used by the servo. This made the total count of batteries to 10. Now, I had initially not accounted for these and hadn’t made enough space for so many battery holders. But with some careful placement (which also involved cutting up a 4 piece battery holder into 2) and a lot of soldering, I was finally able to place all the things in the lower layer itself and also made sure that nothing was causing problems with the DC motors or the wires.

Servo Batteries
Arduino Batteries
Integrating Radio: One Way (Arduino – Arduino)

The next step was to make the robot wireless. I was able to implement this using two NRF24 radios and the RF24 library. The radio was unit tested by modifying the code provided by Professor Shiloh. After the unit testing was successful, one of the radios was integrated to the Arduino on top of the robot car. This was a specifically difficult process as the entire wiring had to changed to the radio shield and all the wires using pins 9-13 had to be shifted to the analog pins as the radio used up pins 9-13. The shield also supported a power channel for the servo and it made the process easier.

Integrating Radio
Integrating IR Distance Sensor – Edge Detection

Edge detection was one of the easiest things to implement. I knew it could be implemented using an IR distance sensor, cause their rays are much more concentrated (unlike the US distance sensor which sends out waves of signals). When I checked the IR sensor, it just worked with me barely writing any code. The integration was also smooth enough and so was the inclusion of the edge detection. The one problem that I faced here was the fact that the sensor is actually adjusted to its surrounding conditions and when I shifted places, the sensor needed to be physically recalibrated for edge detection using a screwdriver. This did happen to me in the exhibition setting causing me to manually calibrate the edge detection.

Integrating all sensors together

The final part was to integrate all the sensors and motors together to create the autonomous part of the robot (unidirectional for now). One important thing here was to make sure that there was no halt in the physical execution of the code due to arduino’s delay function so I designed a custom delay function that checked for difference in milliseconds and entered a while loop for that time period and allowed asynchronous detection by several sensors avoiding delays to cause problems in the overall execution.

This is how the code progressed. The radio receives a signal to enter autonomous mode. The  DC motors start running to move the robot forward. Both the Ultrasonic distance sensor and the IR distance sensors keep recording data. If at any instant, the pinged distance by the US distance sensor comes below the threshold, the collision detection process is activated (as described in detail above). The same thing happens if any of the IR sensors start receiving a value of 1 detecting that an edge has been detected. The aftermath involves the robot stopping and moving back a few steps while the US distance sensor checks for safety and moves in the right direction.

The only unsolved issue here that remains is, since there are no sensors that are present in the back of the car, it can be a bit unsafe sometimes for the car to randomly roll backwards at edges and fall off causing damage.

p5.js Component +Integration

Creating the p5 interface and Integrating it with the arduino code had its own process and set of challenges but finally I was successful in doing it.

Basic Interface

To test the code I first had to create a simple interface with 2 rectangles (signifying the manual and autonomous mode) and another screen for the robot playground. This was a pretty simple interface (rather wireframe), but built for testing and didn’t have any graphics. This is the link to the sketch.

p5-Arduino-Arduino Integration (One way)

I took the template code by Professor Aaron Sherwood and Professor Michael Ang for one-way serial communication code between p5 Serial port and Arduino and combined it to the uni-directional radio communication code I had unit tested previously. This helped me setup a one way communication setup between the p5 canvas to the arduino connected to it using a serial port and this arduino was then able to transmit the message over to the other arduino present on the robot car.

Using this mechanism, I was able to send some messages from p5js and start controlling the basics of the robot like movement, directly from the p5 browser

Creating Robot Playground

For the robot playground, I had an MSLogo Turtle sort of idea in mind. I started out by creating the code for the movement of the turtle. It was actually much more difficult than it felt initially, especially turning the triangle at specific angles. With some difficulty, I was finally able to control the turtle using the cursor (the direct arrow control was just for unit testing – the final version has the proper and better implementation). Then I went on to create a trail when the turtle moved. This trail was a trail of spheres. Whenever the turtle went off course, it started again from the center of the screen.

This is the code for the sketch.

Final Integration

The final phase of development included the implementation of a last few but very important features.

Advanced Interface – Autonomous and Manual

The first step in this phase was to create a properly functional and aesthetic interface. The flow of the website remained similar like the one I unit tested on, but this time it came with more instructions and better graphics. The second screen this time had one extra button over the back button. It was the save button that let the user save the canvas. This feature I felt would be pretty beneficial later when the reverse mapping worked.

This is the link to the initial sketch.

Manual Mode

Coding the manual mode was also important as it provided user the ability to control the robot just like any other RC car.  The process was quite straightforward. I used one bit in the string to send command for “autonomous” or “manual” and then used the other bit to specify the direction based on the key that was pressed on p5. This way I was able to control the car remotely using the arrow keys of my computer.

Bidirectional Communication

Making the communication between the Arduino and p5 bidirectional was perhaps one of the most difficult tasks of the entire project. By the time I reached this part, I had already finished creating a unidirectional communication route between p5 and both the arduinos. I also had a bidirectional communication route between p5 and the arduino that was connected serially. The major problem that I faced was to make the radio communication bidirectional. Now the chip I used was capable of the but the implementation was tricky as the sender and receiver had to be continuously switched. This led to the big problem of packet losses and made the task quite difficult.

I employed several ways to mitigate this including switching in every loop, switching after success statements, switching after a fixed timeout interval or fixed number of retransmissions, etc. But all this just led to the increase in complexity of the program and barely helped with the objective.

Finally, I fiddled around with a code put up by Professor Shiloh, tried out several delay values, and was finally able to make the bidirectional communication thing work.

Final integration – Data Control and Reverse Mapping

After figuring out the bidirectional flow of information, the project was almost complete. I just had to stay set on a specific format of information exchange. I chose a string that consisted of 2 numbers separated by a comma. The data control schematic is as follows:

From p5 to arduino:

– 1st number is used to provide mode-selection information about whether autonomous or manual.

– 2nd number is used to provide direction-selection information about which direction to turn to – if the mode is manual.

Now there was a similar reverse mapping data flow, based on whose information, the trail of the robot was mapped on the p5 canvas.

From arduino to p5:

– 1st number provides the mode information and whether there was a collision or edge detection.

– 2nd mode provides the direction that the robot car takes after such a collision or edge detection.

Based on this information, both the robot and the reverse mapping on p5 were able to run smoothly.

Potential Future Developments

  • Adding additional sensors for detection at the back of the robot
  • Making the p5 interface even more aesthetic with more options for speed control as well.
  • Finding a more permanent fix for the power issue.
  • Giving the robot an even more polished look.

Reflections (Proud of!)

One of my proudest moments in the production phase was when I was finally able to set up the bidirectional communication between p5-Arduino-Arduino. It took me days and I had almost tried out everything to the point of giving up. I had a fallback code ready where I had to ditch the idea of reverse mapping data to p5. But I just didn’t wanna compromise with this feature and kept trying my best. And finally, it worked out!

Some of the other things that I feel very proud of even though they might seem small was the effort I put into the organization of the wires and connections in both layers and figuring out the best and most efficient use of space. I was able to create two floors of connections and kept the wires visible outside to a minimum. I fit in 10 AA batteries, 4 DC motors, and a long breadboard along with a large number of wires all in the lower level. I faced many challenges through the process of making the robot, but the one thing that never caused a problem was wrong connections or failing individual sensors. This was because I made sure to unit-test everything multiple times before moving on to the next feature. I also made sure the connections I made were quite secure by soldering and covering the ends later.

When I had initially written the proposal for the idea, it had felt very ambitious for a person working individually to be able to finish it before the deadline especially considering the complexity of the project. I was very prepared to leave some parts of if required. But somehow, by starting early and putting in a lot of time for the project every week, I was finally able to achieve everything I had promised in my initial proposal and more. It felt surreal to be presenting it in the IM showcase and I feel super proud of myself for the things that I have done and learned through the journey.

User Testing

Exhibition

The project was presented at the NYU Abu Dhabi Interactive Media End-of-the-Semester Showcase. These are some of the pictures and videos from the exhibition.


Some canvas sketches created by people

Final Project

Concept

For the purposes of the Final Project of Introduction to Interactive Media, we were presented the challenging task of connecting Software and Hardware. To achieve this, our team of three members, Zunair, Ishmal, and Abraiz, decided to create a game using P5Js as it seemed like a de-stressing activity. We also wanted to bridge it with hardware by producing an Arcade Game Controller. This led us to the creation of PacXon Premium and its accompanying controller.

Pac-Xon Premium is a game that is based on Pac-Man, and it was inspired by one of our team member’s childhood favorites. We started with Pac-Xon Deluxe, the original game, which was fairly simple but had numerous levels of increasing difficulty. However, the gradual increase in difficulty may lead to repetitiveness and lack of challenge, even in the most difficult levels. We also noticed that the classic graphics of the game were outdated, so we decided to give it a modern touch and feel and create a revamped and customized version.

Initially, we thought that coding the game would be a simple task. However, as we delved deeper into the logic and technical requirements of even the smallest details, we realized that it would require a relatively complex algorithmic approach. Simple Object Oriented Programming and Javascript Basics were not enough to achieve our goal of making almost all objects interact with each other. We decided to make it a tile-based game to add to the complexity.

In summary, Pac-Xon Premium is an updated and customized version of Pac-Xon Deluxe, a game inspired by Pac-Man. We added a modern touch and feel to the classic graphics and produced a tile-based game with a complex algorithmic approach. The game features numerous levels with increasing difficulty and challenges players to think strategically to progress through the game.

Link & Video

While there is a need for a Joystick Controller to utilize the Arcade feel of the game, keyboard will just work fine with the W,A,S,D keys at this link.

To cater to the possibility of any issues with the code, we have also recorded a video of the Game with the Joystick Controller that we produced:

Hardware and its Pictures:

For producing the Arcade Controller, we started off by connecting the Arcade Joystick to a breadboard and Arduino, and connecting its movement to corresponding movements in the P5Js Sketch which can be seen in the following picture:

Then, moving on, we added another breadboard with 3 LED Bulbs that demonstrated lights and also a Vibration Motor that gave sense of a Haptic Feedback response when a person died, level was completed or some significant event happened.

Then, to wrap the content of the Breadboard, we wanted a physically rigid controller, which was large enough to have the Joystick embedded, and also have LED lights and the Vibration Motor stuck inside. The box, in its initial stages, can be seen here:

The box is open from one end for debugging purposes, and also does not sway away from the looks of it with the back side being the only open section. We decided to translate our solderless breadboard design onto a soldered breadboard to complete our hardware in a rigid fashion. This was then installed inside the box as can be seen below:

All in all, we produced a controller:

How it Works:

As you have already seen what the project is, let us explain the intricacies of how it was developed and its functionalities (code is added at the very end):

p5.js Description

As our first step, using Javascript, and particularly the p5 JS library, we started off with creating a 2D Array/ List which was technically mapped over the entire canvas, or rather drawn over the area of the canvas, such that each index in the 2D Array/ List represented a 20px by 20px box on the canvas of the game. Then we took an approach such that a value 1 at any index would draw a solid blue tile (20px by 20px) on the canvas at the position corresponding to the index of the 2D Array/ List. Similarly, if the value was to be 0, nothing was to be drawn and if the value was to be -1, a different blue tile representing a ‘line’ would be drawn instead. Then we created functions which handled the filling of the array and included functionalities like initializing the array borders at the beginning of the game and those that checked for if any values in the 2D Array were modified and matched a certain criteria for a tile to be drawn at that position, or even to map the values of the x and y coordinates on the canvas to the array position and the tile at that very location.

Once we were satisfied with the Array functionality, we started off with creating the Player Class that drew the user controlled character on the screen. This was the class that we found to be the most challenging, since we had to incorporate the functionality of an object of a Player class with its movement being in accordance with the functionality of the 2D Array. Drawing, and moving the player was very simple, however when we changed the direction of the Pac-Xon, it was causing the Pac-Xon to be moving between two different tiles as shown below:

In order to solve this problem, we created a rounding function that checks the player’s position and checks the tile, from the two tiles that it intersects, on which the majority of the player’s body lies and forces the player to be pushed or pulled onto that tile as it changes its direction. We tried other approaches, including the reduction of FrameRate or increasing the speed by the size of the tile, however both of them resulted in reduced game play quality.

Moving on, we allowed for the player to draw connecting lines between two solid blocks. This was done mainly by using the position of the tile that the player is present at and then checking whether the player is at an empty area or a solid position, and then drawing a ‘line’ tile if the condition is fulfilled. We extended this approach to allow for checking the next tile and ensuring the player does not bump into the line that is being formed, we also somewhat extended the same approach to ensure restrict the movements when the player is forming the line or is within the solid block region.

However, the most difficult part of the project was to fill the appropriate ‘boxes’, which are certain enclosed regions in the canvas when the line connects between two solid tiles. A demonstration of this is:

The complications with this was not only the procedure to fill the region, but in fact the considerations to take into account when filling this. A brief overview of them include that the region should not fill if the enemy is present inside of the region, or if multiple regions are created, all of the smallest ones should fill up, and only the largest one and/or the ones including the enemy should remain empty such that:

The approach to solve this was using the following algorithms:

Flood Fill Algorithm
Max Area of an Island (LeetCode Problem)

We used the Max Area of an Island Algorithm, which compares the areas of all the individual regions and finds out the maximum of those, and modified it to instead return x and y coordinates of each of the regions. We then used these coordinates to find the areas of all the regions, with an intermediary step checking if the enemy was present in any of the regions then to not take it into consideration, and then from those areas we excluded the maximum area and used all the other coordinates to fill the smaller areas. In this manner, we were able to achieve the desired result through extensively comprehending the complex recursive algorithms.

After this, we implemented the enemy classes where each type of enemy had a class that inherited from the main enemy class for the features that were common amongst all enemies. The movement of the enemies used a similar approach of checking the tiles around it and reversing its speed if it encountered the solid tile; this was then extended to allow some enemies to eat the solid tiles when they bounced off of them as well. The enemy class interacted with the Player class to check for collisions with the player.

Moving on, we incorporated the Powerups class, where the various power ups were placed at certain positions, like the bomb was to only show up in the region with the solid tiles. The power ups then interacted with the Player and Enemy class both, where either of them could use the power ups effect.

The last complex step was to incorporate the various screens with state variables at certain positions. It produced a lot of variables and seemed like a logic gate problem solved with boolean variables instead of gates. The changing of states and ensuring that the correct screen appears after one another was challenging to keep track of.

The final touches were to add sound, fix any bugs with interactions and movements or any logical errors in the algorithm. With all the effort put in, the end product seemed very satisfactory and came up together better than our initial expectations!

Arduino Description

While most of the complexity was in having the game come together in P5Js, there was a decent amount of effort put into the Hardware connection with p5Js. We wanted to ensure that the game runs fast, to allow for the intended smoothness but also communicates over a Serial connection with the Arduino.

Therefore, we incorporated the vibration of the motor without using any delays and instead making use of timestamp millis, similar to the concept of Blink Without Delay that was taught in class. Moreover, we had a short version of a State Machine in our Arduino code as well which allowed the light up of the number of LED bulbs in correspondence to the number of lives left. Also, the Arduino was keeping track of the point where the lives were lost in order to start the Vibration Motor on its own, without any particular signal from p5Js.

Interaction Design

All in all, as part of our interactive design, we can outline a couple of features:

– Makes use of joystick, keyboard, as well as gestures as input from the user to move the pacman character
– There are LED lights as well as HTML elements that display the lives and progress of the levels
– A particular vibration motor, as well as sound effects, that highlight the different events taking place
– Powerups in the game which can either be utilized by the player, or even the enemies!
– Packaged box controller to utilize a direct interaction with P5Js in real time

What are we proud of:

Overall, we are very proud to have completed a project that saw much attention at the Interactive Media Showcase, and received complements from individuals! It is good to have overcome the difficulties with P5Js, as well as Arduino to create something that looks complete, and at Bug free (at least as of now!). While the game seems simple, if you think of reproducing it, you will begin thinking of the complexities involved, and we are happy to have achieved what we have.

However, in particular, as Computer Science students, we are very glad to bring to life examples from Leetcode and programming competitions, into real life. We had always questioned the necessity for these type of questions and their relevance in the practical world, but we have a live example to showcase the relevance of these complex algorithms now.

We are also particularly positive and happy about our code organization, commenting and file structure. The code is attached at the very end of this article to allow for better reading of content, however, the way all the images, sound files, and even the different pieces of code were divided into different files and organized for better understanding as well as debugging is something we really enjoyed doing. A quick glimpse into it can be seen below:

Moreover, it was very challenging to produce a detailed ‘menu’ in P5js. Therefore, we are particularly proud of having achieved that. It can be seen in the ‘Screens.js’ files below. This is an example of a very complex state machines, where images are shown depending on different click locations, which then only accepts clicks at certain different locations. For example, the ‘Start Game’ shows different levels which accepts clicks at different levels, and then there is a screen for completion or loss of each level, which then accepts click and then responds appropriately.

If you have played the game, you may have experienced the different types of enemies, or ghosts as we call them. These are created in run time through object oriented programming, as well as inheritance. There is a basic class for the Ghosts, and then there is an extension to it for the different types which builds upon the basic class. This is a proper utilization of the coding principles, and we are proud of having made use of this.

Lastly, as an added interactivity, we decided to use gestures. Initially, we had thought of this option to fail completely, however it did not turn out to be as bad if used very properly!

Difficulties:

In any programming assignment, as well as hardware work, there is always difficulties. The first one was faced by us when we replaced the LED Bulbs in our controller with the Bigger LED Bulbs that could be inserted more appropriately into our Box. These are the ones available in one of the hardware boxes in the IM Lab. However, turned out that they were not working at all with the resistor – and this was after it had been soldered and put together. So we had to improvise and replace them with regular LED bulbs, and then laser cut the red circles to cover the light. Since the brightness of the lights were not that good anyways, we used glue gun on them while sticking the acrylic circles to have a ‘spread’ effect.

Then comes something we have mentioned earlier, and it is the algorithmic complexities in our code where we initially did not know where to begin and were completely stuck. However, determination helped us through!

Another particular challenge that we faced was with a connection of the Vibration Motor while there was a Serial connection with p5Js already happening for the JoyStick. We are still not sure what had happened at then, but eventually, somehow, with trial and error it worked and we did not want to go back and debug the root cause!

Improvements:

We believe the hardware could have been developed further wherein there should be no need for a mouse, even to select the levels. However, this would prove to be very complex in an already complex state machines for the Screens. However, an addition of buttons on our controller box, to replace some functionality of the mouse, could have been a good prospect.

Moreover, improving the gesture control by utilizing more advanced models for detection could also be possible. This is something we could do as an improvement should we choose to take this project further!

Code:

The code is divided into different files, with each file performing the functionality that is intuitive to the name of the file. The files that we have are:

– sketch.js (Brings all functionalities together with setup() and draw())
– screens.js (The state machines for the ‘Menu’)
– player.js (For managing the functionality of the PacMan)
– ghost.js (Handles all the ghosts/enemies)
– levels.js (Outlines the different levels that there are)
– level.js (Manages the common functionalities of each level – player movement, etc)
– fillblock.js (The algorithms that were needed to fill the blocks of the 2D Array)

Each file is separately attached below:

sketch.js

// A 2D list to store the tiles for the game board
let level = [];
// Stores the images
let tile, movingTile, rightPacXon, leftPacXon, upPacXon, downPacXon;
// Variables to store the ghosts/enemies
let redGhost, blueGhost, yellowGhost, pinkGhost;
// Variables to store the powerups
let bomb, ice, bolt, slow;
// Array to store all the powerups
let powerups = [];
// Store the tilesize for use throughout
let tileSize;
// Keeping a track of the area of an enclosed regions
let count = 0;
// Storing the count for a certain region
let c1 = 0;
// Storing the maxArea
let mArea;
// Variables to store the areas, and the coordinates for filling the enclosed regions.
let sVals = [];
let pVals = [];
let areas = [];
let tc;
// Sertting the timer for the game and initializing it to 100
let timer = 100;
// declaring and initializing the levels to be kept track of
let levels = 1;
// For storing all the enemies in the list
let enemy = [];
// Keeping track of the x and y positions of the ghost
let ghostx, ghosty;
// Checking if level should be up or not and initializing to false;
let level_up = false;
// State variables to keep track of the screens
let gamestart;
let checkMenuclick;
let load_level;
let loadhowtoplay;
let selectcontrols;
let joystickActive;
let loadcontrolsscreen;
let checkhowtoplay;
let gamebegin;
let checkforselectlevel;
let checkforStart;
let checkfornextLevel;
let levelupscreen;
let endscreen;
let checkforretry;
let gamecomplete;
let checkforfinish;
let mylevel;
// Variables to store all the images
let level1;
let level2;
let level3;
let level4;
let level5;
let level6;
let main_image;
let controlscreens;
let controlscreensbackup;
let joystickselectedscreen;
let howtoplay;
let clicktostart;
let levelup;
let endimg;
let finish;
let returnto;
// Variables for gesture detection
let video;
let handPose;
let hands;
let gestureActive = "";
let getVideo;
let videoSet;
let gestureDirection;
// Variables to store all the sounds
let gameoversound, movingsound, clickedsound, collectionsound, collisionsound, levelupsound, movement, bg;
// Declaring and initializingthe counter and max counter to calculate the percentage and keep track for the preloader
let counter = 1;;
let maxCounter = 34;
// joysrick variables
let joystickInput = 0;

// Function for initiating the Gesture Detection
function modelReady() {
  console.log('hand pose loaded');
  handpose.on('predict', results => {
    // Storing the result based on hand gestures
    hands = results;
  });
}

// Pre Loading all the assets
// The updateCounter parameter is passed in each loadXYZ() function to call the updateCounter function for progressing the pre-loader
function preload() {
  // Loading the tiles to be drawn
  tile = loadImage('assets/Tiles/tile.png', updateCounter);
  movingTile = loadImage('assets/Tiles/movingTile.png', updateCounter);
  // Loading all Pac-Xon direction gifs
  rightPacXon = loadImage('assets/Paxon/right_paXon.gif', updateCounter);
  leftPacXon = loadImage('assets/Paxon/left_paXon.gif', updateCounter);
  upPacXon = loadImage('assets/Paxon/up_paXon.gif', updateCounter);
  downPacXon = loadImage('assets/Paxon/down_paXon.gif', updateCounter);
  // Loading all the Ghosts/ Enemies
  redGhost = loadImage('assets/Enemies/red-ghost.png', updateCounter);
  blueGhost = loadImage('assets/Enemies/blue-ghost.png', updateCounter);
  yellowGhost = loadImage('assets/Enemies/yellow-ghost.png', updateCounter);
  pinkGhost = loadImage('assets/Enemies/pink-ghost.png', updateCounter);
  // Loading all the screens
  main_image = loadImage('assets/Screens/home.gif', updateCounter);
  level1 = loadImage('assets/Screens/level1.png', updateCounter);
  level2 = loadImage('assets/Screens/level2.png', updateCounter);
  level3 = loadImage('assets/Screens/level3.png', updateCounter);
  level4 = loadImage('assets/Screens/level4.png', updateCounter);
  level5 = loadImage('assets/Screens/level5.png', updateCounter);
  level6 = loadImage('assets/Screens/level6.png', updateCounter);
  controlscreens = loadImage('assets/Screens/controls.png', updateCounter);
  joystickselectedscreen = loadImage('assets/Screens/joystick_selected.png', updateCounter);
  gestureselectedscreen = loadImage('assets/Screens/gestures_selected.png', updateCounter);
  howtoplay = loadImage('assets/Screens/howtoplay.png', updateCounter);
  clicktostart = loadImage('assets/Screens/clicktostart.png', updateCounter);
  levelup = loadImage('assets/Screens/levelcompleted.png', updateCounter);
  endimg = loadImage('assets/Screens/gameover.png', updateCounter);
  finish = loadImage('assets/Screens/congrats.png', updateCounter);
  returnto = loadImage('assets/Screens/returnmenu.png', updateCounter);
  // Loading all the powerups
  bomb = loadImage('assets/Extras/redbomb.png', updateCounter);
  ice = loadImage('assets/Extras/ice.png', updateCounter);
  bolt = loadImage('assets/Extras/lightning-bolt.png', updateCounter);
  slow = loadImage('assets/Extras/snail.png', updateCounter);
  // Loading all the sounds
  gameoversound = loadSound('assets/Sounds/gameover.mp3', updateCounter);
  movingsound = loadSound('assets/Sounds/movingsound.wav', updateCounter);
  clickedsound = loadSound('assets/Sounds/clicked.wav', updateCounter);
  collectionsound = loadSound('assets/Sounds/collection.wav', updateCounter);
  collisionsound = loadSound('assets/Sounds/collision.wav', updateCounter);
  levelupsound = loadSound('assets/Sounds/levelup.wav', updateCounter);
  bg = loadSound('assets/Sounds/bg.mp3', updateCounter);

}

function setup() {
  // initializing the canvas and storing a reference to it
  var canvasMain = createCanvas(760,500);
    // set the ID on the canvas element
  canvasMain.id("p5_mainCanvas");
  // set the parent of the canvas element to the element in the DOM with
  // an ID of "left"
  canvasMain.parent("#center");

  // initializing all the state variables for the screens
  gamestart = false;
  checkMenuclick = false;
  load_level = false;
  loadhowtoplay = false;
  loadcontrolsscreen = false;
  selectcontrols = false;
  gestureActive = false;
  getVideo = false;
  videoSet = false;
  joystickActive = false;
  gesturehighlight = false;
  joystickhighlight=false;
  controlscreensbackup = controlscreens;
  checkhowtoplay =  false;
  gamebegin = false;
  checkforselectlevel =  false;
  checkforStart = false;
  levelupscreen = false;
  checkfornextLevel = false;
  endscreen = false;
  checkforretry = false;
  gamecomplete = false;
  checkforfinish = false;
  // initializing the value of mylevels for the levels to be accessed.
  mylevel = 1;

  // making use of the local storage API and obtaining the stored value of the levels that were previously ever completed by the user
  let user_levels = window.localStorage.getItem('levelsCompleted');
  // Checking if there was any data stored,
  if (user_levels) {
    // If so, the data from the local storage is used, otherwised the above initalized value is used instead.
    mylevel = int(user_levels)
  }
  // Declaring the tilesize
  tileSize = 20;
  // Populates the 2D Array with 0s
  initializeLevel();

  // Places 1s at the borders of the 2D Array
  resetLevel();
  tc = 0;
  player = new Player();
  // powerup = new Powerup();

  // Evening out the perlin noise
  noiseDetail(24);
  // Looping the background music

  bg.loop();
  // Setting the volume of the background music to a minimal value
  bg.setVolume(0.3);


}

function draw(){
  // Gets the User's Video if the Gesture Option is selected
  if((getVideo == true)&& (videoSet==false)){
    video = createCapture(VIDEO);
    video.hide();
    const options = {};
    handpose = ml5.handpose(video, options, modelReady);
    videoSet = true;
  }
  if (gestureActive){
    getGestures();
  }
  // When this is false, the MENU or the Level Selection screen appears
  if(gamestart == false){
    // If this if false, the MENU Screen will appear, which it will initially
    if (load_level == false){
      // If the how to play screen is clicked, the menu screen is not shown and instead the how to play screen is shown in the else {
      // When the how to play screen is closed, the menu screen appears again as the variable becomes false
      if (loadhowtoplay == false && loadcontrolsscreen == false){
        // Clicks for the menu screen are detected
        checkMenuclick = true;
        // The Start Screen is shown
        StartScreen();
      }
      else if (loadhowtoplay == true){
        checkMenuclick=false;
        // The How To Play Screen is shown
        HowToPlayScreen();
        // Clicks for that screen are detected
        checkhowtoplay = true;
      }
      else if (loadcontrolsscreen == true){
        checkMenuclick=false;
        // The How To Play Screen is shown
        SelectControlsScreen();
        // Clicks for that screen are detected
        selectcontrols = true;

        if(serialActive==true){
          controlscreens = joystickselectedscreen;
        }
        if(gestureActive==true){
          getVideo = true;
          controlscreens = gestureselectedscreen;
        }
      }
    }
    // The Load Screen will appear instead of the Menu Screen
    else if(load_level == true){
      // When the load screen is loaded, the clicks for the Menu Screen are not detected
      checkMenuclick = false;
      // The Level Screen is showns
      LevelScreen();
      // Clicks for the Level Screen are detected after setting the next variable to true
      checkforselectlevel = true;
    }
  }
  // If the game start is true, the menu or any of the initial screens are not appearing
  else {
    // Fills the background with a black color
    background(0);
    // Draws the level, which in the first instance only draws the borders
    drawLevel();

    // If the game gets completed,
    if(gamecomplete == true){
      // The game complete screen is shown
      image(finish, 0, 0);
      // CLicks for that screen are detected
      checkforfinish = true;
    }
    else{
      // If the game ends
      if(endscreen == true){
        // The game end screen is shown and
        image(endimg, 0, 0);
        // Clicks for that screen are detected
        checkforretry =  true;
      }
      else{
        // If the level gets incremented,
        if(levelupscreen==true){
          // The level up screen is shown
          image(levelup, 0,0);
          // CLicks for that screen are detected
          checkfornextLevel = true;
        }
        else{
          // If the game has not begun yet, the click to start screen appears
          if(gamebegin==false){
            image(clicktostart, 0, 0);
            // Clicks for that screen are detected
            checkforStart = true;
          }
          if(gamebegin == true){
            // Shows the updated Lives on the HTML Page
            let window_score = document.getElementById('current_lives')
            window_score.innerHTML = player.lives;

            //player
            player.display();
            player.move();

            // If there is an existing powerup, it draws it in every frame and ensures the effect() function runs
            if (powerups.length > 0) {
              powerups[0].display();
              powerups[0].effect();
            }

            //Iterates through all the enemies and then displays and moves them
            for (let i = 0; i < enemy.length; i++){
              enemy[i].display();
              enemy[i].move();
            }

            // Shows the updated Progress on the HTML Page
            let window_progress = document.getElementById('current_progress')
            window_progress.innerHTML = completeLevel() + "%";


            // Shows the updated Levels on the HTML Page
            let window_level = document.getElementById('current_level')
            window_level.innerHTML = levels;


            // Makes the powerups appear after a certain time period and ensures only one powerup can appear at a time
            if (frameCount % 600 == 0 && powerups.length == 0) {
              // Adds a powerup to the list for powerups
              powerups.push(new Powerup())
            }

            // Shows the updated Timer on the HTML Page
            let window_timer = document.getElementById('current_timer');
            window_timer.innerHTML = timer + 's';
            // Decreases the timer every second until the timer is 0
            if (frameCount % 60 == 0 && timer > 0) {
              timer --;
            }
            // Calls the next level function to check if the level is complete, and if so, it increases the level
            nextLevel();
            // If the timer or the player lives become 0, the game ends!
            if (timer == 0 || player.lives == 0){
              // The timer and the lives are updated on the HTML Page
              let window_score = document.getElementById('current_lives')
              window_score.innerHTML = player.lives;
              let window_timer = document.getElementById('current_timer');
              window_timer.innerHTML = timer + 's';
              // The game end screen is trigerred
              endscreen = true;
              // The right image for the Pac Xon is loaded
              player.graphic = rightPacXon;
              // The direction and movement of the Pac-Xon is reset
              player.currKeyCode = 0;
              // The pacXon is repositioned at the first index of the array
              player.x = 0;
              player.y = 0;
              // reset player speed
              player.speed = player.pspeed;
              // The levels are reset
              // levels = 1;
              // powerups are emptied
              powerups = [];
              // The level is reset and only the borders are drawn
              resetLevel();
              // The lives of the player are reset
              player.lives = 3;
              // The timer is reset
              timer = 100;
              // The game over sound is played
              gameoversound.play();
              // The all levels function is called to choose the level
              allLevels();
            }

          }
        }
      }

    }
  }
}

function mousePressed(){
  // Checks for clicks on the Various screens
  if(checkMenuclick == true){
    StartScreenClick();
  }
  else if(checkhowtoplay == true){
    HowToPlayClick();
  }
  else if(selectcontrols == true){
    SelectControlsClick();
  }
  else if(checkforselectlevel == true){
    LevelScreenClick();
  }
  else if(checkforStart == true){
    gamebegin =  true;
  }
  // Checks for clicks on the level up screens
  if(checkfornextLevel == true){
    // If the next option is clicked, the screen disappears
    if(mouseX>400 && mouseX <495 && mouseY>325&& mouseY<363){
      levelupscreen = false;
      clickedsound.play();
      checkfornextLevel == false;
      checkMenuclick = false;
    }
    // If the menu is clicked, the menu screen appears
    else if(mouseX>250 && mouseX <345 && mouseY>325&& mouseY<363){
      levelupscreen = false;
      gamestart = false;
      load_level = false;
      checkforselectlevel = false;
      checkfornextLevel == false;
      checkMenuclick = false;
      clickedsound.play();
    }
  }
  // Almost the same thing happens for the Game over screen
  if(checkforretry == true){
    // If the retry option is pressed
    if(mouseX>400 && mouseX <495 && mouseY>325&& mouseY<363){
      endscreen = false;
      checkforretry =  false;
      checkMenuclick = false;
      clickedsound.play();
    }
    // Or if the menu option is pressed
    else if(mouseX>250 && mouseX <345 && mouseY>325&& mouseY<363){
      // endscreen = false;
      endscreen = false;
      gamestart = false;
      load_level = false;
      checkforselectlevel = false;
      checkforretry =  false;
      checkMenuclick = false;
      clickedsound.play();
    }
  }
  // Checks for clicks on the 'Return to Menu' button on the screen that shows up when the game is completed
  if(checkforfinish == true){
    // rect(279, 318, 190, 45);
    if(mouseX>279 && mouseX <469 && mouseY>318&& mouseY<363){
      gamestart = false;
      gamecomplete = false;
      load_level = false;
      checkforselectlevel = false;
      clickedsound.play();
    }
  }
}

// Update counter function used within preload
function updateCounter() {
  // increase our counter
  counter++;

  // use the counter to set the style on the '#progress_bar' div
  let progress_bar = document.querySelector('#progress_bar');
  // The percentage is calculated
  progress_bar.style.width = int(counter/maxCounter*100) + "%";
}

function getGestures(){
  if (hands && hands.length > 0) {
    for (let hand of hands) {
      let annotations = hand.annotations;
      let thumb = annotations.thumb;

      let tx = thumb[3][0];
      let ty = thumb[3][1];

      let thumbsup = true;
      let thumbsdown = true;
      let thumbsleft = true;
      let thumbsright = true;

      let parts = Object.keys(annotations);
      let count = 0;
      for (let part of parts) {
        for (let position of annotations[part]) {
          let [x, y, z] = position;

          if (part === 'thumb') {
            if (x < tx) {
              thumbsleft = false;
            } else if (x > tx) {
              thumbsright = false;
            }
          } else {
            if (y < ty) {
              thumbsup = false;
            } else if (y > ty) {
              thumbsdown = false;
            }
          }
        }
      }

      if (thumbsup) {
        console.log("UP");
        gestureDirection = "up";
      } 
      else if (thumbsdown) {
        console.log("DOWN");
        gestureDirection = "down";
      } 
      else if (thumbsleft) {
        console.log("RIGHT");
        gestureDirection = "right";
      } 
      else if (thumbsright) {
        console.log("LEFT");
        gestureDirection = "left";
      }
    }
  }
}

screens.js

// Function to load up the MENU Screen
function StartScreen(){
  image(main_image, 0, 0);
  // Pauses the gif on the MENU Screen after 3 seconds
  if (frameCount % 180 == 0){
    main_image.pause();
  }
}
// Function to check for specific clicks on the MENU Screen
function StartScreenClick(){
  // Checks if the rectanglular area around the 'New Game' button is clicked
    if(mouseX>285 && mouseX <475 && mouseY>230&& mouseY<275){
      // Sets the variables for the Levels screen to appear
      load_level = true;
      // Ensures that the positions for the clicks on the MENU page are not being checked
      checkMenuclick == false;
      // Plays the click sound
      clickedsound.play();
    }
    // Checks if the rectanglular area around the 'How To Play' button is clicked
    if(mouseX>285 && mouseX <475 && mouseY>285&& mouseY<330){
      // Sets the variables for the How To Play screen to appear
      loadhowtoplay = true;
      // Ensures that the positions for the clicks on the MENU page are not being checked
      checkMenuclick == false;
      // Plays the click sound
      clickedsound.play();
    }
    // Checks if the rectanglular area around the 'More Games' button is clicked
    if(mouseX>285 && mouseX <475 && mouseY>340&& mouseY<385){
      // Sets the variables for the 'Select Controls' screen to appear
      loadcontrolsscreen = true;
      // Ensures that the positions for the clicks on the MENU page are not being checked
      checkMenuclick == false;
      // Plays the click sound
      clickedsound.play();
    }
}
// Function to load the How To Play screen image
function HowToPlayScreen(){
  image(howtoplay, 0, 0);
}
// Function to check if specific areas on the How to play screen have been clicked
function HowToPlayClick(){
    // Checks if the rectanglular area around the 'Return to Menu button is clicked
    if(mouseX>270 && mouseX <460 && mouseY>408&& mouseY<453){
      // Sets the variables to stop showing the how to play screen
      loadhowtoplay = false;
      // Does not check for click on the areas for the buttons on the how to play screen
      checkhowtoplay = false;
      // Plays the sound
      clickedsound.play();
    }
}

// Function to load the How To Play screen image
function SelectControlsScreen(){
  image(controlscreens, 0, 0);
}
// Function to check if specific areas on the How to play screen have been clicked
function SelectControlsClick(){
  // Checks if the rectanglular area around the 'Return to Menu button is clicked

  if(mouseX>155 && mouseX <340 && mouseY>265&& mouseY<360){
    print("JoyStick Clicked")
    // If a Serial Connection with the Arduino has not been established yet
    if(!serialActive){
      // Initiates the establishment of a Serial connection with the JoyStick
      setUpSerial();
    }
    gestureActive = false;
    joystickActive = true;
    // Plays the sound
    clickedsound.play();
  }

  if(mouseX>400 && mouseX <580 && mouseY>265&& mouseY<360){
    print("Gesture Clicked")
    gestureActive = true;
    joystickActive = false;
    // Plays the sound
    clickedsound.play();
  }
  
  if(mouseX>270 && mouseX <460 && mouseY>410&& mouseY<455){
    // Sets the variables to stop showing the how to play screen
    loadcontrolsscreen = false;
    // Does not check for click on the areas for the buttons on the how to play screen
    selectcontrols = false;
    // Plays the sound
    clickedsound.play();
  }
}

// Shows the appropriateimage according to the number of levels that are completed by a user.
function LevelScreen(){
  // Loads up the level one image if the user is on the first level
  if (mylevel == 1){
    image(level1, 0 ,0);
  }
  else if (mylevel == 2){
    image(level2, 0 ,0);
  }
  else if (mylevel == 3){
    image(level3, 0 ,0);
  }
  else if (mylevel == 4){
    image(level4, 0 ,0);
  }
  else if (mylevel == 5){
    image(level5, 0 ,0);
  }
  else if (mylevel == 6){
    image(level6, 0 ,0);
  }
  // Loads the overlayed image for the 'Return to Menu' option
  image(returnto, 0, 0);
}
// Function to check for any clicks on the Level Screen
function LevelScreenClick(){
    // Checks if the box around 'Return to Menu' is clicked
    if(mouseX>267 && mouseX <457 && mouseY>311&& mouseY<356){
      // Sets up the counters for any other clicks to happen to be false
      // Also sets the counters for the Level Screen to not be displayed anymore
      load_level = false;
      checkforselectlevel == false;
      clickedsound.play();
      checkhowtoplay = false;
      loadhowtoplay = false;
    }
    // The condition checks the number of levels 'unlocked' by the user and so allows for the appropriate number of them to be clicked by the user.
    if(mylevel >0){
      // Checks if the box around a specific level is clicked
      if(mouseX>118 && mouseX <193 && mouseY>215&& mouseY<293){
        // Plays the click sound
        clickedsound.play();
        // Initates the game by changing the state of the game
        gamestart = true;
        // Does not let the level screen to load again
        load_level =  false;
        // Does not allow for any click to work
        checkforselectlevel = false;
        // Sets the level to be displayed to be 1
        levels = 1;
        // Calls the function to load the appropriate enemies for that level
        levelOne();
      }
    }
    if(mylevel >1){
      if(mouseX>205 && mouseX <283 && mouseY>215&& mouseY<293){
        clickedsound.play();
        gamestart = true;
        load_level =  false;
        checkforselectlevel = false;
        levels = 2;
        levelTwo();
      }
    }
    if (mylevel >2){
      if(mouseX>290 && mouseX <368 && mouseY>215&& mouseY<293){
        clickedsound.play();
        gamestart = true;
        load_level =  false;
        checkforselectlevel = false;
        levels = 3;
        levelThree();
      }
    }
    if (mylevel >3){
      if(mouseX>375 && mouseX <453 && mouseY>215&& mouseY<293){
        clickedsound.play();
        gamestart = true;
        load_level =  false;
        checkforselectlevel = false;
        levels = 4;
        levelFour();
      }
    }
    if(mylevel >4){
      if(mouseX>460 && mouseX <538 && mouseY>215&& mouseY<293){
        clickedsound.play();
        gamestart = true;
        load_level =  false;
        checkforselectlevel = false;
        levels = 5;
        levelFive();
      }
    }
    if(mylevel >5){
      if(mouseX>545 && mouseX <623 && mouseY>215&& mouseY<293){
        clickedsound.play();
        gamestart = true;
        load_level =  false;
        checkforselectlevel = false;
        levels = 6;
        levelSix();
      }
    }
}

// This function will be called by the web-serial library
// with each new *line* of data. The serial library reads
// the data until the newline and then gives it to us through
// this callback function
function readSerial(data) {
  if (data != null) {
    console.log(data);
    joystickInput = data;
    let sendToArduino = player.lives + "\n";
    writeSerial(sendToArduino);
  }
}

player.js

//class to draw player
class Player {
  constructor(){
    // set player's position, lives, speed, graphic
    this.x = 0;
    this.y = 0;
    this.startMovingRight = false;
    this.startMovingDown = false;
    this.pKeyPress = 'None';
    this.moving = 'not moving';
    this.lives = 3;
    this.speed = 3;
    this.pspeed = this.speed;
    this.graphic = rightPacXon;
  }
  // display player
  display(){
    image(this.graphic, this.x, this.y, 20,20)
  }

  // move player
  move(){

    // set up middle of player positions
    this.middleX = this.x+tileSize/2;
    this.middleY = this.y+tileSize/2;

    // if a key is pressed
    // if (keyIsPressed==true){
      // when the first key of teh game is pressed, set previous key code
      if (this.pKeyPress == 'None'){
        this.pKeyPress = keyCode;
      }
      // if not first key press
      else {
        // set player to moving state
        this.moving = 'moving';
        // if the previous key press is not equal to the current keycode
        if (this.pKeyPress != this.currKeyCode){
          // prev key code = current
          this.pKeyPress = this.currKeyCode;
          // round the player's movement so it moves box to box only
          // round x position
          let roundx = this.x%20
          if (roundx !=0){
            if (roundx >= 10){
              this.x = this.x + (20 - roundx);
            }
            else if(roundx < 10){
              this.x = this.x - roundx;
            }
          }
          // round y position
          let roundy = this.y%20
          if (roundy !=0){
            if (roundy >= 10){
              this.y = this.y + (20 - roundy);
            }
            else if(roundy < 10){
              this.y = this.y - roundy;
            }
          }
        }
        // get the id of the tile where the middle if the player lies
        let pos = getTile(this.middleX, this.middleY);

        // if it is a solid tile
        if(pos == 1){
          // if keycode is right key (D)
          if (joystickInput ==4 || keyCode ==68 || gestureDirection == "right") {
            // set update keycode and change paxon graphic
            this.currKeyCode = 68;
            this.graphic = rightPacXon;
          }
          // if keycode is left key (A)
          if (joystickInput ==3 || keyCode ==65 || gestureDirection == "left") {
            // set update keycode and change paxon graphic
            this.currKeyCode = 65;
            this.graphic = leftPacXon;
          }
          // if keycode is up key (W)
          if (joystickInput ==2 || keyCode ==87 || gestureDirection == "up") {
            // / set update keycode and change paxon graphic
            this.currKeyCode = 87;
            this.graphic = upPacXon;
          }
          // if keycode is down key (S)
          if (joystickInput ==1 || keyCode ==83 || gestureDirection == "down") {
            // / set update keycode and change paxon graphic
            this.currKeyCode = 83;
            this.graphic = downPacXon;
          }
        }
        // If the playeer is moving and creating blocks in the empty space, basically 'drawing the line'
        else{
          // If the player is going left, it cannot move left
          if ((joystickInput ==4 || keyCode ==68 || gestureDirection == "right") && this.currKeyCode!=65) {
            this.currKeyCode = 68;
            this.graphic = rightPacXon;
          }
          // If the player is going right, it cannot move right
          if ((joystickInput ==3 || keyCode ==65 || gestureDirection == "left") && this.currKeyCode!=68) {
            this.currKeyCode = 65;
            this.graphic = leftPacXon;
          }
          // If the player is going down, it cannot move down
          if ((joystickInput ==2 || keyCode ==87 || gestureDirection == "up") && this.currKeyCode!=83) {
            this.currKeyCode = 87;
            this.graphic = upPacXon;
          }
          // If the player is going up, it cannot move up
          if ((joystickInput ==1 || keyCode ==83 || gestureDirection == "down") && this.currKeyCode!=87) {
            this.currKeyCode = 83;
            this.graphic = downPacXon;
          }
        }
      }

    // }
    // if current key code is 68 and x is less than the width, move right
    if (this.currKeyCode == 68 && this.x < width){
      this.x  += this.speed;
    }
    // if current key code is 65 and x is greater than 0, move left
    if (this.currKeyCode == 65 && this.x > 0){
      this.x  -= this.speed;
    }
    // if current key code is 87 and y is greater than 0, move up
    if (this.currKeyCode == 87 && this.y > 0){
      this.y  -= this.speed;
    }
    // if current key code is 83 and y is less than height, move down
    if (this.currKeyCode == 83 && this.y < height){
      this.y += this.speed;
    }

    // get id middle of tile
    let id = getTile(this.middleX, this.middleY);
    // declare next tile
    let nt;

    // Checks if the player is withing the empty space or is not in the border region
    if((this.middleX>20 && this.middleY>20 && this.middleX<width-20 && this.middleY<height-20)){
      // A few pixels to the right, left, up, and down are detected from the player
      this.sensorLeft = this.x-10;
      this.sensorRight = this.x+tileSize+10;
      this.sensorTop = this.y-10;
      this.sensorBottom = this.y+tileSize+5;

      // If the player is moving right, the next tile to the right of it is checked
      if(this.currKeyCode==68){
        nt = getTile(this.sensorRight,this.middleY);
      }
      // If the player is moving left, the next tile to the left of it is checked
      else if(this.currKeyCode==65){
        nt = getTile(this.sensorLeft,this.middleY);
      }
      // If the player is moving up, the next tile above of it is checked
      else if(this.currKeyCode==87){
        nt = getTile(this.middleX,this.sensorTop);
      }
      // If the player is moving down, the next tile below of it is checked
      else if(this.currKeyCode==83){
        nt = getTile(this.middleX,this.sensorBottom);
      }
    }
    // If the player comes into contact with the line that it is drawing itself
    if(nt == -1){
      // The position is reset
      player.x = 0;
      player.y = 0;
      // The graphic is reset
      player.graphic = rightPacXon;
      // The speed is reset
      player.currKeyCode = 0;
      // A life is lost
      player.lives -= 1;
      // Collision sound is played
      collisionsound.play();
      // The canvas is reset to borders only
      resetDrawing();
    }
    // If there is no tile at it's middle position
    else if (id == 0){
      // A blue tile for drawing the line is drawn
      modifyTile(this.middleX, this.middleY)
    }
    // If a  solid tile is encounter
    else if (id == 1) {
      solidTiles();
      // Checks if a line is created and gets completed.
      // It does this by checking if the player just got stopped
      if (this.moving == 'stopped'){
        // Then it changes the state of moving to be 'not moving' which means it hasnt started creating any lines
        this.moving = 'not moving';
        // Makes a deep copy of the level array
        var xyz = makeDeepCopy(level);
        // Gets all the positions of the enemies and then sets the
        // corresponding id in the Level array to be 2 to ensure that
         // the enemies are not being taken into account
        for (let i = 0; i < enemy.length; i++){
          // Makes sure that the yellow enemy is not taken into account
          if(enemy[i].type != "follow"){
            ghostx = int(enemy[i].middleX/tileSize);
            ghosty = int(enemy[i].middleY/tileSize)
            level[ghosty][ghostx] = 2;
          }
        }
        // Gets one coordinate from all the enclosed regions
        mArea, sVals = maxAreaOfIsland(xyz);
        // Gets a list of all the smaller regions' coordinates/ the ones to be removed
        let vals = smallerPair(sVals);

        // Resets the position where the enemies' corresponding positions were set to 2
        for (let i = 0; i < enemy.length; i++){
          if(enemy[i].type != "follow"){
            ghostx = int(enemy[i].middleX/tileSize);
            ghosty = int(enemy[i].middleY/tileSize)
            level[ghosty][ghostx] = 0;
          }
        }

        // Fills the level array, basically floods the enclosed region that meets the criteria
        for (let i = 0; i < vals.length; i++){
          fill_array(level, vals[i][0], vals[i][1], 1, 0);
        }
      }
    }
    // Contrains the x and y positions of the enemy to remain within the canvas width and onto the border tiles.
    this.x = constrain(this.x, 0, width-20);
    this.y = constrain(this.y, 0, height-20);
    }
  }

ghost.js

// The Ghosts class
class Ghost {
  // constructor to declare ghost x,y,graphic,speed
  constructor(){
    this.x = random(80, width-100);
    this.y = random(80, height-80);
    this.speedX = random(1, 3);
    this.speedY = random(1, 3);
    this.speed = 0.005;
    this.graphic = blueGhost;
    // previous speed so enemies can return to their original speed after being affected by powerups
    this.pspeedX = this.speedX;
    this.pspeedY = this.speedY;
    this.pspeed = this.speed;
  }

  // displays the enemy
  display(){
    image(this.graphic, this.x, this.y, 20,20);
  }

  // detects players collisions with walls, player and powerups
  collision () {
    // set up sensor positions
    this.sensorLeft = this.x-3;
    this.sensorRight = this.x+tileSize+3;
    this.sensorTop = this.y-3;
    this.sensorBottom = this.y+tileSize+3;
    this.middleX = this.x+tileSize/2;
    this.middleY = this.y+tileSize/2;

    // check the id of tiles in the 2d array at the sensor positions
    let id = getTile(this.middleX,this.middleY);
    let lid = getTile(this.sensorLeft,this.middleY);
    let rid = getTile(this.sensorRight,this.middleY);
    let uid = getTile(this.middleX, this.sensorTop);
    let bid = getTile(this.middleX, this.sensorBottom);

    // if enemies touch the walls (blue tiles), they bounce off
    // top sensor 
    if (uid == 1) {
      if(this.type != "follow"){
        this.y += 3;
      }
      this.speedY *= -1;
      this.pspeedY *= -1;
    }
    // bottom sensor
    if (bid == 1) {
      if(this.type != "follow"){
        this.y -= 3;
      }
      this.speedY *= -1;
      this.pspeedY *= -1;
    }
    // left sensor
    if (lid == 1) {
      if(this.type != "follow"){
        this.x += 3;
      }
      this.speedX *= -1;
      this.pspeedX *= -1;
    }
    // right sensor
    if (rid == 1) {
      if(this.type != "follow"){
        this.x -= 3;
      }
      this.speedX *= -1;
      this.pspeedX *= -1;
    }
    // detects collision with the player
    this.playerCollision(rid, lid, uid, bid);
    // detects collision with the snail and ice powerups
    this.powerupCollision();

    // add special wall eating effect of wall collision 
    // if enemy type is blue or red
    if (this.type == "eat" || this.type == "duplicate"){
      this.eat(rid, lid, uid, bid)
    }

  }
  // wall eating effect function for blue and red enemies
  eat(rid, lid, uid, bid) {
    // if right tile is a wall but not a border, delete tile
    if (rid == 1 && this.x < width-tileSize-30){
      deleteTile(this.sensorRight, this.middleY);
    }
    // if left tile is a wall but not a border, delete tile
    else if (lid == 1 && this.x > 30){
      deleteTile(this.sensorLeft, this.middleY);
    }
    // if top tile is a wall but not a border, delete tile
    else if (uid == 1 && this.y > 30){
      deleteTile(this.middleX, this.sensorTop);
    }
    // if bottom tile is a wall but not a border, delete tile
    else if (bid == 1 && this.y < height-tileSize-30){
      deleteTile(this.middleX, this.sensorBottom);
    }
  }
  // if enemy is blue, duplicate enemy when player comes in its radius
  duplicate() {
    // if player is within the radius of the enemy
    if (player.x >= this.x-40 && player.x <= this.x+60 && player.y >= this.y-40 && player.y <= this.y+60) {
      // this if condition is to ensure enemy only duplicates once even if the player stays in the radius
      if (this.dup == true){
        enemy.push(new BlueGhost());
        this.dup = false;
      }
    }
    // if player is out of the radius, and comes within it again, enemy can duplicate again
    else {
      this.dup = true
    }
  }
  // move the enemy by determining all collisions
  move() {
    this.collision();
    // pink enemy or red enemy bounces off walls
    if (this.type == "bounce" || this.type == "eat"){
      this.x += this.speedX;
      this.y += this.speedY;
    }
    // yellow enemy follows player
    else if (this.type == "follow"){
      let distX = player.x - this.x;
      let distY = player.y - this.y;

      this.x += this.speed * distX;
      this.y += this.speed * distY;
    }
    // blue enemy has a ring around it and it bounces
    else if (this.type == "duplicate"){
      noFill();
      stroke(0,255,255);
      ellipse(this.x + 10,this.y + 10, 100);
      this.duplicate();
      this.x += this.speedX;
      this.y += this.speedY;

    }
  }
  // if enemy collides with player
  playerCollision(rid, lid, uid, bid) {
    // if enemy comes in contact with "moving blue" tiles or the player itself
    if(lid == -1 || rid == -1 || uid == -1 || bid == -1 || dist(this.x, this.y, player.x, player.y) < 20){
      // play sound
      collisionsound.play();
      // reset player position, graphic, speed, lives
      player.x = 0;
      player.y = 0;
      player.graphic = rightPacXon;
      player.currKeyCode = 0;
      player.lives -= 1;
      // if it bounces off the left moving blue tiles and right tile is not equal to wall jump off 10 pixels to the right
      if (lid == -1 && rid != 1){
        this.x += 10;
      }
      // if it bounces off the right moving blue tiles and left tile is not equal to wall jump off 10 pixels to the left
      else if (rid == -1 && lid != 1){
        this.x -= 10;
      }
      // if it bounces off the top moving blue tiles and bottom tile is not equal to wall jump off 10 pixels to the bottom
      else if (uid == -1 && bid != 1){
        this.y += 10;
      }
      // if it bounces off the bottom moving blue tiles and top tile is not equal to wall jump off 10 pixels to the top
      else if (bid == -1 && uid != 1){
        this.y -= 10;
      }

      // if comes in contact with player, bounce in opposit direction if possible
      if (dist(this.x, this.y, player.x, player.y) < 20) {
        if (rid != 1 || rid != -1){
          this.x += 10;
        }
        else if (lid != 1 || lid != -1){
          this.x -= 10;
        }
        else if (uid != 1 || uid != -1){
          this.y -= 10;
        }
        else if (bid != 1 || bid != -1){
          this.y += 10;
        }

      }
      // if the lives of player are less than or equal to zero
      if (player.lives <= 0){
        // display lives in html 
        let window_score = document.getElementById('current_lives')
        window_score.innerHTML = player.lives;
        // display lives in html 
        let window_timer = document.getElementById('current_timer');
        window_timer.innerHTML = timer + 's';
        // display game over screen
        endscreen = true;
        // reset player lives
        player.lives = 3;
        // reset player speed
        player.speed = player.pspeed;
        // reset timer
        timer = 100;
        // reset powerups
        powerups = [];
        // remove the blue moving tiles
        resetLevel();
        // reset enemy array
        allLevels();
        // play sound
        gameoversound.play();
      }
      // else if player lives are not yet zero but collision with enemy occurs then just remove the blue moving tiles
      else {
          resetDrawing();
      }
    }
  }

  // detect enemy collsions with powerups
  powerupCollision() {
    // if powerup array is not empty
    // and the powerup is snail or ice
    if (powerups.length != 0 && (powerups[0].graphic == slow || powerups[0].graphic == ice)) {
      // if powerup collision with enemy
      if (dist(this.x, this.y, powerups[0].x, powerups[0].y) < 20) {
        // console.log("enemy touched ice/slow")
        // set previous frame
        this.pframe = frameCount;
        // if the power up is snail, decrease player's speed
        if (powerups[0].graphic == slow) {
          player.speed = 1;
        }
        // if power up is ice, freeze player
        else if (powerups[0].graphic == ice){
          player.speed = 0;
        }
        // stop displaying powerup and change its location to outside canvas
        powerups[0].disp = false;
        powerups[0].x=-100;
        powerups[0].y=-100;
        // play sound
        collectionsound.play();
      }
      // if current frame count - frame count when powerup was picked is 180 (3 sec)
      if (frameCount - this.pframe == 180){
        // return palyer's speed to normal and remove powerup from array
        console.log("return to normal")
        player.speed = player.pspeed;
        powerups.splice(0, 1);
        // this.pframe = 0;
      }

    }
  }
}

// pink ghost class, inherits ghost class
class PinkGhost extends Ghost{
  constructor(){
    super();
    this.speedX = random(1.5, 3);
    this.speedY = random(1.5, 3);
    this.graphic = pinkGhost;
    this.type = "bounce";
  }
}
// blue ghost class, inherits ghost class
class BlueGhost extends Ghost{
  constructor(){
    super();
    this.graphic = blueGhost;
    this.speedX = random(1.5, 3);
    this.speedY = random(1.5, 3);
    this.type = "duplicate";
  }


}
// red ghost class, inherits ghost class
class RedGhost extends Ghost{
  constructor(){
    super();
    this.graphic = redGhost;
    this.type = "eat";
  }
}
// yellow ghost class, inherits ghost class
class YellowGhost extends Ghost{
  constructor(){
    super();
    this.graphic = yellowGhost;
    this.type = "follow";
  }
}

levels.js

// calculate and return the percentage of solid tiles in the array
function completeLevel() {
    let count = 0
    let totalcount = 0;
    for (let i=1; i < (height/20) - 1; i++){
        for (let j=1; j < (width/20) - 1; j++){
          if (level[i][j] == 1){
            count += 1;
          }
        }
    }
    totalcount = ((count/828)* 100);
    return round(totalcount * 100) / 100;
}

// promotes player to next level
function nextLevel() {
    // completeLevel();
    // levelOne();
    if (completeLevel() >= 80) {
        // console.log(completeLevel())
        levelupsound.play();
        // increment level
        levels +=1;
        // if all 6 levels completed,
        if(levels>6){
            // game has been completed
            gamecomplete = true;
        }
        // else increment the number of levels unlocked
        else{
            // Checks if the current reached level has become greater than the user stored level
            if(mylevel < levels){
                mylevel +=1;
                // It then updates the local storage as well
                if(mylevel <7){
                    window.localStorage.setItem('levelsCompleted', mylevel);
                }
            }
        }
        // display lives in html 
        let window_score = document.getElementById('current_lives')
        window_score.innerHTML = player.lives;
        // display lives in html 
        let window_timer = document.getElementById('current_timer');
        window_timer.innerHTML = timer + 's';
        // resetLevel();
        player.x = 0;
        player.y = 0;
        // player.lives = 3;
        player.graphic = rightPacXon;
        player.currKeyCode = 0;
        // timer = 100;
        // allLevels();
        // levelupscreen = true;

        // display game over screen
        levelupscreen = true;
        // reset player lives
        player.lives = 3;
        // reset timer
        timer = 100;
        // reset player speed
        player.speed = player.pspeed;
        // reset powerups
        powerups = [];
        // remove the blue moving tiles
        resetLevel();
        // reset enemy array
        allLevels();
    }
}
// function which contains all levels
function allLevels() {
    // level 2
    if (levels == 2) {
        levelTwo();
    }
    // level 3
    else if (levels == 3) {
        levelThree();
    }
    // level 4
    else if (levels == 4) {
        levelFour();
    }
    // level 5
    else if (levels == 5) {
        levelFive();
    }
    // level 6
    else if (levels == 6) {
        levelSix();
    }
}

// level one enemy array declaration
function levelOne() {
    enemy = [];

    enemy.push(new PinkGhost());
    enemy.push(new PinkGhost());
}

// level two enemy array declaration
function levelTwo() {
    enemy = [];

    enemy.push(new PinkGhost());
    enemy.push(new PinkGhost());
    enemy.push(new RedGhost());
}

// level three enemy array declaration
function levelThree() {
    enemy = [];

    enemy.push(new PinkGhost());
    enemy.push(new RedGhost());
    enemy.push(new RedGhost());
    enemy.push(new YellowGhost());
}
// level four enemy array declaration
function levelFour() {
    enemy = [];

    enemy.push(new PinkGhost());
    enemy.push(new BlueGhost());
    enemy.push(new RedGhost());
    enemy.push(new RedGhost());
    enemy.push(new YellowGhost());
}

// level five enemy array declaration
function levelFive() {
    enemy = [];

    enemy.push(new PinkGhost());
    enemy.push(new RedGhost());
    enemy.push(new RedGhost());
    enemy.push(new BlueGhost());
    enemy.push(new YellowGhost());
    enemy.push(new YellowGhost());
}

// level six enemy array declaration
function levelSix() {
    enemy = [];

    enemy.push(new PinkGhost());
    enemy.push(new PinkGhost());
    enemy.push(new RedGhost());
    enemy.push(new RedGhost());
    enemy.push(new BlueGhost());
    enemy.push(new BlueGhost());
    enemy.push(new YellowGhost());
    enemy.push(new YellowGhost());

}

level.js

// set all the blue moving tiles when the player loses a life to black tiles when the game restarts
function resetDrawing() {
  for (let i=0; i < height/20; i++){
    for (let j=0; j < width/20; j++){
      if (level[i][j] == -1){
        level[i][j] = 0;
      }
    }
  }
}
// The following for loops populate the 2D list, level, dynamically and leaves it blank
function initializeLevel() {
  let rows = []
  for (let i = 0; i < height/20; i++){
    rows = []
    for (let j =0; j < width/20; j++){
      rows.push(0);
    }
    level.push(rows)
  }
}

// The following block populates the fixed borders of the board
function resetLevel() {
  for (let i=0; i < height/20; i++){
    for (let j=0; j < width/20; j++){
      level[i][j] = 0;
      if (i == 0 || i == height/20-1 || j == 0 || j == width/20-1 ){
        level[i][j] = 1;
      }
    }
  }
}

// function to draw the tiles
function drawLevel() {
  for (let r = 0; r < level.length; r++) {
    for (let c = 0; c < level[r].length; c++) {
      if(level[r][c] == 1){
        image(tile,c*20,r*20,20,20);
      }
      if(level[r][c] == -1){
        image(movingTile,c*20,r*20,20,20);
      }
    }
  }
}

// returns the id of the tile in the array
function getTile(x,y) {
  x = int(x/tileSize);
  y = int(y/tileSize);
  return level[y][x];
}
function getCoord(x,y) {
  x = int(x/tileSize);
  y = int(y/tileSize);
  return x,y;
}

// modifies the tile to a blue moving tile
function modifyTile(x,y) {
  x = int(x/tileSize);
  y = int(y/tileSize);
  level[y][x] = -1;
}
// deletes a tile
function deleteTile(x,y) {
  x = int(x/tileSize);
  y = int(y/tileSize);
  level[y][x] = 0;
}
// deletes multiple tiles when a bomb goes off
function deleteTiles(x,y){
  deleteTile(x,y);
  deleteTile(x-20,y);
  deleteTile(x+20,y);
  deleteTile(x,y-20);
  deleteTile(x,y+20);
  deleteTile(x+20,y+20);
  deleteTile(x-20,y+20);
  deleteTile(x,y+40);

}
// when the player reaches the border, tranform moving tiles to solid wall tiles
function solidTiles(){
  let maxRow = 0, maxCol=0;
  for (let r = 0; r < level.length; r++) {
    for (let c = 0; c < level[r].length; c++) {
      if(level[r][c] == -1){
        // When a tile is changed from -1 to 1, it means the player created a line so the moving variable of the player is set to stopped
        player.moving = 'stopped'
        maxRow = max(maxRow, r);
        maxCol = max(maxCol, c);
        level[r][c] = 1;
      }
    }
  }
}

fillblock.js

// A recursive function with inspiration from https://learnersbucket.com/examples/algorithms/flood-fill-algorithm-in-javascript/
// The following function fills an enclosed region, basically some values bordered on all four sides by certain other value,
// with the new values that are provided.
// It basically replicates how the paint bucket system works in photoshop.
// The function is supposed to be given coordinates of a point in the region.
function fill_array(level, r, c, newColor, current){
  // Checks if the values are out of bound
    if(r < 0){
        return;
    }
    // Checks if the values are out of bound
    if(c < 0){
        return;
    }
    // Checks if the values are out of bound
    if(r > level.length){
        return;
    }
    // Checks if the values are out of bound
    if(c > level[r].length){
        return;
    }
    // Checks if there is any enemy inside of the region, if so
    // it increases the area count by a large amount in order to flag interval
    // The value of 2 is placed wherever the enemies are present as this function executes.
    if(level[r][c] === 2){
        count = 10000;
        return;
    }
    // A different value is encountered
    if(level[r][c] !== current){
        return;
    }
    // Changes the value at the array index
     level[r][c] = newColor;
     // Count to keep track of the 'area' of an enclosed region.
     count = count + 1;
     // the function recursivly calls itself t ensure all the neigbors are filled.
     fill_array(level, r - 1, c, newColor, current);
     fill_array(level, r + 1, c, newColor, current);
     fill_array(level, r, c - 1, newColor, current);
     fill_array(level, r, c + 1, newColor, current);
     // Returns the 2D Array
     return level
};
// Function to check all the coordinate pairs that have smaller area
function smallerPair(values){
    // initialize two lists
    areas = [];
    pairs = [];
    let enemfound = false;
    // Loops over all the coordinates
    for (let i = 0; i< values.length; i ++){
      // Calls the fill array function ONLY TO COUNT the area of the region in which the point lies.
      fill_array(level,values[i][0], values[i][1], 3, 0);
      // Stores the count into a local variable
      c1 = count;
      // Calls the fill array function to reset the modified values back to normal in the level array
      fill_array(level, values[i][0], values[i][1], 0, 3);
      // updates the global variable count
      count = 0;
      // Checks if the enemy is present
      if(c1<1000){
        areas.push(c1);
        pairs.push(values[i]);
        // Marks the enemy to not be found
        enemfound = true;
      }
    }
    // If the previous condition was not passed, it means the enemy was present in this block.
    if(enemfound == false){
      // The index with the maximum value, an outlier wtih a value of 10000 is removed from the list
      maxA = max(areas)
      maxIndex = areas.indexOf(maxA);
      pairs.splice(maxIndex,1);
    }
    // returns the pairs by excluding the biggest of the regions
    return pairs;
};
// Inspired from the Leet Code Problem Solution: https://dev.to/seanpgallivan/solution-max-area-of-island-4njk
// It returns one coordinate in each enclosed region
function maxAreaOfIsland(grid) {
  // Sets the maximum area to be very high since we need to take the minimum
    let maxArea = 10000
    // Directions over which to check next
    let compass = [[-1, 0], [0, -1], [1, 0], [0, 1]];
    // Checks the previous row and previous columns
    let prow;
    let pcol;
    // An array to store all the coordinate values
    let smallVals = [];
    // Runs for the entire grid and calls the flood function if each value meets a certain criteria.
    for (let i = 0; i < grid.length; i++) {
        for (let j = 0; j < grid[i].length; j++) {
            if (grid[i][j] === 0) {
                flood([[i, j]])
            }
        }
    }
    // Another flood function built differently for checking the enclosed box
    return maxArea, smallVals
    function flood(stack) {
      // initializes the area
        let currentArea = 0
        while (stack.length) {
            let [row, col] = stack.pop()
            if (row < 0 || col < 0 || row >= grid.length || col >= grid[0].length || grid[row][col] === 1) {
                continue
            }
            // increases the area
            currentArea++
            grid[row][col] = 1
            prow = row;
            pcol = col;
            for (const direction of compass) {
                stack.push([row + direction[0], col + direction[1]])
            }
        }
        // Pushes the row and column onto the list
        smallVals.push([prow,pcol]);
        // Gets the minium of all areas.
        maxArea = Math.min(maxArea, currentArea)
    }
};
// Function to make a deep copy of a 2D Array
function makeDeepCopy(g) {
  // initializes a new list
  var gridCopy = [];
  // Runs for all the lists within the big list
  for (var x = 0; x < g.length; x++) {
    // initializes an intermediary/ temporary row
    var newRow = [];
    // Runs a loop for the length of each list within the bigger list
    for (var y = 0; y < g[x].length; y++) {
      // adds the values to the temporary row
      newRow.push(g[x][y])
    }
    // Pushes the copied row into the new bigger row
    gridCopy.push(newRow);
  }
  // returns a newly created 2D Array/ List with the old list.
  return gridCopy;
};

Arduino Code

// joystick ports
int dirUp = 7;
int dirDown = 6;
int dirRight = 5;
int dirLeft = 4;

// lives lights ports
int lives3Pin = 11;
int lives2Pin = 10;
int lives1Pin = 9;
int lives = 3;
int prevlives = 3;
int vibrate = 0;

// int lives, prevlives = 3;
int motorPin = 3; //motor transistor is connected to pin 10
int motorState = LOW;  // motorState used to set the Motor Vibration
unsigned long previousMillis = 0;  // will store last time LED was updated
const long interval = 1000;  // interval at which to blink (milliseconds)


void setup()
{
  pinMode( dirDown , INPUT);
  pinMode( dirUp , INPUT);
  pinMode( dirLeft , INPUT);
  pinMode( dirRight, INPUT);

  pinMode(motorPin, OUTPUT);
  Serial.begin(9600);

  while (Serial.available() <= 0) {
    digitalWrite(LED_BUILTIN, HIGH); // on/blink while waiting for serial data
    Serial.println("0"); // send a starting message
    delay(300);            // wait 1/3 second
    digitalWrite(LED_BUILTIN, LOW);
    delay(50);
  }
}

void loop(){
  
  while (Serial.available()) {
      prevlives = lives;
      lives = Serial.parseInt();
      if(prevlives != lives){
        vibrate=1;
      }

      if (Serial.read() == '\n') {
        if (digitalRead( dirDown ) == LOW ){
          Serial.println(1);
        }
        else if (digitalRead( dirUp ) == LOW ){
          Serial.println(2);
        }
        else if (digitalRead( dirLeft ) == LOW ){
          Serial.println(3);
        }
        else if (digitalRead( dirRight ) == LOW ){
          Serial.println(4);
          // digitalWrite(motorPin, HIGH); //vibrate
        }
        else {
          Serial.println(0);
      }

      if(vibrate == 1){
        unsigned long currentMillis = millis();
        if (currentMillis - previousMillis >= interval) {
          // save the last time you blinked the LED
          previousMillis = currentMillis;

          // if the LED is off turn it on and vice-versa:
          if (motorState == LOW) {
            motorState = HIGH;
          } else {
            motorState = LOW;
            vibrate=0;
          }

          // set the LED with the ledState of the variable:
          digitalWrite(motorPin, motorState);
        }
        // else{
        //   vibrate=0;
        // }
      }

      if (lives == 3) {
        digitalWrite(lives1Pin, HIGH);
        digitalWrite(lives2Pin, HIGH);
        digitalWrite(lives3Pin, HIGH);
      }
      else if (lives == 2) {
        digitalWrite(lives1Pin, HIGH);
        digitalWrite(lives2Pin, HIGH);
        digitalWrite(lives3Pin, LOW);
        // digitalWrite(motorPin, HIGH); //vibrate
      }
      else if (lives == 1) {
        digitalWrite(lives1Pin, HIGH);
        digitalWrite(lives2Pin, LOW);
        digitalWrite(lives3Pin, LOW);
      }
      else if (lives == 0) {
        digitalWrite(lives1Pin, LOW);
        digitalWrite(lives2Pin, LOW);
        digitalWrite(lives3Pin, LOW);
        // digitalWrite(motorPin, HIGH); //vibrate
      }

    }
    } 

}

Final Project: PacXon Premium

Concept

For the purposes of the Final Project of Introduction to Interactive Media, we were presented the challenging task of connecting Software and Hardware. To achieve this, our team of three members, Zunair, Ishmal, and Abraiz, decided to create a game using P5Js as it seemed like a de-stressing activity. We also wanted to bridge it with hardware by producing an Arcade Game Controller. This led us to the creation of PacXon Premium and its accompanying controller.

Pac-Xon Premium is a game that is based on Pac-Man, and it was inspired by one of our team member’s childhood favorites. We started with Pac-Xon Deluxe, the original game, which was fairly simple but had numerous levels of increasing difficulty. However, the gradual increase in difficulty may lead to repetitiveness and lack of challenge, even in the most difficult levels. We also noticed that the classic graphics of the game were outdated, so we decided to give it a modern touch and feel and create a revamped and customized version.

Initially, we thought that coding the game would be a simple task. However, as we delved deeper into the logic and technical requirements of even the smallest details, we realized that it would require a relatively complex algorithmic approach. Simple Object Oriented Programming and Javascript Basics were not enough to achieve our goal of making almost all objects interact with each other. We decided to make it a tile-based game to add to the complexity.

In summary, Pac-Xon Premium is an updated and customized version of Pac-Xon Deluxe, a game inspired by Pac-Man. We added a modern touch and feel to the classic graphics and produced a tile-based game with a complex algorithmic approach. The game features numerous levels with increasing difficulty and challenges players to think strategically to progress through the game.

Link & Video

While there is a need for a Joystick Controller to utilize the Arcade feel of the game, keyboard will just work fine with the W,A,S,D keys at this link.

To cater to the possibility of any issues with the code, we have also recorded a video of the Game with the Joystick Controller that we produced:

Hardware and its Pictures:

For producing the Arcade Controller, we started off by connecting the Arcade Joystick to a breadboard and Arduino, and connecting its movement to corresponding movements in the P5Js Sketch which can be seen in the following picture:

Then, moving on, we added another breadboard with 3 LED Bulbs that demonstrated lights and also a Vibration Motor that gave sense of a Haptic Feedback response when a person died, level was completed or some significant event happened.

Then, to wrap the content of the Breadboard, we wanted a physically rigid controller, which was large enough to have the Joystick embedded, and also have LED lights and the Vibration Motor stuck inside. The box, in its initial stages, can be seen here:

The box is open from one end for debugging purposes, and also does not sway away from the looks of it with the back side being the only open section. We decided to translate our solderless breadboard design onto a soldered breadboard to complete our hardware in a rigid fashion. This was then installed inside the box as can be seen below:

All in all, we produced a controller:

How it Works:

As you have already seen what the project is, let us explain the intricacies of how it was developed and its functionalities (code is added at the very end):

p5.js Description

As our first step, using Javascript, and particularly the p5 JS library, we started off with creating a 2D Array/ List which was technically mapped over the entire canvas, or rather drawn over the area of the canvas, such that each index in the 2D Array/ List represented a 20px by 20px box on the canvas of the game. Then we took an approach such that a value 1 at any index would draw a solid blue tile (20px by 20px) on the canvas at the position corresponding to the index of the 2D Array/ List. Similarly, if the value was to be 0, nothing was to be drawn and if the value was to be -1, a different blue tile representing a ‘line’ would be drawn instead. Then we created functions which handled the filling of the array and included functionalities like initializing the array borders at the beginning of the game and those that checked for if any values in the 2D Array were modified and matched a certain criteria for a tile to be drawn at that position, or even to map the values of the x and y coordinates on the canvas to the array position and the tile at that very location.

Once we were satisfied with the Array functionality, we started off with creating the Player Class that drew the user controlled character on the screen. This was the class that we found to be the most challenging, since we had to incorporate the functionality of an object of a Player class with its movement being in accordance with the functionality of the 2D Array. Drawing, and moving the player was very simple, however when we changed the direction of the Pac-Xon, it was causing the Pac-Xon to be moving between two different tiles as shown below:

In order to solve this problem, we created a rounding function that checks the player’s position and checks the tile, from the two tiles that it intersects, on which the majority of the player’s body lies and forces the player to be pushed or pulled onto that tile as it changes its direction. We tried other approaches, including the reduction of FrameRate or increasing the speed by the size of the tile, however both of them resulted in reduced game play quality.

Moving on, we allowed for the player to draw connecting lines between two solid blocks. This was done mainly by using the position of the tile that the player is present at and then checking whether the player is at an empty area or a solid position, and then drawing a ‘line’ tile if the condition is fulfilled. We extended this approach to allow for checking the next tile and ensuring the player does not bump into the line that is being formed, we also somewhat extended the same approach to ensure restrict the movements when the player is forming the line or is within the solid block region.

However, the most difficult part of the project was to fill the appropriate ‘boxes’, which are certain enclosed regions in the canvas when the line connects between two solid tiles. A demonstration of this is:

The complications with this was not only the procedure to fill the region, but in fact the considerations to take into account when filling this. A brief overview of them include that the region should not fill if the enemy is present inside of the region, or if multiple regions are created, all of the smallest ones should fill up, and only the largest one and/or the ones including the enemy should remain empty such that:

The approach to solve this was using the following algorithms:

Flood Fill Algorithm
Max Area of an Island (LeetCode Problem)

We used the Max Area of an Island Algorithm, which compares the areas of all the individual regions and finds out the maximum of those, and modified it to instead return x and y coordinates of each of the regions. We then used these coordinates to find the areas of all the regions, with an intermediary step checking if the enemy was present in any of the regions then to not take it into consideration, and then from those areas we excluded the maximum area and used all the other coordinates to fill the smaller areas. In this manner, we were able to achieve the desired result through extensively comprehending the complex recursive algorithms.

After this, we implemented the enemy classes where each type of enemy had a class that inherited from the main enemy class for the features that were common amongst all enemies. The movement of the enemies used a similar approach of checking the tiles around it and reversing its speed if it encountered the solid tile; this was then extended to allow some enemies to eat the solid tiles when they bounced off of them as well. The enemy class interacted with the Player class to check for collisions with the player.

Moving on, we incorporated the Powerups class, where the various power ups were placed at certain positions, like the bomb was to only show up in the region with the solid tiles. The power ups then interacted with the Player and Enemy class both, where either of them could use the power ups effect.

The last complex step was to incorporate the various screens with state variables at certain positions. It produced a lot of variables and seemed like a logic gate problem solved with boolean variables instead of gates. The changing of states and ensuring that the correct screen appears after one another was challenging to keep track of.

The final touches were to add sound, fix any bugs with interactions and movements or any logical errors in the algorithm. With all the effort put in, the end product seemed very satisfactory and came up together better than our initial expectations!

Arduino Description

While most of the complexity was in having the game come together in P5Js, there was a decent amount of effort put into the Hardware connection with p5Js. We wanted to ensure that the game runs fast, to allow for the intended smoothness but also communicates over a Serial connection with the Arduino.

Therefore, we incorporated the vibration of the motor without using any delays and instead making use of timestamp millis, similar to the concept of Blink Without Delay that was taught in class. Moreover, we had a short version of a State Machine in our Arduino code as well which allowed the light up of the number of LED bulbs in correspondence to the number of lives left. Also, the Arduino was keeping track of the point where the lives were lost in order to start the Vibration Motor on its own, without any particular signal from p5Js.

Interaction Design

All in all, as part of our interactive design, we can outline a couple of features:

– Makes use of joystick, keyboard, as well as gestures as input from the user to move the pacman character
– There are LED lights as well as HTML elements that display the lives and progress of the levels
– A particular vibration motor, as well as sound effects, that highlight the different events taking place
– Powerups in the game which can either be utilized by the player, or even the enemies!
– Packaged box controller to utilize a direct interaction with P5Js in real time

What are we proud of:

Overall, we are very proud to have completed a project that saw much attention at the Interactive Media Showcase, and received complements from individuals! It is good to have overcome the difficulties with P5Js, as well as Arduino to create something that looks complete, and at Bug free (at least as of now!). While the game seems simple, if you think of reproducing it, you will begin thinking of the complexities involved, and we are happy to have achieved what we have.

However, in particular, as Computer Science students, we are very glad to bring to life examples from Leetcode and programming competitions, into real life. We had always questioned the necessity for these type of questions and their relevance in the practical world, but we have a live example to showcase the relevance of these complex algorithms now.

We are also particularly positive and happy about our code organization, commenting and file structure. The code is attached at the very end of this article to allow for better reading of content, however, the way all the images, sound files, and even the different pieces of code were divided into different files and organized for better understanding as well as debugging is something we really enjoyed doing. A quick glimpse into it can be seen below:

Moreover, it was very challenging to produce a detailed ‘menu’ in P5js. Therefore, we are particularly proud of having achieved that. It can be seen in the ‘Screens.js’ files below. This is an example of a very complex state machines, where images are shown depending on different click locations, which then only accepts clicks at certain different locations. For example, the ‘Start Game’ shows different levels which accepts clicks at different levels, and then there is a screen for completion or loss of each level, which then accepts click and then responds appropriately.

If you have played the game, you may have experienced the different types of enemies, or ghosts as we call them. These are created in run time through object oriented programming, as well as inheritance. There is a basic class for the Ghosts, and then there is an extension to it for the different types which builds upon the basic class. This is a proper utilization of the coding principles, and we are proud of having made use of this.

Lastly, as an added interactivity, we decided to use gestures. Initially, we had thought of this option to fail completely, however it did not turn out to be as bad if used very properly!

Difficulties:

In any programming assignment, as well as hardware work, there is always difficulties. The first one was faced by us when we replaced the LED Bulbs in our controller with the Bigger LED Bulbs that could be inserted more appropriately into our Box. These are the ones available in one of the hardware boxes in the IM Lab. However, turned out that they were not working at all with the resistor – and this was after it had been soldered and put together. So we had to improvise and replace them with regular LED bulbs, and then laser cut the red circles to cover the light. Since the brightness of the lights were not that good anyways, we used glue gun on them while sticking the acrylic circles to have a ‘spread’ effect.

Then comes something we have mentioned earlier, and it is the algorithmic complexities in our code where we initially did not know where to begin and were completely stuck. However, determination helped us through!

Another particular challenge that we faced was with a connection of the Vibration Motor while there was a Serial connection with p5Js already happening for the JoyStick. We are still not sure what had happened at then, but eventually, somehow, with trial and error it worked and we did not want to go back and debug the root cause!

Improvements:

We believe the hardware could have been developed further wherein there should be no need for a mouse, even to select the levels. However, this would prove to be very complex in an already complex state machines for the Screens. However, an addition of buttons on our controller box, to replace some functionality of the mouse, could have been a good prospect.

Moreover, improving the gesture control by utilizing more advanced models for detection could also be possible. This is something we could do as an improvement should we choose to take this project further!

Code:

The code is divided into different files, with each file performing the functionality that is intuitive to the name of the file. The files that we have are:

– sketch.js (Brings all functionalities together with setup() and draw())
– screens.js (The state machines for the ‘Menu’)
– player.js (For managing the functionality of the PacMan)
– ghost.js (Handles all the ghosts/enemies)
– levels.js (Outlines the different levels that there are)
– level.js (Manages the common functionalities of each level – player movement, etc)
– fillblock.js (The algorithms that were needed to fill the blocks of the 2D Array)

Each file is separately attached below:

sketch.js

// A 2D list to store the tiles for the game board
let level = [];
// Stores the images
let tile, movingTile, rightPacXon, leftPacXon, upPacXon, downPacXon;
// Variables to store the ghosts/enemies
let redGhost, blueGhost, yellowGhost, pinkGhost;
// Variables to store the powerups
let bomb, ice, bolt, slow;
// Array to store all the powerups
let powerups = [];
// Store the tilesize for use throughout
let tileSize;
// Keeping a track of the area of an enclosed regions
let count = 0;
// Storing the count for a certain region
let c1 = 0;
// Storing the maxArea
let mArea;
// Variables to store the areas, and the coordinates for filling the enclosed regions.
let sVals = [];
let pVals = [];
let areas = [];
let tc;
// Sertting the timer for the game and initializing it to 100
let timer = 100;
// declaring and initializing the levels to be kept track of
let levels = 1;
// For storing all the enemies in the list
let enemy = [];
// Keeping track of the x and y positions of the ghost
let ghostx, ghosty;
// Checking if level should be up or not and initializing to false;
let level_up = false;
// State variables to keep track of the screens
let gamestart;
let checkMenuclick;
let load_level;
let loadhowtoplay;
let selectcontrols;
let joystickActive;
let loadcontrolsscreen;
let checkhowtoplay;
let gamebegin;
let checkforselectlevel;
let checkforStart;
let checkfornextLevel;
let levelupscreen;
let endscreen;
let checkforretry;
let gamecomplete;
let checkforfinish;
let mylevel;
// Variables to store all the images
let level1;
let level2;
let level3;
let level4;
let level5;
let level6;
let main_image;
let controlscreens;
let controlscreensbackup;
let joystickselectedscreen;
let howtoplay;
let clicktostart;
let levelup;
let endimg;
let finish;
let returnto;
// Variables for gesture detection
let video;
let handPose;
let hands;
let gestureActive = "";
let getVideo;
let videoSet;
let gestureDirection;
// Variables to store all the sounds
let gameoversound, movingsound, clickedsound, collectionsound, collisionsound, levelupsound, movement, bg;
// Declaring and initializingthe counter and max counter to calculate the percentage and keep track for the preloader
let counter = 1;;
let maxCounter = 34;
// joysrick variables
let joystickInput = 0;

// Function for initiating the Gesture Detection
function modelReady() {
  console.log('hand pose loaded');
  handpose.on('predict', results => {
    // Storing the result based on hand gestures
    hands = results;
  });
}

// Pre Loading all the assets
// The updateCounter parameter is passed in each loadXYZ() function to call the updateCounter function for progressing the pre-loader
function preload() {
  // Loading the tiles to be drawn
  tile = loadImage('assets/Tiles/tile.png', updateCounter);
  movingTile = loadImage('assets/Tiles/movingTile.png', updateCounter);
  // Loading all Pac-Xon direction gifs
  rightPacXon = loadImage('assets/Paxon/right_paXon.gif', updateCounter);
  leftPacXon = loadImage('assets/Paxon/left_paXon.gif', updateCounter);
  upPacXon = loadImage('assets/Paxon/up_paXon.gif', updateCounter);
  downPacXon = loadImage('assets/Paxon/down_paXon.gif', updateCounter);
  // Loading all the Ghosts/ Enemies
  redGhost = loadImage('assets/Enemies/red-ghost.png', updateCounter);
  blueGhost = loadImage('assets/Enemies/blue-ghost.png', updateCounter);
  yellowGhost = loadImage('assets/Enemies/yellow-ghost.png', updateCounter);
  pinkGhost = loadImage('assets/Enemies/pink-ghost.png', updateCounter);
  // Loading all the screens
  main_image = loadImage('assets/Screens/home.gif', updateCounter);
  level1 = loadImage('assets/Screens/level1.png', updateCounter);
  level2 = loadImage('assets/Screens/level2.png', updateCounter);
  level3 = loadImage('assets/Screens/level3.png', updateCounter);
  level4 = loadImage('assets/Screens/level4.png', updateCounter);
  level5 = loadImage('assets/Screens/level5.png', updateCounter);
  level6 = loadImage('assets/Screens/level6.png', updateCounter);
  controlscreens = loadImage('assets/Screens/controls.png', updateCounter);
  joystickselectedscreen = loadImage('assets/Screens/joystick_selected.png', updateCounter);
  gestureselectedscreen = loadImage('assets/Screens/gestures_selected.png', updateCounter);
  howtoplay = loadImage('assets/Screens/howtoplay.png', updateCounter);
  clicktostart = loadImage('assets/Screens/clicktostart.png', updateCounter);
  levelup = loadImage('assets/Screens/levelcompleted.png', updateCounter);
  endimg = loadImage('assets/Screens/gameover.png', updateCounter);
  finish = loadImage('assets/Screens/congrats.png', updateCounter);
  returnto = loadImage('assets/Screens/returnmenu.png', updateCounter);
  // Loading all the powerups
  bomb = loadImage('assets/Extras/redbomb.png', updateCounter);
  ice = loadImage('assets/Extras/ice.png', updateCounter);
  bolt = loadImage('assets/Extras/lightning-bolt.png', updateCounter);
  slow = loadImage('assets/Extras/snail.png', updateCounter);
  // Loading all the sounds
  gameoversound = loadSound('assets/Sounds/gameover.mp3', updateCounter);
  movingsound = loadSound('assets/Sounds/movingsound.wav', updateCounter);
  clickedsound = loadSound('assets/Sounds/clicked.wav', updateCounter);
  collectionsound = loadSound('assets/Sounds/collection.wav', updateCounter);
  collisionsound = loadSound('assets/Sounds/collision.wav', updateCounter);
  levelupsound = loadSound('assets/Sounds/levelup.wav', updateCounter);
  bg = loadSound('assets/Sounds/bg.mp3', updateCounter);

}

function setup() {
  // initializing the canvas and storing a reference to it
  var canvasMain = createCanvas(760,500);
    // set the ID on the canvas element
  canvasMain.id("p5_mainCanvas");
  // set the parent of the canvas element to the element in the DOM with
  // an ID of "left"
  canvasMain.parent("#center");

  // initializing all the state variables for the screens
  gamestart = false;
  checkMenuclick = false;
  load_level = false;
  loadhowtoplay = false;
  loadcontrolsscreen = false;
  selectcontrols = false;
  gestureActive = false;
  getVideo = false;
  videoSet = false;
  joystickActive = false;
  gesturehighlight = false;
  joystickhighlight=false;
  controlscreensbackup = controlscreens;
  checkhowtoplay =  false;
  gamebegin = false;
  checkforselectlevel =  false;
  checkforStart = false;
  levelupscreen = false;
  checkfornextLevel = false;
  endscreen = false;
  checkforretry = false;
  gamecomplete = false;
  checkforfinish = false;
  // initializing the value of mylevels for the levels to be accessed.
  mylevel = 1;

  // making use of the local storage API and obtaining the stored value of the levels that were previously ever completed by the user
  let user_levels = window.localStorage.getItem('levelsCompleted');
  // Checking if there was any data stored,
  if (user_levels) {
    // If so, the data from the local storage is used, otherwised the above initalized value is used instead.
    mylevel = int(user_levels)
  }
  // Declaring the tilesize
  tileSize = 20;
  // Populates the 2D Array with 0s
  initializeLevel();

  // Places 1s at the borders of the 2D Array
  resetLevel();
  tc = 0;
  player = new Player();
  // powerup = new Powerup();

  // Evening out the perlin noise
  noiseDetail(24);
  // Looping the background music

  bg.loop();
  // Setting the volume of the background music to a minimal value
  bg.setVolume(0.3);


}

function draw(){
  // Gets the User's Video if the Gesture Option is selected
  if((getVideo == true)&& (videoSet==false)){
    video = createCapture(VIDEO);
    video.hide();
    const options = {};
    handpose = ml5.handpose(video, options, modelReady);
    videoSet = true;
  }
  if (gestureActive){
    getGestures();
  }
  // When this is false, the MENU or the Level Selection screen appears
  if(gamestart == false){
    // If this if false, the MENU Screen will appear, which it will initially
    if (load_level == false){
      // If the how to play screen is clicked, the menu screen is not shown and instead the how to play screen is shown in the else {
      // When the how to play screen is closed, the menu screen appears again as the variable becomes false
      if (loadhowtoplay == false && loadcontrolsscreen == false){
        // Clicks for the menu screen are detected
        checkMenuclick = true;
        // The Start Screen is shown
        StartScreen();
      }
      else if (loadhowtoplay == true){
        checkMenuclick=false;
        // The How To Play Screen is shown
        HowToPlayScreen();
        // Clicks for that screen are detected
        checkhowtoplay = true;
      }
      else if (loadcontrolsscreen == true){
        checkMenuclick=false;
        // The How To Play Screen is shown
        SelectControlsScreen();
        // Clicks for that screen are detected
        selectcontrols = true;

        if(serialActive==true){
          controlscreens = joystickselectedscreen;
        }
        if(gestureActive==true){
          getVideo = true;
          controlscreens = gestureselectedscreen;
        }
      }
    }
    // The Load Screen will appear instead of the Menu Screen
    else if(load_level == true){
      // When the load screen is loaded, the clicks for the Menu Screen are not detected
      checkMenuclick = false;
      // The Level Screen is showns
      LevelScreen();
      // Clicks for the Level Screen are detected after setting the next variable to true
      checkforselectlevel = true;
    }
  }
  // If the game start is true, the menu or any of the initial screens are not appearing
  else {
    // Fills the background with a black color
    background(0);
    // Draws the level, which in the first instance only draws the borders
    drawLevel();

    // If the game gets completed,
    if(gamecomplete == true){
      // The game complete screen is shown
      image(finish, 0, 0);
      // CLicks for that screen are detected
      checkforfinish = true;
    }
    else{
      // If the game ends
      if(endscreen == true){
        // The game end screen is shown and
        image(endimg, 0, 0);
        // Clicks for that screen are detected
        checkforretry =  true;
      }
      else{
        // If the level gets incremented,
        if(levelupscreen==true){
          // The level up screen is shown
          image(levelup, 0,0);
          // CLicks for that screen are detected
          checkfornextLevel = true;
        }
        else{
          // If the game has not begun yet, the click to start screen appears
          if(gamebegin==false){
            image(clicktostart, 0, 0);
            // Clicks for that screen are detected
            checkforStart = true;
          }
          if(gamebegin == true){
            // Shows the updated Lives on the HTML Page
            let window_score = document.getElementById('current_lives')
            window_score.innerHTML = player.lives;

            //player
            player.display();
            player.move();

            // If there is an existing powerup, it draws it in every frame and ensures the effect() function runs
            if (powerups.length > 0) {
              powerups[0].display();
              powerups[0].effect();
            }

            //Iterates through all the enemies and then displays and moves them
            for (let i = 0; i < enemy.length; i++){
              enemy[i].display();
              enemy[i].move();
            }

            // Shows the updated Progress on the HTML Page
            let window_progress = document.getElementById('current_progress')
            window_progress.innerHTML = completeLevel() + "%";


            // Shows the updated Levels on the HTML Page
            let window_level = document.getElementById('current_level')
            window_level.innerHTML = levels;


            // Makes the powerups appear after a certain time period and ensures only one powerup can appear at a time
            if (frameCount % 600 == 0 && powerups.length == 0) {
              // Adds a powerup to the list for powerups
              powerups.push(new Powerup())
            }

            // Shows the updated Timer on the HTML Page
            let window_timer = document.getElementById('current_timer');
            window_timer.innerHTML = timer + 's';
            // Decreases the timer every second until the timer is 0
            if (frameCount % 60 == 0 && timer > 0) {
              timer --;
            }
            // Calls the next level function to check if the level is complete, and if so, it increases the level
            nextLevel();
            // If the timer or the player lives become 0, the game ends!
            if (timer == 0 || player.lives == 0){
              // The timer and the lives are updated on the HTML Page
              let window_score = document.getElementById('current_lives')
              window_score.innerHTML = player.lives;
              let window_timer = document.getElementById('current_timer');
              window_timer.innerHTML = timer + 's';
              // The game end screen is trigerred
              endscreen = true;
              // The right image for the Pac Xon is loaded
              player.graphic = rightPacXon;
              // The direction and movement of the Pac-Xon is reset
              player.currKeyCode = 0;
              // The pacXon is repositioned at the first index of the array
              player.x = 0;
              player.y = 0;
              // reset player speed
              player.speed = player.pspeed;
              // The levels are reset
              // levels = 1;
              // powerups are emptied
              powerups = [];
              // The level is reset and only the borders are drawn
              resetLevel();
              // The lives of the player are reset
              player.lives = 3;
              // The timer is reset
              timer = 100;
              // The game over sound is played
              gameoversound.play();
              // The all levels function is called to choose the level
              allLevels();
            }

          }
        }
      }

    }
  }
}

function mousePressed(){
  // Checks for clicks on the Various screens
  if(checkMenuclick == true){
    StartScreenClick();
  }
  else if(checkhowtoplay == true){
    HowToPlayClick();
  }
  else if(selectcontrols == true){
    SelectControlsClick();
  }
  else if(checkforselectlevel == true){
    LevelScreenClick();
  }
  else if(checkforStart == true){
    gamebegin =  true;
  }
  // Checks for clicks on the level up screens
  if(checkfornextLevel == true){
    // If the next option is clicked, the screen disappears
    if(mouseX>400 && mouseX <495 && mouseY>325&& mouseY<363){
      levelupscreen = false;
      clickedsound.play();
      checkfornextLevel == false;
      checkMenuclick = false;
    }
    // If the menu is clicked, the menu screen appears
    else if(mouseX>250 && mouseX <345 && mouseY>325&& mouseY<363){
      levelupscreen = false;
      gamestart = false;
      load_level = false;
      checkforselectlevel = false;
      checkfornextLevel == false;
      checkMenuclick = false;
      clickedsound.play();
    }
  }
  // Almost the same thing happens for the Game over screen
  if(checkforretry == true){
    // If the retry option is pressed
    if(mouseX>400 && mouseX <495 && mouseY>325&& mouseY<363){
      endscreen = false;
      checkforretry =  false;
      checkMenuclick = false;
      clickedsound.play();
    }
    // Or if the menu option is pressed
    else if(mouseX>250 && mouseX <345 && mouseY>325&& mouseY<363){
      // endscreen = false;
      endscreen = false;
      gamestart = false;
      load_level = false;
      checkforselectlevel = false;
      checkforretry =  false;
      checkMenuclick = false;
      clickedsound.play();
    }
  }
  // Checks for clicks on the 'Return to Menu' button on the screen that shows up when the game is completed
  if(checkforfinish == true){
    // rect(279, 318, 190, 45);
    if(mouseX>279 && mouseX <469 && mouseY>318&& mouseY<363){
      gamestart = false;
      gamecomplete = false;
      load_level = false;
      checkforselectlevel = false;
      clickedsound.play();
    }
  }
}

// Update counter function used within preload
function updateCounter() {
  // increase our counter
  counter++;

  // use the counter to set the style on the '#progress_bar' div
  let progress_bar = document.querySelector('#progress_bar');
  // The percentage is calculated
  progress_bar.style.width = int(counter/maxCounter*100) + "%";
}

function getGestures(){
  if (hands && hands.length > 0) {
    for (let hand of hands) {
      let annotations = hand.annotations;
      let thumb = annotations.thumb;

      let tx = thumb[3][0];
      let ty = thumb[3][1];

      let thumbsup = true;
      let thumbsdown = true;
      let thumbsleft = true;
      let thumbsright = true;

      let parts = Object.keys(annotations);
      let count = 0;
      for (let part of parts) {
        for (let position of annotations[part]) {
          let [x, y, z] = position;

          if (part === 'thumb') {
            if (x < tx) {
              thumbsleft = false;
            } else if (x > tx) {
              thumbsright = false;
            }
          } else {
            if (y < ty) {
              thumbsup = false;
            } else if (y > ty) {
              thumbsdown = false;
            }
          }
        }
      }

      if (thumbsup) {
        console.log("UP");
        gestureDirection = "up";
      } 
      else if (thumbsdown) {
        console.log("DOWN");
        gestureDirection = "down";
      } 
      else if (thumbsleft) {
        console.log("RIGHT");
        gestureDirection = "right";
      } 
      else if (thumbsright) {
        console.log("LEFT");
        gestureDirection = "left";
      }
    }
  }
}

screens.js

// Function to load up the MENU Screen
function StartScreen(){
  image(main_image, 0, 0);
  // Pauses the gif on the MENU Screen after 3 seconds
  if (frameCount % 180 == 0){
    main_image.pause();
  }
}
// Function to check for specific clicks on the MENU Screen
function StartScreenClick(){
  // Checks if the rectanglular area around the 'New Game' button is clicked
    if(mouseX>285 && mouseX <475 && mouseY>230&& mouseY<275){
      // Sets the variables for the Levels screen to appear
      load_level = true;
      // Ensures that the positions for the clicks on the MENU page are not being checked
      checkMenuclick == false;
      // Plays the click sound
      clickedsound.play();
    }
    // Checks if the rectanglular area around the 'How To Play' button is clicked
    if(mouseX>285 && mouseX <475 && mouseY>285&& mouseY<330){
      // Sets the variables for the How To Play screen to appear
      loadhowtoplay = true;
      // Ensures that the positions for the clicks on the MENU page are not being checked
      checkMenuclick == false;
      // Plays the click sound
      clickedsound.play();
    }
    // Checks if the rectanglular area around the 'More Games' button is clicked
    if(mouseX>285 && mouseX <475 && mouseY>340&& mouseY<385){
      // Sets the variables for the 'Select Controls' screen to appear
      loadcontrolsscreen = true;
      // Ensures that the positions for the clicks on the MENU page are not being checked
      checkMenuclick == false;
      // Plays the click sound
      clickedsound.play();
    }
}
// Function to load the How To Play screen image
function HowToPlayScreen(){
  image(howtoplay, 0, 0);
}
// Function to check if specific areas on the How to play screen have been clicked
function HowToPlayClick(){
    // Checks if the rectanglular area around the 'Return to Menu button is clicked
    if(mouseX>270 && mouseX <460 && mouseY>408&& mouseY<453){
      // Sets the variables to stop showing the how to play screen
      loadhowtoplay = false;
      // Does not check for click on the areas for the buttons on the how to play screen
      checkhowtoplay = false;
      // Plays the sound
      clickedsound.play();
    }
}

// Function to load the How To Play screen image
function SelectControlsScreen(){
  image(controlscreens, 0, 0);
}
// Function to check if specific areas on the How to play screen have been clicked
function SelectControlsClick(){
  // Checks if the rectanglular area around the 'Return to Menu button is clicked

  if(mouseX>155 && mouseX <340 && mouseY>265&& mouseY<360){
    print("JoyStick Clicked")
    // If a Serial Connection with the Arduino has not been established yet
    if(!serialActive){
      // Initiates the establishment of a Serial connection with the JoyStick
      setUpSerial();
    }
    gestureActive = false;
    joystickActive = true;
    // Plays the sound
    clickedsound.play();
  }

  if(mouseX>400 && mouseX <580 && mouseY>265&& mouseY<360){
    print("Gesture Clicked")
    gestureActive = true;
    joystickActive = false;
    // Plays the sound
    clickedsound.play();
  }
  
  if(mouseX>270 && mouseX <460 && mouseY>410&& mouseY<455){
    // Sets the variables to stop showing the how to play screen
    loadcontrolsscreen = false;
    // Does not check for click on the areas for the buttons on the how to play screen
    selectcontrols = false;
    // Plays the sound
    clickedsound.play();
  }
}

// Shows the appropriateimage according to the number of levels that are completed by a user.
function LevelScreen(){
  // Loads up the level one image if the user is on the first level
  if (mylevel == 1){
    image(level1, 0 ,0);
  }
  else if (mylevel == 2){
    image(level2, 0 ,0);
  }
  else if (mylevel == 3){
    image(level3, 0 ,0);
  }
  else if (mylevel == 4){
    image(level4, 0 ,0);
  }
  else if (mylevel == 5){
    image(level5, 0 ,0);
  }
  else if (mylevel == 6){
    image(level6, 0 ,0);
  }
  // Loads the overlayed image for the 'Return to Menu' option
  image(returnto, 0, 0);
}
// Function to check for any clicks on the Level Screen
function LevelScreenClick(){
    // Checks if the box around 'Return to Menu' is clicked
    if(mouseX>267 && mouseX <457 && mouseY>311&& mouseY<356){
      // Sets up the counters for any other clicks to happen to be false
      // Also sets the counters for the Level Screen to not be displayed anymore
      load_level = false;
      checkforselectlevel == false;
      clickedsound.play();
      checkhowtoplay = false;
      loadhowtoplay = false;
    }
    // The condition checks the number of levels 'unlocked' by the user and so allows for the appropriate number of them to be clicked by the user.
    if(mylevel >0){
      // Checks if the box around a specific level is clicked
      if(mouseX>118 && mouseX <193 && mouseY>215&& mouseY<293){
        // Plays the click sound
        clickedsound.play();
        // Initates the game by changing the state of the game
        gamestart = true;
        // Does not let the level screen to load again
        load_level =  false;
        // Does not allow for any click to work
        checkforselectlevel = false;
        // Sets the level to be displayed to be 1
        levels = 1;
        // Calls the function to load the appropriate enemies for that level
        levelOne();
      }
    }
    if(mylevel >1){
      if(mouseX>205 && mouseX <283 && mouseY>215&& mouseY<293){
        clickedsound.play();
        gamestart = true;
        load_level =  false;
        checkforselectlevel = false;
        levels = 2;
        levelTwo();
      }
    }
    if (mylevel >2){
      if(mouseX>290 && mouseX <368 && mouseY>215&& mouseY<293){
        clickedsound.play();
        gamestart = true;
        load_level =  false;
        checkforselectlevel = false;
        levels = 3;
        levelThree();
      }
    }
    if (mylevel >3){
      if(mouseX>375 && mouseX <453 && mouseY>215&& mouseY<293){
        clickedsound.play();
        gamestart = true;
        load_level =  false;
        checkforselectlevel = false;
        levels = 4;
        levelFour();
      }
    }
    if(mylevel >4){
      if(mouseX>460 && mouseX <538 && mouseY>215&& mouseY<293){
        clickedsound.play();
        gamestart = true;
        load_level =  false;
        checkforselectlevel = false;
        levels = 5;
        levelFive();
      }
    }
    if(mylevel >5){
      if(mouseX>545 && mouseX <623 && mouseY>215&& mouseY<293){
        clickedsound.play();
        gamestart = true;
        load_level =  false;
        checkforselectlevel = false;
        levels = 6;
        levelSix();
      }
    }
}

// This function will be called by the web-serial library
// with each new *line* of data. The serial library reads
// the data until the newline and then gives it to us through
// this callback function
function readSerial(data) {
  if (data != null) {
    console.log(data);
    joystickInput = data;
    let sendToArduino = player.lives + "\n";
    writeSerial(sendToArduino);
  }
}

player.js

//class to draw player
class Player {
  constructor(){
    // set player's position, lives, speed, graphic
    this.x = 0;
    this.y = 0;
    this.startMovingRight = false;
    this.startMovingDown = false;
    this.pKeyPress = 'None';
    this.moving = 'not moving';
    this.lives = 3;
    this.speed = 3;
    this.pspeed = this.speed;
    this.graphic = rightPacXon;
  }
  // display player
  display(){
    image(this.graphic, this.x, this.y, 20,20)
  }

  // move player
  move(){

    // set up middle of player positions
    this.middleX = this.x+tileSize/2;
    this.middleY = this.y+tileSize/2;

    // if a key is pressed
    // if (keyIsPressed==true){
      // when the first key of teh game is pressed, set previous key code
      if (this.pKeyPress == 'None'){
        this.pKeyPress = keyCode;
      }
      // if not first key press
      else {
        // set player to moving state
        this.moving = 'moving';
        // if the previous key press is not equal to the current keycode
        if (this.pKeyPress != this.currKeyCode){
          // prev key code = current
          this.pKeyPress = this.currKeyCode;
          // round the player's movement so it moves box to box only
          // round x position
          let roundx = this.x%20
          if (roundx !=0){
            if (roundx >= 10){
              this.x = this.x + (20 - roundx);
            }
            else if(roundx < 10){
              this.x = this.x - roundx;
            }
          }
          // round y position
          let roundy = this.y%20
          if (roundy !=0){
            if (roundy >= 10){
              this.y = this.y + (20 - roundy);
            }
            else if(roundy < 10){
              this.y = this.y - roundy;
            }
          }
        }
        // get the id of the tile where the middle if the player lies
        let pos = getTile(this.middleX, this.middleY);

        // if it is a solid tile
        if(pos == 1){
          // if keycode is right key (D)
          if (joystickInput ==4 || keyCode ==68 || gestureDirection == "right") {
            // set update keycode and change paxon graphic
            this.currKeyCode = 68;
            this.graphic = rightPacXon;
          }
          // if keycode is left key (A)
          if (joystickInput ==3 || keyCode ==65 || gestureDirection == "left") {
            // set update keycode and change paxon graphic
            this.currKeyCode = 65;
            this.graphic = leftPacXon;
          }
          // if keycode is up key (W)
          if (joystickInput ==2 || keyCode ==87 || gestureDirection == "up") {
            // / set update keycode and change paxon graphic
            this.currKeyCode = 87;
            this.graphic = upPacXon;
          }
          // if keycode is down key (S)
          if (joystickInput ==1 || keyCode ==83 || gestureDirection == "down") {
            // / set update keycode and change paxon graphic
            this.currKeyCode = 83;
            this.graphic = downPacXon;
          }
        }
        // If the playeer is moving and creating blocks in the empty space, basically 'drawing the line'
        else{
          // If the player is going left, it cannot move left
          if ((joystickInput ==4 || keyCode ==68 || gestureDirection == "right") && this.currKeyCode!=65) {
            this.currKeyCode = 68;
            this.graphic = rightPacXon;
          }
          // If the player is going right, it cannot move right
          if ((joystickInput ==3 || keyCode ==65 || gestureDirection == "left") && this.currKeyCode!=68) {
            this.currKeyCode = 65;
            this.graphic = leftPacXon;
          }
          // If the player is going down, it cannot move down
          if ((joystickInput ==2 || keyCode ==87 || gestureDirection == "up") && this.currKeyCode!=83) {
            this.currKeyCode = 87;
            this.graphic = upPacXon;
          }
          // If the player is going up, it cannot move up
          if ((joystickInput ==1 || keyCode ==83 || gestureDirection == "down") && this.currKeyCode!=87) {
            this.currKeyCode = 83;
            this.graphic = downPacXon;
          }
        }
      }

    // }
    // if current key code is 68 and x is less than the width, move right
    if (this.currKeyCode == 68 && this.x < width){
      this.x  += this.speed;
    }
    // if current key code is 65 and x is greater than 0, move left
    if (this.currKeyCode == 65 && this.x > 0){
      this.x  -= this.speed;
    }
    // if current key code is 87 and y is greater than 0, move up
    if (this.currKeyCode == 87 && this.y > 0){
      this.y  -= this.speed;
    }
    // if current key code is 83 and y is less than height, move down
    if (this.currKeyCode == 83 && this.y < height){
      this.y += this.speed;
    }

    // get id middle of tile
    let id = getTile(this.middleX, this.middleY);
    // declare next tile
    let nt;

    // Checks if the player is withing the empty space or is not in the border region
    if((this.middleX>20 && this.middleY>20 && this.middleX<width-20 && this.middleY<height-20)){
      // A few pixels to the right, left, up, and down are detected from the player
      this.sensorLeft = this.x-10;
      this.sensorRight = this.x+tileSize+10;
      this.sensorTop = this.y-10;
      this.sensorBottom = this.y+tileSize+5;

      // If the player is moving right, the next tile to the right of it is checked
      if(this.currKeyCode==68){
        nt = getTile(this.sensorRight,this.middleY);
      }
      // If the player is moving left, the next tile to the left of it is checked
      else if(this.currKeyCode==65){
        nt = getTile(this.sensorLeft,this.middleY);
      }
      // If the player is moving up, the next tile above of it is checked
      else if(this.currKeyCode==87){
        nt = getTile(this.middleX,this.sensorTop);
      }
      // If the player is moving down, the next tile below of it is checked
      else if(this.currKeyCode==83){
        nt = getTile(this.middleX,this.sensorBottom);
      }
    }
    // If the player comes into contact with the line that it is drawing itself
    if(nt == -1){
      // The position is reset
      player.x = 0;
      player.y = 0;
      // The graphic is reset
      player.graphic = rightPacXon;
      // The speed is reset
      player.currKeyCode = 0;
      // A life is lost
      player.lives -= 1;
      // Collision sound is played
      collisionsound.play();
      // The canvas is reset to borders only
      resetDrawing();
    }
    // If there is no tile at it's middle position
    else if (id == 0){
      // A blue tile for drawing the line is drawn
      modifyTile(this.middleX, this.middleY)
    }
    // If a  solid tile is encounter
    else if (id == 1) {
      solidTiles();
      // Checks if a line is created and gets completed.
      // It does this by checking if the player just got stopped
      if (this.moving == 'stopped'){
        // Then it changes the state of moving to be 'not moving' which means it hasnt started creating any lines
        this.moving = 'not moving';
        // Makes a deep copy of the level array
        var xyz = makeDeepCopy(level);
        // Gets all the positions of the enemies and then sets the
        // corresponding id in the Level array to be 2 to ensure that
         // the enemies are not being taken into account
        for (let i = 0; i < enemy.length; i++){
          // Makes sure that the yellow enemy is not taken into account
          if(enemy[i].type != "follow"){
            ghostx = int(enemy[i].middleX/tileSize);
            ghosty = int(enemy[i].middleY/tileSize)
            level[ghosty][ghostx] = 2;
          }
        }
        // Gets one coordinate from all the enclosed regions
        mArea, sVals = maxAreaOfIsland(xyz);
        // Gets a list of all the smaller regions' coordinates/ the ones to be removed
        let vals = smallerPair(sVals);

        // Resets the position where the enemies' corresponding positions were set to 2
        for (let i = 0; i < enemy.length; i++){
          if(enemy[i].type != "follow"){
            ghostx = int(enemy[i].middleX/tileSize);
            ghosty = int(enemy[i].middleY/tileSize)
            level[ghosty][ghostx] = 0;
          }
        }

        // Fills the level array, basically floods the enclosed region that meets the criteria
        for (let i = 0; i < vals.length; i++){
          fill_array(level, vals[i][0], vals[i][1], 1, 0);
        }
      }
    }
    // Contrains the x and y positions of the enemy to remain within the canvas width and onto the border tiles.
    this.x = constrain(this.x, 0, width-20);
    this.y = constrain(this.y, 0, height-20);
    }
  }

ghost.js

// The Ghosts class
class Ghost {
  // constructor to declare ghost x,y,graphic,speed
  constructor(){
    this.x = random(80, width-100);
    this.y = random(80, height-80);
    this.speedX = random(1, 3);
    this.speedY = random(1, 3);
    this.speed = 0.005;
    this.graphic = blueGhost;
    // previous speed so enemies can return to their original speed after being affected by powerups
    this.pspeedX = this.speedX;
    this.pspeedY = this.speedY;
    this.pspeed = this.speed;
  }

  // displays the enemy
  display(){
    image(this.graphic, this.x, this.y, 20,20);
  }

  // detects players collisions with walls, player and powerups
  collision () {
    // set up sensor positions
    this.sensorLeft = this.x-3;
    this.sensorRight = this.x+tileSize+3;
    this.sensorTop = this.y-3;
    this.sensorBottom = this.y+tileSize+3;
    this.middleX = this.x+tileSize/2;
    this.middleY = this.y+tileSize/2;

    // check the id of tiles in the 2d array at the sensor positions
    let id = getTile(this.middleX,this.middleY);
    let lid = getTile(this.sensorLeft,this.middleY);
    let rid = getTile(this.sensorRight,this.middleY);
    let uid = getTile(this.middleX, this.sensorTop);
    let bid = getTile(this.middleX, this.sensorBottom);

    // if enemies touch the walls (blue tiles), they bounce off
    // top sensor 
    if (uid == 1) {
      if(this.type != "follow"){
        this.y += 3;
      }
      this.speedY *= -1;
      this.pspeedY *= -1;
    }
    // bottom sensor
    if (bid == 1) {
      if(this.type != "follow"){
        this.y -= 3;
      }
      this.speedY *= -1;
      this.pspeedY *= -1;
    }
    // left sensor
    if (lid == 1) {
      if(this.type != "follow"){
        this.x += 3;
      }
      this.speedX *= -1;
      this.pspeedX *= -1;
    }
    // right sensor
    if (rid == 1) {
      if(this.type != "follow"){
        this.x -= 3;
      }
      this.speedX *= -1;
      this.pspeedX *= -1;
    }
    // detects collision with the player
    this.playerCollision(rid, lid, uid, bid);
    // detects collision with the snail and ice powerups
    this.powerupCollision();

    // add special wall eating effect of wall collision 
    // if enemy type is blue or red
    if (this.type == "eat" || this.type == "duplicate"){
      this.eat(rid, lid, uid, bid)
    }

  }
  // wall eating effect function for blue and red enemies
  eat(rid, lid, uid, bid) {
    // if right tile is a wall but not a border, delete tile
    if (rid == 1 && this.x < width-tileSize-30){
      deleteTile(this.sensorRight, this.middleY);
    }
    // if left tile is a wall but not a border, delete tile
    else if (lid == 1 && this.x > 30){
      deleteTile(this.sensorLeft, this.middleY);
    }
    // if top tile is a wall but not a border, delete tile
    else if (uid == 1 && this.y > 30){
      deleteTile(this.middleX, this.sensorTop);
    }
    // if bottom tile is a wall but not a border, delete tile
    else if (bid == 1 && this.y < height-tileSize-30){
      deleteTile(this.middleX, this.sensorBottom);
    }
  }
  // if enemy is blue, duplicate enemy when player comes in its radius
  duplicate() {
    // if player is within the radius of the enemy
    if (player.x >= this.x-40 && player.x <= this.x+60 && player.y >= this.y-40 && player.y <= this.y+60) {
      // this if condition is to ensure enemy only duplicates once even if the player stays in the radius
      if (this.dup == true){
        enemy.push(new BlueGhost());
        this.dup = false;
      }
    }
    // if player is out of the radius, and comes within it again, enemy can duplicate again
    else {
      this.dup = true
    }
  }
  // move the enemy by determining all collisions
  move() {
    this.collision();
    // pink enemy or red enemy bounces off walls
    if (this.type == "bounce" || this.type == "eat"){
      this.x += this.speedX;
      this.y += this.speedY;
    }
    // yellow enemy follows player
    else if (this.type == "follow"){
      let distX = player.x - this.x;
      let distY = player.y - this.y;

      this.x += this.speed * distX;
      this.y += this.speed * distY;
    }
    // blue enemy has a ring around it and it bounces
    else if (this.type == "duplicate"){
      noFill();
      stroke(0,255,255);
      ellipse(this.x + 10,this.y + 10, 100);
      this.duplicate();
      this.x += this.speedX;
      this.y += this.speedY;

    }
  }
  // if enemy collides with player
  playerCollision(rid, lid, uid, bid) {
    // if enemy comes in contact with "moving blue" tiles or the player itself
    if(lid == -1 || rid == -1 || uid == -1 || bid == -1 || dist(this.x, this.y, player.x, player.y) < 20){
      // play sound
      collisionsound.play();
      // reset player position, graphic, speed, lives
      player.x = 0;
      player.y = 0;
      player.graphic = rightPacXon;
      player.currKeyCode = 0;
      player.lives -= 1;
      // if it bounces off the left moving blue tiles and right tile is not equal to wall jump off 10 pixels to the right
      if (lid == -1 && rid != 1){
        this.x += 10;
      }
      // if it bounces off the right moving blue tiles and left tile is not equal to wall jump off 10 pixels to the left
      else if (rid == -1 && lid != 1){
        this.x -= 10;
      }
      // if it bounces off the top moving blue tiles and bottom tile is not equal to wall jump off 10 pixels to the bottom
      else if (uid == -1 && bid != 1){
        this.y += 10;
      }
      // if it bounces off the bottom moving blue tiles and top tile is not equal to wall jump off 10 pixels to the top
      else if (bid == -1 && uid != 1){
        this.y -= 10;
      }

      // if comes in contact with player, bounce in opposit direction if possible
      if (dist(this.x, this.y, player.x, player.y) < 20) {
        if (rid != 1 || rid != -1){
          this.x += 10;
        }
        else if (lid != 1 || lid != -1){
          this.x -= 10;
        }
        else if (uid != 1 || uid != -1){
          this.y -= 10;
        }
        else if (bid != 1 || bid != -1){
          this.y += 10;
        }

      }
      // if the lives of player are less than or equal to zero
      if (player.lives <= 0){
        // display lives in html 
        let window_score = document.getElementById('current_lives')
        window_score.innerHTML = player.lives;
        // display lives in html 
        let window_timer = document.getElementById('current_timer');
        window_timer.innerHTML = timer + 's';
        // display game over screen
        endscreen = true;
        // reset player lives
        player.lives = 3;
        // reset player speed
        player.speed = player.pspeed;
        // reset timer
        timer = 100;
        // reset powerups
        powerups = [];
        // remove the blue moving tiles
        resetLevel();
        // reset enemy array
        allLevels();
        // play sound
        gameoversound.play();
      }
      // else if player lives are not yet zero but collision with enemy occurs then just remove the blue moving tiles
      else {
          resetDrawing();
      }
    }
  }

  // detect enemy collsions with powerups
  powerupCollision() {
    // if powerup array is not empty
    // and the powerup is snail or ice
    if (powerups.length != 0 && (powerups[0].graphic == slow || powerups[0].graphic == ice)) {
      // if powerup collision with enemy
      if (dist(this.x, this.y, powerups[0].x, powerups[0].y) < 20) {
        // console.log("enemy touched ice/slow")
        // set previous frame
        this.pframe = frameCount;
        // if the power up is snail, decrease player's speed
        if (powerups[0].graphic == slow) {
          player.speed = 1;
        }
        // if power up is ice, freeze player
        else if (powerups[0].graphic == ice){
          player.speed = 0;
        }
        // stop displaying powerup and change its location to outside canvas
        powerups[0].disp = false;
        powerups[0].x=-100;
        powerups[0].y=-100;
        // play sound
        collectionsound.play();
      }
      // if current frame count - frame count when powerup was picked is 180 (3 sec)
      if (frameCount - this.pframe == 180){
        // return palyer's speed to normal and remove powerup from array
        console.log("return to normal")
        player.speed = player.pspeed;
        powerups.splice(0, 1);
        // this.pframe = 0;
      }

    }
  }
}

// pink ghost class, inherits ghost class
class PinkGhost extends Ghost{
  constructor(){
    super();
    this.speedX = random(1.5, 3);
    this.speedY = random(1.5, 3);
    this.graphic = pinkGhost;
    this.type = "bounce";
  }
}
// blue ghost class, inherits ghost class
class BlueGhost extends Ghost{
  constructor(){
    super();
    this.graphic = blueGhost;
    this.speedX = random(1.5, 3);
    this.speedY = random(1.5, 3);
    this.type = "duplicate";
  }


}
// red ghost class, inherits ghost class
class RedGhost extends Ghost{
  constructor(){
    super();
    this.graphic = redGhost;
    this.type = "eat";
  }
}
// yellow ghost class, inherits ghost class
class YellowGhost extends Ghost{
  constructor(){
    super();
    this.graphic = yellowGhost;
    this.type = "follow";
  }
}

levels.js

// calculate and return the percentage of solid tiles in the array
function completeLevel() {
    let count = 0
    let totalcount = 0;
    for (let i=1; i < (height/20) - 1; i++){
        for (let j=1; j < (width/20) - 1; j++){
          if (level[i][j] == 1){
            count += 1;
          }
        }
    }
    totalcount = ((count/828)* 100);
    return round(totalcount * 100) / 100;
}

// promotes player to next level
function nextLevel() {
    // completeLevel();
    // levelOne();
    if (completeLevel() >= 80) {
        // console.log(completeLevel())
        levelupsound.play();
        // increment level
        levels +=1;
        // if all 6 levels completed,
        if(levels>6){
            // game has been completed
            gamecomplete = true;
        }
        // else increment the number of levels unlocked
        else{
            // Checks if the current reached level has become greater than the user stored level
            if(mylevel < levels){
                mylevel +=1;
                // It then updates the local storage as well
                if(mylevel <7){
                    window.localStorage.setItem('levelsCompleted', mylevel);
                }
            }
        }
        // display lives in html 
        let window_score = document.getElementById('current_lives')
        window_score.innerHTML = player.lives;
        // display lives in html 
        let window_timer = document.getElementById('current_timer');
        window_timer.innerHTML = timer + 's';
        // resetLevel();
        player.x = 0;
        player.y = 0;
        // player.lives = 3;
        player.graphic = rightPacXon;
        player.currKeyCode = 0;
        // timer = 100;
        // allLevels();
        // levelupscreen = true;

        // display game over screen
        levelupscreen = true;
        // reset player lives
        player.lives = 3;
        // reset timer
        timer = 100;
        // reset player speed
        player.speed = player.pspeed;
        // reset powerups
        powerups = [];
        // remove the blue moving tiles
        resetLevel();
        // reset enemy array
        allLevels();
    }
}
// function which contains all levels
function allLevels() {
    // level 2
    if (levels == 2) {
        levelTwo();
    }
    // level 3
    else if (levels == 3) {
        levelThree();
    }
    // level 4
    else if (levels == 4) {
        levelFour();
    }
    // level 5
    else if (levels == 5) {
        levelFive();
    }
    // level 6
    else if (levels == 6) {
        levelSix();
    }
}

// level one enemy array declaration
function levelOne() {
    enemy = [];

    enemy.push(new PinkGhost());
    enemy.push(new PinkGhost());
}

// level two enemy array declaration
function levelTwo() {
    enemy = [];

    enemy.push(new PinkGhost());
    enemy.push(new PinkGhost());
    enemy.push(new RedGhost());
}

// level three enemy array declaration
function levelThree() {
    enemy = [];

    enemy.push(new PinkGhost());
    enemy.push(new RedGhost());
    enemy.push(new RedGhost());
    enemy.push(new YellowGhost());
}
// level four enemy array declaration
function levelFour() {
    enemy = [];

    enemy.push(new PinkGhost());
    enemy.push(new BlueGhost());
    enemy.push(new RedGhost());
    enemy.push(new RedGhost());
    enemy.push(new YellowGhost());
}

// level five enemy array declaration
function levelFive() {
    enemy = [];

    enemy.push(new PinkGhost());
    enemy.push(new RedGhost());
    enemy.push(new RedGhost());
    enemy.push(new BlueGhost());
    enemy.push(new YellowGhost());
    enemy.push(new YellowGhost());
}

// level six enemy array declaration
function levelSix() {
    enemy = [];

    enemy.push(new PinkGhost());
    enemy.push(new PinkGhost());
    enemy.push(new RedGhost());
    enemy.push(new RedGhost());
    enemy.push(new BlueGhost());
    enemy.push(new BlueGhost());
    enemy.push(new YellowGhost());
    enemy.push(new YellowGhost());

}

level.js

// set all the blue moving tiles when the player loses a life to black tiles when the game restarts
function resetDrawing() {
  for (let i=0; i < height/20; i++){
    for (let j=0; j < width/20; j++){
      if (level[i][j] == -1){
        level[i][j] = 0;
      }
    }
  }
}
// The following for loops populate the 2D list, level, dynamically and leaves it blank
function initializeLevel() {
  let rows = []
  for (let i = 0; i < height/20; i++){
    rows = []
    for (let j =0; j < width/20; j++){
      rows.push(0);
    }
    level.push(rows)
  }
}

// The following block populates the fixed borders of the board
function resetLevel() {
  for (let i=0; i < height/20; i++){
    for (let j=0; j < width/20; j++){
      level[i][j] = 0;
      if (i == 0 || i == height/20-1 || j == 0 || j == width/20-1 ){
        level[i][j] = 1;
      }
    }
  }
}

// function to draw the tiles
function drawLevel() {
  for (let r = 0; r < level.length; r++) {
    for (let c = 0; c < level[r].length; c++) {
      if(level[r][c] == 1){
        image(tile,c*20,r*20,20,20);
      }
      if(level[r][c] == -1){
        image(movingTile,c*20,r*20,20,20);
      }
    }
  }
}

// returns the id of the tile in the array
function getTile(x,y) {
  x = int(x/tileSize);
  y = int(y/tileSize);
  return level[y][x];
}
function getCoord(x,y) {
  x = int(x/tileSize);
  y = int(y/tileSize);
  return x,y;
}

// modifies the tile to a blue moving tile
function modifyTile(x,y) {
  x = int(x/tileSize);
  y = int(y/tileSize);
  level[y][x] = -1;
}
// deletes a tile
function deleteTile(x,y) {
  x = int(x/tileSize);
  y = int(y/tileSize);
  level[y][x] = 0;
}
// deletes multiple tiles when a bomb goes off
function deleteTiles(x,y){
  deleteTile(x,y);
  deleteTile(x-20,y);
  deleteTile(x+20,y);
  deleteTile(x,y-20);
  deleteTile(x,y+20);
  deleteTile(x+20,y+20);
  deleteTile(x-20,y+20);
  deleteTile(x,y+40);

}
// when the player reaches the border, tranform moving tiles to solid wall tiles
function solidTiles(){
  let maxRow = 0, maxCol=0;
  for (let r = 0; r < level.length; r++) {
    for (let c = 0; c < level[r].length; c++) {
      if(level[r][c] == -1){
        // When a tile is changed from -1 to 1, it means the player created a line so the moving variable of the player is set to stopped
        player.moving = 'stopped'
        maxRow = max(maxRow, r);
        maxCol = max(maxCol, c);
        level[r][c] = 1;
      }
    }
  }
}

fillblock.js

// A recursive function with inspiration from https://learnersbucket.com/examples/algorithms/flood-fill-algorithm-in-javascript/
// The following function fills an enclosed region, basically some values bordered on all four sides by certain other value,
// with the new values that are provided.
// It basically replicates how the paint bucket system works in photoshop.
// The function is supposed to be given coordinates of a point in the region.
function fill_array(level, r, c, newColor, current){
  // Checks if the values are out of bound
    if(r < 0){
        return;
    }
    // Checks if the values are out of bound
    if(c < 0){
        return;
    }
    // Checks if the values are out of bound
    if(r > level.length){
        return;
    }
    // Checks if the values are out of bound
    if(c > level[r].length){
        return;
    }
    // Checks if there is any enemy inside of the region, if so
    // it increases the area count by a large amount in order to flag interval
    // The value of 2 is placed wherever the enemies are present as this function executes.
    if(level[r][c] === 2){
        count = 10000;
        return;
    }
    // A different value is encountered
    if(level[r][c] !== current){
        return;
    }
    // Changes the value at the array index
     level[r][c] = newColor;
     // Count to keep track of the 'area' of an enclosed region.
     count = count + 1;
     // the function recursivly calls itself t ensure all the neigbors are filled.
     fill_array(level, r - 1, c, newColor, current);
     fill_array(level, r + 1, c, newColor, current);
     fill_array(level, r, c - 1, newColor, current);
     fill_array(level, r, c + 1, newColor, current);
     // Returns the 2D Array
     return level
};
// Function to check all the coordinate pairs that have smaller area
function smallerPair(values){
    // initialize two lists
    areas = [];
    pairs = [];
    let enemfound = false;
    // Loops over all the coordinates
    for (let i = 0; i< values.length; i ++){
      // Calls the fill array function ONLY TO COUNT the area of the region in which the point lies.
      fill_array(level,values[i][0], values[i][1], 3, 0);
      // Stores the count into a local variable
      c1 = count;
      // Calls the fill array function to reset the modified values back to normal in the level array
      fill_array(level, values[i][0], values[i][1], 0, 3);
      // updates the global variable count
      count = 0;
      // Checks if the enemy is present
      if(c1<1000){
        areas.push(c1);
        pairs.push(values[i]);
        // Marks the enemy to not be found
        enemfound = true;
      }
    }
    // If the previous condition was not passed, it means the enemy was present in this block.
    if(enemfound == false){
      // The index with the maximum value, an outlier wtih a value of 10000 is removed from the list
      maxA = max(areas)
      maxIndex = areas.indexOf(maxA);
      pairs.splice(maxIndex,1);
    }
    // returns the pairs by excluding the biggest of the regions
    return pairs;
};
// Inspired from the Leet Code Problem Solution: https://dev.to/seanpgallivan/solution-max-area-of-island-4njk
// It returns one coordinate in each enclosed region
function maxAreaOfIsland(grid) {
  // Sets the maximum area to be very high since we need to take the minimum
    let maxArea = 10000
    // Directions over which to check next
    let compass = [[-1, 0], [0, -1], [1, 0], [0, 1]];
    // Checks the previous row and previous columns
    let prow;
    let pcol;
    // An array to store all the coordinate values
    let smallVals = [];
    // Runs for the entire grid and calls the flood function if each value meets a certain criteria.
    for (let i = 0; i < grid.length; i++) {
        for (let j = 0; j < grid[i].length; j++) {
            if (grid[i][j] === 0) {
                flood([[i, j]])
            }
        }
    }
    // Another flood function built differently for checking the enclosed box
    return maxArea, smallVals
    function flood(stack) {
      // initializes the area
        let currentArea = 0
        while (stack.length) {
            let [row, col] = stack.pop()
            if (row < 0 || col < 0 || row >= grid.length || col >= grid[0].length || grid[row][col] === 1) {
                continue
            }
            // increases the area
            currentArea++
            grid[row][col] = 1
            prow = row;
            pcol = col;
            for (const direction of compass) {
                stack.push([row + direction[0], col + direction[1]])
            }
        }
        // Pushes the row and column onto the list
        smallVals.push([prow,pcol]);
        // Gets the minium of all areas.
        maxArea = Math.min(maxArea, currentArea)
    }
};
// Function to make a deep copy of a 2D Array
function makeDeepCopy(g) {
  // initializes a new list
  var gridCopy = [];
  // Runs for all the lists within the big list
  for (var x = 0; x < g.length; x++) {
    // initializes an intermediary/ temporary row
    var newRow = [];
    // Runs a loop for the length of each list within the bigger list
    for (var y = 0; y < g[x].length; y++) {
      // adds the values to the temporary row
      newRow.push(g[x][y])
    }
    // Pushes the copied row into the new bigger row
    gridCopy.push(newRow);
  }
  // returns a newly created 2D Array/ List with the old list.
  return gridCopy;
};

Arduino Code

// joystick ports
int dirUp = 7;
int dirDown = 6;
int dirRight = 5;
int dirLeft = 4;

// lives lights ports
int lives3Pin = 11;
int lives2Pin = 10;
int lives1Pin = 9;
int lives = 3;
int prevlives = 3;
int vibrate = 0;

// int lives, prevlives = 3;
int motorPin = 3; //motor transistor is connected to pin 10
int motorState = LOW;  // motorState used to set the Motor Vibration
unsigned long previousMillis = 0;  // will store last time LED was updated
const long interval = 1000;  // interval at which to blink (milliseconds)


void setup()
{
  pinMode( dirDown , INPUT);
  pinMode( dirUp , INPUT);
  pinMode( dirLeft , INPUT);
  pinMode( dirRight, INPUT);

  pinMode(motorPin, OUTPUT);
  Serial.begin(9600);

  while (Serial.available() <= 0) {
    digitalWrite(LED_BUILTIN, HIGH); // on/blink while waiting for serial data
    Serial.println("0"); // send a starting message
    delay(300);            // wait 1/3 second
    digitalWrite(LED_BUILTIN, LOW);
    delay(50);
  }
}

void loop(){
  
  while (Serial.available()) {
      prevlives = lives;
      lives = Serial.parseInt();
      if(prevlives != lives){
        vibrate=1;
      }

      if (Serial.read() == '\n') {
        if (digitalRead( dirDown ) == LOW ){
          Serial.println(1);
        }
        else if (digitalRead( dirUp ) == LOW ){
          Serial.println(2);
        }
        else if (digitalRead( dirLeft ) == LOW ){
          Serial.println(3);
        }
        else if (digitalRead( dirRight ) == LOW ){
          Serial.println(4);
          // digitalWrite(motorPin, HIGH); //vibrate
        }
        else {
          Serial.println(0);
      }

      if(vibrate == 1){
        unsigned long currentMillis = millis();
        if (currentMillis - previousMillis >= interval) {
          // save the last time you blinked the LED
          previousMillis = currentMillis;

          // if the LED is off turn it on and vice-versa:
          if (motorState == LOW) {
            motorState = HIGH;
          } else {
            motorState = LOW;
            vibrate=0;
          }

          // set the LED with the ledState of the variable:
          digitalWrite(motorPin, motorState);
        }
        // else{
        //   vibrate=0;
        // }
      }

      if (lives == 3) {
        digitalWrite(lives1Pin, HIGH);
        digitalWrite(lives2Pin, HIGH);
        digitalWrite(lives3Pin, HIGH);
      }
      else if (lives == 2) {
        digitalWrite(lives1Pin, HIGH);
        digitalWrite(lives2Pin, HIGH);
        digitalWrite(lives3Pin, LOW);
        // digitalWrite(motorPin, HIGH); //vibrate
      }
      else if (lives == 1) {
        digitalWrite(lives1Pin, HIGH);
        digitalWrite(lives2Pin, LOW);
        digitalWrite(lives3Pin, LOW);
      }
      else if (lives == 0) {
        digitalWrite(lives1Pin, LOW);
        digitalWrite(lives2Pin, LOW);
        digitalWrite(lives3Pin, LOW);
        // digitalWrite(motorPin, HIGH); //vibrate
      }

    }
    } 

}

FINAL PROJECT DOCUMENTATION- Mani Drive

PROJECT DESCRIPTION

My project, Mani-Drive, consists of a robot car controlled by an Arduino board and a p5.js program. The robot car’s movements are controlled through a combination of hand tracking and user input via the p5.js program. The program utilizes the ml5.js library for hand tracking using a webcam. The position of the tracked hand determines the movement of the robot car. Moving the hand to the left, right, or forward commands the robot to move in the corresponding direction, while moving the hand downward makes the robot car move backward. The p5.js program communicates with the Arduino board via serial communication to control the robot’s movements. The circuit setup consists of the arduino uno board, basic wire connections, the DRV8833 Controller DC Motor driver, resistor, an ultrasonic sensor, four wheels, a buzzer, an LED and a bread board.The Arduino Uno board is responsible for motor control and obstacle detection. It uses an ultrasonic sensor to measure the distance to obstacles. If an obstacle is detected within a safe distance, the Arduino stops the robot’s movement, plays a sound using the buzzer, and turns on the LED as a warning. The Arduino code continuously checks the distance to handle object detection and resumes normal movement if no obstacles are detected. The Arduino board also receives commands from the p5.js program to control the robot’s movements based on the hand tracking data.

INTERACTION DESIGN

The interaction design of the project provides a user-friendly and intuitive experience for controlling and interacting with the robot car. By running the p5.js program and pressing the “s” key, the user initiates the program and activates hand tracking. The webcam captures the user’s hand movements, which are visually represented by a circular shape on the screen. Moving the hand left, right, up, or down controls the corresponding movement of the robot car. The color of the circular shape changes to indicate the intended movement direction, enhancing user understanding. Visual feedback includes a live video feed from the webcam and a warning message if an obstacle is detected. The Arduino board measures obstacle distances using an ultrasonic sensor and provides visual feedback through an LED and auditory feedback through a buzzer to alert the user about detected obstacles. This interactive design empowers users to control the robot car through natural hand gestures while receiving real-time visual and auditory feedback, ensuring a seamless and engaging interaction experience.

CODE(ARDUINO)

// Pin definitions for motor control
const int ain1Pin = 3;
const int ain2Pin = 4;
const int pwmaPin = 5;

const int bin1Pin = 8;
const int bin2Pin = 7;
const int pwmbPin = 6;

const int triggerPin = 9;      // Pin connected to the trigger pin of the ultrasonic sensor
const int echoPin = 10;        // Pin connected to the echo pin of the ultrasonic sensor
const int safeDistance = 10;   // Define a safe distance in centimeters

const int buzzerPin = 11;      // Pin connected to the buzzer
const int ledPin = 2;          // Pin connected to the LED

long duration;
int distance;
bool isBraking = false;

void setup() {
  // Configure motor control pins as outputs
  pinMode(ain1Pin, OUTPUT);
  pinMode(ain2Pin, OUTPUT);
  pinMode(pwmaPin, OUTPUT);
  pinMode(bin1Pin, OUTPUT);
  pinMode(bin2Pin, OUTPUT);
  pinMode(pwmbPin, OUTPUT);

  // Initialize the ultrasonic sensor pins
  pinMode(triggerPin, OUTPUT);
  pinMode(echoPin, INPUT);

  // Initialize the buzzer pin
  pinMode(buzzerPin, OUTPUT);

  // Initialize the LED pin
  pinMode(ledPin, OUTPUT);

  // Initialize serial communication
  Serial.begin(9600);
}

void loop() {
  // Measure the distance
  digitalWrite(triggerPin, LOW);
  delayMicroseconds(2);
  digitalWrite(triggerPin, HIGH);
  delayMicroseconds(10);
  digitalWrite(triggerPin, LOW);

  duration = pulseIn(echoPin, HIGH);

  // Calculate the distance in centimeters
  distance = duration * 0.034 / 2;

  // Handle object detection
  if (distance <= safeDistance) {
    if (!isBraking) {
      isBraking = true;
      stopRobot();
      playNote();
      digitalWrite(ledPin, HIGH);  // Turn on the LED when braking
    }
  } else {
    isBraking = false;
    digitalWrite(ledPin, LOW);     // Turn off the LED when not braking

    // Continue with normal movement
    if (Serial.available() > 0) {
      char command = Serial.read();

      // Handle movement commands
      switch (command) {
        case 'L':
          moveLeft();
          break;
        case 'R':
          moveRight();
          break;
        case 'U':
          moveForward();
          break;
        case 'D':
          moveBackward();
          break;
        case 'S':
          stopRobot();
          break;
      }
    }
  }
}

// Move the robot left
void moveLeft() {
  digitalWrite(ain1Pin, HIGH);
  digitalWrite(ain2Pin, LOW);
  analogWrite(pwmaPin, 0);
  digitalWrite(bin1Pin, HIGH);
  digitalWrite(bin2Pin, LOW);
  analogWrite(pwmbPin, 255);
}

// Move the robot right
void moveRight() {
  digitalWrite(ain1Pin, LOW);
  digitalWrite(ain2Pin, HIGH);
  analogWrite(pwmaPin, 255);
  digitalWrite(bin1Pin, LOW);
  digitalWrite(bin2Pin, HIGH);
  analogWrite(pwmbPin, 0);
}

// Move the robot forward
void moveForward() {
  digitalWrite(ain1Pin, LOW);
  digitalWrite(ain2Pin, HIGH);
  analogWrite(pwmaPin, 255);
  digitalWrite(bin1Pin, HIGH);
  digitalWrite(bin2Pin, LOW);
  analogWrite(pwmbPin, 255);

}

// Move the robot backward
void moveBackward() {

 digitalWrite(ain1Pin, HIGH);
  digitalWrite(ain2Pin, LOW);
  analogWrite(pwmaPin, 255);
  digitalWrite(bin1Pin, LOW);
  digitalWrite(bin2Pin, HIGH);
  analogWrite(pwmbPin, 255);

  // Check the distance after moving backward
  delay(10);  // Adjust this delay based on your needs

  // Measure the distance again
  digitalWrite(triggerPin, LOW);
  delayMicroseconds(2);
  digitalWrite(triggerPin, HIGH);
  delayMicroseconds(10);
  digitalWrite(triggerPin, LOW);
  duration = pulseIn(echoPin, HIGH);

  // Calculate the distance in centimeters
  int newDistance = duration * 0.034 / 2;

  // If an obstacle is detected, stop the robot
  if (newDistance <= safeDistance) {
    stopRobot();
    playNote();
    digitalWrite(ledPin, HIGH);  // Turn on the LED when braking
  }
  else {
    digitalWrite(ledPin, LOW);   // Turn off the LED when not braking
  }
}

// Stop the robot
void stopRobot() {
  digitalWrite(ain1Pin, LOW);
  digitalWrite(ain2Pin, LOW);
  analogWrite(pwmaPin, 0);
  digitalWrite(bin1Pin, LOW);
  digitalWrite(bin2Pin, LOW);
  analogWrite(pwmbPin, 0);
}

// Play a note on the buzzer
void playNote() {
  // Define the frequency of the note to be played
  int noteFrequency = 1000;  // Adjust this value to change the note frequency

  // Play the note on the buzzer
  tone(buzzerPin, noteFrequency);
  delay(500);  // Adjust this value to change the note duration
  noTone(buzzerPin);
}

DESCRIPTION OF CODE

The code begins by defining the pin assignments for motor control, ultrasonic sensor, buzzer, and LED. These pins are configured as inputs or outputs in the setup() function, which initializes the necessary communication interfaces and hardware components.

The core functionality is implemented within the loop() function, which is executed repeatedly. Within this function, the distance to any obstacles is measured using the ultrasonic sensor. The duration of the ultrasonic pulse is captured and converted into distance in centimeters. This distance is then compared to a predefined safe distance.

If an object is detected within the safe distance, the robot enters a braking mode. The stopRobot() function is called to stop its movement by setting the appropriate motor control pins and turning off the motors. The playNote() function is called to emit an audible alert using the buzzer, and the LED is illuminated by setting the corresponding pin to high.

On the other hand, if no objects are detected within the safe distance, the robot continues with normal movement. It waits for commands received through serial communication. These commands correspond to different movement actions:

moveLeft(): This function is called when the command ‘L’ is received. It sets the motor control pins to make the robot turn left by activating the left motor in one direction and the right motor in the opposite direction.

moveRight(): This function is called when the command ‘R’ is received. It sets the motor control pins to make the robot turn right by activating the left motor in the opposite direction and the right motor in one direction.

moveForward(): This function is called when the command ‘U’ is received. It sets the motor control pins to make the robot move forward by activating both motors in the same direction.

moveBackward(): This function is called when the command ‘D’ is received. It sets the motor control pins to make the robot move backward by activating both motors in the opposite direction. After a small delay, it performs an additional obstacle check by measuring the distance using the ultrasonic sensor. If an obstacle is detected, the stopRobot() function is called, and the playNote() function emits an audible alert. The LED is also illuminated.

stopRobot(): This function is called to stop the robot’s movement. It sets all motor control pins to low and stops the motors by setting the PWM value to 0.

playNote(): This function is called to generate tones on the buzzer. The frequency and duration of the played note can be adjusted by modifying the variables within the function. It uses the tone() and noTone() functions to play the note and pause the sound, respectively.

The modular structure of the code, with separate functions for each movement action, allows for easier maintenance and future enhancements. The implementation enables the robot car to navigate its environment, detect obstacles, and take appropriate actions for collision avoidance. It showcases the integration of hardware components with the Arduino microcontroller and demonstrates the practical application of sensor-based control in robotics.

P5.js CODE( For hand detection and movement of robot )

function gotHands(results = []) {
if (!programStarted && results.length > 0) {
const hand = results[0].annotations.indexFinger[3];
handX = hand[0];
handY = hand[1];

// Start the program when hand is detected and 's' is pressed
if (handX && handY && keyIsPressed && (key === 's' || key === 'S')) {
  programStarted = true;
  startRobot();
}
} else if (results.length > 0) {
const hand = results[0].annotations.indexFinger[3];
handX = hand[0];
handY = hand[1];
} else {
handX = null;
handY = null;
}
}

function moveLeft() {
if (isConnected) {
serial.write('L');
}
}

function moveRight() {
if (isConnected) {
serial.write('R');
}
}

function moveForward() {
if (isConnected) {
serial.write('U');
}
}

function moveBackward() {
if (isConnected) {
serial.write('D');
}
}

function stopRobot() {
if (isConnected) {
serial.write('S');
}
}

function startRobot() {
// Start the robot movement when the hand tracking model is ready
console.log('Hand tracking model loaded');
}

// Function to detect obstacle
function detectObstacle() {
obstacleDetected = true;
carMovingBack = true;
}

// Function to stop obstacle detection
function stopObstacleDetection() {
obstacleDetected = false;
carMovingBack = false;
}

DESCRIPTION OF P5.js code

The code starts by declaring variables such as isConnected, handX, handY, video, handpose, obstacleDetected, carMovingBack, and programStarted. These variables are used to track the connection status, hand coordinates, video capture, hand tracking model, obstacle detection status, and program status.

In the preload() function, images for the instructions and introduction screen are loaded using the loadImage() function.

The keyPressed() function is triggered when a key is pressed. In this case, if the ‘s’ key is pressed, the programStarted variable is set to true, and the startRobot() function is called.

The setup() function initializes the canvas and sets up the serial communication with the Arduino board using the p5.serialport library. It also creates a video capture from the webcam and initializes the hand tracking model from the ml5.handpose library. The gotHands() function is assigned as the callback for hand tracking predictions.

The introScreen() function displays the introduction screen image using the image() function, and the instructions() function displays the instructions image.

The draw() function is the main loop of the program. If the programStarted variable is false, the intro screen is displayed, and the function returns to exit the draw loop. Otherwise, the webcam video is displayed on the canvas.

If the handX and handY variables have values, an ellipse is drawn at the position of the tracked hand. Based on the hand position, different movement commands are sent to the Arduino board using the moveLeft(), moveRight(), moveForward(), and moveBackward() functions. The color of the ellipse indicates the direction of movement.

The code checks if the hand position is out of the frame and stops the robot’s movement in that case. It also checks for obstacle detection and displays a warning message on the canvas if an obstacle is detected.

The gotHands() function is the callback function for hand tracking predictions. It updates the handX and handY variables based on the detected hand position. If the programStarted variable is false and a hand is detected while the ‘s’ key is pressed, the programStarted variable is set to true, and the startRobot() function is called.

The moveLeft(), moveRight(), moveForward(), moveBackward(), and stopRobot() functions are responsible for sending corresponding commands to the Arduino board through serial communication.

The startRobot() function is called when the hand tracking model is loaded successfully. Currently, it only logs a message to the console.

The detectObstacle() function sets the obstacleDetected and carMovingBack variables to true, indicating an obstacle has been detected and the robot should move back.

The stopObstacleDetection() function resets the obstacleDetected and carMovingBack variables, indicating the obstacle has been cleared and the robot can resume normal movement.

PARTS I’M PROUD OF AND FUTURE IMPROVEMENTS

The most obvious part of the project that i’m very proud of is how i got to implement the hand tracking library into the code to make it work even though it has some minor control bugs. Initially, i started off by setting the control system to the arrow keys on the keyboard and after i got that to work, i went ahead to integrate the ml5.js library into the code to track the user’s hands through the webcam and then map the movement of the hands to the corresponding arrow keys to make the robot move. Future improvements include making the whole arduino setup work with the p5.js part wirelessly to allow free movement of the car and also improving the implementation  and integration of the hand tracking model to ensure accurate response to the movement s of the user’s hands. I also intend to add an LCD screen and also more LED lights to make it very similar to how an actual car looks.

Final Project (Submission Post)

Aaron, Majid, Hassan.

CONCEPT

How would someone virtually learn how complicated it is to drive a car? Would teaching someone how to drive a car virtually save a lot of money and decrease potential accidents associated with driving? These questions inspired our project, which is to create a remote-controlled car that can be controlled using hand gestures (that imitate the driving steering wheel movements), specifically by tracking the user’s hand position and a foot pedal. The foot pedal will be used to control the acceleration, braking, and reversing. We will achieve all these by integrating a P5JS tracking system into the car, which will interpret the user’s hand gestures and translate them into commands that control the car’s movements. The hand gestures and pedal control will be synced together via two serial ports that will communicate with the microcontroller of the car.

Experience

The entire concept is not based only on a driving experience. We introduce a racing experience by creating a race circuit. The idea is for a user to complete a lap in the fastest time possible. Before you begin the experience, you can view the leaderboard. After your time has been recorded, a pop-up appears for you to input your name to be added to the leaderboard. For this, we created a new user interface on a separate laptop. This laptop powers an Arduino circuit connection which features an ultrasonic sensor. The ultrasonic sensor checks when the car has crossed the start line and begins a timer, and detects when the user ends the circuit. After this, it records the time it took a user to complete the track and sends this data to the leaderboard.

This piece of code is how we’re able to load and show the leaderboard.

function loadScores() {
  let storedScores = getItem("leaderboard");
  if (storedScores) {
    highscores = storedScores;
    console.log("Highscores loaded:", highscores);
  } else {
    console.log("No highscores found.");
  }
}

function saveScores() {
  // make changes to the highscores array here...
  storeItem("leaderboard", highscores);
  console.log("Highscores saved:", highscores);
}


IMPLEMENTATION(The Car & Foot Pedal)

We first built the remote-controlled car using an Arduino Uno board, a servo motor, a Motor Shield 4 Channel L293D, an ultrasonic sensor, 4 DC motors, and other peripheral components. Using the Motor Shield 4 Channel L293D decreased numerous wired connections and allowed us space on the board on which we mounted all other components. After, we created a new Arduino circuit connection to use the foot pedal. 

The foot pedal sends signals to the car by rotating a potentiometer whenever the pedal is engaged. The potentiometer value is converted into forward/backward movement before it reaches p5.js via serial communication.

P5/Arduino Communication

At first, a handshake is established to ensure communication exists before proceeding with the program:

//////////////VarCar/////
// Define Serial port
let serial;
let keyVal;
//////////////////////////
const HANDTRACKW = 432;
const HANDTRACKH = 34;

const VIDEOW = 320;
const VIDEOH = 240;

const XINC = 5;
const CLR = "rgba(200, 63, 84, 0.5)";

let smooth = false;
let recentXs = [];
let numXs = 0;

// Posenet variables
let video;
let poseNet;

// Variables to hold poses
let myPose = {};
let myRHand;

let movement;
////////////////////////

let Acceleration = 0;
let Brake = 0;
let data1 = 0;
let data2 = 0;

let s2_comp=false;

function setup() {
 // Create a canvas
  //createCanvas(400, 400);

  // // Open Serial port
  // serial = new p5.SerialPort();
  // serial.open("COM3"); // Replace with the correct port for your Arduino board
  // serial.on("open", serialReady);

  ///////////////////////////
  // Create p5 canvas


The Hand Gestures

Two resources that helped detect the user’s hand position were PoseNet and Teachable Machine. We used these two resources to create a camera tracking system which was then programmed to interpret specific hand gestures, such as moving the hand right or left to move the car in those directions. This aspect of our code handles the hand tracking and gestures.

if (myPose) {
    try {
      // Get right hand from pose
      myRHand = getHand(myPose, false);
      myRHand = mapHand(myRHand);

      const rangeLeft2 = [0, 0.2 * HANDTRACKW];
      const rangeLeft1 = [0.2 * HANDTRACKW, 0.4 * HANDTRACKW];
      const rangeCenter = [0.4 * HANDTRACKW, 0.6 * HANDTRACKW];
      const rangeRight1 = [0.6 * HANDTRACKW, 0.8 * HANDTRACKW];
      const rangeRight2 = [0.8 * HANDTRACKW, HANDTRACKW];

      // Check which range the hand is in and print out the corresponding data
      if (myRHand.x >= rangeLeft2[0] && myRHand.x < rangeLeft2[1]) {
        print("LEFT2");
        movement = -1;
      } else if (myRHand.x >= rangeLeft1[0] && myRHand.x < rangeLeft1[1]) {
        print("LEFT1");
        movement = -0.5;
      } else if (myRHand.x >= rangeCenter[0] && myRHand.x < rangeCenter[1]) {
        print("CENTER");
        movement = 0;
      } else if (myRHand.x >= rangeRight1[0] && myRHand.x < rangeRight1[1]) {
        print("RIGHT1");
        movement = 0.5;
      } else if (myRHand.x >= rangeRight2[0] && myRHand.x <= rangeRight2[1]) {
        print("RIGHT2");
        movement = 1;
      }
      // Draw hand
      push();
      const offsetX = (width - HANDTRACKW) / 2;
      const offsetY = (height - HANDTRACKH) / 2;
      translate(offsetX, offsetY);
      noStroke();
      fill(CLR);
      ellipse(myRHand.x, HANDTRACKH / 2, 50);
      pop();
    } catch (err) {
      print("Right Hand not Detected");
    }
    print(keyVal)


The Final Result & Car Control

The final result was an integrated system consisting of the car, the pedal, and gesture control in P5.JS. When the code is run in p5.js, the camera detects a user’s hand position and translates it into movement commands for the car.

The entire code for controlling the car.

//////////////VarCar/////
// Define Serial port
let serial;
let keyVal;
//////////////////////////
const HANDTRACKW = 432;
const HANDTRACKH = 34;

const VIDEOW = 320;
const VIDEOH = 240;

const XINC = 5;
const CLR = "rgba(200, 63, 84, 0.5)";

let smooth = false;
let recentXs = [];
let numXs = 0;

// Posenet variables
let video;
let poseNet;

// Variables to hold poses
let myPose = {};
let myRHand;

let movement;
////////////////////////

let Acceleration = 0;
let Brake = 0;
let data1 = 0;
let data2 = 0;

let s2_comp=false;

function setup() {
 // Create a canvas
  //createCanvas(400, 400);

  // // Open Serial port
  // serial = new p5.SerialPort();
  // serial.open("COM3"); // Replace with the correct port for your Arduino board
  // serial.on("open", serialReady);

  ///////////////////////////
  // Create p5 canvas
  createCanvas(600, 600);
  rectMode(CENTER);

  // Create webcam capture for posenet
  video = createCapture(VIDEO);
  video.size(VIDEOW, VIDEOH);
  // Hide the webcam element, and just show the canvas
  video.hide();

  // Posenet option to make posenet mirror user
  const options = {
    flipHorizontal: true,
  };

  // Create poseNet to run on webcam and call 'modelReady' when model loaded
  poseNet = ml5.poseNet(video, options, modelReady);

  // Everytime we get a pose from posenet, call "getPose"
  // and pass in the results
  poseNet.on("pose", (results) => getPose(results));
}

function draw() {
  // one value from Arduino controls the background's red color
  //background(0, 255, 255);
  
  /////////////////CAR///////
  background(0);

  strokeWeight(2);
  stroke(100, 100, 0);
  line(0.2 * HANDTRACKW, 0, 0.2 * HANDTRACKW, height);
  line(0.4 * HANDTRACKW, 0, 0.4 * HANDTRACKW, height);
  line(0.6 * HANDTRACKW, 0, 0.6 * HANDTRACKW, height);
  line(0.8 * HANDTRACKW, 0, 0.8 * HANDTRACKW, height);
  line(HANDTRACKW, 0, HANDTRACKW, height);
  line(1.2 * HANDTRACKW, 0, 1.2 * HANDTRACKW, height);

  if (myPose) {
    try {
      // Get right hand from pose
      myRHand = getHand(myPose, false);
      myRHand = mapHand(myRHand);

      const rangeLeft2 = [0, 0.2 * HANDTRACKW];
      const rangeLeft1 = [0.2 * HANDTRACKW, 0.4 * HANDTRACKW];
      const rangeCenter = [0.4 * HANDTRACKW, 0.6 * HANDTRACKW];
      const rangeRight1 = [0.6 * HANDTRACKW, 0.8 * HANDTRACKW];
      const rangeRight2 = [0.8 * HANDTRACKW, HANDTRACKW];

      // Check which range the hand is in and print out the corresponding data
      if (myRHand.x >= rangeLeft2[0] && myRHand.x < rangeLeft2[1]) {
        print("LEFT2");
        movement = -1;
      } else if (myRHand.x >= rangeLeft1[0] && myRHand.x < rangeLeft1[1]) {
        print("LEFT1");
        movement = -0.5;
      } else if (myRHand.x >= rangeCenter[0] && myRHand.x < rangeCenter[1]) {
        print("CENTER");
        movement = 0;
      } else if (myRHand.x >= rangeRight1[0] && myRHand.x < rangeRight1[1]) {
        print("RIGHT1");
        movement = 0.5;
      } else if (myRHand.x >= rangeRight2[0] && myRHand.x <= rangeRight2[1]) {
        print("RIGHT2");
        movement = 1;
      }
      // Draw hand
      push();
      const offsetX = (width - HANDTRACKW) / 2;
      const offsetY = (height - HANDTRACKH) / 2;
      translate(offsetX, offsetY);
      noStroke();
      fill(CLR);
      ellipse(myRHand.x, HANDTRACKH / 2, 50);
      pop();
    } catch (err) {
      print("Right Hand not Detected");
    }
    print(keyVal)


    //print(movement);
   // print("here")
    //print(writers);
  }
  //////////////////////////

  if (!serialActive1 && !serialActive2) {
    text("Press Space Bar to select Serial Port", 20, 30);
  } else if (serialActive1 && serialActive2) {
    text("Connected", 20, 30);

    // Print the current values
    text("Acceleration = " + str(Acceleration), 20, 50);
    text("Brake = " + str(Brake), 20, 70);
    mover();
  }

}

function keyPressed() {
  if (key == " ") {
    // important to have in order to start the serial connection!!
    setUpSerial1();
  } else if (key == "x") {
    // important to have in order to start the serial connection!!
    setUpSerial2();
    s2_comp=true
  }
}

/////////////CAR/////////
function serialReady() {
  // Send initial command to stop the car
  serial.write("S",0);
  print("serialrdy");
}

function mover() {
    print("mover");

  // Send commands to the car based wwon keyboard input
  if (Acceleration==1) {
    writeSerial('S',0);
   
    //print(typeof msg1)
    
  }else if (Brake==1) {
    writeSerial('W',0);
  }else if ( movement < 0) {
    print("left")
    writeSerial('A',0);
  }else if ( movement > 0) {
        print("right")

    writeSerial('D',0);
  }else if (movement== 0) {
    print("stop");
    writeSerial('B',0);
  }
}

// When posenet model is ready, let us know!
function modelReady() {
  console.log("Model Loaded");
}

// Function to get and send pose from posenet
function getPose(poses) {
  // We're using single detection so we'll only have one pose
  // which will be at [0] in the array
  myPose = poses[0];
}

// Function to get hand out of the pose
function getHand(pose, mirror) {
  // Return the wrist
  return pose.pose.rightWrist;
}

// function mapHand(hand) {
//   let tempHand = {};
//   tempHand.x = map(hand.x, 0, VIDEOW, 0, HANDTRACKW);
//   tempHand.y = map(hand.y, 0, VIDEOH, 0, HANDTRACKH);

//   if (smooth) tempHand.x = averageX(tempHand.x);

//   return tempHand;
// }
function mapHand(hand) {
  let tempHand = {};
  // Only add hand.x to recentXs if the confidence score is greater than 0.5
  if (hand.confidence > 0.2) {
    tempHand.x = map(hand.x, 0, VIDEOW, 0, HANDTRACKW);

    if (smooth) tempHand.x = averageX(tempHand.x);
  }

  tempHand.y = map(hand.y, 0, VIDEOH, 0, HANDTRACKH);

  return tempHand;
}

function averageX(x) {
  // the first time this runs we add the current x to the array n number of times
  if (recentXs.length < 1) {
    console.log("this should only run once");
    for (let i = 0; i < numXs; i++) {
      recentXs.push(x);
    }
    // if the number of frames to average is increased, add more to the array
  } else if (recentXs.length < numXs) {
    console.log("adding more xs");
    const moreXs = numXs - recentXs.length;
    for (let i = 0; i < moreXs; i++) {
      recentXs.push(x);
    }
    // otherwise update only the most recent number
  } else {
    recentXs.shift(); // removes first item from array
    recentXs.push(x); // adds new x to end of array
  }

  let sum = 0;
  for (let i = 0; i < recentXs.length; i++) {
    sum += recentXs[i];
  }

  // return the average x value
  return sum / recentXs.length;
}

////////////////////////

// This function will be called by the web-serial library
// with each new *line* of data. The serial library reads
// the data until the newline and then gives it to us through
// this callback function
function readSerial(data) {
  ////////////////////////////////////
  //READ FROM ARDUINO HERE
  ////////////////////////////////////

  if (data != null) {
   // print(data.value);
    let fromArduino = data.value.split(",");
    if (fromArduino.length == 2) {
      //print(int(fromArduino[0]));
      //print(int(fromArduino[1]));
      Acceleration = int(fromArduino[0]);
      Brake  = int(fromArduino[1])
      
    }

    //////////////////////////////////
    //SEND TO ARDUINO HERE (handshake)
    //////////////////////////////////
    if(s2_comp){
    let sendToArduino = Acceleration + "," + Brake + "\n";
      // mover()
    //print("output:");
    //print(sendToArduino);
    //writeSerial(sendToArduino, 0);
    }
  }
}


The car moves forward/backward when a user engages the foot pedals, and steers left/right when the user moves his/her hand left/right. The components of the car system are able to communicate via serial communication in p5.js. To enable this, we created 2 serial ports(one for the car and the other for the foot pedal). 


CHALLENGES

One challenge we may face during the implementation is accurately interpreting the user’s hand gestures. The camera tracking system required a lot of experimentation and programming adjustments to ensure that it interprets the user’s hand movements while also being light and responsive. Originally the camera was tracking the X and Y axis, but it caused p5 to be very slow and laggy because of the number of variables that it needs to keep track of. The solution was to simply remove one of the axes, this improved the responsiveness of the program drastically.


The initial plan was to operate the car wirelessly, however, this was not possible due to many factors, such as using the wrong type of Bluetooth board. With limited time, we resorted to working with two serial ports for communication between the car, the pedals, and the hand gesture control. This introduced a new problem- freely moving the car. However, we solved the issue by using an Arduino USB extension cable for the car to be able to move freely.


Another major roadblock was the serial ports in p5js. Since the project uses both a pedal and the car, there was the need to use 2 separate Arduino Uno boards to control both systems. This necessitated the use of 2 serial ports in p5js. The original starter code for connecting p5 to Arduino was only for 1 serial port. A lot of time was spent adjusting the existing code to function with 2 serial ports. 


Lessons learned, especially with regard to robots, is be grouped into the following points: 

Planning is key: The project can quickly become overwhelming without proper planning. It’s important to define the project goals, select appropriate devices and how to sync the code to those devices and create a detailed project plan. 

Test as often as you can before the showcase date: Testing is crucial in robotics projects, especially when dealing with multiple hardware components and sensors. This one was no exception. It’s important to test each component and module separately before combining them into the final project.

Future steps needed to take our project to the next level.

  1. Expand functionality: While the current design allows for movement in various directions, there are other features that could be added to make the car more versatile. We plan on adding cameras and other sensors(LiDar) to detect obstacles to create a mapping of an environment while providing visual feedback to a user.
  2. Optimize hardware and software: We also plan on optimizing the hardware and software components used. This would involve changing the motors to more efficient or powerful motors, using more accurate sensors (not using the ultrasonic sensor), or exploring other microcontrollers that can better handle the project’s requirements. Additionally, optimizing the software code can improve the car’s responsiveness and performance. For example, our software code can detect obstacles but cannot detect the end of a path.  Regardless, we believe we can engineer a reverse obstacle-sensing algorithm to create an algorithm that could detect cliffs and pot-holes, and dangerous empty spaces on roads to ultimately reduce road accidents.

User Testing

Final project Neuro_Jump

Concept:
Neuro-jump is an interactive game that aims to challenge its users and encourage them to think about using their body as an interaction tool that allows them to interact with technology. Neuro-jump detects the user’s EMG-muscle signals and allows them to control the jumping Alien cowboy by flexing their bicep muscle
This game is a critique to the status quo of video games and technology in general and an invitation to steer away from using the basic interactive tools such us touch screens and hand held items, and to think about the possibility of employing different techniques.

User testing:
Throughout the process of developing the game I have tried different settings and techniques. I have noticed that some people do very well whereas others struggle to play it. After multiple tests I figured out the best level of difficulty that is not too challenging but not too boring at this same time. I also implemented a slider that allows the users to change the height of the jump of the alien thus making the game easier.

Implementation:
I have used P5 and Arduino to link the EMG signal detecting electrodes with the P5 side of the game. Setting the serial connection was not a very big challenge for me as I made sure only the necessary data will be ent form the Arduino to the computer which will make the user interaction instant and very fast and effective. I have also used the brain-shield gadget that allowed me to detect the EMG signal and transition them into digital data.
The game allows the user to both jump the incoming obstacles by flexing their hand but to also shoot the harmful birds by pressing the space Bar.
For the Arduino code I have used the original script that came with the hardware but I had to change and alter it to make it send the strength signal and use it in the length.

Future improvements and reflections:
I would like to implement the strength of the flex in the game and maybe make the jump or the attack depend on the strength of the flex. I would also like to add other tools that would allow the game to be played by two players instead of one, and maybe add another character and make the game a competitive. I would also like to create a “button-free” game the users can manipulate without the use of their hands but just their movement, facial expression or body position. I want to experiment mare with Interactivity and allow the users to be creative and have a fun time without the need of buttons or touch screens. For Neuro-Jump I would like to implement a program that detects facial gesture or body tracking that would allow the user the control the character.

P5:

Arduino code:

/*
* --------------------------------------------------------------------------------------
* Code monitors amplitude of EMG envelope, displays EMG strength on LED bar and controls
* robotic gripper by controlling servo motor.
* --------------------------------------------------------------------------------------
*/

#include <Servo.h>
#define GRIPPER_STATE_BUTTON_PIN 4          //pin for button that switches defult state
                                            //of the gripper (opened/closed)
#define SERVO_PIN 2                         //pin for servo motor
#define SENSITIVITY_BUTTON_PIN 7            //pin for button that selects sesitivity
#define NUM_LED 6                           //number of LEDs in LED bar
#define GRIPPER_MINIMUM_STEP 5              //5 degree dead zone (used to avoid
                                            //aiming oscilation)
#define OPEN_MODE 1                         //default gripper state is opened
#define CLOSED_MODE 2                       //default gripper state is closed
#define MINIMUM_SERVO_UPDATE_TIME 100       //update servo position every 100ms
#define Max_EMG_LED 3


Servo Gripper;                              //servo for gripper
byte ledPins[] = {8, 9, 10, 11, 12, 13};    //pins for LEDs in LED bar

//EMG saturation values (when EMG reaches this value
//the gripper will be fully opened/closed)
int sensitivities[] = {200, 350, 520, 680, 840, 1000};
int lastSensitivitiesIndex = 2;             //set initial sensitivity index

int emgSaturationValue = 0;                 //selected sensitivity/EMG saturation value
int analogReadings;                         //measured value for EMG
byte ledbarHeight = 0;                      //temporary variable for led bar height

unsigned long oldTime = 0;                  //timestamp of last servo angle update (ms)
int oldDegrees = 0;                         //old value of angle for servo
int newDegree;                              //new value of angle for servo

unsigned long debouncerTimer = 0;           //timer for button debouncer
int gripperStateButtonValue = 0;            //variable that stores state of button
int userReleasedButton = 1;                 //flag that is used to avoid multiple
                                            //button events when user holds button

int currentFunctionality = OPEN_MODE;       //current default position of claw


//-----------------------------------------------------------------------------------
//   Setup servo, inputs and outputs
// ----------------------------------------------------------------------------------
void setup(){

  Serial.begin(9600);
    //init servo
    Gripper.attach(SERVO_PIN);

    //init button pins to input
    pinMode(GRIPPER_STATE_BUTTON_PIN, INPUT);
    pinMode(SENSITIVITY_BUTTON_PIN, INPUT);

    //initialize all LED pins to output
    for(int i = 0; i < NUM_LED; i++){
        pinMode(ledPins[i], OUTPUT);
    }

    //get current sensitivity
    emgSaturationValue = sensitivities[lastSensitivitiesIndex];
}


//-----------------------------------------------------------------------------------
//   Main loop
//
//   - Checks state of sesitivity button
//   - Checks state of default-gripper-state button
//   - Measure EMG
//   - Shows EMG strength on LED bar
//   - Sets angle of servo based on EMG strength and current mode (open/closed)
// ----------------------------------------------------------------------------------
void loop()
{

    //-----------------------  Switch sensitivity ------------------------------------

    //check if button is pressed (HIGH)
    if (digitalRead(SENSITIVITY_BUTTON_PIN))
    {
        //turn off all the LEDs in LED bar
        for(int j = 0; j < NUM_LED; j++)
        {
            digitalWrite(ledPins[j], LOW);
        }

        //increment sensitivity index
        lastSensitivitiesIndex++;
        if(lastSensitivitiesIndex==NUM_LED)
        {
            lastSensitivitiesIndex = 0;
        }

        //get current sensitivity value
        emgSaturationValue = sensitivities[lastSensitivitiesIndex];

        //light up LED at lastSensitivitiesIndex position for visual feedback
        digitalWrite(ledPins[lastSensitivitiesIndex], HIGH);

        //wait user to release button
        while (digitalRead(SENSITIVITY_BUTTON_PIN))
        {
            delay(10);
        }
        //whait a bit more so that LED light feedback is always visible
        delay(100);
    }


    //----------------------------  Switch gripper default position open/close ---------

    //check if enough time has passed for button contact to settle down
    if((millis() - debouncerTimer) > 50)
    {
        gripperStateButtonValue = digitalRead(GRIPPER_STATE_BUTTON_PIN);
        //if button is pressed
        if(gripperStateButtonValue == HIGH)
        {
            //if last time we checked button was not pressed
            if(userReleasedButton)
            {
                debouncerTimer = millis();
                //block button events untill user releases it
                userReleasedButton = 0;

                //toggle operation mode
                if(currentFunctionality == OPEN_MODE)
                {
                    currentFunctionality = CLOSED_MODE;
                }
                else
                {
                    currentFunctionality = OPEN_MODE;
                }
            }
         }
         else
         {
            userReleasedButton = 1;
         }
    }


    //-----------------------------  Measure EMG ---------------------------------------

    analogReadings = analogRead(A0);//read EMG value from analog input A0


    //---------------------- Show EMG strength on LED ----------------------------------

    //turn OFF all LEDs on LED bar
    for(int j = 0; j < NUM_LED; j++)
    {
        digitalWrite(ledPins[j], LOW);
    }

    //calculate what LEDs should be turned ON on the LED bar
    analogReadings= constrain(analogReadings, 30, emgSaturationValue);
    ledbarHeight = map(analogReadings, 30, emgSaturationValue, 0, NUM_LED);

    //turn ON LEDs on the LED bar
    for(int k = 0; k < ledbarHeight; k++)
    {
        digitalWrite(ledPins[k], HIGH);
    }

  //-------------------- Send EMG strength data over serial -----------------------
  Serial.println(analogReadings);


    //-------------------- Drive Claw according to EMG strength -----------------------

    //set new angle if enough time passed
    if (millis() - oldTime > MINIMUM_SERVO_UPDATE_TIME)
    {
        //calculate new angle for servo
        if(currentFunctionality == OPEN_MODE)
        {
            analogReadings = constrain(analogReadings, 40, emgSaturationValue);
            newDegree = map(analogReadings, 40 ,emgSaturationValue, 190, 105);
        }
        else
        {
            analogReadings = constrain(analogReadings, 120, emgSaturationValue);
            newDegree = map(analogReadings, 120 ,emgSaturationValue, 105, 190);
        }

        //check if we are in servo dead zone
        if(abs(newDegree-oldDegrees) > GRIPPER_MINIMUM_STEP)
        {
             //set new servo angle
             Gripper.write(newDegree);
        }
        oldTime = millis();
        oldDegrees = newDegree;
    }
}