For the 11th Week assignment, we were tasked to pair up in groups of 2-3, and complete the following 3 exercises to fully understand the connection and communication methodologies between Arduino and p5Js. The 3 exercises were:
-
-
-
make something that uses only one sensor on arduino and makes the ellipse in p5 move on the horizontal axis, in the middle of the screen, and nothing on arduino is controlled by p5
-
make something that controls the LED brightness from p5
-
take the gravity wind example (https://editor.p5js.org/aaronsherwood/sketches/I7iQrNCul) and make it so every time the ball bounces one led lights up and then turns off, and you can control the wind from one analog sensor
-
-
The requirements were to post the code for each exercise, and the video of the LED lighting up with the ball bouncing.
We paired up in a group of 3, consisting of Abraiz Azhar, Ishmal Khalid, and Zunair Viqar. In the next few sections, we have described the solutions to each of the above exercises.
Prompt 1
Make something that uses only one sensor on arduino and makes the ellipse in p5 move on the horizontal axis, in the middle of the screen, and nothing on arduino is controlled by p5
Implementation
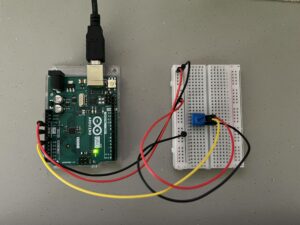
For this part, I made use of a potentiometer and connected it to the Arduino’s A0 port. The variable rVal changes according to the position of the potentiometer and this variable is in turn mapped to the ellipse’s x-position. I made the ellipse’s grey-scale value change according to the potentiometer’s reading.
Code
let rVal = 0;

function setup() {
  createCanvas(640, 480);
  textSize(18);
}

function draw() {
  // one value from Arduino controls the background's red color
  background(map(rVal, 0, 1023, 0, 255), 255, 255);

  if (!serialActive) {
    text("Press Space Bar to select Serial Port", 20, 30);
  } else {
    text("Connected", 20, 30);


    // Print the current values
    text('rVal = ' + str(rVal), 20, 50);
    text('alpha = ' + str(alpha), 20, 70);

  }

  // making an ellipse that moves according to the potentiometer's rVal
  noStroke()
  fill(map(rVal, 0, 1023, 0, 255));
  ellipse(map(rVal, 0, 1023, 20, width - 20), height/2, 20);
}
Circuit
Prompt 2
Implementation & Challenges
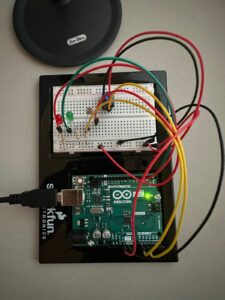
The prompt for the second task seemed straightforward initially: create a system to control LED brightness using p5. However, it turned out to be more challenging than expected. Our initial approach was to map the mouseX position relative to the screen width to adjust the brightness of the lamp accordingly. We removed the code for reading from p5 and writing to Arduino, as we thought only sending data from p5 was needed. However, we later realized that both read and write operations are necessary for establishing a connection.
Despite this realization, we still encountered issues as we didn’t initially understand that data must be continuously read and written from both Arduino and p5 for the circuit to function properly. It wasn’t just limited to the handshake phase, but required continuous data exchange. Despite the challenges, this exercise provided us with a deeper understanding of the serial connection between p5 and Arduino.
We also faced challenges with data formatting during the data exchange. It was important to ensure that the data sent from p5 was properly formatted with the addition of ‘\n’, and that Arduino used println instead of print to receive the data. This was crucial for establishing reliable communication between p5 and Arduino, and it required careful attention to detail to get the formatting right.
Code
p5Js
let rVal = 0;
let alpha = 255;
let left = 0;
let right = 0;
let brightness = 0;

function setup() {
  createCanvas(640, 480);
  textSize(18);
}

function draw() {
  // one value from Arduino controls the background's red color
  background(map(rVal, 0, 1023, 0, 255), 255, 255);

  // the other value controls the text's transparency value
  brightness = map(mouseX, 0, 640, 0, 255);

  if (!serialActive) {
    text("Press Space Bar to select Serial Port", 20, 30);
  } else {
    text("Connected", 20, 30);


    // Print the current values
    text('rVal = ' + str(rVal), 20, 50);
    text('alpha = ' + str(alpha), 20, 70);

  }

}

function keyPressed() {
  if (key == " ") {
    // important to have in order to start the serial connection!!
    setUpSerial();
  }
}


function readSerial(data) {
  ////////////////////////////////////
  //READ FROM ARDUINO HERE
  ////////////////////////////////////

  if (data != null) {

    //////////////////////////////////
    //SEND TO ARDUINO HERE (handshake)
    //////////////////////////////////
    let sendToArduino = brightness + "\n";
    writeSerial(sendToArduino);
  }
}
Arduino .ino
int leftLedPin = 2;
int rightLedPin = 5;

void setup() {
  // Start serial communication so we can send data
  // over the USB connection to our p5js sketch
  Serial.begin(9600);

  // We'll use the builtin LED as a status output.
  // We can't use the serial monitor since the serial connection is
  // used to communicate to p5js and only one application on the computer
  // can use a serial port at once.
  pinMode(LED_BUILTIN, OUTPUT);

  // Outputs on these pins
  pinMode(leftLedPin, OUTPUT);
  pinMode(rightLedPin, OUTPUT);

  // Blink them so we can check the wiring
  digitalWrite(leftLedPin, HIGH);
  digitalWrite(rightLedPin, HIGH);
  delay(200);
  digitalWrite(leftLedPin, LOW);
  digitalWrite(rightLedPin, LOW);

  // start the handshake
  while (Serial.available() <= 0) {
    digitalWrite(LED_BUILTIN, HIGH); // on/blink while waiting for serial data
    Serial.println("0"); // send a starting message
    delay(300);            // wait 1/3 second
    digitalWrite(LED_BUILTIN, LOW);
    delay(50);
  }
}

void loop() {
  // wait for data from p5 before doing something
  while (Serial.available()) {
    digitalWrite(LED_BUILTIN, HIGH); // led on while receiving data

    int right = Serial.parseInt();
    if (Serial.read() == '\n') {
      analogWrite(rightLedPin, right);
      int sensor = analogRead(A0);
      Serial.println(sensor);
    }
  }
  digitalWrite(LED_BUILTIN, LOW);
}
Prompt 3
Implementation & Challenges
For the very last prompt, we were required to take an input from Arduino in the form of an Analog Sensor and also send data to Arduino to blink an LED.
Using an existing p5Js Sketch (https://editor.p5js.org/aaronsherwood/sketches/I7iQrNCul), the requirement was to blink the LED when the ball bounces, and use an Analog Sensor to control the wind.
Therefore, making use of the circuit we designed in class by taking help from the basics of these 3 sources, we began to adapt the Gravity Wind Example from p5Js:
-
-
- Circuit (https://github.com/mangtronix/IntroductionToInteractiveMedia/blob/master/code/Week_11_Serial_schematic.png)
- Arduino Code (https://github.com/mangtronix/IntroductionToInteractiveMedia/blob/master/code/Week11Serial.ino)
- P5Js Starter Code (https://editor.p5js.org/mangtronix/sketches/s67XC0zT4)
-
The first task was to detect a bounce, and once a bounce was detected, we just simply sent a signal of ‘1’ to the Arduino – which only meant switching on the light, which would then switch off with ‘0’ being sent when the ball was in motion.
Similarly, the Potentiometer value was read from the Arduino, and its value was sent to the P5Js sketch. This value was checked to be either greater then 512, or less than that, which then meant left or right movement of the wind.
Video
Code
p5Js
let velocity;
let gravity;
let position;
let acceleration;
let wind;
let drag = 0.99;
let mass = 50;

let rVal = 0;
let alpha = 255;
let left = 0;
let right = 0;

function setup() {
  createCanvas(640, 360);
  noFill();
  position = createVector(width/2, 0);
  velocity = createVector(0,0);
  acceleration = createVector(0,0);
  gravity = createVector(0, 0.5*mass);
  wind = createVector(0,0);
}

function draw() {
  left = 0;
  background(255);
  applyForce(wind);
  applyForce(gravity);
  velocity.add(acceleration);
  velocity.mult(drag);
  position.add(velocity);
  acceleration.mult(0);
  fill(0);
  ellipse(position.x,position.y,mass,mass);
  if (position.y > height-mass/2) {
      velocity.y *= -0.9;  // A little dampening when hitting the bottom
      position.y = height-mass/2;
    }


  if(abs(velocity.y)>1){
    if(position.y+(mass/2)>=(height)){
      left = 1;
    }
  }

  // print(alpha);

  if(alpha>512){
    // print("right");
    wind.x=1;
  }
  else{
    // print("left");
    wind.x=-1;
  }


}

function applyForce(force){
  // Newton's 2nd law: F = M * A
  // or A = F / M
  let f = p5.Vector.div(force, mass);
  acceleration.add(f);
}

function keyPressed(){
  if (key == " ") {
    // important to have in order to start the serial connection!!
    setUpSerial();
  }

  if (keyCode==UP_ARROW){
    // wind.x=-1;
    position.y = 200;
  }

  if (keyCode==ENTER){
    mass=random(15,80);
    position.y=-mass;
    velocity.mult(0);
  }
}


function readSerial(data) {
  ////////////////////////////////////
  //READ FROM ARDUINO HERE
  ////////////////////////////////////

  if (data != null) {
    // make sure there is actually a message
    alpha = data;

    //////////////////////////////////
    //SEND TO ARDUINO HERE (handshake)
    //////////////////////////////////
    let sendToArduino = left + "\n";
    writeSerial(sendToArduino);
  }
}
Arduino .ino
// Week 11.2 Example of bidirectional serial communication

// Inputs:
// - A0 - sensor connected as voltage divider (e.g. potentiometer or light sensor)
// - A1 - sensor connected as voltage divider
//
// Outputs:
// - 2 - LED
// - 5 - LED

int leftLedPin = 2;

void setup() {
  // Start serial communication so we can send data
  // over the USB connection to our p5js sketch
  Serial.begin(9600);

  // We'll use the builtin LED as a status output.
  // We can't use the serial monitor since the serial connection is
  // used to communicate to p5js and only one application on the computer
  // can use a serial port at once.
  pinMode(LED_BUILTIN, OUTPUT);

  // Outputs on these pins
  pinMode(leftLedPin, OUTPUT);

  // Blink them so we can check the wiring
  digitalWrite(leftLedPin, HIGH);
  delay(200);
  digitalWrite(leftLedPin, LOW);


  // start the handshake
  while (Serial.available() <= 0) {
    digitalWrite(LED_BUILTIN, HIGH); // on/blink while waiting for serial data
    Serial.println("0,0"); // send a starting message
    delay(300);            // wait 1/3 second
    digitalWrite(LED_BUILTIN, LOW);
    delay(50);
  }
}

void loop() {
  // wait for data from p5 before doing something
  while (Serial.available()) {
    digitalWrite(LED_BUILTIN, HIGH); // led on while receiving data

    int left = Serial.parseInt();
    // int right = Serial.parseInt();
    if (Serial.read() == '\n') {
      digitalWrite(leftLedPin, left); // Write value to the bulb, to blink it
      int sensor2 = analogRead(A1); // Read input from the Potentiometer
      delay(5);
      Serial.println(sensor2); // Send message to p5js
    }
  }
  digitalWrite(LED_BUILTIN, LOW);
}
Circuit


