
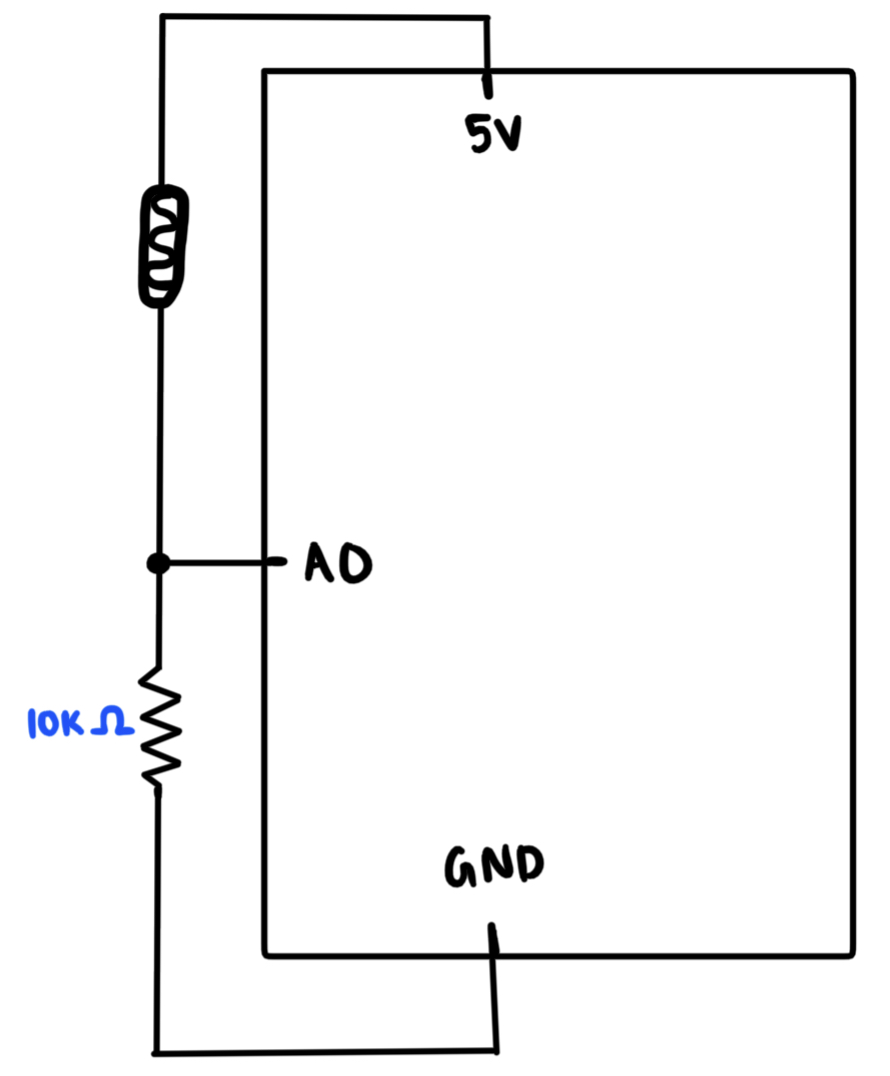
Exercise 1: Control p5js through Arduino
In this exercise, we had to have an analog sensor on our Arduino and let those values control something in p5js. Hence, I used a photo resistor and the values from that would make an ellipse in p5js move along its horizontal axis.
Schematic:
p5js Code:
//Class Exercise 1: Controlling P5JS objects from Arduino
let xValue = 0;

function setup() {
  createCanvas(700, 700);
}

function draw() {
  background(220);

  if (!serialActive) {
    text("Press Space Bar to select Serial Port", 20, 30);
  }

  else {
    text("Connected", 20, 30);
    ellipse(xValue, height/2, 150, 150);
  }
}

//Sets up the serial connection
function keyPressed() {
  if (key == " ") {
    setUpSerial();
  }
}

//Function to read in serial data from the Serial Port.
function readSerial(data) {
  if (data != null) {
    //Mapping the sensor values from 'data' - 0 to 500 - 0
    xValue = map(data, 0, 1023, 0, width);
  }
}
Arduino Code:
const int lightSensor = A0;

void setup() {
  Serial.begin(9600);
  pinMode(lightSensor, INPUT);
}

void loop() {
  //Reads value from the sensor and prints it to the Serial Port (p5js)
  int lightValue = analogRead(lightSensor);
  Serial.println(lightValue);
}
Video:
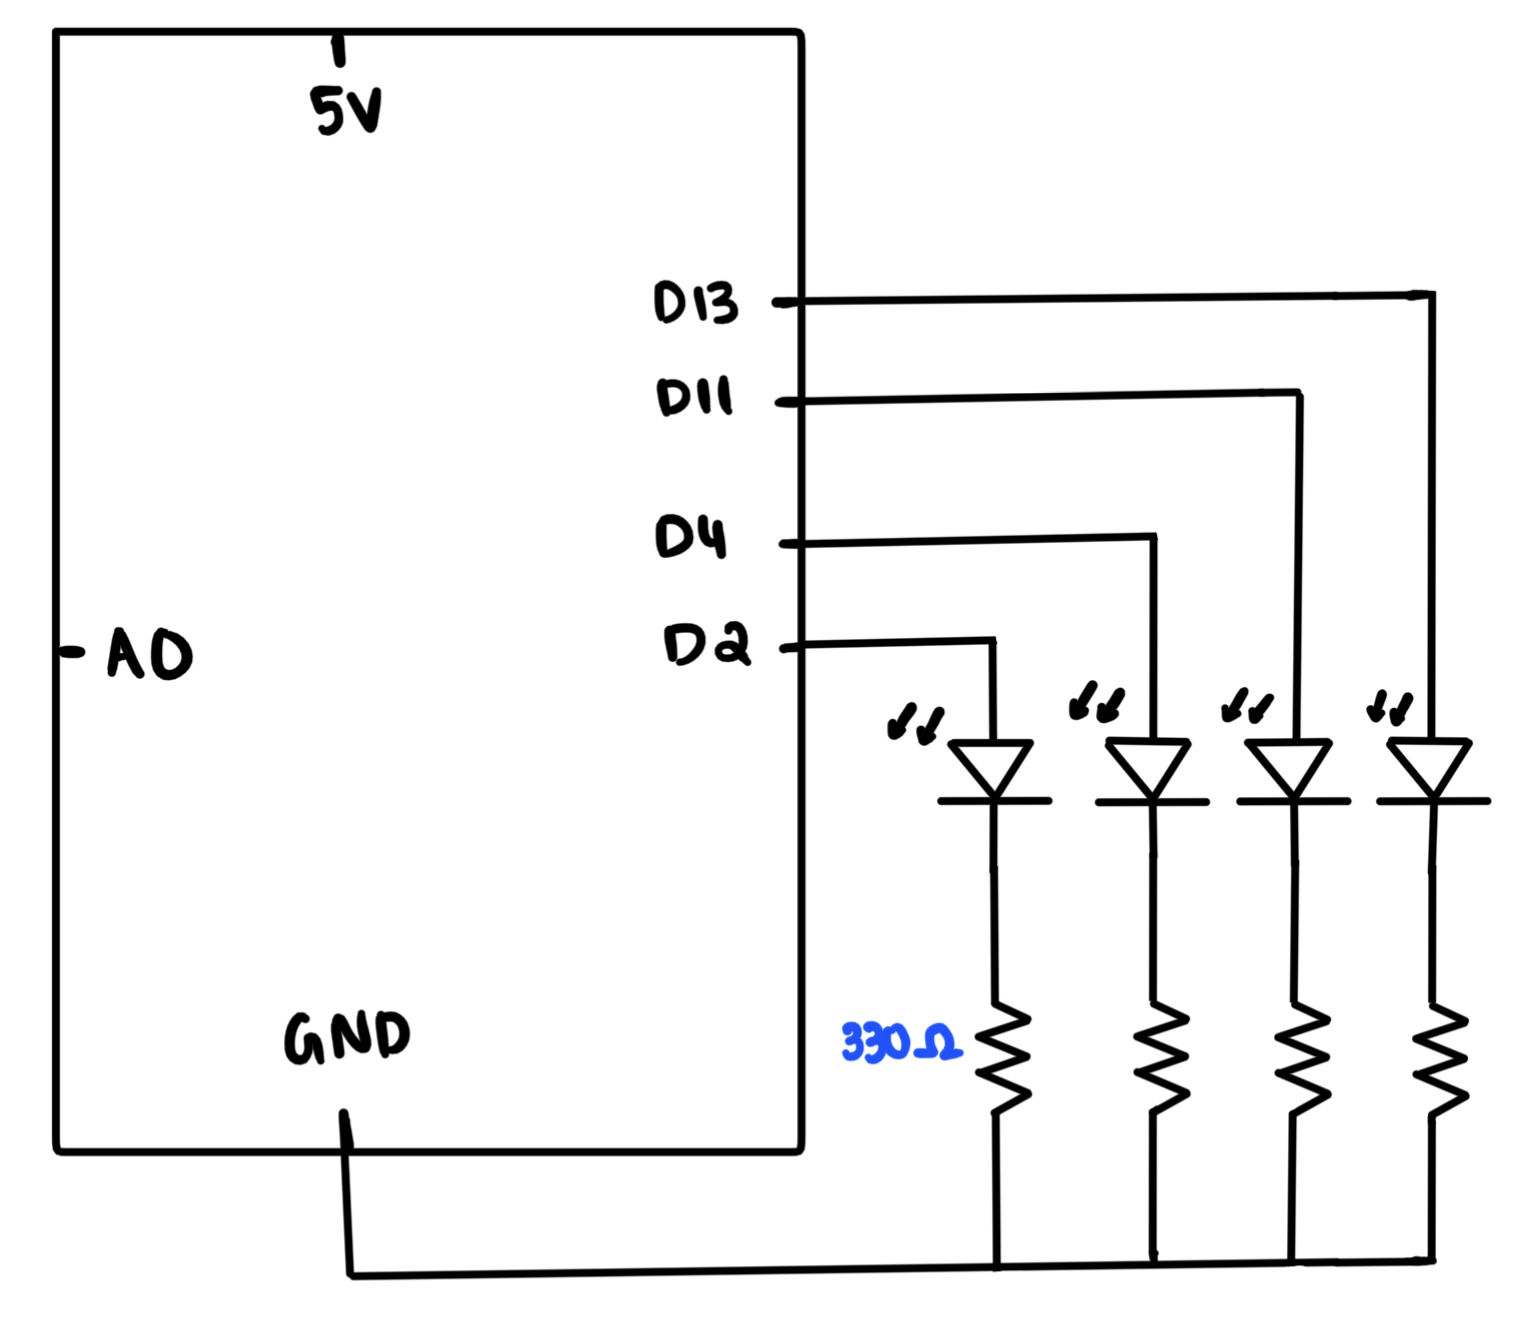
Exercise 2: Control Arduino LEDs through p5js
In this exercise, we had to simply control LEDs on our Arduino board via p5js code. Hence, I decided to do something where depending on where the user’s mouse is on the canvas on p5js, it will light up a specific LED. So, for instance, if it’s on the far left side, it will switch on the left most LED, and if it’s on the right side, it will switch on the right most LED and so on.
Schematic:
p5js Code:
let circle_size = 50;

//These are variables to determine whether the any of the coloured lights are ON or OFF
let g_ON = 0;
let b_ON = 0;
let r_ON = 0;
let y_ON = 0;

function setup() {
  createCanvas(700, 700);
}

function draw() {
  background(0);
  fill(255);
  textAlign(CENTER);
  textSize(20);
  text("Move the cursor around to switch the LED's ON!", width/2, 40);

  if (!serialActive) {text("Press Space Bar to select Serial Port", width/2, 75); }
  else {text("Connected", width/2, 75); }

  //Depending on which side of the canvas the mouse is on, that specific LED will switch on and the circle icon will also be switched to that color as well
  if(mouseX < width/4) {
    fill("red");
    r_ON = 1;
    y_ON = 0;
    b_ON = 0;
    g_ON = 0;
  }

  else if(mouseX >= width/4 && mouseX < width/2) {
    fill("yellow");
    r_ON = 0;
    y_ON = 1;
    b_ON = 0;
    g_ON = 0;
  }

  else if(mouseX >= width/2 && mouseX < 3*width/4) {
    fill("blue");
    r_ON = 0;
    y_ON = 0;
    b_ON = 1;
    g_ON = 0;
  }

  else {
    fill("green");
    r_ON = 0;
    y_ON = 0;
    b_ON = 0;
    g_ON = 1;
  }

  circle(mouseX, mouseY, circle_size);
}

function keyPressed() {
  if(key == " ") {
    setUpSerial();
  }
}

function readSerial(data) {
  if(data != null) {
    //Sends the light ON/OFF messages for all the lights to the arduino
    let sendToArduino = r_ON + "," + y_ON + "," + b_ON + "," + g_ON + "\n";
    writeSerial(sendToArduino);
  }
}
Arduino:
const int red_pin = 13;
const int yellow_pin = 11;
const int blue_pin = 4;
const int green_pin = 2;

void setup() {
  Serial.begin(9600);
  pinMode(red_pin, OUTPUT);
  pinMode(yellow_pin, OUTPUT);
  pinMode(blue_pin, OUTPUT);
  pinMode(green_pin, OUTPUT);

  // Blink them so we can check the wiring
  digitalWrite(red_pin, HIGH);
  digitalWrite(yellow_pin, HIGH);
  digitalWrite(blue_pin, HIGH);
  digitalWrite(green_pin, HIGH);
  delay(200);
  digitalWrite(red_pin, LOW);
  digitalWrite(yellow_pin, LOW);
  digitalWrite(blue_pin, LOW);
  digitalWrite(green_pin, LOW);

  //Checks while the Serial Port is available then we send '0'
  while(Serial.available() <= 0) {
    Serial.println("0");
    delay(300);
  }
}

void loop() {
  while(Serial.available()) {
    //We parse the integer values (ON/OFF) to the respective leds
    int red = Serial.parseInt();
    int yellow = Serial.parseInt();
    int blue = Serial.parseInt();
    int green = Serial.parseInt();

    //Once it's read the \n character, then we switch the according LEDs on
    if (Serial.read() == '\n') {
      digitalWrite(red_pin, red);
      digitalWrite(yellow_pin, yellow);
      digitalWrite(blue_pin, blue);
      digitalWrite(green_pin, green);
    }
    Serial.println(); //Needs two way handshake commuincation between ports.
  }
}
Video:
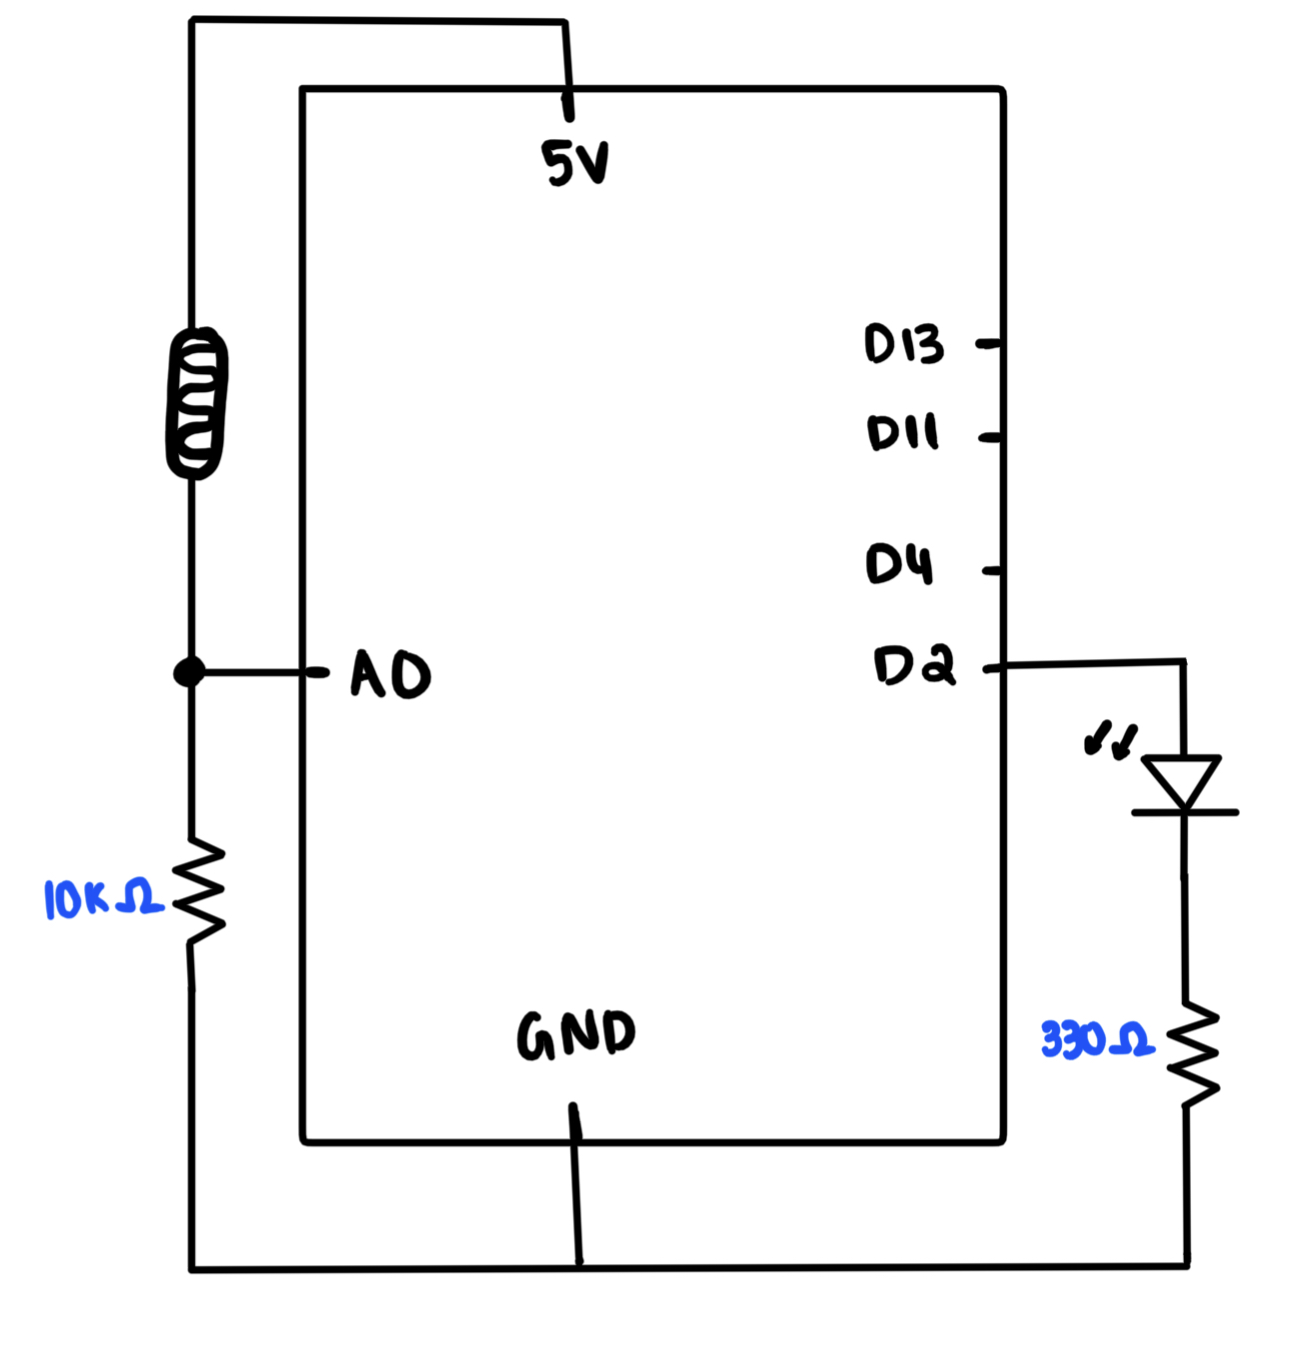
Exercise 3: Two-way communication between p5js and Arduino
In this exercise, we were given a p5js code which drew a bouncing ball and it could change directions depending on some ‘wind’ variable. We were supposed to relay the information of when the ball bounced (hit the floor), then the LED would switch on, otherwise it’s off. Similarly, we would also be able to control the wind value through an analog sensor, hence I chose the photo resistor.
Schematic:
p5js Code:
let velocity;
let gravity;
let position;
let acceleration;
let wind;
let drag = 0.99;
let mass = 50;

//These are the variables which would be read and written from/to the Arduino
let sensor_wind = 0;
let led_ON = 0;

function setup() {
  createCanvas(640, 640);
  position = createVector(width/2, 0);
  velocity = createVector(0,0);
  acceleration = createVector(0,0);
  gravity = createVector(0, 0.5*mass);
  wind = createVector(0,0);
}

function draw() {
  background(255);

  if (!serialActive) {text("Press Space Bar to select Serial Port", 20, 30); }
  else {text("Connected!", 20, 30); }

  fill(0);
  applyForce(wind);
  applyForce(gravity);
  velocity.add(acceleration);
  velocity.mult(drag);
  position.add(velocity);
  acceleration.mult(0);
  ellipse(position.x,position.y,mass,mass);

  if (position.y > height-mass/2) {
      velocity.y *= -0.9;  // A little dampening when hitting the bottom
      position.y = height-mass/2;
      led_ON = 1;  //If the ball makes contact with the ground, the LED will be ON
  }
  else {led_ON = 0;}   //Else the LED will be OFF

  //If the sensor_wind value from the Arduino that was mapped is greater than 0, then it will move the ball to the right
  if(sensor_wind > 0) {
    wind.x = 1;
  }

  //Else if the sensor_wind value from the Arduino is less than 0, it will move the ball to the left
  else if(sensor_wind < 0) {
    wind.x = -1;
  }

  //If it's 0, aka no wind, then it will just keep the ball where it is, no wind.
  else {
    wind.x = 0;
  }
}

function applyForce(force){
  // Newton's 2nd law: F = M * A
  // or A = F / M
  let f = p5.Vector.div(force, mass);
  acceleration.add(f);
}

function keyPressed(){
  if (key == "m"){
    mass=random(15,80);
    position.y=-mass;
    velocity.mult(0);
  }

  if(key == " ") {
    setUpSerial();
  }
}

function readSerial(data) {
  if(data != null) {
    //Sends the LED ON/OFF information to the Arduino
    let sendToArduino = led_ON + "\n";
    writeSerial(sendToArduino);
    //Reads the sensor_wind values from the Arduino and maps its value to either -1 or 1 to correspond to wind direction.
    sensor_wind = map(data, 0, 1023, -1 , 1);
  }
}
Arduino Code:
const int led_pin = 13;
const int lightSensor = A0;

void setup() {
  Serial.begin(9600);
  pinMode(led_pin, OUTPUT);
  pinMode(lightSensor, INPUT);

  //Check wiring:
  digitalWrite(led_pin, HIGH);
  delay(200);
  digitalWrite(led_pin, LOW);

  while(Serial.available() <= 0) {
    Serial.println("0");
  }

}

void loop() {
  while(Serial.available()) {
    //Gets the led ON/OFF information from p5js and switches the led on/off accordingly
    int led_ON = Serial.parseInt();
    digitalWrite(led_pin, led_ON);

    //Gets the light value from the sensor and sends it to p5js
    int lightValue = analogRead(lightSensor);
    Serial.println(lightValue);
  }
}