Weekly Assignment 3

Concept:

For the first time, I had a fixed idea from the beginning of what I wanted to do for this assignment. I wanted to replicate a computer circuit and signals going through and simulate the signals as blood cells going through the veins. I wanted to have a canvas full of randomly generated veins going everywhere and then have each blood cells precisely follow that vein for each veins.

Making Process:

Initially, I created a class of veins and tried to test out printing a single instance of a vein. I needed a function that would create several lines that would consistently build on top of each other to create a single vein going across the canvas. I decided to create an array attribute that stored multiple line parameters(x1,y1,x2,y2) that would add up to create a vein. Each line segment would have a random color between red, green, and blue.

constructor(){
  this.paramArray = [];
  this.initPos = int(random(0,400));
  this.posVar = 0;

...

  let counter = 0;
  if(counter % 2 == 0){
    //storing of initial x value before adding changes and then adding changes
    let tempPosVar = this.posVar;
    this.posVar += (int(random(1,5)) * 10);
    color = this.colorRange[int(random(0,3))];
    this.paramArray.push([tempPosVar, this.initPos, this.posVar, this.initPos, color]);
  }
    else{
      let tempInitPos = this.initPos;
      this.initPos += (int(random(-4,4)) * 10);
      //in case random initPos is 0, to prevent incosistent vein
      if (this.initPos == tempInitPos)
        this.initPos -= 10;
      //push the 5 parameters in the array
      this.paramArray.push([this.posVar, tempInitPos, this.posVar, this.initPos,     color]);
  }
  counter++;
...


After I achieved this, I then proceeded to create an entire circuit of 300 sets of veins going from left to right and top to bottom

Then I worked on the blood class for the cells to follow its assigned vein. This part, I am particularly proud of since planning ahead helped me a lot. Since I knew there was going to be instances of two separate classes, I specifically created the attribute of the coordinates for each lines in a vein stored in an array so that I could pass it on to the blood cell instance. Therefore, in the blood class’s display function I can easily pass on the cell’s coordinates based on the lines’ coordinates.

if(this.lineNum < this.veinRoute.length){
        
  //the actual printing of the cell 
  strokeWeight(0);
  fill(60, 100, 100);
  circle(this.x, this.y, 4);
        
  //The cell movement mechanism: the cell position variable will move towards the end of the current line it is on the vein
        
  //For x position
  if(this.x != this.veinRoute[this.lineNum][2]){
    if(this.x < this.veinRoute[this.lineNum][2])
      this.x++;
    if(this.x > this.veinRoute[this.lineNum][2])
      this.x--;
    }
        
  //For y position
  else if(this.y != this.veinRoute[this.lineNum][3]){
    if(this.y < this.veinRoute[this.lineNum][3])
      this.y++;
    if(this.y > this.veinRoute[this.lineNum][3])
      this.y--;
    }
        
      //If the cell is on the end of the line, move on to the next line of the vein
  else
    this.lineNum++;
  }
      
//If the cell had reached the end of the vein, reset to the beginning of the vein
else{
  this.x = this.veinRoute[0][0];
  this.y = this.veinRoute[0][1];
  this.lineNum = 0;
}

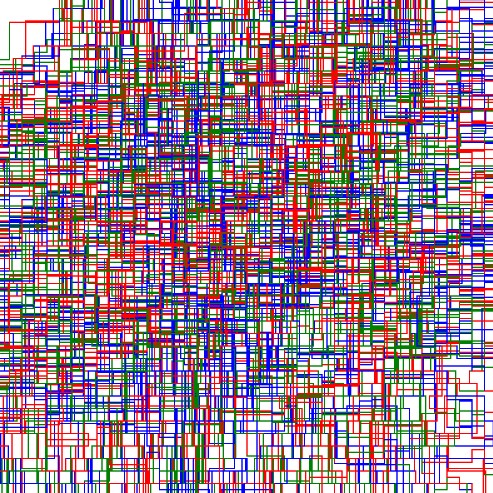
Now that my setup for the whole project has finished, I created an array of vein and blood cell instances. Then I changed the coloring a little to make it aesthetically appealing. Instead of the normal RGB that I am used to, I decided to implement the HSB color mode to differentiate the cell and the veins brightness. This is the following result:

I also added another set of cells going backwards on the veins to populate the circuit a little more.

Challenge:

My challenge at this point was that the cells were all initialized at the same moment, which initially creates a recognizable pattern which is a phenomenon that I didn’t like. The reason why this happens is because I initialize and draw the veins and blood cells at the same time

for(let i = 0; i < 300; i++){
  groupOfVeins.push(new veins(i));
}
  
for(let j = 0; j < 300; j++){
  //do the setup for the veins and create the blood cells based on it
  groupOfVeins[j].create();
  groupOfBloodFor.push(new blood(groupOfVeins[j].paramArray, true));
  groupOfBloodBack.push(new blood(groupOfVeins[j].paramArray, false));
}

...

for(let j = 0; j < 300; j++){
  groupOfVeins[j].display();
  groupOfBloodFor[j].display();
  groupOfBloodBack[j].display();
}

At this point, I consulted with Professor Ang and he gave me the advise of a) create and print each vein and cell one by one, b) try to involve less fixed numbers and create a pattern that can be randomized each run therefore creating a new result for each run. So I worked with the first task and successfully made a function that initialize the veins one by one instead of doing the whole thing at once using an array. I also slowed this process using the frameCount variable to show what exactly is going on.

Then I applied changed for suggestion B where I set colors for horizontal veins as red and vertical veins for blue. I also set a random parameter that changed the range of the veins each run which somewhat makes a new pattern each time it runs

if(frameCount % 75 == 0){
  if(counter < maximumNumber){
    initialize();
  }
  else{
    counter = -1;
    resetCanvas();
  }
  counter++
}

...

function initialize(){
  groupOfVeins.push(new veins(counter));  
  groupOfVeins[counter].create();
  groupOfBloodFor.push(new blood(groupOfVeins[counter].paramArray, true));
  groupOfBloodBack.push(new blood(groupOfVeins[counter].paramArray, false));
}


Finally I made a version where the color of the veins would be black so only the cells would be seen which makes it look like a swarm of fireflies dancing in the dark

Reflection:

Overall through this project, I was able to learn new things about OOP using p5js especially regarding using attributes and passing them. At first I was somewhat annoyed that each time I had to use the attribute I had to put “this.” in front of the attribute name to use it which caught me aback the first hour but later on I was so glad that p5js was very lenient with passing attributes of one instance for another of different class. I also learned how to use the HSB color scheme which added the sprinkle on top of my project’s aesthetics.

This was also an assignment where I liked each variation of my work since each variation kept its uniqueness which all looked cool to me in different ways. This ended up making my documentation super long but in the end I thought it was a good thing for me try different things on this project.

Week 3 – OOP(s) Moon

Concept & Inspiration:

This code creates a graphical representation of a moon with an orbit. The code defines a class called “Moon” that creates an instance of a moon with given x, y coordinates, width, and height. The class has a method called “draw” which draws the moon on the canvas. The code also defines a class called “Square” which creates a square with given x, y coordinates, size and color. This class also has a method called “draw” which draws the square on the canvas.The code uses an array “squares” to store instances of the square class and uses a loop to draw multiple squares in an orbit around the moon. The squares are positioned using the cosine and sine functions to make them move in a circular motion.The code also allows for the creation of stars by making an array “stars” and using a loop to draw 50 small circles on the canvas. The stars can be displayed by clicking on the canvas.The function “setup” initializes the canvas, sets the frame rate and creates the instances of the moon and squares.The function “draw” displays the moon and squares on the canvas. The function “mouseClicked” changes the display of stars when the mouse is clicked on the canvas.

This code captures the essence of a celestial body inspired by the rings of Saturn. The inspiration for this code came from an image of the moon surrounded by clouds, which gave the illusion of it having its own set of rings. With a creative and imaginative approach, the goal was to bring to life a moon with an animated orbit. The picture of the image is shown below.

Code:

let star = false; // when there are no stars
let stars = []; //making an array for storing stars
class moon{ // class for making a moon
  constructor(xm, ym, wm, hm,cm) {
    this.xm = xm; // x coordinate of moon
    this.ym = ym; // y coordinate of moon
    this.wm = wm; // width of moon
    this.hm = hm; //height of moon
  }
  
  draw() {
    // drawing the moon itself with craters 
    fill("lightgrey");
    ellipse(this.xm, this.ym, this.wm, this.hm);
    noStroke();
    fill("#adadad");
    ellipse(this.xm + 20, this.ym-10, this.wm/5, this.hm/4);
    ellipse(this.xm -15, this.ym+10, this.wm/5, this.hm/4);
    ellipse(this.xm -10 , this.ym-20, this.wm/5, this.hm/5);
    ellipse(this.xm +15 , this.ym+12, this.wm/5, this.hm/5);
  }

}
class Square { // making a class for squares for the orbit 
  constructor(x, y, size, colors) {
    this.x = x; // x coordinate 
    this.y = y; // y coordinate 
    this.size = size; // size of squares
    this.colors = colors; //color of square
  }

  draw() { //drawing a square 
    strokeWeight(1);
    fill(this.colors);
    rect(this.x, this.y, this.size, this.size);
  }
}

let squares = []; //array of squares to store them 
let angle = 0;
let angleStep = 5;
let radius = 1;
let xoffset = 0;
let yoffset = 0;


let moon_obj = new moon(200,200,75,75,100,200); //making a moon with the help of a moon class


function setup() {
  createCanvas(400, 400);
  frameRate(50);
  //making the orbit with squares which are very tiny and using sin and cos functions to make them move in a particular motion
  for (let i = 0; i < 1000; i++) {
    let x = width/2 + radius * cos(angle);
    let y = height/2 + radius * sin(angle);
    let size = 2;
    let colors = (random(200), random(200), random(255));
    squares.push(new Square(x, y, size, colors));
    
    angle += angleStep;
    radius += 0.01;
    
  }

  // to make stars which appear upon clicking on the canvas
  for (let i = 0; i < 50; i++) {
    stars[i] = {
      x: random(0, width),
      y: random(0, height)
    };
  }
}

function draw() { // displaying my creative idea of a moon with an orbit 
  if(star==false)
  {
     background(0);
  
  for (let i = 0; i < squares.length; i++) {
    squares[i].x = squares[i].x + xoffset + sin( frameCount*0.01+i*0.1);
    squares[i].y = squares[i].y + yoffset + cos(frameCount * 0.05 + i * 0.1);
    squares[i].draw();
  }
   moon_obj.draw();
  }
  
  
  else // if clicked displaying moon as imagined by many
  {
     background(0);
  moon_obj.draw();
fill("white");
  for (let i = 0; i < 50; i++) {
    ellipse(stars[i].x, stars[i].y, 1, 1);
  }
  }
 
 
}


function mouseClicked() {
  
  if(star==false)
  {
    star =true;
  }
  else
    star =false;
}

Reflection / Future Improvements:

The project was really fun to work on as I learned how to deal with classes and arrays. Making the entire thing function was hard and took a lot of time to understand the concept better. The code creates a beautiful representation of a moon with rings similar to that of Saturn. The code uses classes for the moon and the rings to make it organized and reusable. The rings are created using a series of small squares that are animated in an orbital pattern around the moon. The use of sin and cos functions adds a touch of realism to the motion of the rings. Additionally, the user can toggle between a starry night sky or a moon with rings with a single mouse click.

However, there are a few areas for improvement in this code. First, the color scheme of the moon and the rings could be made more dynamic by using random colors or a gradient effect. Second, the stars in the starry night sky could be made better to make it look more realistic. Lastly, the motion of the rings could be made more dynamic by adding an acceleration or deceleration effect. These improvements would enhance the overall look and feel of the code and make it even more visually appealing.

Assignment 3: Tetris


This program’s code carries out a straightforward falling-blocks game.

In order to avoid colliding with other blocks or the canvas’s bottom, the user must use the arrow keys to move the blocks to the right or left as they constantly fall from the top of the canvas in this piece of art. A block becomes a permanent block and a new block begins to fall when it collides with another block or reaches the bottom of the canvas. The game continues until all of the blocks have reached the top of the canvas or until it becomes impossible to construct new blocks because they would clash with existing ones.


A class called “Block” and numerous functions make up the code. The class is used to specify each block’s characteristics and behavior. When the game first begins, the canvas is initialized and the first block is started by using the “setup” method once. The lines of the matrix are drawn on the canvas via the “matrix” function. The “draw” function is used repeatedly in a loop to update and depict the game’s current state. The location of the falling block is updated using the “updateFallingBlock” function. All the blocks on the canvas are drawn using the “drawAllBlocks” function. A new block is created via the “startNewBlock” function. When the user taps an arrow key to move the falling block, the “keyPressed” function is invoked. If the user clicks the mouse to restart the game after it has ended, the “mouseClicked” method is invoked.

The main issue is that blocks may sometime collide with each other when the keys are pressed. The part of checking if there is a block already placed adjacently was a bit complicated. This is something I can work on in the future. Another issue is that there is no method to record the score or the time in the game. It is not too complicated to add the scoreboard, but I decided to focus on the OOP mainly on this Assignment.

Majid Week 3 – SURVIVE

Concept:
My concept this week is “SURVIVE”. It is an interactive video game in which the player is a triangle located at the cursor and the objective is to avoid incoming projectiles RGB colored projectiles. The text at the top includes a timer and a health counter. The timer is 30 seconds long, if the user survives for the amount of time without losing all his/her health the game displays a “MISSION ACCOMPLISHED” page. If the player loses all his Health before the timer runs out then the game will display a “GAME OVER” screen.

Embedded:

Code:

In this week’s assignment, I had  2 main issues, which were keeping track of time and managing the projectile collision.  The first snippet is the method I used to keep track of time. I discover a setinterval() function in js which allows the user to set a specific amount of time in order to increment, which I set to 1000 ms or 1s. I created another function that counts down the timer and displays a console message when the timer ran out for debugging purposes. I then used the timer variable to dictate what happens in the game.

The collision aspect was interesting because it requires precision or else the player experience for the game would not be great.  I created 2 functions that calculated the triangle area and checked whether the inputted coordinates are within that triangle. In order to make this work for the cursor triangle, I inputted the coordinates of 3 points surrounding the cursor which combined make up a triangle. This allowed me to get precise collision detections for the triangle which is located on the cursor.

Future Improvements:
There are quite a lot of improvements that can be made to this assignment. For example, I can add different levels which scale in difficulty. The difficulty would be dictated by the speed of the incoming projectiles as well as the number of them. Another way is to have the speed of the projectiles scale with the timer, and there would be a points system based on the timer as well. This setup is similar to how the classic game Tetris works in which the longer the player lasts the higher their score. Adding sound effects would also enhance the player’s overall experience as well. This assignment has the potential to be a fully-fledged game in the future.


HW3: Generative Art using OOP

CONCEPT

I was inspired by the Solar System, specifically by Saturn. I wanted to draw a planet in the night sky, however, I don’t really know how to do smooth gradients and complex coloring in p5.js, so instead, I took the shape of one of the most easily recognizable planets to create my own version of it.

30k+ Saturn Pictures | Download Free Images on Unsplash


IMPLEMENTATION

My sketch may not look too complicated, but it took me a long time to figure it out. The main challenge was “filling” the body of the planet with parallel lines. I thought that I could imitate volume by drawing a circle out of parallel ellipses. However, I didn’t know how to make them change their width in a smooth way so as to form a circle (look at the reference image below). I have tried checking the coordinate ranges with if-statements and manipulating X points of the ellipses there, but it didn’t quite behave as I expected it to. I then moved on to using lines instead, expecting that it could be easier to implement, which it was, but it took me at least 10 minutes of staring at the screen expecting to recall something useful from math classes. The answer to my question was the Pythagorean theorem, where c^2 = a^2 + b^2. In my case, I have c and a and am looking for b, so the function that I have used to find X_1 and X_2 for a line was:

//use Pythagorean theorem to find point X_n
function differenceOfSquares(num1, num2) {
  let diff = num1 * num1 - num2 * num2;
  return sqrt(abs(diff));
}

My sketch uses two classes to build planet body stripes and planet rings. Sketch elements are drawn in the next order: stars -> planet body -> planet rings -> arc to cover the back side of planet rings -> planet rings. I found it to be the easiest scheme. Planet rings and body rings have random red values in the stroke color, and random stroke weight (0 or 1) to imitate rotation. Planet rings have a wider range of red values than body rings. I figured that it look better this way. On top of the rings, there are floating rocks drawn as points with random stroke weights and coordinates. These rocks make the planet feel more alive and less plain. Rotating the whole thing was easier this time, now that I know that rotate function uses radians and not degrees as I assumed when working on my first homework submission. The frame rate is 8, which is fast enough to feel like the planet is rotating and slow enough to see the details and get overwhelmed by the picture.

639 Slice Sphere Illustrations & Clip Art - iStock
Circle Made Out of Ellipses – Reference Image

ASPECTS TO WORK ON

There is a feeling of movement in the sketch. However, I can’t tell where or how exactly it is moving. Everything is “rotating” at the same time at the same speed, making me feel disoriented. I feel like I could have used Perlin noise for the sky and the planet’s body stripes to make the picture move smoother. I also feel like there could have been some text there because it gives me wall poster vibes but that’s just a thought.

Week 3 – recreating my pattern with classes

For this week we had to use the artwork from last year and incorporate classes into the code. Since I already explained my concept I will write it down very briefly here:

I was inspired to recreate one of the examples shown in class, and I did a series of 4 pieces of art which related to geometric patterns and symmetry as the one below. This one shows a different pattern each time the code is run, hence creating a new piece of art each time.

Since I revised last weeks’ work, there was no difference in the artwork (because that was the intention), there was, however, quite a difference in the code. I am a lot more pleased with the revised code, as it is easier to read and looks cleaner – grouping most of the repetitive things under the class, creating the squares in an array and keeping the setup() function cleaner.

class squareFiller {
  //constructor consists of the x and y coordinates
  constructor(x, y) {
    this.x = x;
    this.y = y;
  }

The constructor is very simple with just the coordinates as attributes.

//the first option of a pattern
  //the x and y coordinates are parameters as they will
  //be determined later in setup()
  //k variable determines how spaced each square will be 
  //from each other
  //the while loop determines the pattern by incrementing 
  //and decrementing respectively each of the variables
  //the rest of the fillers have the same idea but with 
  //different spacing and corners which they approach
  filler1(x, y) {
    var i = x;
    var j = y;
    var k = 100;
    while (i < x + 60) {
      square(i, j, k);
      i += 10;
      j += 10;
      k -= 15;
    }
  }

This is the first of 12 similar filler pattern functions.

randomizer() {
    let num = floor(random(12)) + 1;

    print(num);
    if (num == 1) {
      this.filler1(this.x, this.y);
    } else if (num == 2) {
      this.filler2(this.x, this.y);
    } else if (num == 3) {
      this.filler3(this.x, this.y);
    } else if (num == 4) {
      this.filler4(this.x, this.y);
    } else if (num == 5) {
      this.filler5(this.x, this.y);
    } else if (num == 6) {
      this.filler6(this.x, this.y);
    } else if (num == 7) {
      this.filler7(this.x, this.y);
    } else if (num == 8) {
      this.filler8(this.x, this.y);
    } else if (num == 9) {
      this.filler9(this.x, this.y);
    } else if (num == 10) {
      this.filler10(this.x, this.y);
    } else if (num == 11) {
      this.filler11(this.x, this.y);
    } else {
      this.filler12(this.x, this.y);
    }
  }

The randomizer function randomly chooses one of the patterns for the square at hand.

//instantiating the objects in the array for
 //each square in the grid
 for(let i = 0; i<601; i+=100)
   {
     for(let j =0; j<301; j+=100)
       {
         arr.push(new squareFiller(i,j));
       }
   }
 //calling the randomizer function for each
 //square in the array
 for(let i=0; i<arr.length; i++)
   {
     arr[i].randomizer();
   }

The setup() function is quite simple, with these lines being the most important as they instantiate the SquareFiller objects in an array, then there is another for loop which calls the randomizer function for each of the objects – hence choosing a pattern for each square in the canvas.

The biggest challenge for me was thinking about how I was going to incorporate a class into this code. But after a bit of pondering and experimenting I decided to create a SquareFiller class, which determined the pattern of each square.

Furthermore, I faced the challenges of writing a class in JavaScript as I had never done that before. To solve this, I referred to the class notes, used the Reference of P5 and the internet and figured everything out.

Week 3 – Object Oriented Programming Art

Concept:

Object Oriented Programming (OOP) and art are two separate concepts to me. I have only ever used it to create games, or different data structures, so when it came to creating art, I was in an art block. Since OOP is extremely useful when it comes to motion of objects and graphics on the screen, I was immediately drawn to something dynamic. But what? Since all of my friends are taking Foundations of Science, I am continuously surrounded by physics. This month, the topic was circular motion. When I think about circular motion, I think about rotation and revolution of celestial bodies. Hence, for this week’s project, I have created a small work that depicts the motion of planets (Mercury through Neptune sorry Pluto 🙁 ) around the Sun.

The Solar System 

Link: https://editor.p5js.org/ajlasacic/full/GIWVhC73H

Challenges:

To start off, circular motion was hard to think about when working with OOP. Since I was working with many orbits, it was a struggle to spread them adequately across the screen. The model is obviously scaled down, it is an artistic representation of the system, but managing the distances between the planets and setting up the asteroid belt was really tricky and took some fiddling to get right.

  this.display = function () {
    fill(this.color);
    ellipse(this.x, this.y, this.radius);
  };
}

// Move objects in a circle by updating the angle
move() {
  this.x = this.xPos + this.distance * cos(this.angle / this.speed);
  this.y = this.yPos + this.distance * sin(this.angle / this.speed);

  this.angle++;
}

The asteroid belt was another point of concern. I wanted to contain it in one place, so that it can be considered one object. Although I could have just used for loops outside of the code, I created another class which made it easier to control the specific parameters of the belt such as the size and number of circles.

// Asteroid belt 
class Belt {
  constructor(m, n) {
    // Number of belts
    this.n_belts = m;
    
    // Number of asteroids in belt
    this.n_rocks = n;
    
    // Array for storing asteroid objects
    this.beltArray = [];
  }

  // Produces a 2d array - this.beltArray[] 
  add_asteroids() {
    for (let i = 1; i <= this.n_belts + 1; i++) {
      let belt = [];
      for (let j = 1; j <= this.n_rocks; j++) {
        belt[j] = new Celestial(
          width / 2,
          height / 2,
          random(2, 4),
          i * (start - 10) + 170,
          j * 130 + i * random(10, 15),
          random(12.5, 37.5) * rotation,
          random(100, 200)
        );
      }
      this.beltArray.push(belt);
    }
  }

  // Displays each meteor by calling Celestial
  display_meteors() {
    for (let i = 1; i <= this.n_belts; i++) {
      for (let j = 1; j <= this.n_rocks; j++) {
        this.beltArray[i][j].move();
        this.beltArray[i][j].display();
      }
    }
  }
}

Unfortunately, when I came to that point, my code got deleted. In all honesty, it was my fault since I did not save the file once before leaving my workstation. From then on, it took another couple of hours to get back to my original progress, but I was devastated for quite some time because a split second was all it took to lose hours of work.

I was struggling to create the trail effect. In the beginning, I was trying to write more code in order to make it appear behind the celestial object. In the end, I realized that if I decrease the alpha of the background, a nice trail should be left behind by the celestial objects.

// Opacity can change for trail effect of moving objects
  background(0,0,0, opacity);

Finally, in order to introduce some creativity, I wondered whether an orbit can be drawn for each planet. For some time I tried to create it within the class, but since my Belt class creates instances of the Celestial class, it would make an orbit for each asteroid as well. I settled for creating a separate orbit() function that uses the start variable to size the orbits. Unlike C++ I could not make getter functions, so I could not extract radii for the planets which is why I ultimately could not make everything resizable .

function orbits() {
  // Sun glow
  for (let i = 0; i < 50; i++) {
    fill(241, 93, 34, 3);
    ellipse(width / 2, height / 2, i * 1.3);
  }
  
  noFill();
  stroke(255, 255, 255, val);
  ellipse(width / 2, height / 2, start * 4);
  ellipse(width / 2, height / 2, start * 6);
  ellipse(width / 2, height / 2, start * 10);
  ellipse(width / 2, height / 2, start * 14);
  ellipse(width / 2, height / 2, start * 24);
  ellipse(width / 2, height / 2, start * 28);
  ellipse(width / 2, height / 2, start * 32);
  ellipse(width / 2, height / 2, start * 37);
  noStroke();
}

function mousePressed() {
  val = 20;
}

function mouseReleased() {
  val = 0;
}

Reflection

Overall, I am satisfied by the look of the project. I altered some CSS parameters to make the canvas corners rounded which gives a nice effect to the piece. Although we can intuitively realize that this is our solar system, I wished to add more detail to the planets. For example, Saturn’s rings and Earth’s life, i.e., greenery. Unfortunately, since I lost all of my progress and had to trace my steps in order to remake the piece, I was left with little time to try and achieve that. Although I could have created a Saturn class, I wanted to make use of OOP and use one class for all planets. I am very happy with the trail and glow effect I created by utilizing the alpha variable of fill. In the future, I wish to create pieces that are more artistic, perhaps expressionist, but since I am not used to combining art with OOP, I know it will take some time.


Week 3 – (OOP) Emotions

Inspiration & Thought Process:

During the class discussion facilitated by Saamia and Yerk, we discussed various emotions and how they can be depicted through art. As they displayed the brush strokes on the canvas, I could sense the chaos and anger that the artist was attempting to express. In class, I argued that digital art could not accurately represent emotions, and thus I disregarded the idea of attempting to recreate a similar artwork. However, while looking for inspirations on the internet I came across this picture:

As soon as I encountered this task, the entire classroom discussion came to mind and I realized I had to challenge myself to determine if digital art could effectively convey emotions just as traditional art can. The challenge then became choosing which emotions to depict. After careful consideration, I chose to depict chaos and sadness, as these emotions best reflected my state of mind over the past four days. The chaos in my project symbolizes the numerous assignments and tight deadlines I was facing, which contributed to a sense of being overwhelmed. Meanwhile, the sadness in my project represents my feelings of homesickness and illness, both of which were constantly present in my thoughts. I wanted to bring these emotions to life in my project, to provide a visual representation of my innermost thoughts and feelings.

Work Process and Code:

To begin, I had to brush up on the basics of Object Oriented Programming and familiarize myself with the syntax differences in p5js compared to other languages. It took me almost two days to figure out the best way to depict my emotions. I conducted various experiments, trying out both emotions separately in different p5js files and adjusting different elements to see what worked best. For the chaos aspect, I created a “Circle” class that took in the x and y coordinates, as well as the diameter, of the circles as parameters. This class also had a display() function that filled the circles with random colors with each iteration of the draw() loop, and then created a circle at the specified location with varying diameters. The update() function in the Circle class updated the x and y coordinates of the circles randomly, based on a specified speed, to display chaotic behavior. In the setup() function, a for loop was used to append a large number of Circle class objects (150 in this case) to an array passing random x coordinates, y coordinates and diameters. The code for the Circle class looked like this:

class Circle //circle class
{
  constructor(x, y, diameter) //pass three parameters to the constructor
  {
    //update the variables that define size and position
    this.x_cord = x;
    this.y_cord = y;
    this.diameter = diameter;
    this.speed = 10;
  }

  display() 
  {
    noStroke();
    fill(random(255), random(255), random(255)); //random colored circles e  every iteration of the draw loop
    ellipse(this.x_cord, this.y_cord, this.diameter, this.diameter); //circles
  }

  update() 
  {
    //update the x and the y value randomly between speed value left and right (or up and down)
    this.x_cord += random(-this.speed, this.speed);
    this.y_cord += random(-this.speed, this.speed);
  }
}

The task of depicting the second emotion proved to be more challenging than the chaos emotion. Initially, the representation of rain appeared flat and the background lacked a gloomy atmosphere. After several hours of research and watching YouTube videos, I discovered the “map()” function, which allowed me to effectively depict the rain droplets as I desired. The process of using Object-Oriented Programming was similar to that of the Circle class. Another array was used to store objects of the “Drop” class. The constructor of the Drop class ensured that each drop had a random x value within the canvas, while the y value of the raindrops was randomly placed above the canvas to create the illusion of actual rain. The “z_coordinate” variable influenced the depth, size, and speed of each raindrop. If the drop was closer to the screen, it appeared thicker, longer, and faster compared to drops that were farther away from the screen. The Drop class looks like this:

class Drop 
{
  constructor() 
  {
    this.x_cord = random(width);
    this.y_cord = random(-500, -50); //this will start at various different locations above the canvas
    this.z_cord = random(0, 20); //this is to add depth effect to the rain
    this.len = map(this.z_cord, 0, 20, 10, 20); //length of the drop will be corresponding to the depth of the drop
    this.yspeed = map(this.z_cord, 0, 20, 1, 20); //the depth will also influence the speed of the drop
  }

  fall() 
  {
    this.y_cord = this.y_cord + this.yspeed; //falling
    let grav = map(this.z_cord, 0, 20, 0, 0.2); //more depth will be less speed
    this.yspeed = this.yspeed + grav;

    if (this.y_cord > height) //when the drops go out of canvas
    {
      this.y_cord = random(-200, -100); //respawn them by changing their y coordinates to above frame
      this.yspeed = map(this.z_cord, 0, 20, 4, 10); //map their speed again depending on the depth
    }
  }

  display() 
  {
    let thick = map(this.z_cord, 0, 20, 1, 3); //thickness also depends on the depth of the rain drop. more depth means less thick drop
    strokeWeight(thick);
    stroke(200, 200, 0);
    line(this.x_cord, this.y_cord, this.x_cord, this.y_cord + this.len); //rain drops are basically lines of different lengths
  }
}

Finally, I combined both classes into one p5js file, included suitable royalty-free sounds, and implemented the feature where clicking anywhere on the canvas changes the song and the emotion. I struggled to create a gloomy background for the second emotion, so I searched the web for an image and set it as the background. To ensure all assets were loaded before the start of the drawing loop, I utilized the preload() function. The final result appears as follows:

CLICK IN THE CANVAS TO CHANGE EMOTION

Reflection:

My viewpoint on representing emotions through digital art underwent a significant transformation after completing this task. I feel like I was able to accomplish most of what I wanted to convey. I am particularly pleased with how the rain droplets turned out, as they required a lot of effort to create a convincing depth effect. I faced some challenges with the audio, where one sound would not stop when the other started playing, but it was eventually resolved. For future assignments, I hope to improve by creating my own original background, instead of using a pre-existing image. I also intended to include a joyful emotion, but I was unable to create a rotating sun with precisely angled triangle rays. Maybe with more practice, I would be able to do that as well. In the future, I plan to continue working on this project to add more emotions such as scared and surprised.

Assignment 3 – OOP

Concept 

Using object oriented programming, I was able to create a piece of art which resembles everyday pressure and stress. Each circle, gets a randomly assigned color from the blue end of the spectrum. This is to symbolize the blues everyone faces every once in a while. Additionally, I wanted to implement something which takes away this pressure and so I did.

Code 

This assignment was tricky to some extent as it was the first time I was facing OOP. However, by revising the class material and looking over online resources along with the p5js Reference, I was able to tackle it. I created a class for the circles and included four arguments in the constructor: x and y coordinates, radius and color.  Then using a for loop, I created a program which assigns a random value to these arguments. This was done by this following code:

// Create 100 circles with random positions, sizes, and colors
for (let i = 0; i < 100; i++) {
  let x = random(width);
  let y = random(height);
  let r = random(10, 15);
  let c = color(random(30), random(70), random(255));
  let circle = new Circle(x, y, r, c);
  circles.push(circle);
}

Additionally, as I wanted to add the option of clearing the canvas and resetting the animation, I wrote an if statement using some of the p5js built in functions. This allowed for the animation to be restarted just by pressing space bar. Following is the if statement I used:

function keyPressed() {
  if (key === "space") {
    circle.reset();
  } 
}

Finally, I was left with the final version of my artwork which can be seen below:

Reflection

For this assignment, I felt like I was not able to fully express my creative thought as I was not familiar with the technical aspect of OOP. However, I am glad I was able to finish it and I am eager to learn more about the implications of OOP in generative art.

Homework 03 – Art with Classes, “The Satanic Donut”

Sketch

Concept

“The Satanic Donut” is a donut that tries to, but can never completely finish creating itself. One way to interpret it is as a display of never-ending conflict, due to its rapidly-moving and constantly-at-odds components of red and black colour.

As classes allow us to create objects where each object can have its own unique behaviour, I got the idea to create an art piece where the entities inside the art piece are the ones creating the art. Therefore, I conceptualised two groups of entities inside my art: ‘leaders’ and ‘followers’. The leaders move around, while the followers follow the leaders. All entities leave a trail of colour as they move around, as if there are many small brushes simultaneously creating the art piece.

The catch is, the leaders never stop moving towards their cryptic destination, while the followers never stop going after them. Thus, the art piece can never truly finish drawing itself.

Code highlight

A particularly interesting part of the code is the logic that enables each follower to ‘steer’ towards a leader. The followers don’t instantly turn in the direction of their target, but instead perform a smooth turn.

steerTowardsTarget() {
  // Update velocity to point towards the target.
  // However, use a 'steering' effect so the follower does not instantly turn
  // towards the target, but instead gradually turns.
  if (this.target == null) {
    return;
  }
  
  // v here is a vector pointing towards the target, with its magnitude being
  // how far we have to move.
  let v = this.target.pos.copy();
  v.sub(this.pos);
  
  if (v.mag() <= this.speed) {
    // We have reached the target.
    this.velocity = v.copy();
  } else {
    // Make v have a magnitude of our speed.
    // It is still pointing towards the target.
    v.normalize();
    v.mult(this.speed);
    // Make v be the vector from the tip of our current velocity
    // to the tip of the vector pointing towards the target.
    v.sub(this.velocity);
    // Multiply v by a constant to make its effect less pronounced.
    v.mult(STEERING_CONSTANT);
    // Add v to our velocity, to partially change velocity towards our target.
    this.velocity.add(v);
  }
}

The explanation for how this works requires a bit of math knowledge, but this video explains it very well, starting from 50:27. This is where I found out about this concept.

Reflection

The concept of an art piece drawing itself using several small brushes is very interesting and is worth exploring more deeply. Namely, one could devise many different classes of entities, each of which moves in its own unique way or pattern. With every small modification, just running the simulation could create something you never expect.