
Inspiration
The assignment required us to play with basic shapes in p5.js and explore around to design a self-portrait. I wanted to add some creativity to the self-portrait so I began with the process of ideation to determine what could be a story behind my self-portrait. I wanted to do something funny.
I stumbled across a number of ideas throughout – including creating a type of animation or using text to create a portrait (but I realized it would go against the spirit of the assignment). But the one that stuck out the most was inspired from an episode of the show Phineas and Ferb – the one where the two brothers carve the face of Candace (their sister) on Mount Rushmore beside the others.
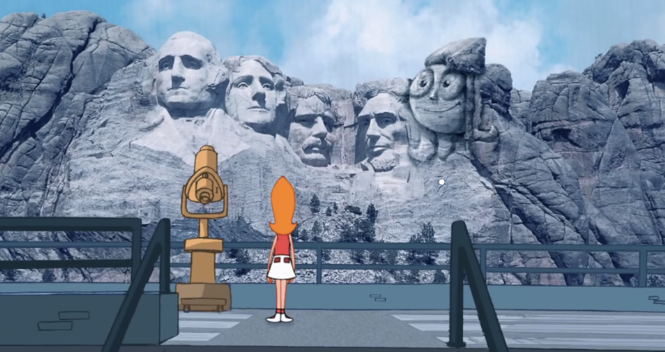 I instantly knew I had to do this. This became the story and purpose behind my self-portrait – To put my face up there on Mount Rushmore!
Project Implementation
I started by importing the picture of Mount Rushmore from Unsplash. To avoid any lag in displaying the image, I preloaded the image in p5 before the setup function.
let bgImg;

function preload() {
  //preloading background image
  bgImg = loadImage(
    "https://images.unsplash.com/photo-1664048322440-7df65ca19151?ixlib=rb-4.0.3&ixid=MnwxMjA3fDB8MHxwaG90by1wYWdlfHx8fGVufDB8fHx8&auto=format&fit=crop&w=1170&q=80"
  );
}
The next steps involved slowly creating different parts of the face. I started out with an overall arc that would act as the outline of the face, went forward to create eyes, made a nose using a triangle, and used more arcs for the smile and the head, ellipses for ears, and circles for the eyeballs. I made sure to follow a definite order in which I added the different features in order to put them layer by layer. A specific piece that I wanted to add to the portrait was hair falling on the forehead, which sort of makes it more similar to me. I placed a triangle near the head to depict this. Then, I went about adding color to the different parts of the portrait. I copied color codes of natural skin tones from schemecolor.com.
Finally, I wanted to give a left tilt to the portrait to match the original design of the mountain and went about rotating all the components by a few radians and then translating their position to bring the portrait to the right place.
function setup() {
  createCanvas(500, 500);
  background(bgImg);

  //to give a tilted feeling
  rotate(radians(3))
  translate(18, -20)

  //ears
  fill("#F1C27D")
  ellipse(405, 276, 20, 30);
  ellipse(315, 276, 20, 30);

  //face
  fill("#FFDBAC")
  arc(360, 250, 100, 240, 0, PI, OPEN);

  //eyes
  fill(color(255))
  ellipse(337, 275, 30, 20);
  ellipse(382, 275, 30, 20);

  //eyeballs
  fill(color(0))
  circle(338, 278, 13);
  circle(381, 278, 13);

  //mouth
  fill("#FFDBAC")
  arc(360, 315, 60, 60, 0 +radians(25), PI - radians(25));

  //nose
  fill("#F1C27D")
  triangle(360, 290, 370, 317, 351, 317);

  //head
  fill(color(0))
  arc(355, 250, 110, 80, PI, 0, OPEN);

  //dropping hair

  noStroke();
  triangle(300, 250, 365, 247, 301, 280);
}
Throughout the process, knowing very specific coordinates was very necessary. For this reason, I used to continuously log the x and y coordinates of my cursor on the console using the draw function and then use those values in creating the different shapes.
function draw() {
  //   useful for finding coordinated on the canvas
  print(mouseX, mouseY)
}
Challenges
Personally, I didn’t face many challenges. There was just one that I would like to highlight. While trying to give the portrait a slight tilt, I used a number of functions before stumbling upon the right one. The ones I used before required the created canvas to be in WebGL format. I wasn’t aware of WebGL and decided against making the portrait more complicated before stumbling across the right function.
Learnings and Reflections
One of the key takeaways I had from an Interactive Media course I took last semester was to question every creative decision and understand its requirement. My thinking while creating this assignment was the same. Why make a self-portrait? What could be the story behind this?
I believe I feel happy with the result I achieved. I didn’t look at this assignment as to just create a self-portrait, but rather to build a story about it and I feel I was successful in creating the outcome I had hoped for. Through the process, I got to explore the basics of p5 and get comfortable working with shapes and images. It was a great learning experience overall.