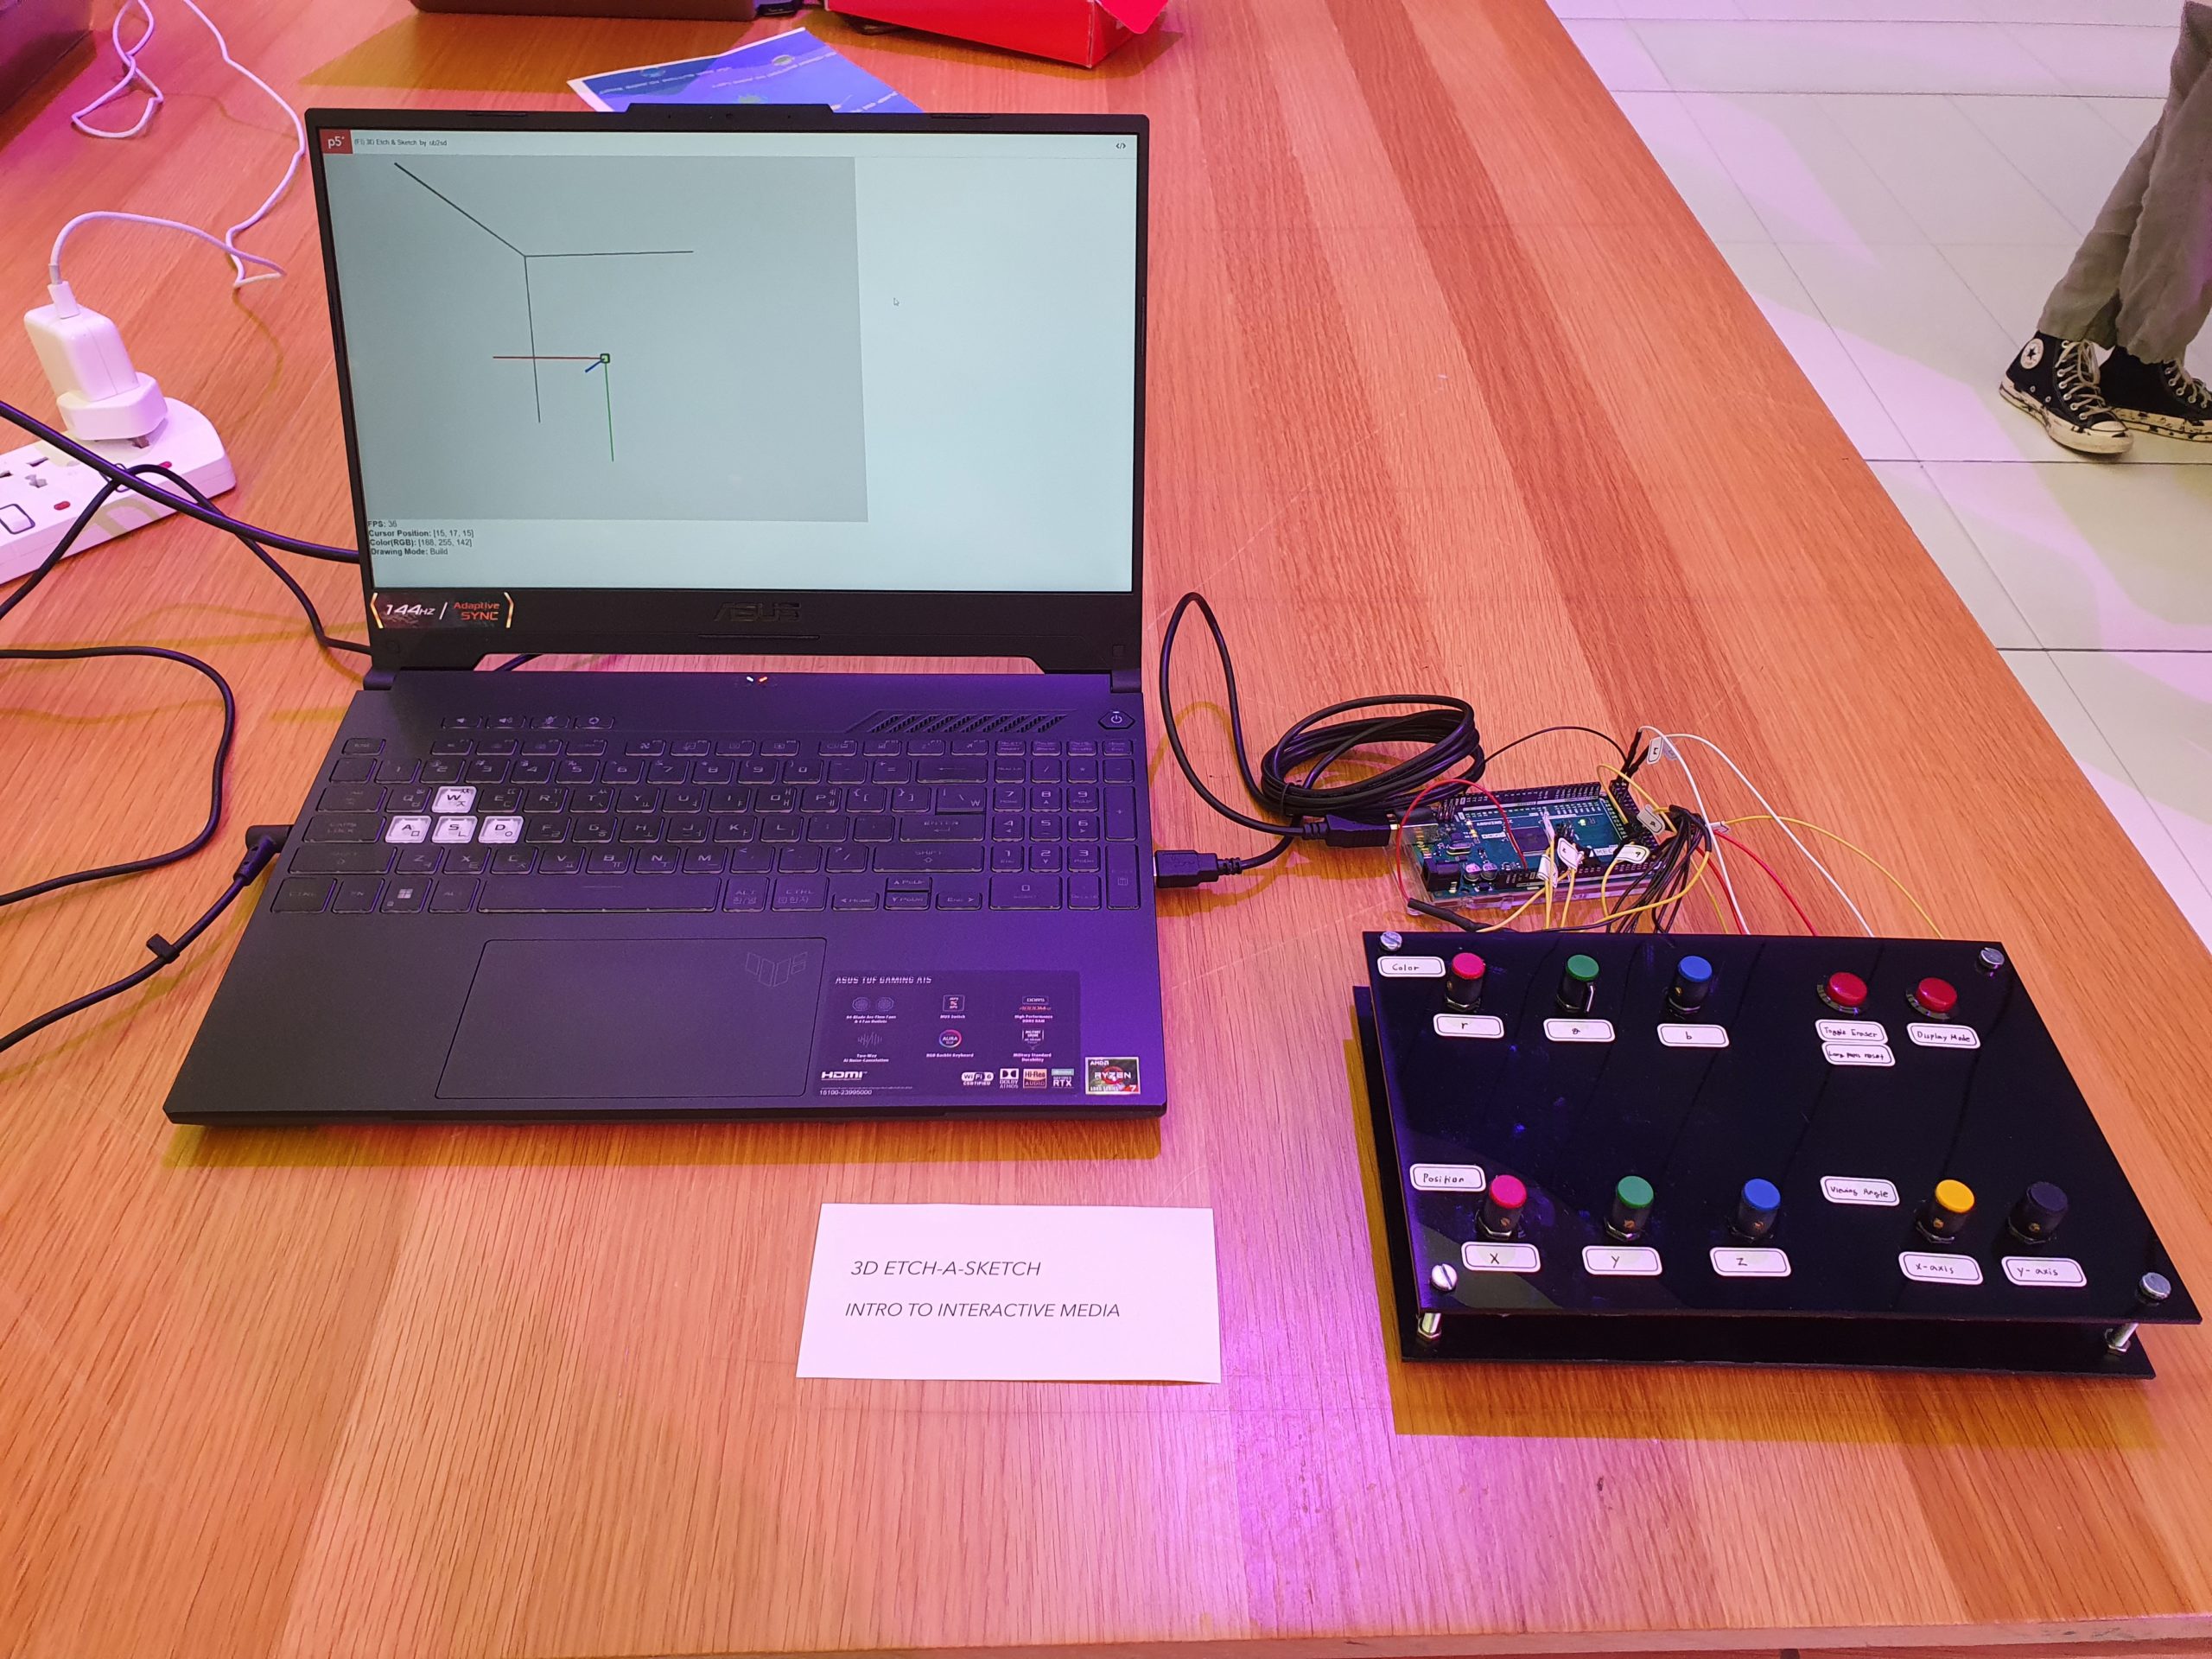
Previously, as a part of the progress, I posted the following video.
The video is recorded using a debug mode, which is controlling interactives with keyboard. My physical component was incomplete to create a user testing video back then.
However, I completed my physical component before the showcase.
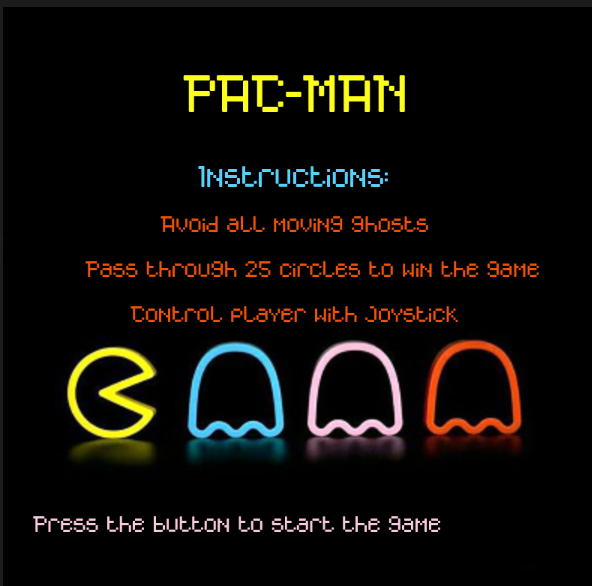
I decided for the final project to design a game that is very similar to the maze action video game, Pacman. Therefore, the main concept of my game is that there is a main character that looks like a green arc who tries to avoid the ghost enemies and eat circles, the more circles the character eats the more points he gets. The player will win the game if he or she can eat fifteen circles before bumping into one of the ghosts. On the other hand, if one of these ghosts catches the player before reaching a score of 15 circles eaten, then the player will lose the game.
I decided to create a game with this concept because I enjoyed playing Pacman as a kid and wanted to explore if I might be able to make a game that is very similar to my favorite childhood game. To make this project even more interesting, I decided to change some of the instructions of the normal Pacman game. If the main player eats a circle, the circle should change colors from yellow to red. Moreover, the main player can eat a circle more than one time.
This design for the game was implemented in my midterm project. For the final project, I decided to add more stuff to this game and make it controllable using hardware devices. Therefore, I created a physical structure that contains the hardware devices which control the Pacman game. These devices mainly include a joystick and a button and you can see the final output in the video below.
Description of Interaction Design
The interaction between the user and the game using hardware was done using mainly a joystick and a button. At first, the user will only see the main menu screen of the game that you can see attached below.
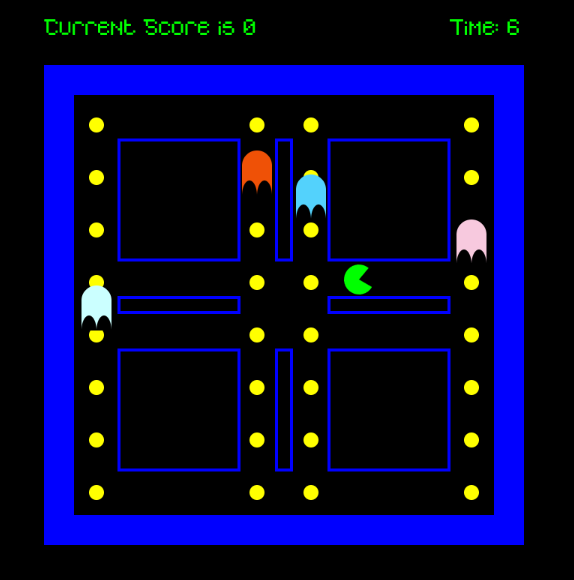
By pressing on the blue button that you can see in the image of the physical structure above, the user can start the game and move to the screen where the play screen of the game that you can see below.
After that, the user can use the joystick to control the motion of Pacman in the game. By moving the joystick to the left PacMan will move to the left, while moving it to the right PacMan will move to the right, by moving the joystick forward PacMan will move up and by moving the joystick backward PacMan will move down. With this control of the PacMan motion the user can play the game easily and smoothly and enjoy one of the most famous classic arcade games. When the user win the game by reaching the score of 255 they will see the following screen
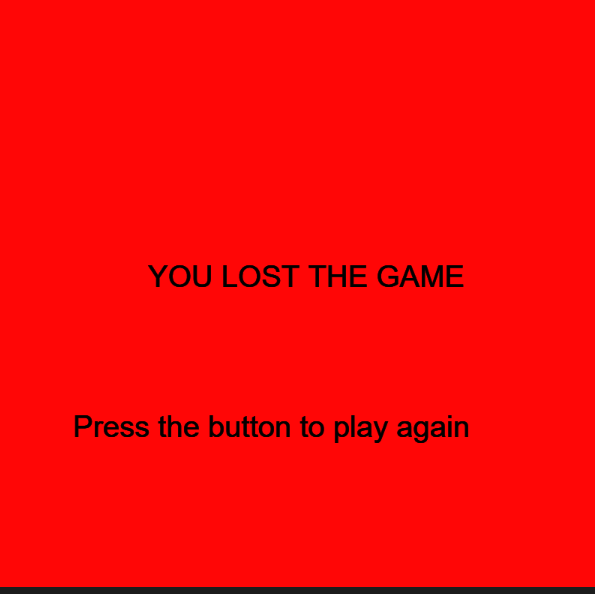
However, when the user loses the game they will see the following screen
By just pressing the blue button the user will be able to restart the game again.
Description of Arduino Code
The Arduino code for my final project is designed to control the joystick and the button in my game. I initialized four different pins that the Arduino code will read based on the inputs from the joystick. This is because the joystick that I am using has five different wires. One wire is connected to the ground while the other four wires are responsible for detecting the motion of the joystick in four different directions, forward, backward, left, and right. Therefore as you can see in this section of my Arduino code I am reading the values of these four different pins in Arduino. I decided to use the pull-up resistor when defining these pins to ensure that the pins are all set to 1 whenever the switch is turned off.
void loop() {

  switchState=digitalRead(12);

  UP = digitalRead(upPin);
  RIGHT = digitalRead(rightPin);
  LEFT = digitalRead(leftPin);
  DOWN=digitalRead(downPin);

  Serial.print(UP);
  Serial.print(',');
  Serial.print(DOWN);
  Serial.print(',');
  Serial.print(RIGHT);
  Serial.print(',');
  Serial.print(LEFT);
  Serial.print(',');
  Serial.println(switchState);
  delay(100); // add some delay between reads
}
Furthermore, I read another value in the Arduino code which is the value of the blue button to determine the state of the switch at any time. After that, I print the values of the four joystick pins as well as the value of the blue button and separate them by commas to send them to p5.js. I added delay between the reads to ensure that there is no unnecessary errors due to fast reads.
Description of P5.js code
The p5.js code contains information about the pacman game. It contains four main states which are the main menu, play state, win and loss states. I showed images of these states above, and to move from one state to another I created a state machine. To come up with the pacman and ghosts in the game I used two different classes. Inside the pacman class I created some functions to draw the pacman, move the pacman and check if the pacman hits any of the boundaries that I draw on the screen.
To create the ghosts in the game I created another class called ghost, in this class I also created functions to draw the ghosts and place them in random positions and move them up and down. I also control the speed of the ghosts in this class. After that, I created a function that detects whenever the pacman hits one of the ghosts to detect when the user is supposed to move to the loss state. I show the code for calling these functions in the playscreen below.
  for (let k = 0; k < 4; k++) {
    ghost[k].moveEnemy();
    ghost[k].checkBounds();
    ghost[k].drawEnemy();
    //check if the main player will hit the enemy
    ghost[k].checkLossState(mainCharacter.xPos, mainCharacter.yPos);
  }
  //draw main character and call different functions of the class
  mainCharacter.drawPlayer();
  currTime = int((millis() - prevTime) / 1000);
  textSize(15);

  text("Time: " + currTime, 300, 30);

  mainCharacter.checkBoundsConditions();
  mainCharacter.movePlayer();
  mainCharacter.eatCircles();
  mainCharacter.displayCount();

  mainCharacter.checkWinningState();
}
Communication between Arduino and p5.js
P5.js should also read 4 different values from arduino which will be the UP position, DOWN position, LEFT position and RIGHT position. If any of these values is zero then in p5.js I will write if statements to move the pacman towards this direction. For instance, if UP is zero then pacman moves towards the up direction.
In addition to this, the p5.js program will read another value from Arduino which will be the current state of the blue button. If the button is pressed, then in the p5.js I can move from one game state to another. For example, if I am in the main menu screen and would like to move to the game screen then I can easily do this by just pressing the blue button.
As a result, in the Arduino part of my project, I will be writing to the serial the 5 different values that I want to send to p5.js which are the four different directions along with the switch state and will separate these values by commas so that they could be easily read in p5.js. I display below the finalized version of my game with sounds implemented in it.
What are some aspects of the project that you’re particularly proud of?
This project especially the hardware and the physical computing part of it was very challenging for me. I spent so much time drilling wood and connecting wooden pieces together, therefore I think that the most challenging part of my project is mainly building the physical structure to house the different hardware devices. Although it was not easy, I am very proud of the result that came out of it because I really like how it looks right now and you can see it in the video that I attached above. Furthermore, I discuss in detail how I came out with this output in my previous post which shows the progress towards my final project.
What are some areas for future improvement?
I believe that I could add more hardware stuff to the game in the future. I would be adding some indicators like LED lights that will display to the user their progress in the game. For instance, if the user needs 25 points to win the game, I will have 5 LED lights and each LED light will light up after the user obtains 5 points. So after the user get the 25 points, he will have the 5 lights all being on.
Furthermore, I would also like to improve more on the software part of the game. This will be done by making the yellow circles disappear when the user goes over them. This will avoid having a glitch in the game where the user can go over the same yellow circle multiple times and still win the game. Overall, I really enjoyed this project and believe that I learned so much from it. I hope I can design more creative things with this knowledge in the future.
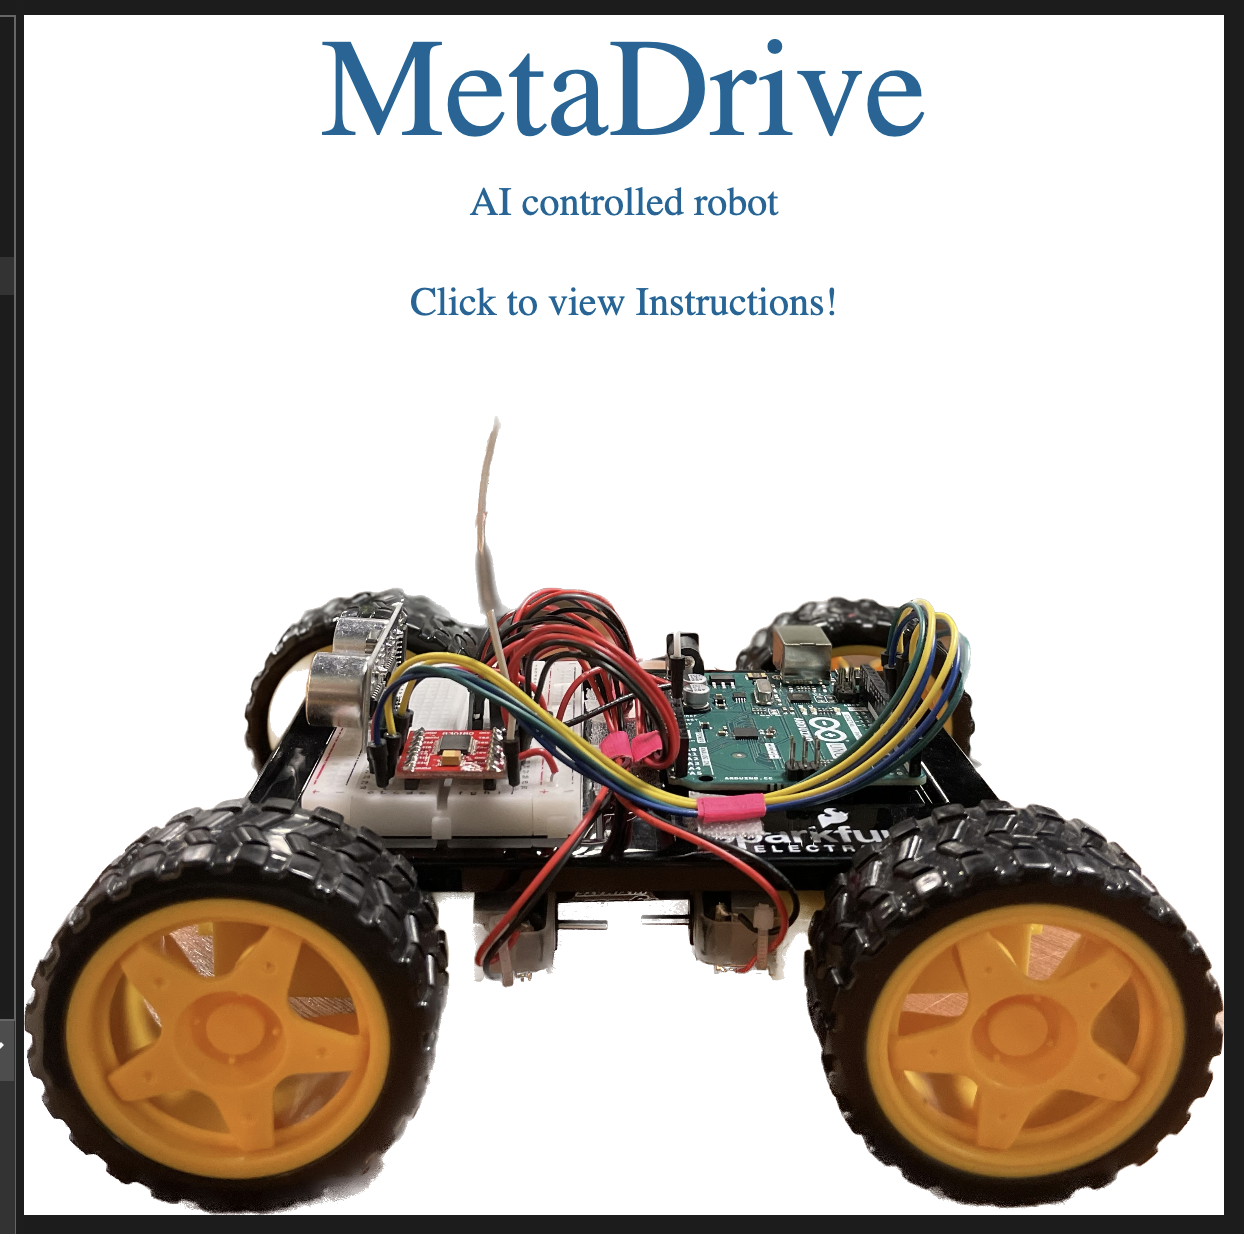
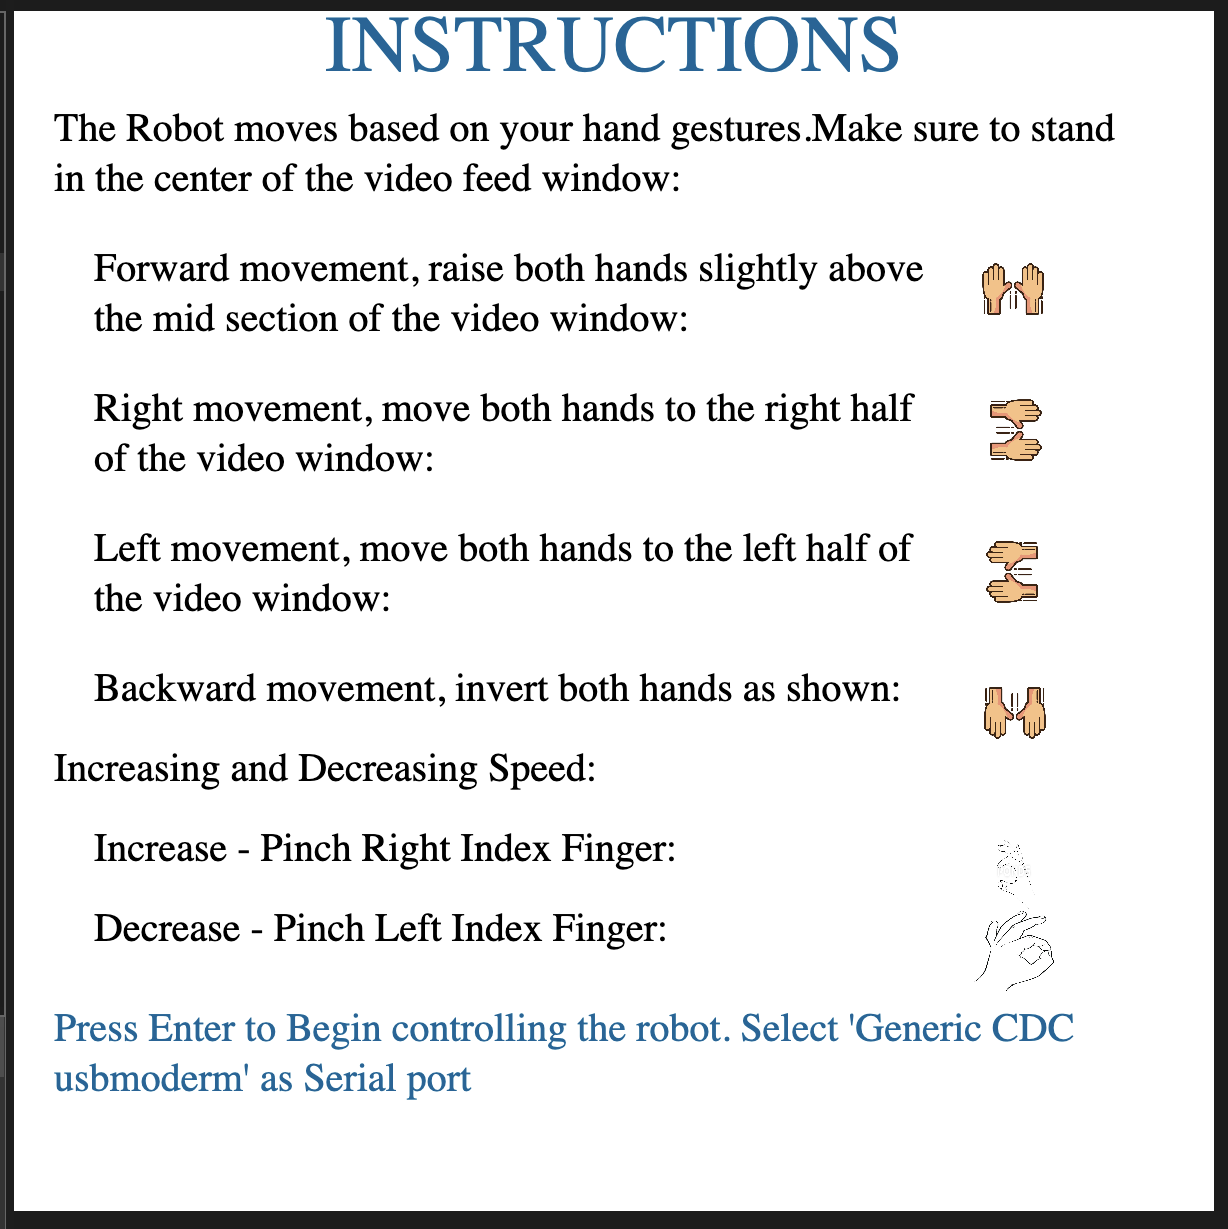
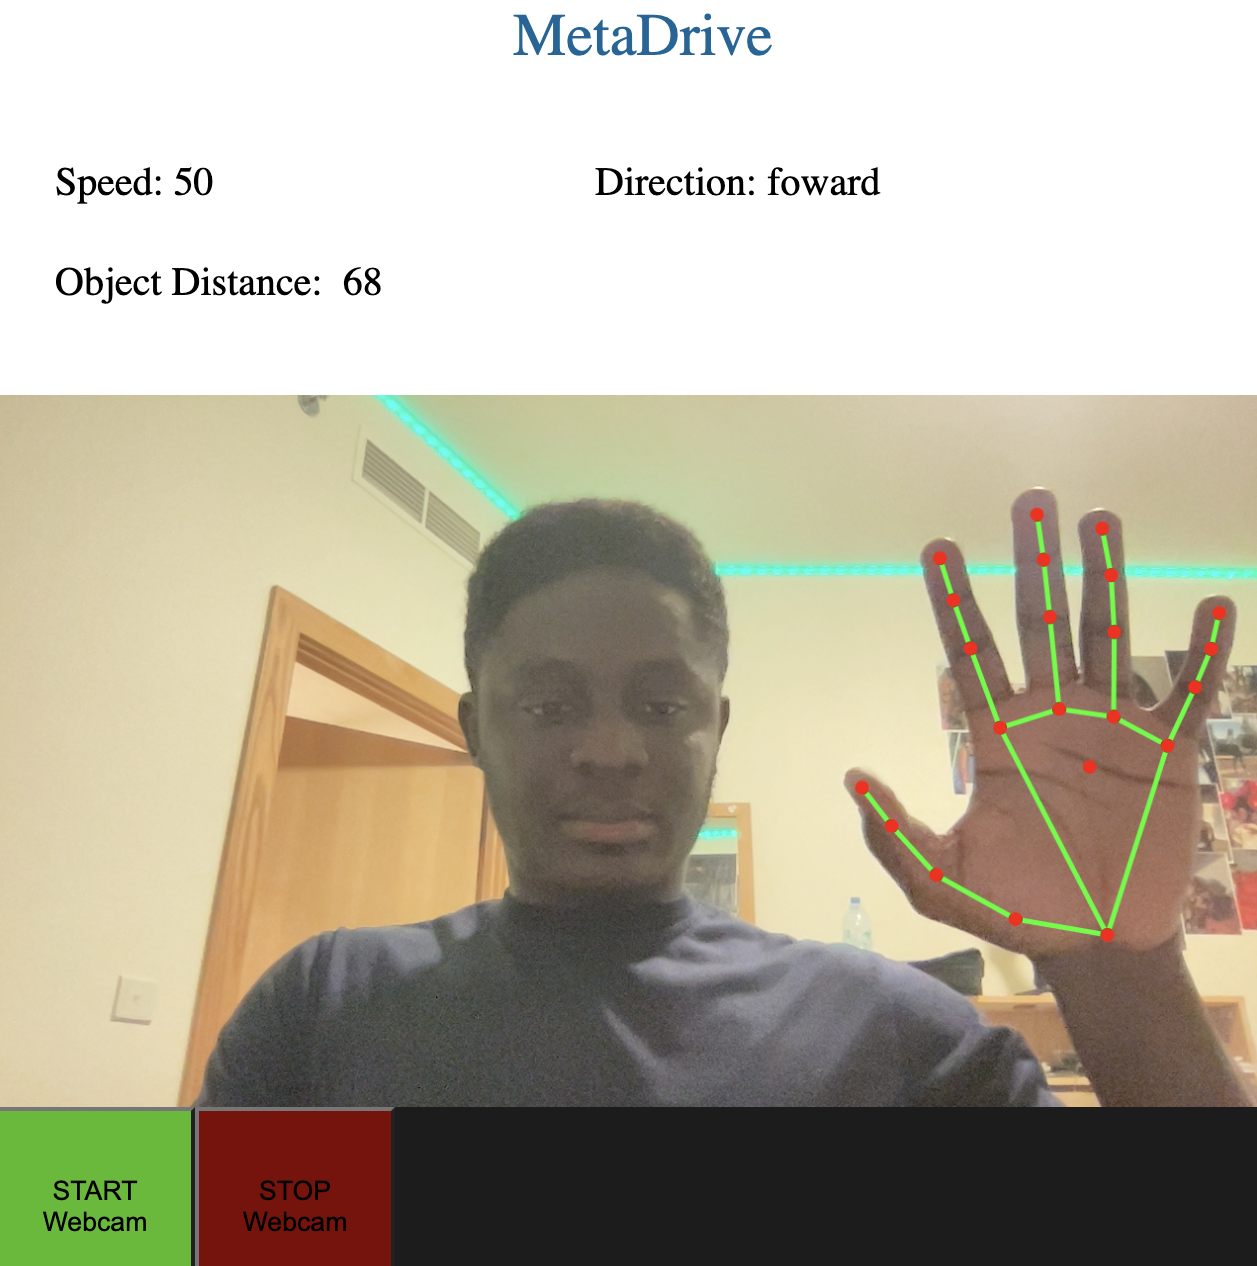
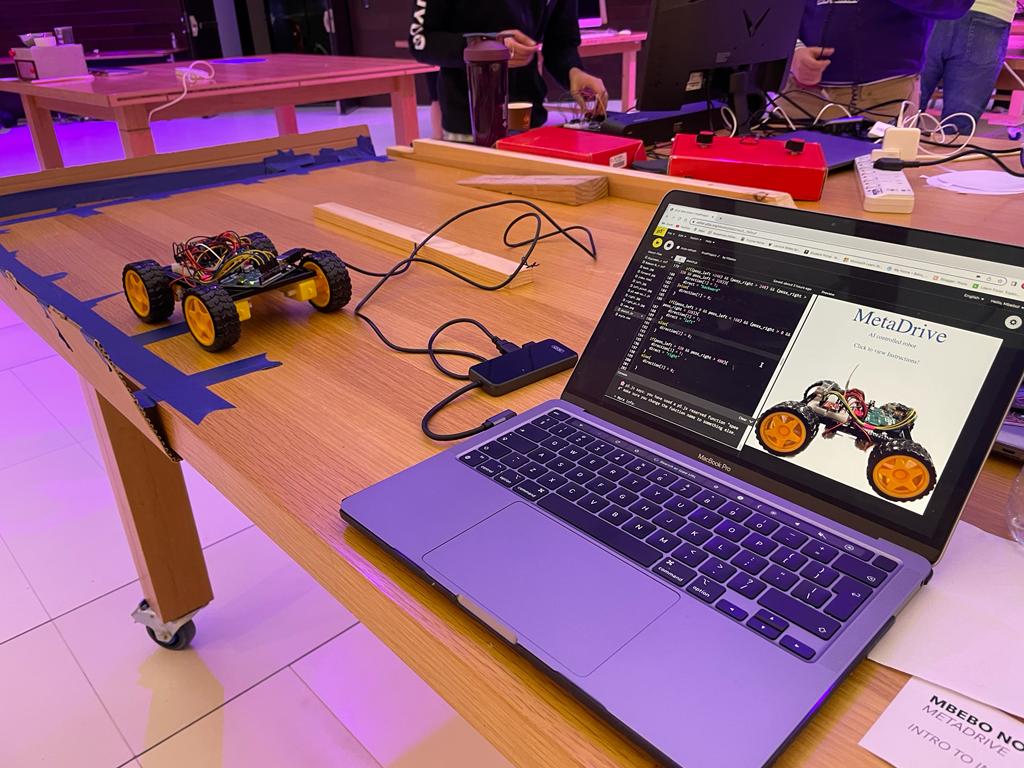
The concept was to use AI to control an arduino robot. Using the machine learning module handsfree.js, I mapped different hand gestures and finger positions to control an arduino robot I created. The arduino robot had 4 DC motors for movement, 1 ultrasonic sensor to measure the distance of nearest obstacles, 1 buzzer and two LED lights.
Interaction Design:
A video webcam feed in p5js maps your fingers and palms, calculates the positions of the two hands and sends the data to arduino. Based on the palm positions, arduino decides whether to move forward, backward, left or right. Arduino calculates the distance between the robot and the nearest obstacle ahead of it and sends the data to p5js, which then displays the distance to you.
Also, by pinching your index fingers in p5js, you’re able to increase and decrease the speed of the DC motors. Anytime your start the webcam in p5js, this sends data to arduino and it plays a sound using the buzzer to signal readiness to receive the data.
Arduino Code:
The arduino code uses two libraries: “NewPing.h” and “TimerFreeTone.h”. The NewPing library makesre using the ultrasonic sensor easy and convenient. The TimerFreeTone also simplifies the use of the tone function and makes working with the buzzer seamless.
The additional header file labeled “pitches.h” contains sounds that are played when arduino is ready to receive data from p5js.
#include "pitches.h"
#include <NewPing.h>
#include <TimerFreeTone.h>

//left_wheels
const int left_ain1Pin = 3;
const int left_ain2Pin = 4;
const int left_pwmAPin = 5;

//left wheels speed
int leftspeedA=200;


//right wheels
const int right_bin1Pin = 8;
const int right_bin2Pin = 7;
const int right_pwmBPin = 6;

//right wheels speed
int rightspeedB=200;


//ditance sensor
const int trig = 9;
const int echo = 10;
const int max = 100;
//distance
NewPing dist(trig, echo, max);
int direct;


//leds
int greenlight = 2;
int redlight = 12;


//state machine for timer
unsigned long previousMillis;
long interval = 1000;

//foward motion function
void forward(){
  analogWrite(left_pwmAPin, leftspeedA);
  analogWrite(right_pwmBPin, rightspeedB);

  digitalWrite(left_ain1Pin, LOW);
  digitalWrite(left_ain2Pin, HIGH);

  digitalWrite(right_bin1Pin, HIGH);
  digitalWrite(right_bin2Pin, LOW);
}

//backward motion function
void backward(){
  analogWrite(left_pwmAPin, leftspeedA);
  analogWrite(right_pwmBPin, rightspeedB);

  digitalWrite(left_ain1Pin, HIGH);
  digitalWrite(left_ain2Pin, LOW);

  digitalWrite(right_bin1Pin, LOW);
  digitalWrite(right_bin2Pin, HIGH);
}

//left motion function
void left(){
  analogWrite(left_pwmAPin, leftspeedA);
  analogWrite(right_pwmBPin, rightspeedB+50);

  digitalWrite(left_ain1Pin, LOW);
  digitalWrite(left_ain2Pin, LOW);

  digitalWrite(right_bin1Pin, HIGH);
  digitalWrite(right_bin2Pin, LOW);
}

//right motion function
void right(){
  analogWrite(left_pwmAPin, leftspeedA+50);
  analogWrite(right_pwmBPin, rightspeedB);

  digitalWrite(left_ain1Pin, LOW);
  digitalWrite(left_ain2Pin, HIGH);

  digitalWrite(right_bin1Pin, LOW);
  digitalWrite(right_bin2Pin, LOW);
}

//stop all movements
void stop(){
  analogWrite(left_pwmAPin, leftspeedA);
  analogWrite(right_pwmBPin, rightspeedB);

  digitalWrite(left_ain1Pin, LOW);
  digitalWrite(left_ain2Pin, LOW);

  digitalWrite(right_bin1Pin, LOW);
  digitalWrite(right_bin2Pin, LOW);
}

//playing christmas themed songs as the car moves
void play(){
  int tempo = 180;
  int notes = sizeof(melody) / sizeof(melody[0]) / 2;

  // this calculates the duration of a whole note in ms
  int wholenote = (60000 * 4) / tempo;

  int divider = 0, noteDuration = 0;
  // iterate over the notes of the melody.
  // Remember, the array is twice the number of notes (notes + durations)
  for (int thisNote = 0; thisNote < notes * 2; thisNote = thisNote + 2) {
    // calculates the duration of each note
    divider = melody[thisNote + 1];
    if (divider > 0) {
      // regular note, just proceed
      noteDuration = (wholenote) / divider;
    } else if (divider < 0) {
      // dotted notes are represented with negative durations!!
      noteDuration = (wholenote) / abs(divider);
      noteDuration *= 1.5; // increases the duration in half for dotted notes
    }
      // we only play the note for 90% of the duration, leaving 10% as a pause
    TimerFreeTone(11, melody[thisNote], noteDuration * 0.9, 10);
  }
}

void setup() {
  Serial.begin(9600);

  pinMode(left_ain1Pin, OUTPUT);
  pinMode(left_ain2Pin, OUTPUT);
  pinMode(left_pwmAPin, OUTPUT); // not needed really

  pinMode(right_bin1Pin, OUTPUT);
  pinMode(right_bin2Pin, OUTPUT);
  pinMode(right_pwmBPin, OUTPUT);

  //leds
  pinMode(greenlight, OUTPUT);
  pinMode(redlight, OUTPUT);

  play();
}


void loop() {
  direct = dist.ping_cm();
  if(direct == 0){
    direct = 100;
  }

  Serial.println(direct);

  //reading values for p5js
  //toggles between 1 and 0 to specify which movement
  int fo = Serial.parseInt(); //controls forward movement
  int ba = Serial.parseInt(); //controls back movement
  int le = Serial.parseInt(); //controls left movement
  int ri = Serial.parseInt(); //controls right movement
  int sp = Serial.parseInt(); //controls speed

  //read the speed from p5js and assign it to the speed of the wheels
  leftspeedA = sp;
  rightspeedB = sp;

  //checking to see which direction to move as per the command from p5js

  if(fo != 0 || ba != 0 || le != 0 || ri != 0){
    //set a time stamp here
    unsigned long currentMillis = millis();

    //calculate interval between and current stamp and previous stamp
    //compare to the set duration (interval)
    long itr = currentMillis - previousMillis;
    if(fo == 1 && itr > interval){
      previousMillis = currentMillis;

      //turn green light on when moving forward
      digitalWrite(greenlight, HIGH);
      forward();
    }
    else if (ba == 1 && itr > interval){
      previousMillis = currentMillis;
      digitalWrite(redlight, HIGH);
      backward();
    }
    else if (le == 1 && itr > interval){
      previousMillis = currentMillis;
      //turn green light on when moving left
      digitalWrite(greenlight, HIGH);
      left();
    }
    else if (ri == 1 && itr > interval){
      previousMillis = currentMillis;
      //turn green light on when moving right
      digitalWrite(greenlight, HIGH);
      right();
    }
  }else{
      stop();
      digitalWrite(greenlight, LOW);
      digitalWrite(redlight, LOW);
  }
}
p5js uses two additional libraries: handsfree.js library and the webserial library. The handsfree.js is a machine learning module that enables detection of the hands, postures and hand movement. The webserial library enables serial communication between arduino and p5js.
let speed = 50;
let distance;

//handsfree module
let running = false;
let once = false;

//forward, back, left, right
let direction = [0, 0, 0, 0];
let direct;

//image
let robo;
let right;
let left;
let back;

//fonts
let rboto;
let header;

//states
let start_state = true;
let instruct_state = false;
let command_state = false;

// This is like pmouseX and pmouseY...but for every finger [pointer, middle, ring, pinky]
let prevPointer = [
  // Left hand
  [{x: 0, y: 0}, {x: 0, y: 0}, {x: 0, y: 0}, {x: 0, y: 0}],
  // Right hand
  [{x: 0, y: 0}, {x: 0, y: 0}, {x: 0, y: 0}, {x: 0, y: 0}]
]

// Landmark indexes for fingertips [pointer, middle, ring, pinky]...these are the same for both hands
let fingertips = [8, 12, 16, 20]

//preload function
function preload(){
  robo = loadImage("robo.png");
  header = loadFont("DiplomataSC-Regular.ttf");
  rboto = loadFont("Roboto-Regular.ttf");
  left  = loadImage("left.jpg");
  right  = loadImage("right.jpg");
  forward  = loadImage("forward.jpg");
  back  = loadImage("back.jpg");
  pinch_r = loadImage("right_pinch.jpg");
  pinch_l = loadImage("left_pinch.jpg");
}


function setup() {
  sketch = createCanvas(windowWidth, 200)

  // Colors for each fingertip
  colorMap = [
    // Left fingertips
    [color(0, 0, 0), color(255, 0, 255), color(0, 0, 255), color(255, 255, 255)],
    // Right fingertips
    [color(255, 0, 0), color(0, 255, 0), color(0, 0, 255), color(255, 255, 0)]
  ]

  // #1 Turn on some models (hand tracking) and the show debugger
  // @see https://handsfree.js.org/#quickstart-workflow
  handsfree = new Handsfree({

    showDebug:true,
    hands: true,
  })
  handsfree.enablePlugins('browser')
  handsfree.plugin.pinchScroll.disable()
  handsfree.update({
    setup:{
      canvas:{
        hands: {
           $el: true,
        width: 400,
        height: 400
      },
      wrap: {
         $el: true,
        width: 400,
        height: 400
      },
       video: {
         $el: true,
        width: 400,
        height: 400
      }
      }
    }

  })

}


function draw() {
  start();
  instruct();
  command();
}


function keyPressed()
{
  if(keyCode === ENTER){
    setUpSerial();
    command_state = true;
  }
}


function fingerPosition () {
  // Check for pinches and create dots if something is pinched
  const hands = handsfree.data?.hands


  if (hands?.pinchState) {
    // Loop through each hand
    hands.pinchState.forEach((hand, handIndex) => {
      // Loop through each finger
      hand.forEach((state, finger) => {
        if (hands.landmarks?.[handIndex]?.[fingertips[finger]]) {

          // Landmarks are in percentage, so lets scale up
          let x = 640 - hands.landmarks[handIndex][fingertips[finger]].x * 640
          let y = hands.landmarks[handIndex][fingertips[finger]].y * 480

          // Set the position of each finger
          prevPointer[handIndex][finger] = {x, y}
        }
      })
    })
  }

  //pinch right left index finger to decrease volume
  if (hands?.pinchState && hands.pinchState[0][0] === 'released') {
    if(speed > 50){
      speed-=10;
    }
  }

  //pinch right index finger to increase volume
  if (hands?.pinchState && hands.pinchState[1][0] === 'released') {
    if(speed < 200){
      speed +=10;
    }
  }

  //pinch right middle finger to play christmas songs
  if (hands?.pinchState && hands.pinchState[1][1] === 'held') {
    christmas = 1;
  }else{
    christmas = 0;
  }


  let posx_right= int(prevPointer[1][1].x);
  let posy_right = int(prevPointer[1][1].y);

  let posx_left= int(prevPointer[0][1].x);
  let posy_left = int(prevPointer[0][1].y);

  if( (posy_right < 150) && (posy_left < 150) && (posx_right > 320 && posx_left < 320) ){
      direction[0] = 1;
      direct = "foward";
  }
  else{
    direction[0] = 0;
    direct = "";
  }

  if((posy_left >240) && (posy_right > 240) && (posx_right > 320 && posx_left < 320)){
    direction[1] = 1;
    direct = "backward"
  }else{
    direction[1] = 0;
  }

  if((posx_left > 0 && posx_left < 160) && (posx_right > 0 && posx_right < 320)){
    direction[2] = 1;
    direct = "left"
  }
  else{
    direction[2] = 0;
  }

  if(posx_left > 320 && posx_right > 480){
    direction[3] = 1;
    direct = "right"
  }
  else{
    direction[3] = 0;

  }

}


function readSerial(data) {
 if(data != null){
   distance = int(data);
 }
  let sendToArduino = direction[0] +"," + direction[1]+"," + direction[2]+","+direction[3]+","+ speed + "\n";
  writeSerial(sendToArduino);
}

function windowResized() {
  resizeCanvas(windowWidth, 200);
}

function sethandsfree(){
  if(running == false){
    buttonStart = createButton('START Webcam')
    buttonStart.size(100, 100);
    let scol = color(76, 187, 23);
    buttonStart.style('background-color', scol);
    buttonStart.class('handsfree-show-when-stopped')
    buttonStart.class('handsfree-hide-when-loading')
    buttonStart.mousePressed(() => handsfree.start())

      // Create a "loading..." button
    buttonLoading = createButton('...loading...')
    buttonLoading.size(windowWidth);
    buttonLoading.class('handsfree-show-when-loading')
      running = true;
  }


  if(running == true){
    // Create a stop button
    buttonStop = createButton('STOP Webcam')
    buttonStop.size(100, 100);
    let stcol = color(128,0,0);
    //buttonStop.position(windowWidth-100);
    buttonStop.style('background-color', stcol);
    buttonStop.class('handsfree-show-when-started')
    buttonStop.mousePressed(() => handsfree.stop())

    running = false;
  }
}

function start(){
  if(start_state == true){
    createCanvas(600, 600);
    background(255, 255, 255);
    image(robo, 0, 200, 600, 400);

    //header
    textSize(70);
    fill(0, 102, 153);
    textAlign(CENTER)
    textFont("header");
    text("MetaDrive", 300, 60);

    //click for instructions
    textSize(20);
    fill(0, 102, 153);
    textAlign(CENTER)
    textFont("rboto")
    text("AI controlled robot", 300, 100);
    text("Click to view Instructions!", 300, 150);

  }
}

function instruct(){
    if (instruct_state == true){
    createCanvas(600, 600);
    background(255, 255, 255);
    textSize(40);
    fill(0, 102, 153);
    textFont("header");
    text("INSTRUCTIONS", 300, 30);
    textAlign(LEFT);
    textSize(20);
    textWrap(WORD);
    textFont("rboto")
    fill(0);

    //movement
    text("The Robot moves based on your hand gestures.Make sure to stand in the center of the video feed window: ", 20, 50, 550, 50);
    text("Forward movement, raise both hands slightly above the mid section of the video window: ", 40, 120, 420, 50);
    text("Right movement, move both hands to the right half of the video window: ",40, 190, 420, 50);
    text("Left movement, move both hands to the left half of the video window: ", 40, 260, 420, 50);
    text("Backward movement, invert both hands as shown: ", 40, 330, 420, 50);

    //speed
    text("Increasing and Decreasing Speed: ", 20, 370, 420, 50);
      text("Increase - Pinch Right Index Finger: ", 40, 410, 420, 50);
    text("Decrease - Pinch Left Index Finger: ", 40, 450, 420, 50);
    fill(0, 102, 153);
    text("Press Enter to Begin controlling the robot. Select 'Generic CDC usbmoderm' as Serial port ", 20, 500, 550, 50);


      //instruction images
      image(forward, 480, 120, 40, 40);
      image(right, 480, 190, 40, 40);
      image(back, 480, 330, 40, 40);
      image(left, 480, 260, 40, 40);
      image(pinch_r, 480, 410, 40, 40);
      image(pinch_l, 480, 450, 40, 40);

      instruct_state = false;
    }
}

function command(){
  if(command_state == true){
    createCanvas(windowWidth, 200);
    if(serialActive){
      background(255);
      textSize(30);
      fill(0, 102, 153);
      textAlign(CENTER)
      text("MetaDrive", windowWidth/2, 30);
      textSize(20);
      fill(0);
      textAlign(LEFT);
      text("Speed: "+ speed, 30, 100);
      text("Direction: "+ direct, 300, 100);
      if(distance < 10){
        fill(255, 0, 0);
      }
      text("Object Distance:  "+ distance, 30, 150);
      fingerPosition()
      if(once == false){
        sethandsfree()
        once = true;
      }
    }
  }
}

function mousePressed(){
  if(start_state == true){
    start_state = false;
    instruct_state = true;
  }
}
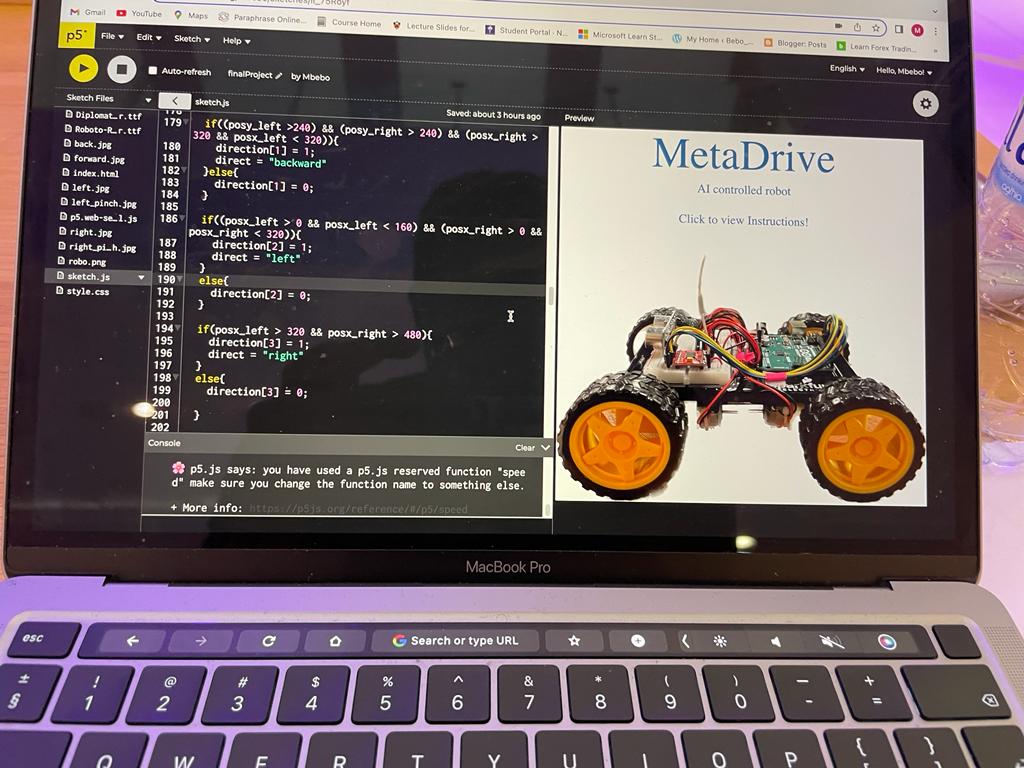
The p5js code has three pages: the start page, instruction page and command page. The three pages move in order based on the events that the user executes. The command page is where the interaction happens between p5js and arduino.
The start page:
The instruction page:
The control page:
Communication between p5js and arduino:
p5js sends 5 integer controls for forward, back, left, right and speed in arduino. Arduino sends the distance measured by the ultrasonic sensor to p5js.
Video Demo:
Project Pictures:
Aspects I’m proud of:
I’m particularly proud of how I drew the hand skeleton, measured the hand gestures and hand positions from the handsfree.js.
function fingerPosition () {
  // Check for pinches and create dots if something is pinched
  const hands = handsfree.data?.hands


  if (hands?.pinchState) {
    // Loop through each hand
    hands.pinchState.forEach((hand, handIndex) => {
      // Loop through each finger
      hand.forEach((state, finger) => {
        if (hands.landmarks?.[handIndex]?.[fingertips[finger]]) {

          // Landmarks are in percentage, so lets scale up
          let x = 640 - hands.landmarks[handIndex][fingertips[finger]].x * 640
          let y = hands.landmarks[handIndex][fingertips[finger]].y * 480

          // Set the position of each finger
          prevPointer[handIndex][finger] = {x, y}
        }
      })
    })
  }

  //pinch right left index finger to decrease volume
  if (hands?.pinchState && hands.pinchState[0][0] === 'released') {
    if(speed > 50){
      speed-=10;
    }
  }

  //pinch right index finger to increase volume
  if (hands?.pinchState && hands.pinchState[1][0] === 'released') {
    if(speed < 200){
      speed +=10;
    }
  }

  //pinch right middle finger to play christmas songs
  if (hands?.pinchState && hands.pinchState[1][1] === 'held') {
    christmas = 1;
  }else{
    christmas = 0;
  }


  let posx_right= int(prevPointer[1][1].x);
  let posy_right = int(prevPointer[1][1].y);

  let posx_left= int(prevPointer[0][1].x);
  let posy_left = int(prevPointer[0][1].y);

  if( (posy_right < 150) && (posy_left < 150) && (posx_right > 320 && posx_left < 320) ){
      direction[0] = 1;
      direct = "foward";
  }
  else{
    direction[0] = 0;
    direct = "";
  }

  if((posy_left >240) && (posy_right > 240) && (posx_right > 320 && posx_left < 320)){
    direction[1] = 1;
    direct = "backward"
  }else{
    direction[1] = 0;
  }

  if((posx_left > 0 && posx_left < 160) && (posx_right > 0 && posx_right < 320)){
    direction[2] = 1;
    direct = "left"
  }
  else{
    direction[2] = 0;
  }

  if(posx_left > 320 && posx_right > 480){
    direction[3] = 1;
    direct = "right"
  }
  else{
    direction[3] = 0;

  }

}
Future Improvements:
I plan to make the communication between arduino and p5js wireless and probably attach a camera to the robot to access the robot arial vision. Another area of improvement is to remodel the robot’s body and 3D print the model.
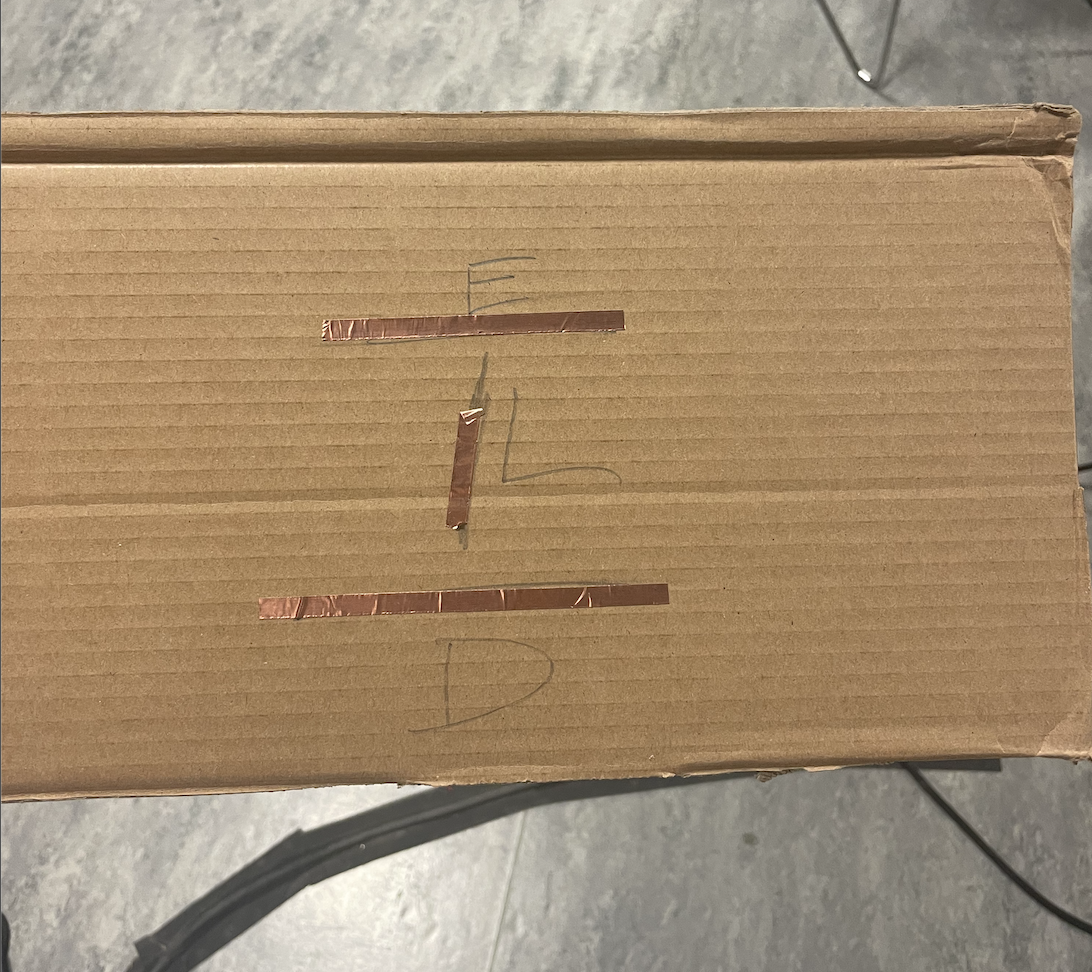
My final is going Really well. I have finally been able to find the right balance of code that i needed thank to the help of Nouf and Jack. i had to add a stop command after every sound to make it not repeat itself
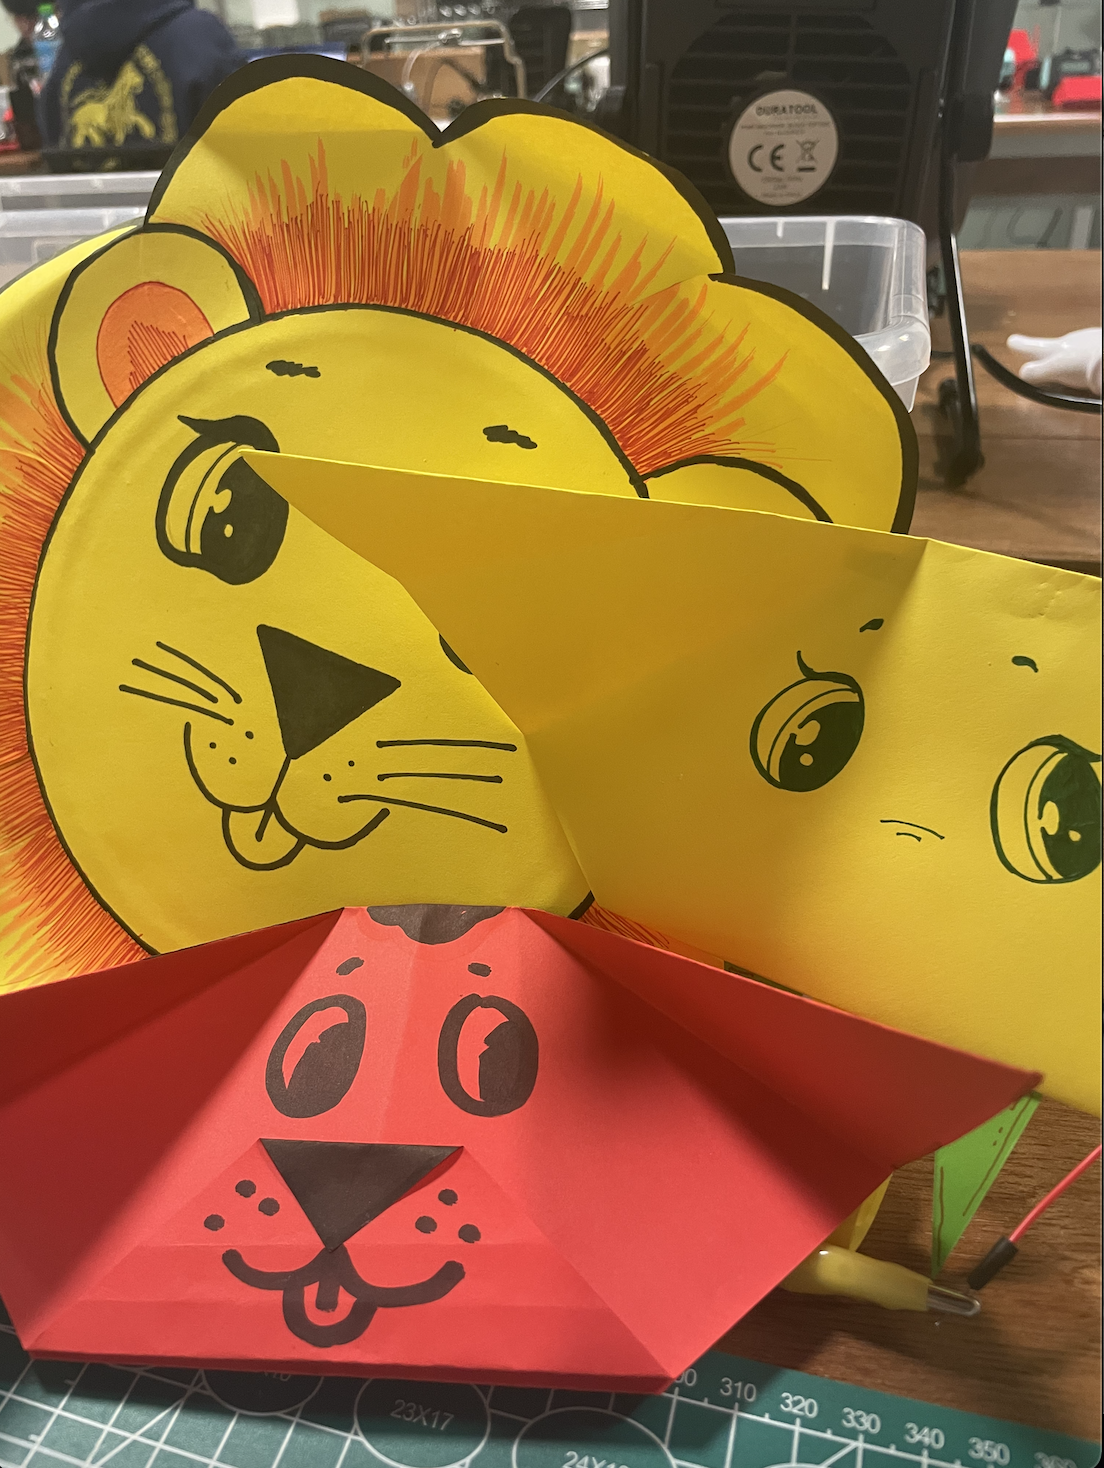
All that i have left is building the actual project which as the professor said was not as easy as i had expected. I started off with a base of cardboard like shown.
I then tested it out with the animals i build
I then spent the whole day on the lab working on my build( special thank to Ahmed the lab assistant) where i made a stage and a platform from my animals to go on. I was unfortunately too focused and forgot to take pictures. I had crocodile clips hanging from the stage but the professor told me to switch it to using nails and have copper tape to complete the circuit.
Work left
I am yet to add the screws and add some design aspect after that i will hopefully be ready to present
The concept of my game is based on the Chrome running dinosaur game, which I adapted for my midterm project. I wanted to learn to work with sprites, so I decided that the pony will be the main theme. For the final, I adapted it more, and when the player jumps physically, the pony will jump on the screen, too.
Implementation
Description of interaction design
The game starts when the player clicks on the mouse and they have to connect the port by pressing the space bar. After that, the player has to jump over the little dragon and earn points by collecting a pink magic box, they have 3 lives. The score and remaining lives are displayed at the top of the screen.
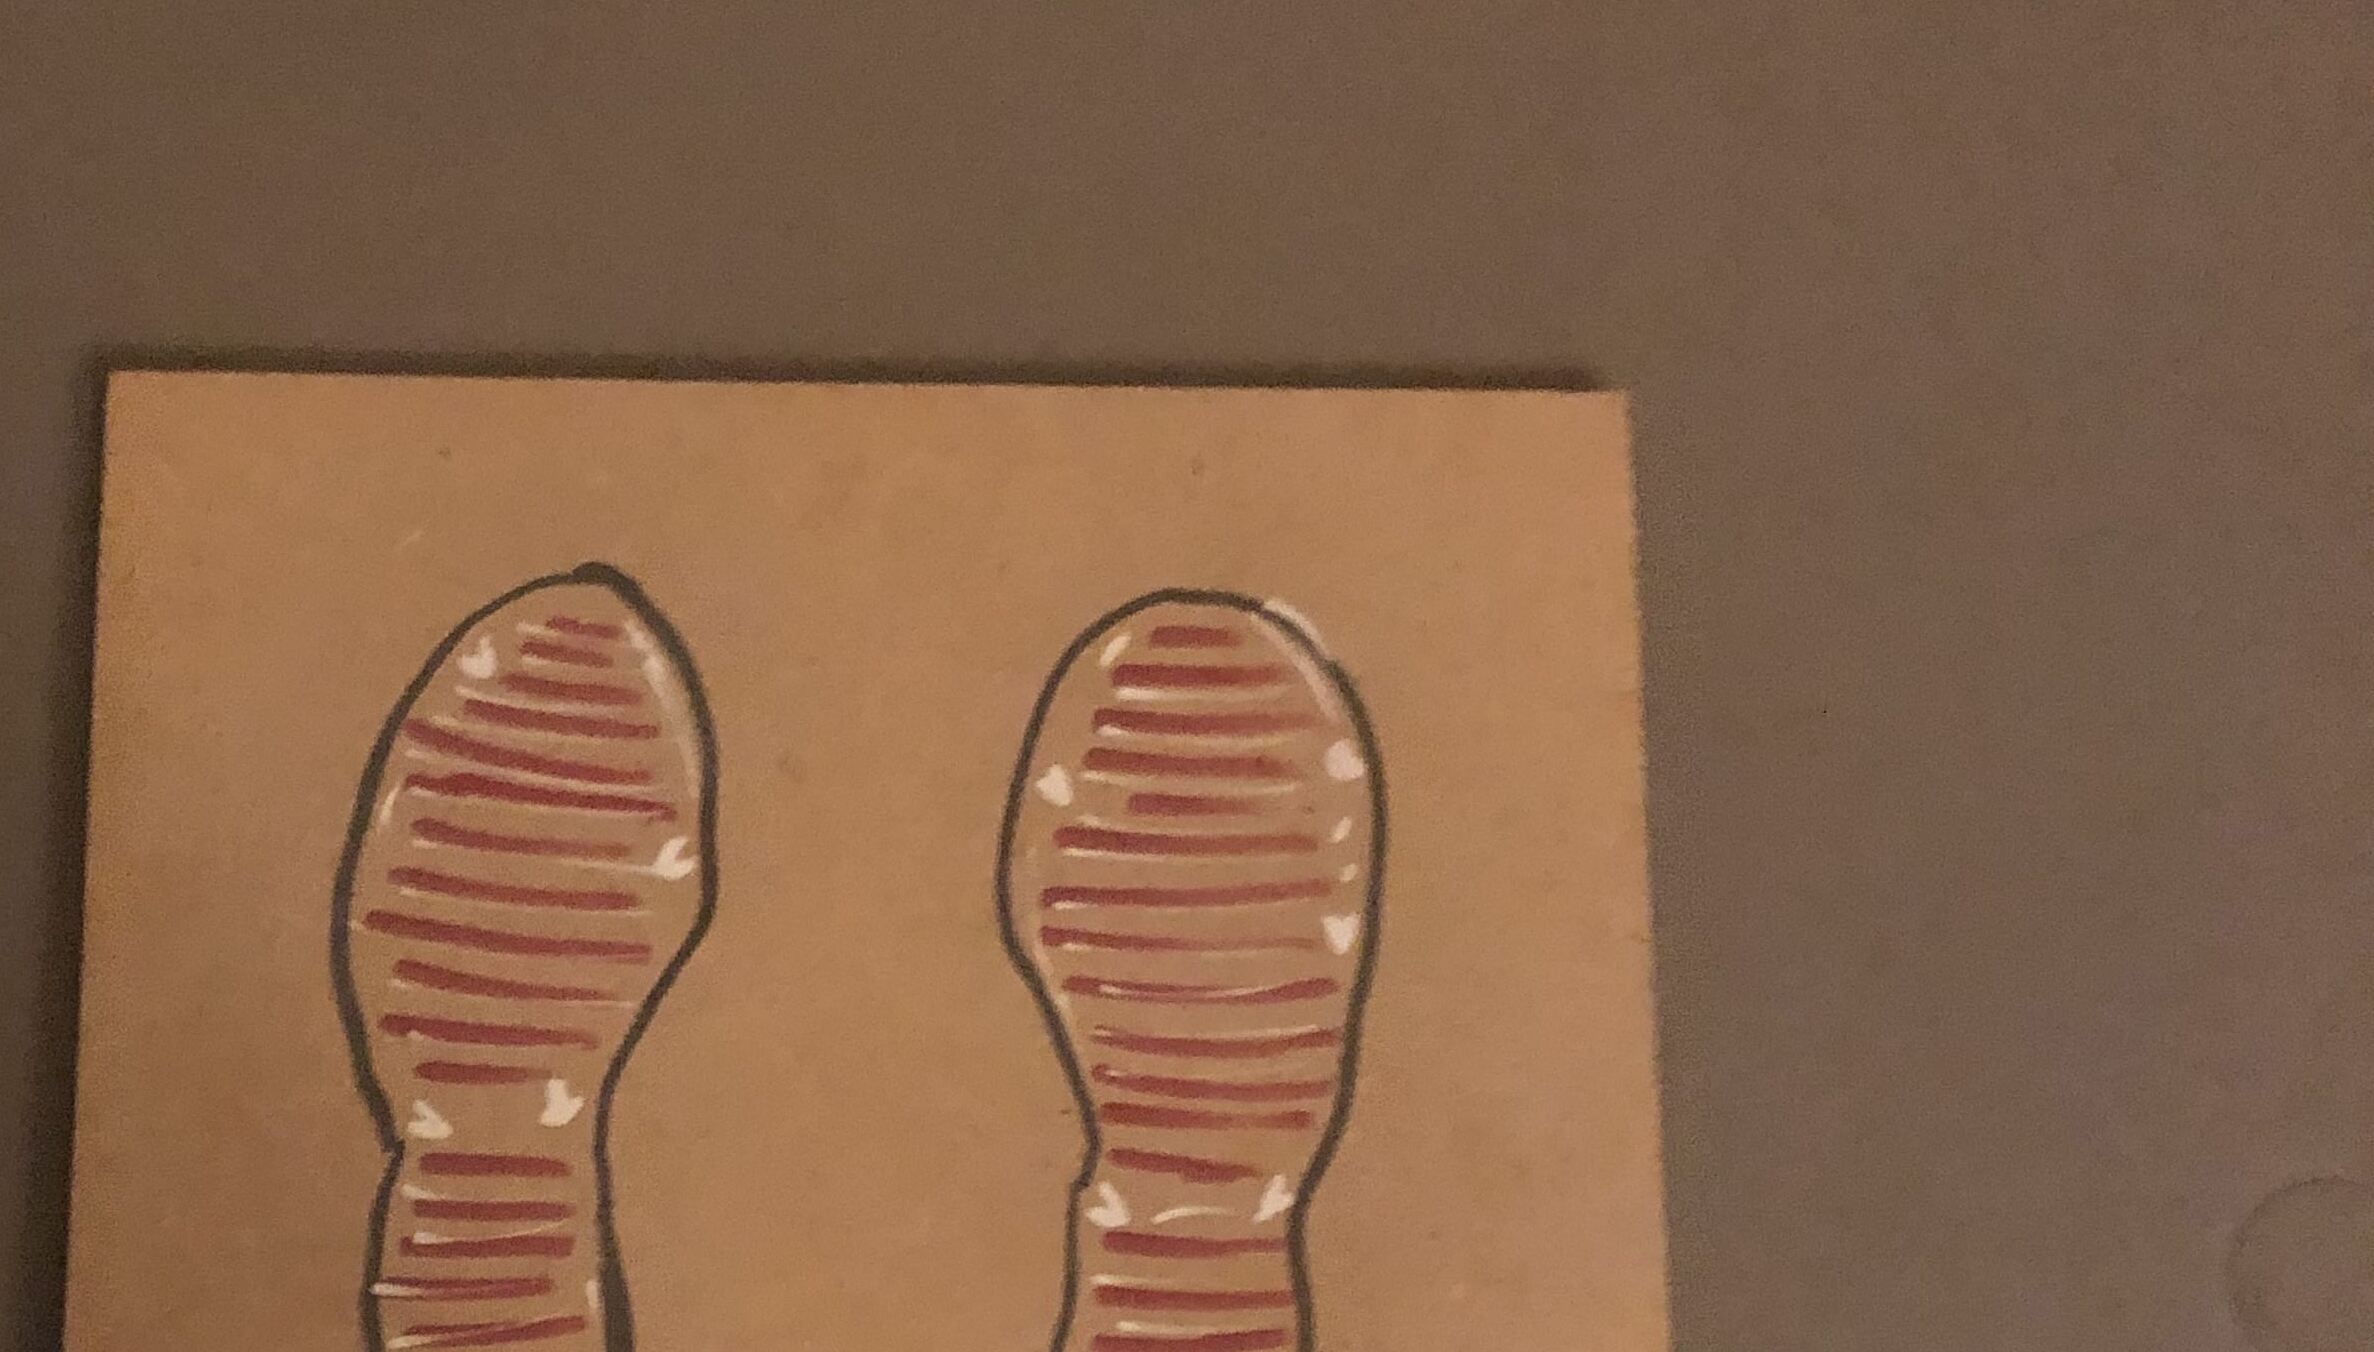
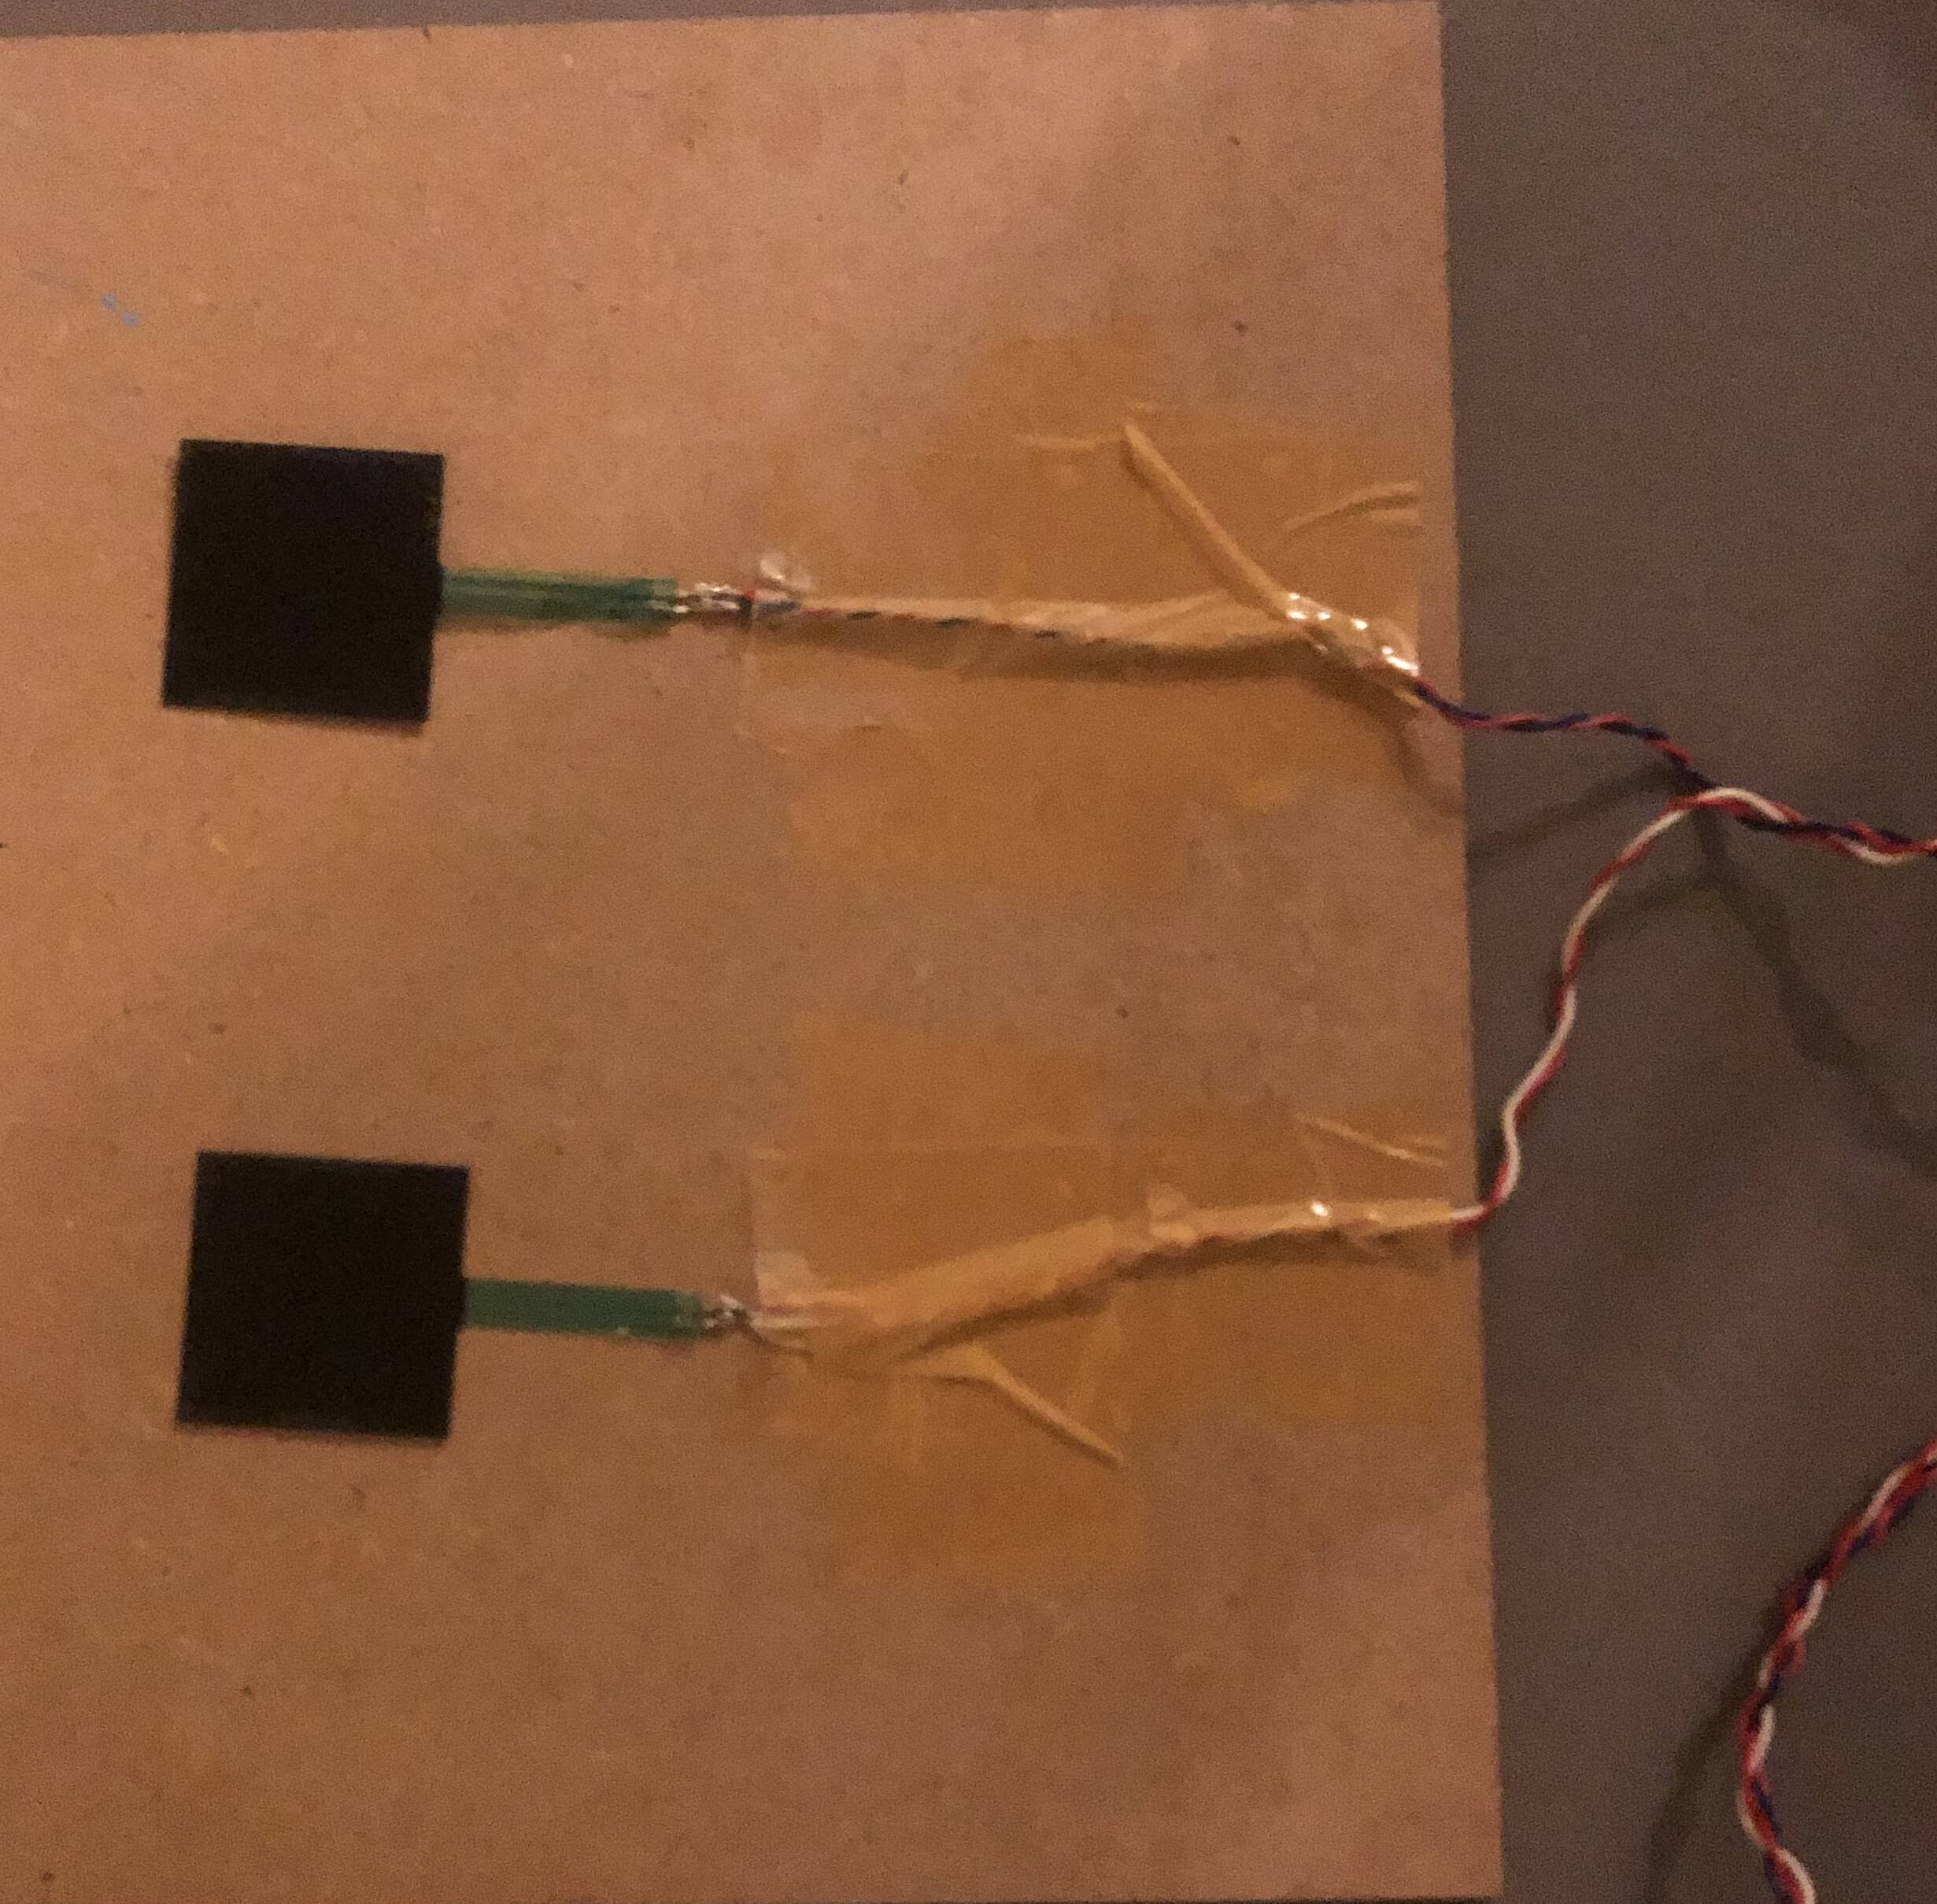
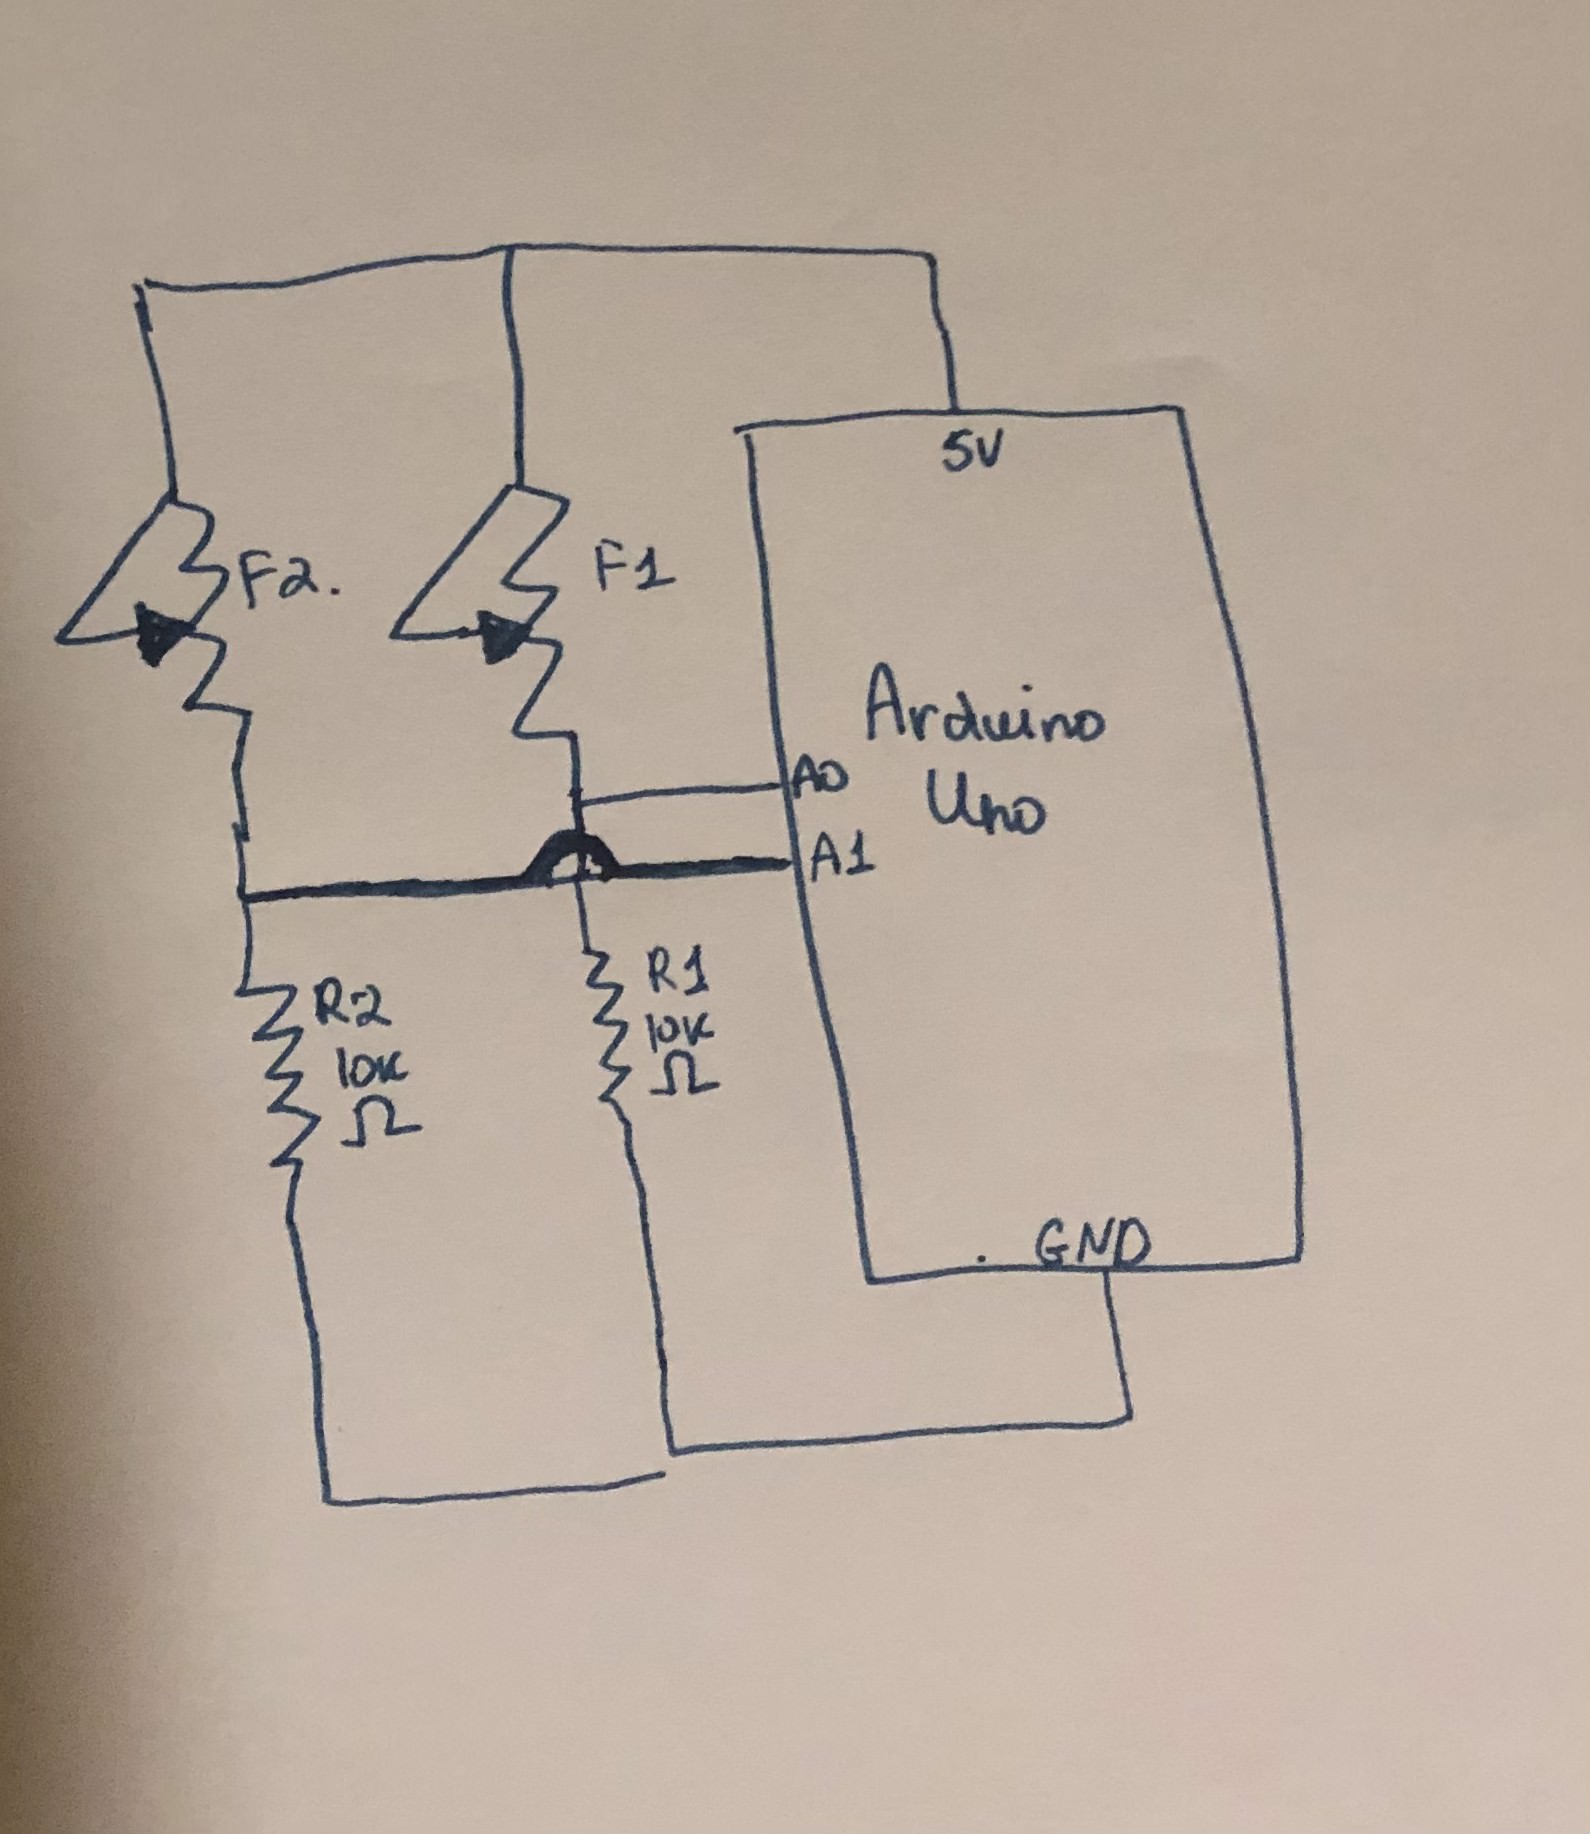
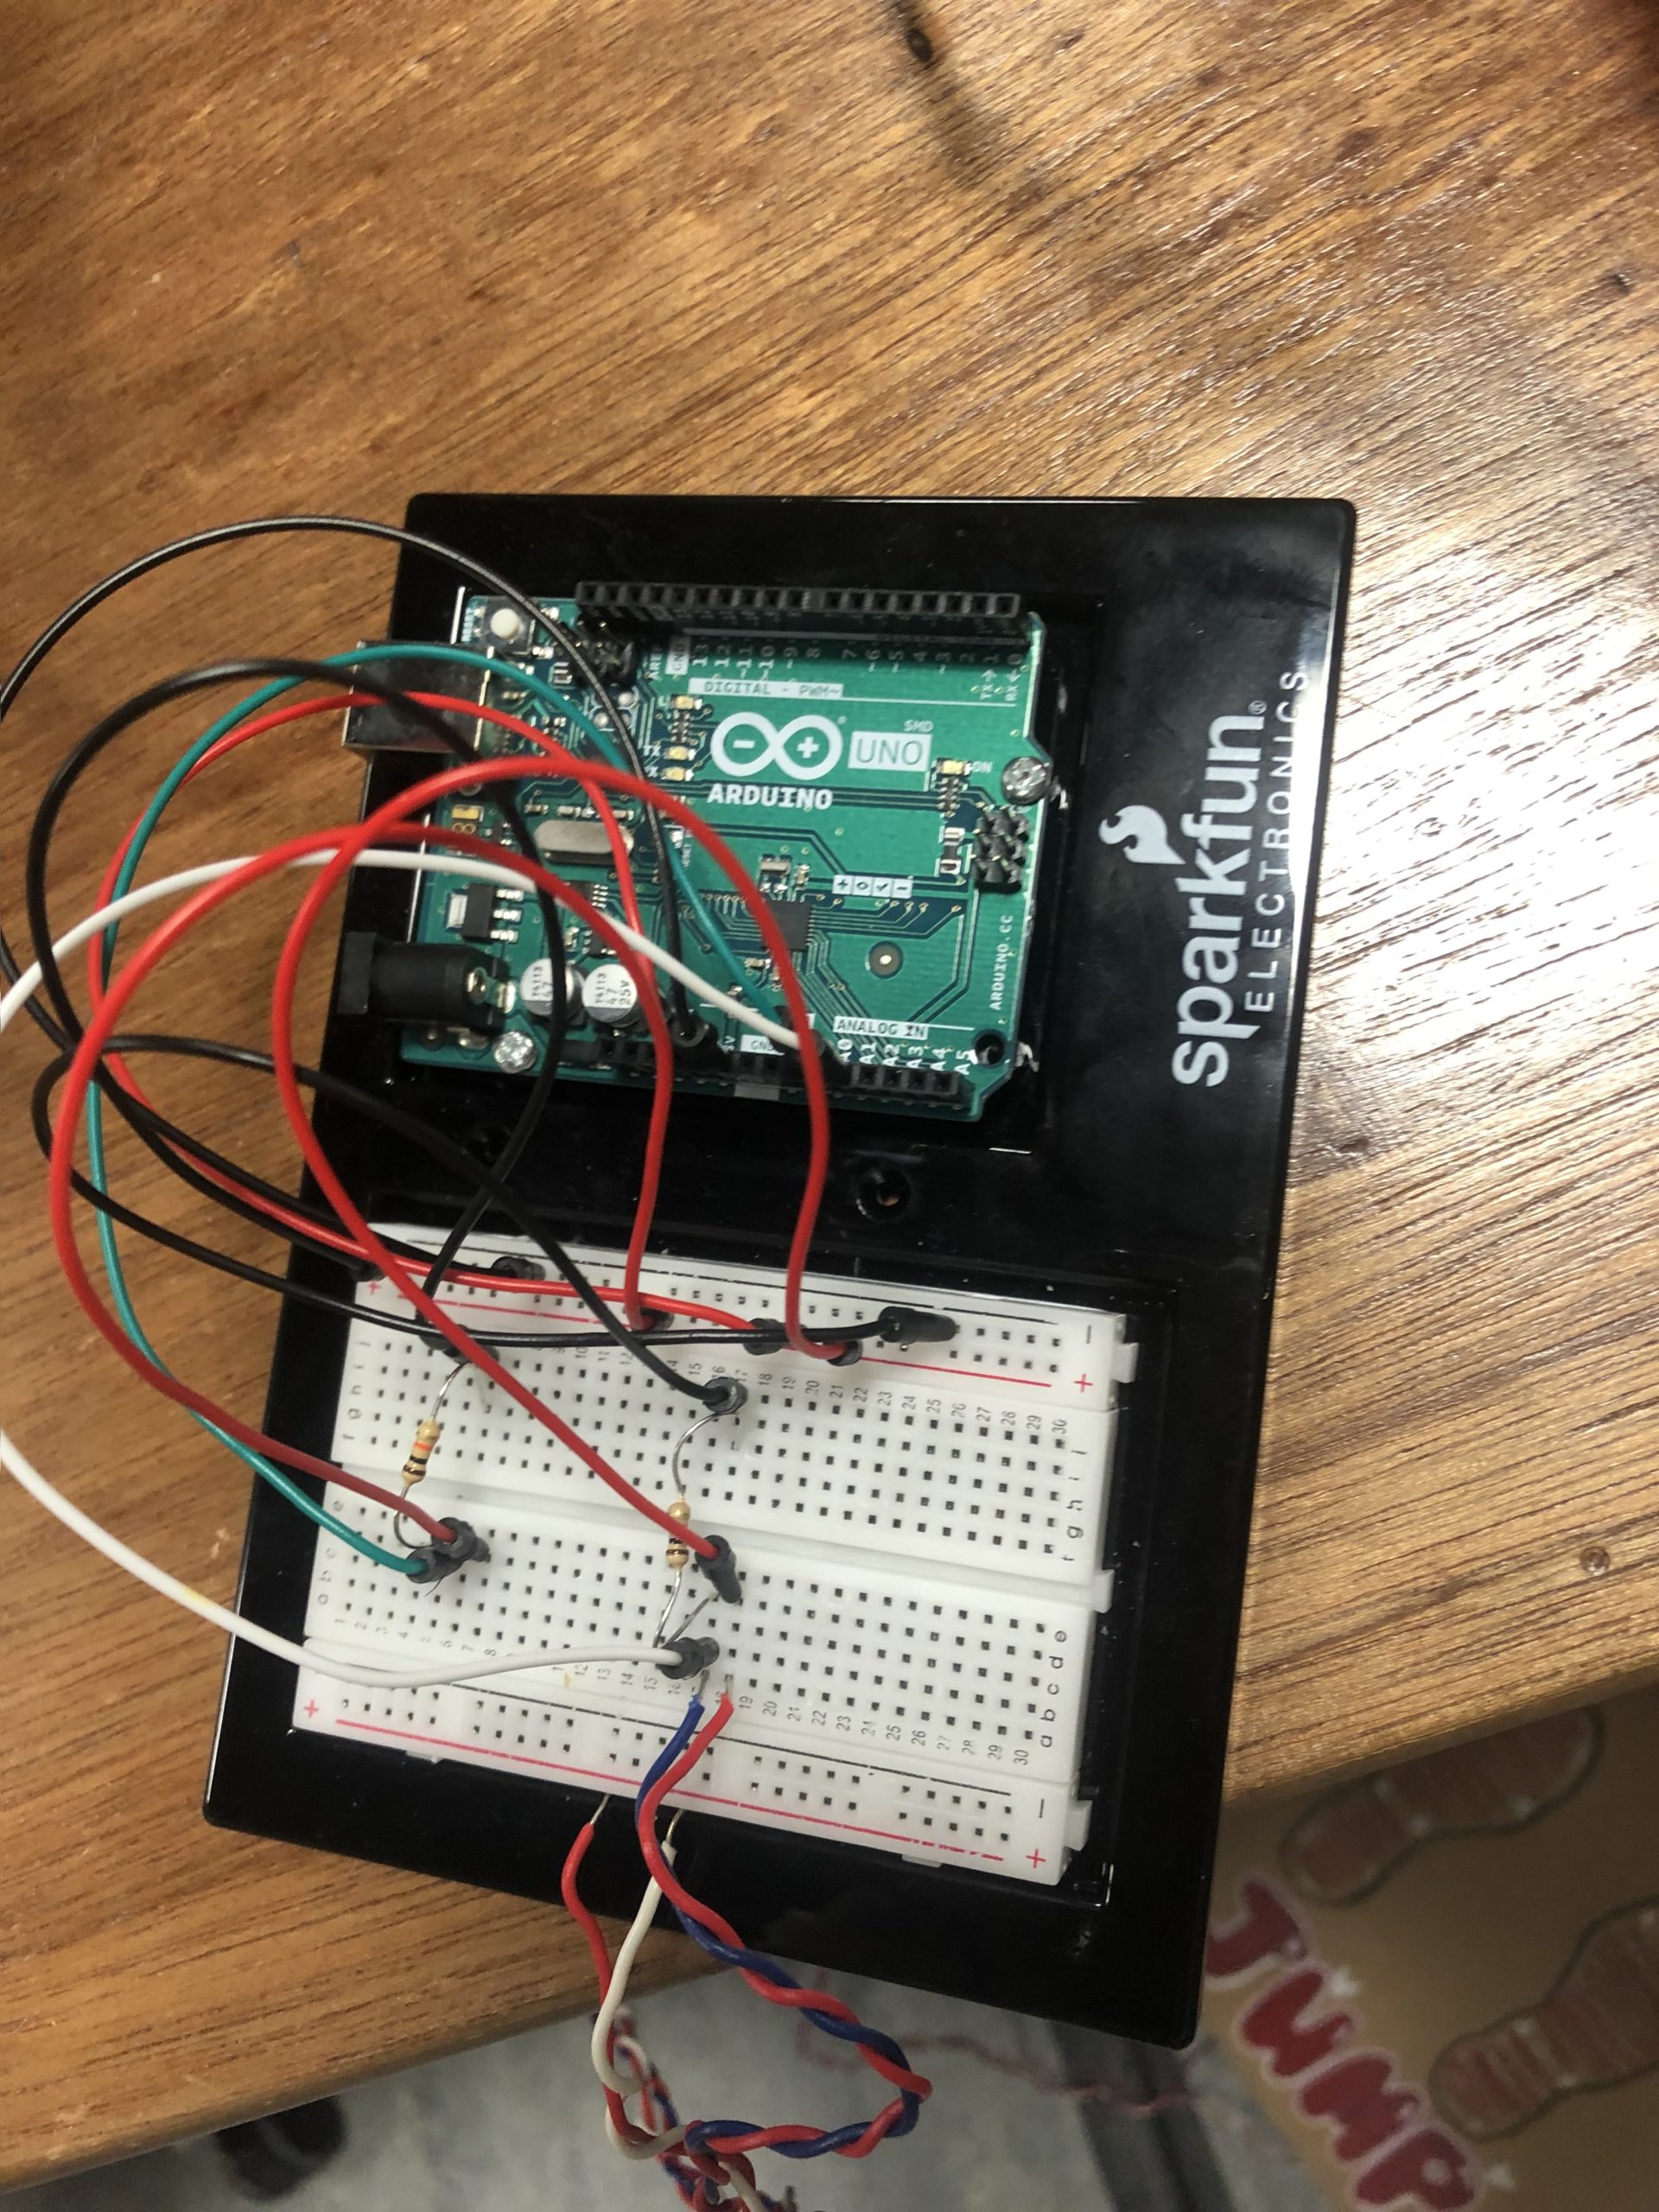
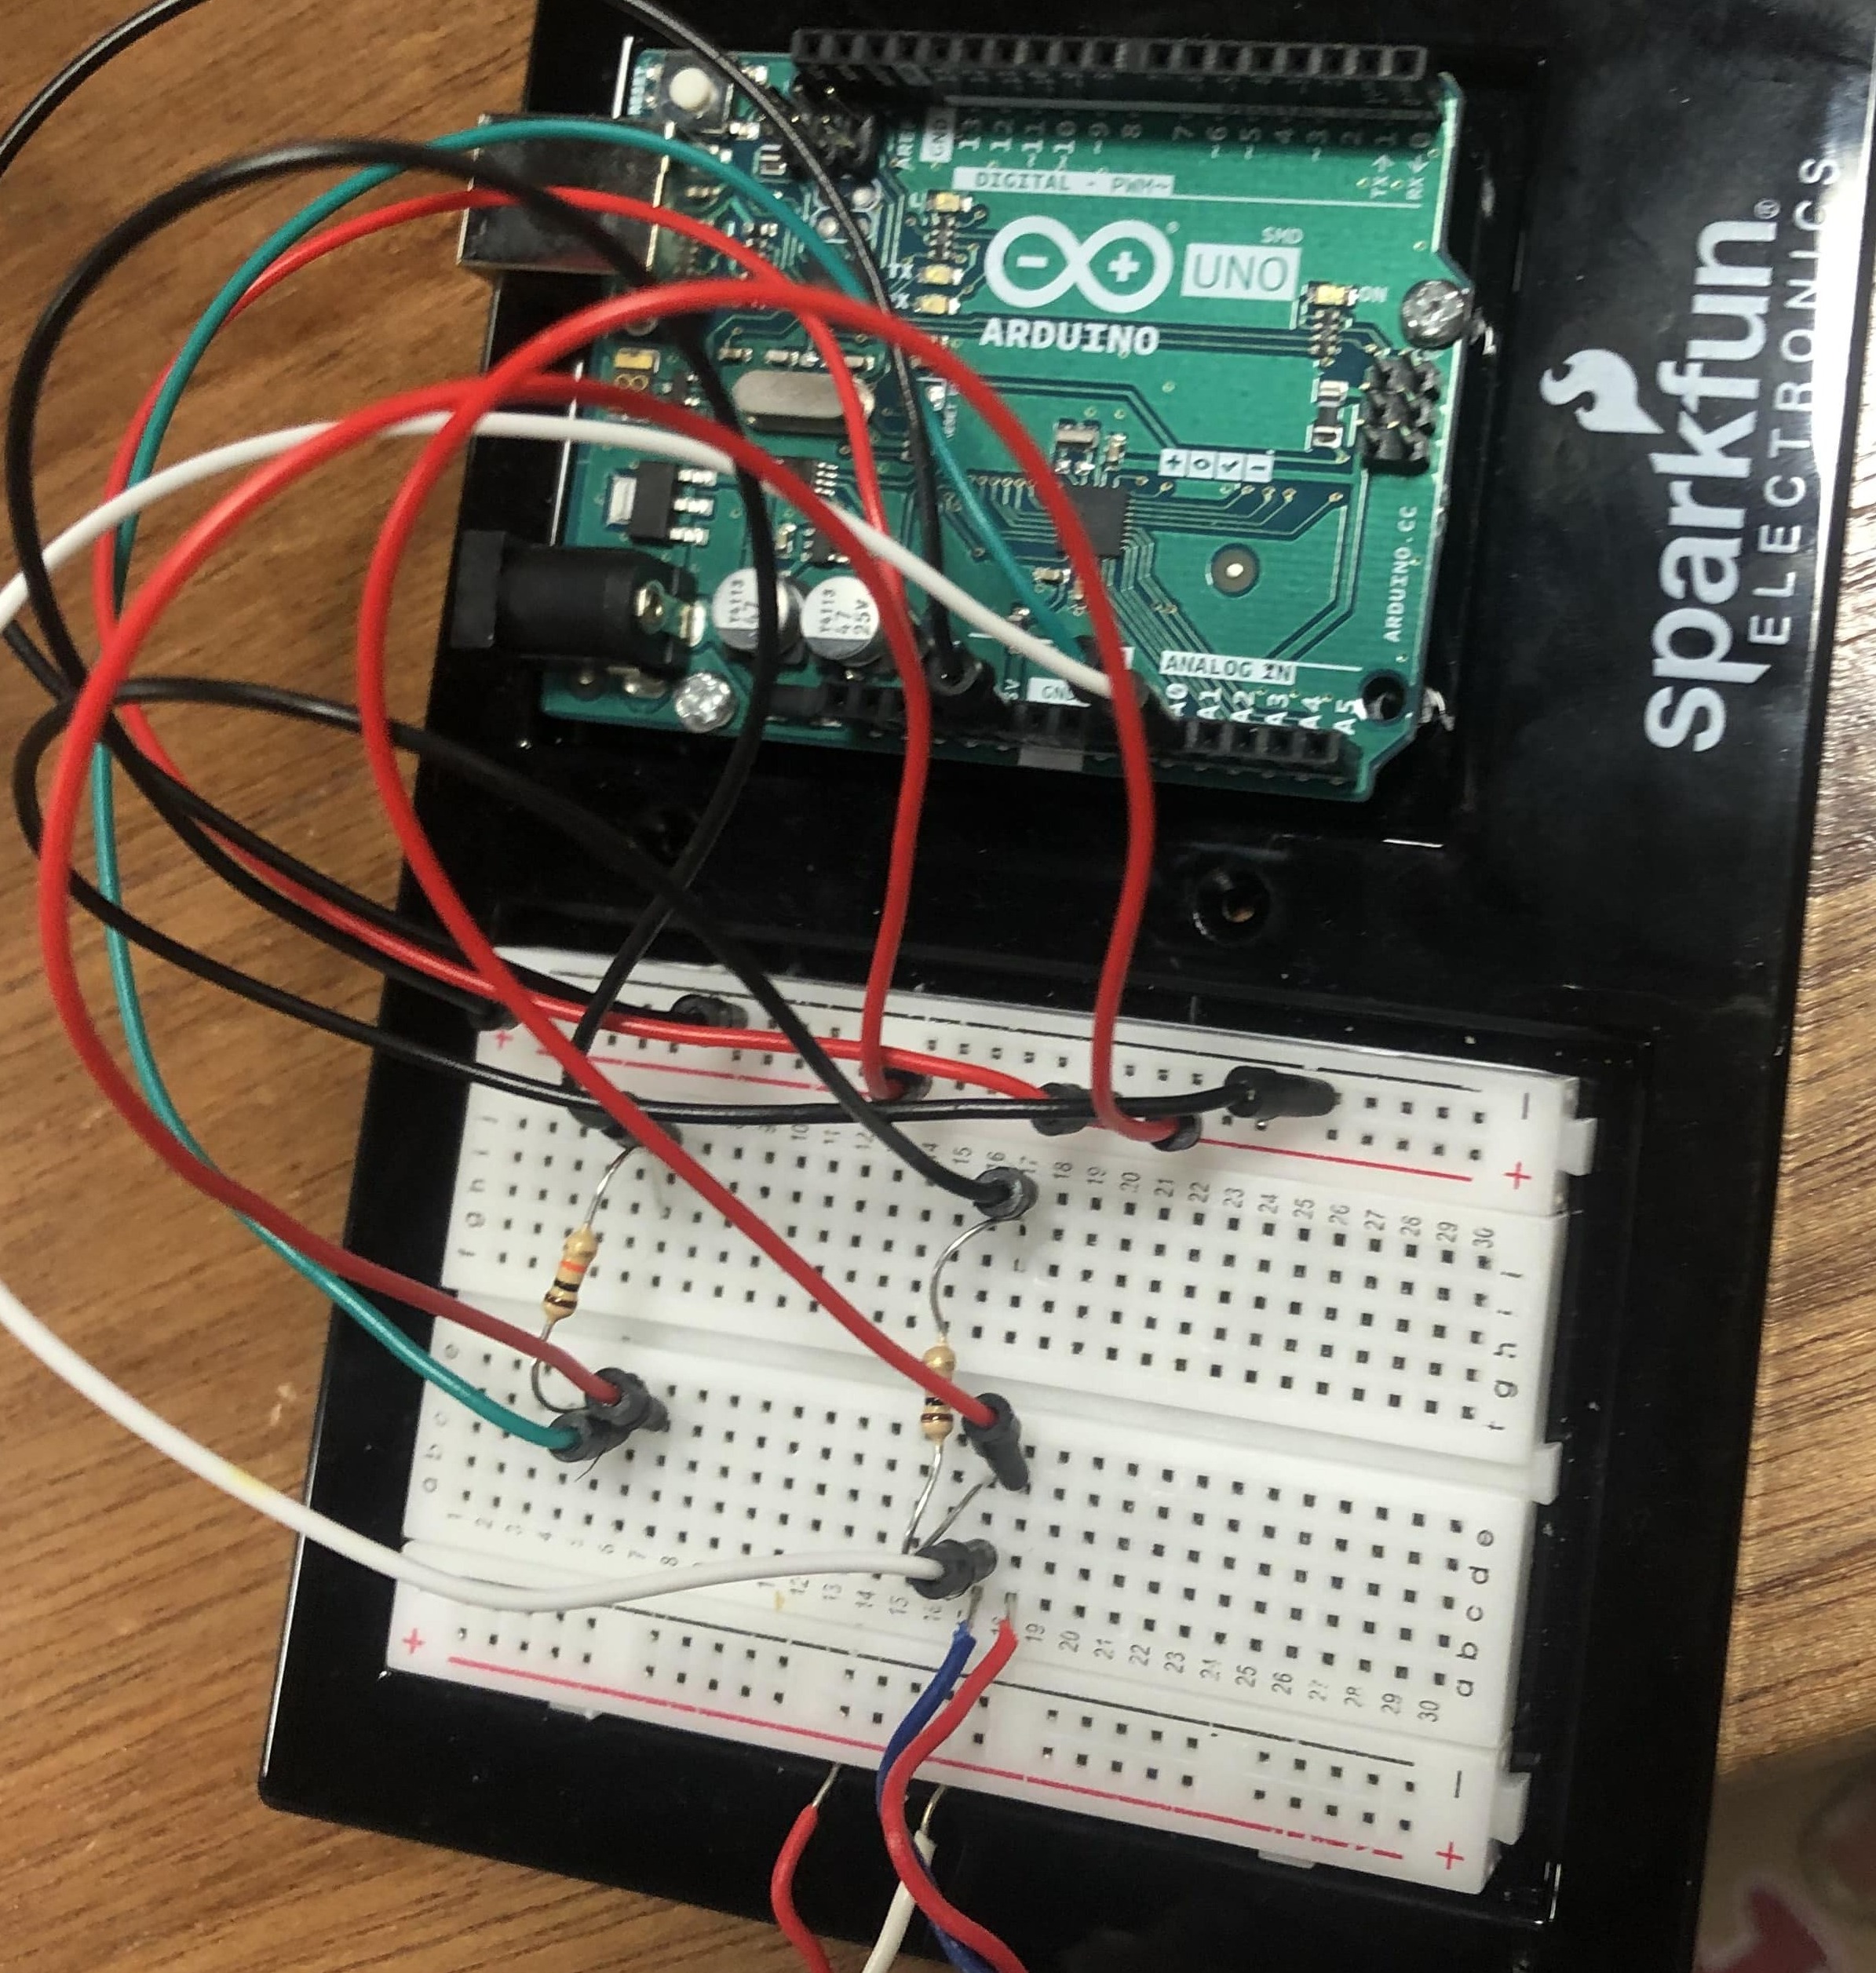
For the physical part, I connected two force resistors to Arduino, by soldering really long wire to the sensor and sticking them onto the board.
Arduino code is pretty simple, I just get the sensor values and send them to p5 by also adding a coma.
Schematic and circuit
Description of p5.js code
Because I implemented a collision library, it calculates to what extent the pony collides with a Draco, which is why depending on where/when they collide, lives change non-linearly. For example, if it doesn’t jump at all it is -1 point, but if the pony touches the Draco slightly around half a point is deducted. This gives the players grace jump, as the collision area is not too precise and bigger. And the game ends when there are no lives left.
I had trouble restarting the game and realized that my lives were not updated whenever I want to restart. That is why I created a restart function that resets all the variables.
//to restart the game and scores
const restartGame = () => {
  gameLost=false;
  score=0;
  lives=3;
  lives1=3;
  lastFrame=0;
  frameDelay=500;
  lastFrame1=0;
  frameDelay1=200;
  dracos = [];
  stars=[];
  pinkiePie= new PinkiePie(walk);
  new Draco();
  new Star();
  loop();
}
Description of communication between Arduino and p5.js
function readSerial(data) {
  ////////////////////////////////////
  //READ FROM ARDUINO HERE
  ////////////////////////////////////
  //console.log("data"+data);
  if (data != null) {

    //for button
    //if(data==0)

    let fromArduino = split(trim(data), ",");

    // if the right length, then proceed
    if (fromArduino.length == 2) {

      sensor1= fromArduino[0];
      sensor2 = fromArduino[1];
      console.log("s1 "+sensor1);
      console.log("s2 "+sensor2);


      if((sensor1 <= 1) && (sensor2<=1)){
        pinkiePie.jump();
      }
    }

  }

}
Here, I get the data and split it on comma, and store the two values in an array, assign them to two sensor variables. When a player stands on the board, there is some amount of pressure, when they jump->almost no pressure, and when they land on the board there is a force again. That is why, I made an if statement when there is no force, Pinkie Pie will jump.
What are some aspects of the project that you’re particularly proud of?
Overall, I am really proud of how the project turned out and the experience players have when the game is dependent on their physical activity. I am also happy that I learned how to work with another type of sensor, which means that I can work with more sensors and hardware features in the future thanks to the knowledge I got from the class. I love how sound also adds interactive experience, as well as lives implementation.
What are some areas for future improvement?
There is a problem with the sensitivity of the game, as players should practice and get used to the pace of the game. This could be improved by adding more sensors or maybe trying to implement other sensors, too. I also think the game could be improved by adding more levels or speeding up the pace when players play longer.
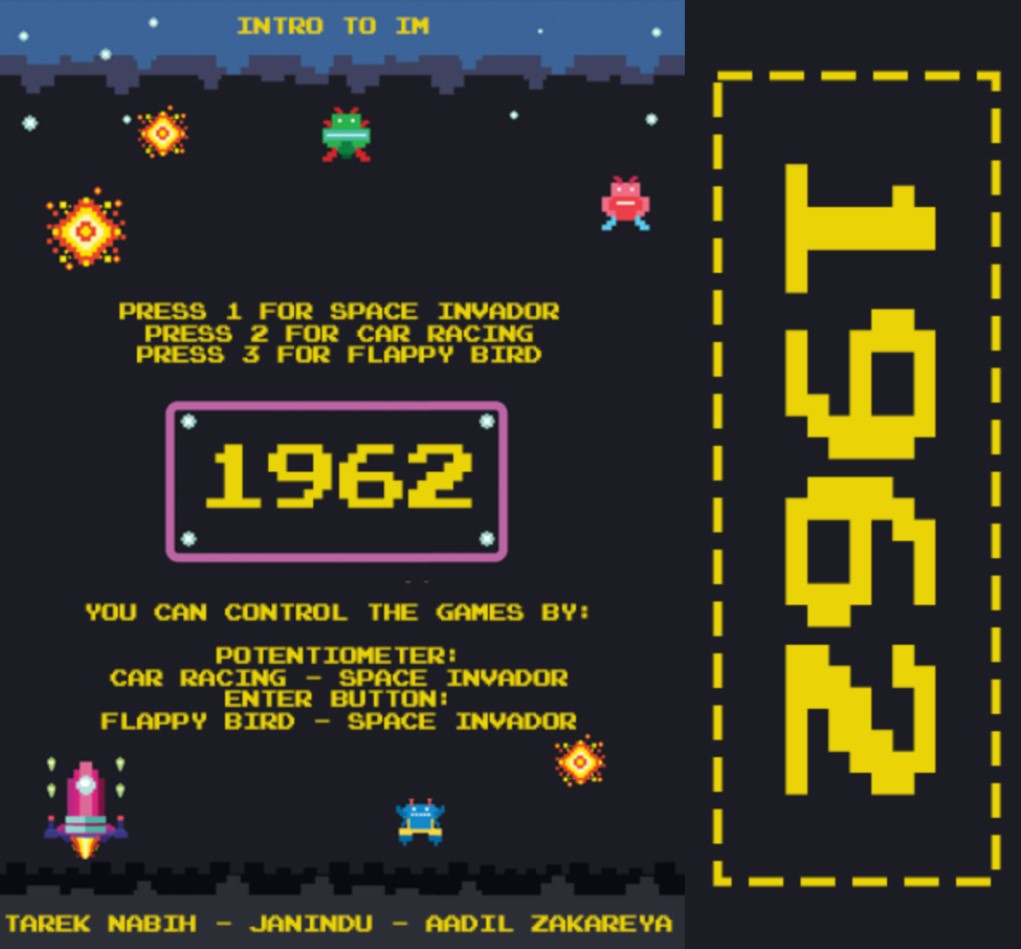
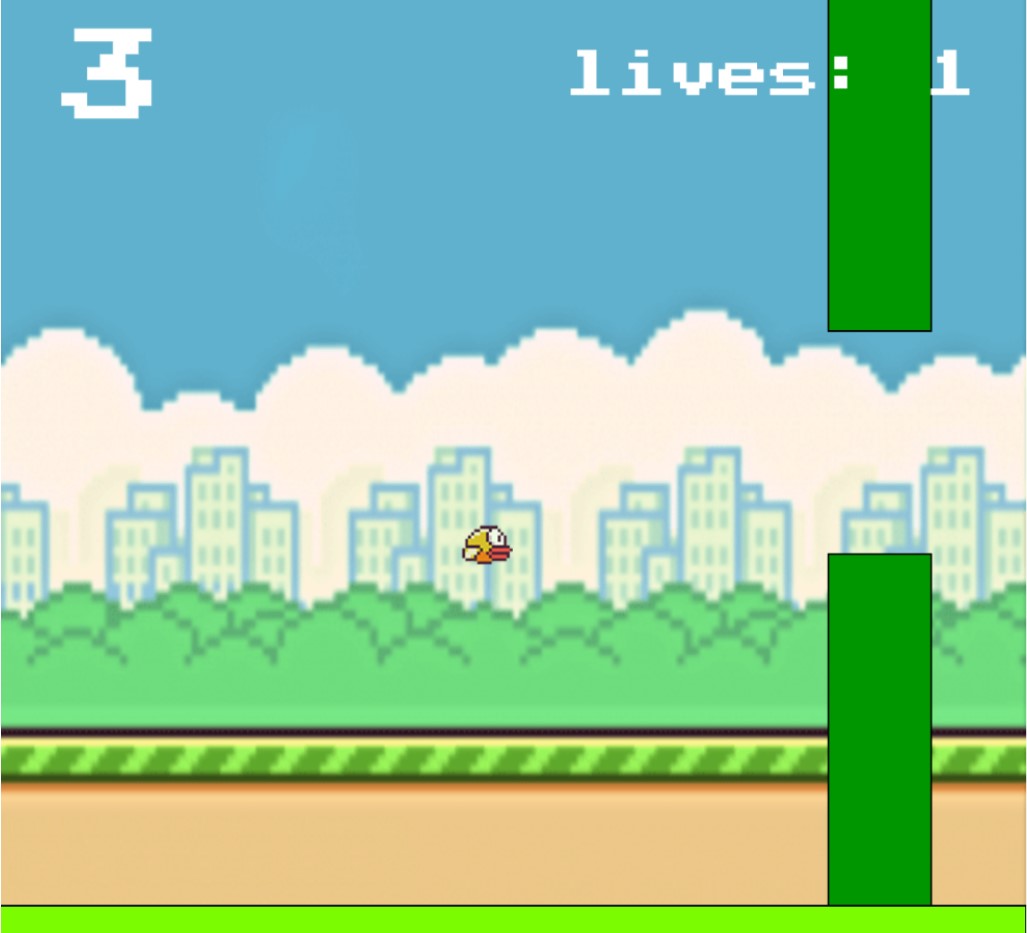
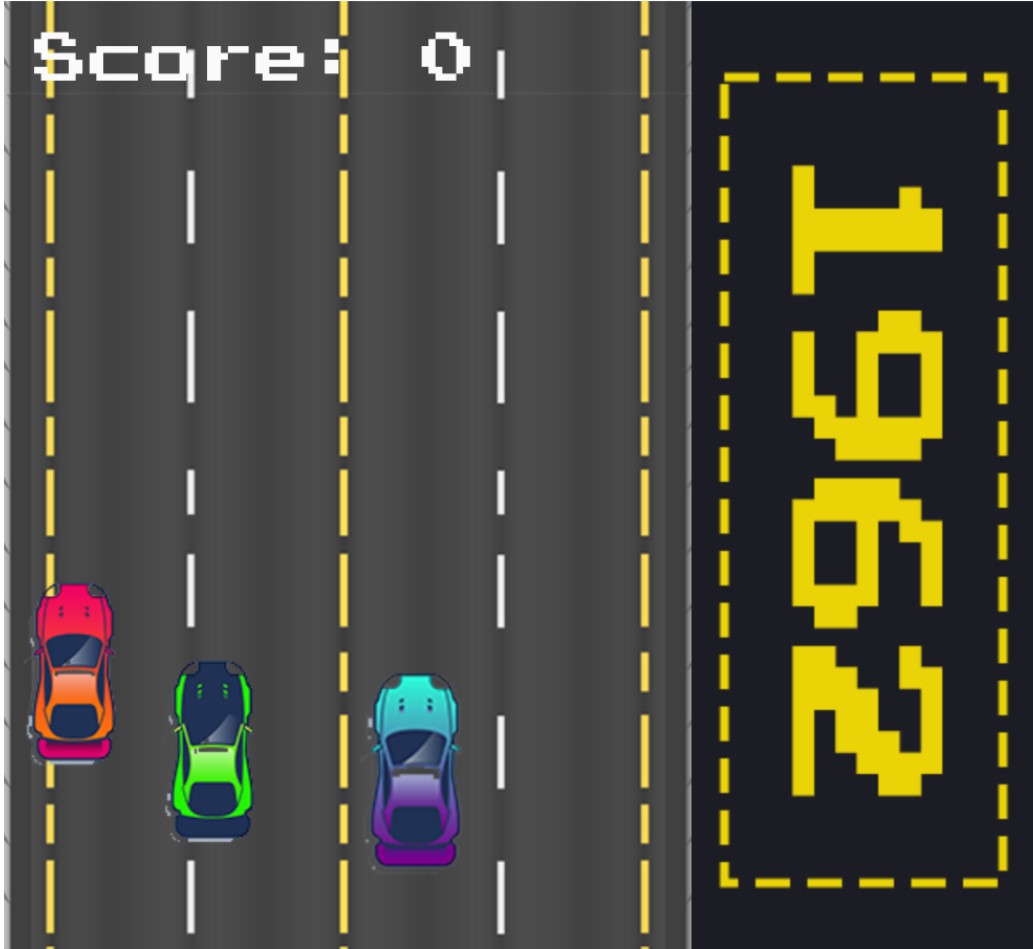
The three of us collectively decided to make something similar to an arcade machine as it was a very exciting part of our childhoods. Therefore, the project is a collection of three games that are designed to be played using an Arduino controller. The games include Flappy Bird, a popular mobile game in which the player controls a bird and navigates through obstacles; Racing Game, in which the player controls a race car and avoids colliding with the randomly generated cars as the race car overtakes them; and Space Invaders, a classic arcade game in which the player controls a spaceship and fights against invading aliens.
Arduino to P5js communication:
int button = 2;
int pot = A0;

int button1 = 4;
int button2 = 7;
int button3 = 8;

int lastPotValue;
int lastbutton;

long previousmill = 0;
long timebutton = 500;

void setup() {
  // put your setup code here, to run once:
  Serial.begin(9600);
  pinMode(button, INPUT_PULLUP);
  pinMode(button1, INPUT_PULLUP);
  pinMode(button2, INPUT_PULLUP);
  pinMode(button3, INPUT_PULLUP);

  pinMode(pot, INPUT);
}

int getpot(){
  int potValue = analogRead(pot)/255  ;
  int temp;
  if(potValue == 2 || potValue == 1){
    temp = 1;
  }else if(potValue == 3 || potValue == 4){
    temp = 2;
  }else{
    temp = 0;
  }
  return temp;
}

void loop() {
  int potValue = getpot();
  int buttonState = !digitalRead(button);
  long currentmill = millis();

  int buttonstate1 = !digitalRead(button1);
  int buttonstate2 = !digitalRead(button2);
  int buttonstate3 = !digitalRead(button3);

  int game = 0;

  if(buttonstate1 == 1){
    game = 1;
  }

  if(buttonstate2 == 1){
    game = 2;
  }

  if(buttonstate3 == 1){
    game = 3;
  }

  Serial.println(String(buttonState) + "," + String(potValue) + "," + String(game));
  if(buttonState == 1 && currentmill - previousmill >= timebutton){
    previousmill = currentmill;
    lastbutton = buttonState;
  }
}
We implemented this using the web serial. Here is how it briefly works:
The user connects an Arduino board to their computer using a USB cable.
The user writes and uploads a sketch (see above for the code) to the Arduino board that defines the behavior of the board and the data that it will send to the computer.
The user opens a P5.js sketch in their web browser and includes the p5.webserial.js library in their code.
The user adds event listeners to their P5.js sketch that will be called when the user connects or disconnects from the Arduino board, when the Arduino board is ready to be connected to, when there is an error communicating with the Arduino board, or when data is received from the Arduino board.
The user calls the getPorts() method of the p5.WebSerial object to check for any available Arduino boards. If an Arduino board is available, the portavailable event listener is called, which can be used to open a connection to the Arduino board.
Once the connection to the Arduino board is established, the user can send data to the Arduino board using the send() method of the p5.WebSerial object. The user can also receive data from the Arduino board using the data event listener, which is called whenever data is received from the Arduino board.
The user can use the received data from the Arduino board to control the behavior and appearance of their P5.js sketch. The user can also send data from the P5.js sketch to the Arduino board to control the behavior of the Arduino board.
When the user is finished using the Arduino board, they can close the connection to the board using the close() method of the p5.WebSerial object.
The getRndInteger() function is a helper function that returns a random integer between two given values. This function is used to randomly generate the heights of the pipes in the game. The Bird and Pipes classes define the objects that appear in the game. The Bird class has a draw() method that is used to draw the bird on the screen, an update() method that is used to update the bird’s position and velocity, a flap() method that causes the bird to jump upwards, and a checkDeath() method that checks if the bird has collided with any of the pipes and ends the game if necessary. The Pipes class has an update() method that updates the positions of the pipes and a drawPipes() method that draws the pipes on the screen. Overall, the code defines a simple game in which the player controls a bird and must avoid colliding with pipes by jumping over them. The game keeps track of the player’s score and ends if the bird hits a pipe.
Racing Game:
The generateCars() function is used to randomly generate cars that appear on the screen and the displayCars() function is used to draw the cars on the screen. The displayScore() function is used to display the player’s current score on the screen. The potentiometer returns three readings: 0,1, and 2 based on the positioning. Based on the number being returned by the potentiometer – we handle the car movement.
Space Invaders:
// both games =================================== function score(){ textSize(32); fill(250); text("Score: "+currentScore,20,50); } function increaseD(){ if(currentScore === 1 + prevScore){ difficulty += 0.5; prevScore = currentScore; // console.log(difficulty); } return random(1,5)+difficulty; }

//space invadors ======================================
function startPage(){
  textSize(27);
  fill(250);
  text("Space invador",27,250);
  textSize(15);
  text("press enter to start",52,290);
}

function removeRocks(){
  rocks.splice(0,rocks.length);
  rocksctr = 0;
}


function displaybullets(){
    for(let i = 0; i < bullets.length; i++){
      bullets[i].display();

      if(bullets[i].y < 0){
        bullets.splice(i,1);
        numBullets--;
      }

    }
  // console.log(numBullets);
}

function generaterocks(){
  let rand = int(random(0, 100));
  let rand2 = int(random(0, 100));
  if(rand % 7 == 0){
    if(rand2 % 3 == 0){
      if(rand2 % 2 == 0 && rand % 2 == 0){
          rocks[rocksctr] = new boulders();
          rocks[rocksctr].display();
          // console.log(rocksctr);
          rocksctr++;
        }
     }
  }
}

function displayrocks(){
  for(let i = 0; i < rocks.length; i++){
    rocks[i].display();
    // console.log(">",rocks.length);

    let temp = false;
    for(let j = 0; j < bullets.length; j++){
      if(bullets[j].didcollide(rocks[i])){
        temp = true;
        bullets.splice(i,1);
        numBullets--;
      }
    }

    if(mainship.didcollide(rocks[i])){
      rocks.splice(i,1);
      rocksctr--;
      gamestatus = "end";
      bomb.play();
      losing1.play();

    }else if(rocks[i].y > height || temp){
      rocks.splice(i,1);
      rocksctr--;
    }
  }
}
 var timechecker = 0.5;

function makebullet(x,y){

  // console.log(x);
  bullets[numBullets] = new bulletClass(x,y);
  m0 = millis(); //time when laser created
  if(timechecker>0.3){
  bullets[numBullets].display();}
  numBullets++;
  m = millis();
  timechecker = m - m0;
} //tried to disable continous shooting maybe look into it later


// end space invadors ================================

// start racing car game functions=====================
function startPage2(){
  textSize(27);
  fill(250);
  text("Car racing",63,255);
  textSize(15);
  text("press enter to start",52,290);
}


function generateCars(){
  let rand = int(random(0, 100));
  let rand2 = int(random(0, 100));
  if(rand % 7 == 0 && carrs.length < 4){
    if(rand2 % 3 == 0){
      if(rand2 % 2 == 0 && rand % 2 == 0){
          carrs[carsctr] = new cars();
          carrs[carsctr].display();
          // console.log(carsctr);
          carsctr++;
        }
     }
  }
}

function displayCars(){
  for(let i = 0; i < carrs.length; i++){
    carrs[i].display();
    // console.log(">",carrs.length);

    let temp = false;

    if(maincar.didcollide(carrs[i])){
      checklanes(0,carrs[i]);
      carrs.splice(i,1);
      carsctr--;
      currentScore = 0;
      // bomb.play();
      gamestatus = "end";
      losing2.play();
      // gamestatus = "end";
      // bomb.play();
    }else if(carrs[i].y > height || temp){
      checklanes(0,carrs[i]);
      carrs.splice(i,1);
      carsctr--;
      currentScore++;
      cargoing.play();
    }
  }
}


function checklanes(x,other){

  if(x === 1){
     if(lanes2[other.temp] === 1){
       other.temp = int(random(0,4));
       other.x = lanes[other.temp];
       checklanes(1,other);
     }else{
       lanes2[other.temp] = 1;
     }
  }else if(x === 0){
    lanes2[other.temp] = 0;
  }
}

function removeCars(){
  carrs.splice(0,carrs.length);
  carsctr = 0;
}
Initialization:
we initialized a lot of variables that would be used by the serial and the three games. the pre load function was also used to prepare the necessary pictures and sounds as well as fonts. the we set up what was necessary in the set up function.
let whichgame = 0;
let whichgameprev = 0;
// space invadors
let mainship;
let bullets = [];
let numBullets = 0;
let arrRocks;
let rocks = []
let lasersound;
let rocksctr = 0;

let difficulty = 0; // both games
let currentScore = 0;  //both games
let prevScore = 0;  //both games
let gamestatus = "start"; // both games
let rate = 0; // both games
let widthh = 400;

//racing game
let arrCars;
let carrs = [];
let carsctr = 0;
let lanes = [8,88,168,248,328];
let lanes2 = [0,0,0,0,0];


//flappy bird
var menu = 0;
var SCROLL_SPEED = 4;
var SCORE = 0;
let oof;
let bruh;
let music;
var bird ;
var pipes;
var lives = 5;
const GRAVITY = 8.81;
const JUMP_HEIGHT = 6.0;
const GROUND_HEIGHT = 20;
const WIDTH = 600;
const HEIGHT = 550;

//-------------arduino----------------
// let x=0;
// var c;
let values = [];
// variable to hold an instance of the p5.webserial library:
const serial = new p5.WebSerial();

// HTML button object:
let portButton;
let inData;                   // for incoming serial data
let outByte = 0;

function preload() {
  main = loadImage('mainpicture.png');

  //space invadar
  img = loadImage('Hs4QN2.gif');
  startScreen = loadImage('startscreen.gif');
  ship = loadImage('Untitled-1.png');
  bullet = loadImage('bullet.png');
  soundFormats('mp3', 'ogg');
  lasersound = loadSound('lasersound.mp3');
  bomb = loadSound('explo.mp3');
  rock1 = loadImage('rock1.png');
  rock2 = loadImage('rock2.png');
  rock3 = loadImage('rock3.png');
  gameoverpng = loadImage('gameover.png');
  mainFont = loadFont('PressStart2P-vaV7.ttf');
  alternateFont = loadFont('metal lord.otf');
  losing2 = loadSound('losing2.wav');
  arcade = loadSound('arcade.mp3');
  sp = loadSound('space.wav');

  //racing car game;
  imgg = loadImage('maincar.png');
  car1 = loadImage('car1.png');
  car2 = loadImage('car2.png');
  car3 = loadImage('car3.png');
  backgroundd = loadImage('background.png');
  backgrounddd = loadImage('final.gif');
  cargoing = loadSound('mixkit-fast-car-drive-by-1538.wav');
  startscreen = loadImage('startscreen.png');
  done = loadImage('gameovercar.png');
  losing1 = loadSound('losing1.wav');
  carpassing = loadSound('carpassing.wav');
  extraedge = loadImage('extraedge.png');

  //flappy bird
  music = loadSound("bgmusic.mp3");
  bg = loadImage('bg11.png');
  home = loadImage('homescreem.png');
  b = loadImage('bird.png');
  jump = loadSound('flap-1.mp3');
  oof = loadSound('oof.mp3');

}


function setup() {

  createCanvas(600, 550);
  arcade.play();

  if (!navigator.serial) {
    alert("WebSerial is not supported in this browser. Try Chrome or MS Edge.");
  }
  // if serial is available, add connect/disconnect listeners:
  navigator.serial.addEventListener("connect", portConnect);
  navigator.serial.addEventListener("disconnect", portDisconnect);
  // check for any ports that are available:
  serial.getPorts();
  // if there's no port chosen, choose one:
  serial.on("noport", makePortButton);
  // open whatever port is available:
  serial.on("portavailable", openPort);
  // handle serial errors:
  serial.on("requesterror", portError);
  // handle any incoming serial data:
  serial.on("data", serialEvent);
  serial.on("close", makePortButton);

  //space invadors
  mainship = new spaceship();
  arrRocks = [rock1,rock2,rock3] ;
  textFont(mainFont);

  //racing
  maincar = new main_car();
  arrCars = [car1,car2,car3] ;

  //flappy bird
  bird = new Bird(WIDTH / 2, HEIGHT / 2, 30);
  pipes = new Pipes(60, 200, 130);
}
The draw function: this is where all the functions get called:
The draw() function starts by clearing the background of the canvas with background(0), then it checks the value of whichgame and renders the appropriate game. The code uses several other functions, such as controls(), score(), and startPage(), to handle game mechanics and display game elements.
In the first if statement, the code checks if whichgame is equal to 0, and if so, it displays two images: main and extraedge and this is like the default screen. In the second if statement, the code checks if whichgame is equal to 1 and, if so, it displays the game for whichgame 1 which is space invadors. This game has several possible states (running, end, start) and the code uses if statements to handle each state. The third and fourth if statements do the same thing for games 2 and 3, car race and flappy bird respectively.
The boulders class represents the falling boulders, and the bulletClass class represents bullets that the player can shoot to destroy the boulders. The spaceship class represents the player’s spaceship, and the cars class represents the cars that the player must avoid. The main_car class is a subclass of spaceship, and it appears to have the same functionality as the spaceship class.
The boulders class has a display() function that is used to draw the boulder on the screen, a move() function that is used to update the boulder’s position, and a width() function that is used to determine the width of the boulder. The bulletClass class has a display() function that is used to draw the bullet on the screen, a move() function that is used to update the bullet’s position, and a didcollide(other) function that is used to check if the bullet has collided with another object.
The spaceship and main_car classes have a display() function that is used to draw the spaceship or car on the screen, a move() function that is used to update the spaceship or car’s position, and a didcollide(other) function that is used to check if the spaceship or car has collided with another object. The cars class has the same functions as the boulders class, but it is used to represent cars rather than boulders.
Flappy Bird: Use the button on the arduino or the UP key to jump.
Racing Game: Use the potentiometer or left and right keys to control the car’s steering.
Space Invaders: Use the potentiometers or left and right keys to control the spaceship’s movement and button or UP key to fire lasers.
user testing:
Conclusion
This project demonstrates how to create and play games using p5.js and Arduino. The project includes three games that can be controlled using potentiometers and push buttons, and can be easily extended to include additional games and custom controller designs. We’re particularly proud of the aesthetics of the games – we were able to recreate what we initally had in mind. Furthermore, we had a lot of bugs which wouldn’t let the games run smoothly. We figured out how to implement the games smoothly by making changes in our algorithms and by handling specific types of errors which were mostly given by the arduino board. However, there is no proper restart function for flappy bird – if you lose, the canvas simply starts from scratch.
Work contributed: Car racing game, Space invaders, while helping in integrating the games together, and using my graphic design skills in making 1962 more user friendly. Also helped making the circuit necessary to send data.
The three of us collectively decided to make something similar to an arcade machine as it was a very exciting part of our childhoods. Therefore, the project is a collection of three games that are designed to be played using an Arduino controller. The games include Flappy Bird, a popular mobile game in which the player controls a bird and navigates through obstacles; Racing Game, in which the player controls a race car and avoids colliding with the randomly generated cars as the race car overtakes them; and Space Invaders, a classic arcade game in which the player controls a spaceship and fights against invading aliens.
Arduino to P5js communication:
int button = 2;
int pot = A0;

int button1 = 4;
int button2 = 7;
int button3 = 8;

int lastPotValue;
int lastbutton;

long previousmill = 0;
long timebutton = 500;

void setup() {
  // put your setup code here, to run once:
  Serial.begin(9600);
  pinMode(button, INPUT_PULLUP);
  pinMode(button1, INPUT_PULLUP);
  pinMode(button2, INPUT_PULLUP);
  pinMode(button3, INPUT_PULLUP);

  pinMode(pot, INPUT);
}

int getpot(){
  int potValue = analogRead(pot)/255  ;
  int temp;
  if(potValue == 2 || potValue == 1){
    temp = 1;
  }else if(potValue == 3 || potValue == 4){
    temp = 2;
  }else{
    temp = 0;
  }
  return temp;
}

void loop() {
  int potValue = getpot();
  int buttonState = !digitalRead(button);
  long currentmill = millis();

  int buttonstate1 = !digitalRead(button1);
  int buttonstate2 = !digitalRead(button2);
  int buttonstate3 = !digitalRead(button3);

  int game = 0;

  if(buttonstate1 == 1){
    game = 1;
  }

  if(buttonstate2 == 1){
    game = 2;
  }

  if(buttonstate3 == 1){
    game = 3;
  }

  Serial.println(String(buttonState) + "," + String(potValue) + "," + String(game));
  if(buttonState == 1 && currentmill - previousmill >= timebutton){
    previousmill = currentmill;
    lastbutton = buttonState;
  }
}
We implemented this using the web serial. Here is how it briefly works:
The user connects an Arduino board to their computer using a USB cable.
The user writes and uploads a sketch (see above for the code) to the Arduino board that defines the behavior of the board and the data that it will send to the computer.
The user opens a P5.js sketch in their web browser and includes the p5.webserial.js library in their code.
The user adds event listeners to their P5.js sketch that will be called when the user connects or disconnects from the Arduino board, when the Arduino board is ready to be connected to, when there is an error communicating with the Arduino board, or when data is received from the Arduino board.
The user calls the getPorts() method of the p5.WebSerial object to check for any available Arduino boards. If an Arduino board is available, the portavailable event listener is called, which can be used to open a connection to the Arduino board.
Once the connection to the Arduino board is established, the user can send data to the Arduino board using the send() method of the p5.WebSerial object. The user can also receive data from the Arduino board using the data event listener, which is called whenever data is received from the Arduino board.
The user can use the received data from the Arduino board to control the behavior and appearance of their P5.js sketch. The user can also send data from the P5.js sketch to the Arduino board to control the behavior of the Arduino board.
When the user is finished using the Arduino board, they can close the connection to the board using the close() method of the p5.WebSerial object.
The getRndInteger() function is a helper function that returns a random integer between two given values. This function is used to randomly generate the heights of the pipes in the game. The Bird and Pipes classes define the objects that appear in the game. The Bird class has a draw() method that is used to draw the bird on the screen, an update() method that is used to update the bird’s position and velocity, a flap() method that causes the bird to jump upwards, and a checkDeath() method that checks if the bird has collided with any of the pipes and ends the game if necessary. The Pipes class has an update() method that updates the positions of the pipes and a drawPipes() method that draws the pipes on the screen. Overall, the code defines a simple game in which the player controls a bird and must avoid colliding with pipes by jumping over them. The game keeps track of the player’s score and ends if the bird hits a pipe.
Racing Game:
The generateCars() function is used to randomly generate cars that appear on the screen and the displayCars() function is used to draw the cars on the screen. The displayScore() function is used to display the player’s current score on the screen. The potentiometer returns three readings: 0,1, and 2 based on the positioning. Based on the number being returned by the potentiometer – we handle the car movement.
Space Invaders:
// both games =================================== function score(){ textSize(32); fill(250); text("Score: "+currentScore,20,50); } function increaseD(){ if(currentScore === 1 + prevScore){ difficulty += 0.5; prevScore = currentScore; // console.log(difficulty); } return random(1,5)+difficulty; }

//space invadors ======================================
function startPage(){
  textSize(27);
  fill(250);
  text("Space invador",27,250);
  textSize(15);
  text("press enter to start",52,290);
}

function removeRocks(){
  rocks.splice(0,rocks.length);
  rocksctr = 0;
}


function displaybullets(){
    for(let i = 0; i < bullets.length; i++){
      bullets[i].display();

      if(bullets[i].y < 0){
        bullets.splice(i,1);
        numBullets--;
      }

    }
  // console.log(numBullets);
}

function generaterocks(){
  let rand = int(random(0, 100));
  let rand2 = int(random(0, 100));
  if(rand % 7 == 0){
    if(rand2 % 3 == 0){
      if(rand2 % 2 == 0 && rand % 2 == 0){
          rocks[rocksctr] = new boulders();
          rocks[rocksctr].display();
          // console.log(rocksctr);
          rocksctr++;
        }
     }
  }
}

function displayrocks(){
  for(let i = 0; i < rocks.length; i++){
    rocks[i].display();
    // console.log(">",rocks.length);

    let temp = false;
    for(let j = 0; j < bullets.length; j++){
      if(bullets[j].didcollide(rocks[i])){
        temp = true;
        bullets.splice(i,1);
        numBullets--;
      }
    }

    if(mainship.didcollide(rocks[i])){
      rocks.splice(i,1);
      rocksctr--;
      gamestatus = "end";
      bomb.play();
      losing1.play();

    }else if(rocks[i].y > height || temp){
      rocks.splice(i,1);
      rocksctr--;
    }
  }
}
 var timechecker = 0.5;

function makebullet(x,y){

  // console.log(x);
  bullets[numBullets] = new bulletClass(x,y);
  m0 = millis(); //time when laser created
  if(timechecker>0.3){
  bullets[numBullets].display();}
  numBullets++;
  m = millis();
  timechecker = m - m0;
} //tried to disable continous shooting maybe look into it later


// end space invadors ================================

// start racing car game functions=====================
function startPage2(){
  textSize(27);
  fill(250);
  text("Car racing",63,255);
  textSize(15);
  text("press enter to start",52,290);
}


function generateCars(){
  let rand = int(random(0, 100));
  let rand2 = int(random(0, 100));
  if(rand % 7 == 0 && carrs.length < 4){
    if(rand2 % 3 == 0){
      if(rand2 % 2 == 0 && rand % 2 == 0){
          carrs[carsctr] = new cars();
          carrs[carsctr].display();
          // console.log(carsctr);
          carsctr++;
        }
     }
  }
}

function displayCars(){
  for(let i = 0; i < carrs.length; i++){
    carrs[i].display();
    // console.log(">",carrs.length);

    let temp = false;

    if(maincar.didcollide(carrs[i])){
      checklanes(0,carrs[i]);
      carrs.splice(i,1);
      carsctr--;
      currentScore = 0;
      // bomb.play();
      gamestatus = "end";
      losing2.play();
      // gamestatus = "end";
      // bomb.play();
    }else if(carrs[i].y > height || temp){
      checklanes(0,carrs[i]);
      carrs.splice(i,1);
      carsctr--;
      currentScore++;
      cargoing.play();
    }
  }
}


function checklanes(x,other){

  if(x === 1){
     if(lanes2[other.temp] === 1){
       other.temp = int(random(0,4));
       other.x = lanes[other.temp];
       checklanes(1,other);
     }else{
       lanes2[other.temp] = 1;
     }
  }else if(x === 0){
    lanes2[other.temp] = 0;
  }
}

function removeCars(){
  carrs.splice(0,carrs.length);
  carsctr = 0;
}
Initialization:
we initialized a lot of variables that would be used by the serial and the three games. the pre load function was also used to prepare the necessary pictures and sounds as well as fonts. the we set up what was necessary in the set up function.
let whichgame = 0;
let whichgameprev = 0;
// space invadors
let mainship;
let bullets = [];
let numBullets = 0;
let arrRocks;
let rocks = []
let lasersound;
let rocksctr = 0;

let difficulty = 0; // both games
let currentScore = 0;  //both games
let prevScore = 0;  //both games
let gamestatus = "start"; // both games
let rate = 0; // both games
let widthh = 400;

//racing game
let arrCars;
let carrs = [];
let carsctr = 0;
let lanes = [8,88,168,248,328];
let lanes2 = [0,0,0,0,0];


//flappy bird
var menu = 0;
var SCROLL_SPEED = 4;
var SCORE = 0;
let oof;
let bruh;
let music;
var bird ;
var pipes;
var lives = 5;
const GRAVITY = 8.81;
const JUMP_HEIGHT = 6.0;
const GROUND_HEIGHT = 20;
const WIDTH = 600;
const HEIGHT = 550;

//-------------arduino----------------
// let x=0;
// var c;
let values = [];
// variable to hold an instance of the p5.webserial library:
const serial = new p5.WebSerial();

// HTML button object:
let portButton;
let inData;                   // for incoming serial data
let outByte = 0;

function preload() {
  main = loadImage('mainpicture.png');

  //space invadar
  img = loadImage('Hs4QN2.gif');
  startScreen = loadImage('startscreen.gif');
  ship = loadImage('Untitled-1.png');
  bullet = loadImage('bullet.png');
  soundFormats('mp3', 'ogg');
  lasersound = loadSound('lasersound.mp3');
  bomb = loadSound('explo.mp3');
  rock1 = loadImage('rock1.png');
  rock2 = loadImage('rock2.png');
  rock3 = loadImage('rock3.png');
  gameoverpng = loadImage('gameover.png');
  mainFont = loadFont('PressStart2P-vaV7.ttf');
  alternateFont = loadFont('metal lord.otf');
  losing2 = loadSound('losing2.wav');
  arcade = loadSound('arcade.mp3');
  sp = loadSound('space.wav');

  //racing car game;
  imgg = loadImage('maincar.png');
  car1 = loadImage('car1.png');
  car2 = loadImage('car2.png');
  car3 = loadImage('car3.png');
  backgroundd = loadImage('background.png');
  backgrounddd = loadImage('final.gif');
  cargoing = loadSound('mixkit-fast-car-drive-by-1538.wav');
  startscreen = loadImage('startscreen.png');
  done = loadImage('gameovercar.png');
  losing1 = loadSound('losing1.wav');
  carpassing = loadSound('carpassing.wav');
  extraedge = loadImage('extraedge.png');

  //flappy bird
  music = loadSound("bgmusic.mp3");
  bg = loadImage('bg11.png');
  home = loadImage('homescreem.png');
  b = loadImage('bird.png');
  jump = loadSound('flap-1.mp3');
  oof = loadSound('oof.mp3');

}


function setup() {

  createCanvas(600, 550);
  arcade.play();

  if (!navigator.serial) {
    alert("WebSerial is not supported in this browser. Try Chrome or MS Edge.");
  }
  // if serial is available, add connect/disconnect listeners:
  navigator.serial.addEventListener("connect", portConnect);
  navigator.serial.addEventListener("disconnect", portDisconnect);
  // check for any ports that are available:
  serial.getPorts();
  // if there's no port chosen, choose one:
  serial.on("noport", makePortButton);
  // open whatever port is available:
  serial.on("portavailable", openPort);
  // handle serial errors:
  serial.on("requesterror", portError);
  // handle any incoming serial data:
  serial.on("data", serialEvent);
  serial.on("close", makePortButton);

  //space invadors
  mainship = new spaceship();
  arrRocks = [rock1,rock2,rock3] ;
  textFont(mainFont);

  //racing
  maincar = new main_car();
  arrCars = [car1,car2,car3] ;

  //flappy bird
  bird = new Bird(WIDTH / 2, HEIGHT / 2, 30);
  pipes = new Pipes(60, 200, 130);
}
The draw function: this is where all the functions get called:
The draw() function starts by clearing the background of the canvas with background(0), then it checks the value of whichgame and renders the appropriate game. The code uses several other functions, such as controls(), score(), and startPage(), to handle game mechanics and display game elements.
In the first if statement, the code checks if whichgame is equal to 0, and if so, it displays two images: main and extraedge and this is like the default screen. In the second if statement, the code checks if whichgame is equal to 1 and, if so, it displays the game for whichgame 1 which is space invadors. This game has several possible states (running, end, start) and the code uses if statements to handle each state. The third and fourth if statements do the same thing for games 2 and 3, car race and flappy bird respectively.
The boulders class represents the falling boulders, and the bulletClass class represents bullets that the player can shoot to destroy the boulders. The spaceship class represents the player’s spaceship, and the cars class represents the cars that the player must avoid. The main_car class is a subclass of spaceship, and it appears to have the same functionality as the spaceship class.
The boulders class has a display() function that is used to draw the boulder on the screen, a move() function that is used to update the boulder’s position, and a width() function that is used to determine the width of the boulder. The bulletClass class has a display() function that is used to draw the bullet on the screen, a move() function that is used to update the bullet’s position, and a didcollide(other) function that is used to check if the bullet has collided with another object.
The spaceship and main_car classes have a display() function that is used to draw the spaceship or car on the screen, a move() function that is used to update the spaceship or car’s position, and a didcollide(other) function that is used to check if the spaceship or car has collided with another object. The cars class has the same functions as the boulders class, but it is used to represent cars rather than boulders.
Flappy Bird: Use the button on the arduino or the UP key to jump.
Racing Game: Use the potentiometer or left and right keys to control the car’s steering.
Space Invaders: Use the potentiometers or left and right keys to control the spaceship’s movement and button or UP key to fire lasers.
Conclusion
This project demonstrates how to create and play games using p5.js and Arduino. The project includes three games that can be controlled using potentiometers and push buttons, and can be easily extended to include additional games and custom controller designs. We’re particularly proud of the aesthetics of the games – we were able to recreate what we initally had in mind. Furthermore, we had a lot of bugs which wouldn’t let the games run smoothly. We figured out how to implement the games smoothly by making changes in our algorithms and by handling specific types of errors which were mostly given by the arduino board. However, there is no proper restart function for flappy bird – if you lose, the canvas simply starts from scratch.
My contribution to the project was coding the handling the serial communication and the design of the physical user interface. I did some of the error handling and debugging towards the end as well.
As I was testing the game, I understood that one sensor is not enough as data gets into the game randomly depending on where is the user. That is why I decided to connect two sensors as well as get a board for jumping. I had a lot of stress getting data from two sensors as it was getting lost somewhere or as far as I understood, there was just an extra line.😭
Schematic
Circuit
User testing video
Results:
It seems like shoes can be a little obstacle on how legs are pressed on the board, as it might be difficult to center the pressure of the legs with shoes. If the legs are pressed correctly every time a person jumps, the game is pretty responsive.
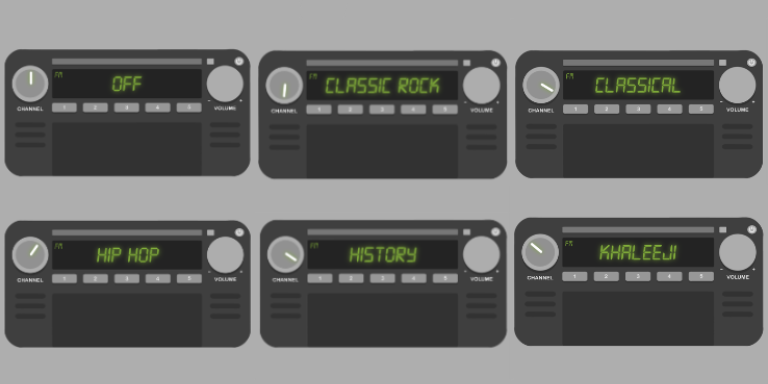
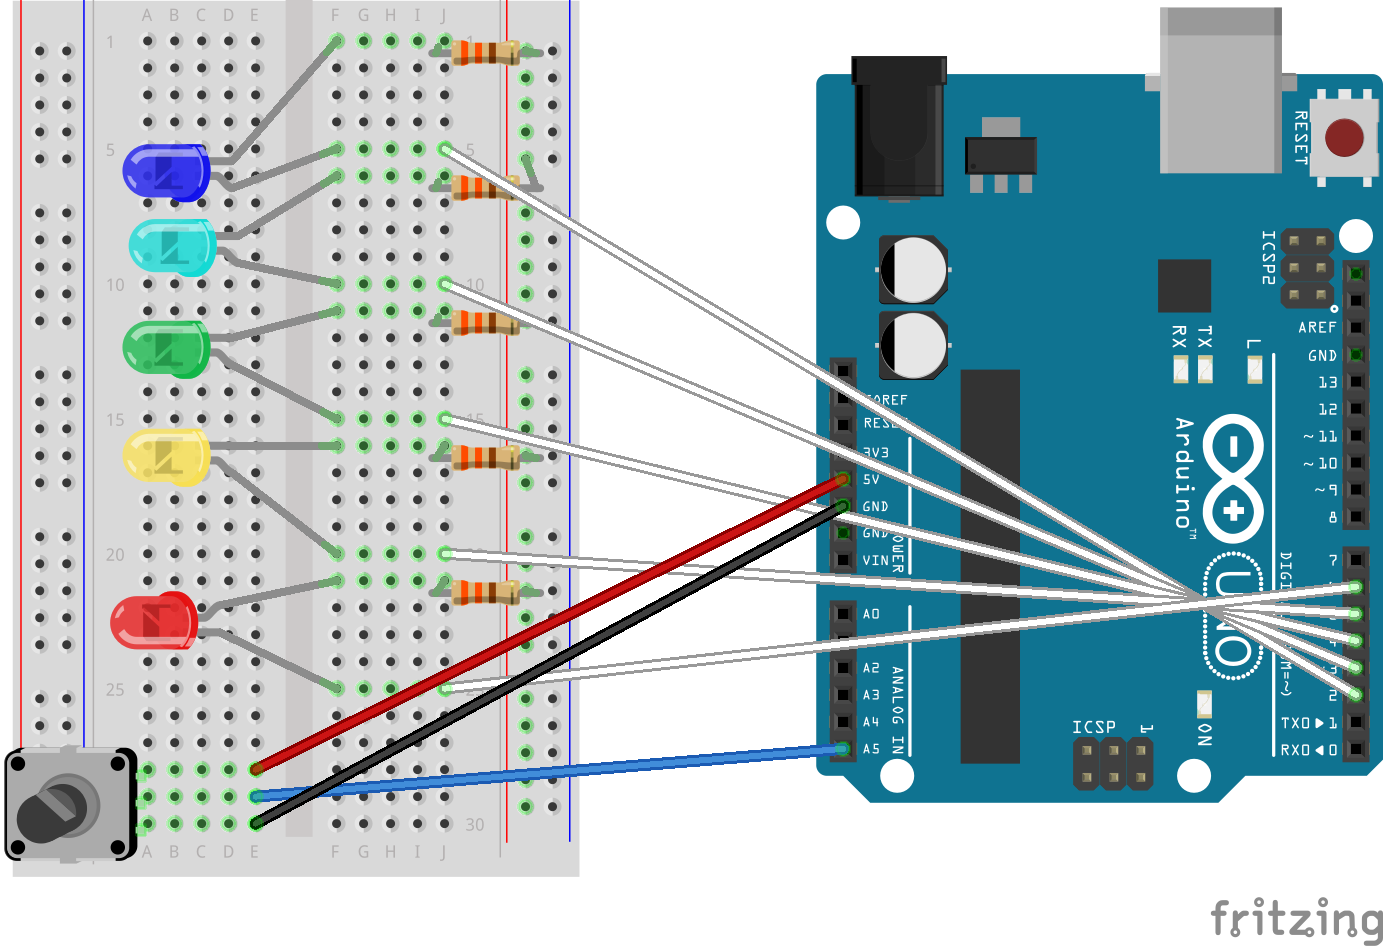
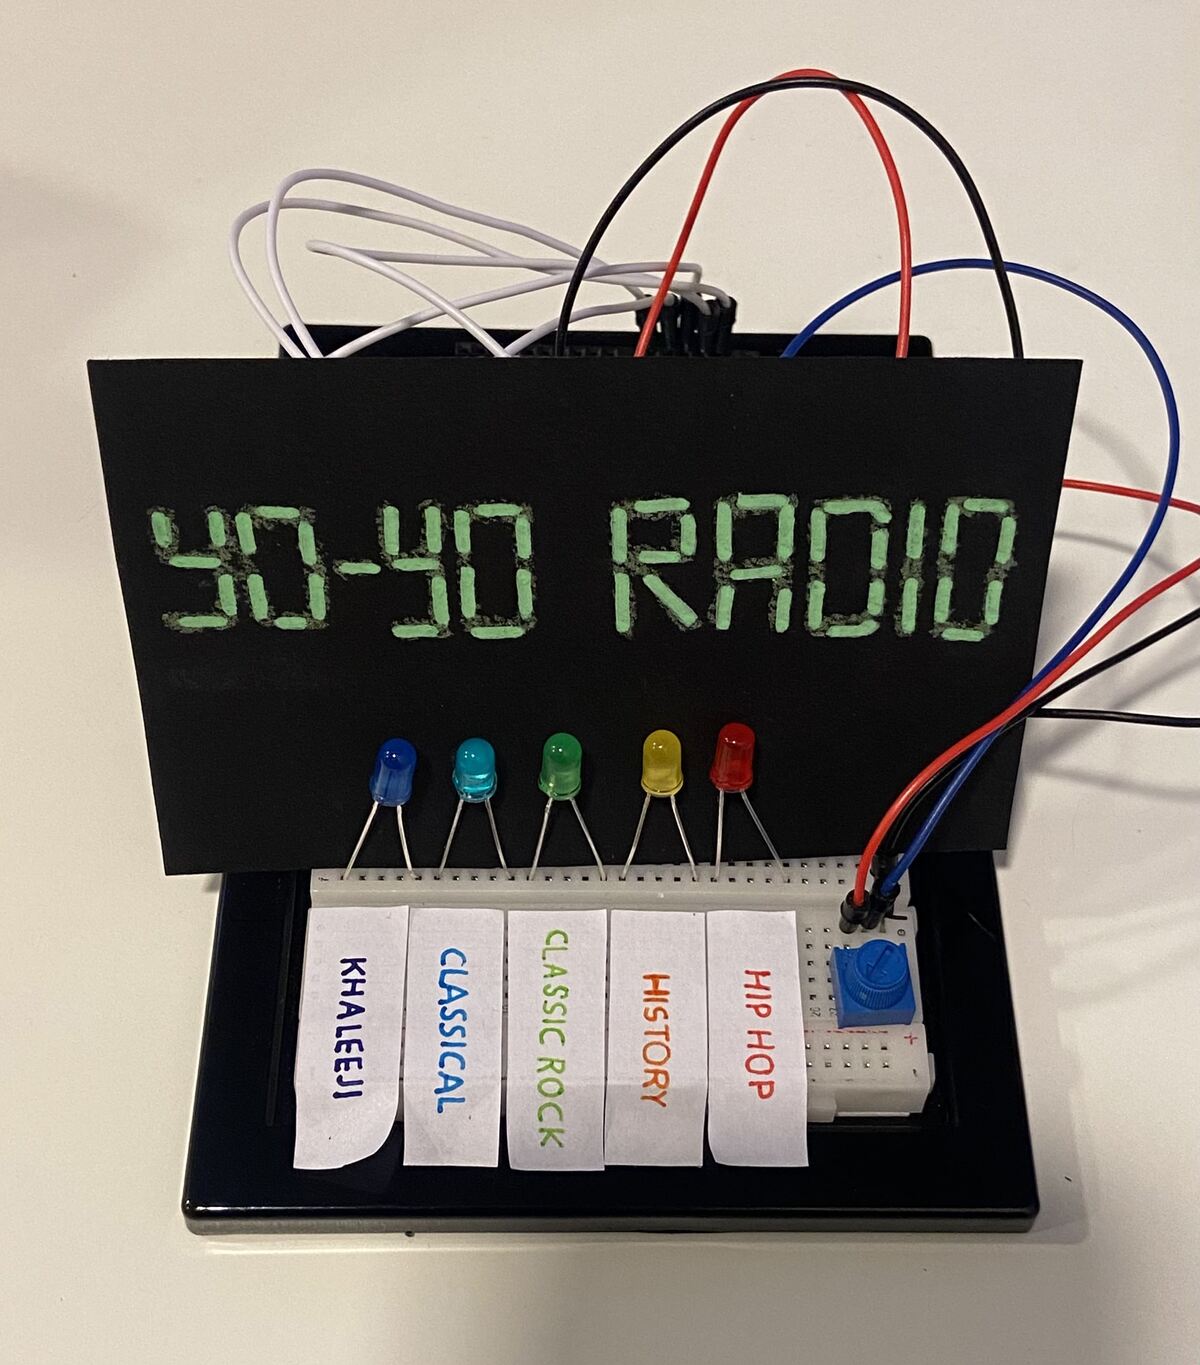
For my final project, I made a radio that changes FM channels according to what value range you turn the potentiometer dial to. I inputted song files that play according to their designated serial monitor value and an array of different songs for each channel.
This includes:
51-240 (Hip Hop), which is designated the variable RED on p5
241-429 (History), variable YELLOW on p5
430-619 (Classic Rock), variable GREEN on p5
620-814 (Classical), variable TEAL on p5
815-1023 (Khaleeji), variable BLUE on p5
For 0-50 Radio is switched off (variable OFF on p5)
Implementation and Interaction
So, whenever you turn the dial to 267, for example, an audio file from the History channel will start to play, and the yellow LED will simultaneously light up to indicate the change in channels.
The interactive element comes from you turning the dial to change the channel, and being able to control the output according to what value you stop on.
Arduino Code
int potPin = A5; // potentiometer
int bluePin = 2;
int tealPin = 3;
int greenPin = 4;
int yellowPin = 5;
int redPin = 6;
int currentColor = 0; // current color
int OFF = 0;
int RED = 6;
int YELLOW = 5;
int GREEN = 4;
int TEAL = 3;
int BLUE = 2;

void setup() {
  pinMode (potPin, INPUT);
  pinMode (bluePin, OUTPUT);
  pinMode (tealPin, OUTPUT);
  pinMode (greenPin, OUTPUT);
  pinMode (yellowPin, OUTPUT);
  pinMode (redPin, OUTPUT);
  Serial.begin (9600); // serial monitor count
}

void loop() {

  // x == y (x is equal to y)
  // x != y (x is not equal to y)
  // x <  y (x is less than y)
  // x >  y (x is greater than y)
  // x <= y (x is less than or equal to y)
  // x >= y (x is greater than or equal to y)

  delay(100);
  int potMeasure = analogRead (A5);
  int mappedPot = map(potMeasure, 0, 1023, 0, 255);
  Serial.println(currentColor);

  if ((potMeasure > 0) && (potMeasure <= 50)) {
    currentColor = 0;
    digitalWrite (redPin, LOW);
    digitalWrite (yellowPin, LOW);
    digitalWrite (greenPin, LOW);
    digitalWrite (tealPin, LOW);
    digitalWrite (bluePin, LOW);
    int OFF = 0;
  }
  else if ((potMeasure > 50) && (potMeasure <= 240)) {
    currentColor = 6;
    digitalWrite (redPin, HIGH);
    digitalWrite (yellowPin, LOW);
    digitalWrite (greenPin, LOW);
    digitalWrite (tealPin, LOW);
    digitalWrite (bluePin, LOW);
    int RED = 1;
  }
  else if ((potMeasure > 240) && (potMeasure < 430)) {
    currentColor = 5;
    digitalWrite (yellowPin, HIGH);
    digitalWrite (redPin, LOW);
    digitalWrite (greenPin, LOW);
    digitalWrite (tealPin, LOW);
    digitalWrite (bluePin, LOW);
    int YELLOW = 2;
  }
  else if ((potMeasure >= 430) && (potMeasure < 620)) {
    currentColor = 4;
    digitalWrite (greenPin, HIGH);
    digitalWrite (redPin, LOW);
    digitalWrite (yellowPin, LOW);
    digitalWrite (tealPin, LOW);
    digitalWrite (bluePin, LOW);
    int GREEN = 3;
  }
  else if ((potMeasure >= 620) && (potMeasure < 815)) {
    currentColor = 3;
    digitalWrite (tealPin, HIGH);
    digitalWrite (redPin, LOW);
    digitalWrite (yellowPin, LOW);
    digitalWrite (greenPin, LOW);
    digitalWrite (bluePin, LOW);
    int TEAL = 4;
  }

  else if ((potMeasure >= 815) && (potMeasure <= 1023)) {
    currentColor = 2;
    digitalWrite (bluePin, HIGH);
    digitalWrite (redPin, LOW);
    digitalWrite (yellowPin, LOW);
    digitalWrite (greenPin, LOW);
    digitalWrite (tealPin, LOW);
    int BLUE = 5;
  }
}
For my Arduino code, I essentially made it so that whenever the integer potMeasure (potentiometer value) is between a range of values, it would trigger the designated pin to light up.
For example, this segment of code here shows that whenever the potMeasure value is between or equivalent to 817 and 1023, all other pins but the bluePin are on LOW (to indicate them being switched off), and the bluePin is on HIGH (to indicate it being switched on). Each colored pin stands for each colored LED on the board.
The currentColor integer encompasses each of the potMeasure ranges for each LED to light up, hence why if the serial monitor is between or equivalent to 815 and 1023, the value 2 would pop up as it is the designated value for the blue LED.
int potMeasure = analogRead (A5);
int mappedPot = map(potMeasure, 0, 1023, 0, 255);
Serial.println(currentColor);
p5 Code
For p5, I first uploaded all the audio files for each channel to function preload and designated each channel an array of audio files that p5 can randomly choose from.
soundFormats("mp3");
 // BLUE (KHALEEJI)
blueSong1 = loadSound ("MEHAD.mp3");
blueSong2 = loadSound ("UMY KM AHWAHA.mp3")
blueSounds = [blueSong1, blueSong2] // etc
I then designated a new variable called oldData in function draw, which holds the previous value of inData (serial monitor value/ potMeasure on Arduino). This was done so that whenever the user changes the channel, p5 would stop the song from playing so as to not interrupt the next song.
// oldData holds the *previous* value of inData

// if user changes station, p5 checks that oldData has changed into inData
// then prints the change
if (inData != oldData) {
  // The station changed
   console.log("changed from " + oldData + " to " + inData);

  // stops all songs if inData (new station value) is not equal to oldData (old station value)
  redSong1.stop();
  redSong2.stop();
  yellowSong1.stop();
  yellowSong2.stop();
  greenSong1.stop();
  tealSong1.stop();
  blueSong1.stop();
  blueSong2.stop();
I then created an if statement for each inData value (BLUE in this context is the Khaleeji channel. Within each statement, there would be a new variable initializing the random selection of songs from the designated array, which it would then play.
if (inData == BLUE){
  khaleejiChannel = random(blueSounds)
  khaleejiChannel.play()
}
I then added more if statements further below within function draw, which consisted of the font and text to be displayed on the screen every time a channel is changed.
else if (inData == BLUE) { // KHALEEJI

    // CHANNEL NAME TEXT
    noStroke();
    fill (128,172,57); // text color
    textFont(radioFont, 45); // (font name, font size)
    text("KHALEEJI", 178, 148); // (text, x, y)
    glow(color(128,172,57), 19); // (color, intensity) calls glow function

  }
The glow variable refers to the glow function further below, which makes the text look like it’s lit up.
Some other visual demonstration that indicates what channel you’re on. I would have liked for the background to possibly show the sound waves of the song playing and in the color of the designated channel.
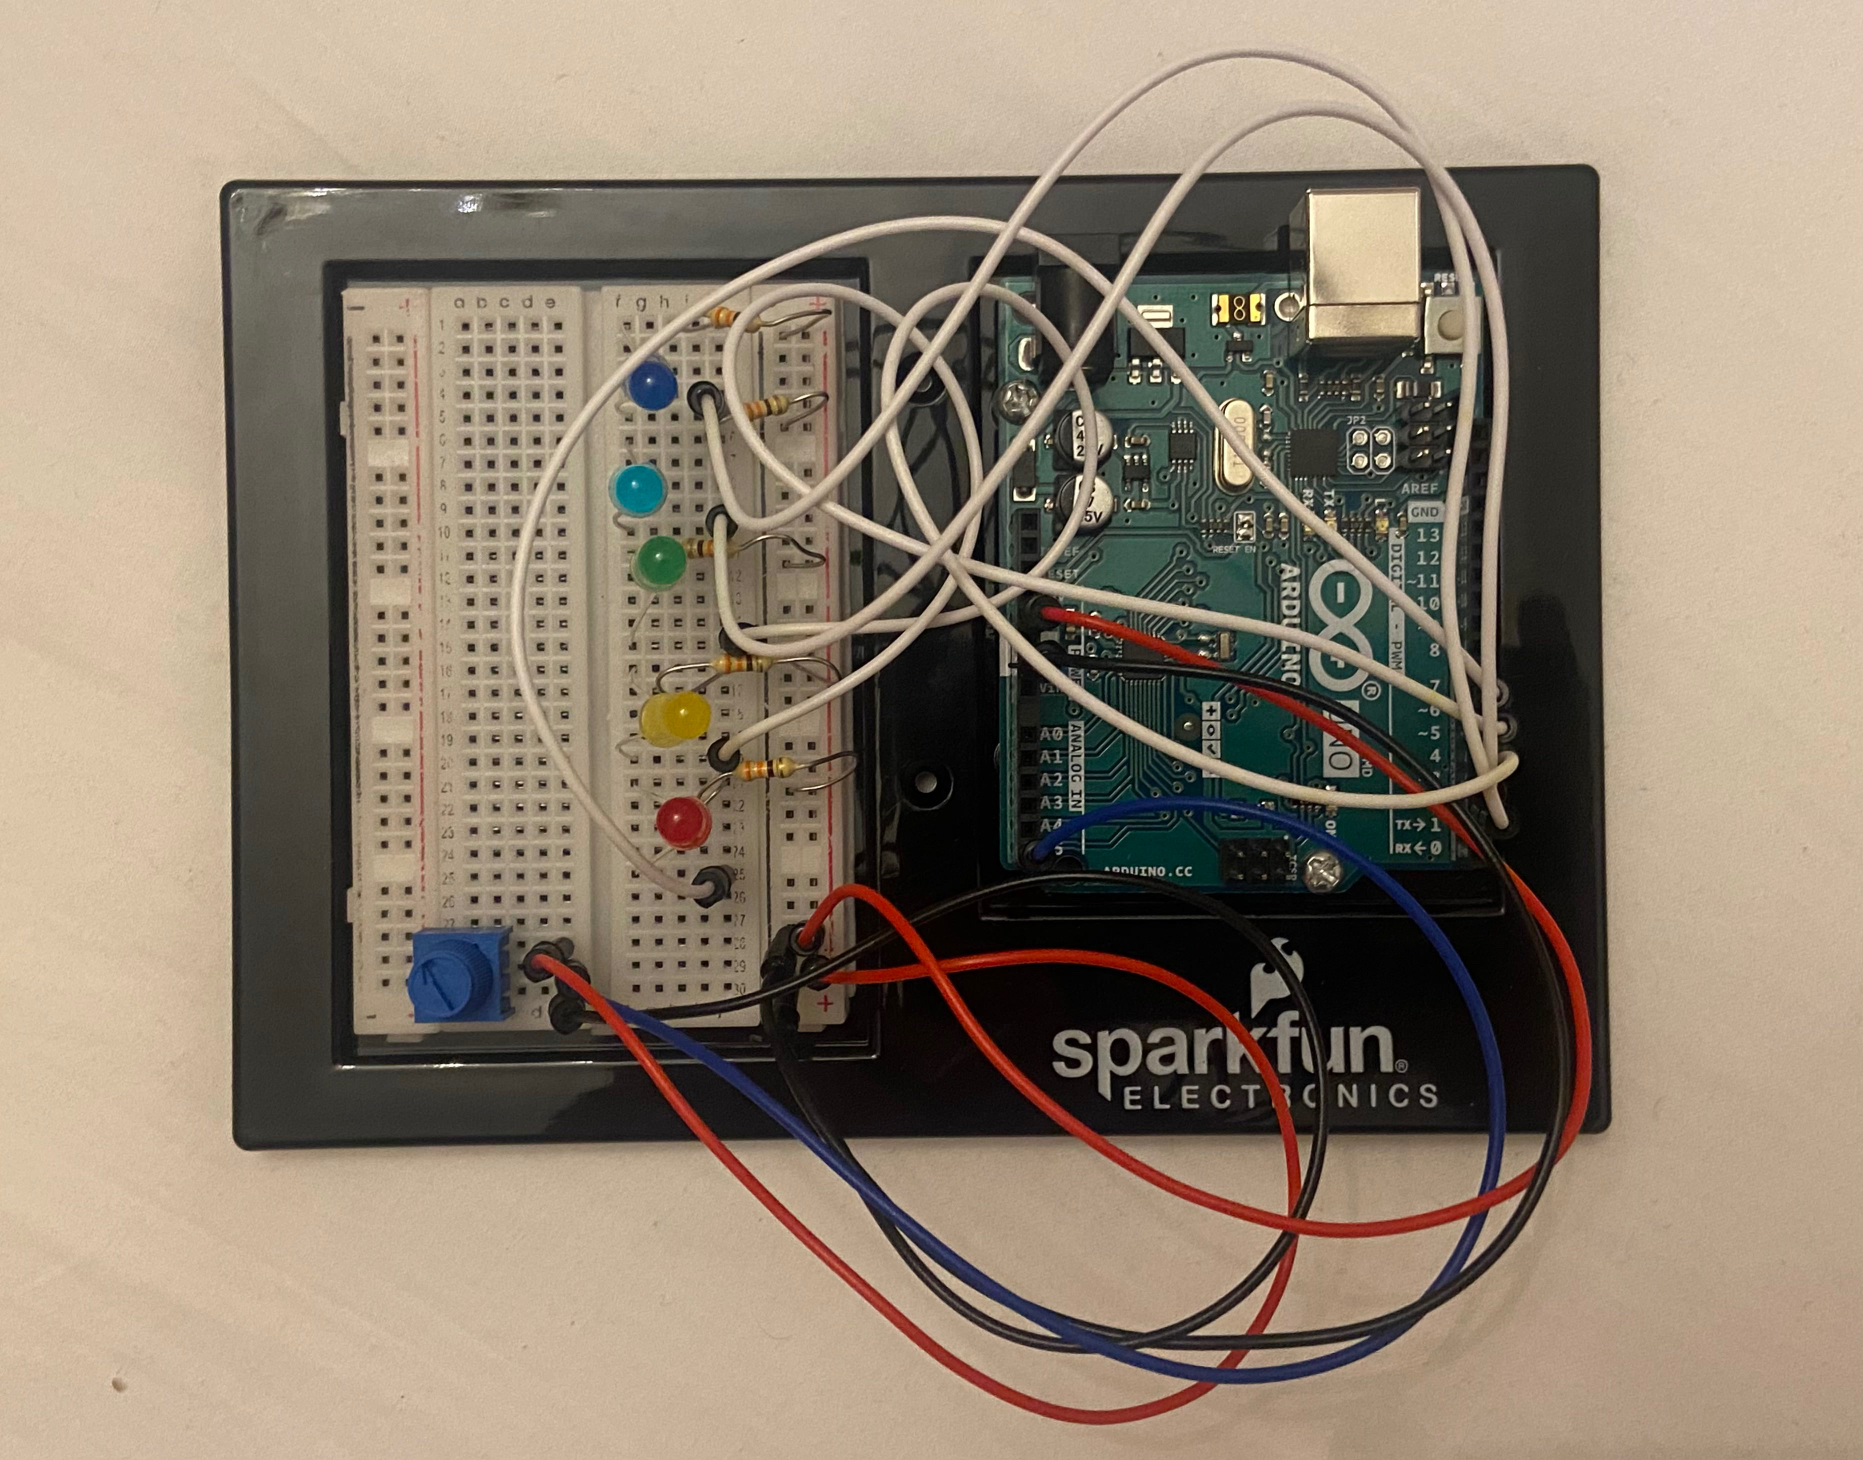
I also wanted to do something more for the physical presentation of the Arduino board, though I was able to customize it just a little using some card paper.
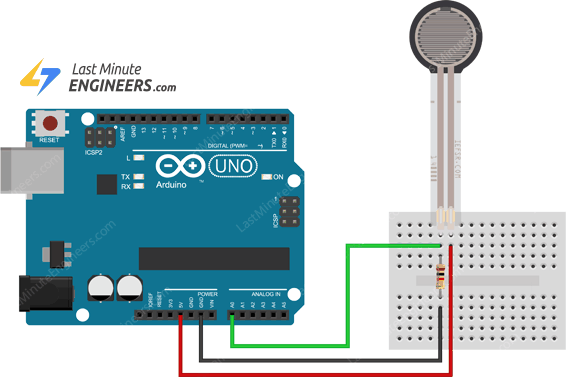
I finally connected Arduino to my game and before setting up the jumping board, I tried checking whether the force resistor works and if so, how it works. I searched on the internet how to connect the force resistor sensor to Arduino and get the data.
Schematic
I followed this schematic to hook up the resistor:
Arduino code:
int fsrPin = 0;     // the FSR and 10K pulldown are connected to a0
int fsrReading;     // the analog reading from the FSR resistor divider

void setup(void) {
  Serial.begin(9600);
}

void loop(void) {
  fsrReading = analogRead(fsrPin);

  Serial.print("Analog reading = ");
  Serial.print(fsrReading);
}
Next steps:
Work on the jumpability of the game
Set up the jumping area->work on the sensitivity of the sensors