
Concept
My midterm project is an extension of the “Ivy’s Hardest Game” game, where I have incorporated additional features. Unlike the original game, my version of the game, titled “ChaseMe”, is a time-based game, where John Wick, a fictional Hollywood character, is the primary character, while other Marvel characters like Thanos, Monolith, Howard and so on are supplementary characters. Here, the main character is being chased by the secondary characters mentioned above, so the target is to help Wick survive as long as possible. In case, the secondary characters catch him, the game is over and all the progress vanishes.
Moreover, I took a tiny bit of inspiration from “Adventure Trap 2” – a game famous for its hard levels and hidden traps. In simple words, no matter what you do, no matter what the player does, the character dies in this game. Thus, I wanted to implement such features; consequently, it is relatively challenging to go beyond level 4 in this game (Good luck with this!). With this idea in mind, I have displayed the number of levels on the top-left corner.
Code
The entire project is divided into four JavaScript files for organizational purposes (character.js, game.js, keyboard_keys.js and driver_file.js). Most of the functions are present inside the “game.js” file, character.js file contains blueprints of superclass and subclasses. In the same way, “keyboard_keys.js” files contain functions that keep track of arrow keys pressed and released during the game, whereas the driver_file.js file is the driving code that consists of all the global variables as well as setup() and draw() functions.
The core feature of the game is the use of Object Oriented Programming (OOP) and related features like abstraction, encapsulation and modularity. There is a superclass titled “Character” from which two subclasses — MyCharacter and SuppCharacter — are derived.
Here, the MyCharacter consists of image dimension and collision attributes in addition to the attributes of superclass; similarly, it constitutes of five methods as mentioned below:
-
- up_collision_check()
It checks if the primary character has collided with secondary characters or not — if yes, class attributes are updated accordingly. - movement()
It loops through the list of secondary characters and checks collision with them and sets attributes accordingly. - border_check()
It keeps the primary character within the canvas. - update()
It updates the location of the primary character and calls border check and movement method in the process. - display()
It displays the primary character (image) and updates its position as the character moves.
- up_collision_check()
Similarly, the SuppCharacter subclass initializes additional attributes (particularly, acceleration and velocity vectors) and includes three methods as mentioned below:
-
- border_check()
It makes sure secondary characters stay within the canvas — when each character reaches the border, its velocity is reversed. - update()
It updates the (x, y) coordinates of the character, checks border collision and uses an algorithm so that each supplementary character follows the primary character with the help of vector methods. - display() method
This method calls the update() method and displays the image of the secondary character.
- border_check()
Above mentioned are the three classes of the project. The entire function is based on these classes and additional features are implemented over them to shape the project.
The fundamental phases of this game can be divided into the following game stages (or called “gamePhase”) in the code. I have made various changes and included additional features in each of these stages.
-
- “Start” phase
- “Playing” phase
- “Complete” phase
In the start phase, the game’s interface is shown to the user. It displays an interface background (an image loaded into the system), shows the game instructions (how to play the game) and consists of a “Start” button, which should be clicked on to start the game.
This stage relies on “start_screen()” and “instruction_text()” functions. The “start_screen()” function displays the background image, sets up the “start” button and ensures the game progresses to the next stage when clicked on. In addition, when the cursor is brought over the button, hover effect is visible on the screen. Similarly, the “instruction_text()” function displays a set of texts on how to play the game on the right corner of the screen. Once, the “start” button is clicked, “gamePhase” changes to “playing”, thus new functions are called and the game interface changes.
The second phase is the “playing” phase, which is the most code-intensive stage of the game. This is where a player plays the game, progresses to different levels and completes the game (it can be tiring though). Once the game starts, the “game_screen()” function is called. It displays the primary character and loops through the supplementary characters’ lists and displays all the secondary characters on the screen. Inside this function, “timer()” function is called.
function timer()
{
  // Co-ordinates of timer text
  let x_pos = -160;
  let y_pos = 25;

  // Timer Functionality Text
  textAlign(CENTER, CENTER);
  stroke(5);
  textSize(25);
  fill("white");
  text("Time Remaining: " + timer_len, canvas_w + x_pos, y_pos);                                // Displaying Timer
  text("Level: " + level + " of " + num_levels, canvas_w/2 + 2.5 * x_pos, y_pos);              // Displaying Level


  // A second passed using modulus function
  // Decrease time and increase score
  if (frameCount % 60 == 0 && timer_len > 0)
  {
    timer_len--;
    score++;
  }

  // If the character has survived until the end of the level, call next_level_screen() function
  if (isGameOver == false && timer_len <= 0)
  {
    next_level_screen();
  }

}
The “timer()” function displays the timer and level of the game on the screen. The idea behind the countdown timer is to decrease the value of the “timer_len” global variable every second, which is done using the “modulus” operator — i.e. in an interval of every 60 frames, the timer_len variable’s value is decreased once. This way, it appears as if the timer is in countdown mode. Additionally, while decreasing the value of the timer_len variable, the value of the “score” variable is increased too. This function also ensures the game proceeds to the next level if the timer_len is “0” and isGameOver boolean is “false”, which implies that the game should go on — this is done by calling the “next_level_screen()” function.
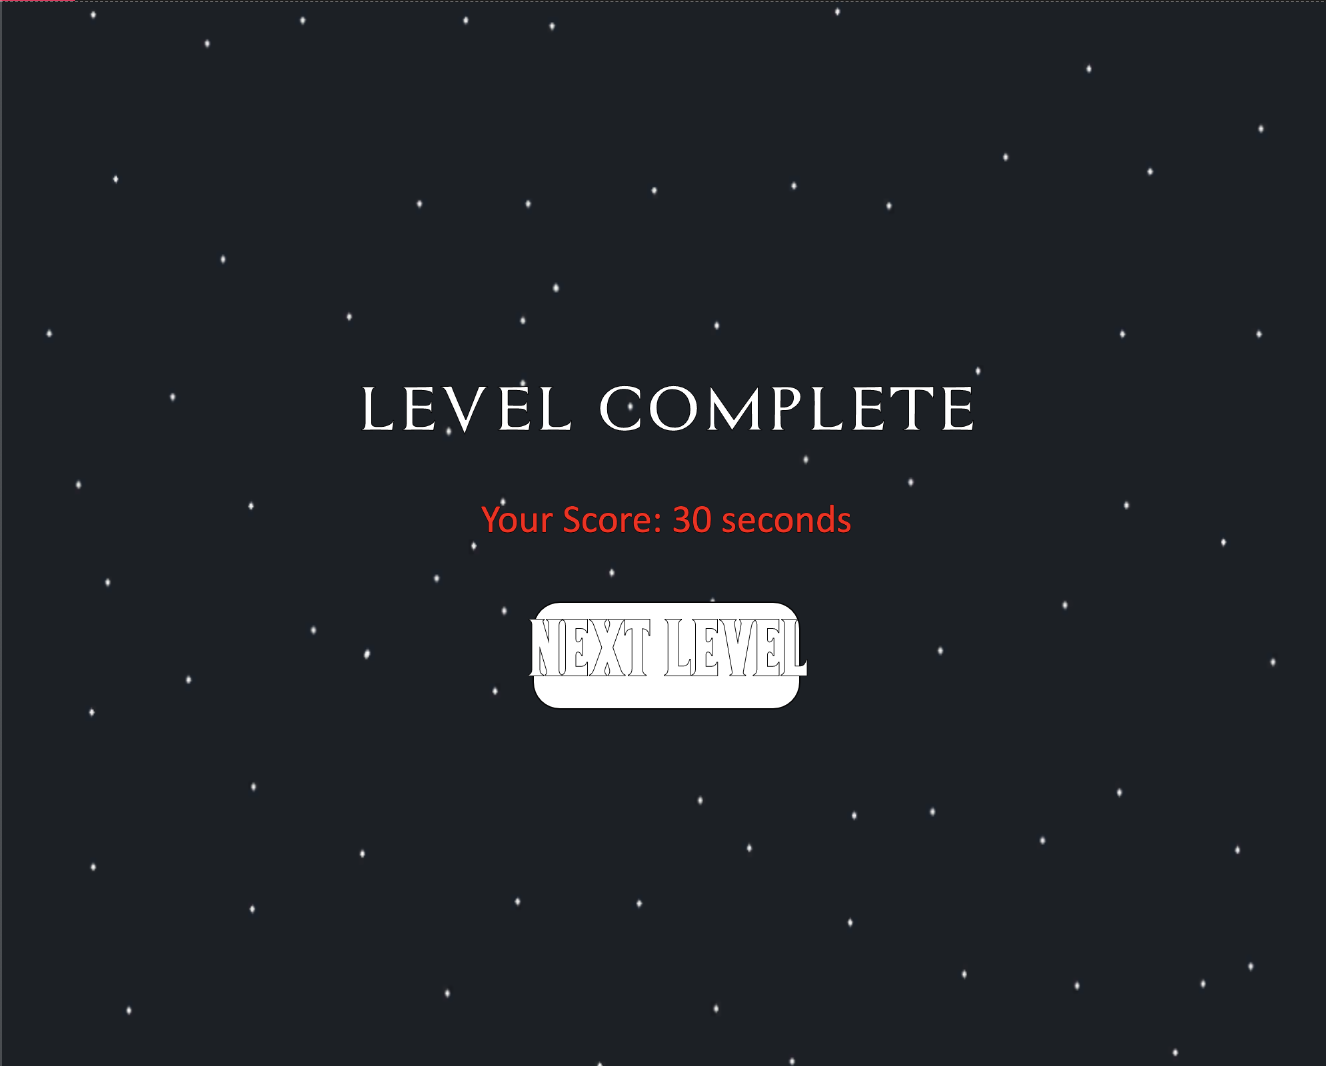
The “next_level_screen()” function depends on two helper functions “level_completion_setting()” and “next_level_settings()”. These functions update appropriate global variables like isGameOver, gamePhase and score. The next_level_settings() function adds an increasing number of normal characters to the game as it progresses. Also, a new character called “big-boss” is introduced after level 3 in the game (and two of them after level 6), which is done by the next_level_settings() function.
The next_level_screen() function checks if it’s the end of the level — if there are more levels in the game, it shows a button (which is done using the “myButton()” function described later) that can be clicked to move to the next level.
While playing the game, if the primary character collides with any other characters, the isGameOver variable changes to true and using the collision check method of the “MyCharacter” subclass, the gameOver_screen() function is invoked. This function again displays a game over the screen along with a button that can be clicked to restart the game. In order to do so, reset() function is called, which resets different global variables and lists to initial states for a fresh start.
function reset_game()
{
  // Reset isGameOver boolean and change the gamephase
  isGameOver = false;
  gamePhase = "playing";
  score = 0;
  level = 1;

  timer_len = timer_len_1;               // Reset the timer to 30 seconds
  supp_char_list = [];                  // Reset the list of secondary characters
  add_supp_char();                      // Secondary characteres added manually in reset
  textFont("calibri");                  // For Timer Font (Otherwise it changes to Assassin Font)

  add_soundtrack();

  // Placing the primary character at the middle of the canvas
  my_char.location.x = (canvas_w/2 - my_char_size/3);
  my_char.location.y = (canvas_w/2 - my_char_size*3);
}
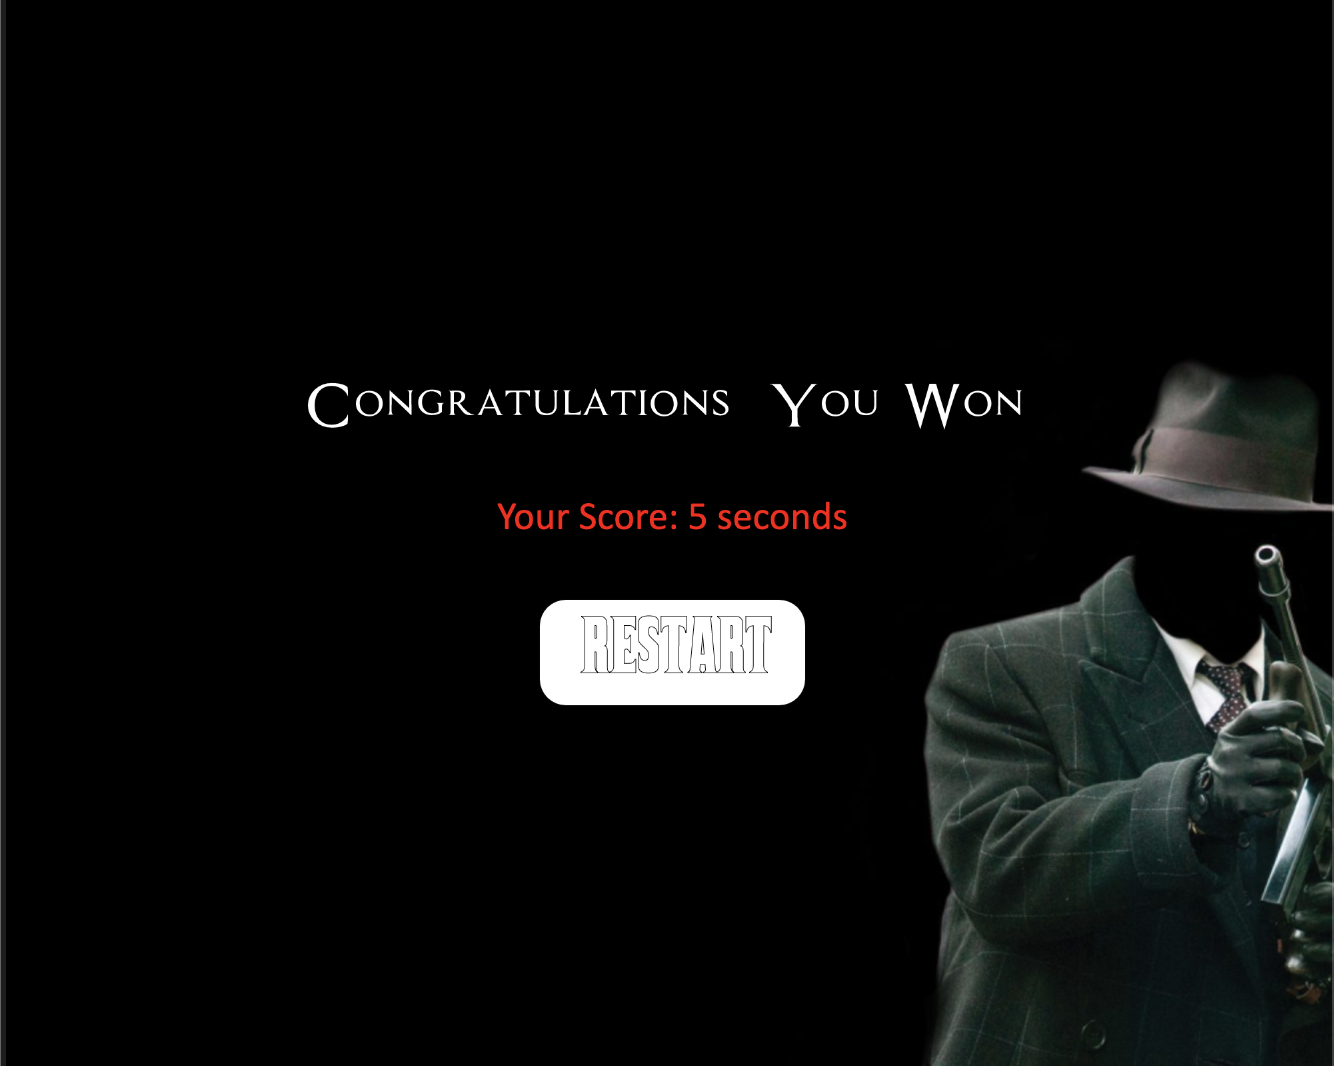
Similarly, the third phase of the game is the “complete” phase. If all the levels are completed, the “game_complete_screen()” function is called. It displays a congratulatory message and provides the player with a button to restart the game – once again, myButton() and reset() functions are used respectively to restart the game.
Additional Functionalities
The game consists of different sound effects to aid the overall gameplay. Using the “add_soundtrack()” function, background music is added to the game, which spans for the entirety of the game (to do so, p5.js’s inbuilt loop() function is used). This function is called inside the “setup()” function as well as the “reset()” function — this way, music does not overlap and it can be stopped whenever the game over screen is to be displayed.
In the same way, a collision sound is a part of the game, which is played when secondary characters catch the primary character successfully.
I spent a significant amount of time brainstorming possible algorithms and game designs for this project. Consequently, I came up with different ideas that I am particularly proud of. For instance, the chasing feature inside the update method of the “SuppCharacter” subclass. Initially, I was planning on implementing Dijkstra’s Algorithm to find the shortest path between characters, but the concept of vector implementation seemed more reasonable. I used some ideas from this source to complete this function. The idea here is to create a vector that points to the position of the primary character. Then, the (vector) location of the chasing characters is subtracted from the vector created above. The resultant vector has a strong magnitude or pull; thus, it is mapped by a particular scale (in this case, 0.1) as a result, the movement is more realistic. Finally, the vector of the primary character is assigned to the acceleration vector, which is used to update the velocity vector; the velocity vector in turn updates the location vector. This way, it appears as if supplementary characters are chasing the primary character. Essentially, it is using basic mechanics to find the shortest path.
update()
{
  // Create location vector for main character (dynamic in nature)
  let main_vec = createVector(my_char.location.x, my_char.location.y);
  main_vec.sub(this.location);                  // Subtract location of this.location from main_vec
  main_vec.setMag(supp_char_mag);               // Set the magnitude of the vector - used as 'Pull'
  this.acc = main_vec;                          // Set acceleration to main_vec

  this.location.add(this.velocity);            // Update location
  this.velocity.add(this.acc);                 // Similary for velocity
  this.velocity.limit(supp_vel_limit);        // Set max velocity limit

  this.border_check();
}
At first, I used p5.js’ inbuilt createButton() function to take user input. However, in the later phase of game design, I manually created a myButton() function that takes certain parameters and creates a button for the user. This function displays the required message to the user (based on the message parameter), creates different buttons (based on the button_text parameter) and enables unique hover effects (based on the color parameter). This way, using one function, unique buttons are created throughout the game. Moreover, the use of the “type” parameter ensures the implementation of certain features under certain conditions only.
function myButton(img_name, rect_x, rect_y, rect_w, rect_h, message, button_text, color, type)
{
  image(img_name, 0, 0, canvas_w, canvas_h);            // Load the image based on parameter

  textSize(50);
  textFont(assassin_font);
  fill("white");
  stroke(1);
  text(message, canvas_w/2, canvas_h/2 - 100);


  // Your Score Text -- for all pages except the first one
  if (type != "start")
  {
    textSize(30);
    textFont("calibri");
    fill("red");
    text("Your Score: " + score + " seconds", canvas_w/2, canvas_h/2 - 10);
  }

  // Play Again Button
  let isWithinRectangle = (mouseX < (rect_x + rect_w) && mouseX > (rect_w) && mouseY < (rect_y + rect_h) && mouseY > (rect_y))

  // Hover Effect
  if (isWithinRectangle)
  {
    if (type != "start")
      fill(color);
    else
       fill("grey");

    text_size = 55;
  }
  else
  {
    if (type != "start")
      fill("white");
    else
      fill(143,148,123);

    text_size = 50;
  }

  // Border rectangle for Start Button
  stroke(5);
  rect(rect_x, rect_y, rect_w, rect_h, 20);

  // Font setting for start page
  if (type == "start")
  {
    textAlign(CENTER);
    textFont("Helvetica");
    fill("white");
  }
  else
    textFont(corleone_font);

  stroke(5);
  textSize(text_size);
  text(button_text, rect_x + 100, rect_y + 30);                      // Button text

  return isWithinRectangle;            // Return if cursor is within the rectangle or not
}
Similarly, I am proud of the way the overall project is organized. For instance, there are separate “add_supp_char()” and “add_big_boss()” functions in the driver_file.js file, where I have adjusted the x-coordinates of new characters so that no supplementary character overlap with the primary character. Also, this design lets me call the functions in each level separately, thus the number of supplementary characters can be increased after each level; also, big-boss characters can be added after certain levels due to this game design. Thus, I am happy with the game design.
Problems I encountered
The section that took most of my time was designing the functionality where secondary characters follow the primary character. I was trying to implement this feature without using ‘vectors’; however, it was tedious and failed in many circumstances. Thus, I switched the location, velocity and acceleration attributes of the classes mentioned above, which allowed me to track the path of the character’s movement. This way, I was able to implement this feature. Similarly, increasing the level of difficulty required a worthwhile time investment as sometimes the levels were too difficult or supremely easy. I solved this problem by introducing supp_vel_increment and supp_char_mag variables which let me increase the secondary character’s velocity and pull force manually inside different functions or methods.
Reflection
Overall, I am incredibly happy with the way the project turned out. Designing a tentative plan was definitely helpful as I could build upon different ideas. In future iterations of this project, I would love to include the following changes:
- The use of Computer Vision (web camera or microphone) to control the movement of the primary character. As of now, the character’s movement is sensitive given the increasing level of difficulty, thus proper algorithms and modes of user interactivity can enhance the game.
- A setting page at the beginning of the game, which lets the user select the number of levels or number of characters.
- The use of more animation and sound in the game.
Use Fullscreen Mode to play the final version of the game.