In this assignment, my idea was to create a generative artwork that simulates rainfall and rainy clouds. The inspiration was from the falling ball example in class. I asked myself if there was a way to add meaning to the falling balls and I immediately thought of rain and snow.
My implementation of the assignment uses shapes, sound, an image background, gravity, and noise . I created a class for raindrops and clouds. The collection of raindrops produces the rain. At first I tried to make the cloud class inherit from the raindrop class. I tried this because I wanted each individual cloud to produce rain by itself. However my approach did not work as intended so I made the rain exclusive from the clouds while making the raindrops start at the y position of the clouds.
I also tried to include wind in the rain. I initially used the noise to simulate the wind but it became difficult to control the direction of the rainfall so I mapped the the y position of the mouse to an interval and added it to the raindrop coordinates. This way changing the mouse position will change the direction of fall thus creating the illusion of wind in a particular direction.
I tried to also add parallax to the raindrops but it didn’t work quite well so I played with the stroke weight of the raindrop to make some raindrops appear closer than others.
By clicking on the sketch you can make it rain or not.
The embedded code:
Conclusion:
Future improvements will focus on adding an umbrella to the mouse’s movement and blocking off the raindrops from the area the umbrella occupies. Furthermore, lightening bolts and thunder sounds will be randomly added to make the simulation close to actual rain.
The completed sketch that utilizes both arrays and object oriented programming is shown below. The link to the sketch on the p5.js web editor can be found here.
A screen capture that I particularly like is also shown below:
INSPIRATION & DESIGN:
The inspiration for this piece came to me when I came across a time lapse video showcasing the growth of different crystals. I was surprised at how how beautiful and calming the video was; one would think that there isn’t anything too special about the process of crystallization, but when looked at closely, it is revealed how mesmerizing and almost fantastical it is, and you can’t help but admire how amazing nature is. I also think that crystal growth works quite well for being translated to something that is generative: crystals tend to start off small and exponentially grow, but even after they are fully “bloomed”, the process still continues so long the environment remains unchanged.
For this project, I wanted to create something that mimicked the process of water turning into ice or snowflakes forming. I found this sketch to be very challenging in terms of making the crystallization to look as biologically accurate as possible, as well just generally making the sketch look aesthetically pleasing. However, I was really interested and committed to the sketch because using code to mimic processes found in nature, such as the golden ratio, trees, and Fibonacci numbers, has always sparked my curiosity.
CODING SPECIFICS
The sketch is built using a user defined Crystal class, and instances of this class are put into a single array (in the setup() function), in which methods of the class are applied on each object in the array (in the draw() function).
In setup():
function setup() {
  createCanvas(700, 500);

 //initializing an array of little crystals
 for (let i = 0; i < 300; i++) {
    start_x = random(-100, 100);   //give each line random points
    start_y = random(-100, 100);
    end_x = random(-50, 50);
    end_y = random(-50, 50);
    max_opacity = random(20, 100);  //set each line to have a maximum opacity to make it look more natural
    cluster.push(new Crystal(start_x,start_y, end_x, end_y, max_opacity));
  }

}
In draw():
function draw() {
  translate(width/2, height/2);
  background(116, 150, 183);
  //background(0);

  //iterate over each object in the array and apply methods to it
  for (let i = 0; i < cluster.length; i++) {
    cluster[i].move();
    cluster[i].display();
  }

}
Each individual crystal is actually just a single line, with semi-randomized starting and ending (x,y) positions, a randomized opacity, a jitter variable, and a direction variable (this.direction). These variables define where each line starts and ends, how opaque the stroke color is, and how much each line moves, and in what direction the line lengthens over time. It also has a a time keeper value (this.age) and a boolean value that defines when to draw more lines (this.has_child). These variables are what creates the “growth” effect are described in more detail later on in this post.
Crystal class constructor:
constructor(star_x, start_y, end_x, end_y, max_opacity) {
  this.start_x = start_x;  //start x pos
  this.start_y = start_y; //start y pos
  this.end_x = end_x; //end x pos
  this.end_y = end_y; //end y pos

  this.max_opacity = max_opacity;
  this.jitter=0.2;  //variable that causes it to move slightly
  this.opacity = 0;

  //variable that helps lengthen the lines
  this.direction = atan2(this.end_y-this.start_y, this.end_x-this.start_x);
  this.age = frameCount; //time keeper
  this.has_child = false; //boole value
}
In the beginning of the draw() function, we iterate over the array of objects and call methods move() and display(), which do exactly as they sound: they move each line based on the jitter value and display them by increasing the opacity from 0 to the max opacity value each frame.
However, I created an additional method called grow_children() that is only called inside the Crystal class, which I think is the most interesting part of the code. This method essentially keeps initializing and adding new objects into the cluster array, where the move(), display(), and grow_children() functions are then applied to these new objects, and so on. Here is how it works:
Inside move() method, we create an if statement that evaluates to true only when the object that was just created has not drawn any children and when 20 frames have passed since the object was initialized (defined by this.age). If both these conditions are met, we call grow_children():
Then, inside grow_children(), we redefine the parameters start_x, start_y, end_x, and end_y so that the growth of the lines will spread outwards towards the edge of the canvas. Using these new parameters, we then push a new Crystal object into the cluster array:
grow_children(){
  //adjusting the x and y positions of the child lines
  start_x = this.end_x;
  start_y = this.end_y;
  end_x = random(start_x-100, start_x+100);
  end_y = random(start_y-100, start_y+100);

  max_opacity = random(20, 100);

    //initiate new objects and set this.hasChild to True
    cluster.push(new Crystal(start_x,start_y, end_x, end_y, max_opacity));
    this.hasChild = true;
}
Finally, this.hasChild is set to true, and the process repeats.
REFLECTIONS
As I was making this sketch, I realize that what I was envisioning in my head was a little ambitious given the time frame. I became very wrapped up in trying to make it look realistic as possible, and I still don’t believe I have accomplished that. I would love to continue working on this project, and possibly make different variations of it too. Some improvements that I would like to work on are the shapes of the crystals. I chose to use lines for simplicity, but I would like to experiment with long triangles, skinny rectangles, or even my own custom shape. Another issue I want to tackle is how there is only 1 array of objects. Initially I envisioned having several clusters that would appear on different parts of the screen at different times, which would more accurately mirror how water crystallizes. Unfortunately, making one “cluster” was already very complex, and in the end I decided to just focus on one.
The artwork initially depicts raindrops falling onto a dark background. I thought of it as a depiction of when I am feeling down or having a bad day. However, I wanted the background to change color as the raindrops are clicked, as I wanted to depict how absorbing the beauty in the small things or interactions can reflect positively on my wellbeing and entirely change the vibe.
Implementation
// global variables
let s;
let gShapeArray = [];
let numShapes = 10;
let howmanyCircles = 10;
let deletedCircles = 0;
let rr = 0;
let bb = 0;
let gg = 0;

//function for detecting the shape on mouse press
function mousePressed(){
  for(let i = 0; i < gShapeArray.length; i++){
    gShapeArray[i].clicked(mouseX,mouseY,i);
  }
}

//class for a Shape being dropped
class Droped_shape{
  constructor() {
    this.x = random(width);
    this.y = 0;
    this.width = random(20, 50);
    this.speed = random(0.5,3);
    this.r = random(250);
    this.g = random(250);
    this.b = random(250);
  }
  //movement downwards
   move() {
    this.y += this.speed;
  }
  //how the shape is shown on screen
  display() {
    fill(this.r,this.g,this.b);
    stroke(255);
    strokeWeight(2);
    ellipse(this.x, this.y, this.width, this.width);
    this.move();
  }
  //what happens to shape when clicked
  clicked(px,py,index){
    let d = dist(px,py,this.x,this.y);
    if(d < this.width){
      rr = this.r;
      bb = this.b;
      gg = this.g;
      //deleting object from array(destructor)
      gShapeArray.splice(index,1);
      numShapes--;

    }

  }

}
function setup() {
  createCanvas(400, 400);
 // creating an instance of dropped shape
  s = new Droped_shape();
  //creating initial instances of shapes
  for(let i = 0; i < numShapes; i++){
    gShapeArray[i] = new Droped_shape();
  }
}

function draw() {
  background(rr,gg,bb);
  smooth();
  s.display();
  for(let i = 0; i < numShapes; i++){
    gShapeArray[i].display();
    //delete circles exiting canvas from array
    if(gShapeArray[i].y > height){
      gShapeArray.splice(i,1);
      numShapes--;
      deletedCircles++;
    }
  }
  //controlling the rate and flow of dropped shape
  let rand = int(random(0, 100));
  let rand2 = int(random(0, 100));
  //randomly creating shapes over time controlled with two if loops, could have used Perlin noise for this.
  if(rand % 5 == 0){
    if(rand2 % 3 == 0){
    //adding obects to arracy (could have been done with gShapeArray.push)
    gShapeArray[numShapes] = new Droped_shape();
    numShapes++;
      howmanyCircles++;
     }
  }
  //print to console to keep track of circles
  console.log(howmanyCircles,deletedCircles);

}
Some interesting parts of the code were definitely the creating and and using the classes. I wanted the background to take the color of the object that has been clicked. The workaround for this was to assign the objects color (where random RGB values were given to 3 variables r, g and b) to a global variable later assigned to background when the mousePressed() function was called. This could have also been done as an array where the numbers were saved to an array and the values inside the array were later given to the background.
Also, I realized that the array just keeps on taking objects indefinitely, which significantly slowed the sketch later in run-time. The workaround for this was to delete the objects which had reached the bottom of the screen.
I had to revisit a lot of p5.js reference, sketches done during lectures and coding train videos to solidify the concepts of Object oriented Programming before I could implement a functioning class.
Sketch
Reflections
Looking back, I could have used more elegant features such as array.push(object) and Perlin noise to determine creating of objects. However, it was really cool to be able to finally give more meaning to my artwork than before. The animation still isn’t as smooth as I would like it to be, as there are very evident glitches, this maybe due to the inefficient memory use. I would have also like to implement a function to merge objects or detect collisions as this would have made the sketch look much more natural in a way that it shows the true behavior of water droplets.
In this assignment, I wanted to come up with something interactive that starts moving on the screen randomly and would make the viewer so confused about what the result could be, then after a while, the viewer would understand everything and see the beauty behind the chaos. Therefore, I decided to add multiple arcs to the screen that have an angle that is even less than a quarter of a circle. Each time an arc bumps into a wall, its stop angle is increased and gradually becomes closer to looking like a full circle. When an arc becomes a full circle, its position is transferred to the center of the screen and it freezes there. I designed the work in a way such that smaller arcs are slower than faster arcs, thus the biggest arcs will freeze earlier, and with time as the smaller arcs freeze they fill the whole screen with concentric circles that would look amazing. You can see this interactivity in the sketch below.
To be able to come up with this sketch on p5.js I used an object-oriented programming approach, in which I created a class called bumpingArc and added member functions to this class. I added a constructor where I initialized all necessary variables such as the xPosition and yPosition of the arcs, as well as the dimensions of the arc. I decided to add parameters to my constructor so that when I create various objects in my class, I would have the freedom to modify these variables. You can see the code for the class attached below.
class bumpingArc {
  //initialize important variables in the constructor
  constructor(speedX, speedY, diameter) {
    this.xPos = width / 2;
    this.yPos = height / 2;
    this.xSpeed = speedX;
    this.ySpeed = speedY;
    this.stopAngle = 60;
    this.arcDiameter = diameter;
    this.angleChange = 30;
    this.Rcolor = random(0, 255);
    this.Gcolor = random(0, 255);
    this.Bcolor = random(0, 255);
  }
  //change the position of the arc each frame by adding xSpeed and ySpeed to initial positions
  moveArc() {
    this.xPos += this.xSpeed;
    this.yPos += this.ySpeed;
  }
  //check if the arc hit the bound, if yes increase the angle of the arc and flip positions
  checkBounds() {
    if (this.xPos >= width || this.xPos <= 0) {
      this.xSpeed = -this.xSpeed;
      this.stopAngle += this.angleChange;
    }
    if (this.yPos >= height || this.yPos <= 0) {
      this.ySpeed = -this.ySpeed;
      this.stopAngle += this.angleChange;
    }
  }

  changeArcColor() {
    //check if the arc becomes a full circle if it becomes a full circle place it in the center and freeze it
    if (this.stopAngle % 360 == 0) {
      fill(this.Rcolor, this.Gcolor, this.Bcolor);
      this.xPos = width / 2;
      this.yPos = height / 2;
      this.xSpeed = 0;
      this.ySpeed = 0;
    }
  }
  //drawArc functions draws an arc using the variables defined in the constructor

  drawArc() {
    arc(this.xPos,this.yPos,this.arcDiameter, this.arcDiameter, radians(0), radians(this.stopAngle));

  }
}
In addition to this, I added some other member functions to the class to be able to move these arcs and increase their angle when they are bumped into the wall, and freeze them when they become full circles. Most importantly, I added a member function to draw these arcs. To be able to make use of this class, I created an array of objects of this class, and I passed different parameters to each object. After that, I created another for loop to call all the functions related to these objects so that I can draw them in the way I wanted You can see the code for the objects attached below
let newArc = []; //initializing newArc as array as we will define arc objects
function setup() {
  createCanvas(400, 400);
  let xSpeed = 5; //initializing some variables to be passed as parameters to the constructor
  let ySpeed = 3;
  let initialDiameter = 400;
  //creating an array of size 10 to create 10 objects of class bumpingArc
  for (let i = 0; i < 10; i++) {
    newArc[i] = new bumpingArc(xSpeed, ySpeed, initialDiameter);
    xSpeed = xSpeed - 0.35;
    ySpeed = ySpeed - 0.35;
    initialDiameter -= 35;
  }
}

function draw() {
  background(220);
  strokeWeight(5);

  fill(255, 255, 255); //create a for loop to call the functions of each object and draw 10 arcs
  for (let i = 0; i < 10; i++) {
    newArc[i].moveArc();
    newArc[i].checkBounds();
    newArc[i].changeArcColor();

    newArc[i].drawArc();
  }
}
I was so happy and excited to see how my initial idea grew and how I was able to come up with this nice generative artwork that is generated purely from arcs. I was not inspired by any other artwork during this assignment. Initially, I was only trying to test out how to use arcs with classes and objects realized that arcs can be manipulated in many ways, and after testing out a couple of things I realized that so many different and amazing artworks can be generated from the movements of arcs. Then I came up with this idea which I enjoyed implementing.
Possible Improvements
I still believe that more work can be done to make this artwork more interesting and understandable to others. This is because I believe that any viewer will not understand anything when they first see tens of arcs bumping over each other. Therefore, to solve this issue I believe that the best thing would be to create a new arc object of smaller size only after the previous arc is positioned in the center and freezes over there. In addition to this, I realize that all arcs change color whenever one of them becomes a complete circle. I was not planning to do this initially, but it ended up being like this. Therefore I would like in the future to control the colors of these arcs in a better way and make my code even work in a great way for a higher number of arcs.
This assignment required creating a generative artwork using Object-Oriented Programming, paying attention to the structure, clarity, and organization of the program. As usual, I started off the project with something very ambitious, a piece inspired by Manolo Gamboa Naon (Link to his art).
Code
A greater part of the code was inspired by the examples we had in class as well as the tutorials we were required to watch. While my final piece had nothing particularly interesting to represent in terms of code, I must admit the learning process was an interesting ride. I tried applying most of the concepts we learnt, and was pretty confident that they should have been enough to produce a similar piece to the one I was inspired with. However, there were quite some challenges, such as generating the vectors surrounding the circles, during the process which required me to improvise and come up with the piece that I have.
for (let i = 0; i < 5; i++){
      fill(random(100,255), random(100,255), random(100,255));
      push();
      translate(this.x, this.y);
      rotate(TWO_PI * i / 5);
      ellipse(60, 0, 10, 10);
      pop();
    }
Reflection / Future Improvements
I am not quite sure how I feel about my piece. I spent a lot of time on it yet I could not reach the level of creativity I was envisioning. On the bright side I believe I have learnt a lot, and there is still more to learn along the way. Some things I would work on the piece is it being more detailed, sophisticated, perhaps even animated.
For this project, I made two similar sketches: one that is dynamic, and one that is a still image.
I. The dynamic sketch:
The link to my code in the online editor for version 1 can be found here.
II. The still sketch:
The link to my code for the second version can be found here.
INSPIRATION & DESIGN:
The idea for this project came to me rather slowly. Usually with any new artwork I have a very clear idea about what I want to create and can visualize it on paper before I start coding. However, I had a lot of difficulty because I personally don’t love artwork that heavily relies on randomness, and I don’t love overly abstract/geometric designs (conveniently what loops are good for!). After hours of trying to come up with a uniform idea, I decided to just start coding. I knew that I wanted to challenge myself by working with noise(), and I enjoy working with sin() and cos() functions. I used these two things as my starting point.
In the end, I ended up creating a sort of wavy sun pattern that stretches and contracts with the help of the noise() function. I later wanted to have several of these patterns on the same canvas, but this was too much for my computer to handle and resulted in very slow and glitchy animation (likely due to the nested for loop and calling noise() with each iteration). Consequently, I created a second version of a sketch that does not animate and simply consists of 5 sun patterns randomly placed on the canvas. While I do wish this one also animated, I think it still looks beautiful.
CODING SPECIFICS
Each sun pattern is composed of of several sine waves that are rotated about an invisible center point. In the first version, that point is the center of the canvas; in the second version, 5 points were chosen at random. The first version uses a simple for loop inside the draw() block, while I create a separate function called spirals() in the second version that is called 5 times within a for loop in draw(). To make the sketch s Regardless, the integrity of the algorithm for drawing these shapes is the same in both. A snippet of the code for function_squiggles() is shown below:
for (let j = 0; j < 16; j++) {
beginShape();
  rotate(PI/8);
  for (let i = -800; i < 800; i++) {
    y= noise(xoff) * amp * sin(i/(period));
    vertex(i, y);

    xoff+=0.00001;
  }
endShape();
The waves are drawn using a custom shape, which basically plots each point (vertex) on the sin wave and connects them together to create a uniform curve. Each vertex has an x-coordinate that increments by 1 with each iteration. An upper bound 800 is used to ensure that even shapes whose center point is at the edge of the canvas can extend all the way to the edge. The y coordinate is dependent on the sin() function, who’s amplitude changes every frame based on the constant variable amp and the changing variable xoff. This variable begins at 0.0 and increments by 0.0001 with each iteration; as a result, each frame when the noise() function is called it returns a different number.
You may notice that some of the waves appear thicker than others and some lines appear to overlap. This was done by layering a second for loop in addition to the first one shown above . Continuing in the function_squiggles() we have:
for (let j = 0; j < 12; j++) {
beginShape()
  rotate(PI/12);
  for (let i = -800; i < 800; i++) {
    y= noise(xoff) * amp * sin(i/(period));

    vertex(i, y);
    xoff+=0.00001;

  }
endShape();
Note that the degree to which each wave is rotated is now PI/12 and iterates 12 times, in contrast to the first for loop, which has each wave rotating at PI/8 and iterates 16 times. This slight difference allowed for the shape to have some irregularity, and to look more “organic” versus geometric.
REFLECTIONS:
While I feel that the actual code of this project was far easier than that of last weeks, I experienced much more difficulty creating the design for this one. Still, I’m not quite sure what I’ve created and how I feel about it; however I’ve stepped outside of my IMA comfort zone in that I created something without any pre-planning, and rather relied on experimenting and improvising. Being a lover of control, these are skills that I’ve always struggled with as an artist, but I am happy that I was able to have a different approach for this project.
For this assignment, I decided to generate one of my favorite games, Sudoku. The board is generated, styled, and displayed with the help of the ‘Cell’ class and using loops.
Code highlight
// %%%%%%%%%%%%%%%%%%%%%%%%%%%%%%%%%%%%%%%%%%%%%%%%%%%%%%%%%%%%%%%%%%%%%%%%%%%%%
function setup() {
  createCanvas(500, 500);

//populating the board
  board = [];

  grid = [ [3, '', 6, 5, '', 8, 4, '', ''],
         [5, 2, '', '', '', '', '', '', ''],
         ['', 8, 7, '', '', '', '', 3, 1],
         ['', '', 3, '', 1, '', '', 8, ''],
         [9, '', '', 8, 6, 3, '', '', 5],
         ['', 5, '', '', 9, '', 6, '', ''],
         [1, 3, '', '', '', '', 2, 5, ''],
         ['', '', '', '', '', '', '', 7, 4],
         ['', '', 5, 2, '', 6, 3, '', ''] ]


  for (let i = 0; i < 9; i++) {
    for (let j = 0; j < 9; j++) {
      board.push([]);
      board[i].push(new Cell(i, j, grid[i][j]));
    }
  }

// 9x9 board, text size, and text location
  scl = width / 9;
  textSize(30);
  textAlign(CENTER, CENTER);
}


function draw() {
  for (let i = 0; i < 9; i++) {
    for (let j = 0; j < 9; j++) {
      board[i][j].display();
    }
  }
}

//cell class and display options
class Cell {
  constructor(i, j, value) {
    this.i = i;
    this.j = j;
    this.value = value; //value will be taken later from the grid array
  }

  display() {
    stroke(0);
    fill("#f2eecb");
    rect(scl * this.i, scl * this.j, scl, scl); // dividing the grid 9x9     with rectangles
    fill(0);
    text(this.value, scl * this.i, scl * this.j, scl, scl);
  }
}
// %%%%%%%%%%%%%%%%%%%%%%%%%%%%%%%%%%%%%%%%%%%%%%%%%%%%%%%%%%%%%%%%%%%%%%%%%%%%%
Embedded sketch:
Reflection and ideas for future work or improvements:
The next step would be modifying the code such that it generates [solvable] Sudoku boards instead of manually placing numbers in the board matrix. And then the next step would be adding another button that actually solves the board. This might be what I’ll be working on for the midterm.
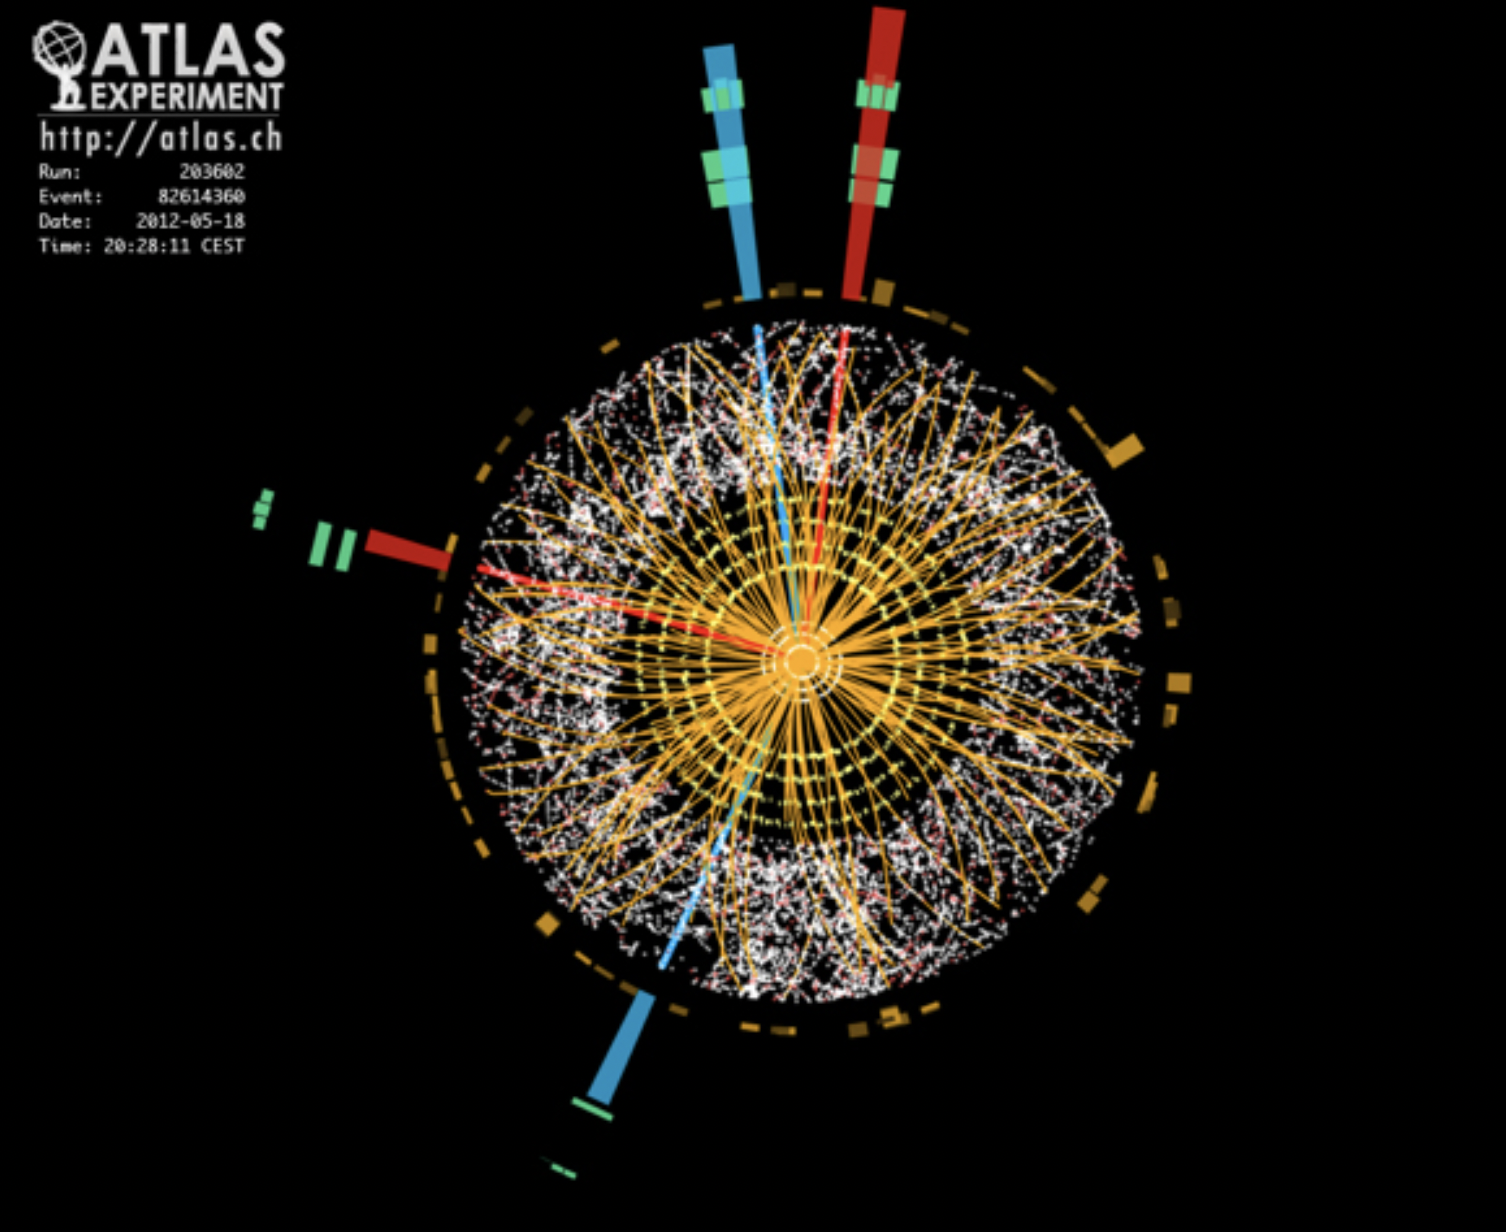
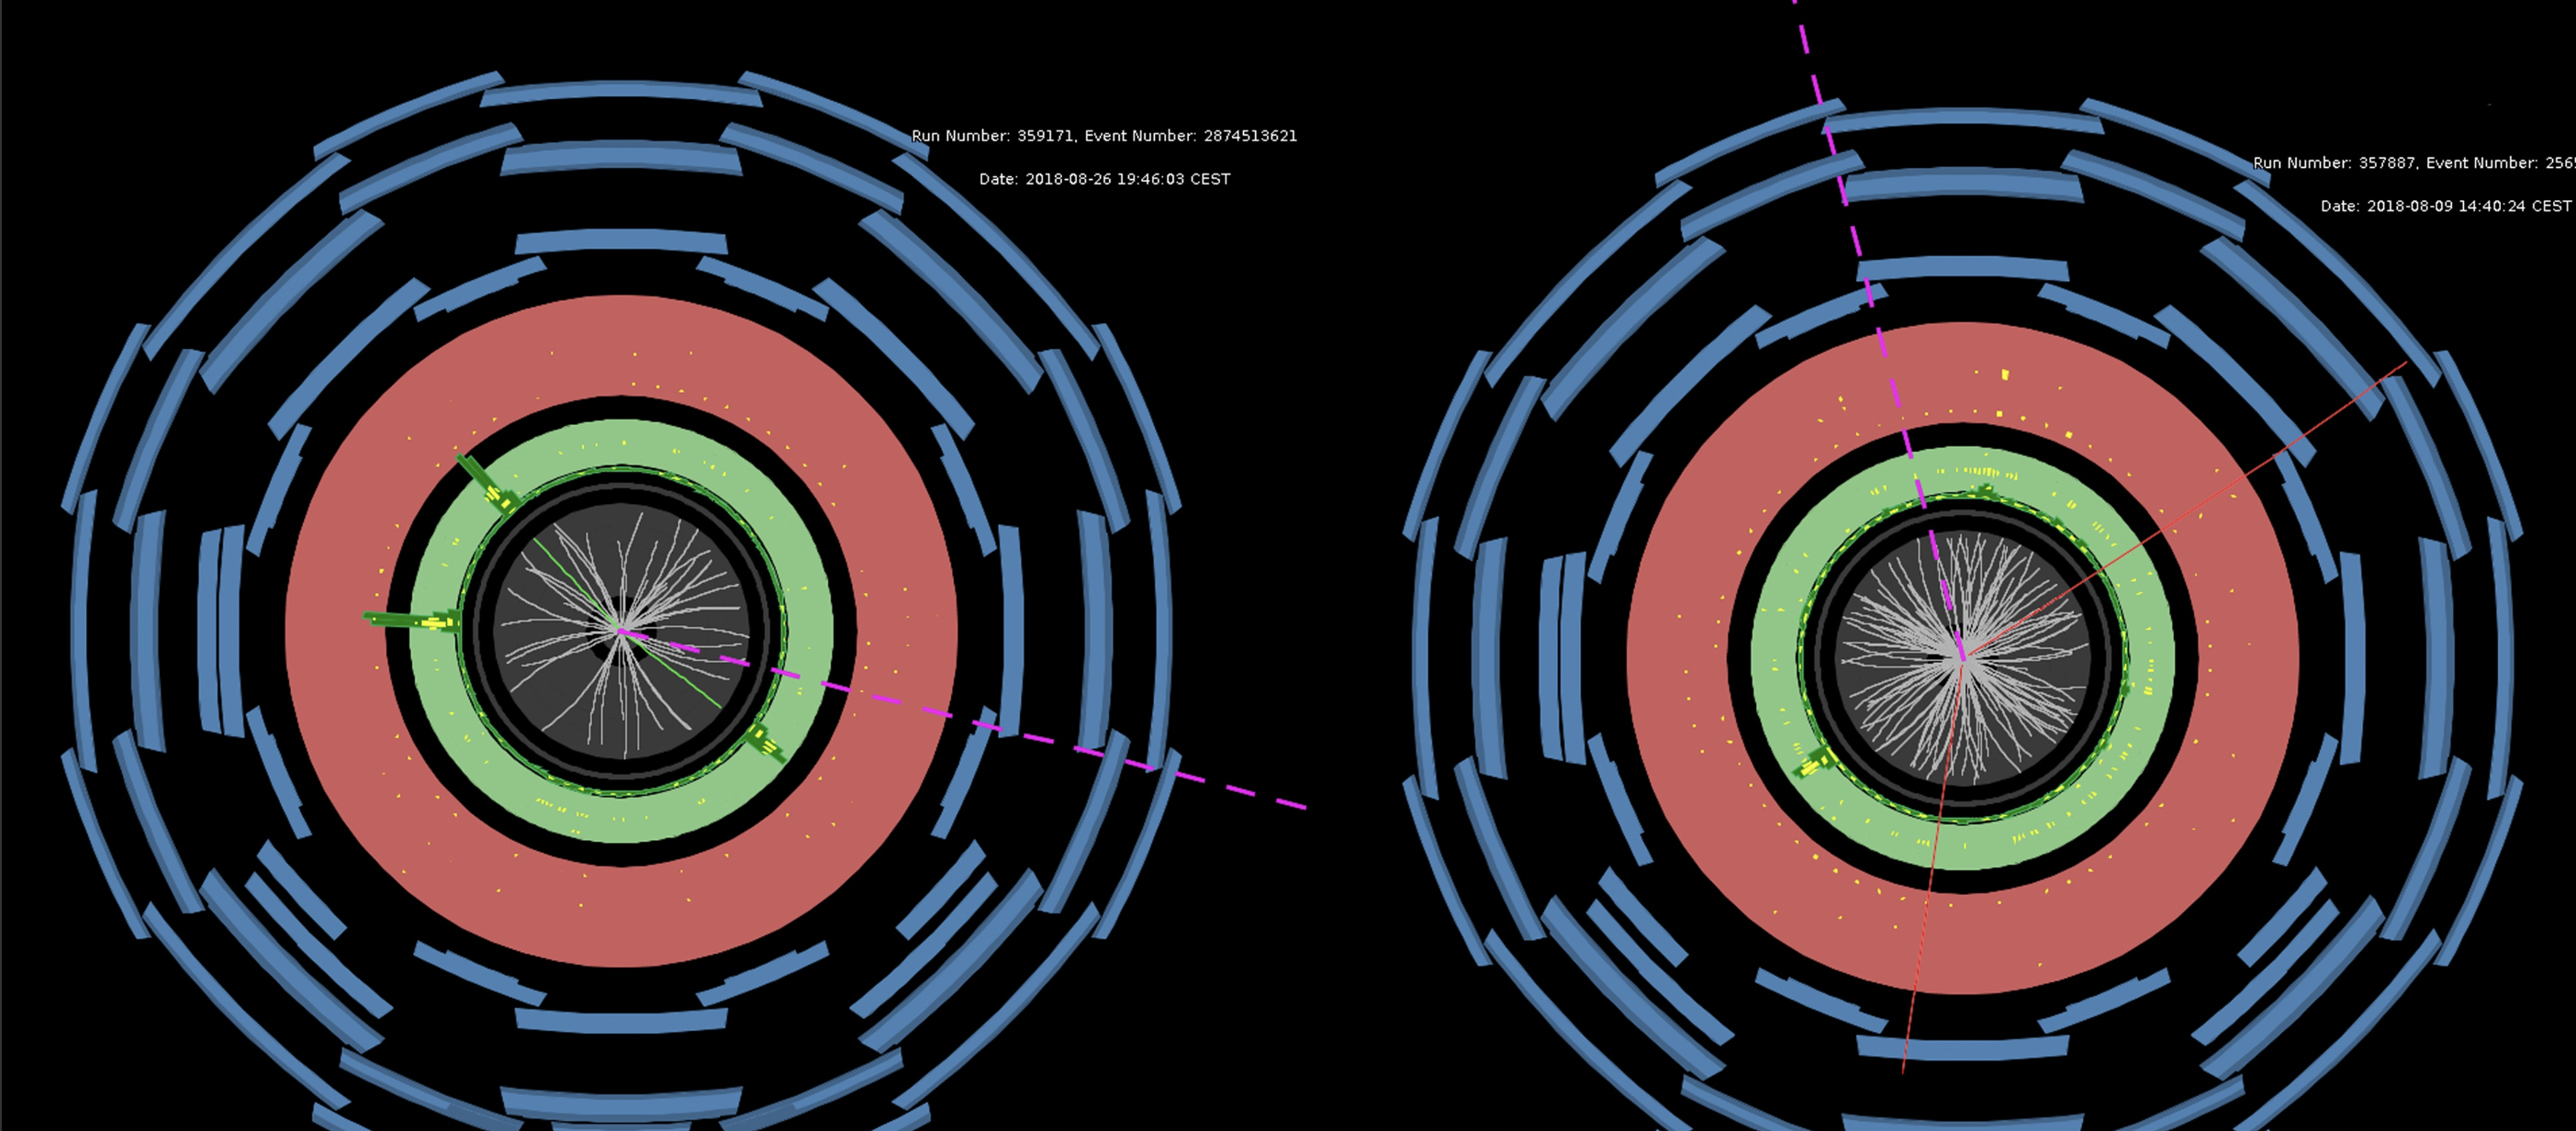
For this assignment, I have replicated the renowned particle physics experiment called ATLAS, the largest general-purpose particle physics experiment at the Large Hadron Collider (LHC) (at CERN in Switzerland). The scientists at LHC use the Higgs boson (an unstable particle that decays into stable particles) to search for dark photons. The image below (Image 1) is related to an experiment completed on May 18, 2012, where the ATLAS detector records a Higgs boson decay; the second image (Image 2) is also related to a similar experiment. Thus, in this project, I have created an animated simulation of the experiments mentioned above — it is an amalgamation of two images shown.
Image 1 – Higgs decay to four electrons recorded by ATLAS in 2012. Source: atlas.cernImage 2 – Higgs boson decay. Source: atlas.cern
Code
In addition to p5.js’ two default functions (draw() and setup()), the project comprises of one additional function and four classes.
OuterShell class
Circle class
Particle class
Pattern class
Draw_beam function
OuterShell Class
I began writing code for the project by completing OuterShell class at first. It is a class that represents the outer rectangular-shaped structure of the lateral cross-section of the collider shown above. The class depends on five attributes and one display method that draws rectangle(s) using the information fed into its attributes. The display method makes use of two transformations — translation and rotation — in order to make the rectangles rotate around a fixed point (here, it is the center of the canvas). Thus, when objects are instantiated, stored and displayed using this class, it appears that a set of inclined rectangles are revolving around the core of the detector.
// Reset the canvas using push() and pop()

push();
translate(canvas_w / 2, canvas_h / 2);                // Move the origin to the middle of canvas
rotate(ANGLE);                                        // Angle of rotation
fill(random_r_val, random_g_val, random_b_val);       // Fill the shape
noStroke();
rect(this.x, this.y, this.length_, this.width_, this.roundness);         // The fifth parameter determines the roundness of edges
pop();

ANGLE += 3;
Circle Class
The Circle class is relatively a simple implementation, as it consists of three attributes and one display method. The primary challenge here was to implement fill() function on each circle individually. Even though I used multiple fill() functions, only the final color would cover the largest circle on the canvas, and since I planned on using different fill colors for different circles, the use of if-conditionals to manually specify RGB values helped me solve this problem. Here, I used radial measurement to determine which RGB values go with which circle.
Later, four concentric circles are instantiated in the setup function. In doing so, a list of radii is stored in a list and looped through using another for-loop to create and store circles in their corresponding list. Finally, in the draw function, using another for-loop, the display() method is called on each circle in the list and is displayed on the canvas.
Particle Class
This class is similar to the OuterClass class in terms of its display() method, yet a lengthy one. It depends on three attributes and two methods. The first method, titled display(), is used to create a set of red particles (ellipses) that revolve around the core, which has been done using a similar algorithm used in the OuterShell class, whereas the second method, titled disperse(), is related to free-flowing particles (ellipses) on the entire canvas. The idea for the disperse() method is such that there are particles around the detector, in reality, thus I implemented this method to represent the existence of different kinds of particles in and around the detector. Here, I update the x and y coordinates of free-flowing particles inside the disperse() method, which provided mobility to individual particles.
// METHOD 2

disperse()
{
  stroke("white");
  ellipse(this.x, this.y, random(0, 0.5), random(0, 0.5));

  // Update x and y values simultaneously
  this.x += this.speed;
  this.y += this.speed;
}
Pattern Class
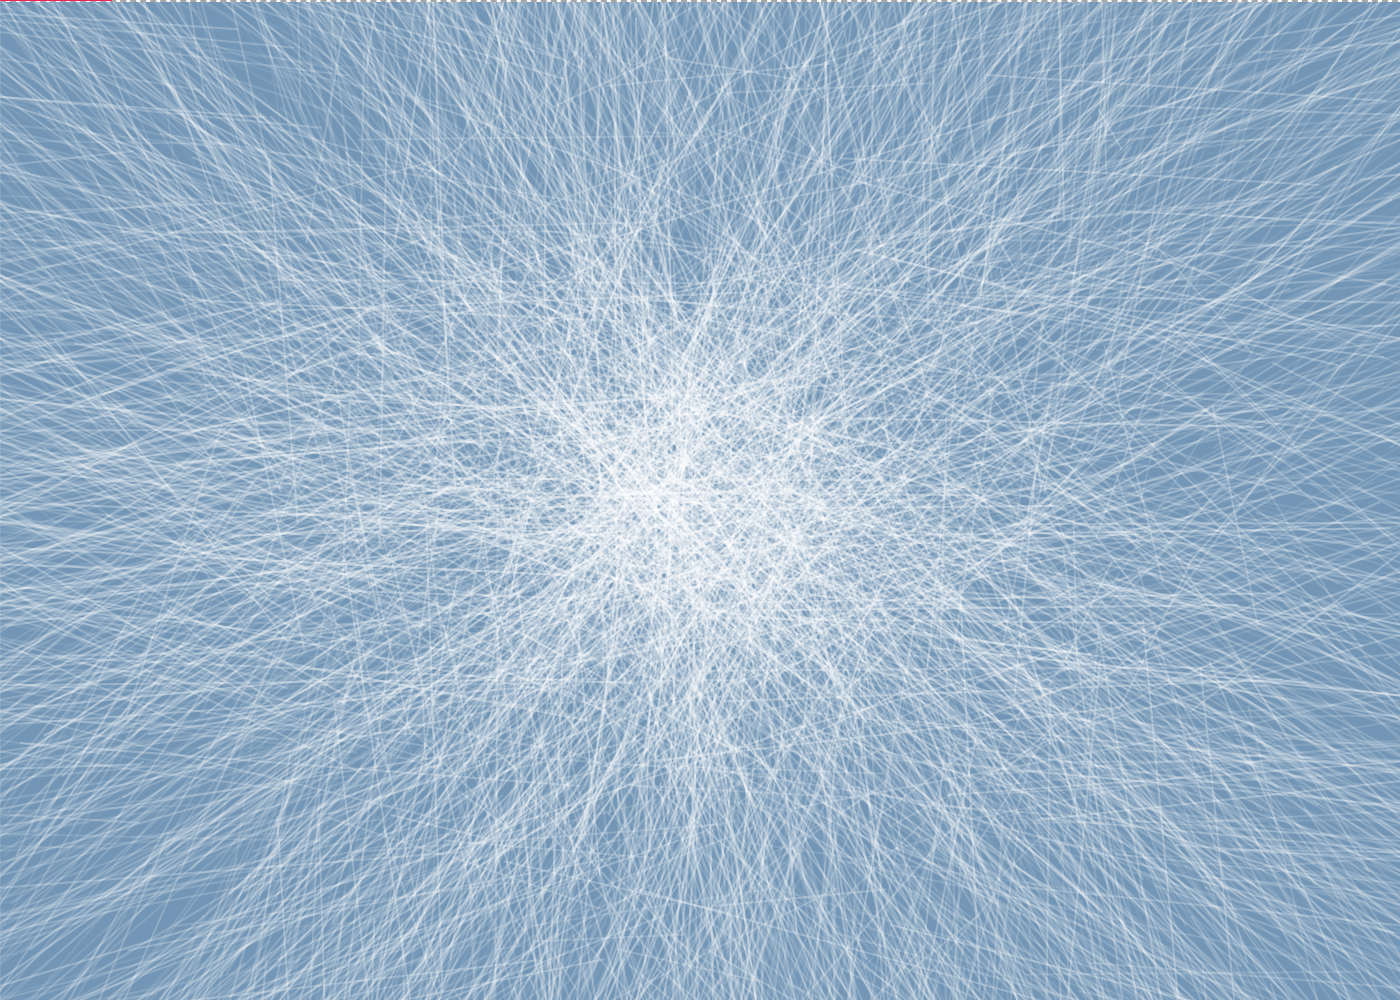
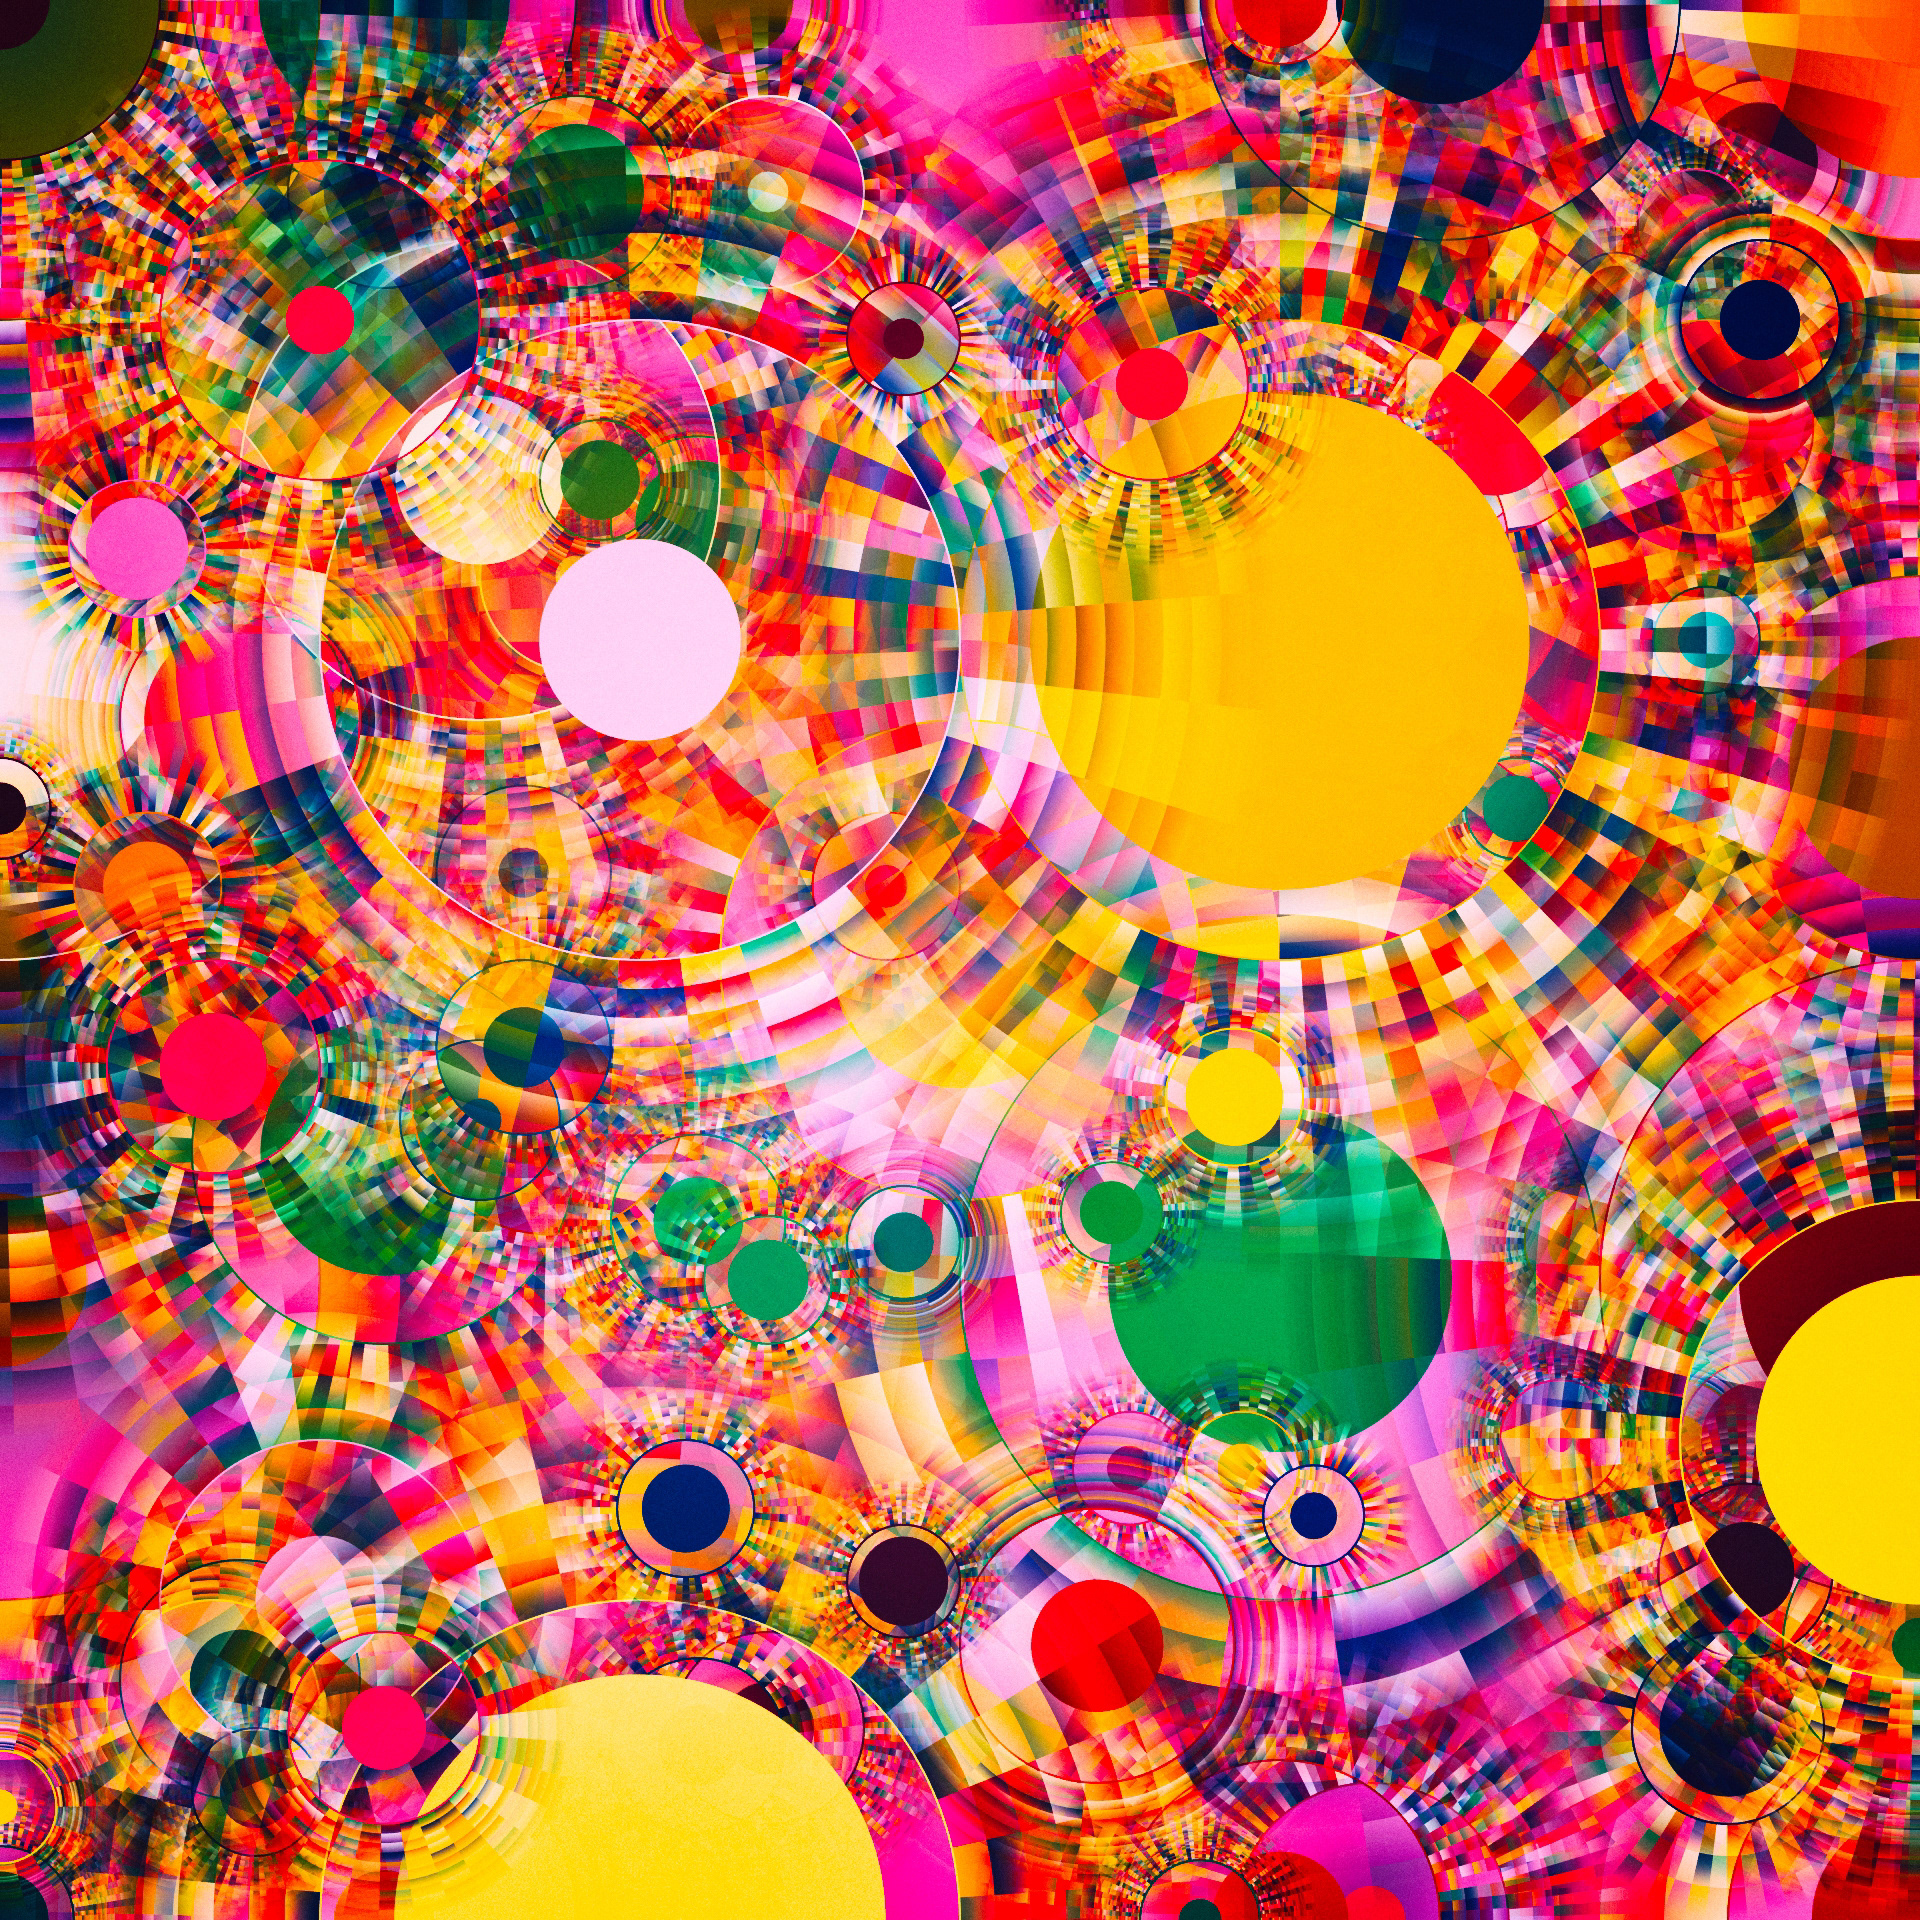
This is by far the most interesting and tedious section of the project. Initially, I was planning to draw either spiral or arc-related designs, but I went with a new pattern to differentiate this project from previous assignments.
The class depends on three attributes and consists of a single display() method. Here, I used one of the attributes (count) to determine the number of lines drawn. And, using a combination of for-loop and line() function, with some basic trigonometric calculations to determine two points of a line, a number of linear segments are drawn inside a circle of radius 80 (modifiable). Since its objects are instantiated and displayed inside the draw() function, which is called a certain number of times in a second, it appears as if the lines are mobile in nature.
display()
  {
    let radius = 80;                              // Radius whichin which lines creation is confined

    push();
    translate(canvas_w / 2, canvas_h / 2);       // Move the origin to the middle of canvas

    // Loop execution determined by this.count attribute
    for (let i = 0; i < this.count; i++) {
      let ANGLE1 = random(0, 2 * PI);            // Angle value that determines x and y coordinate of Point 1
      let point_1_x = sin(ANGLE1) * radius;      // x-cordinate of Point 1
      let point_1_y = cos(ANGLE1) * radius;      // y-cordinate of Point 1

      let ANGLE2 = random(0, 2 * PI);            // Angle value that determines x and y coordinate of Point 1
      let point_2_x = sin(ANGLE2) * radius;      // x-cordinate of Point 2
      let point_2_y = cos(ANGLE2) * radius;      // y-cordinate of Point 2

      strokeWeight(0.4);
      stroke(234, 148, 14);

      // Drawing line from point 1 to point 2
      line(point_1_x, point_1_y, point_2_x, point_2_y);
    }

    pop();
  }
Draw_beam function
Finally, to add to the final effect and incorporate user interaction, this function is implemented so that a random number of lines (in a range of 3 to 7 inclusive) that lead to the core of the detector are drawn. These lines imitate the actual beam of light that is radiated inside a reactor when particles collide with each other. Thus, when the user clicks on the canvas, different colored lines are generated and displayed on the screen. The function makes use of if-conditional statements to pick a certain color for each line.
Here, the frameRate() function’s argument can be modified to control the speed of the canvas element. If a lower frameRate is used, the output may seem laggy. However, for this assignment, frameRate is set to be “5”.
Reflection
Overall, I am satisfied with the final output. I was prepared to start working on this project on Friday, but the brainstorming phase got an unforeseen amount of extension. Thus, I believe, I invested a good portion of time in planning. Also, since the project is divided into fixed classes and dependencies are handled separately, I am happy with the project.
If I get to improve or re-work this particular project, I will focus on the following ideas and technicalities to further improve the final output:
When the user clicks on the canvas, lines are drawn from random particles to the center of the core. However, with a little bit of work, it can be modified so that when the user clicks on a particular particle, a line will be drawn connecting it and the core of the reactor.
Similarly, using 3D libraries, an extra dimension can be added as a result when the mouse is clicked, the canvas spans 360 degrees to give a thorough animation of the simulation.
I was originally playing around on p5js with Perlin nose trying to learn it, until it finally began taking shape and I thought of the opening credits of Monsters Inc., specially the scene with the doors being at the end before the title of the movie was shown. (I’ve put a link to the video, it is from minute 1:05 to around 1:10-1:15)
https://www.youtube.com/watch?v=FCfv5P8GXU4
With my inspiration clear, I looked for ways to add different colors while still being in the same color pallet, and that’s when I found this sketch of a background changing colors with Perlin noise.
The part that was of most relevance to the code was the following, as it allowed me to get the colors I wanted
let n = noise(offset)
 colorMode(HSB)

 background(n*360, 100, 100);

 offset += 0.01
code
As for the code, that was a completely different adventure. It was originally difficult to try and find an idea, or get my grasps on how things worked with Perlin noise, specially with getting my head around mapping.
I think that my code ended up how it did as I did not place anything to make the area the ball moved in back to the background, but I believe it made it work better.
My code ended up looking like this:
//This code was in part done while learning about Perlin noise by the Coding Train on youtube and following his tutorials//

let xOff = 0; //offset on X axis//
let yOff = 10000; // offset on Y axis//
let offset = 0; //offset for color//

function setup() {
  createCanvas(400, 400);
  background(0);
}

function draw() {
  // used the mapping function in order for the Perlin noise to scale around with the canvas //
  let x = map(noise(xOff), 0, 1, 0, 400);
  let y = map(noise(yOff), 0, 1, 0, 400);

  n = noise(offset); // declared the offset in for the colors//

  // found out about HSB coloring with Perlin noise by this sketch https://editor.p5js.org/amcc/sketches/XcXWNTPB-//
  colorMode(HSB);
  // I wanted to make the strokes also change colors, maybe it could be done with the same result with noStroke//
  stroke(n * 260, 100, 100);
  //Making the offsets change a bit in order for the circle to move around the screen//
  xOff += 0.01;
  yOff += 0.01;
  //filling in with Perlin noise in order to have different but somewhat matching colors//
  fill(n * 255, 180, 180);
  ellipse(x, y, 50);

  offset += 1;
}
My only one complain is that I wish I could have figured out how to use a specific color pallet, as having more variations would have been interesting.
Art Works
I made multiple versions of the code, either by adding or removing some strands of code.
This was the first attempt and what lead to me finding my project:
No color, just black and white, looks kinda 3D
The second version I made was similar, as it had lines and in a white canvas, but the ellipses were filled with colors, this is the second version of my design:
Only added color to the circles
And the final version of it came a bit later, where I made the lines also change color, and made the background black in order to make the colors pop-out more:
In a black space with seemingly no filling, looks a bit trippy
And here is a loop version of it:
reflection/future work
Personally I am happy with my end result, however I wish I could have understood more the process of creating it instead of randomly stumbling into it.
Secondly, I would have liked it to be able to use different color pallets, however I lack the skill and knowledge to do so at the moment.
Lastly it would be interesting if I could have added a mouseX or mouseY function, but with the time constraint I did not want to.
I recently watched a documentary called Trainwreck: Woodstock ‘99 on Netflix about how the 1999 Woodstock recreation completely backfired in comparison to the iconic 1969 concert, and I heard a song from the documentary called Woodstock by the band Matthews’ Southern Comfort. This inspired me to create some randomly generated ‘peace & love’ themed artworks using object-oriented programming.
I created 3 pieces. 2 that randomly generate images and shapes every time you click the play button, and 1 that constantly adds images on a loop without stopping.
Code highlight –
function setup() {
  createCanvas(400, 400);
  background(255);
  for (let i = 0; i < 1000; i = i + 1) {
    // designates spots for random circles and images being generated (repetition); i is 0, it has to be less than 1000, it will move by 1 coordinate each time a shape is generated

    image(green2, random(width), random(height), 50, 50);
    image(blue1, random(width), random(height), 50, 50);
    image(smile, random(width), random(height), 50, 50);
    image(pink2, random(width), random(height), 50, 50);
  }
}
Embedded sketches–
Randomly generated artworks:
(every time you click the play button it will randomly generate a new piece)
(this one is my favorite)
I managed to maintain warmer hues for this artwork because I inputed the ‘i’ value into the fill for the ellipses.
Loop artwork:
Reflection and improvements –
I struggled mostly with the loop artwork, because every time an image was plotted, it was placed within a designated proximity of another image, and I couldn’t figure out how to change that to be more random. I even inputted the push and pop feature I learned from The Coding Train but that didn’t seem to change anything.
Trying to slow down the speed in which the images appeared in the loop artwork.
I feel that I need to figure out how to make more advanced pieces, but I don’t have enough knowledge to be able to execute what I imagine.
I’d also like to make something beyond randomization.
All the pieces I’ve made so far feel very 2D, I’d love to learn more about how to make my work feel more 3-dimensional.
Although The Coding Train videos do help, I feel that I need way more time and practice to learn how to code proficiently— or at least to the level of my peers. I don’t fully understand coding language yet— and trust me, I’M TRYING!