
Ideation
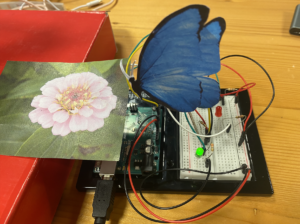
I struggled a lot with coming up with a creative idea for this assignment. I thought about my love for butterflies and considered making something butterfly related (again). Initially I thought of making a glow in the dark butterfly which would light up in the dark. However, I was still unsure about this hence reached out to Prof. with my idea and he helped me navigate through a more creative idea. Using flex sensors (analog sensor), as the butterfly flies over to the Zinnia flower, the LED gets brighter and brighter (as the flex sensor bends). For context, adult butterflies land on these flowers to suck on some delicious nectar. The button (digital sensor), when pressed, blinks red to indicate that the butterfly is about to approach the flower.
Implementation
It took a while to figure out how to wire everything as I’m still wrapping my head around Arduino. I used online resources to help, I watched a ton of YouTube videos and tried to make sense of it. I first coded and wired the circuits for the flex sensors & LED1. I had to make sure I was using the right resisters for each component otherwise it would not work well. I also learnt that these sensors are very sensitive – I also tested this out by printing out the values in my code.
Once I got the flex sensor wired up, I coded and wired the circuit for the button & LED2. I then printed out my butterfly & flower, taped the butterfly onto the flex sensor and attached the flower image to a lollipop stick so it’s easier to hold. The coding for the flex sensor was relatively straightforward however the coding for the button was more complex (therefore I used an online resource to help me with this – https://forum.arduino.cc/t/how-to-make-a-led-light-stay-on-when-press-switch/195814/5). The code I was writing initially for the button would only light up the LED if the button was pressed continuously and I wanted the LED to stay on when the button was pressed and then switched off when the button was pressed again.
An issue I was facing was to get the flex sensor and button to work at the same time. I was able to get them to work individually however then had to make adjustments in my code in order to enable them both to work simultaneously.
Code
//for the button
const int ledPin2 = 2;
const int buttonPin = 5;

unsigned long timer = 0;
bool onOff = LOW;
byte prevButtonState = LOW;
bool blinking = false;

//for the flex sensor
const int ledPin1 = 3;
const int flexPin = A0;

int value;

void setup() {
  //for the flex sensors
  pinMode(ledPin1, OUTPUT);
  Serial.begin(9600);

//  //for the button
  pinMode (ledPin2,OUTPUT);
  pinMode (buttonPin,INPUT);
}

void loop() {
  //for the flex sensors
  value = analogRead (flexPin);
  Serial.println (value);
  value = map (value, 550, 800, 0, 255);
  //   value = map (value, 700, 900, 0, 255);
  analogWrite(ledPin1, value);
//  delay (100);

  //for the button which blinks the LED (code from class exercise)
    byte buttonState  = digitalRead(buttonPin);
  Serial.println(buttonState);

  if (buttonState == HIGH && prevButtonState == LOW) {
    blinking = !blinking;
  }
  prevButtonState = buttonState;
  if (blinking == true) {
    if (millis() > timer) {
      onOff = !onOff;
      timer = millis() + 250;
      digitalWrite(ledPin2, onOff);
    }
  } else {
    digitalWrite(ledPin2, LOW);
  }
}
The final piece
Video