Week 3: Object Oriented Ball Dropper Game

Introduction:

Week 3 comes with more challenges and more learning regarding processing programming. We have to implement some real objects using object oriented programming and program in a manageable way. We have to implement our own functions to show different behaviors of our objects and properties to display characteristics.

Challenges and Problems:

The very first challenge that I faced is to sketch the logic for the game. To give random movements to balls and moving them continuously from top to bottom is challenging for me to implement in code. During game implementation, it is challenging for me to track the position of the ball after each movement. I came across at situation where two balls intersecting with each other. To check for the intersection of two balls was challenging for me.

Procedure:

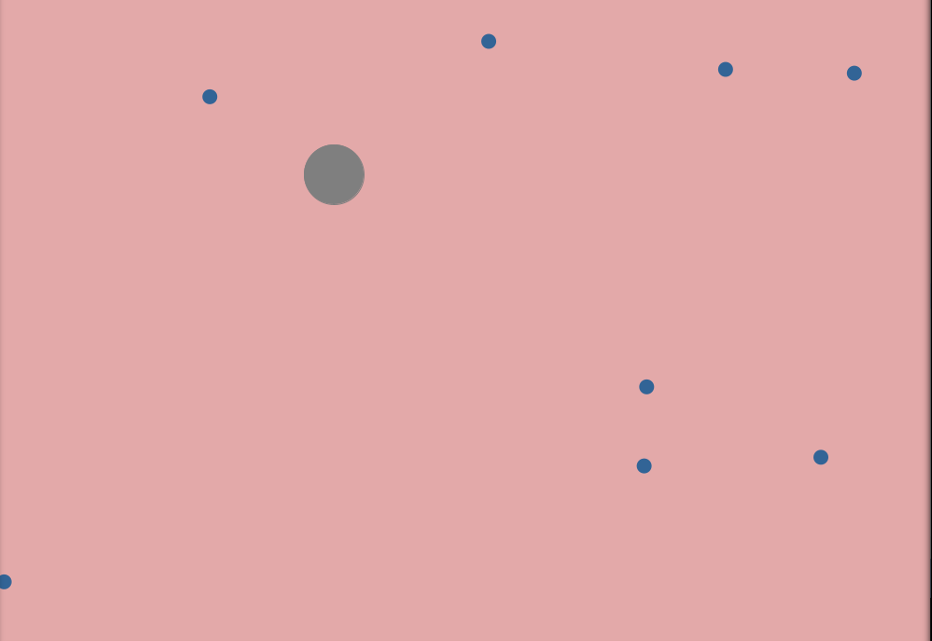
I started by implementing a class for bag. The bag is handling with mouse movement and when it touches any ball then it will count in bag. In bag class I implemented structure for the bag which is of circular shape and have some radius. I implemented basic methods for bag class which are displaybag() and to check if the bag touches any ball dropping from top to bottom of screen.

Then I implemented class for ball which is also of round shape and has its own behavior. I implemented displaybag() function for ball class. I implemented functions to move the ball with specific speed and also check if the ball position exceeding the screen width and height using ballIntersection() function which returns Boolean value. I implemented balldropper() class where bag class and ball class objects are initialized. In ball dropper class I am checking if the bag touches any ball which dropping from top to bottom. I implemented functions to drop the ball with random speed and from random positions.

I implemented watcher class which i used for start and end of the game and counting the time in milli seconds. The main function of this class is TimeCounterEnds() which checks if the time to catch the ball exceed the time frame in which ball moves from top to bottom.

I initialized global variable to count the total balls in bag. In setup function I am initializing object for watcher class and start the timer to watch the ball capturing behavior of the game. In draw function I am handling the bag with mouseX and mouseY and by using for loop checking if the watcher time ends or not. If the watch time ends then initializing more balls to drop from top to bottom. I used another for loop to display each ball by using displayball() function. I used if else statement inside for loop to check if the ball touches the bag by using IsBallCaptured() function.

Below I listed all the code work for all the classes that is implemented for ball game.

class Bag
{
  //Default attributes for bag
  float xPosition; 
  float yPosition; 
  float radius; 

  //Default constructor for bag
  Bag(float radius, float xPosition, float yPosition)
  {
    this.xPosition = xPosition; 
    this.yPosition = yPosition; 
    this.radius = radius;
  }
  
   //to show the bag
  public void DisplayBag() 
  {
    stroke(127);
    fill(127);
    ellipse(xPosition, yPosition, radius*2, radius*2);
  }

  // to check if two balls intersect with eachother or not
  public boolean intersect(BallDropper d) 
  {
    float distance = dist(xPosition, yPosition, d.xpos, d.ypos);
    if (distance < (radius+d.r)) 
    {
      return true;
    }
    else 
    {
      
      return false;
    }
  }
}


// Class for Ball dropper
class BallDropper 
{

  float xpos;
  float ypos;
  color ballcolor;
  float r;
  float ballspeed;

  //default constructor for Ball Dropper
  BallDropper() 
  {

    this.r = 8; 
    this.xpos = random(width); 
    this.ypos = -r * 4; 
    this.ballspeed = random(1, 5);
    this.ballcolor = color(50, 100, 150);
  
  }

  //for dropping BallDropper from top of screen
  public void balldrop()
  {
    this.ypos+=ballspeed;
  }

  //check if the BallDropper goes out of screen or not
  public boolean balloutofscreen()
  {
    if (ypos > height +r*4)
    {
      return true;
    } 
    else 
    {
      return false;
    }
  }

  //to display BallDropper
  public void DisplayBall()
  {
    fill(50, 100, 150);
    noStroke();
    ellipse(xpos, ypos, r*2, r*2);
  }

  
  public void IsBallCaptured()
  {
    ballspeed = 0;
    ypos = -1000;
  }

}


class Watcher 
{
  //Attributes for time measure and time count
  int timemeasure; 
  int BallsTime; 

  //Default constructor for watcher initialized with deafult time
  Watcher(int t)
  {
    this.BallsTime = t;
  }

  // start the time counter
  public void startWatcher() 
  {
    this.timemeasure = millis(); 
  }

  //Check if the watcher time is finished or not
  public boolean TimeCounterEnds()
  {

    int timeElapsed = millis() - timemeasure;
    //checking if the remaining time is greater than default initialized time
    if (timeElapsed > BallsTime) 
    {
      return true;
    } 
    else 
    {
      return false;
    }

  }

}


class Ball
{
  float ballxpos; 
  float ballypos; 
  float ballRadius; 
  float xposSpeed;
  float yposSpeed;
  color ballcolor;

   //Construtor to draw ball
  Ball(float ballRadius)
  {
    this.ballRadius = ballRadius;
    this.ballxpos = random(width);
    this.ballypos = random(height);
    this.xposSpeed = 5;
    this.yposSpeed = 5;
  }

  // To move the ball 
  public void ballMove()
  {
    ballxpos += xposSpeed;
    ballypos += yposSpeed;

    if (ballxpos > width || ballxpos < 0)
    {
      xposSpeed *= -1;
    }
    if (ballypos > height || ballypos < 0) 
    {
      yposSpeed *= -1;
    }
  }


  // to display ball position
  public void DisplayBallPosition() 
  {
    stroke(0);
    fill(ballcolor);
    ellipse(ballxpos, ballypos, ballRadius*2, ballRadius*2);
    ballcolor = color(100, 50);
  }

  // check if two balls intersect with eachother
  public boolean ballIntersection(BallDropper BallDropper)
  {
    float distance = dist(ballxpos, ballypos, BallDropper.xpos, BallDropper.ypos);
    if (distance < (BallDropper.r + ballRadius))
    {
      return true;
    } 
    else 
    {
      return false;
    }
    
  }
   
  //to give random color to ball
  public void highLight() 
  {
    ballcolor = color(#6535B4);
  }
}


//Initializing Bag object
Bag Bag;

//Initializing time watcher for game
Watcher Watcher;

//Initializing Balls
BallDropper rainBalls[];

//Total Balls in bag count
int totalBalls = 0;


//Setup for game screen configuration
public void setup()
{
  size(1000, 700);
  Bag = new Bag(32, 0, 0);
  rainBalls = new BallDropper[1000];
  Watcher = new Watcher(300);
  Watcher.startWatcher();
  
}


public void draw() 
{
  background(#E3A9A9);
  Bag.xPosition = mouseX;
  Bag.yPosition = mouseY;
  Bag.DisplayBag();

  if (Watcher.TimeCounterEnds() == true) 
  {
    rainBalls[totalBalls] = new BallDropper();
    totalBalls++;
    if (totalBalls >= rainBalls.length) 
    {
      totalBalls = 0;
    }
    Watcher.startWatcher();
  }

  for (int i=0; i<totalBalls; i++)
  {
    rainBalls[i].balldrop();
    rainBalls[i].DisplayBall();

    if (Bag.intersect(rainBalls[i]))
    {
      rainBalls[i].IsBallCaptured();
    }
  }
}

Final work:

Conclusion:

This assignment supports me learn more of object oriented programming and gives me opportunity to work on real time programming by using classes and objects. How to initialize any object and use its functions and variables. I learned how to build a game structure in a manageable and reusable way. I get opportunity to practice calling of class object inside any class to ensure encapsulation. I learned how to move objects and give them some speed. I also merged my previous knowledge of for loops and 2D shapes with object oriented programming.


Week 3: Generative Object-Oriented Art Leo Shirky

Intro:

My sister used to love butterflies, so I decided I would try to animate a Monarch butterfly migration flight in Processing.

Process:

I started by creating a class called Butterflies, and made a simple butterfly shape, with a body and wings. I then added some code that would make the Butterflies fly along the screen at varying speeds and at random points on the X axis to give a sense of magnitude to the migration.

Finally, in order to make the animation more dynamic, I added some code that told the Butterflies to move towards the X coordinate of the mouse, so that the user had some control over the animation.

Challenges:

I really wanted the butterflies to flap their wings as they flew, but I couldn’t figure out how to make that happen. I tried to add a variable butterflyWing with two possible states, butterflyExtend and butterflyContract. I wanted the butterflies to alternate between the two randomly on every frame count. I drew the two states, but no matter what I tried, I couldn’t get the result I wanted. I also wasn’t sure how to even search for what I wanted. I ended up watching a number of Coding Train videos in hopes of finding some help, but in the end I was unsuccessful.

Final:

Code:

The Butterfly Class code:

class Butterfly{
  float posX, posY;
  float butterflyWidth, butterflyHeight;
  color butterflyColor;
  float speed;
  
  Butterfly(float _posX_, float _posY_, float _speed){
    posX = _posX_;
    posY = _posY_;
    butterflyWidth = random(10, 20);
    butterflyHeight = random(50, 100);
    butterflyColor = color(252,127,3);
    speed = _speed;
}

void migration(){
 butterflyBody();
 butterflyWing();
 butterFly();
 update();
}

void constructButterfly(float _posX_,float _posY_){
  
}

void butterFly(){
  posY += speed;
  
  if (posY > height+butterflyHeight/2) {
    posY = +butterflyHeight/2;
  }
    

}

void update(){ 
  if (posX > mouseX){
    posX --;
  }
  if (posX < mouseX){
    posX ++;
  }
}

void butterflyBody(){
  fill(0);
  stroke(0);
  strokeWeight(1);
  strokeJoin(ROUND);
  ellipse(posX, posY, butterflyWidth, butterflyHeight);
}

void butterflyWing(){
  fill(butterflyColor);
  triangle(posX, posY, posX-butterflyHeight, posY+butterflyHeight/20, posX-butterflyHeight, posY+butterflyHeight);
  triangle(posX, posY, posX+butterflyHeight, posY+butterflyHeight/20, posX+butterflyHeight, posY+butterflyHeight);
  triangle(posX, posY, posX-butterflyHeight, posY-butterflyHeight/20, posX-butterflyHeight, posY-butterflyHeight);
  triangle(posX, posY, posX+butterflyHeight, posY-butterflyHeight/20, posX+butterflyHeight, posY-butterflyHeight);

}
}

The operational code:

Butterfly[] myButterflies;

void setup(){
 size(1280, 1280); 
 rectMode(CENTER);
 
 myButterflies = new Butterfly[50];
 for (int i=0; i<myButterflies.length; i++){
   myButterflies[i] = new Butterfly(random(width), height + 100, random(5, 10));
 }
}

void draw() {
  background(255);
  
  for (int i=0; i<myButterflies.length; i++){
    myButterflies[i].migration();
  }
}


Week 3 Generative Art

Generative Art

This was inspired by one of the things we saw in class. For some reason, I cannot seem to find it, but it was a piece where lines go from a circumference of a circle inwards to fill the circle.

I had a plan in mind to have lines growing out of the center into a circle, but I did not like how it looked, as the lines were too sharp for my preference.


So instead I used the noise function to make random dots, on a 360-degree variation.

I wanted to make it look more natural, however, so I decided to also add some cloudy form around it.

When I saw this, I felt like it reminded me of a laptop screen saver, as the circles grow out and it progresses into what it is. Screen savers though, unlike this design above, have different circles it would usually be more than one, so using a random function, I generated the circles starting from a different center point every 100 frameCounts.

That, if I would let go on I would have gotten into a huge mesh after some time, so I called the background function after every 5 circular things are created.

Later I also edited the colors and added an alpha value to make the circles a little easier on the eye.

and to make it a little user-controlled, I called the background function and reset the center with each click on the screen.


I also decided to make it a full screen like a real screen saver.

video:

code:

main file:
Circles _circles;

int centerX = 0;
int centerY = 0;


void setup() {
  fullScreen();
  background(0);
  frameRate(10);
  _circles = new Circles(width/2, height/2);
}

void draw() {
  _circles.generate();
  if (frameCount%20==0){
    _circles.cloudy();
  }

  if (frameCount%100==0){
    _circles.setCenter(random(0, width),random(0, height));
  }

  if (frameCount%500==0){
    background(0);
  }
  
}


void mouseClicked(){
  background(0);
  _circles.setCenter(mouseX, mouseY);
}


Circle file:
class Circles {

  public float xcenter;
  public float ycenter;

  public float x_pt;
  public float y_pt;

  public int rad;

  public float[][] ptarr = new float[90][2];

  Circles(float _xcenter, float _ycenter) {
    xcenter = _xcenter;
    ycenter = _ycenter;
    rad = 4;
    setupp(30, xcenter, ycenter);
  }

  public void setupp(int num, float x, float y) {
    for (int i=0; i<90; i++) {
      x_pt = x + num*cos((float)radians(i*4));
      y_pt = y + num*sin((float)radians(i*4));
      fill(255, 50);
      noStroke();
    }
  }

  //getters and setters
  public void setCenter(float _xcenter, float _ycenter) {
    xcenter = _xcenter;
    ycenter = _ycenter;
    setupp(30, xcenter, ycenter);
  }

  public void generate() {
    int offset = 30+(frameCount%100)*5;
    float newoffset;
    float newoffset2x;
    float newoffset2y;
    fill(random(100, 200), random(100, 200), random(100, 200), 100);
    noStroke();
    for (int i=0; i<90; i++) {
      newoffset = noise(frameCount + i*0.01)*offset;
      
      newoffset2x= noise(frameCount + i*0.02)*cos((float)radians(i*4));
      x_pt = xcenter + newoffset*newoffset2x;

      newoffset2y= noise(frameCount + i*0.02)*sin((float)radians(i*4));
      y_pt = ycenter + newoffset*newoffset2y;

      circle(x_pt, y_pt, rad);
    }
  }

  public void cloudy() {
    fill(100, 30);

    float new_x = random(xcenter-(frameCount*20)%width/3, xcenter+(frameCount*20)%width/3);
    float new_y = random(ycenter-(frameCount*20)%height/3, ycenter+(frameCount*20)%height/3);

    for (int i=0; i<99; i++) {
      circle(random(new_x-width/10, new_x+width/10), random(new_y-height/10, new_y+height/10), random(40, 80));
    }
  }
}


Week 3: Generative artwork using OOP

Description:

For this week’s assignment, I created a generative artwork using Object-Oriented Programming. Using mainly ellipses, I tried to generate a spiral that contracts and expands continuously and repetitively. 

To improve the program’s clarity and organization, I utilized classes, variables, and a couple of functions.

Setup:

First, I had to set the display window’s size to 640 x 640 (1:1 aspect ratio) to get a square window, then used a pitch-black background.

void setup(){
  size(640, 640);  
  background(0);
}
Class:
Name & Attributes:

I have only used one class named Ellipse which has two float attributes (xradius, and yradius) that respectively store the width and height of the ellipse.

class Ellipse{
  float xradius, yradius;
}
Constructor:

The constructor here takes two float arguments (xradius and yradius) then sets the attributes to those values.

Ellipse(float xradius, float yradius){
  this.xradius=xradius;
  this.yradius=yradius;
}
Functions:

I have used two functions (one to draw a single ellipse, and the other to draw multiple ellipses). The first function takes xradius and yradius as arguments, then proceeds to draw an ellipse. The second is more complicated. In fact, it starts by moving the shapes to the middle of the display window by setting the x-axis offset to width/2 and the y-axis offset to height/2 using the translate() function, then inside the for() loop, the ellipses are generated with an xradius that depends on the frameCount. To get a sort of spiral, the window is rotated with an angle that equals the frameCount.

void build(float xradius, float yradius){
  ellipse(0, 0, xradius, yradius);
}

void build_all(){
  translate(width/2, height/2);
  for (int i=0; i<400; i+=40) {
    float framecount = radians(frameCount);
    xradius = yradius - i*cos(framecount);
    rotate(cos(framecount));
    build(xradius, yradius);
  }
}
draw():

To get a sort of motion, I have set the transparency (alpha) to 85 instead of resetting the background at each frame.

void draw(){
  fill(0,85);
  rect(0,0,width,height);
  stroke(250);
  noFill();
  ellipse.build_all();
}

View post on imgur.com

Whole code:
// Ellipse Class
class Ellipse{
  // Attributes
  float xradius, yradius;
  
  // Constructor
  Ellipse(float xradius, float yradius){
    // Width of the ellipse
    this.xradius=xradius;
    // Height of the ellipse
    this.yradius=yradius;
  }
  
  // Generate one ellipse
  void build(float xradius, float yradius){
    ellipse(0, 0, xradius, yradius);
  }
  
  // Generate all ellipses
  void build_all(){
    // Move the shapes to the middle
    translate(width/2, height/2);
    for (int i=0; i<400; i+=40) {
      // Convert frameCount to rad
      float framecount = radians(frameCount);
      // Change the xradius depending on the framecount 
      xradius = yradius - i*cos(framecount);
      // Rotate the ellipses
      rotate(cos(framecount));
      // Call to the first function
      build(xradius, yradius);
    }
  }
}

Ellipse ellipse;

void setup(){
  size(640, 640);  
  background(0);
  // Create an ellipse
  ellipse = new Ellipse(380,380);
}

void draw(){
  // Add visible motion
  fill(0,85);
  rect(0,0,width,height);
  stroke(250);
  noFill();
  // Generate the ellipses
  ellipse.build_all();
}

Generative Art Piece

Description& Inspiration:

I wanted to create something simple yet eye catching, the first thing that came to mind was something like this, the picture on the  left  is a picture  of   mars,  while  the  right  is  how  I  imagined  I  can  bring  it  to  life  in  processing.

Process:

My focus in this project was creating an organized code and figuring out how to use Object-Oriented Programming rather than creating a complicated design. I started out as follows,  by laying out the needed standard functions such as setup() and draw(). Then I started planning and laying out all the variables I knew I was going to need. Starting out with drawing the actual sphere, the prices was quite long and a bit confusing however, after a lot of research and a lot of help from The Coding Train, I was able to get started. In order to create a sphere like shape (without resorting to the basic sphere function on processing),  I needed a longitude value (which is 'I' in the for loop) and latitude value (which is 'j' in the for loop).

with the above code only, the screen was still blank, in order to continue drawing the sphere the formulas for converting from latitude and logitude to coordinates were needed. Where theta refers to longitude and phi refers to latitude. 
 formulas are as follows :

Then I needed to give motion to the sphere by using rotateX() and rotateY(), then I used point(x,y,z) to actually finish the drawing. 

I also wanted to change the color of the sphere from red to yellow when any key is pressed so I used the mouse clicked for red and mouse pressed for yellow.  


Final Project:

I created two versions: one where I have decreased the detail level of the sphere and how fine the resolution is and one where I increased it.


This is the increased version:


This is the decreased version:


I also really wanted to tidy up my code and make it easy to understand to I created two function, displaySphere() and colorChange(), and added them both two one big function which is runSphere(), so the final code only had sphere.runSphere() in it.

Difficulties:

I would say that this is definitely the most challenging assignment I have gotten in the course so far in my opinion, the actual design was not very easy but what I found most difficult was trying to organize my code and figuring out the class. However, the way my code looks at the end was very worth it, and I will be able to use it later in other projects much easier.


Sources: 
The Coding Train: Spherical Geometry video
Sphere sphere;


void setup(){
  size(600,600,P3D);
 sphere=new Sphere();

}


void draw(){
  background(0);
sphere.runSphere();
 
}
class Sphere{

  float r;
  int total;
float x;
float y;
float z;
float lon;
float lat;
  
  
  Sphere(){
    
  r=200;
  total=100;
  x=r*sin(lon)*cos(lat);
  y=r*sin(lon)*sin(lat);
}


 void runSphere(){
    
displaySphere();
colorChange();
 }


void displaySphere(){
    background(0);
  noFill();
  lights();
  
//I needed a longitute value (which is 'i') and latitude value (which is 'j')
  translate(width/2,height/2);
  for(int i=0;i<150;i++){
 lon=map(i,0,total,-PI,PI);
   for (int j=0;j<150;j++){
   lat=map(j,0,total,-HALF_PI,HALF_PI);
   
 //as per the formulas for converting from latitude and logitude where theta refers to longitude and phi refers to latitude. 
 // formulas are as follows :
 //x=rsin(theta)cos(phi)
 //y=rsin(theta)sin(phi)
 //z=r*cos(theta)
   x=r*sin(lon)*cos(lat);
    y=r*sin(lon)*sin(lat);
    z=r*cos(lon);
    
 //this if for the movement of the sphere (rotation) using mouse events   
   rotateX(mouseY);
   rotateY(mouseX);
  
  point(x,y,z);
}
  }
   }
   
//changing the color from yellow to red by using mouse events as well
void colorChange(){
  if (mousePressed){
     stroke(255,0,0);
   } else if (keyPressed)
   {
     stroke(142,142,62);
   }
}
  }


Week 3 Assignment – Shanaia Paruthi

Description

Create a generative artwork using Object-Oriented Programming.

Process

I started with setting the background as black. This particular design has a monochrome theme, therefore I have only used the shades of black and white for this assignment.

I started by creating a spiral starting from the centre of the screen using the ellipse shape and sin and cos function to move it. I then created a circle in the centre and put its colour in a loop to give it an effect.

The main part of my design consisted of rotating square in the centre. By putting the square in a loop and a strokeWeight of 10, the square got its special effect. Then I increased the square angle  by 0.1 with every  frame.

VIDEO TO MY WORK:

https://youtu.be/lZz2NTa6jeU

//introducing variables 
float r = 0;
float theta = 0;
float angle;

void setup() {
  //setting the display size
  size(640, 480);
  
  background(0);//black
  fill (256/2,80); //grey
  circle(0, 0, 150);
}

void draw() {
  
  spiral();
  
  center(250);
  
  square();
}

void spiral(){
  //defining x coordinate to move the ellipse
   float x = r * cos(theta);
   //defining the y coordinate to move the ellipse
  float y = r * sin(theta);

  
  noStroke();
  //defning stroke Weight
  strokeWeight(0.5);
  //filling colour
  fill(random(100,150));
  translate(width/2,height/2);
  
  //creating the ellipse
  ellipse(x, y, 30, 30); 

  //increment of angle
  theta += 0.1;
  //increment of radius of the spiral
  r += 0.5;
}

void center(float h) {
  //defining the center circle 
  h-= 5;
  circle(0, 0, h+60);
  //giving it a zooming effect
  for (int i=0; i<angle; i++) {
    fill(100,80);
    line(h, h-2, h, i);
  }
  
  
}
void square(){
  //creating a loop
  for (int i=0; i<100; i++) {
    fill(random(100, 180), 85);
    stroke(0);
    strokeWeight(10);
    //scaling the square
    scale(0.95);
    
    //rotate
    rotate(radians(angle*1.5));
    
    //creating a rectangle
    rect(0, 0, 150, 150);
  }
  //increment of the angle
  angle+= 0.1;
}


Ocean Currents (Generative Art) – Jade


Description

This work was inspired by an artwork I saw on Youtube. I love the flowing lines, the dynamic movements, and the way it interacts with people.

In this work, I used the concepts of Object-Oriented Programming and the particle system. My favorite part of this project is the interaction with the cursor, that changes both the transparency of the background and the starting point of the particles. Also I added the two perpendicular lines to locate the cursor and to show how the particles change with the move of my mouse.


Code

This part is my class of the particles.

 class Particle {               
  float posX, posY, val=0, angle, speed=2;   
  color c;    
  float r, g, b;
    
  Particle() { 
    posX = random(width);
    posY = random(height);
  }
 
  // the main function of the class
  void run() { 
    update();
    add_color();
    check();
    generate();
  }
 
  // update the position of particles
  void update() {     
    float noise_val = noise(posX * 0.005, posY * 0.004, val);    
    val += 0.01;  
    angle = noise_val * TWO_PI;
    
    posX += speed * cos(angle);  
    posY += speed * sin(angle);
    
  }
  
  // when particles in the canvas, draw the particles
  void generate() {
    if (posX > 0 && posX < width && posY > 0  && posY < height) {
        lines();
        ellipse(posX, posY, 2, 2);
    }
  }
  
  // check if the particles are out of edges, so to place them back to the canvas
  void check() {   
    if (posX< 0 || posX > width) 
      posX = mouseX;
    if (posY < 0 || posY > height)
      posY = mouseY;
  }
  

  // generate slightly different blue colors
  void add_color() {
      float col = map(posY, 0, height, 255, 0); 
      c = color(30, col, 255); 
      fill(c);
  }
  
  // the lines intersecting at mouse coordinates
  void lines() {
     stroke(150, 150, 150);
     line(mouseX, 0, mouseX, height);
     line(0, mouseY, width, mouseY);
  }

}

The part below is my main function.

Particle[] particles;     
float trans;     
int nums = 500;
 
void setup() {
  size(300, 600);
  background(#070B46);
  noStroke();
  setParticles();         
}
 
void draw() {
  trans = map(mouseY, 0, width, 0, 50);  // transparency changes with mouseY
  fill(#070B46, trans);  // background    
  rect(0, 0, width, height);
  for (int i = 0; i < nums; i++) {
      particles[i].run();
  }
}
 
// make the particles
void setParticles() {        
  particles = new Particle[nums];  
  for (int i = 0; i < nums; i++) {        
    particles[i]= new Particle();   
  }
 
}-
 
// if pressed, regenerate all the particles
void mousePressed() {
  setParticles();
}


Process

I set the canvas to be size(300, 600) because I think this size fits the patterns best, and I think I want to create a bottle-like scene. When running this project, it first randomly generates 500 particles across the canvas. When you move the cursor up and down, it changes the transparency of the background, which results in the change of the density of the particles visually. As the particles strike the edges, new particles will generate at either (x, mouseY) or (mouseX, y). To be visually clearer, I added the two lines to better display where the particles appear, which turns out to be pretty cool. Since quite a few parameters are related to mouseX and mouseY, as you move the cursor around, it may create some artistic patterns and effects. Pressing mouse would regenerate the particles randomly, in other words, refresh the work.

One of the difficulties I encounter was to adjust the parameters of the particles, like their color, speed and angles. It takes time to experiment to achieve my expectation. I initially wanted to make the color change every time the particles are regenerated. So I included the code for color in the void generate() function, but it didn’t work out and only filled in the same color. After a few attempts, the approach I eventually take is to use the map function to make the color change with my mouseY.

The most challenging part is about the class/ struct. After writing different functions, I found it sometimes confusing when putting them together, especially when I wanted to use functions inside another function. As result, I also found it challenging to decide whether this function should be put in draw function or the setup function.


Conclusion

I think this project really improves my understanding of class and noise/map functions. And it is always interesting and surprising to see what will come out as I change the parameters. I feel that randomness is really an important part of Processing artworks. Randomness inspires me and leads me during the whole time.

Assignment 3: project oriented programming

inspiration & CONCEPT: Haunting Questions, Bursting Emotions

I intended to create repeating shapes and have them follow around the cursor. The mushrooming question marks describe the unfading nature of problems that never seem to go away. It shows how questions and emotions can loom in our minds and pulsate with time.

VIDEO DEMO

the codes

Twist [] myTwist;            

void setup() {
  size(1280, 720);
  
  //constructor
  myTwist = new Twist[25];
  for (int i=0; i<myTwist.length; i++){
    myTwist[i] = new Twist(i);
  }
}

//EXECUTION
void draw() {
  //background
  for (int i = 0; i < 1280; i += 128) {
    noStroke();
    fill(0+i/64*16*random(-10, 10)*noise(frameCount*0.01),49+i/64,156+i/64, 30);
    rect(0+i, 0, 128, 720);
  }
  
  //bursting emotions (two groups of circles )
  for (int i = 0; i<myTwist.length/2; i++){
    myTwist[i].runTwist();
    
    pushMatrix();               //save current coordinate system to the stack
    translate(50, 75);          //take the anchor coordinates from (0,0) to (width/2, height/2)               
  for (int l = myTwist.length/2; l<myTwist.length; l++ ) {
    tint(255, 156);
    myTwist[l].runTwist();
  }
    popMatrix();                //restore coordinate system
  }
}
//CLASS VARIABLES
class Twist{ 
  float posX, posY;     //inital coordinate of the circles
  float easing = 0.05;  //speed of the circles
  float diameter;       //size of circles
  color circleColor;    //color of the circles
  float speed;          //dictates how fast the circles move
  
//CONSTRUCTOR
Twist(float _speed){
  circleColor = color(200, 100, 100, 30);
  diameter = 100;
  speed =_speed;
}

//FUNCTIONALITY
//executes all functions 
void runTwist(){
  drawCircles();
  sizeCircles();
  drawText();
}

void drawCircles(){
  fill(circleColor);
  noStroke();
 //makes circles follow the cursor
  float targetX = mouseX;
  float dx = targetX - posX;
  posX += dx * easing * speed;
  
  float targetY = mouseY;
  float dy = targetY - posY;
  posY += dy * easing*speed;
  
  circle(posX+random(-10, 10)*noise(frameCount*0.01), posY+random(-10, 10)*noise(frameCount*0.01), diameter);
}

  //generates random question marks and the text in the middle of the circle
void drawText(){
  fill(255);
  text("why", mouseX, mouseY);
  fill(255, 180);
  text("?", random(width)-50, random(height/2)+400);
}

  //controls the size of circles
void sizeCircles(){
     diameter +=3;
  if (diameter>250){
    diameter = 100;
  }
}
}

PROBLEMS

Initially, I tried to create a group of circles that enlarges and shrinks to mimic a heart pulsating with its left ventricle. It does look like it’s pumping and it doesn’t look like a heart to begin with. I ay have to control the speed of the size changing and draw better next time.

Week 3 : Object Oriented Programming

WEEK 3 : OBJECT ORIENTED CYBER FIBER COMPUTER GRAPHIC

INTRODUCTION :

In week 3, we have to code in a more mature and reusable way. For that we learned object oriented programming. With the help of previous knowledge of 2D shapes, lines, arcs, built in functions, and arrays we must write reusable and managed code for computer graphics. We learned this week how to create classes and implement attributes and methods in it to initiate a class object. We have to implement some objects and make them dynamic to give it an animated look. We have to learn how to call functions.

IDEA FOR COMPUTER GRAPHIC:

Nowadays everything is connected, and communication is quick and reliable. The communication of devices today on networks is a paradigm similar to the manner in which body muscle fibers flow. The muscle tissues are connected to each other through small fibers that share the same structure as mesh cyber network in which communication is through different routes in some visible pattern.

CHALLENGES & PROBLEMS :

The graphic I decided to code was creative and it was very hard for me to understand and implement math into my code. It was challenging for me to provide random movements to the fibers to keep the flow. I used the hit and trial approach to check if the translation of objects is in the right direction which was quite time consuming. Giving angles to the fibers to keep them in flow was challenging which extended with some random movements. It was also very challenging for me to implement math equations in order to keep up the shape of fibers to randomly move between the four corners.

PROCEDURE:

The first step I took is to implement and initiate the built-in functions to create the screen for my graphics. I used setup () and draw () functions for that. Then I started implementing my Fiber class which shows pure use of object oriented programming. I initialized important attributes inside the fiber class which later changed their values during different function calls. I used PVector to give each fiber some specific directions which is randomly generated during function calls. Then, I implemented the constructor of fiber class which takes one parameter which is the size of the fiber. The size of the fiber is decided during object initialization outside the class. After that I began working on some major behaviors of graphics such as moving the fibers and the specific directions. As the fiber moves randomly it is generating more fibers. I made functions for the get random rotations and random addition of fibers during movement. In the movefiber() function I set the major attributes of the class. To display the fibers movement, I implemented displayfiber() function.


//for the movement of Fiber
  void MoveFibers()
  {
   Fiberrotationorignal=radians(random(360));
   translatingFiberrotation=MakeFiberRotate(0.1,2.0);
   Fiberaddition=GetMoreFibers(10000);
  }
  
  //for rotation of Fibers
  float MakeFiberRotate(float start , float end)
  {
    return radians(random(start,end));
  }
  
  //for addition of more Fibers
  float GetMoreFibers(int howmuch)
  {
    return random(howmuch);
  }

I used map function in it to transform the values from one range to another. I gave audio-like harmonic movements to additional fibers generated during movement by using noise() function. Subsequently, I angled the fiber vectors which are moving along x and y axes by using cosine and sine functions.
//for displaying Fibers
 void DisplayFiber()
 {
  float noi=map(noise(Fiberaddition),0,1,-20,20);
  direction.x=(size+noi)*cos(Fiberrotationorignal)*cos(Fiberrotationorignal)*cos(Fiberrotationorignal); 
  direction.y=(size+noi)*sin(Fiberrotationorignal)*sin(Fiberrotationorignal)*sin(Fiberrotationorignal);
  Fiberrotationorignal+=translatingFiberrotation;
  Fiberaddition+=0.01;
 }
I initialized global variables for the number of fibers to generate and initialized a global array for it. These are the initial fibers which were generated during movement. In setup () function I set the color mode to HSB to give hue, saturation and brightness to fibers strokes. I initiated the fibers in 2 halves with different sizes. We can see this in for () loop in setup function.
// Main setup functions to get screen size
void setup()
{
  //drawing screen width and height
  size(640,500);
 
  colorMode(HSB,360,100,100);
  
  stroke(255);
  
  for(int i=0;i<N;i++)
  {
    if(i<N/2)
    {
      p[i]=new Fiber(180);
    }
    else 
    {
      p[i]=new Fiber(230);
    }
  }
  
}
Then, in draw function I made use of the display function to show the movement of fibers along x and y axis. I used translate function to put my graphics on the center of the screen. To give different strokes to different fibers and initializing of fiber in specific direction, I used stroke and line function in nested for loop which runs for N times as long as all fiber objects displayed on the screen. The draw function is looping unlimited times and every time the fibers are being placed in new angles directions.

// For drawing loop of fibers
void draw()
{
  colorMode(RGB);
  background(0);
  colorMode(HSB,360,100,100);
  translate(width/2,height/2);
  
  for(int i=0;i<N;i++)
  {
   p[i].DisplayFiber(); 
  }
  
  for(int i=0;i<N;i++)
  {
   for(int j=i+1;j<N;j++)
   {
     
    if(p[i].direction.dist(p[j].direction)<120)
    {
      stroke(map(p[i].direction.dist(p[j].direction),0,80,50,200),100,100);
      line(p[i].direction.x,p[i].direction.y,p[j].direction.x,p[j].direction.y); 
    }
    
   }
  
}
  
}

FINAL WORK:

Below IS the code work for my computer graphic:

class Fiber
{
  //size of Fiber
  float size;
  
  //orignal rotation of Fiber cluster
  float Fiberrotationorignal=0;
  
  //for Fiber movement rotation
  float translatingFiberrotation;
  
  //direction of fiber
  PVector direction=new PVector();
  
  //for adding more Fibers in cluster
  float Fiberaddition;

  //constructor for Fiber
  Fiber(float s)
  {
   size=s;
   MoveFibers();
  }
  
  //for the movement of Fiber
  void MoveFibers()
  {
   Fiberrotationorignal=radians(random(360));
   translatingFiberrotation=MakeFiberRotate(0.1,2.0);
   Fiberaddition=GetMoreFibers(10000);
  }
  
  //for rotation of Fibers
  float MakeFiberRotate(float start , float end)
  {
    return radians(random(start,end));
  }
  
  //for addition of more Fibers
  float GetMoreFibers(int howmuch)
  {
    return random(howmuch);
  }
  
  //for displaying Fibers
  void DisplayFiber()
  {
   float noi=map(noise(Fiberaddition),0,1,-20,20);
   direction.x=(size+noi)*cos(Fiberrotationorignal)*cos(Fiberrotationorignal)*cos(Fiberrotationorignal); 
   direction.y=(size+noi)*sin(Fiberrotationorignal)*sin(Fiberrotationorignal)*sin(Fiberrotationorignal);
   Fiberrotationorignal+=translatingFiberrotation;
   Fiberaddition+=0.01;
  }
  
}


//Number of Fibers
int N=100;

//fibers array
Fiber p[]=new Fiber[N];


// Main setup functions to get screen size
void setup()
{
  //drawing screen width and height
  size(640,500);
 
  colorMode(HSB,360,100,100);
  
  stroke(255);
  
  for(int i=0;i<N;i++)
  {
    if(i<N/2)
    {
      p[i]=new Fiber(180);
    }
    else 
    {
      p[i]=new Fiber(230);
    }
  }
  
}

// For drawing loop of fibers
void draw()
{
  colorMode(RGB);
  background(0);
  colorMode(HSB,360,100,100);
  translate(width/2,height/2);
  
  for(int i=0;i<N;i++)
  {
   p[i].DisplayFiber(); 
  }
  
  for(int i=0;i<N;i++)
  {
   for(int j=i+1;j<N;j++)
   {
     
    if(p[i].direction.dist(p[j].direction)<120)
    {
      stroke(map(p[i].direction.dist(p[j].direction),0,80,50,200),100,100);
      line(p[i].direction.x,p[i].direction.y,p[j].direction.x,p[j].direction.y); 
    }
    
   }
  
}
  
}

CONCLUSION:

This assignment gave me the opportunity to learn object-oriented programming, how to define objects, and different ways to use them to sketch different objects. I learned how to manage the complex code and how to enhance the reusability of code during processing programming. I also learned more knowledge of how to give different angles to objects and how to map one range of values to another range to visualize some useful pattern. I also learned how to use arrays and array indexes to display different objects. I benefitted more in terms of knowledge and the learning of new aspects with this assignment by using arrays inside the for loop.


The Moon Of Neon Dandelions

This week’s project of creating generative art was really fun and interesting as I had a clear vision of what I wanted to achieve from the beginning of the process. I noticed that initially, as I started looking for inspiration for generative art online,  I was gripped by art that depicted nature in one way or another. Daniel Brown had a piece with flowers and the bright colors on it were something I wanted to have in my work in addition to elements of nature. Here’s the work:

Hybrid Landscapes by Daniel Brown

As I brainstormed, I finalized on an idea of creating a piece contemplating what’s on the other side of the moon – the far side that we never get to see. I wanted to begin with something very natural, something that looks like the moon, and then transition that to my wacky thoughts on the question to create an experience for the person who views the work.

The Moon

I began looking for works that have already achieved creating a realistic moon using processing but unfortunately, I couldn’t find anything. I didn’t want to give up on the idea of creating a realistic moon and I played around with processing to see if I could get close. This is when I came across a print by Anders Hoff’s:

Anders Hoff’s Inconvergence

The circle is made of a lot of lines to create a planet-like texture and I found this idea very intriguing and I decided to use this because his print looked like a planet, so my idea was that I could create something that resembled the moon. This concept of creating something that looks natural entirely out of straight lines was one of the most favorite things that I learned from this week. The idea was to connect random points of the circle with lines and to get patterns and I restricted the angles of the lines to different ranges over time. For the parameters of the line, I randomized the angles and took the sine and cosine of it, multiplied it by the radius of the circle to obtain points on the circle. This took some time to figure out because my positions kept showing up incorrectly even though mathematically it should be on the circle. Finally, I realized that I made a mistake with the radius, I had used diameter instead of it. 

In the background, I put in stars at first but I didn’t quite like how it looked. In the end, after trying out different things, I ended up creating this depiction of stars when photographed in a timelapse or a star shower. I used lines for the same.

My version of the moon


Neon Dandelions

After many many extreme ideas on what to put on the other side of the moon, ranging from cheese to flowers, I finalized on making them be made out of neon dandelions. I was intrigued by the shape of dandelions and wanted to work on making one, so I decided to make my moon be made of dandelions. My idea was to create this effect of getting gripped into the art as the moon gets constructed and then creating a swift transition to hallucinations where the neon elements appear, mimicking the process of when you get too carried away into something, you start imagining things. I used bright colors of yellow, purple, and pink.

I used a class for organizing my dandelions. It had the following features: X and Y coordinates for a position, the radius of the dandelion, the color of the dandelion, an array of colors. It had a constructor to initialize these positions, the color, and the radius. It had the functions of drawing dandelions and also a transition effect to show the transition from the moon to neon dandelions. There is a shadow of the moon in the transition and as an effect of one looking at the moon for a long time, you will see an illusion of a darker circle nearby over the neon lights (if you look at it long enough) which was a fun addition to the visual experience. 

I end the visuals with a quick blackout. 

I started off with the idea of presenting the other side of the moon by having the moon suddenly rotating to reveal the neon dandelions, but given that I made the moon by drawing lines one over the other, I couldn’t figure out a way to retain the idea of lines creating the moon and the rotation effect. I tried the 3d rotation in one of my trials, but it didn’t look quite as realistic as to how it did for a 2d version of the moon with lines. Here’s a video of the final output and the code is below that:

Code:

Dandelion[] dandelions = new Dandelion[500];
float radius=150;
float count=0;


color c1 =  #FFEB00; //yellow
color c2 = #5600CC; //purple
color c3 = #FF01D7; //pink


void setup() {
  size(640, 480);
  background(0);
  frameRate(500);
  
  //calling constructor to create Dandelion objects - colors are randomly assigned from the array of colors 
  for (int i=1; i<=dandelions.length; i++) {
    dandelions[i-1] = new Dandelion(int(random(3)));
  }
}

void draw() {
  
  //creating the moon scenery
  if (frameCount<3000) {
    stroke(202, 202, 202);
    moon();
    stars();
  }

  //transition to the "other side" of the moon - of neon dandelions
  if ((frameCount>=3000) && (frameCount<3010 )) {
    delay(100);
    for (int i=1; i<=dandelions.length; i++) {
      dandelions[i-1].transition();
    }
  }

 //momentary blackout
  if (frameCount==3010) {
    background(0);
  }

//dandelion moon
  if (frameCount>3005 && frameCount<6000 ) {
    for (int i=1; i<=dandelions.length; i++) {
      dandelions[i-1].dandDraw();
    }
  }


//final blackout
  if ((frameCount>=6000)) {
    background(0);
  }
}


void moon() {
  float i=random(0-count*PI/20, PI/20); //randomized angle of first line - the angles are restricted to give a patterned effect and it increases as frameCount increases
  float j=random(i, PI/20); //randomized angle of second line
  strokeWeight(0.1); //thinner strokes
  
  pushMatrix();
  translate(width/2, height/2);
  line((sin(i)*radius), (cos(i)*radius), (sin(j)*radius), (cos(j)*radius)); //gives chords
  if (frameCount%5==0) {
    count++;
  }
  popMatrix();
}

//shooting stars effect or a stars timelapse
void stars() {

  fill(255, 255, 255);
  stroke(255, 255, 255);
  float i = random(0, width);
  float j=random(0, width);
  line(i, j, i+40, j+20);
  rotate(90);
  delay(5);
  fill(0);//graying it out
  line(i, j, i+40, j+20);
  rotate(-90);
}

Dandelion Class –

class Dandelion{
 float posX;
 float posY;
 float dandRad; //radius of dandelion
 float colorPick;
 color[] colors ={c1, c2, c3}; 
 color dandColor;

 
 //constructor
 Dandelion(int colorPick)
 {  
   dandColor=colors[colorPick]; 
   
   posX=random(width/2-150,width/2+radius);
   posY=random(height/2-150,height/2+radius);
   
   //while condition to get points within the circle
   while(((posX- width/2)* (posX- width/2))+ ((posY - height/2)*(posY - height/2) )>=(radius*radius))
   { 
     posX=random(width/2-150,width/2+radius);
     posY=random(height/2-150,height/2+radius);
   }
   dandRad=5;
 }
 
//draw individual dandelions 
 void dandDraw(){
  fill(dandColor);
   //circle(posX,posY,dandRad);
   stroke(dandColor);
   strokeWeight(0.5);
   float l=random(20);
   line(posX,posY,posX+random(-l,l),posY-random(-l,l));
  
  }
  
  
//transition
  void transition(){
    fill(dandColor);
   stroke(dandColor);
   strokeWeight(0.5);
   float l=random(20);
   line(300,200,300+random(-l,l)*frameCount*0.5,300-random(-l,l)*frameCount*0.5);
}
}


References

http://danielbrowns.com/

https://img.inconvergent.net/print/706dbb4.html