
IDEA:
I wanted to create the popular game Flappy Bird, but using the distance sensor and my hand to control the movement of the bird.
PROCESS:
I started by creating an array of rectangles that formed at a distance apart, and at random heights. For some reason, this was my most frustrating part because I didn’t realise how quickly I could forget Java. Eventually figured out how to move the screen, and the ball, to make it seem like the bird was moving.
ARDUINO:
This was the first time I w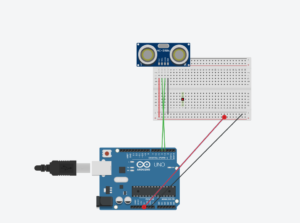 as using the Distance sensor so it took me some time to understand it, but some research and help from my peers did the trick. Once I kept experimenting using my hand, I constrained the results to a distance I thought seemed appropriate, which was between 1 and 10 inches. After that, I connected the Arduino and processing using the sendBytetoProcessing example and was happy to have found that process easy for me.
FINAL TOUCHES:
I added a collision if statement, to end the game, and also added some fun graphics to have the game seem more fun!
OBSTACLES:
I couldn’t manage to get the bird to mimic my hand movements exactly, The bird seemed to keep bouncing. I played around a lot with constrain, mapping, time, and framerate, but am still not sure what exactly the issue is. I would love some insight if anyone knows!
Good job on getting the look of flappy birds. Definitely needs some smoothing on that photo cell, that would help out a lot. The other thing you can do is add a little physics. Look at the example in the class github repo under processingExamples>>gravityExamples>>gravityWind and then look at how the wind force works. You can use the number from the photocell to add a force that makes the bird go up or down.