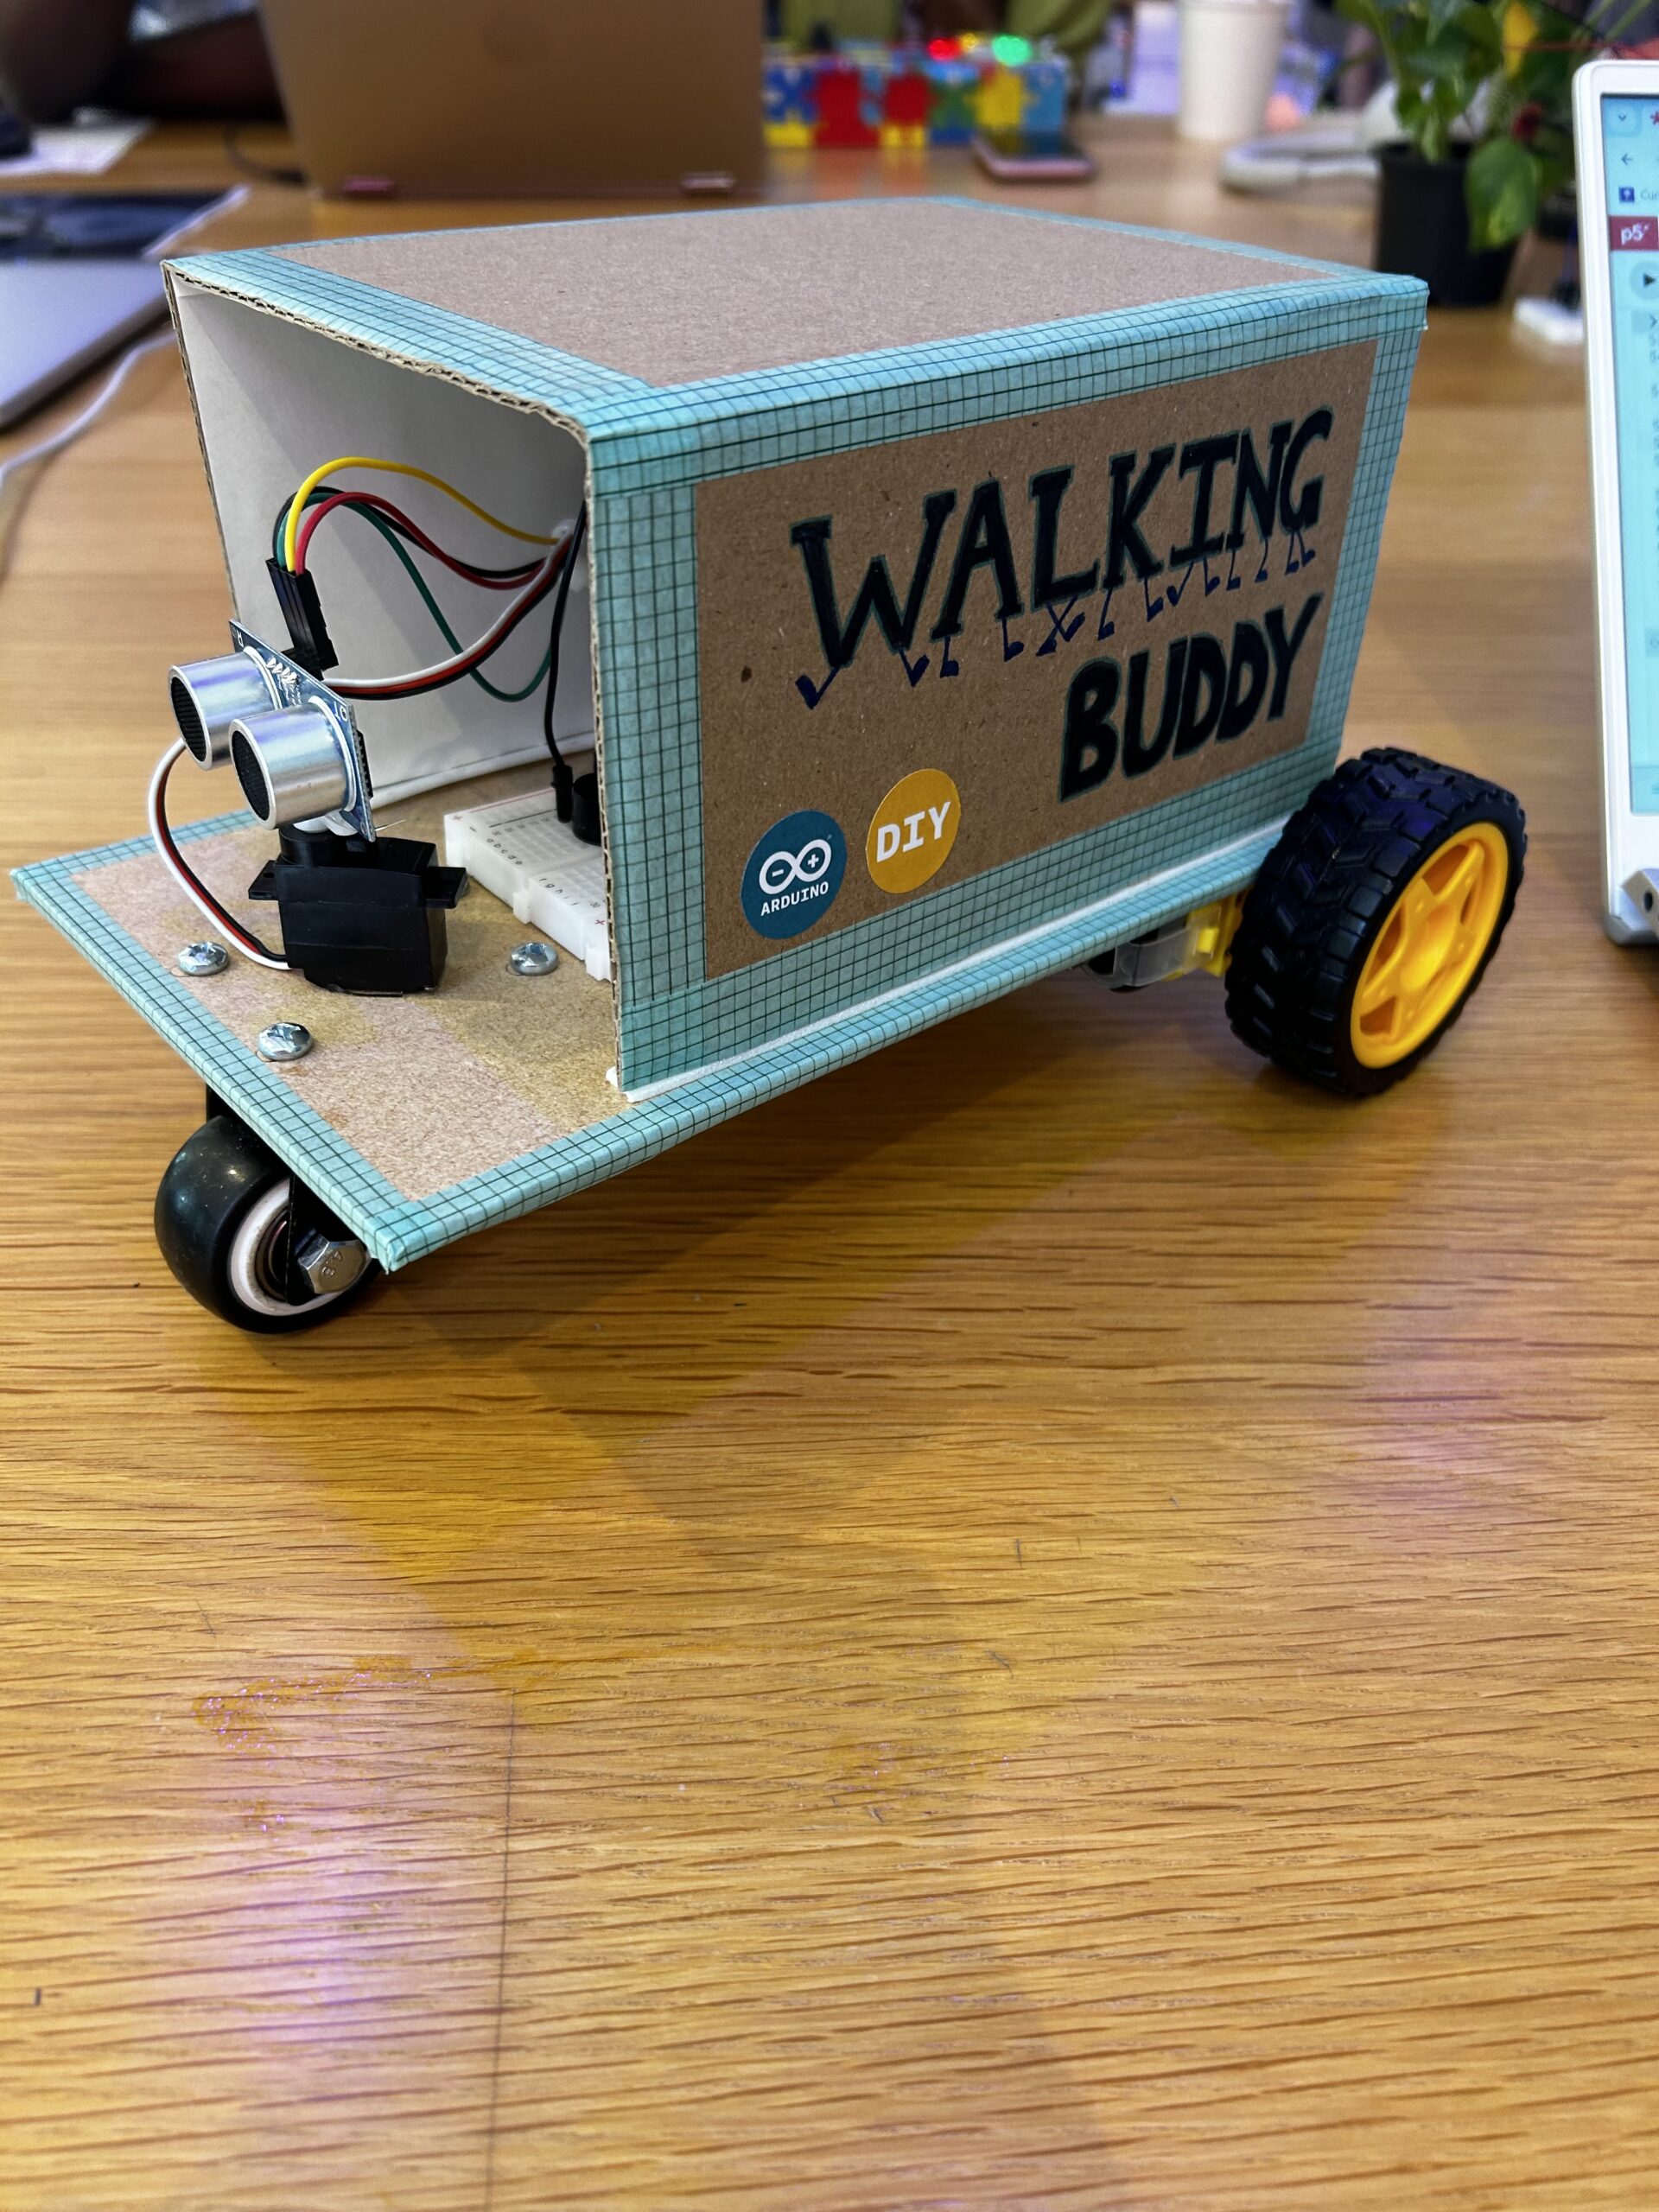
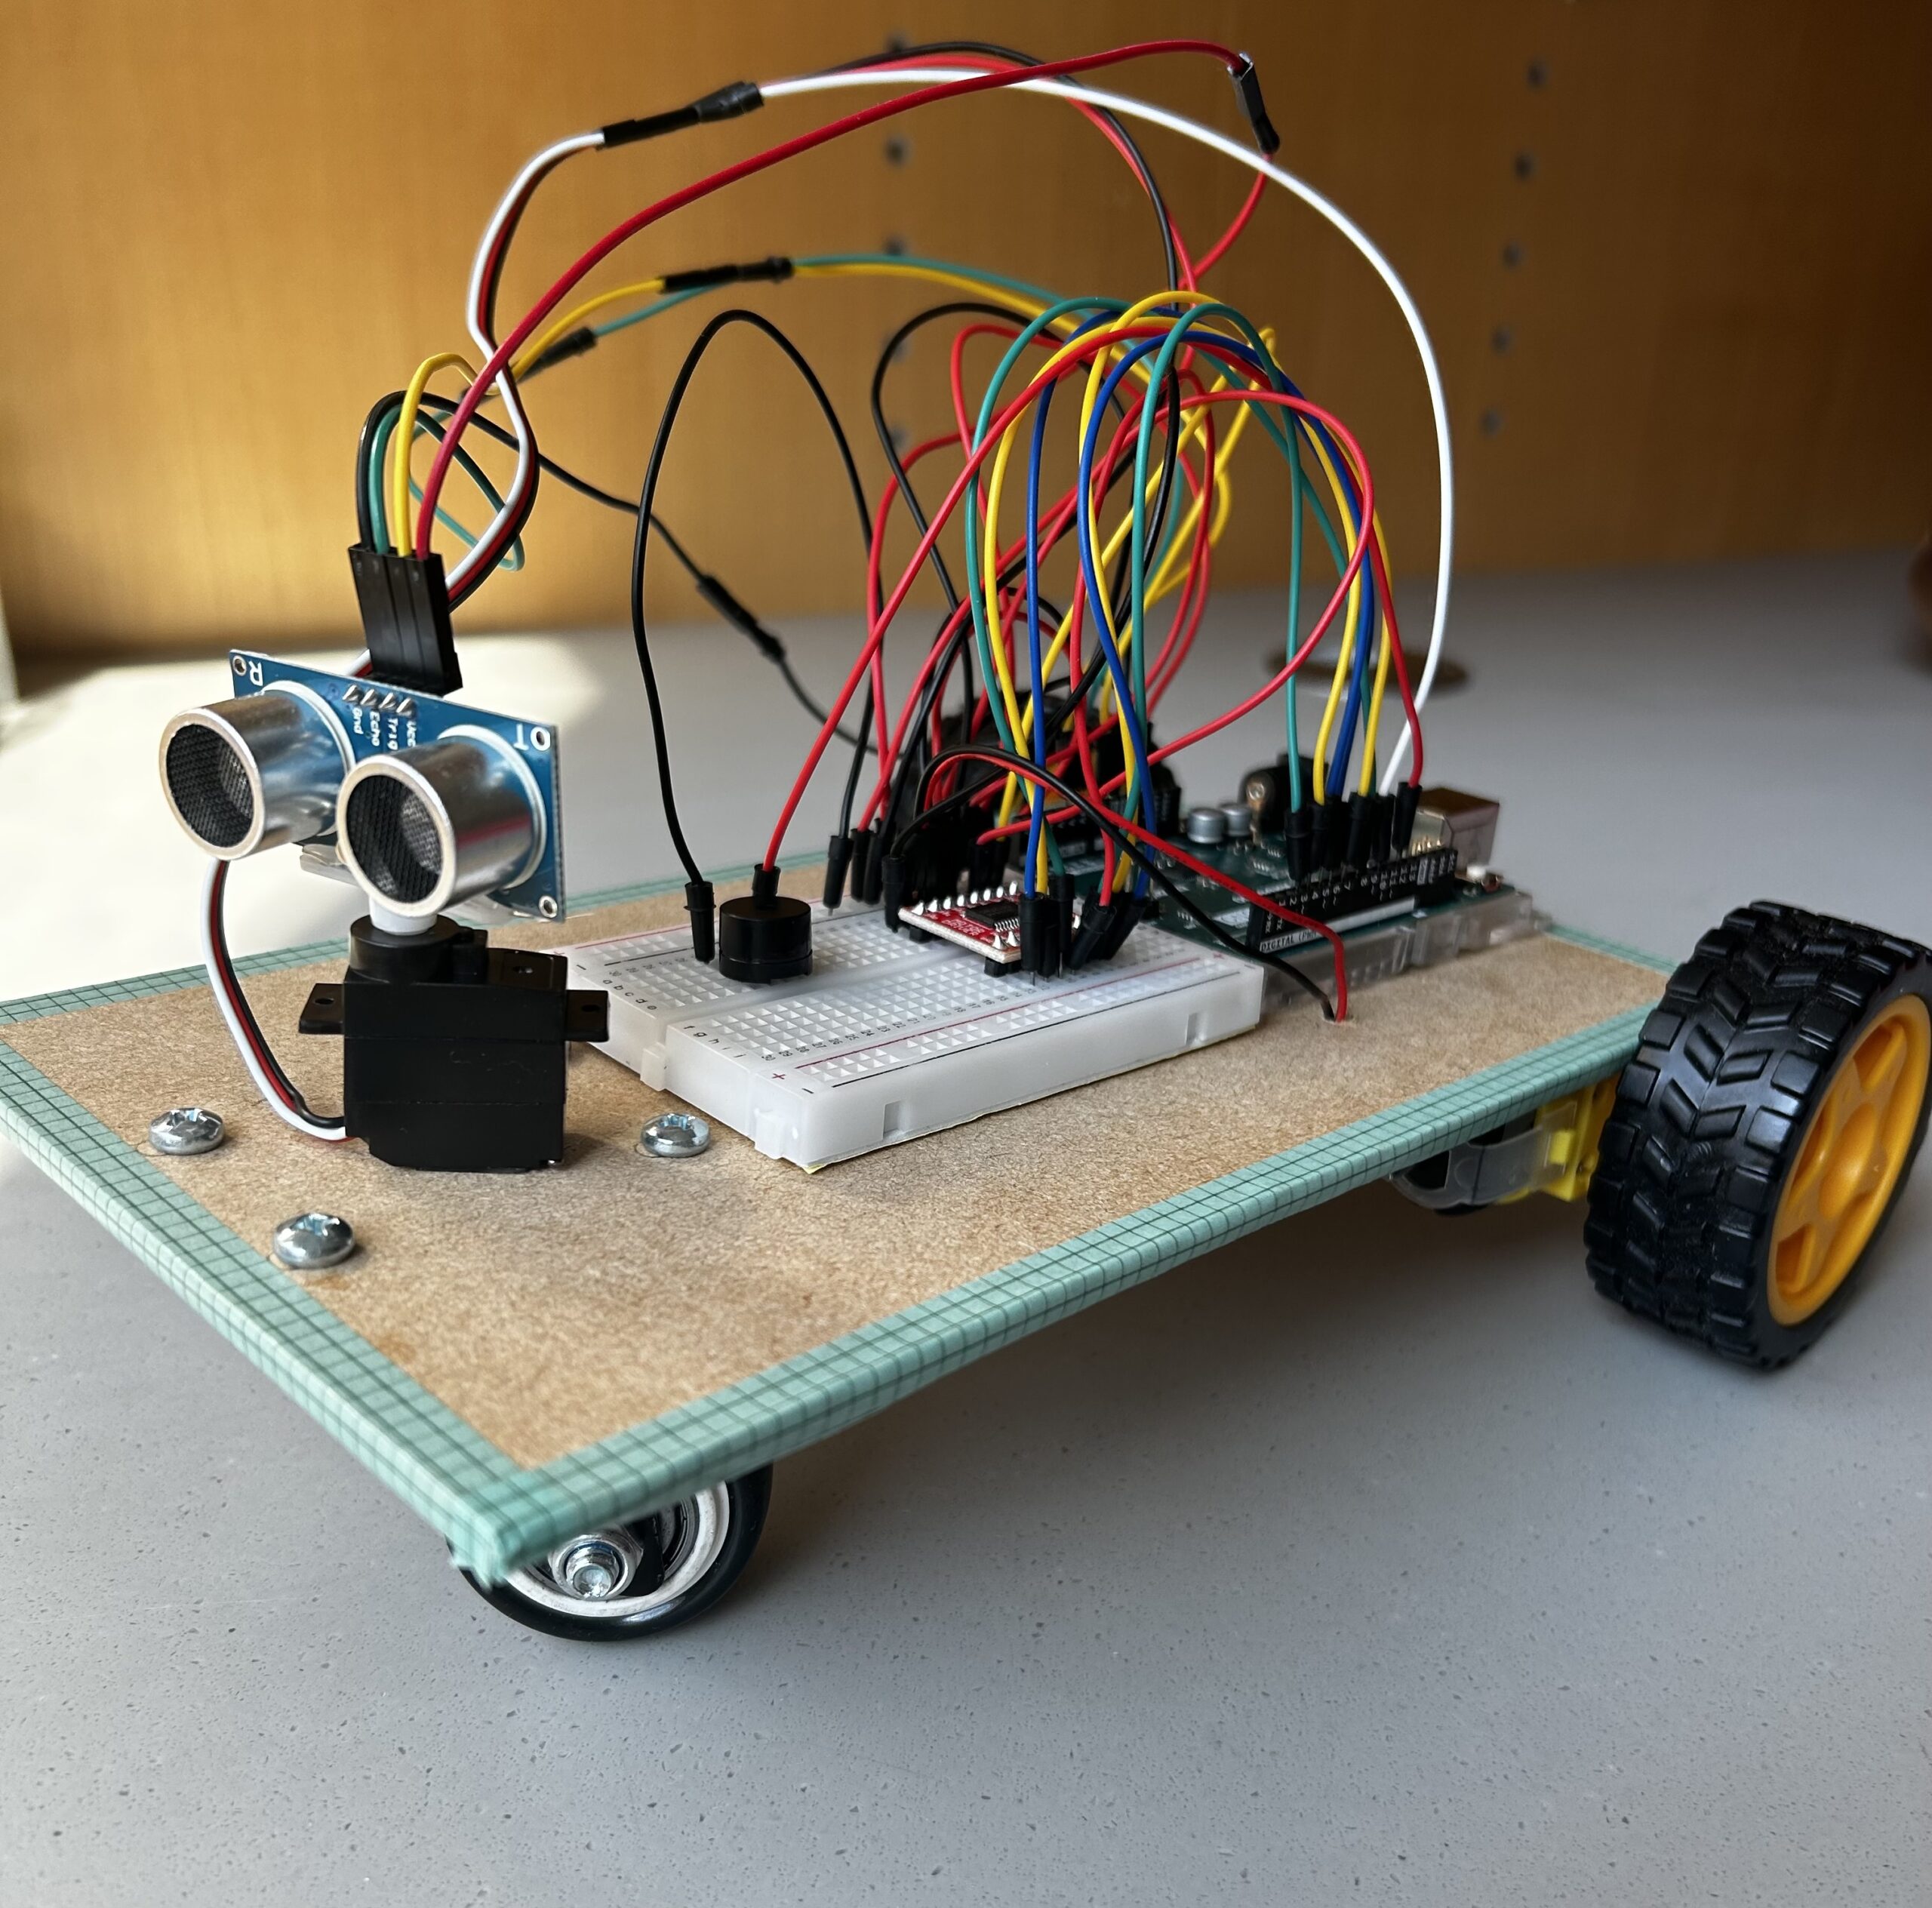
Final Project – Walking Buddy

CONCEPT:

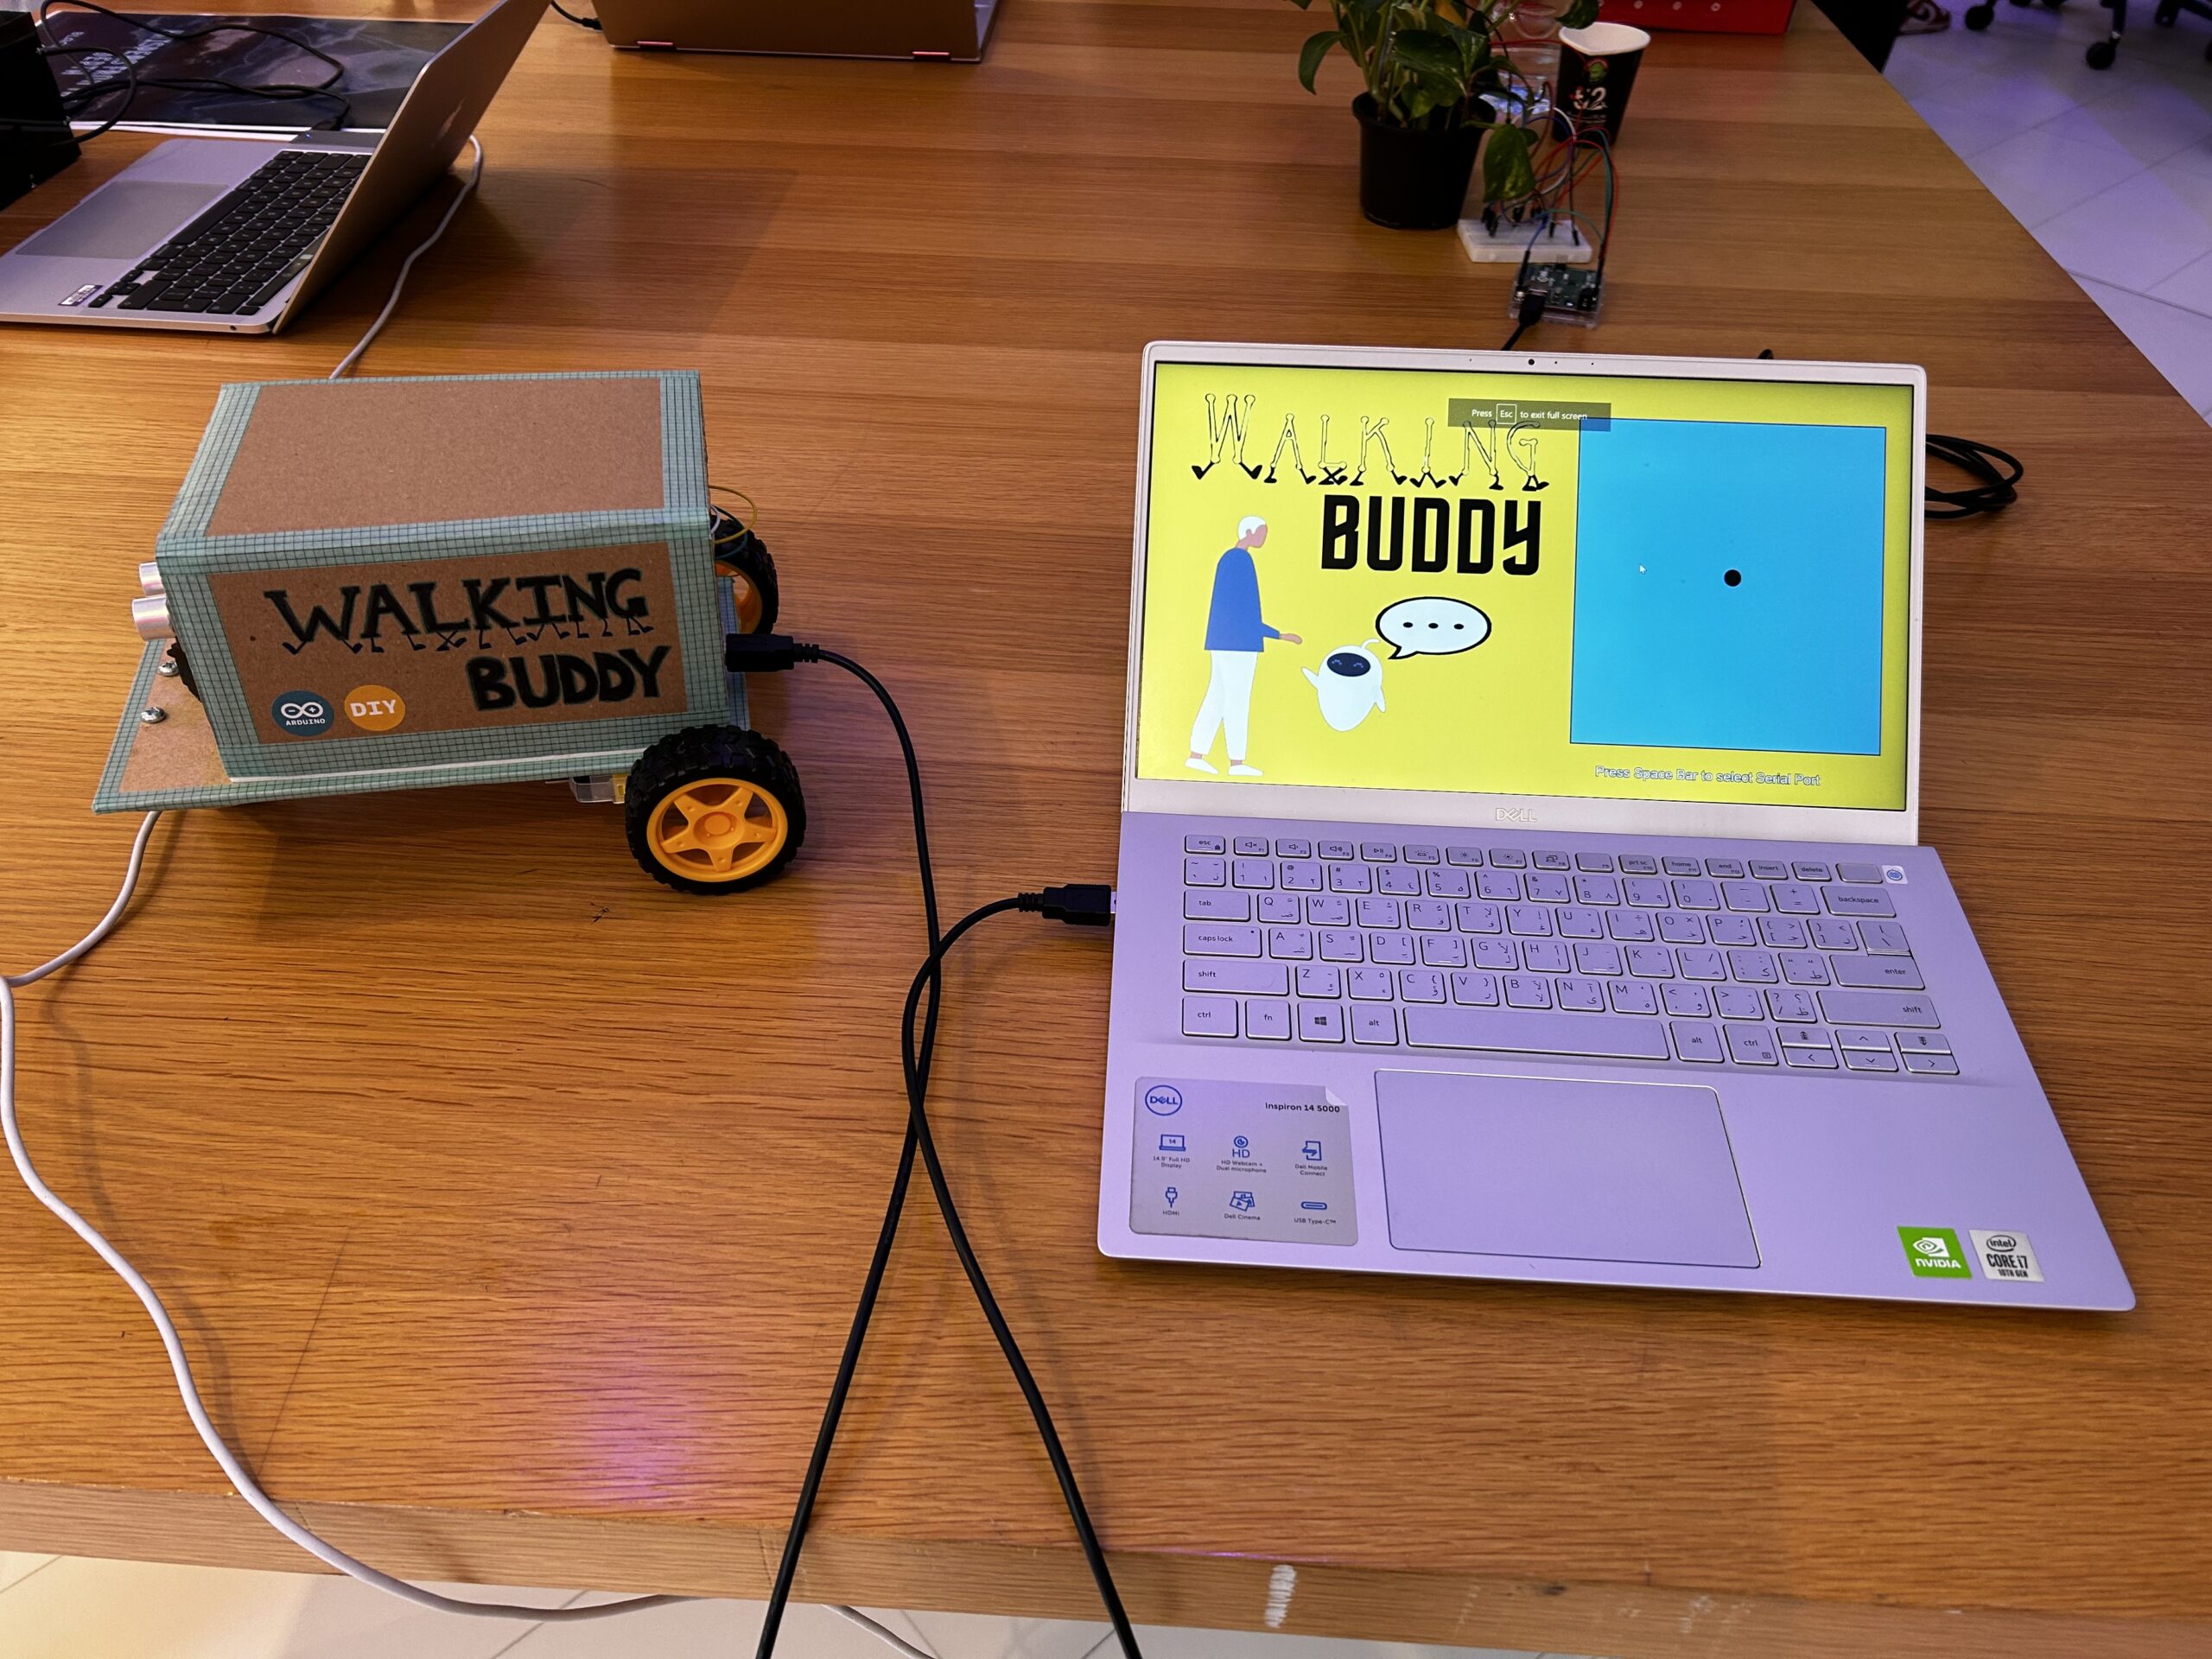
For the final project I was inspired to create an assistive device called “Walking Buddy” – a voice-controlled walking guide. Based on voice commands provided by the user, the robot changes direction and continues to move until the next command. If it encounters an obstacle, the robot stops and warns the user by playing a tune through the speaker. All the interaction involved is through voice and sound making the design inclusive for all users.
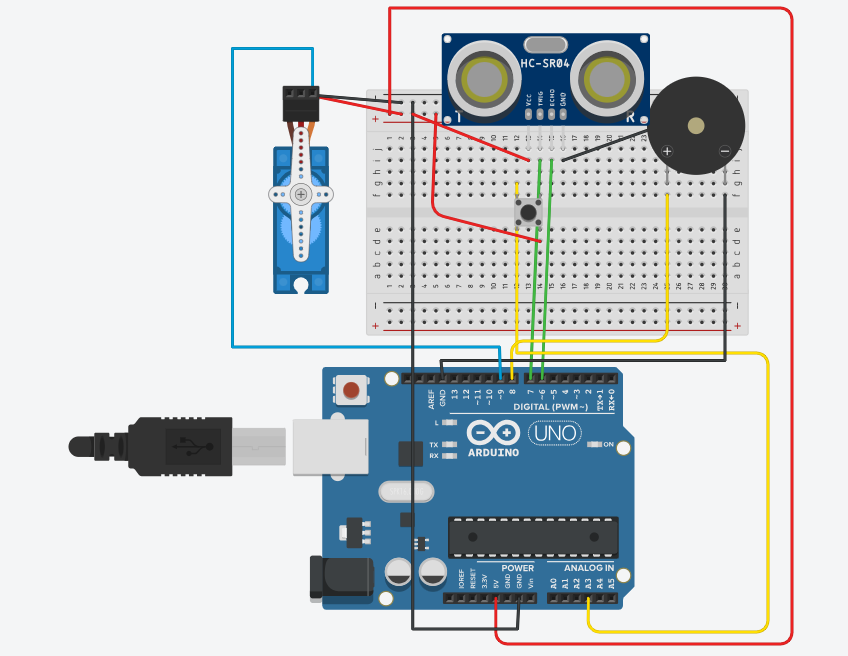


IMPLEMENTATION:

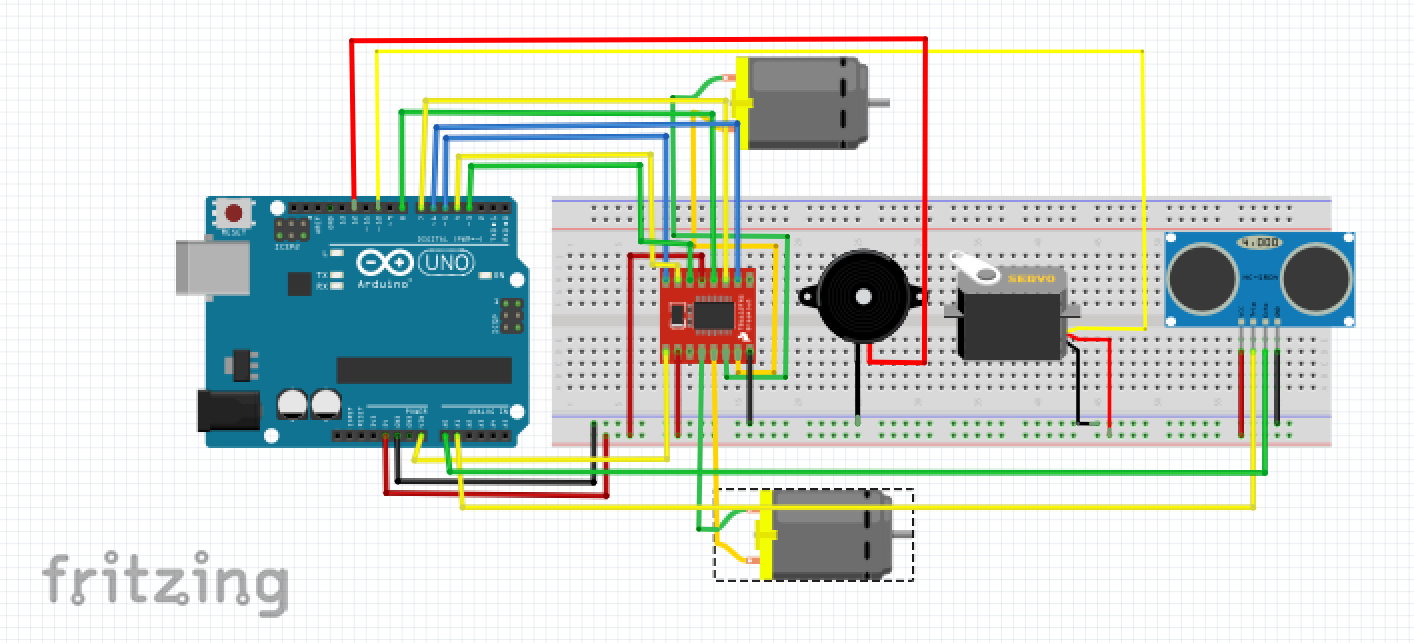
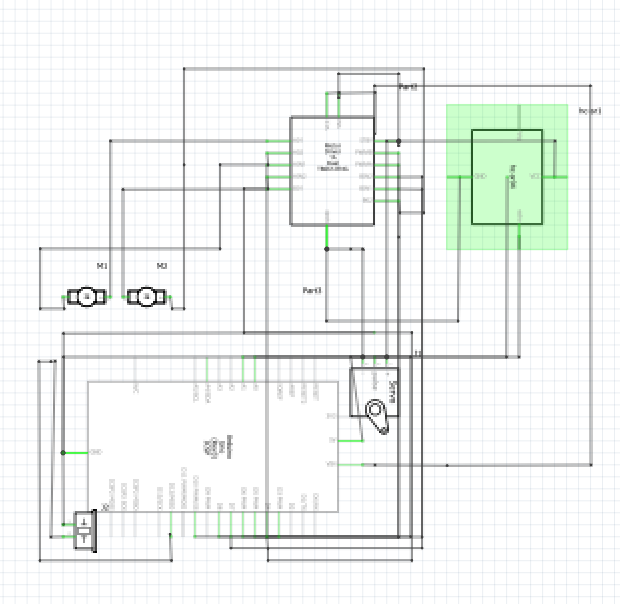
The communication begins through P5 where speech library has been used to create a code that infers the voice command and sends relevant data to the Arduino. After receiving the data, the Arduino checks the input received from the ultrasonic sensor, if there is no obstacle detected, it implements the direction of motors according to the command. However, in the presence of an obstacle it sends out a tune to warn the user and stop. Further, the ultrasonic sensor has been mounted on a servo motor which allows it to scan the surroundings before turning left or right. An additional feature that I added involves moving an ellipse in the p5 sketch based on the direction of movement of the robot.


ARDUINO CODE:

#include <Servo.h>
#include "pitches.h"

#define Echo A0
#define Trig A1
#define motor 10
#define Speed 170
#define spoint 103

const int ain1Pin = 3;
const int ain2Pin = 4;
const int pwmAPin = 5;

const int bin1Pin = 8;
const int bin2Pin = 7;
const int pwmBPin = 6;

// notes in the melody:
int melody[] = {
  NOTE_A3, NOTE_A3, NOTE_A3, NOTE_A3, NOTE_A3, NOTE_A3, NOTE_A3, NOTE_A3,
};

// note durations: 4 = quarter note, 8 = eighth note, etc.:
int noteDurations[] = {
  4, 4, 4, 4, 4, 4, 4, 4
};

char value;
int distance;
int Left;
int Right;
int L = 0;
int R = 0;
Servo servo;

void setup() {
  Serial.begin(9600);
  pinMode(Trig, OUTPUT);
  pinMode(Echo, INPUT);
  servo.attach(motor);
  pinMode(ain1Pin, OUTPUT);
  pinMode(ain2Pin, OUTPUT);
  pinMode(pwmAPin, OUTPUT);
  pinMode(bin1Pin, OUTPUT);
  pinMode(bin2Pin, OUTPUT);
  pinMode(pwmBPin, OUTPUT); 
  while (Serial.available() <= 0) {
    digitalWrite(LED_BUILTIN, HIGH); // on/blink while waiting for serial data
    Serial.println("0"); // send a starting message
    delay(300);            // wait 1/3 second
    digitalWrite(LED_BUILTIN, LOW);
    delay(50);
  }
}
void loop() {
  VoiceControl();
}

void moveBackward() {
  analogWrite(pwmAPin, Speed);
  digitalWrite(ain1Pin, HIGH);
  digitalWrite(ain2Pin, LOW);
  analogWrite(pwmBPin, Speed);
  digitalWrite(bin1Pin, HIGH);
  digitalWrite(bin2Pin, LOW);
}

void moveForward() {
  analogWrite(pwmAPin, Speed);
  digitalWrite(ain1Pin, LOW);
  digitalWrite(ain2Pin, HIGH);
  analogWrite(pwmBPin, Speed);
  digitalWrite(bin1Pin, LOW);
  digitalWrite(bin2Pin, HIGH);
}

void turnRight() {
  analogWrite(pwmAPin, Speed);
  digitalWrite(ain1Pin, HIGH);
  digitalWrite(ain2Pin, LOW);
  analogWrite(pwmBPin, Speed);
  digitalWrite(bin1Pin, LOW);
  digitalWrite(bin2Pin, HIGH);
}

void turnLeft() {
  analogWrite(pwmAPin, Speed);
  digitalWrite(ain1Pin, LOW);
  digitalWrite(ain2Pin, HIGH);
  analogWrite(pwmBPin, Speed);
  digitalWrite(bin1Pin, HIGH);
  digitalWrite(bin2Pin, LOW);
}

void stopMotors() {
  analogWrite(pwmAPin, Speed);
  digitalWrite(ain1Pin, LOW);
  digitalWrite(ain2Pin, LOW);
  analogWrite(pwmBPin, Speed);
  digitalWrite(bin1Pin, LOW);
  digitalWrite(bin2Pin, LOW);
}


int ultrasonic() {
  digitalWrite(Trig, LOW);
  delayMicroseconds(2);
  digitalWrite(Trig, HIGH);
  delayMicroseconds(10);
  digitalWrite(Trig, LOW);
  long t = pulseIn(Echo, HIGH);
  long cm = t * 0.034 / 2;; //time convert distance
  return cm;
}

int rightsee() {
  servo.write(20);
  delay(800);
  Left = ultrasonic();
  return Left;
}
int leftsee() {
  servo.write(180);
  delay(800);
  Right = ultrasonic();
  return Right;
}

void VoiceControl() {
  while (Serial.available()) {
    digitalWrite(LED_BUILTIN,HIGH);
    int value = Serial.parseInt();
    if (Serial.read() == '\n') {
      Serial.println(value);
      distance=ultrasonic();
      //Serial.println(distance);
      if (distance <= 12) {
        stopMotors();
        value=0;
        for (int thisNote = 0; thisNote < 8; thisNote++) {

          int noteDuration = 1000 / noteDurations[thisNote];
          tone(12, melody[thisNote], noteDuration);

          int pauseBetweenNotes = noteDuration * 1.30;
          delay(pauseBetweenNotes);
          // stop the tone playing:
          noTone(12);
        }
        
      }
      if (value == 3) {
        moveForward();
      } else if (value == 4) {
        moveBackward();
      } else if (value == 2) {
        L = leftsee();
        servo.write(spoint);
        if (L >= 10 ) {
          turnLeft();
        } else if (L < 10) {
          stopMotors();
        }
      } else if (value == 1) {
        R = rightsee();
        servo.write(spoint);
        if (R >= 10 ) {
          turnRight();
        } else if (R < 10) {
          stopMotors();
        }
      } else if (value == 0) {
        stopMotors();
      }
    }
  }
  digitalWrite(LED_BUILTIN,LOW);
}


P5 SKETCH AND  CODE:

let dir = 0;
let robotX, robotY;
let img1;
let title;
let speechRec;

function preload(){
  img1=loadImage("img.png")
  title=loadImage("title.png")
  speakImg=loadImage("speak.png")
}

function setup() {
  createCanvas(600, 400);
  robotX = 460;
  robotY = 195;
  
  let lang = navigator.language || "en-US";
  speechRec = new p5.SpeechRec(lang, gotSpeech);
  let speech = new p5.Speech();
  
  //Checks for the end of text-to-speech conversion
  speech.onEnd = () => {
    isSpeaking = false;
    let continuous = true;
    let interim = false;
    speechRec.start(continuous, interim);
  };
  isSpeaking = true;
  speech.speak('Hi there!,This is your walking buddy. Join me to explore the world on foot. Use the commands Right, Left, Forward, Backward and Stop to navigate the directions. Finally, remember to stop when you hear the siren.')
  

  function gotSpeech() {
    console,log("Speech")
    if (speechRec.resultValue) {
      createP(speechRec.resultString);
      //Conditions to detect the direction command
      if (speechRec.resultString.toLowerCase().includes("right")) {
        dir = 1;
      } else if (speechRec.resultString.toLowerCase().includes("left")) {
        dir = 2;
      } else if (speechRec.resultString.toLowerCase().includes("forward")) {
        dir = 3;
      } else if (speechRec.resultString.toLowerCase().includes("backward")) {
        dir = 4;
      } else if (speechRec.resultString.toLowerCase().includes("stop")) {
        dir = 0;
      }
    }
  }
}

function draw() {
  stroke(0);
  background("rgb(244,227,68)");
  image(img1,30,140,170,260)
  image(title,30,20,300,180)
  
  fill(146,196,248)
  rect(340,40,240,310)
  fill(0);
  ellipse(robotX, robotY, 20, 20);
  fill(255);
  textSize(15);

  if (!serialActive) {
    text("Press Space Bar to select Serial Port", 340, 380);
  } else {
    text("Connected", 3400, 380);
  }
  
  if (dir == 1) {
    stroke(255, 0, 0); // Red stroke for right
  } else if (dir == 2) {
    stroke(0, 255, 0); // Green stroke for left
  } else if (dir == 3) {
    stroke(0, 0, 255); // Blue stroke for forward
  } else if (dir == 4) {
    stroke(255, 255, 0); // Yellow stroke for backward
  } else {
    noStroke(); // No stroke for stop
  }
  noFill()
  strokeWeight(2)
  ellipse(robotX, robotY, 30, 30);
  
  if (dir==1 && robotX < width - 40){
    robotX+=0.5
  }
  else if (dir==2 && robotX > 360){
    robotX-=0.5
  }
  else if (dir==3 && robotY > 60){
    robotY-=0.5
  }
  else if (dir==4 && robotY < height-70 ){
    robotY+=0.5
  }
  if (isSpeaking) {
    image(speakImg, 180, 210, 100, 70);
  }
    
}

function keyPressed() {
  if (key == " ") {
    setUpSerial();
  }
}

function readSerial(data) {
  ////////////////////////////////////
  //READ FROM ARDUINO HERE
  ////////////////////////////////////

  if (data != null) {
    // make sure there is actually a message
    // split the message
   let fromArduino = split(trim(data), ",");
//     // if the right length, then proceed
    if (fromArduino.length == 1) {
    console.log(fromArduino[0]);
   }
    
    //////////////////////////////////
    //SEND TO ARDUINO HERE (handshake)
    //////////////////////////////////
    
    console.log(dir);
    let sendToArduino= dir + "\n";
    writeSerial(sendToArduino);
  }
}


The part of this project that I am proud of is achieving the voice control feature. I used ‘The Coding Train’ youtube tutorials to explore the p5 speech library and implemented both text-to-speech as well as speech-to-text conversions.

Coding Train Tutorial: https://youtu.be/q_bXBcmfTJM

CHALLENGES FACED:

Understanding the direction of movement of the motors was difficult initially but after a few trials I figured out the right code for each direction. Apart from this sending the text obtained from the commands of the user to the arduino did not always work as expected which made it challenging to understand what was wrong.

PROJECT TESTING VIDEOS:

The below videos include the robot following voice commands, detecting an obstacle and p5 screen.

https://drive.google.com/drive/folders/17U0GwIh4A0-HnNlQ5Dn-SARxTF9sP-2-?usp=drive_link
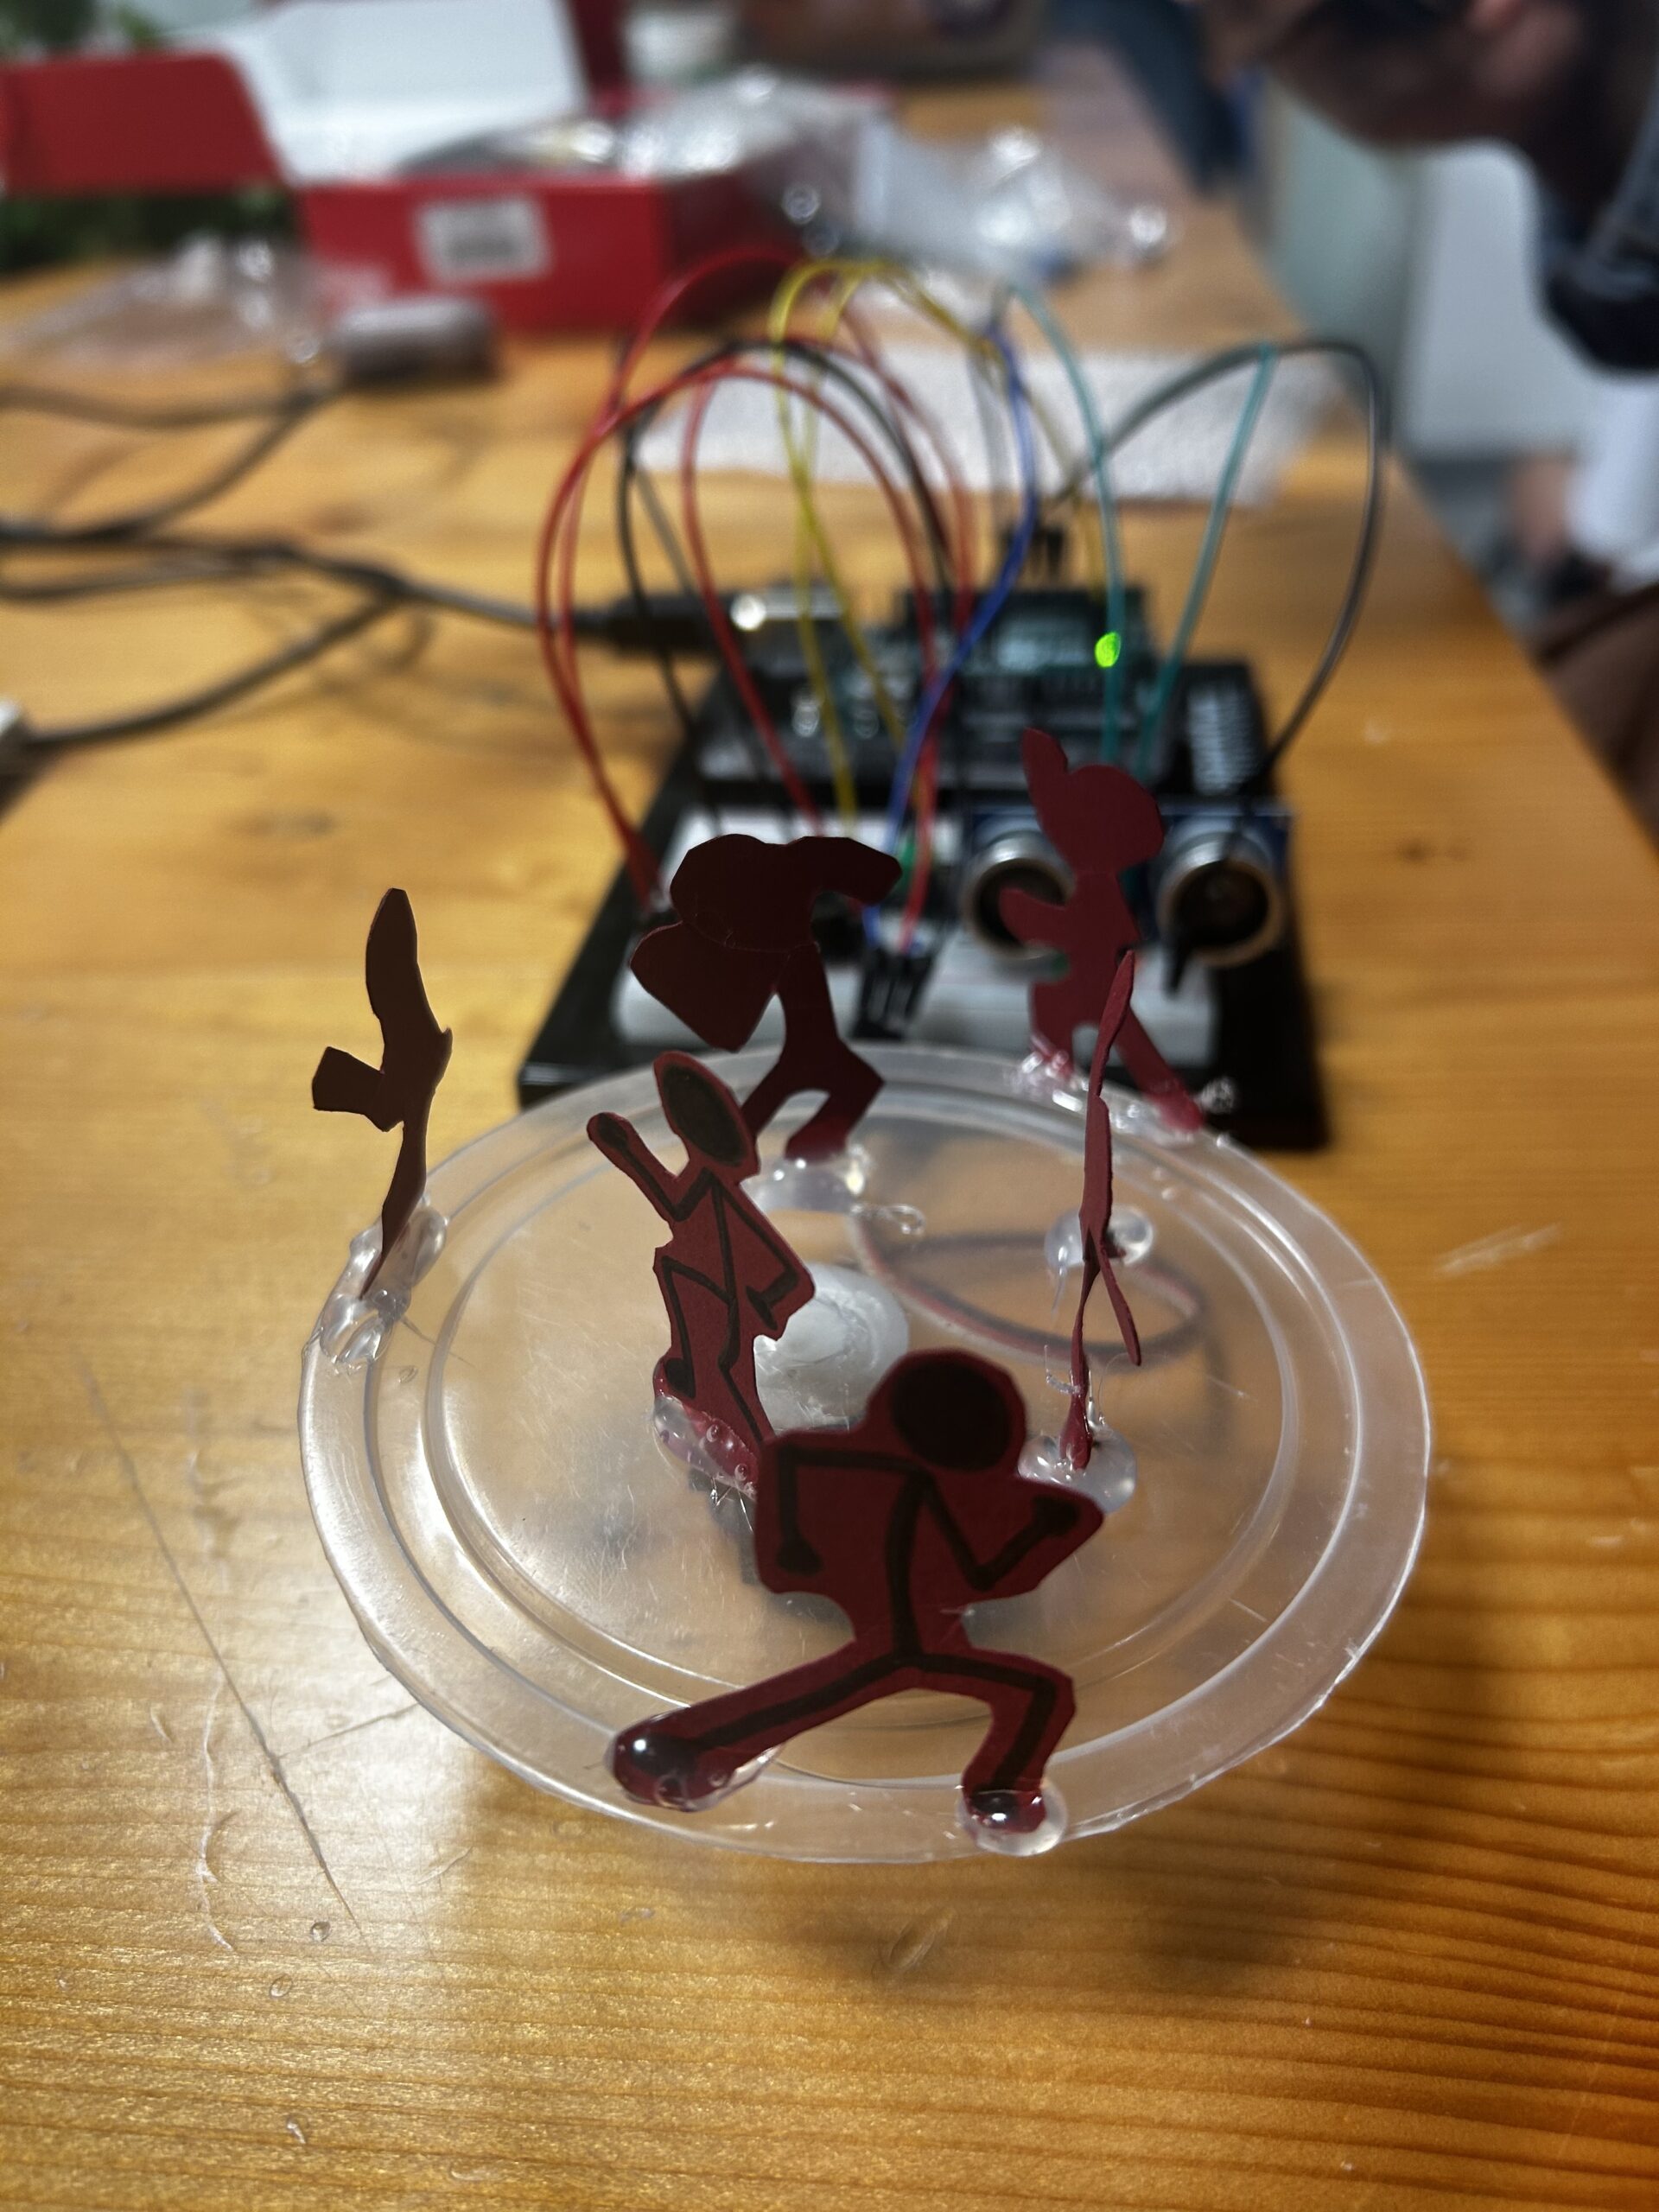
IM SHOW:

The showcase was a wonderful experience to see the creative work of others which also served as a sorce of inspiration for future projects. The concept of my project seemed interesting to people. However, I was encountered with an unanticipated situation where the robot was unable to work due to the detection of multiple sounds.

FURTHER IMPROVEMENT:

Some areas of future improvement would be to design a more efficient communication system with a precise description of the surrounding being conveyed to the user.

After the IM show, I felt that for such a robotic assistive device to be practical it would be necessary to have stronger sound selection to allow it to work even in crowded environments where multiple sounds can be detected.

Final Project – Draft 2 – Walking Buddy

Building on my initial idea to create an assistive device, I have decided to create a robot that serves as a walking assistant by warning the user of possible obstructions along the way. The robot would be voice controlled to give commands such as the direction of the robot. Based on the reading of an ultrasonic sensor the walking buddy would send out signals through the speaker to alert the user. Additionally, the user would be informed of the distance between the next obstruction to have a better sense while walking. If time permits, I plan to include the option of controlling the robot through hand movements as well to make the model more inclusive.

Arduino:

  • Uses the ultrasonic sensor to provide input on possible obstructions and sends it to p5.
  • Based on the ultrasonic reading the speaker plays a tune to warn the user.
  • The movement of the robot is controlled using the DC motors.

P5.js program:

  • Begins with informing the user of the different tunes and voice commands.
  • The user gives a voice command to change the direction of the robot.
  • The direction is communicated to the Arduino and the robot starts moving accordingly
  • P5 stores the distance from the next obstruction received from the Arduino and increases the frequency of the tune as the user gets closer to it.

Week 11 – Reading Reflection

This week’s reading “Design meets Disability” seemed to capture the essence of a good design through the lens of disability. The author begins with the conversation regarding the traditional absence of design or focus on appearance in goods created to aid a disability. With an emphasis on discretion, the object often serves contrary to its purpose by depriving the wearer of a positive image and instead results in stigmatizing the disability. It was interesting to note that an object’s association with design often changes with the way it is categorized, evident in the example of eyewear transforming from an object of disability to that of fashion. Through this observation I was reminded of a previous reading that sparked a conversation about form versus function in a design. As mentioned in an earlier response, that an ideal design would be one that is able to strike a balance between the two. However, this article further prompted me to take into consideration the preference of people who often have varying needs. The inclusion of design can definitely be a boost for the self-confidence of people but it is useful only if it is done without compromising the intended functionality.

Reflecting on the ideas presented, I felt that it may be interesting to consider creating all existing items with more thought and consideration instead of creating an entire separate line of products for disability. While this brings us back to the debate around simple design over a universal design, I think making designs inclusive through simple tactile and auditory inputs can be done without complicating its usability. Finally, a user-centric design remains the top priority and it is necessary to ensure a product reflects simplicity, inclusion, design and allows the user to develop a positive self-image which can be achieved by involving all relevant people including designers in the creation of a product.

Final Project Draft 1

Reading through the examples given for the final project, I was inspired to explore the idea of creating an assistive device using the arduino and p5 communication. I believe this theme would allow me to apply the interactivity in coming up with something that is practical and useful. A concept that I found interesting is the creation of a sensory enhancement model for the visually impaired to provide feedback of their surrounding through different arduino sensors. However, I am still exploring existing assistive devices to get a better understanding of the requirements of a model and hope to come up with something unique for the final project.


Week 11 – Assignment (Rujul and Mariam Al Khoori)

Exercise 1: ARDUINO TO P5 COMMUNICATION

Using the potentiometer the ellipse is moved across the screen while also changing its opacity.

P5.js Sketch:

// variable to control x-coordinate
let x = 0;
function setup() {
  createCanvas(640, 480);
  textSize(18);
}
function draw() {
  // sets background
  background(255);
  stroke(0);
  // draws ellipse on canvas
  fill(0,255,0,map(x, 0, 1023, 0, 255))
  ellipse(map(x, 0, 1023, 0, width), height / 2, 100, 100);
  
  // checks if serial communication has been established
  fill(0)
  if (!serialActive) {
    text("Press Space Bar to select Serial Port", 20, 30);
  } else {
    text("Connected", 20, 30);
  }
  
}
// sets up serial connection
function keyPressed() {
  if (key == " ") {
    // important to have in order to start the serial connection!!
    setUpSerial();
  }
}
// This function will be called by the web-serial library
// with each new *line* of data. The serial library reads
// the data until the newline and then gives it to us through
// this callback function
function readSerial(data) {
  ////////////////////////////////////
  //READ FROM ARDUINO HERE
  ////////////////////////////////////
  if (data != null) {
    x = int(trim(data));
  }
  
}

Arduino Sketch:

void setup() {
  // Start serial communication so we can send data
  // over the USB connection to our p5js sketch
  Serial.begin(9600);
  // We'll use the builtin LED as a status output..
  pinMode(LED_BUILTIN, OUTPUT);
}
void loop() {
  // gets sensor reading
  int sensor = analogRead(A0);
  delay(5);
  // indicates data transfer
  digitalWrite(LED_BUILTIN, HIGH);
  // sends data to p5
  Serial.println(sensor);
  
  // indicates data transfer
  digitalWrite(LED_BUILTIN, LOW);
  
}

VIDEO – Exercise1


Assignment 2: P5 TO ARDUINO COMMUNICATION

Brightness of the LED changes when pressing the UP and DOWN keys.

P5.js Sketch:

let brightness=0;

function setup() {
  createCanvas(640, 480);
  textSize(18);
}

function draw() {
  background(255);
  fill(0);

  if (!serialActive) {
    text("Press Space Bar to select Serial Port", 20, 30);
  } else {
    text("Connected", 20, 30);
  }
  fill(255,0,0,brightness)
  square(width/2-150,height/2-30,50)
  fill(0)
  text("Brightness: "+str(brightness),width/2-50,height/2)
  text("Use the UP and DOWN arrow keys to adjust the brightness. ",width/2-220,height/2+50)

  if (keyIsPressed) {
    if (keyCode==UP_ARROW) {
      if (brightness<255){
        brightness+=5;
      }  
    } else if (keyCode==DOWN_ARROW) {
      if (brightness>0){
        brightness-=5;
      }
    }
  } 
}

function keyPressed() {
  if (key == " ") {
    // important to have in order to start the serial connection!!
    setUpSerial();
  }
}

function readSerial(data) {
  if (data != null) {
    writeSerial(brightness+"\n");
  }
}

Arduino Sketch:

int LedPin = 5;

void setup() {
  // Start serial communication so we can send data
  // over the USB connection to our p5js sketch
  Serial.begin(9600);

  // We'll use the builtin LED as a status output..
  pinMode(LED_BUILTIN, OUTPUT);

  // Outputs on this pin
  pinMode(LedPin, OUTPUT);

  // Blink them so we can check the wiring
  digitalWrite(LedPin, HIGH);
  delay(200);
  digitalWrite(LedPin, LOW);

  // start the handshake
  while (Serial.available() <= 0) {
    digitalWrite(LED_BUILTIN, HIGH); // on/blink while waiting for serial data
    Serial.println("0"); // send a starting message
    delay(300);            // wait 1/3 second
    digitalWrite(LED_BUILTIN, LOW);
    delay(50);
  }
}

void loop() {
  // wait for data from p5 before doing something
  while (Serial.available()) {
    Serial.println("0");
    digitalWrite(LED_BUILTIN, HIGH); // led on while receiving data

    int brightness = Serial.parseInt();
    if (Serial.read() == '\n') {
      analogWrite(LedPin, brightness);
    }
  }
  digitalWrite(LED_BUILTIN, LOW);
}

VIDEO – Exercise2


Assignment 3: BI-DIRECTIONAL COMMUNICATION

The LED glows up when the ball touches the ground. The ultrasonic sensor is used to change the direction of the wind.

P5.js Sketch:

let velocity;
let gravity;
let posit5
let acceleration;
let wind;
let drag = 0.99;
let mass = 50;
let LED=0;
let wind_speed=0;

function setup() {
  createCanvas(640, 360);
  noFill();
  position = createVector(width/2, 0);
  velocity = createVector(0,0);
  acceleration = createVector(0,0);
  gravity = createVector(0, 0.5*mass);
  wind = createVector(0,0);
}

function draw() {
  background(255);
  fill(0)
  if (!serialActive) {
    text("Press RIGHT key to select Serial Port", 20, 30);
  } else {
    text("Connected", 20, 30);
  }
  applyForce(wind);
  applyForce(gravity);
  velocity.add(acceleration);
  velocity.mult(drag);
  position.add(velocity);
  acceleration.mult(0);
  fill(205,104,219); 
  ellipse(position.x,position.y,mass,mass);
  if (position.y > height-mass/2) {
      velocity.y *= -0.9;  // A little dampening when hitting the bottom
      position.y = height-mass/2;
    }
  
  if (position.y==height-mass/2){
    LED=1
  }else{
    LED=0
  }
  
  if (position.x>=width || position.x<=0){
    position.x=width/2
  }   
}

function applyForce(force){
  // Newton's 2nd law: F = M * A
  // or A = F / M
  let f = p5.Vector.div(force, mass);
  acceleration.add(f);
}

function keyPressed(){
  if (key==' '){
    
    mass=random(15,80);
    position.y=-mass;
    velocity.mult(0);
  }
  if (keyCode==RIGHT_ARROW){
    setUpSerial();
  }
}

function readSerial(data) {
  ////////////////////////////////////
  //READ FROM ARDUINO HERE
  ////////////////////////////////////

  if (data != null) {
    let fromArduino = trim(data);
    distance= int(fromArduino);
    if (distance>10){
      wind.x=2
    }
    else{
      wind.x=-2
    }
    
    let sendToArduino = LED+"\n";
    writeSerial(sendToArduino);
  }
}

Arduino Sketch:

int LedPin = 2;
int trigPin = 9;
int echoPin = 10;
long duration;
int distance;

void setup() {
  // Start serial communication so we can send data
  // over the USB connection to our p5js sketch
  pinMode(trigPin, OUTPUT); 
  pinMode(echoPin, INPUT);
  Serial.begin(9600);
  pinMode(LED_BUILTIN, OUTPUT);

  // Outputs on these pins
  pinMode(LedPin, OUTPUT);

  // Blink them so we can check the wiring
  digitalWrite(LedPin, HIGH);
  delay(200);
  digitalWrite(LedPin, LOW);


  // start the handshake
  while (Serial.available() <= 0) {
    digitalWrite(LED_BUILTIN, HIGH); // on/blink while waiting for serial data
    Serial.println("0,0"); // send a starting message
    delay(300);            // wait 1/3 second
    digitalWrite(LED_BUILTIN, LOW);
    delay(50);
  }
}

void loop() {
  // wait for data from p5 before doing something
  while (Serial.available()) {
    digitalWrite(LED_BUILTIN, HIGH); // led on while receiving data

    int LED = Serial.parseInt();
    if (Serial.read() == '\n') {
      digitalWrite(LedPin, LED);
      digitalWrite(trigPin, LOW);
      delayMicroseconds(2); 
      digitalWrite(trigPin, HIGH);
      delayMicroseconds(10);
      digitalWrite(trigPin, LOW);
      // Reads the echoPin, returns the sound wave travel time in microseconds
      duration = pulseIn(echoPin, HIGH);
      // Calculating the distance
      distance = duration * 0.034 / 2;
      Serial.println(distance);
    }
  }
  digitalWrite(LED_BUILTIN, LOW);
}

VIDEO – Exercise3 Wind

VIDEO – Exercise3 LED

Lecture Reflection

Professor Neil’s lecture titled “Alien Intelligence” was a thought-provoking experience. From his beliefs about the terror of AI attributed to the fast-developing nature of technology to his reasoning that behind the success of AI is the triumph of human beings, I found myself engrossed in a period of reflection and understanding of what the future holds. With the debate surrounding AI overtaking humans, I particularly liked Professor’s emphasis on the term “Alien Intelligence” and how human beings may no longer be at the center but their capacity to think remains unmatched. Listening to impact of AI on our lives seems to instill a sense of helplessness and a sincere hope that we are able to grapple with the self-created dangers as AI continues to grow in the hands of human beings.

Week 10 – Reading Reflection

A Brief Rant on the Future of Interaction Design

Bret Victor prompts us to question whether the future of interaction design in the form of screens is visionary. Through his unique take on the topic, with a focus on human capabilities to understand the ideal nature of design, the author emphasizes the need to incorporate the use of hands in design. This would not only lead to a true sense of interaction but also prevent the mighty capabilities of our hands from being reduced to tapping a screen. Throughout the reading, I was able to resonate with the argument as I reflected on my reading experience. While a Kindle does offer a sustainable solution, in my opinion, it can never replace the experience of reading a physical book. When I read a book, I enjoy engaging my sense of touch with the pages. Feeling the thickness of the divided pages between my fingers provides a sense of the passage of time in the reading, along with an anticipation of what lies ahead. All these involuntary thoughts seem to vanish as I slide to turn page after page on a Kindle and find myself distanced from the story.
What I inferred from the reading and the responses to it was that the author does not deny the development of technology in the form of screens for it has certainly simplified our lives. However, he is against the idea of limiting ourselves to this model for future innovations and urges redefining visionary in terms of making the best use of human capabilities in addition to technology.

Week 10 – Assignment – Music Box

For the assignment we were required to use an analog sensor and a digital sensor to create a musical instrument. We came up with the idea of using an ultrasonic sensor as our analog input and also incorporated the servo motor to add a physical dimension to the instrument. The overall concept of our project is inspired from a music box that is wound to play the music.

We created a disc with small stick figures placed around at different distances and attached it to the servo motors. As the servo motor rotates the different positions of the figures serve as an input to the sensor to change the delay between the notes of the tune being played through the piezo speaker. Additionally, we have used a button as the digital sensor to restart the rotation of the disc from its initial position.


#include <Servo.h>

#define TRIG_PIN 7
#define ECHO_PIN 6
#define SPEAKER_PIN 8
#define BUTTON_PIN 2 

Servo myservo;
bool soundProduced = false;
int servoSpeed = 3; // Initial servo speed
unsigned long debounceDelay = 50;
unsigned long lastButtonPress = 0;
bool buttonState;
bool lastButtonState = LOW;

void setup() {
  Serial.begin(9600);
  pinMode(TRIG_PIN, OUTPUT);
  pinMode(ECHO_PIN, INPUT);
  pinMode(SPEAKER_PIN, OUTPUT);
  pinMode(BUTTON_PIN, INPUT_PULLUP);
  myservo.attach(9);
}

void loop() {
  // Read the button state
  buttonState = digitalRead(BUTTON_PIN);

  // Check for button press
  if (buttonState == HIGH && lastButtonState == LOW && millis() - lastButtonPress > debounceDelay) {
    // Change servo speed
    servoSpeed += 1; // Increase servo speed by 1 degree
    lastButtonPress = millis();
  }

  lastButtonState = buttonState;

  // Rotate the servo in a carousel motion with adjustable speed
  for (int pos = 0; pos <= 360; pos += servoSpeed) {
    myservo.write(pos % 180); // Limit the position within the 0-180 degrees range
    delay(5);
    checkDistanceAndSound();
  }
}

void checkDistanceAndSound() {
  int duration, distance;

  digitalWrite(TRIG_PIN, LOW);
  delayMicroseconds(2);
  digitalWrite(TRIG_PIN, HIGH);
  delayMicroseconds(10);
  digitalWrite(TRIG_PIN, LOW);

  duration = pulseIn(ECHO_PIN, HIGH);
  distance = (duration * 0.0343) / 2;

  // Play different melodies for different distance ranges
  if (distance > 0 && distance <= 5 && !soundProduced) {
    playMelody1();
    soundProduced = true;
    delay(2000); 
  } else if (distance > 5 && distance <= 10 && !soundProduced) {
    playMelody2();
    soundProduced = true;
    delay(2000); 
  } else if (distance > 10 && distance <= 20 && !soundProduced) {
    playMelody3();
    soundProduced = true;
    delay(2000); 
  } else {
    noTone(SPEAKER_PIN);
    soundProduced = false;
  }
}

void playMelody1() {
  int melody[] = {262, 294, 330, 349, 392, 440, 494, 523}; // First melody
  int noteDurations[] = {250, 250, 250, 250, 250, 250, 250, 250};

  for (int i = 0; i < 8; i++) {
    tone(SPEAKER_PIN, melody[i], noteDurations[i]);
    delay(noteDurations[i]);
  }
}

void playMelody2() {
  int melody[] = {392, 440, 494, 523, 587, 659, 698, 784}; // Second melody
  int noteDurations[] = {200, 200, 200, 200, 200, 200, 200, 200};

  for (int i = 0; i < 8; i++) {
    tone(SPEAKER_PIN, melody[i], noteDurations[i]);
    delay(noteDurations[i]);
  }
}

void playMelody3() {
  int melody[] = {330, 330, 392, 392, 440, 440, 330, 330}; // Third melody
  int noteDurations[] = {500, 500, 500, 500, 500, 500, 1000, 500};

  for (int i = 0; i < 8; i++) {
    tone(SPEAKER_PIN, melody[i], noteDurations[i]);
    delay(noteDurations[i]);
  }
}

It was an interesting experience to use the ultrasonic sensor with the speaker and I hope to explore their working in more detail in future projects.

Week 9 – Assignment – Caution Coaster

For this assignment we were required to apply the concepts and components used so far to create a project involving an analog sensor, a digital sensor and two LEDs. I decided to explore the functioning of the TMP36 Temperature sensor and have used it as the analog sensor to develop a simple temperature detection model that may be employed in beverage holders to warn the people of the temperature of the contents of the glass.

Using the RGB LED, I have depicted temperature ranges from hot to cold by changing the colors from red to green to blue. Apart from this I have used a switch along with a yellow LED which may be turned on or off. As the program runs, the corresponding temperature value is printed in the Serial Monitor.

I have demonstrated the working of this circuit using glasses containing water of different temperatures ranging from ice cold to boiling hot and was able to achieve the desired color code.

Assignment Video

I particularly enjoyed figuring out the connections and coding for the temperature sensor through a video and the datasheet provided.

Overall, I believe the assignment helped me delve deeper into creating simple circuits and the commands of Arduino IDE.

int RED=9;
int GREEN=10;
int BLUE=11;
int PIN=A0;
void setup() {
  Serial.begin(9600);
  pinMode(RED,OUTPUT);
  pinMode(BLUE,OUTPUT);
  pinMode(GREEN,OUTPUT);
}

void loop() {
  int sensorValue=analogRead(PIN);
  delay(200); //delays the frequency of temperature readings
  float mv = sensorValue*4.9; //converts the analog input into mV
  float temp = (mv-500)/10; //calculates the final temperature value
  Serial.print("Temperature: ");
  Serial.print((mv-500)/10);
  Serial.print("°C\n");
  if (temp>27){
    digitalWrite(RED,HIGH);
    digitalWrite(GREEN,LOW);
    digitalWrite(BLUE,LOW);
  }
  else if (temp>21){
    digitalWrite(GREEN,HIGH);
    digitalWrite(RED,LOW);
    digitalWrite(BLUE,LOW);
  }
  else if (temp>16){
    digitalWrite(BLUE,HIGH);
    digitalWrite(GREEN,LOW);
    digitalWrite(RED,LOW);
  }
  
}


Week 9 – Reading Reflection

In this week’s reading, “Making Interactive Art: Set the Stage, Then Shut Up and Listen” the author set out the fundamental nature of interactive art as free and uncontrolling. He argues that artists should never impose or provide their intentions or interpretation of the artwork to the viewer. This field of art calls for the complex nature of human thought to allow the viewer to explore unique interpretations impacted by personal experiences. I found this idea to be particularly relatable as I often witness people having entirely different viewpoints regarding pieces of art. I also feel that if an artist provides their interpretation or explanation, it limits the viewer from exploring their thoughts as they begin to believe that there is only one right understanding of the art. Providing viewers with the freedom to think brings out their true reaction and adds greater depth to the interactive art. It may also be possible for the artist to discover a new dimension of their own work which they may not have previously considered. Hence, I completely agree with the argument presented by the author and firmly believe that the world of interactive art is all about exploring yourself through the displays.

The second reading, “Physical Computing’s Greatest Hits (and misses)”, felt like an unexplored world of opportunities. I was intrigued to read about the numerous projects created using various aspects of physical computing. It has also provided with an inspiration to think more creatively for future assignments. It was interesting to note that all involved relatively similar components and yet were so diverse in concept and implementation.