Week 7 – Unusual Switch

Calf Extension Switch
Idea

I realized that I cannot make my claves bigger regardless of how much I trained them. There were three probable reasons for this: inefficient training, insufficient training, or bad genetics. Hence, I came up with a solution that lets me overcome all three obstacles by efficiently training my calves all day efficiently.

Implementation

As seen above the switch if formed by connecting a 330 ohm resistor and bulb in series configuration, and then using two pieces of aluminum foil (one attached to my heel and the other to my shoes inner sole). Resting the foot completes the circuit by making the sheets of foil come in contact and thus lighting the bulb to indicate that you have failed in flexing your calf muscle.

Reflections and improvements

Something I would improve in the design is definitely the mobility of the switch. I have to be able to move with the switch to further activate my calves. Also the look of the switch is very unappealing, it is something I would like to make much more visually appealing.

Week 6- Data visualisation

Concept

I wanted to visualize data from important and relevant statistics such as global climate statistics and data. I also realized that representing these statics can also pave way for an art form where the statistics come together graphically to convey an abstract artistic motif.

Implementation
var data_stored = [];
var data_in;
var colors=[];

function preload (){
  data_in = loadTable ("global_csv.csv", "csv","header"); 
}

function setup() {
  randomSeed();
  createCanvas(400, 400);
  noStroke();
  background(0,0,0);
  //Hard code the selection of data required
  for (var i = 0; i<260; i++){
    for (var j = 0; j<2; j++){
      //push into data stored array
      data_stored.push(data_in.getNum(i,j));
          
    }
  }
  //random colour generator
  for (var c_=0; c_<244; c_++){
      colors[c_]=c_+1;
    }
//drawing the shape
  var base= 30;
  for (var k =0; k<data_stored.length; k++){
    var data_points= data_stored[k];
    var x = width/2;
    var y = height/2;
    //fixing data to correct proportions
    var h = map(data_points, 0, max(data_stored), 0 , (height/2-base)*1.3);
    var r = map(k, 0, data_stored.length, 0 , 2*PI); 
    fill (random(colors), 100, 100);
    push ();
    translate(x,y);
    rotate(r);
    rect(0, -base, 1, h)
    pop(); 
  }
}

The code implemented simply loads a csv file containing raw data, then takes the data on to an array. Then it uses the values from the array to produce heights of the bars that will be visualized. Then these heights are mapped onto a suitable scale and displayed.

Design

Reflections and Improvements

I would definitely like to make the application take in any arbitrary data set and visualize it. Here I had to hard code some of the properties. Some of the functions to manipulate the array did not seem to work. Also, I would like to add a bit more meaningful color to the presentation of data to give it an extra dimension.

Week 3: Object Oriented Programming

This week we were asked to create using Classes in Javascript. Classes are pretty cool because they store both data and functions and can be used to create ‘instances’. An apt analogy would be comparing a class to a cookie cutter and instances to cookies that can be cut using a cookie cutter. One cookie cutter can cut out an unlimited number of cookies and this makes classes very powerful. For this week’s assignment I made a very simple graphic called ‘Cats and Dogs’ (yes, the rain proverb!) and it shows a town at night where it’s raining cats and dogs, quite literally!

The process and the code:

For this assignment I relied solely on the Reference page of p5js and random tutorials on YouTube. I spent a lot of time trying to grasp how to write classes in Javascript. In the end what I made looks very simple, but I know that a lot more can be done using classes. Most of my time in this project was spent trying to understand classes.

I created 1 class that does it all, and I called it Drop. Besides the constructor() method, the class had two other methods, update() and show():

class Drop {
  constructor() {
    this.x = random(0, width);
    this.y = random(0, -height);
  }

  update() {
    this.y = this.y + 4;
    if (this.y > height) {
      this.y = random(0, -height);
    }
  }
  show() {
    noStroke();
    fill(0);
    // ellipse(this.x, this.y, 2, 10);
    image(doge, this.x, this.y, 40, 40);
    image(catto, this.x - 30, this.y + 60, 70, 70);
  }
}

The images of the dog and the cat was uploaded on to the project directly.

What I realized about Classes:

On their own, it’s hard to figure out stuff to do with Classes. I personally feel the true benefits of classes can be reaped when used in bigger projects where a class can be act as a cog in a machine.


Door Switch

Concept

For this week, I created a switch that turns the LED light on in my circuit every time you close the door. I attached aluminum foil balls on either end of both the red wire and black wire so that when they make contact, they would close the circuit.

Method

To do this, I scrunched up some aluminum foil that I could poke the wires into and then proceeded to stick them on. I stuck one wire on the door, and the other on the door frame. This way, whenever the two pieces of foil would touch each other, the current would flow through them to switch on the LED.

Result

It’s fairly simple, but that’s to be expected since it’s my first time using Arduino.

Reflection and Improvements:

  • The aluminum foil balls kept falling off the wires and reattaching them every few minutes got pretty annoying.
  • Couldn’t really open the door all the way just because the circuit was so small, I think expanding the circuit or even taping more wires together to lengthen them would’ve made my door switch better.

Unusual Switch

Concept

For this assignment, I wanted to replicate the functionality of a volume knob but in the form of a switch. In other words, it would be a non-continuous electrical switch (unlike the volume knob) that serves as a three-way switch. Plus, my initial thought was to implement it in some kind of musical instrument, thus I ended up with a combination of (1) a three-way switch and (2) a guitar multipurpose pedal. 

Electrical Circuit

The rudimentary electrical circuit that has been implemented using the breadboard is based on the diagram given above.

Here, we can see that three sets of resistors are connected in parallel to the negative end of the power source. The first branch of the resistor is a single resistor of resistance 10 kΩ (kiloOhm), which is connected to a blue-colored Light Emitting Diode (LED) that enables a single directional flow of current. The second branch consists of a single resistor of resistance of 330 Ω, which is connected to a red-colored LED. Finally, the third branch consists of two resistors (connected in series) of resistance 330 Ω each (total resistance 660 Ω). Each branch is connected to the positive terminal of the power supply, which is facilitated by the use of a switch. 

I completed the circuit design in steps. The first step was to complete the 330 Ω branch connected to the red LED. In the circuit, a blue cable has been used to connect the resistor and the switch. 

Red LED Circuit

The second step was to complete the 660 Ω branch connected to the blue LED. In the circuit, a yellow cable has been used to connect the resistor and the switch. 

Green LED Circuit

The third step was to complete the 10 kΩ branch connected to the blue LED. In the circuit, a white cable has been used to connect the resistor and the switch. 

Blue LED Circuit

Now, the design of the switch involves the use of a multi-effect guitar pedal. Since its three pedals (labeled A, B and C) are made of conductive material, I connected the wires using paper pins. The red wire (connected to the positive terminal) can be connected to A, B or C, which in return completes the circuit and as we move the wire to different pedals, different LEDs light up. For instance, connecting the red wire to pedal A (330 Ω) causes the red LED to light up; connecting the red wire to pedal B (10 kΩ) causes the blue LED to light up, and connecting the red wire to pedal C (660 Ω) causes the green LED to light up. 

View on YouTube here.

Reflection/ Improvements

The use of a switch with multiple pedals enables a variety of purposes in real-life situations. Since there are resistors of different resistances connected to individual components, suitable pedals can be used to complete a circuit. In order to improve on this project, longer electric cables can be connected to the red wire, which again will be attached to the shoes using double-sided tape. For now, I have attached the (red) cable to one side of the double-sided tape; its second side should be glued to the shoe for optimum use. 

As a result, the indirect involvement of hands can be totally substituted by legs. Then, using legs, the required pedals can be selected and pressed to light a particular LED. Thus, gluing both sides of the double-sided tape (one to cable and the second to shoes) will improve the design. Overall, I am happy with the way this project got shaped to be. 

Midterm Project (Game): Save the Snail

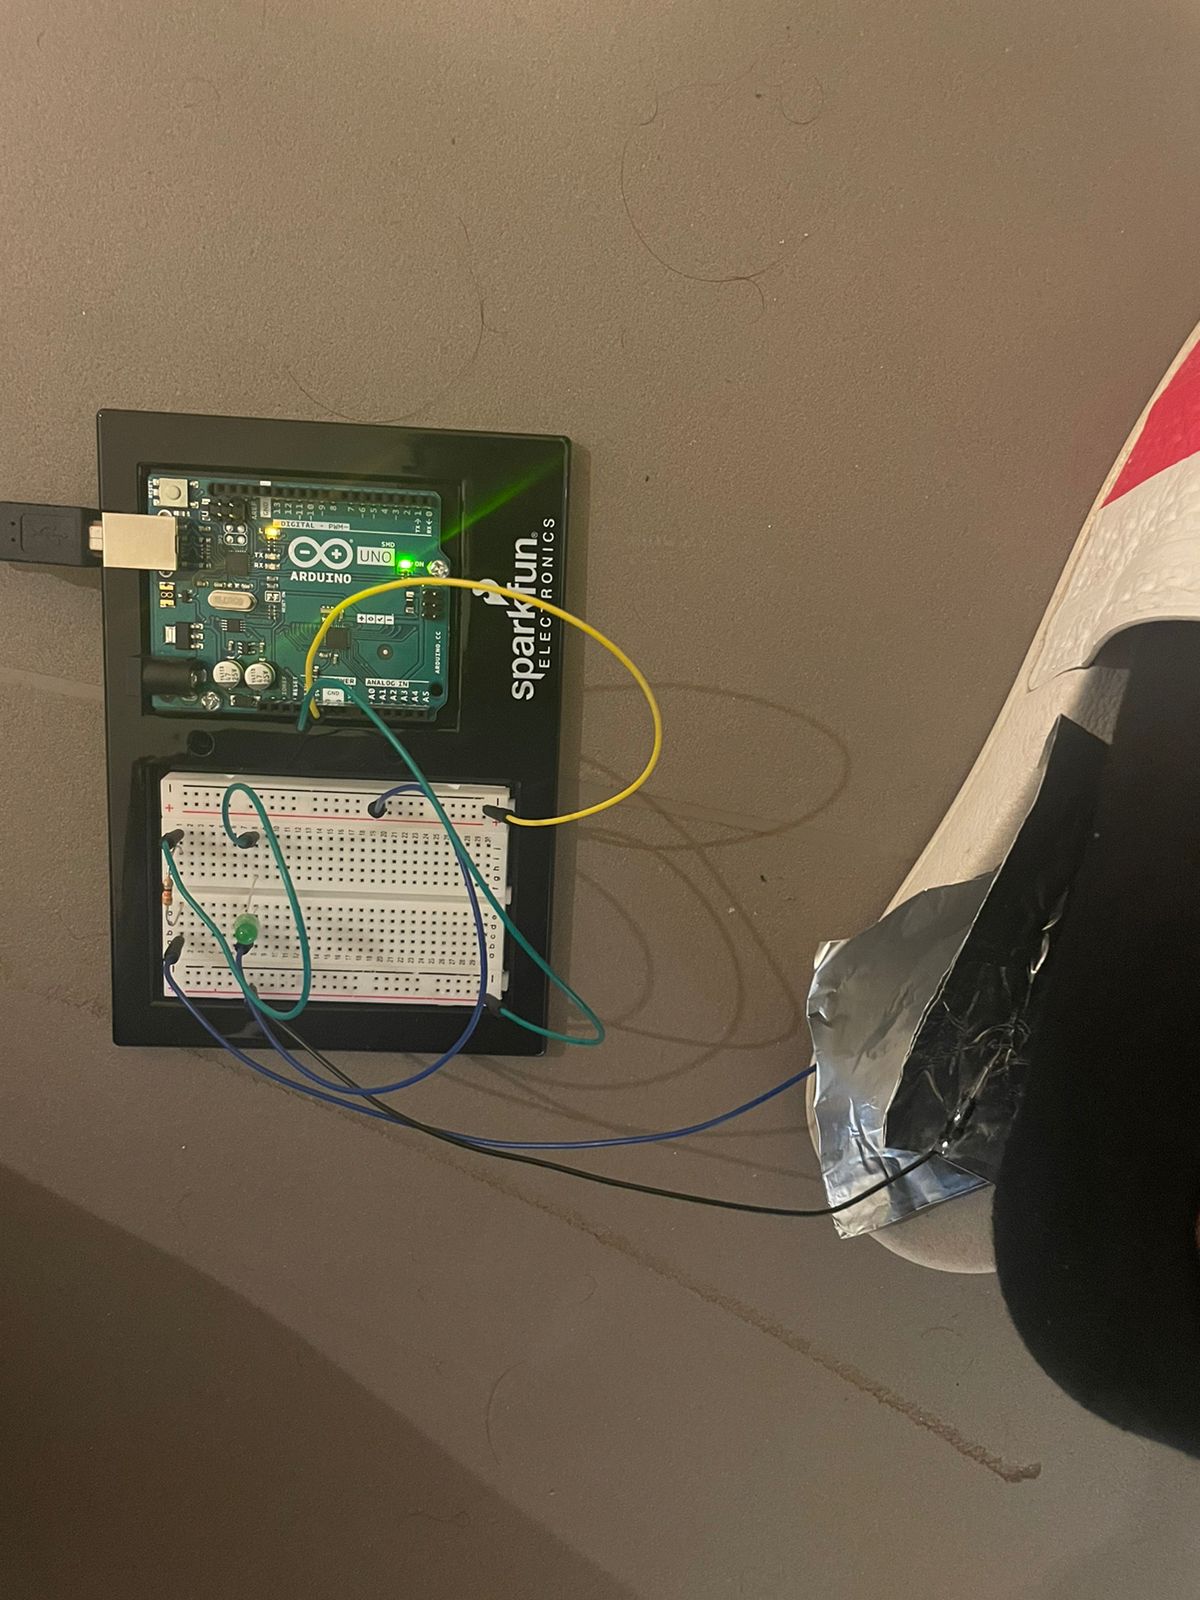
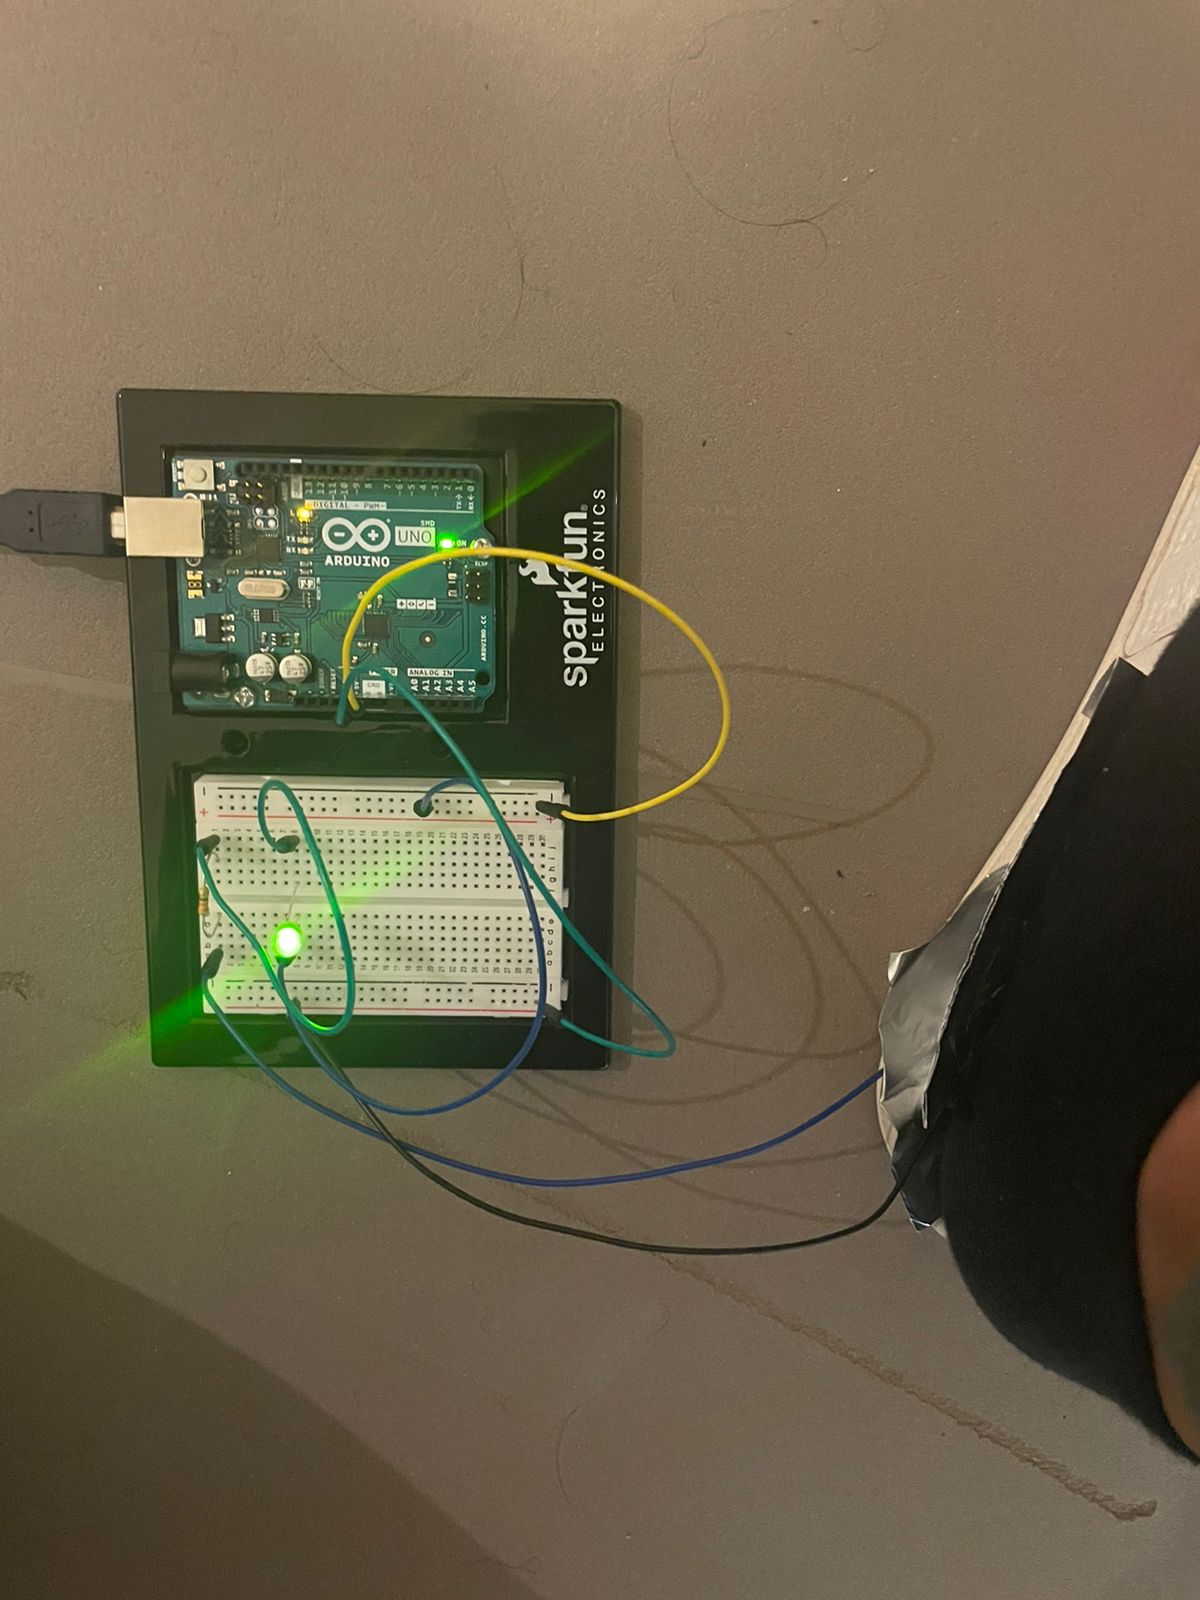
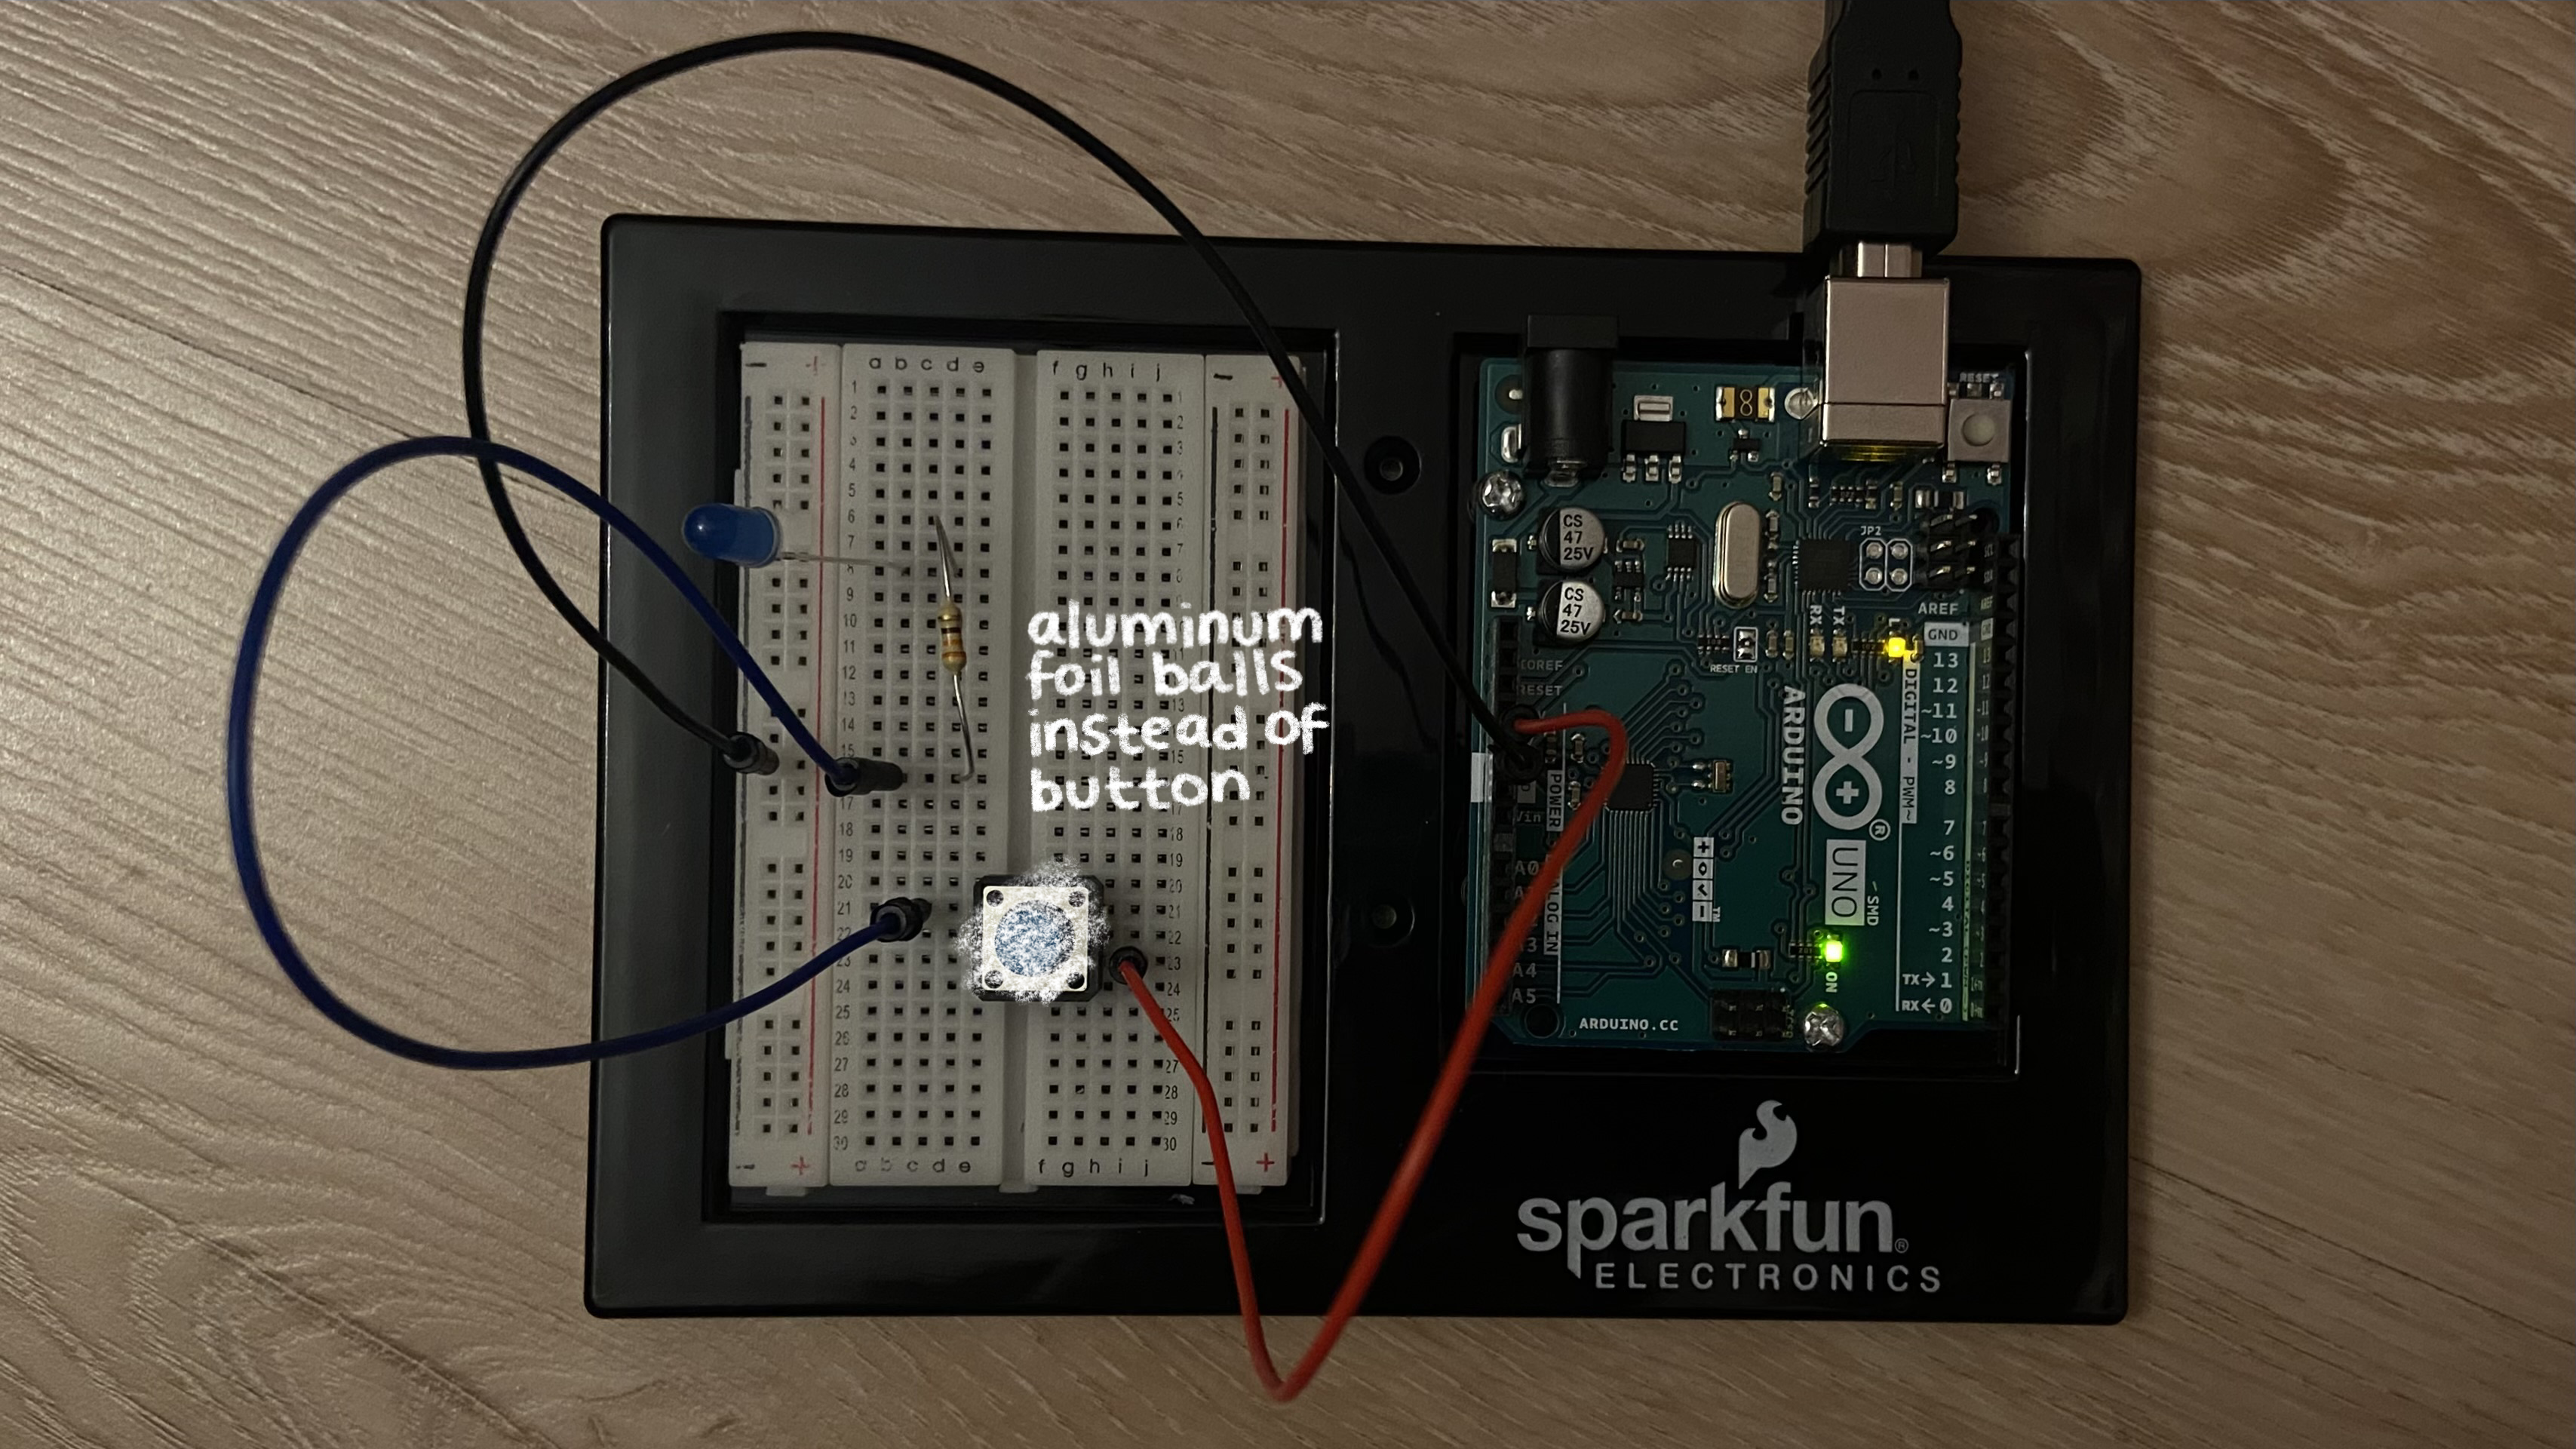
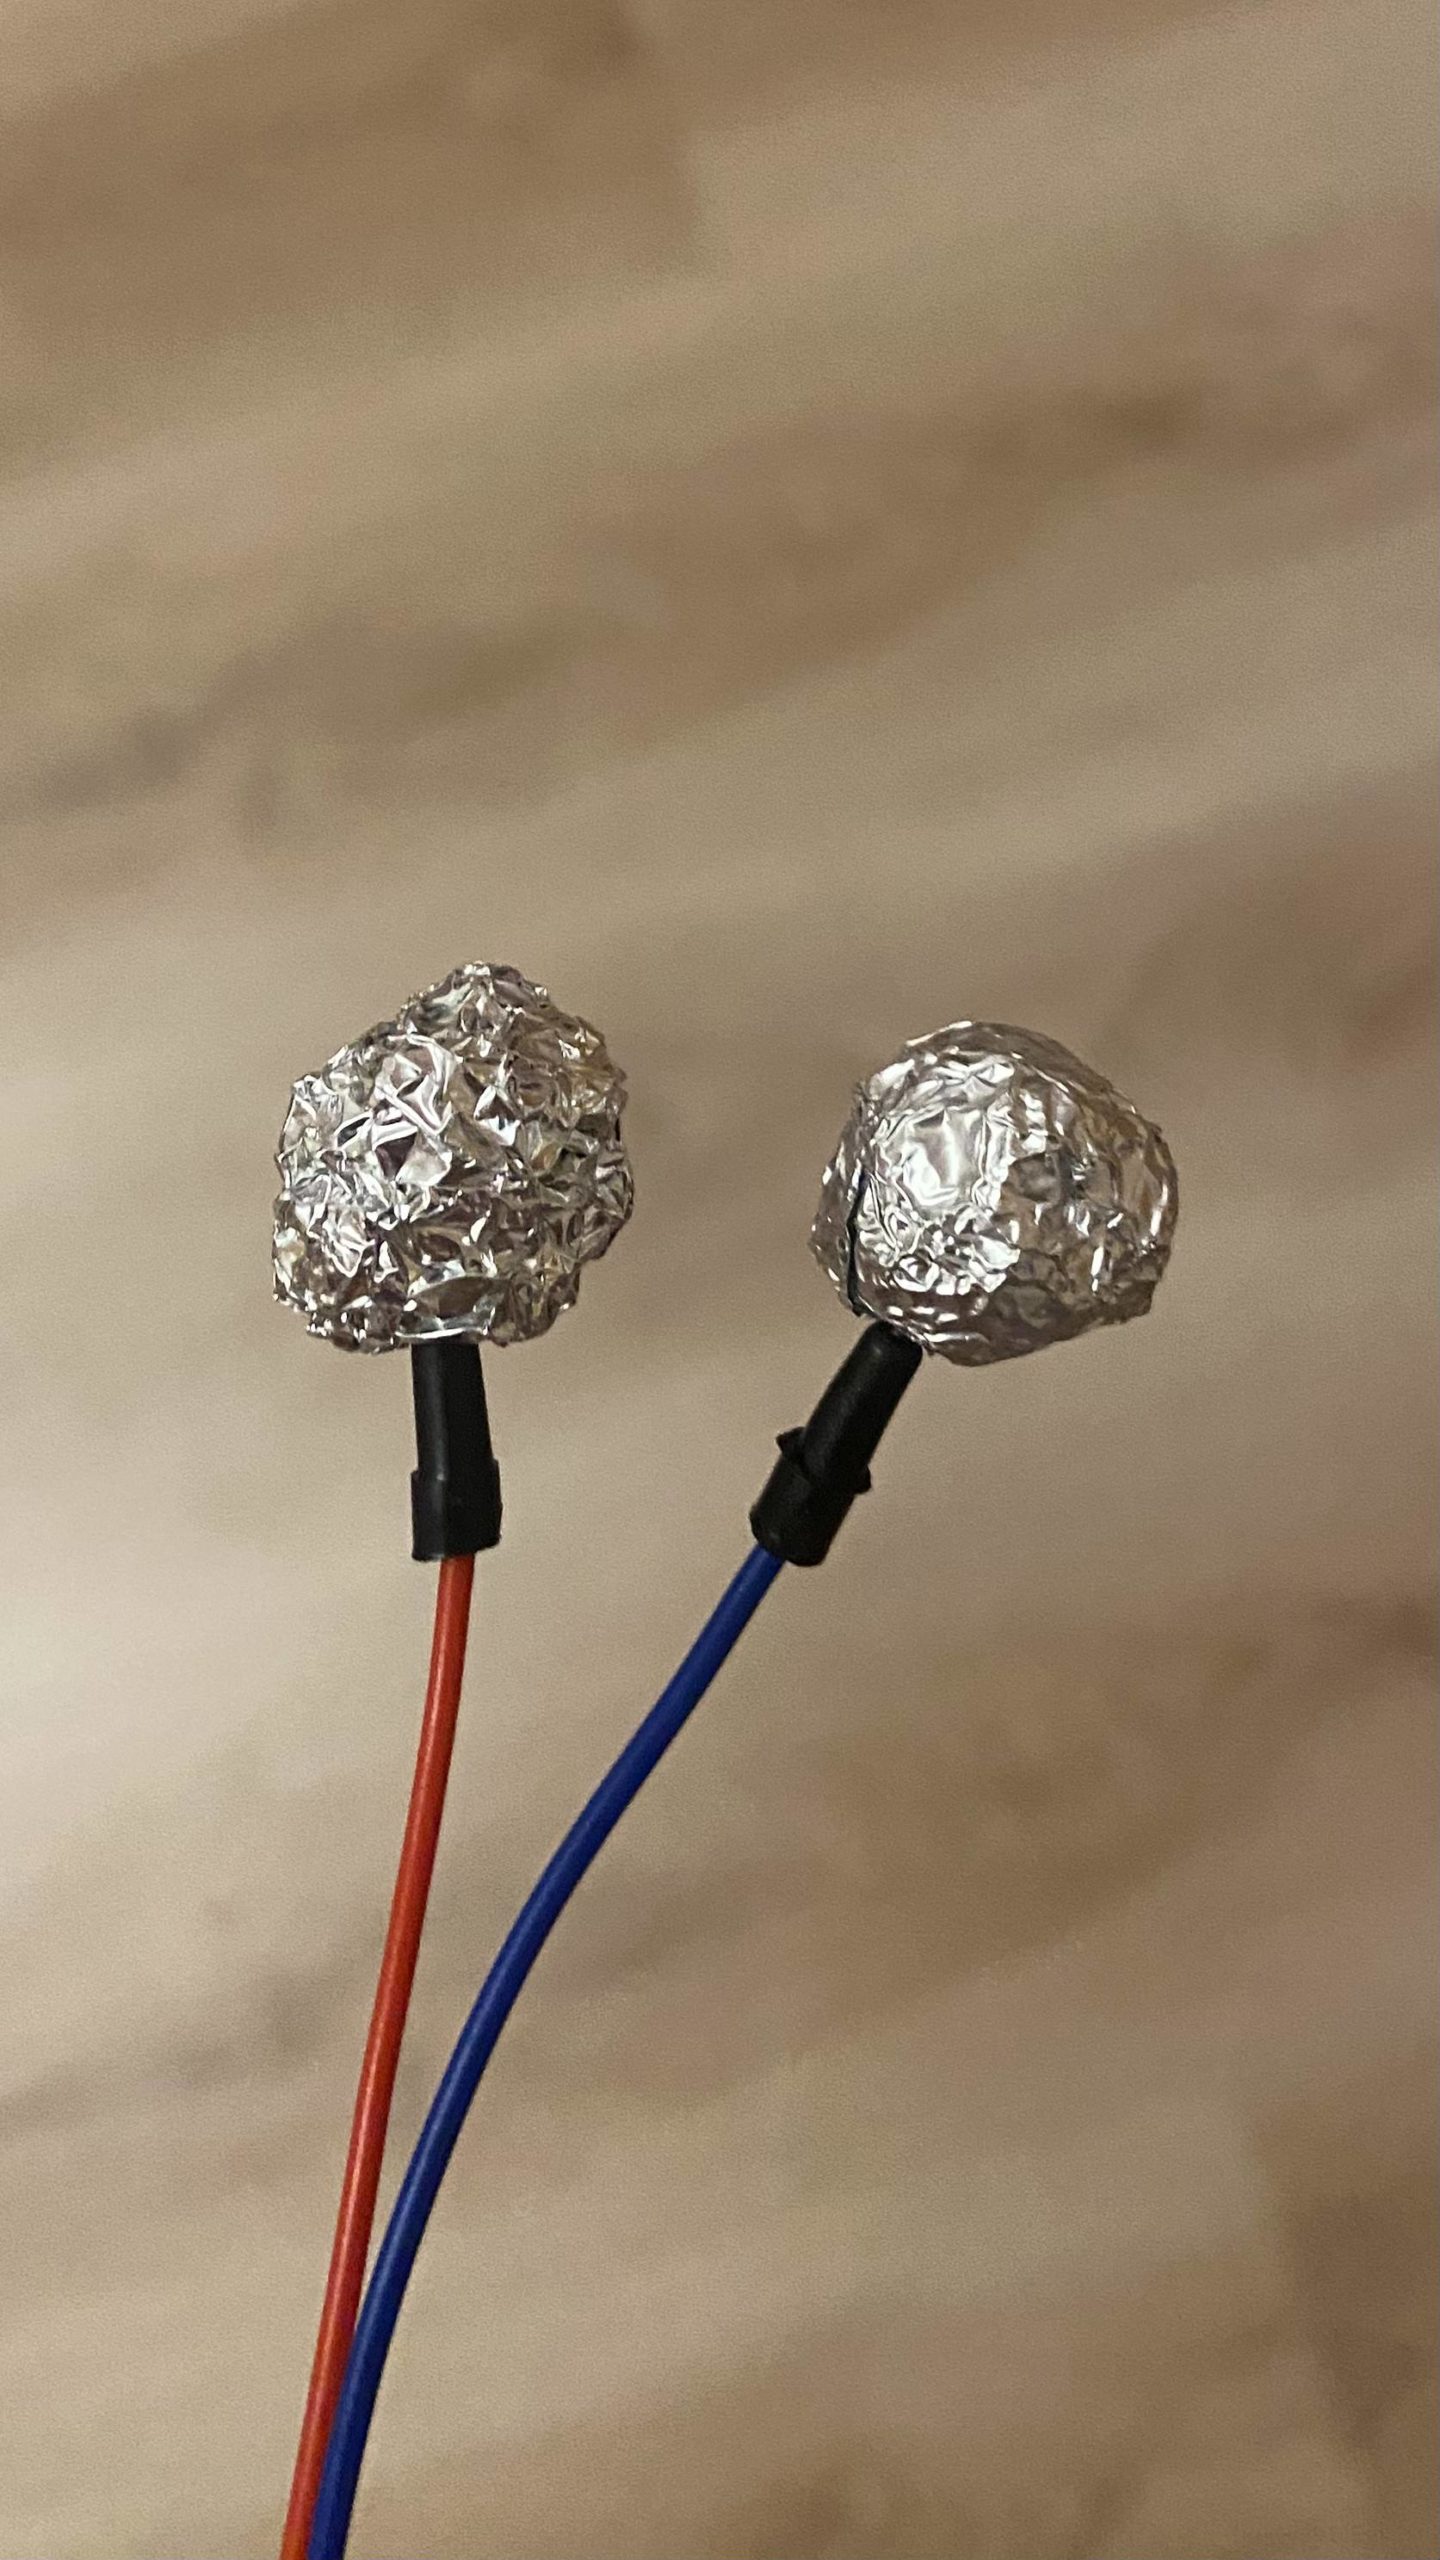
For the midterm project, I created a game in p5js called ‘Save the Snail’, which can be played directly inside the browser. Just hit Space and start playing! To play click and hold down on the mouse (any of the buttons) to move the snail. It’s pretty intuitive (I think) and one should easily get the hang of it after trying it out a couple times.

The idea:

The hardest part about making the game was coming up with an idea. I wanted the game to be simple, easy-to-play and kind of original. Apparently whatever I wanted to create had been implemented in one way or other. So I decided to not be too hung up on creating something totally new. I came up with this game idea where you had to ‘save’ an object from getting hit by obstacles.

The code:

The code for this game involves a lot of functions. I felt more comfortable using functions instead of classes so that’s what I went with. There are three main elements in the game:

  1. The frog
  2. The snail
  3. The rocks

I think the most important function in the code is the rockhit() function because it determines the end of the game. Here’s the code snippet:

function rockhit() {
  let temp = 0.5 * (snail_dia + rock_dia) - 2;
  let distance;

  for (let i = 0; i < rocksnum; i++) {
    distance = dist(xpoint, ypoint, rockposX[i], rockposY[i]);
    if (distance < temp) {
      return true;
    }
  }
  return false;
}

This function returns true if any of the rocks hit the snail. It checks this by iterating through a for loop.

To make the game interesting, I added difficulty levels to it. Again, I wanted to keep things extremely simple and easy-to-understand, so I added only two levels of difficulty: Easy and Hard. The difference the difficulty levels make is in the number of rocks that fall from above. I achieved this by simply adding an if condition to my code and changing the numrocks variable if the user chooses the hard level. Here’s the code for the interface that prompts the user to choose a level:

function chooseLevel() {
  imageMode(CENTER);
    image(banner, width / 2, height / 2, 400, 300);
    fill(207, 185, 151);
    textFont(myFont);
    textSize(40);
    stroke(139, 69, 19);
    strokeWeight(5);
    textAlign(CENTER, CENTER);
    text("Choose difficulty level", 0, height / 2 - 85, width);
    textSize(35);
    text(
      "EASY (hit UP ARROW)\nHARD (hit DOWN ARROW)",
      0,
      height / 2 + 2,
      width
    );
    imageMode(CORNER);
}

The if condition that increases the number of rocks:

function draw() {
  clear();
  background(bg);
  if (mode == 0) {
    welcomeScreen();
  }
  if (mode == 1) {
    chooseLevel()
  }
  if (mode == 2) {
    gamePlay();
  }
  if (mode == 3) {
    rocksnum = 30;
    gamePlay();
  }
}

To keep track of the score, I used a counter which just keeps on incrementing as time passes. A noLoop() statement stops the increment as soon as the game is over.

So that is how my midterm project turned out! It’s a simple game but I created it regardless because it’s something I would enjoy playing.

Things that could be improved:

The game could be made better by adding levels progressively after certain score thresholds. The graphics could have been

Touch-less Switch

DESIGN

For this project, I created a touch-less switch that turns on when the user blows a metal ball onto another metal plate. A demo of the switch is shown below:

I wanted my switch to be fun and have a game/challenge aspect to it, and I feel like I satisfied this,  since the person turning on the switch must blow from the right angle and direction to ensure the ball touches the metal plate. Moreover, depending on how hard the user blows, the LED can go from a flickering/flashing light to a constant light, so the harder and more direct the air is blown, the brighter the LED. I also think that this aspect of the switch helps the user better understand how the circuit is working, because they can clearly see (and feel) that when not enough air is applied to the ball, the circuit is very loosely connected and doesn’t work as well.

Originally, I wanted to create a tumble weed made of wire; however, after some experimentation, I realized the shape I had created didn’t roll as well unless the user was blowing extremely hard, so I switched to using something that was perfectly spherical.

MATERIALS

The materials I used to create the switch included:

  • 1 LED
  • 4 wires
  • 1 330 ohm resistor
  • electrical tape
  • duct tape
  • copper tape
  • 1 ping pong ball
  • 1 metal plate
  • scrap block of metal

BUILDING THE SWITCH 

A close up of what my Arduino board looks like is shown below:

I began by building the most elementary circuit that we had worked on in class. For this I used an LED, resistor, and 1 black and red wire each. After completing this, I then added two wires (in white) in the “middle” of the circuit, which I would then use to extend the circuit outside the Arduino board and integrate my touch-less switch.

The next step was building the components of the switch. For the metal ball, I knew I needed something light enough to be able to be moved by someone blowing on it, so I opted for a tin foil covered ping pong ball. The other side of the switch was constructed by duct-taping a metal plate onto a scrap piece of metal. This step was important to ensure that the other end of the switch was heavy enough to not move as the user blew on the metal ball. A close up of the switch is shown below:

Finally, I secured each side of the switch to each of the white wires using some electrical and copper tape. The entire circuit is shown below:


CHALLENGES WITH ADHESIVES

The biggest challenge of this project was honestly attaching the components of the switch to the wires. I experimented a lot with the copper tape, as it had been recommended to me by another student. However, I found that the tape is barely adhesive and not flexible enough to wrap around curved objects like the ping pong ball or thin objects like the head of the wires. On the other hand, the electrical tape, while much more sticky and elastic, didn’t stick very well to metal objects. My solution was to use copper tape as a base layer to stick the wires to the metal ball/plate and then cover it with electrical tape to secure it in place. I found that duct tape worked best on metal, but because it is an insulator, I only used it to attach the metal plate to the scrap metal.

ALTERNATIVE SWITCH 

Finally, one alternative version to this touch-less switch is instead of having the metal plate standing up vertically, having it lay flat on the table. In this way, the user does not need to continuously blow on the ball to keep the light on; instead they need only to blow at the right angle and speed so that the ball rolls on top of the plate.

Week 8 : Hands-free Switch

Concept

For this assignment we were required to get creative with creating an unusual switch. At first I thought of using sanitizer spray in the concept of the switch, but later on I decided to stick with water.

Circuit

The circuit makes use of a moisture sensor that allows electricity to pass through depending on whether there is moisture or not, in this case water. So when the sensor is dipped inside the water, the switch goes off, and when taken out the LED turns on again.

Result


Assignment 8

I played with a few different, everyday materials and mechanisms to create a switch for this assignment. And finally settled on the conventional sealing clips, attached with pieces of conductive aluminum foil. When both of the claws of the sealing clip meet the LED bulb gets illuminated in a similar manner to a door closing or something being sealed.

The plastic outer body acts as the insulating material and has pieces of the aluminum inside it. When pushed together the conductive materials get connected with the wires and act as a whimsy switch that you can tinker with to turn the light on and off.

Here is the video,

Week 5: Midterm Progress: Save the Snail

For my midterm project I’m creating a game called ‘Save the Snail’. It’s a very simple, easy-to-play game where the user tries to save a snail from getting eaten by a frog or getting hit by rocks.

Save the Snail:

The game will be extremely easy to play, and will just need a press on the keyboard or a click on the mouse. The frog will be at one end of the screen and the snail will keep getting attracted to the frog and the user’s click on the mouse will move the snail away to the right. At the same time there will be rocks falling randomly from the top of the screen and the user will also have to make sure the rocks don’t hit the snail. The gameplay overall is very simple. If the snail comes in contact with the frog or gets hit by the rocks, the screen shows the score and a game over message.

My Progress:

So far I have figured out how to make the rocks drop down randomly. I accomplished that using a class for the rocks and then a update() method to make them drop down. I also made the ‘snail’, currently it’s just a circle that keeps moving to the left and a built-in p5js function- mouseIsPressed()-  moves the circle ten units to the right.

Here’s a screenshot of the progress. The code is still very scratchy and uncommented for the most part:

Things left to do:

Although the code is somewhat functional, what makes or breaks a game is the interface. I am looking to make the interface a lot more friendly and add graphical elements to it. Also, I’ll maybe try to add difficulty levels but I’m not sure if I can make that happen. For now the game is an arcade style game, a very good way to kill time, haha.