Final Project: User Testing

I managed to build a prototype with focus on confirming whether my initial ideas worked or not. Unfortunately, I couldn’t build a completed physical hardware for my project just yet, so I had tin foils as my moles, but the circuit closing with hammer worked so all I need to do is build the physical hardware and polish the UI for the p5 side.

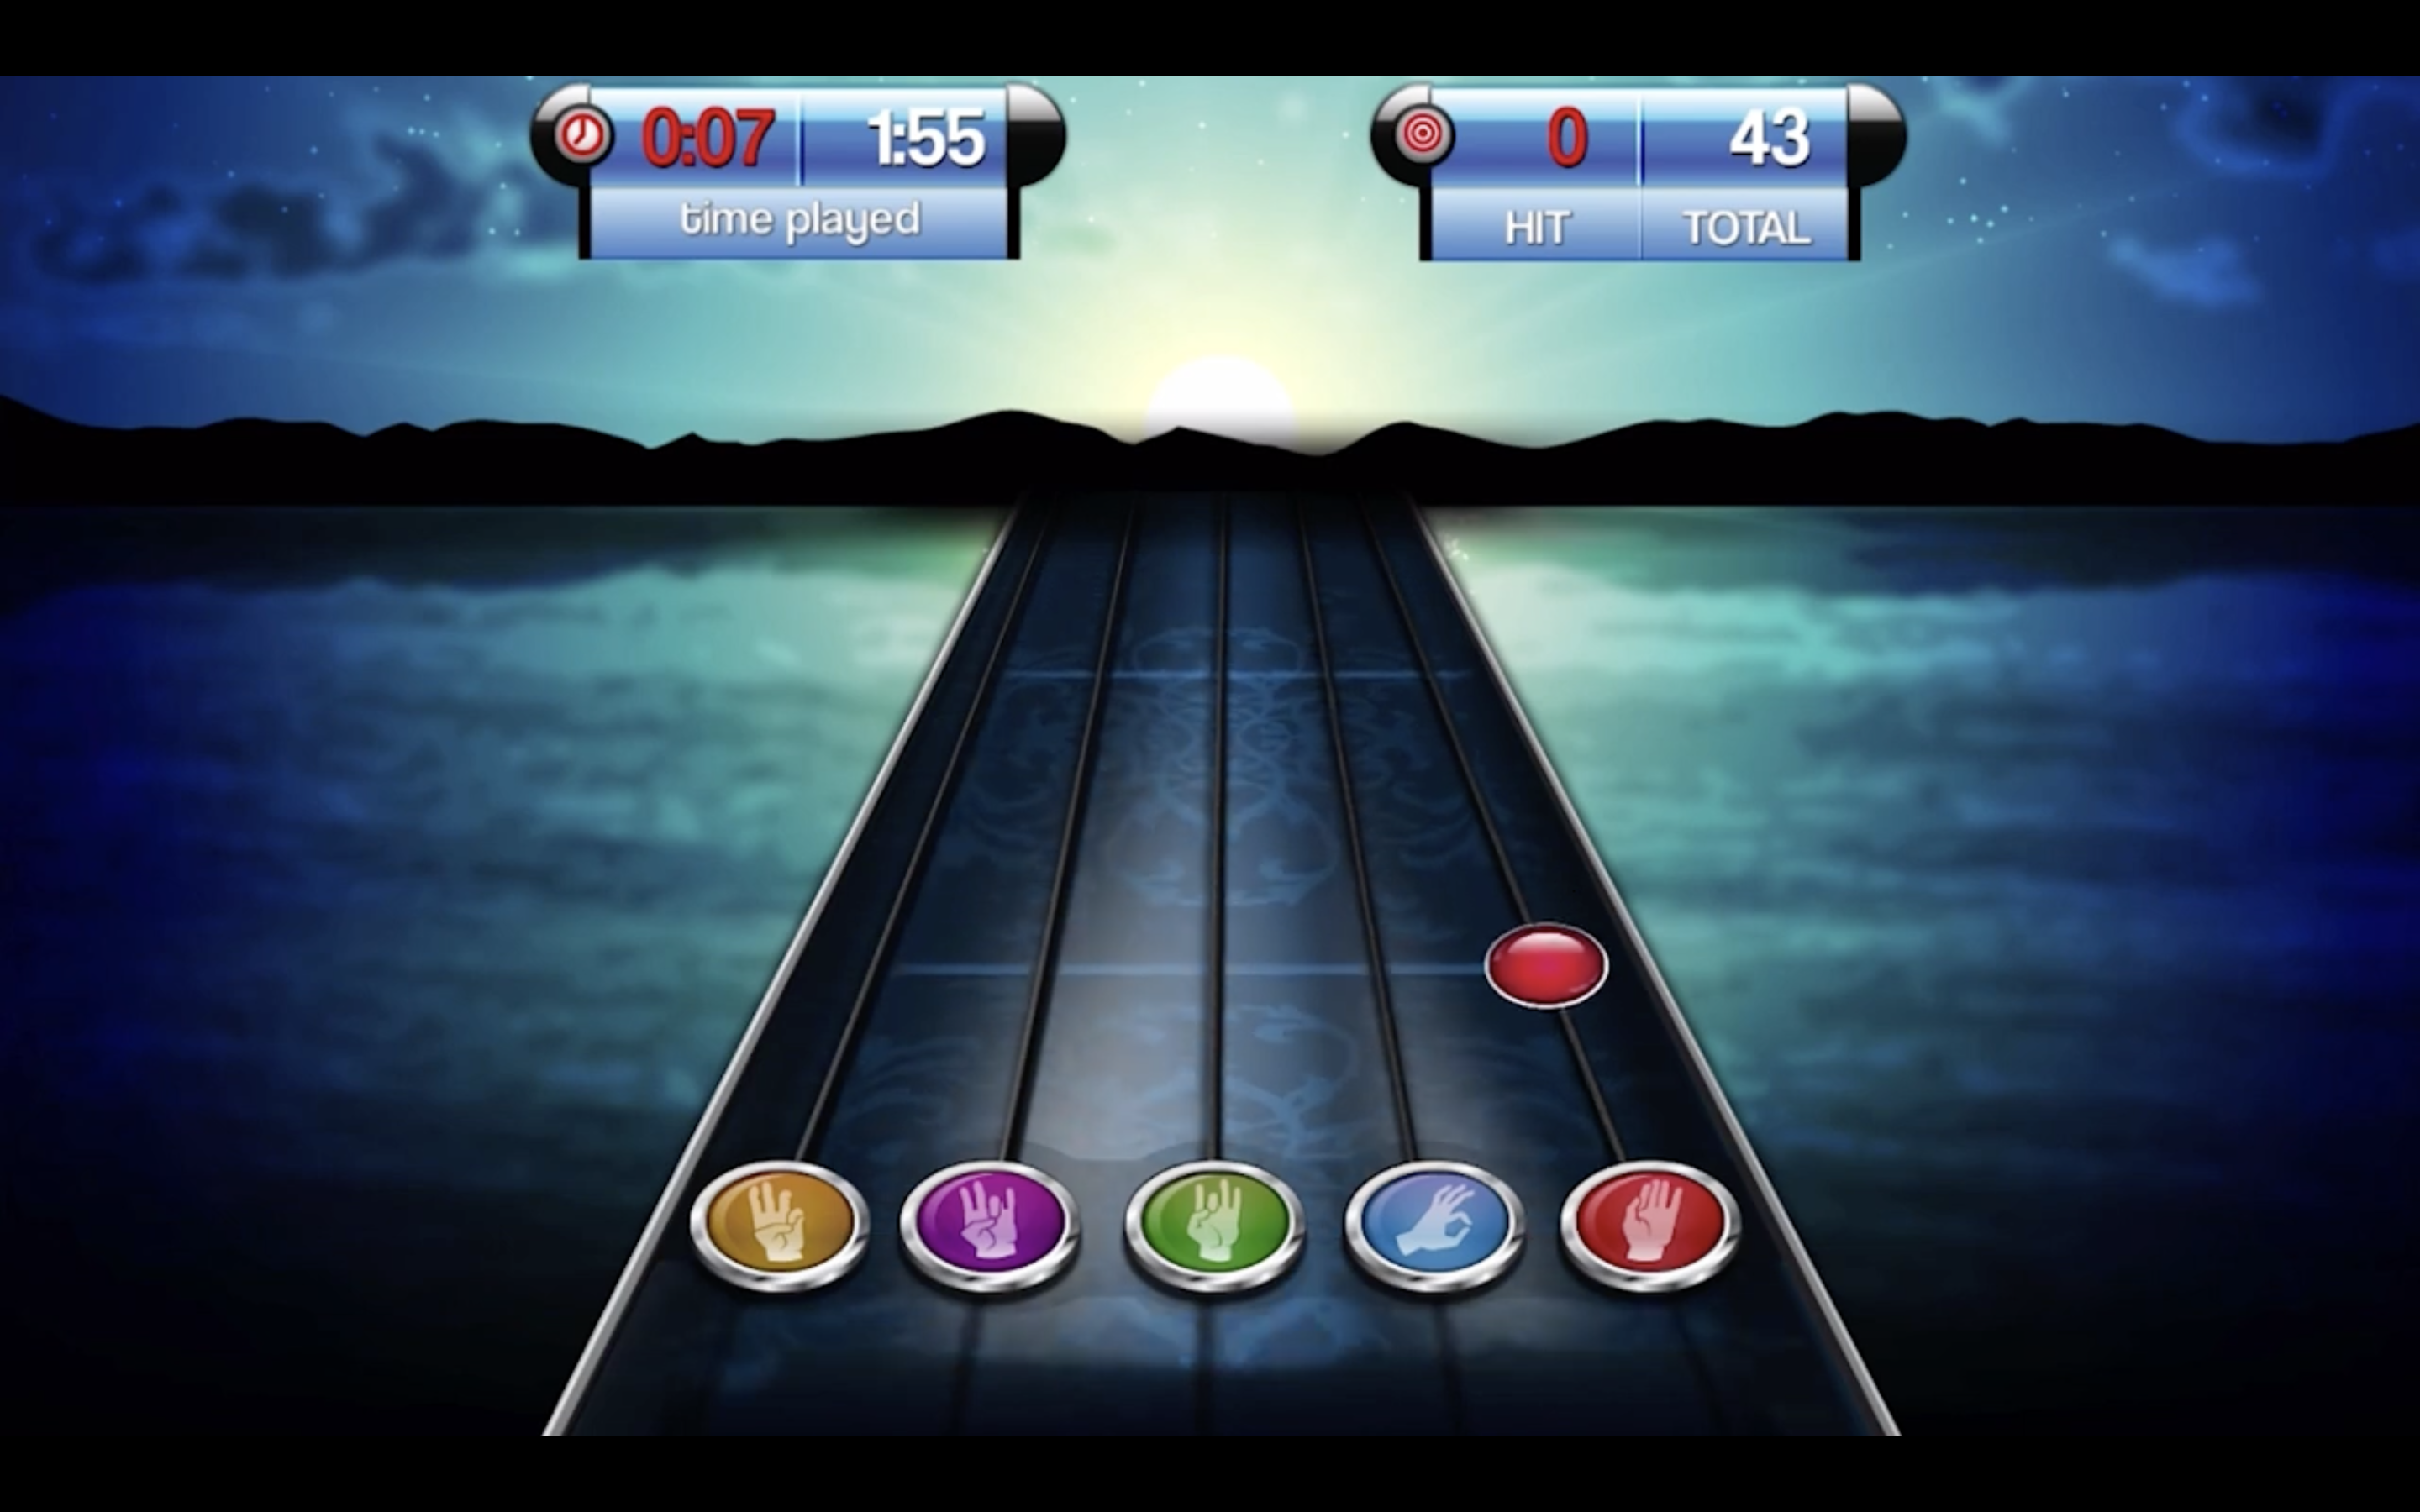
  • Sarthak was able to figure out the connection between the physical moles (tin foils) and the moles on the screen (the red, green, blue circles in UI) intuitively through the color assignment of the moles and the ordering/location of the moles. He also quickly figured that he had to time the hitting of the mole right correlating to the moving music notes on the UI where it coincides with the respective mole.
  • Since hardware was very lacking of physical shape, sometimes the wires coincided, causing a bug where another future note was recognized as hit while hitting only one note, causing confusion and error to the game play. This error will be fixed when I make a concrete hardware which will prevent such errors. Another improvement I really need to look into is correlation between node patterns and the musical notes/rhythms of the music to make the game play more interesting, challenging, and immersive.
  • While having an actual hardware with shapes of moles and hammer might make the game more intuitive, I feel like I should explain the connection between hitting the moles and the musical side of the game since it doesn’t have a clear apparent connection between the two elements of this project.

special thanks to Sarthak for being my guinea pig

Week 13: Final Project User Testing

Project Concept

I changed my Final Project idea from the LED simulation to a space exploration simulation. This project enables user to interact with the p5js console using the Arduino controlled input devices. Through various buttons (subject to change), the user can navigate through space and explore various planets. The project features a aesthetic interface with liberty for the user to move around in space and explore. As of now, the user can only see the nine planets in the Solar System (including Pluto) and the Sun.

User Testing

Jun Lee and my roommate were my user testers (featured in the video: Jun). They had some difficulty navigating the buttons as they were not labelled, but they quickly learned the mechanic looking at what each of the buttons did. They were able to navigate the space quite easily after a few seconds of trying. The project is still not complete, so the only thing the players can do is move around and admire the heavenly objects and their surface mappings.

Areas that are working well

The navigation is working quite well. I had to adjust where the camera moves (spatial positioning) relative to where it is pointing, such that the left, right, forward, and backward movement are not static and can change depending on where the player is looking at.

There are a lot of areas that need improving. One of them is positioning. Since the background is completely back, it is hard to tell where the player is in space and where he could find planets. I tried adding in a pointer to the Earth, such that the player is not lost and can come back home anytime.

Another thing that needs improvement is the purpose of the project. I want this project to be educational, and at the same time adventurous and fun as the player explores various planets and stars.

Parts I had to explain

I had to explain what the project is and what it does, which is natural and necessary. However, for the controls, I did not explain anything, but the users caught up on it pretty quickly. I had to say what planet they were looking at when they explored, but this can be fixed with a pop-up on screen about such information.

Final Project Proposal

Idea

For the final project, I wanted to create a game that uses the ultra sonic sensor to create a trackpad for the movement of the player. As a rough outline, I am thinking of creating a car game in which the goal is to avoid other cars in the lane and get the highest score. It would look something like this:

Arduino

The main component to be used in Arduino would be the ultrasonic sensor which will use the movement of our fingers to move the car along horizontal axis. The reading from the sensor will be provided to p5.js for the x-coordinates of the car. There will also be a button to start the game and a two LEDs to indicate if the game has ended or is still on going.

p5.js

The p5.js would read the values from the ultrasonic sensor and map them to fit the movement of the car and start the game when the button is pressed. The classes for the car, obstacles and other game components will also be created in p5.js. It will also send data to Arduino when the game phase has changed so that the LEDs light up.

Week 12 – Final project proposal

COLOUR FALL

Concept:

The theme for the final project is to have a simple color catch game. For the final project, I wanted something unique but still interactive. This game is inspired by many games like the piano tiles or the falling catch game. So the game is to catch the respective colors before it falls down with the respective colors. To add difficulty to the game, there will be a blinking level in the game, and the color will blink till it stabilizes to catch.

Arduino:

For this game, I will be using many big Arcade buttons, along with small buttons for navigation, such as the instructions page or the start page. I plan to use arcade buttons or force sensors for the color-matching functionality.

P5.js:

The P5 js code will be responsible for the aesthetics of the game. It will have the GameState controlling the different screens of the game. It will display the scores of players at the end of the battle for the next revenge!


Final Project Proposal – Revision Week 12

Concept

For my finally project, I was inspired by a classic Japanese video game called “Dance Revolution.” In this game, the user hears a song and has to tap on the right tiles of the platform that is under them in order to win the game: the tiles on which the person has to tap on appear faster and the game becomes harder over time. However, to put my own spin on the project, I decided to reverse the idea, and create “Dance Evolution.” In this game, the user will not be given a prior song but rather a set of tiles that they have to press on, similar to the original, and construct the song themselves.

picture taken from https://www.reddit.com/r/DanceDanceRevolution/comments/85guhf/my_self_made_ddr_pad_gallery_and_howto_in_comments/

The tiles will be modeled after the iconic “Dance Revolution” tiles.

Implementation:

The user will construct the song with the help of a set of successive arrows that they have to tap on, which in turn represent a certain instrument. After tapping, these instruments will be layered and will start turning into an actual song. The trick is that the user has to tap on the arrows/tiles in a timely manner, as the time slot for a successful tap will shrink over time. The user wins if they are able to tap on all tiles correctly and create the song that consists of all instruments: the beat, the bass, the chords, the melody, the pad, etc. The user loses if they do not tap on the tile on time, thereby ruining the structure of the song.

The instruments will most likely be generated using p5.js, in order to add an element of randomness and unpredictability so that the melodies and the beats heard in one round of the game will be different in another round. The user will also have the possibility of changing the key of the song by using a distance sensor, allowing them to hear the song in different renditions of their own volition.

Arduino input:

There would be nine tiles in total and five of them would have a function. Each tile would be connected to a pressure sensor that would then trigger some sort of operation. The tiles on the sides pointing up, down, right, and left would be used for the game itself, while the tile in the middle would perform general functions such as restarting the game, going from one window to another.

Meanwhile, p5js would light up the tiles due to an LED connected to the tiles showing the user what tile to press on.

Final Proposal

 Idea/Concept:

For the final project, I have decided to develop a simple game using p5.js and Arduino Uno. The game is the same as the popular Dinosaur Game by Google. The game involves controlling the dinosaur character by making it jump over obstacles using a button on the Arduino board. To make the game more interesting, the player can also challenge the Arduino board, which will be controlling the button using a servo motor with a tiny hook attached at the end of the motor to press the button.

How to Play Google Chrome Dinosaur Game both Online and Offline -  Studytonight

Serial Communication (Arduino & P5js):

Arduino:

The Arduino board is responsible for controlling the servo motor and reading the status of the game mode selection button and the challenge button. The board communicates with the p5.js game over serial communication.

P5.js:

The p5.js game is responsible for rendering the graphics of the game and communicating with the Arduino board over serial communication. The game receives the status of the dinosaur’s jump button and sends the status of the challenge mode selection button.

Game Modes:

Single player: the user controls the dinosaur jump with a button attached to the Arduino board.

Challenge mode: the user competes against the Arduino board, which controls the dinosaur’s jump using a servo motor. If the user selects the challenge mode, the Arduino board will play first by pressing the dinosaur jump button using the servo motor. The user’s turn starts after the Arduino’s turn. During the user’s turn, the user can press the button attached to the Arduino board to make the dinosaur jump. The user’s score is displayed on the screen, and the game ends when the user fails to jump over an obstacle.

Problems (Training Arduino to play the game):

There’s only one possible problem that I might face while doing this project and that is challenge mode. For the challenge mode to work, I have to train Arduino to turn the servo motor whenever there’s an obstacle. However, I looked on the internet and I think I will be able to train using a simple algorithm on p5.js. The breakdown of the algorithm is as follows:

  1. Use the p5.js pixels array to get the color of the pixels representing the obstacles on the screen.
  2. Check if there are any obstacles present by looking for a specific color in the pixels array.
  3. If an obstacle is present, move the servo motor to press the dinosaur jump button.
  4. Wait for a short time to allow the dinosaur to jump over the obstacle.
  5. Release the servo motor to allow it to return to its initial position.

Hopefully, this will fix the issue. It might require a lot of testing for the motor to match the time of the obstacles appearing on the screen.

Week 12: Final Project Proposal

While searching for ideas, the music glove for hand therapy caught my attention, which inspired me to recreate my own version using Arduino and Processing. With the knowledge gained in class about music and sound production, Arduino switches, and creating interactive screens using P5js, I plan to create an interactive musical glove that allows users to control sound production and play music through hand gestures. This would also encourage hand movement

A few years ago, my grandfather suffered from a paralysis attack after which one side of his body lost the ability to move. Despite the challenges he faced, he was able to restore his mobility through physiotherapy and exercise. Considering this, I believe that an accessible hand glove could be immensely valuable for elderly individuals with blood pressure-related conditions. Such a device could provide a portable and convenient means of conducting regular physiotherapy sessions within the comfort of one’s own home.

Processing

Similar to piano tiles I will make a screen on p5js which will randomly ask the user to make different hand poses and click the button on different finger tips. The button should be clicked within the time and when the corresponding button is overlapping with the moving tile. The number of hits will be recorded on screen along with the total time of the hand therapy session. A specific note will be played for each hand pose to allow the glove to produce a specific tune/ melody during the session.

Arduino

I am planning to use regular buttons stuck on the tips of the four fingers and operating them with the use of thumb. Alternatively, I may opt for a more convenient sensor such as a pressure sensor that can be easily integrated onto the glove while ensuring user comfort. Upon pressing the buttons, the switch state will be relayed to the processing system, which will remove the corresponding tile. If the user presses the wrong button, an error message will be displayed on the screen. If the user is slow to press the button, a message stating “slightly late” will appear. Successful hits will be met with encouraging messages displayed on the screen.

Week 12 – Final Project Concept

Jumpy Bird

My inspiration is the old classic favourite bird of everyone: Flappy Bird! But I will be reimagining the game to better fit into the environment of Arduino and P5 js.


For starters, I plan on using a force sensor in order to make bird jump. I may also implement powerups that will be utilized through other external controls such as buttons.  I will also be implementing LEDs of different colours in order to represent different games states or actions such as jumps or game overs.

Arduino

The Arduino code will handle all the input from the physical board such as the force sensor and also lighting up the different LEDs depending on the corresponding action. It will be communication with p5 js using serial connection. It will also be handling the different sound effects for the jumps and defeats.

P5 js

The P5 js code will be responsible for the looks and designs of the game. In order to start the game, the user will have to interact with the menu at the beginning of the program. It will also display the high score so different players can battle it out for who has the highest score!

Week 12 – Final_Project_Last_Final

Concept and Design:

For my final project, I will be creating a table piano using the ultra sonic sensor and would be connecting it to the P5js interface. The start screen will allow users to choose between three modes: free mode, game mode, and record mode.

In free mode, users can play the piano for as long as they want and try to figure out a tune on their own. Record mode will be an extension of free mode, where each key played by the user will be stored within P5.js and can be played back by pressing a button.

In game mode, notes will fall from the sky, and the user would have to press the appropriate note on the table piano. The game will eventually keep getting harder as more and more notes fall. Every un-pressed note will result in losing a life and after a certain number of lives lost, the game will end.

[optional] If I get enough time, I might add another feature to the game where users will be presented with a pre-set tune, including its sound, the keys to be played, and the order in which they should be played. The goal will be for the user to memorize the tune/keys and then play it on the piano. Correctly played tunes will earn points, while pressing the wrong key will result in a buzzer sound and the need to start over. Users will have the option to replay the tune or skip to a new one.

Arduino:

The Arduino will mainly have the ultrasonic sensor, LEDs, buttons, and a buzzer. First, Arduino will receive which mode the program is in right now i.e. free mode, record mode, or game mode. This will light up the appropriate LED in the physical setup. After that the ultrasonic sensor will allow the user to “press keys” on the table piano. Varying distance would correspond to different keys on the table. Arduino would send the values of the ultrasonic sensor (distance) to the P5js interface. These values will then be processed by the P5js program and appropriate action will be taken. Furthermore, in the free and record mode, every time a key will be pressed, Arduino would send that specific key to the P5 program to be displayed on the screen. In record mode, when the play button would be hit, the P5 program would send signals to the Arduino program to play the notes stored in the array. 

P5 Program:

The P5js program will mainly have the user interface. This program will allow the user to choose between different modes and would act as the screen for the communication done by Arduino. Once the user decides the game mode, the P5 program would send in this information to the Arduino program so that the ultrasonic sensor and buzzer can be switched on or off appropriately. This program will then receive the notes/distances from Arduino and will process it in a way to recognize the notes and then display the appropriate picture/note on the screen. The program will match the notes received from Arduino during the game mode with the ones it is displaying in order to award the user with scores. Finally when the user will exhaust all of their lives, P5js would send a signal to Arduino, that will in turn play a “game ended” themed sound.

Week 12: Final Project Proposal

Concept

As a final project for my course, I settled on implementing the popular game Stick Hero, but with a twist. I plan to incorporate a flex sensor connected to the Arduino board to determine the length of the stick, and serial communication between p5Js and Arduino to create a unique gaming experience.

Stick Hero - Apps on Google Play

P5Js

The game will be played on the p5Js console. The user will have to press a button to start the game. A stick figure will then appear on the console, and the user will be required to build a bridge by extending the stick. The length of the stick will be determined by the flex sensor connected to the Arduino board. The user will have to extend the stick to the correct length to cross the gap successfully. If the stick is too short or too long, the stick figure will fall, and the game will end.

Arduino

The Arduino board will handle the input from the flex sensor, and the data will be sent to the p5Js console using serial communication. Arduino will also be responsible for playing sound effects. When the stick is extended correctly, a good sound will be played, while a bad sound will be played if the stick figure falls.