Week 8 unusual switch

Concept

For my unusual switch, I had a pretty difficult time trying to come up with a creative method without using hands to make a switch. Initially I thought of some switch using a plastic water bottle and its cap, but then it struck me that water is also a conductor. So I came up with the idea to use water to turn the switch on.

Methodology

It’s is very very simple. I attached two ends of wire that is connected to a system inside a cup. All I have to do to turn the light on, is to pour water on the cup. If enough water is filled so that the surface of the water touches the wire ends, then electricity will flow through the water and complete the system. While doing this process I also found out the light produced from the bulb was a bit dimmer than using just the arduino board which meant some electricity flow of the system was lost due to the water’s resistance, which meant that water is not a good conductor. While I based this project on my vague memory of common sense that water is an electric conductor, apparently through a quick google search, apparently pure water is actually an insulator since it doesn’t contain any ions, but tap water is still a conductor because it contains some impurities.

Video

Future Improvements

As simple as this switch is, the downside of this switch is that it’s a bit bothersome to pour the water out to turn the light back off since there are wires attached to the cup and the arduino board. A simple fix to that is to put a straw in the cup and drink the water to turn the light off, but unfortunately I didn’t have any straws in my room nor I couldn’t think of this easy fix before I disassembled the entire switch… But I did learn something new about water today which is a bonus I didn’t think of.

Assignment – Do Not Disturb (Unusual Switch)

Concept and Methods: 

In the past, I’ve spent a significant amount of time trying to use my card to open a locked room door. All that inspired me to create this circuit which indicates whether a door is locked from the inside using a simple LED circuit. I built it using the SparkFun inventor’s kit and some spare foil I had laying around. I realized my idea by putting two wires inside the lock hole in the door frame and having the lock itself act as a switch as it’s made from metal and it is conductive. I additionally wrapped the metal endings of the wires with tin foil to increase the surface area and ensure that the lock touches on both of them connecting the circuit.

Reflection 

This assignment was somewhat tricky to record as I was not able to record the exact switching on because it was going on inside the door frame. Additionally, I can improve this as it is visible in the video that the led flickers as the door unlocks which implies something loose in the setup. Beside these points, I think I executed this well as it works and that can be heard in the video. Finally, I had a bunch of fun putting this project together and I look forward to learning more about physical computing.

Week 8 – Unusual Switch

Idea

Since we are not allowed to use our hands to create a switch, the first thing I thought of was using my legs. I wanted to make something that is simple but also useful/could solve some real problem. One of the habits that I have is toe-tapping which I keep doing unconsciously when I sit in one place for a long time.  It’s hard to consciously be aware of this, so the things that easily draw attention, such as a continuously blinking light bulb, could help me and other people having the same problem be more aware of when they do toe-tapping and consequently eradicate this disturbing behavior.


How it works

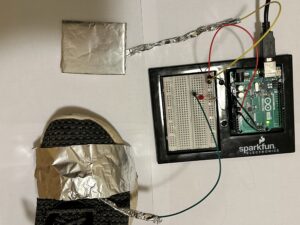
My switch consists of a ring made of aluminum foil and a flat square cardboard covered with aluminum foil. You wear the aluminum ring to your shoes and place the square cardboard right underneath your legs. Every time you fidget and touch the cardboard with your legs the bulb lights up, signaling you that you’re doing toe-tapping.


Video


Future Improvements

This switch design is pretty simple and straightforward, however it is not very practical if I want to use it to detect and fight my fidget behavior. So one of the future improvements would be to make the design more user-friendly: I could work on expanding the wires so that the light bulb will be right in front of me, not on the ground, and I’ll be able to actually see it when working on a desk.

Unusual Switch – Yerkebulan Imanbayev

Idea:

For my unusual switch, I was inspired by Grinch and his signature furrowed eyebrows. Specifically, I decided to create my circuit in a way that grimacing (or furrowing your brows) is equal to the action of turning over the switch.

Execution:

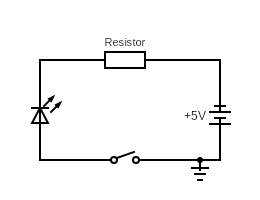
I decided to create a simple circuit with a resistor and an LED. I have a wire that is connected to the power source and the LED. The LED is connected to a resistor, which, in turn, is connected to a wire. This wire is connected to a strip of aluminum foil, which is taped to one of my brows. I connected another wire to the ground and then taped aluminum foil on it as well, connecting it to my other brow. Now, if I furrow my eyebrows, the aluminum brows connect, conducting the electricity and turning the light bulb. If I do not make a Grinch face, the wires are disconnected, which does not conduct any electricity. Below, I created a simple diagram of the circuit:

Video:

Week 8: Unusual Switch

Concept

Since, we had to make a switch that did not require the use of hands, I thought of using wind to switch on the LED lights. The easiest thing to do was to blow onto a metallic strip like aluminium or tin foil, such that the strip would touch another metallic surface to complete the circuit.

This idea of blowing onto something let me develop this project into a device that would act as a spirometer (Fig. below). A spirometer is a device used to test a person’s lung capacity. One would simply blow onto the pipe and try to raise the three balls to the top. The idea of my switch is similar; one would simply blow onto two strips of metallic strip to turn on the two LED lights.

Video

How it Works

I used some copper tapes and joined them together to make two flexible metallic strip. I used a solid metallic sheets such that they stay in place when some wind is applied to it. The idea is to blow onto the copper strip hard enough to light up both the bulbs.

The first metallic strip is thinner and easier to deform, while the second one is relatively thicker and requires more force to make it touch the metallic sheet.

Note: the first circuit lights up the red LED, while the second lights up the yellow.

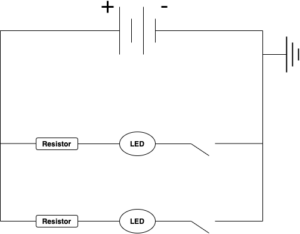
When a copper strip touches a metallic sheet, they complete the circuit. However, only one copper strip and metallic sheet is associated with one LED light. In other words, the circuit is set up as two parallel circuits as shown in the figure below.

Improvement

The copper strips are set up in such a way that one blocks the wind from the other which only makes it harder to light up the second LED. So, an improvement could be a set-up which does not block wind, but a mechanism which requires more pressured air such that both the lights are lit up.

Assignment 5: Unusual Switch

Idea:

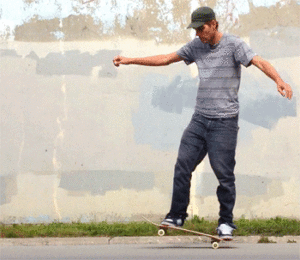
For my unusual switch, I decided to link something I love doing into my assignment which is skateboarding. There’s this skating move called “manual” where you balance the board on your back wheels and continue riding, kinda like this picture shown below:

If the board touches the ground, it’s not a manual, however if you manage to keep the board up and balanced, you’re doing a manual. So for my unusual switch, essentially, you would do a manual, and if the back end of the board would touch the ground, then it would connect the circuit, hence acting like a switch.

So I taped some aluminum foil to my board and some to the ground. If I manage to do a manual (aka the board not touching the ground), the LED light will be off because the circuit isn’t connected. Else, if the board does touch the ground, the two foils will touch and thus connecting the circuit and the LED light would switch on.

Here is a simple circuit diagram I have constructed to show my assignment:


Video:

Midterm Game: Star Shooter

Inspiration:
The inspiration for Star Shooter comes from a variety of sources, including classic arcade games like Space Invaders and Galaga, as well as more modern games like Geometry Wars and Asteroids. These games typically involve shooting at large moving targets, often with a spaceship or other vehicle as the player’s avatar. The use of space-themed graphics, such as stars and comets, and the inclusion of a timer and score system are also one of the common features of shooting games. The game draws inspiration from science fiction movies and TV shows, which often depict space battles and laser gun fights.

Features and challenges:

One of the main features of the game is that it uses object-oriented programming to create dots and bullets that move around the screen. I had to use arrays to hold all of the dots and bullets, and I spent a lot of time making sure that the movement and collision detection was smooth and accurate, using efficient algorithms for collision detection. I used the testIntersection() function that allows the measurement of the distance between the radius of the bullet and the comet. If the distance is less than or equal to the sum of their radii, the bullet has intersected with the dot.

testIntersection(dot) {
  var d = dist(this.x, this.y, dot.x, dot.y);
  if (d <= this.r + dot.r) {
    return true;
  }
}

preload(): This function is used to load all the necessary assets (images) for the game before it starts. It is called once when the program starts. The arguments are the file paths to the image files that need to be loaded. The function works by using the loadImage() function provided by p5.js to load the images and store them in global variables for later use.

mousePressed(): This function is called once every time the left mouse button is pressed. It is used to create a new bullet object and add it to the bullets array. The function works by creating a new instance of the Bullet class and passing the current x-coordinate of the mouse as an argument. The new bullet is then added to the bullets array.

keyPressed(): This function is called once every time a key is pressed. It is used to create a new bullet object and add it to the bullets array when the spacebar key is pressed. The function works by checking if the key that was pressed is the spacebar key, and if it is, creating a new instance of the Bullet class and adding it to the bullets array.

Bullet.display(): This method is used to display the bullet on the canvas. It takes no arguments. The function works by drawing a rectangle on the canvas with a white fill color and a size of 10×20 pixels, using the bullet’s x- and y-coordinates.

Bullet.move() : This method is used to move the bullet up the screen. It takes no arguments. The function works by subtracting a fixed value from the bullet’s y-coordinate every frame, causing it to move up the screen.

Bullet.testIntersection(): This method is used to test if the bullet has intersected with a dot (enemy). It takes a single argument, which is a dot object to test against. The function works by calculating the distance between the center of the bullet and the center of the dot, and comparing it to the sum of their radii. If the distance is less than or equal to the sum of their radii, the bullet has intersected with the dot.

Dot.display(): This method is used to display the dot on the canvas. It takes no arguments. The function works by drawing an ellipse on the canvas with a red fill color and a size of 60×60 pixels, using the dot’s x- and y-coordinates.

Dot.move(): This method is used to move the dot around the canvas. It takes no arguments. The function works by adding a random value to the dot’s x- and y-coordinates every frame, causing it to move in a random direction. If the dot reaches the edge of the canvas, it is wrapped around to the opposite edge.

Mid-Term Project: Traffic Racer

Midterm Project – Duck Hunt

Duck Hunt sketch: 

For this assignment, I researched retro arcade games and decided I want to make a replica of the classic NES game Duck Hunt. Initially, I started with the background on which I built the rest of the game. Then, I used a sprite sheet that changes the ducks to dead ducks when shot. That was done using the following code, which is also the code that decides the gravity of the falling duck:

if (shot == true) {
  speed = -7;
  speed2 = 0
  push();
  noStroke();
  fill(220);
  duck(deadDuck);
  pop();
  
  if (y > 440) {
    shot = false;
    x = random(5, 580);
    speed = random(4,12);
    speed2 = random(-7,7);
    score += 1;
  }
}

I had several versions of the game until I decided to go with the final one in which you have unlimited ammo but a limited time to shoot as many ducks as possible. This way, the game can be played by anyone, however the score gives it a competitive edge in a sense that players can compete with their own previous score.

Regarding the code and the technical aspect of my assignment, I would say I am most proud of setting the timer to countdown from whatever value we assign to it. This was done with the following code:

fill(0, 0, 0);
  textSize(30);
  text("Time Left:" + timer, 25, 380)
  if (frameCount % 60 == 0 && timer > 0) {
    timer --;
  }
  if (timer == 0) {
    //text("GAME OVER", 200, 200);
    window.location.reload();

The timer additionally ends the game and displays the home screen. This particular switch from the home screen to the game was a problem that I was luckily able to overcome. Additionally, I ran into a problem while using OOP in one of the earlier versions. As I could not fix this problem I decided just to switch up and not use OOP. This is one of the few key changes that should be done to improve the game in the future. Other than this, I should improve the spawning points of the ducks as well as implement another paradigm to run the game including limited ammo, power ups and difficulty levels.

Finally, this game has a lot of space to improve, but it is a good starting point. I personally chose this game in order to recreate the feelings and experience of hunting for ducks on the NES using the gun controllers. I plan on doing this with the help of Arduino.


Mid-Term Project – Snakes and Ladders

Snakes and Ladders

Concept

My project is a digital adaptation of the classic board game, Snakes and Ladders, which holds a special place in my heart due to fond childhood memories of playing it with my sister. I created this game as a way to relive those memories with her whenever we are apart. I made this to play the game with her whenever I am back home.

Upon opening the game, players are presented with a visually appealing cover page that offers the option to access instructions or dive right into the game play. The game features a soothing soundtrack that helps to enhance concentration and enjoyment. Two players can participate, each with a randomly assigned token represented by an ellipse in a unique color. The game board is comprised of four snakes and ladders each, with the placement randomized for each playthrough. These snakes and ladders can either hinder or assist the players, respectively, in reaching the goal of 100. As a luck-based game, there are no guarantees, but players who land on ladders can quickly ascend to the finish line, while those who land on snakes must descend to their tails. Upon completion, players can easily restart the game by simply pressing any key, returning them to the cover page for another round of fun.

Code

new p5();// Initialize the p5.js library as it random function was not working without this

// Define some constants for the game
const rows = 10;
const cols = 10;
const cellSize = 60;

// Define some global variables for game elements
let boardImage;
let startTime = 0;
let startTimeSnake = millis()*2;
let startTimeLadder = millis()*2;
let diceResult;
let dice1;
let dice2;
let dice3;
let dice4;
let dice5;
let dice6;
let cover;
let back;
let restart;
let instructions;
let bg_music;
let dice_sound;

// Define ladders
const ladders = [
  { start: 2, end: 22},
  { start: 16, end: 37},
  { start: 36, end: 74},
  { start: 58, end: 85}
];

// Define snakes
const snakes = [
  { start: 99, end: 1 },
  { start: 90, end: 61 },
  { start: 50, end: 23 },
  { start: 39, end: 17 }
];
// Preload all the game assets
function preload()
{
  boardImage = loadImage("boardImage.png");
  dice1 = loadImage("1.png");
  dice2 = loadImage("2.png");
  dice3 = loadImage("3.png");
  dice4 = loadImage("4.png");
  dice5 = loadImage("5.png");
  dice6 = loadImage("6.png");
  cover = loadImage("cover.png");
  back = loadImage("back.png");
  instructions = loadImage("instructions.png");
  restart = loadImage("restart.png");
  bg_music = loadSound("bgmusic.mp3");
}
// Set up the canvas
function setup()
{
  createCanvas(cellSize * cols, cellSize * rows);
}

function draw()
{ // Start playing background music if it's not already playing
  if (!bg_music.isPlaying()) 
  {
    bg_music.play();
  }
  board.display();
  
  //handling mouse click events
  handledMouseEvent = false;
  if ((millis() - startTime < 2000) && board.gameState == "start")
  {
    diceDisplay();
  }
  
  if ((millis() - startTimeSnake < 2000) && board.gameState == "start" && frameCount > 180)
  {
    board.snakeText();
  }
  
  if ((millis() - startTimeLadder < 2000) && board.gameState == "start" && frameCount > 180)
  {
    board.ladderText();
  }
  
  
}
// Roll the dice and return the result
function getDiceRoll() 
{
  startTime = millis();
  diceResult = floor(random(1, 7));
  return diceResult;
}
// Display the dice image based on the result out of the 6 images 
function diceDisplay()
{
  let diceWidth = 100;
  let diceHeight = 100;
  let diceX = 250;
  let diceY = 250;
  if (diceResult == 1)
  {
    dice1.resize(diceWidth, diceHeight);
    image(dice1, diceX, diceY);
  }
  else if (diceResult == 2)
  {
    dice2.resize(diceWidth, diceHeight);
    image(dice2, diceX, diceY);
  }
  else if (diceResult == 3)
  {
    dice3.resize(diceWidth, diceHeight);
    image(dice3, diceX, diceY);
  }
  else if (diceResult == 4)
  {
    dice4.resize(diceWidth, diceHeight);
    image(dice4, diceX, diceY);
  }
  else if (diceResult == 5)
  {
    dice5.resize(diceWidth, diceHeight);
    image(dice5, diceX, diceY);
  }
  else if (diceResult == 6)
  {
    dice6.resize(diceWidth, diceHeight);
    image(dice6, diceX, diceY);
  }
}

class Board
{
  constructor() //initializes various game-related variables, including the player array and the game state
  {
    startTime  = 0;
    this.playerArray = [];
    this.playerNum = 2;
    this.counter = 0;
    this.playerIndex = 0;
    this.encounter = false;
    this.gameState = "cover";
    for (let i = 0; i < this.playerNum; i++)
    {
      this.playerArray[i] = new Player();
    }
  }
  
  display() //displays different images depending on the game state, including the game board, cover page, instructions, and restart page.
  {
    if (this.gameState == "cover")
    {
      image(cover, 0, 0);
      if (mouseX >= 170 && mouseX <= 405 && mouseY >= 385 && mouseY <= 460)
      {
        noStroke();
        fill(255, 0, 0, 100);
        rect(170, 385, 235, 80);
      }
      
      if (mouseX >= 20 && mouseX <= 580 && mouseY >= 490 && mouseY <= 570)
      {
        noStroke();
        fill(255, 0, 0, 100);
        rect(20, 488, 560, 83);
      }
    }
    else if (this.gameState == "start")
    {
      image(boardImage, 0, 0);
      for (let i = 0; i < this.playerNum; i++)
      {
        this.playerArray[i].display();
      }
    }
    else if (this.gameState == "instructions")
    {
      image(instructions, 0, 0);
      image(back, 10, 10);
    }
    else if (this.gameState == "restart")
    {
      image(restart, 0, 0);
    }
  }
  //called whenever it is the player's turn to move, and it moves the player based on the number they rolled on the dice
  playing()
  {
    this.playerIndex = this.counter % this.playerNum;
    this.playerArray[this.playerIndex].movement(getDiceRoll());
    let newPos = this.checkForSnakeAndLadder(this.playerArray[this.playerIndex].player_position);
    let oldPos = this.playerArray[this.playerIndex].player_position;
    
    let movingPos = newPos - oldPos;
    
    this.playerArray[this.playerIndex].movement(movingPos);
      
    this.counter = this.counter + 1;
    this.checkForWin();
  }
  //method checks whether any player has reached the end of the board and sets the game state to restart if so.
  checkForWin()
  {
    for (let i = 0; i < this.playerNum; i++)
    {
      if (this.playerArray[i].player_position > 99)
      {
        this.gameState = "restart";
      }
    }
  }
  //checks whether the player has landed on a snake or ladder and returns the new position accordingly
  checkForSnakeAndLadder(position)
  {
    for (let ladder of ladders)
    {
      if (ladder.start == position)
      {
        startTimeLadder = millis();
        return ladder.end;
      }
    }
    
    for (let snake of snakes)
    {
      if (snake.start == position)
      {
        startTimeSnake = millis();
        return snake.end;
      }
    }
    
    return position;
  }
  
  snakeText()
  {
    textSize(30);
    fill(0, 0, 0);
    rect(200, 400, 200, 50);
    fill(255, 255, 255);
    text("SNAKE!", 240, 435);
  }
  
  ladderText()
  {
    textSize(30);
    fill(0, 0, 0);
    rect(200, 400, 200, 50);
    fill(255, 255, 255);
    text("LADDER", 240, 435);
  }
}

class Player
{
  constructor(player_color) //initializes the player's position and color, and the movement method moves the player on the board
  {
    this.player_position = 0;
    this.player_color = player_color;
    this.player_x = cellSize/2;
    this.player_y = cellSize/2;
    this.red = random(255);
    this.green = random(255);
    this.blue = random(255);
    this.opacity = 225;
  }
  
  movement(dice_roll)  // movement dependent on dice roll as an arguement
  {
    this.player_position = this.player_position + dice_roll;
    this.player_x = (this.player_position % cols) * cellSize + (cellSize/2);
    this.player_y = floor(this.player_position / cols) * cellSize + (cellSize/2);
  }
  
  display() //displays the player's avatar on the board.
  {
    fill(this.red, this.green, this.blue, this.opacity);
    ellipse(this.player_x, this.player_y, cellSize/2, cellSize/2);
  }
}

let board = new Board();

// Use a flag to indicate if the mouse click event has been handled
let handledMouseEvent = false;

function mouseClicked() // handles mouse clicks during the game, allowing the player to roll the dice and move accordingly
{
  if (board.gameState == "start")
  {
    // Check if the event has already been handled
    if (!handledMouseEvent) {
      board.playing();
      handledMouseEvent = true;
    }
  }
  else if (board.gameState == "cover")
  {
    handledMouseEvent = true;
    if (mouseX >= 170 && mouseX <= 405 && mouseY >= 385 && mouseY <= 460)
    {
      board.gameState = "start";
    }
    if (mouseX >= 20 && mouseX <= 580 && mouseY >= 490 && mouseY <= 570)
    {
      handledMouseEvent = true;
      board.gameState = "instructions";
    }
    
  }
  else if (board.gameState == "instructions")
  {
    if (mouseX >= 30 && mouseX <= 90 && mouseY >= 30 && mouseY <= 90)
    {
      board.gameState = "cover";
    }
  }
 
}

function keyPressed() //allows the player to restart the game if they win.
{
  if (board.gameState == "restart")
  {
    board = new Board();
  }
}
remove();


Overview

The game begins with a cover page that offers the player two options: to start playing or to read the instructions. Once the player begins the game, they roll a dice to determine the number of moves they can make on the board. The board is a 10×10 grid that features both snakes and ladders in specific cells. If the player lands on a ladder’s bottom cell, they climb up to the ladder’s top cell. If they land on a snake’s head cell, they slide down to the snake’s tail cell. Before the game begins, the program initializes various constants, global variables, ladders, and snakes. It also preloads all the game assets, sets up the canvas, and defines several functions to handle mouse clicks, retrieve the dice roll value, display the corresponding dice image, and show different images based on the game state. The game employs a Board class, which initializes various game-related variables, such as the player array and the game state. The class offers methods to display different images based on the game state, update the player’s position on the board, and display text when the player lands on a snake or ladder cell.

The cover page is the first thing that the player sees, and it sets the tone for the entire game. The font and background theme of the snake design create a sense of excitement and anticipation, drawing the player into the game before it even begins. Creating the board game that you played as a child was a significant accomplishment that speaks to your creativity and resourcefulness. It likely required a lot of time and effort to design and produce, but the end result is something that you can be truly proud of.

Future Improvements

To add more interactive features to the game, there are a few different directions that could be explored. One option is to introduce different levels of difficulty, which could be achieved by changing the layout of the board or adding new challenges for the player to overcome. For example, some cells on the board could be marked as “obstacle” cells, where the player has to complete a mini-game or answer a trivia question to progress.

Another way to make the game more engaging is to introduce power-ups or special abilities that the player can use to gain an advantage. For instance, the player could collect “snake repellent” items that allow them to skip over snake cells or “ladder boosters” that let them climb higher on ladder cells. These power-ups could be randomly placed on the board or awarded to the player for completing certain challenges.

Moreover, bonus points or rewards could be given to the player for landing on specific cells on the board. For example, landing on a cell with a picture of a golden apple could give the player bonus points, while landing on a cell with a picture of a bomb could subtract points from their score. This would add an element of strategy to the game, as players would have to decide whether to take risks and aim for high-reward cells or play it safe and avoid the high-risk ones. In terms of graphics and user interface, there are many ways to enhance the visual appeal and immersion of the game. For example, the background could be animated to show a moving snake or ladders climbing up and down the sides of the board. The game could also have different themes or environments, such as a jungle or a castle, with corresponding graphics and sound effects. This for me was very hard to try implementing but I still tried and could not.