I was probably most clueless for this week’s assignment when I started planning for it. I initially tried making numerous different games including, aligning moving objects, shooting game, and so on. I resorted to this game because it is the most neatly operating game in my opinion. I am not a huge gamer myself, but I sometimes get fascinated (or close to getting addicted to) by smartphone app games that are very simple yet clear on their objectives.
The objective of this game is to align the circles. To be more specific, for each round there will be a circle randomly generated by variating radius. The circle will be centered in the middle of the scree, but its size will differ every round. You, as a player, have to align your circle by resizing it and adjusting it to the generated circle. The resizing will be carried out by moving the potentiometer. So, when you move the potentiometer to the right, the circle gets bigger, and when you move the potentiometer to the left, the circle gets smaller. You will repeat this until you have successfully overlapped 3 circles in total. You will be timed each round on your performance and the completion time will be posted on the scoreboard.
To talk a bit about the design and the location of different elements, you will see a scoreboard on your left that is updated after every 3 circles, and you will also be able to see how many circles you have aligned so far on the right-hand side. On the top segment, you will see the time. Most importantly, you will see the two circles in the center. Without further ado, enjoy!
For this week’s assignment, the first thing I started thinking about was which elements to use from Arduino. I wanted Arduino to offer some sort of functionality that Processing couldn’t.
So, I decided to use a potentiometer that would allow you to rotate a line within a circle, by converting the potentiometer values into angles.
Yes, this can be done with just Processing, but I think that physically twisting a button and having the line rotate as you twist, is something you can’t replicate with the keyboard or mouse.
idea
The point of the game is to try and deactivate a bomb before it explodes.
A red arc shows up randomly on the screen of the bomb and you have to move the potentiometer to get the line inside that arc before a specific amount of time passes.
When you first run the game, you get around 5 seconds to deactivate the first arc. This is because it was taking some time at first to load everything. But after that, you have 2 seconds for each arc.
You would win/deactivate the bomb if you are able to deactivate 20 arcs. And, you would lose if 2 seconds go by before you are able to reach one of the arcs.
You can restart the game by clicking the mouse anywhere on the screen.
Here, you can see how the potentiometer controls the line:
Circuit
The wiring is really basic. All I used was a potentiometer.
code
This the Arduino Code:
//get value of potentiometer at where you want degree 180 to be
float at180=862;
//get value of potentiometer at where you want degree 0 to be
float at0=144;

void setup() {
  // put your setup code here, to run once:
  Serial.begin(9600);
  Serial.println('0'); //sending an ASCII version
  //println sends a string of ascii values
}

void loop() {

  if(Serial.available()>0)
  {
    float toAngle = ((at180-at0)/180);
    char inByte=Serial.read();
    //read the poteniometer value
    int sensor = analogRead(A0);
    //convert it to an angle
    float angle = (sensor - at0) / toAngle;
    delay(1);
    //send the angle value to processing
    Serial.println(String(angle));
  }
}
And this is the Processing code:
import processing.serial.*;
Serial myPort;
float pAngle;
PImage bomb;
int x =0;
int y =0;
int r = 170;
float angle, dist;
boolean done, lost, won;
color c;
int score;
int timer, timeleft, timestart,seconds;
int coolingTime;
float lineX, lineY;

void setup()
{
  size(420,750);
  //connection with arudino
  printArray(Serial.list());
  String portname=Serial.list()[1];
  println(portname);
  myPort = new Serial(this,portname,9600);
  myPort.clear();
  myPort.bufferUntil('\n');
  //variable initialization
  bomb = loadImage("b.png");
  lost = false;
  won = false;
  done = false;
  angle = random (-8*PI/7,PI/6); //radnom angle
  dist = angle + PI/8; //another angle distant from the first one by PI/8 to make up the arc
  c = color(255,0,0);
  pAngle = radians(36);
  score=0;
  timer = timeleft = 5500; // set timer for about 5 seconds the first time
  //because it takes some time to load the potentiometer
  //but then you get only 2 seconds
  timestart = millis();
  coolingTime =0; //variable used to pause a bit before switching to another random angle value
}

void draw(){
  //display once you lose
  if (lost)
  {
    background(0);
    fill(255,0,0);
    textSize(30);
    textAlign(CENTER);
    text("YOU LOST!!", width/2,height/3 - 50);
    text("Bomb was not deactivated!!", width/2,height/3);
    textSize(20);
    fill(255);
    text("Remaining moves until deactivation: "+ str(20-score), width/2,height/2);
    textSize(20);
    text("Click anywhere to start again.", width/2,3*height/4);
    textSize(13);
    text("Make sure to reset your potentiometer at lowest angle", width/2,4*height/5);
    text("(which is at the far right) before restarting.", width/2,5*height/6);
  }
  //display once you won
  else if (won)
  {
    background(100);
    fill(0,255,0);
    textSize(50);
    textAlign(CENTER);
    text("BOMB", width/2,height/3);
    text("DEACTIVATED", width/2,height/3 + 60);
    fill(255);
    textSize(20);
    text("Click anywhere to start again.", width/2,3*height/4);
    textSize(13);
    text("Make sure to reset your potentiometer at lowest angle", width/2,4*height/5);
    text("(which is at the far right) before restarting.", width/2,5*height/6);
  }
  //display during the game
  else if (!won && !lost)
  {
    background(50);
    image(bomb,-2,4);
    translate(width/2,height/2);
    timeleft =  timer - (millis() - timestart);
    seconds = (timeleft/1000) % 60;
    //println(seconds);
    fill (255,190);
    rect(-200,-370,250,65);
    fill(0);
    textSize(20);
    textAlign(LEFT);
    text("Timer: "+ seconds, -185, -345);
    text("Moves to deativate: "+ str(20-score), -185, -320);

    //drawing a circle and the arc
    strokeWeight(3);
    fill(255);
    ellipse(0,0,r,r);
    fill(c);
    arc(x, y, r, r, angle, dist);
    //drawing the line controlled by the potentiometer angle value
    lineX = cos(pAngle)*(r/2);
    lineY = sin(pAngle)*(r/2);
    line(0,0,lineX,lineY);
    //losing condition : you run out of time before reaching an arc
    if (seconds <= 0)
    {
      lost = true;
    }
    //winning condition : you manage to reach 20 arcs
    if (score == 20)
    {
      won = true;
    }
    //if you touch an arc before timer runs out
    if ((pAngle>angle)&&(pAngle<dist) && seconds>0){
      done = true;
      c= color(0,255,0); //change color to green
      coolingTime ++; //start incrementing coolingTime
      timer = timeleft = 2500; //restart the timer
      timestart = millis();
    }
    //this statement is used so that cooling time will still increment if you touch the arc
    //and then move away from it
    else if ( !((pAngle>angle)&&(pAngle<dist)) && coolingTime >= 1) {coolingTime++;}
    //println(coolingTime);
    //once the coolingTime is over
    if(coolingTime> 15)
    {
      score++; //increment score
      //get new random arc
      angle = random (-8*PI/7,PI/6);
      dist = angle + PI/8;
      done = false;
      c= color(255,0,0); //change color of arc back to red
      coolingTime = 0; //reset coolingTime to 0
    }
  }
}
//restart the game and resee all the needed variables when mouse is clicked at one of the end screens
void mouseClicked()
{
  if (lost || won)
  {
    won = false;
    lost = false;
    timer = timeleft = 5500;
    timestart = millis();
    score=0;
    coolingTime = 0;
    done = false;
    angle = random (-8*PI/7,PI/6);
    dist = angle + PI/8;
    c = color(255,0,0);
  }
}

//getting the value from arduino
void serialEvent(Serial myPort){
  String s=myPort.readStringUntil('\n'); //to know where it ends
  s=trim(s);
  if (s!=null){
    pAngle= int(s);
    pAngle = - radians(pAngle);
  }
  //println(pAngle);
  myPort.write("0"); //send something back to arduino to ask for next value
}
final outcome
If I had more time, I would have liked to add a buzzer, as well as a button on Arduino to restart the game instead of doing that with the mouse. I would have also liked to add a start-screen.
Something else I would like to fix is when generating a random arc, it shouldn’t be where the previous one was.
For my Final Project, I have managed to narrow it down to a single idea as explained below.
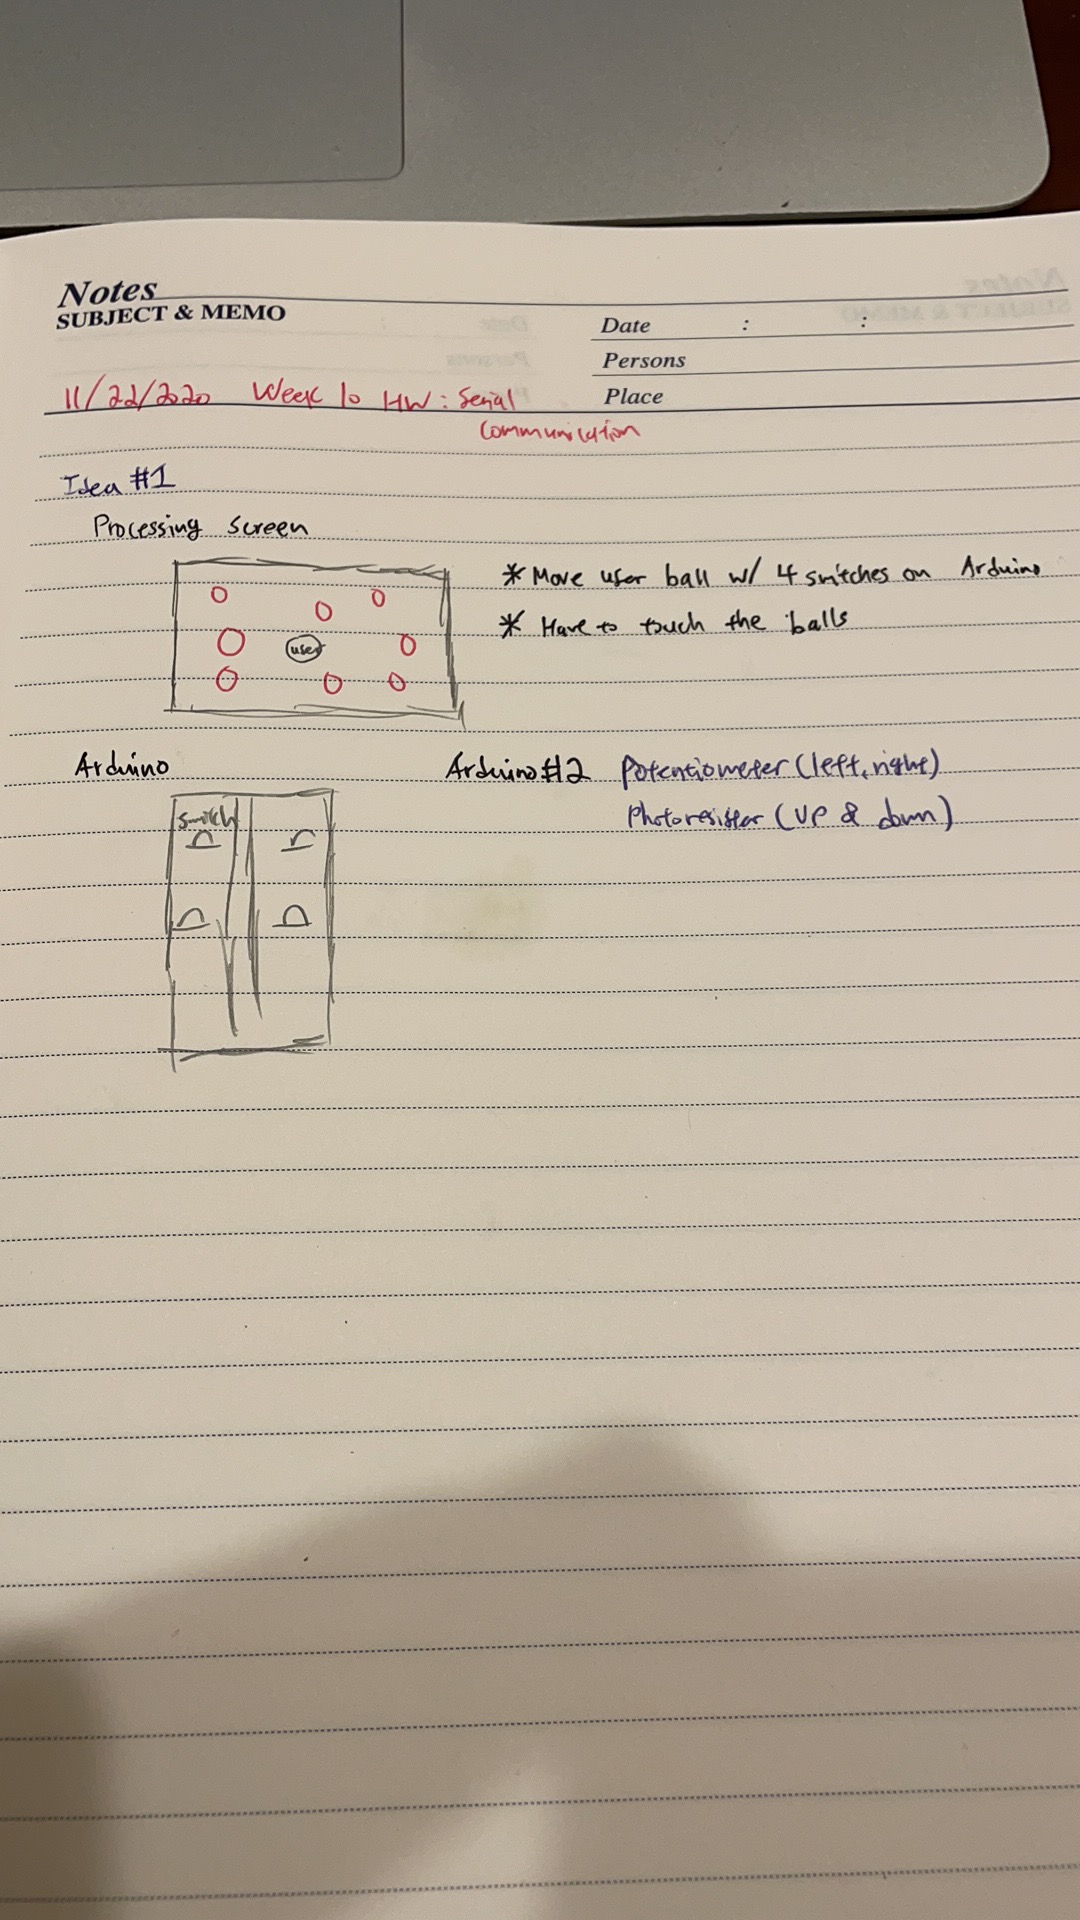
MAIN IDEA #1
For this, I wanted to recreate the Flappy Bird game but make it a Covid 19 edition, where the user will be able to control the bird’s up & down movement with a photoresistor or distance sensor and to control its left & right movement with a switch or potentiometer.
another possible idea…if i have enough time of course…
I wanted to also introduce another type of input instead of using the photoresistor only, which would be a microphone. So, instead of being able to control the up and down movement with only your hand, it would move the bird’s location base on the user’s amplitude value within the volume, or how loud they scream.
Objective of the Game
The goal of the game would be to avoid the incoming Covid viruses that will be constantly appearing from the right side of the screen and disappearing off the left side of the screen. If the user touches any of the Covid viruses, he or she loses.
Another idea…
I also wanted to introduce more elements such as live counts, where the player will have a total of 3 total lives or something. Another idea would also probably involve different levels??
For this week project I took inspiration from my one of my previous weekly assignments where I made a device where a user could record a Morse code message and could play it back.
One issue with that project is that a user must know Morse code first. I personally don’t know Morse code but I find the idea to be pretty cool.
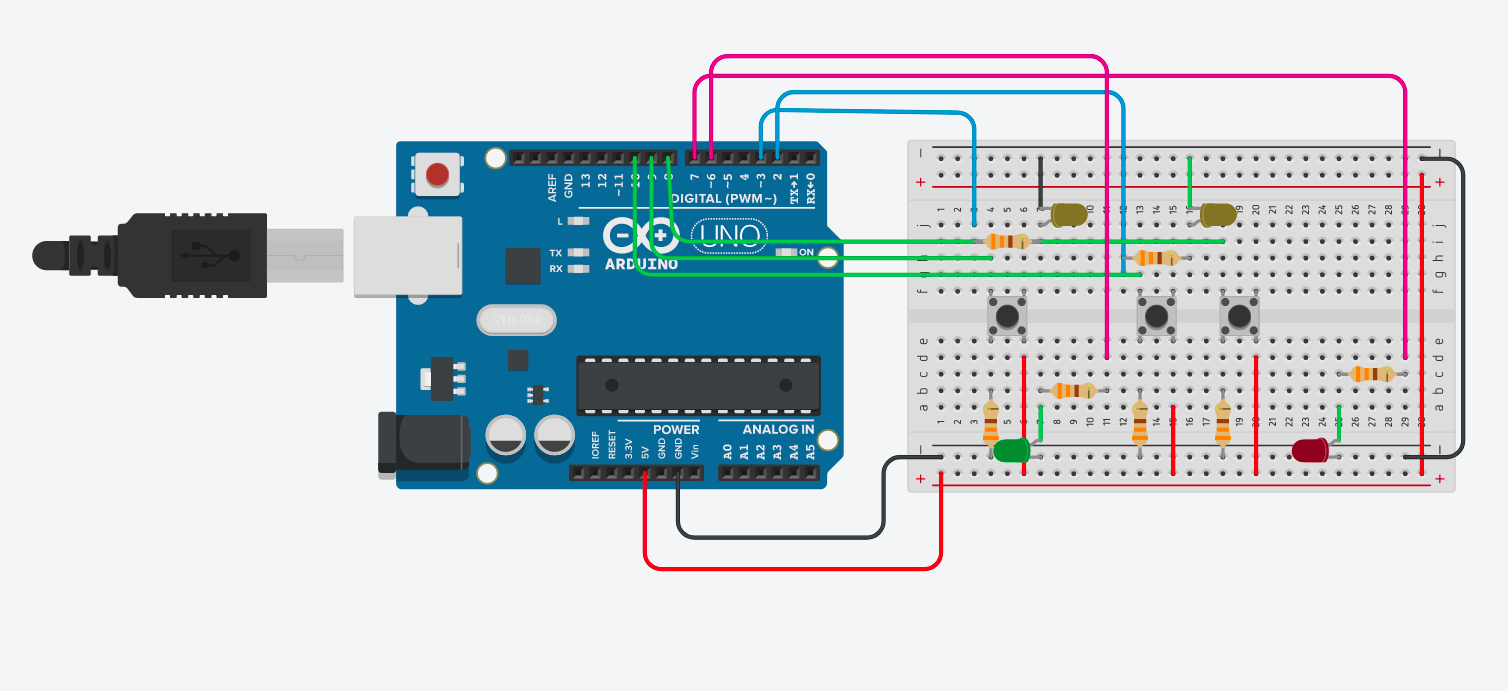
For my assignment this week I made a setup where you could interact with processing via the buttons on the breadboard to input a dashes and dot and you could press enter to check if your input was correct.
The user would press the blue button to input a dot and the yellow button to input a dash. The corresponding would be displayed on the processing window. Once the user is satisfied with the input they can press the red button to check if the input is correct. If the input is correct a green light would flash on the breadboard, if not a red light would flash. Once the enter button is pressed a new letter is displayed and the input is cleared.
int led1 = 3;
int led2 = 2;
int enter = 8;
int dot = 9;
int dash = 10;
int buttonDelay = 400;
int wrong = 7;
int correct = 6;

void setup() {
  // put your setup code here, to run once:
  Serial.begin(9600);
  pinMode(led1,OUTPUT);
  pinMode(led2,OUTPUT);
  pinMode(enter,INPUT);
  pinMode(dot,INPUT);
  pinMode(dash,INPUT);
  pinMode(wrong,OUTPUT);
  pinMode(correct,OUTPUT);
}

void loop() {
  // put your main code here, to run repeatedly:
  if (digitalRead(dot)==1){
    // send a 1 to processing
    Serial.write(1);
    digitalWrite(led1,HIGH);
    delay(buttonDelay);
    digitalWrite(led1,LOW);
  }

  else if(digitalRead(dash)==1){
    // send a 2 to processing
    Serial.write(2);
    digitalWrite(led1,HIGH);
    digitalWrite(led2,HIGH);
    delay(buttonDelay);
    digitalWrite(led1,LOW);
    digitalWrite(led2,LOW);
  }

  else if(digitalRead(enter)==1){
    Serial.write(3);
    delay(buttonDelay);
  }

  if (Serial.available()>0){
    int data = Serial.read();
    if (data == 100){
      digitalWrite(wrong,HIGH);
      delay(100);
      digitalWrite(wrong,LOW);
    } else if(data == 101){
      digitalWrite(correct,HIGH);
      delay(100);
      digitalWrite(correct,LOW);
    }
  }
}

/*
 *  1 for dot
 *  2 for dash
 *  3 for enter
 */
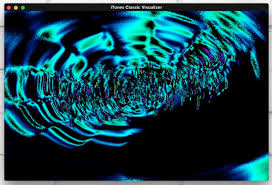
I’m taking inspiration from the interactive music piece, LINES, but using different sensors/analog and digital input to control the frequency of the sounds and introduce new sounds. The input from the sensors can add visual effects that move according to the frequency of sound. In addition the user can change the color hues, the amplitude and add different effects to create a sound and image piece via sensors and inputs.
Due to the number of effects and sound components, I will likely purchase more components for my Arduino kit.
Inputs:
Buttons.
Light sensors.
Potentiometers.
Distance sensor
Update from feedback session:
Add a UI card to guide the user in how to manipulate the visuals and sound coming from processing.
For the final project, Ons and I will be working together to build an interactive travel experience that brings together Arduino and Processing.
Idea
We’re thinking of doing a virtual trip around the world. The Arduino would be used to navigate “around the world” and the visuals would be through processing. The analog elements that we’re considering are:
A potentiometer: to control a servo motor. (A small globe will be stuck onto the servo so that the user will be able to spin it using the potentiometer.)
NOTE: The location will probably be determined by the angle of the servo, but for the purpose of “visual clarity” and successful cognitive mapping we will have something pointing to the globe to indicate the current location.
A distance sensor: using it as a zoom tool so the user zooms in and out of the visuals on processing
Button: This could add an extra element to the idea, for example, if someone presses the button it would trigger some sort of activity that relates to the location such as generating art specific to the location (we’re still thinking this through)
Questions/Concerns
The Scope: we’re not sure how far we should go with the features, is an interactive “exploration” experience enough, or should we add more (such as the suggestion of the button)
Another element we’re confused about in the scope is should it be a “world tour” or should it be to a specific region
Servo: how could we navigate the globe vertically? In this would a 2D map be better?
Every room in the dollhouse will have a variety of either physical interactions (lights, sounds), virtual tasks (that will be displayed on the computer), or a mixture of both. The goal of the game is to be able to interact with the dollhouse, but also to finish all the tasks set in place. The user will be able to complete the tasks on processing and this will be reflected on the dollhouse. We would also like to integrate a display on the dollhouse to display the progress as well display a message when the game is won.
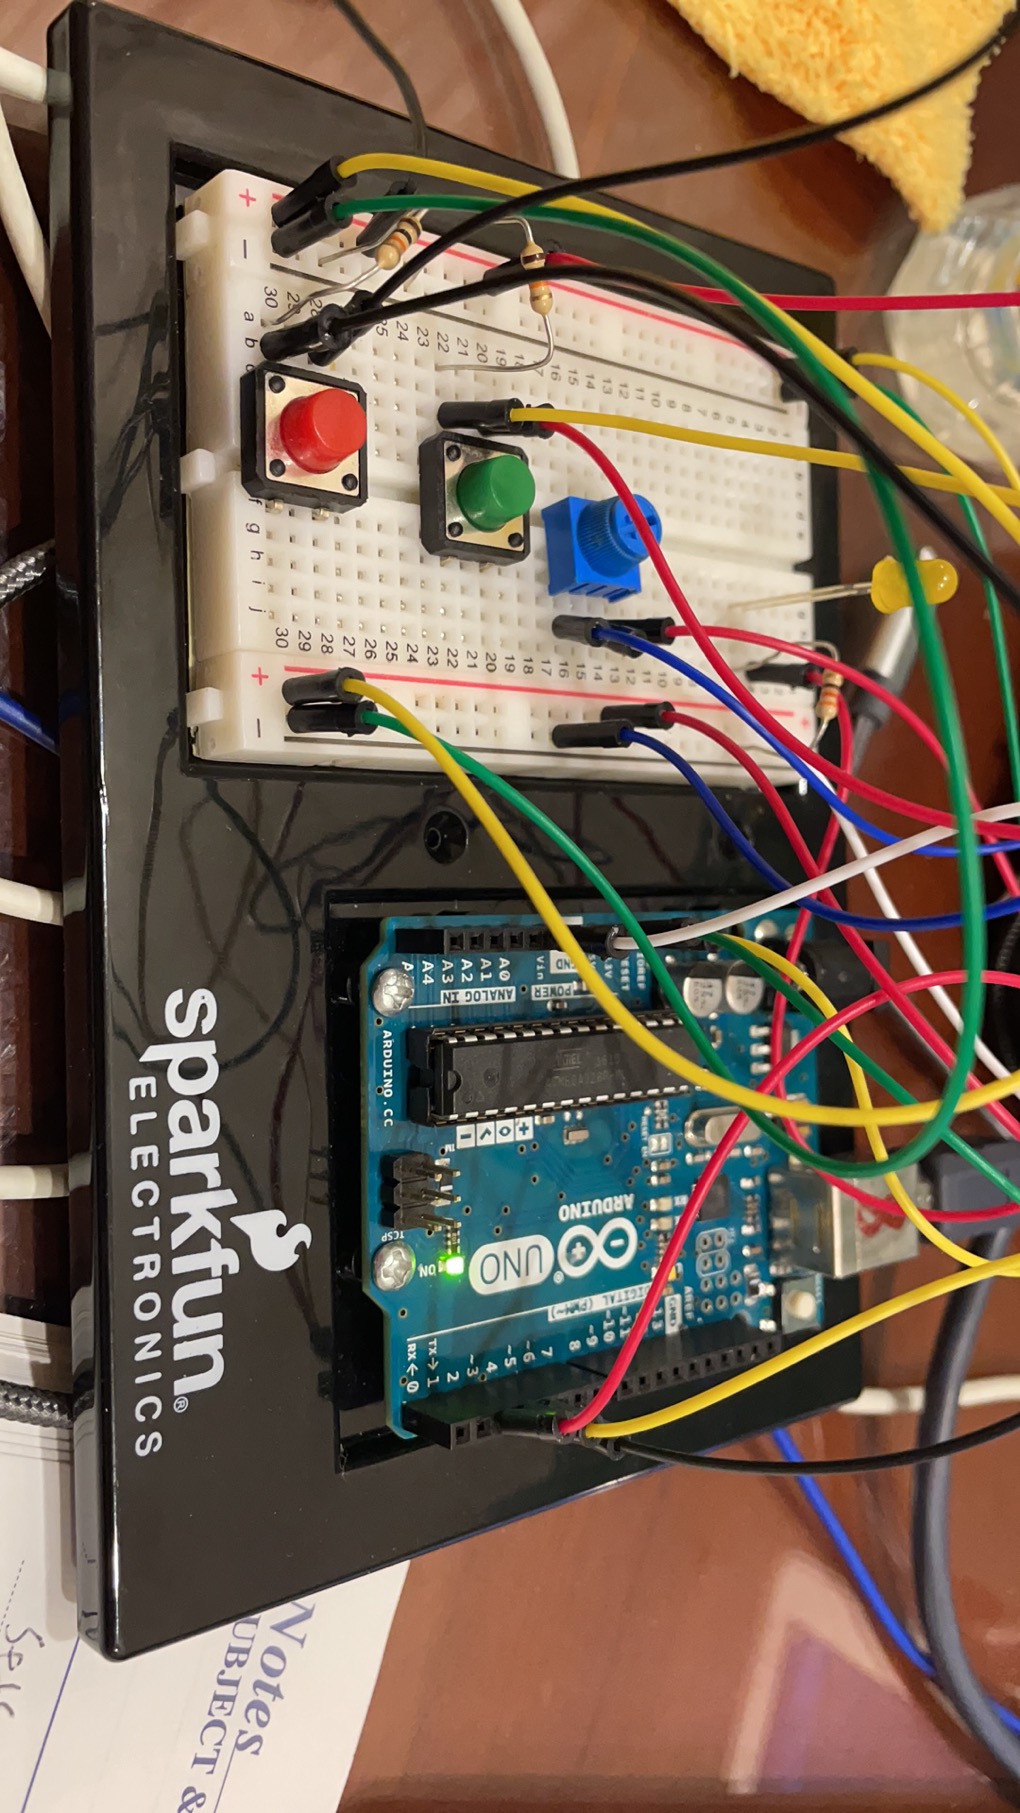
For this week’s assignment, I could not really think of another creative or original game so I just decided to create a simpler version of the game that I had created for my Midterm project but with a little twist. That twist is that instead of controlling the user ball with only arrow keys, I made it available to control the left & right movement of the ball with a potentiometer on the Arduino along with two buttons (Red and Green buttons) that controls the up and down movement of the user ball, Red being up and Green being down.
Challenges/Difficulties
There was not as much difficulties faced throughout the process of making it, but I would say that the most difficult part I encountered was understanding the relationship between Arduino and Processing as I was not able to fully grasp all of the information from our last lab session. However, after talking with Professor Aaron, I was able to get a clearer idea of serial communication.
Setup
Final Demonstration
Arduino Code
const int greenSwitch = 3;
const int redSwitch = 4;

void setup() {
  // put your setup code here, to run once:
  Serial.begin(9600);
  Serial.println("0,0");
  pinMode(greenSwitch, INPUT);
  pinMode(redSwitch, INPUT);
}

void loop() {
  if (Serial.available() > 0) {
    char inByte = Serial.read();
    int sensor = analogRead(A0);
    delay(1);
    int sensor2 = digitalRead(greenSwitch);
    int sensor3 = digitalRead(redSwitch);
    Serial.print(sensor);
    Serial.print(',');
    Serial.print(sensor2);
    Serial.print(',');
    Serial.println(sensor3);
  }
}
Processing Code
import processing.serial.*;
Serial myPort;
int xPos=0;
Balls [] balls;
//Timer timer;
userBall myBall;
int numberofballs = 15;
int amountcollided;
void setup() {
  size(1280, 960);
  //printing out all the available ports
  printArray(Serial.list());
  //make the chosen port from the list as a string or a name
  String portname=Serial.list()[4];
  /*initializes the class "Serial"
   the 9600 is the baud (kinda the rate that bytes are being uploaded or transferred
   */
  myPort = new Serial(this, portname, 9600);
  //timer = new Timer();
  myBall = new userBall();
  balls = new Balls [numberofballs];
  for (int i=0; i<balls.length; i++) {
    balls[i] = new Balls();
  }
}
void draw() {
  background(255);
  //fill(0);
  //ellipse(xPos, height/2, 50, 50);
  for (int i=0; i<balls.length; i++) {
    balls[i].drawBalls();
  }
  myBall.drawuserBall();
  myBall.checkEdge();
  collisionDetection();
  //timer.showTimer();
}

void serialEvent(Serial myPort) {
  //read string of information
  String s=myPort.readStringUntil('\n');
  s=trim(s);
  //if there's sth in s
  if (s!=null) {
    //split the string s based on commmas and put it into integer array "values"
    int values[]=int(split(s, ','));
    /*as long as there's a total of three arrays of information from Arduino
     */
    if (values.length==3) {
      //potentiometer value
      myBall.xPos=values[0];
      //sthis is values for greenswitch
      if (values[1] ==1) {
        myBall.yPos +=3;
      }
      //this is values for redswitch
      if (values[2] == 1) {
        myBall.yPos -=3;
      }
      myBall.xPos = int (map(myBall.xPos, 0, 1023, 0, width));
    }
  }
  //println(xPos);
  myPort.write('0');
}

void collisionDetection() {
  amountcollided = 0;
  for (int i=0; i<balls.length; i++) {
    //if the x and y location distance of any NPC ball and user ball added together is smaller than the radius of the NPC ball and user ball, then it means it has collided
    if (dist(balls[i].locx, balls[i].locy, myBall.xPos, myBall.yPos)< balls[i].radius + myBall.radius) {
      //println(dist(balls[i].locx, balls[i].locy, myBall.locx, myBall.locy));
      //balls[i].iscollided=true; //if it collides, changes the boolean to true, changing the image
      //if (balls[i].iscollided == true) {
      //  amountcollided +=1;
        stroke(255);
        fill(139,0,139);
        ellipse(balls[i].locx, balls[i].locy, balls[i].ballwidth, balls[i].ballheight);
      //}
    }
  }
}
class Balls {
  float locx, locy;
  float ballwidth, ballheight;
  int radius=25;
  boolean iscollided=false;

  Balls() {
    locx=random(width); //putting random will let the balls appear at different locations
    locy=random(height);
    ballwidth=2*radius;
    ballheight=2*radius;
  }
  void drawBalls() {
    stroke(166, 134, 230);
    fill(255, 0, 0);
    ellipse(locx, locy, ballwidth, ballheight);

  }
  void collided() {
    if (iscollided == true) {
      stroke(255);
      fill(255);
      ellipse(locx, locy, ballwidth, ballheight);
    }
  }
}
class Timer {
  float locx, locy;
  float timerwidth, timerheight;
  int countdown=20;
  int seconds;
  float startTime;


  Timer() {// ask about the logic behind this and how to create a countdown timer?
    textSize(50);

    startTime= millis()/1000 + countdown;
    seconds = int(startTime- millis()/1000);
  }
  void showTimer() {
    if (seconds<0) {
      startTime= millis()/1000 + countdown;//resets the timer and restarts it when less than 0
      //if seconds is zero, display "game over"
    } else {
      seconds = int(startTime- millis()/1000);
      fill(255, 0, 0);
      text(seconds, width/2-100, 100);
    }
  }
}
This weekend, I visited an art exhibition in a space called Warehouse 421 in Mina Zayed. It was my first time exploring a creative space other than the Louvre, and I realized that I wanted to make a checklist of some of the main places that I would like to visit during my time here. Something else I realized, is that sometimes it’s hard to visualize how far something is in the UAE (does that make sense?), I’m still constructing a mental map of Abu Dhabi but find myself still needing to refer to Google Maps to make an estimate of the distance.
This inspired my game, I wanted to show the user pictures of some art/creative spaces in the UAE, and for them to estimate how far they are by interacting with the sensor.
Initial Attempts
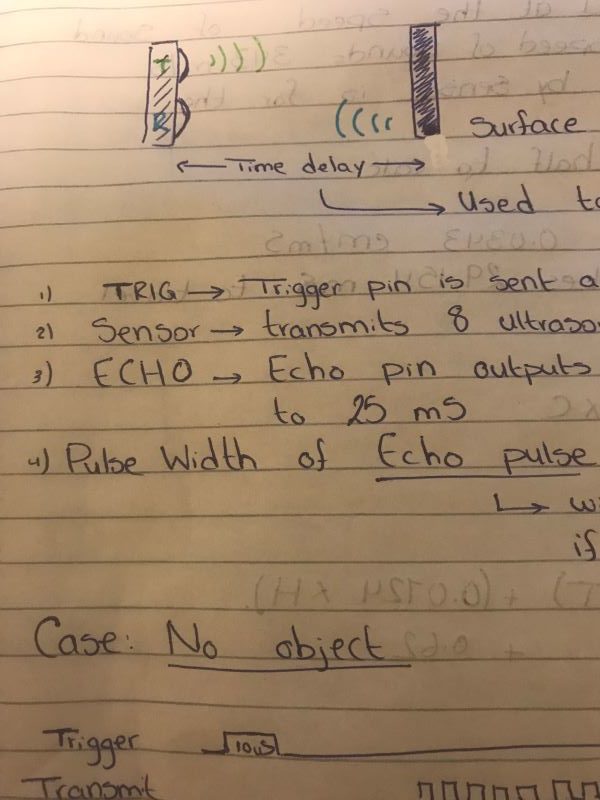
Again, I wanted to experiment with the Ultrasonic Sensor. I spent a lot of time understanding how it works, and the conversions needed to change time to distance. I found it really fascinating and actually recalled that it isn’t my first experience with the sensor! I used to use it in robotics back in high school, but I guess I didn’t have that clear of an understanding of it.
some of my notes
This video was really helpful in terms of understanding the functionality and conversion. However, I struggled a lot with the serial communication part. I was initially able to print out the distance in CM on the screen but then was faced with a lot of difficulties and errors when it came to working with the value for the game functionality.
Final Idea
So, for this one, I switched to the light sensor/photocell and thought it could be interesting to see how one could map brightness to distance. I completed my communication using the ascii handshake, as I wanted the full range of readings.
For the game, I created an array of locations in the UAE and another array of distances (referring to the distance from campus). I created three categories:
1-10 KM Away
11 – 20 KM Away
Outside the City
Then, based on the distance array I classified all the locations in the group. As for the input, I created brightness ranges, i.e. if the brightness was between 50- 200 (sensor covered), the spot is in the 1 – 10 KM category…etc. Whatever the user inputs is then saved in a variable that is used to compare with the “correctCategory”. So, if the user gets “Louvre Abu Dhabi”, they’re meant to cover the sensor. If they do, their input value saves UserInputCategory as 1, and hence it shows a correct message when it is compared to the CorrectCategory variable.
I tried to make the sequences logical in terms of cognitive mapping and how the user interacts with the game, rather than ordered in the code. Meaning that category 1 has the darkest range while category 2 has the brightest, and 3 (actually farthest from the sensor and farthest from campus) has a brightness in between.
Here’s an example of the gameplay, I’m missing a start screen and a replay button since I focused on getting this part to work. As you can see, I had indicators on my desk, the first one indicating spaces that are within the city but a bit farther from campus, and the second one indicating spaces outside of the city. So, for the second example, when I got “Alserkal Avenue” located in Dubai, it only worked when I moved to the suitable indicator.
However, this is not always the case, there’s a glitch in the code, and I’m afraid it might be how sensitive the photocell is, as sometimes it shows the “correct” message at the wrong time.
Possible Developments
I found myself understanding the concepts of serial communication we went over in class, and the other examples but struggled with the application a bit, especially with the distance sensor. So trying to work with it more could be helpful before starting to work on the final project.
A nice development/addition to this game would be inquiring about estimate cab price rather than distance. I found that many students estimate how far someplace is by how much a cab would cast. e.g. 50 AED to YAS mall, so anything around that would cost around the same amount. It might be more relatable and interesting that way!
Arduino Code:
int photoCell = A0;

void setup() {
  // put your setup code here, to run once:
  Serial.begin(9600);
  Serial.println('0'); //initial message

}

void loop() {
  if(Serial.available()>0){ //checks if something is recieved from processing
    char inByte=Serial.read(); //and reads it
    int photoCellReading = analogRead(A0); //reads my photocell
    delay(1);
    Serial.println(photoCellReading); //sends it to processing

  }
}
Processing Code:
import processing.serial.*;
Serial myPort;
int data=0;

int userInputCategory = 0; //variable dependent on user input
int correctCategory; //variable dependent on location distance, used to compare with user input
int randomLocation; //random location for each run

//arrays of locations and how far they are from campus
String[] locations =  {"Louvre Abu Dhabi", "Warehouse 421", "Abu Dhabi Cultural Foundation", "Etihad Modern Art Gallery", "Alserkal Avenue", "Sharjah Art Foundation"};
int [] distanceFromCampus = {6, 10, 13, 18, 132, 167};

//loading images and font
PImage image;
PFont f;

void setup() {
  size(960, 540);
  printArray(Serial.list());
  String portname=Serial.list()[2];
  println(portname);
  myPort = new Serial(this, portname, 9600);
  myPort.clear(); //clearing port from any previous data
  myPort.bufferUntil('\n'); // reading until the new line

  randomLocation = (int)random(0,locations.length); // generating a random location for the play

  //loading the suitable image
   image = loadImage(locations[randomLocation] + ".jpg");
   imageMode(CENTER);
   image.resize(350,350);


   //font
   f = createFont("Montserrat-BoldItalic.ttf",20);
   textFont(f);
   textMode(CENTER);


}
void draw() {
  background(102,133,147);
  fill(0);
  // if statement to set the correct category based on location
  if (distanceFromCampus[randomLocation] <= 10) {
    correctCategory = 1;
  } else if (distanceFromCampus[randomLocation] >= 10 && distanceFromCampus[randomLocation] <= 20) {
    correctCategory = 2;
  } else if (distanceFromCampus[randomLocation] > 100) {
    correctCategory = 3;
  }
  //setting user input categories
  if (data >= 100 && data <= 200) {
    userInputCategory = 1;
  } else if (data >= 700 && data <= 830) {
    userInputCategory = 3;
  } else if (data > 855) {
    userInputCategory = 2;
  }
//println(randomLocation);

  switch (randomLocation) {
  case 0:
    //display stuff
    textSize(40);
    text(locations[randomLocation],width/2-250, height - 450);
    image(image, width/2,height/2 + 30);
    //compares user input to the correct value and displays correct if the user is right
    if (userInputCategory == correctCategory) {
      background(102,133,147);
      text("CORRECT", width/2-100,height/2);
      break;
    }

  case 1:

    textSize(40);
    text(locations[randomLocation],width/2-250, height - 450);
    image(image, width/2,height/2 + 30);
    if (userInputCategory == correctCategory) {
        background(102,133,147);
      text("CORRECT", width/2-100,height/2);
      break;
    }
  case 2:

    textSize(40);
    text(locations[randomLocation],width/2-250, height - 450);
    image(image, width/2,height/2 + 30);
    if (userInputCategory == correctCategory) {
        background(102,133,147);
      text("CORRECT", width/2-100,height/2);
      break;
    }
  case 3:

    textSize(40);
    text(locations[randomLocation],width/2-250, height - 450);
    image(image, width/2,height/2 + 30);
    if (userInputCategory == correctCategory) {
       background(102,133,147);
      text("CORRECT", width/2-100,height/2);
      break;
    }
  case 4:

    textSize(40);
    text(locations[randomLocation],width/2-250, height - 450);
    image(image, width/2,height/2 + 30);
    if (userInputCategory == correctCategory) {
        background(102,133,147);
      text("CORRECT", width/2-100,height/2);
      break;
    }
  case 5:

    textSize(40);
    text(locations[randomLocation],width/2-250, height - 450);
    image(image, width/2,height/2 + 30);
    if (userInputCategory == correctCategory) {
        background(102,133,147);
      text("CORRECT", width/2-100,height/2);
      break;
    }
  }
}


void serialEvent(Serial myPort) {
  //recieves the value as string and reads it one line at a time
  String s=myPort.readStringUntil('\n');
  s=trim(s); //trimming for any additional or hanging white spaces
  if (s!=null) { // if something is received
    data=(int (s)); //set the variable to the integer value of the string
  }
  //println(data);
  myPort.write('0'); //send something back to arduino to complete handshake
}

