All Posts

Feels Like We Only Go Backwards – Artwork Using Loops

As I was brainstorming for this exercise, I came across a recreation of Joy Division’s Unknown Pleasures album cover that incorporates looping and the noise function to animate the same mountain-like structure.
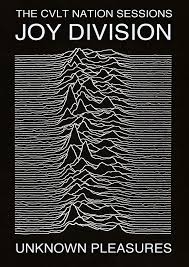
Joy Division’s album cover

This led me to think of the album art of one of my favorite artists, Tame Impala. I looked some of the artwork up and it felt like something I could recreate using geometric shapes, loops, and the noise function.
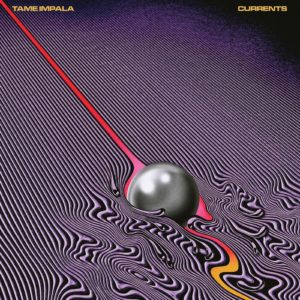
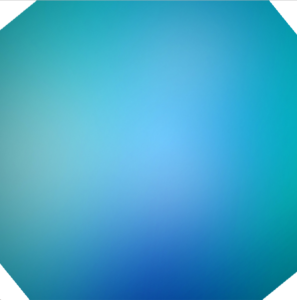
Currents by Tame Impala Album Art


I recalled the lyric video for “Feels Like We Only Go Backwards”, and this particular frame inspired me. I wanted to attempt to recreate it and add an element of animation or flow.
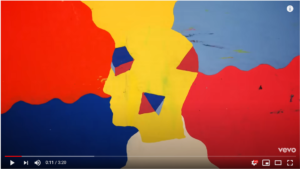
Still from “Feels Like We Only Go Backwards” Lyric Video

I thought: “this shouldn’t be too hard, right?” Weeeelll, I did struggle quite a bit with recreating the exact image I had in my head, so I will take you through my various attempts and takeaway from this assignment.


Attempt 1: Using Equidistant Lines in a Triangle Form:

My approach here was going through a loop and drawing multiple vertical lines close to each other in the form of a triangle and then apply noise() to each of these lines to create a stream that’s narrow and then widens near the edge of the screen.
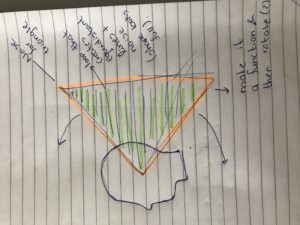
First Sketch

This didn’t work, as the noise function created a uniform movement where all the lines leaned together in one direction. Even when increasing and decreasing the input value to get more random movement, I didn’t get a smooth wave like I had imagined, the change in X was consistent for all the lines creating a beam-like movement rather than a wave.

Attempt 2: Using Points to Create a Diagonal Side

Then, inspired by this tutorial, I tried to take a different approach using Point(), where I draw the triangle sides as points and then apply the noise() function to the x value of each point. I used two variables for noise, the second one called xOffset which creates the animation.
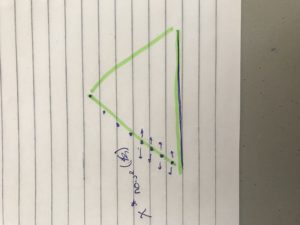
Sketch 2

This way, I got closer to the movement I wanted, but it was still off, because I wanted the whole shape to flow as one, and this was too random to achieve that.

Finally, I decided that the most suitable approach would be similar to the one in the tutorial I linked earlier, to create a 4-sided shape (close to a rectangle or square) by drawing vertical equidistant lines through a loop and applying a noise() function to my X-value that takes a scaled Y for the first input, and an xOffset variable as the second input. This was the closest I got to my initial goal, but I think it could still be more accurate to the inspiration image.

This exercise really challenged my understanding of the thought process required for loops and the noise function, specifically how to choose values to input into the function. I went through our code in class and then followed any tutorials I could find on YouTube which helped make the concept more understandable. However, I still think that achieving my goal with this artwork could have been possible with the first two approaches I used, but it definitely requires more confidence with the concept of Noise(), so I might go back to these approaches after more practice.

Ironically, at some points, it really did feel like the more I tried the less progress I made (very in line with the song title), so it was a bit frustrating.  Nonetheless, this exercise was a great way to work on my skills in using sketches and trial to translate an image I have in my head to code and to be patient and kind to myself when things don’t work out as well as I thought.

Have a look at my code, and make sure you go listen to Feels Like We Only Go Backwards!

color bgColor = color(240,245,230);
color upperLeft = color(221, 28,26);
color upperRight = color(111,156,235 );  
color lowerLeft = color(7,42,200  );
color lowerRight = color( 249,240,0);
float xOff = 0;
float yOff =0;
PImage img;
void setup(){
 size(400,400);
 //image from noun project, artist: Maxim Kulikov
 img = loadImage("noun_Head_2053552TWO.png");
 
}

void draw(){
 background(bgColor);
 
 
 // loop 1, upper left corner
 for(float y = 0; y<height/2; y++){
   strokeWeight(4);
   stroke(upperLeft);
   //pushMatrix();
   //translate(150,0);
   //rotate(radians(45)); // and attempt to make it look as if it is diagonally flowing out of the head. current shape looked better in my opinion.
   line(width/2*noise(y/100,xOff),y,width/2,y);
   //shifting the "wave" horizontally and decreasing opacity
   stroke(upperLeft,80);
   line(width/2*noise(y/100,xOff) - 50,y,width/2,y);
   stroke(upperLeft,60);
   line(width/2*noise(y/100,xOff) - 100,y,width/2,y);

  y +=1 ;
 
}
//loop2, upper right corner
for(float y2 = 0; y2<height/2; y2++){
 stroke(upperRight);
 

 line(width/2, y2, 200 + width/2*noise(y2/100,xOff),y2); 
 stroke(upperRight,80);
 line(width/2, y2, 250 + width/2*noise(y2/100,xOff),y2); 
 stroke(upperRight,60);
 line(width/2, y2, 300 + width/2*noise(y2/100,xOff),y2);


 y2 += 1; 
}

//loop3, lower left corner
for(float y3 = height/2; y3<height; y3++){
 stroke(lowerLeft);
 line(width/2*noise(y3/100,xOff),y3,width/2,y3);
 stroke(lowerLeft,80);
 line(width/2*noise(y3/100,xOff) -50,y3,width/2,y3);
 stroke(lowerLeft,60);
 line(width/2*noise(y3/100,xOff)- 100,y3,width/2,y3);
  y3 +=1 ;
 
}

// loop 4, lower right corner
for(float y4 = height/2; y4<height; y4++){
  stroke(lowerRight);
  line(width/2, y4, 200 + width/2*noise(y4/100,xOff),y4); 
  stroke(lowerRight,80);
  line(width/2, y4, 250 + width/2*noise(y4/100,xOff),y4); 
  stroke(lowerRight,60);
  line(width/2, y4, 300 + width/2*noise(y4/100,xOff),y4); 


 y4 += 1; 

}
 
//incrementing the Y val of the noise function to create movement.
xOff += 0.01;


imageMode(CENTER);
image(img, width/2, height/2);
}


Mini Solar System

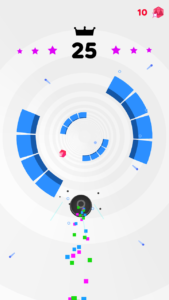
At first, I couldn’t think of any ideas and I considered doing something similar to the mobile app game “Rolly Vortex”.

how the approaching rings and rectangles of the game look like

But then I realized this is more of a cool game rather than an interesting art piece and that I can save the idea for a later more complex project.

I didn’t go far but rather kept the idea of things spiraling and a sphere bouncing around by a cartoon-chalk-like implementation of our solar system.

I decided to use the random function heavily to create somewhat of a dynamic outer space background.

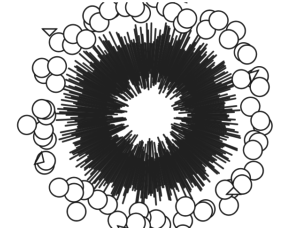
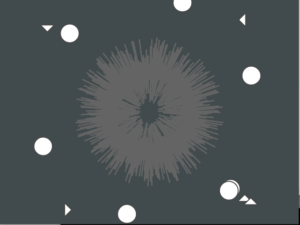
how my initial design of a celestial object looked like
improved version of the model where the spheres represented the planets and the triangles other objects


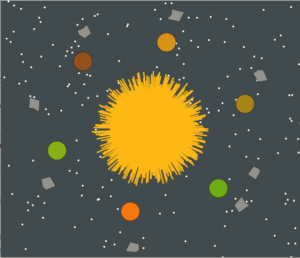
I then improved the functions to make them seem more random, made the screen bigger in size, allowed the planets to randomly change color, and made the sun orange-yellow.

I also made use of the beginShape() function to draw the asteroids (celestial objects) which fly about around the planets and I made them more than the planets since that is the case in real life with their smaller size.

I also chose a color spectrum for the planets that is somewhat possible in real-life to make them more recognizable. I decided to not really make the colors exactly like real-life nor the number of planets because that is unnecessary and would create traffic on the art piece.

I created some stars which place randomly around the plane, and which are the background that give the sense of outer space in the first place. The planets also move about randomly but at a small scale, and the asteroids move around much further than them.

https://vimeo.com/460059157

A snapchot of my final piece
int seed = 0;
int checkerWidth = 80;
int checkerHeight = 80;
float r = 0;
float g = 0;
float b = 0;

void setup() {
  size(640, 550);
  rectMode(CENTER);
  
}

void draw() {
  background(#414a4c);
  
  if (frameCount%10 == 0) {
    seed = frameCount/10;
  }
  
  randomSeed(seed);
  translate(width/2, height/2);

  
  for (int k = 0; k < 720; k++) {
    float x = random(-width, width);
    float y = random(-height, height);
    pushMatrix();
      strokeWeight(1);
      stroke(255);
      fill(255);
      ellipse(x, y, 3, 3);
    popMatrix();
  }
  for (int i = 0; i < 360; i += 1) {
  
    float x = random(0, 10);
    float z = random(80, 125);
    pushMatrix();
      rotate(radians(i));
      strokeWeight(3);
      stroke(#FDB813);
      line(x, 0, z, 0);
    popMatrix();
  }
  
  for (int j = 0; j < 360; j+=60) {
    
    float x = random(120,150);
    float y = random(120, 150);
      r = random(64, 253);
      g = random(60, 190);
      b = random(0, 40);
    pushMatrix();
      rotate(radians(j));
      strokeWeight(2);
      
      stroke(0);
      strokeWeight(0.5);
      fill(r, g, b);
      ellipse(x, y, 40, 40);
     popMatrix();
  }
  
  for (int j = 0; j < 360; j+=random(40,60)) {
    
    float x = random(160,180);
    float y = random(160, 180);
    pushMatrix();
      rotate(radians(j));
      strokeWeight(2);
      stroke(0);
      strokeWeight(0.5);
      fill(#93928c);
      beginShape();
        vertex(x, y);
        vertex(x+random(10,20), y-random(10,20));
        vertex(x+random(20, 25), y-random(5, 10));
        vertex(x+random(25,35), y);
        vertex(x+random(20,25), y+random(5,10));
        vertex(x+random(10,15), y+random(15,20));
        
      endShape();
     popMatrix();
  }
}


I feel like with the knowledge of OOP and classes furthermore in the course, I will be able to master Java much more and achieve much more complex goals I have in mind.

Week 2: ArtWork using For loops


My inspiration came from the moving rectangles we drew in class. there was something calming about watching the rectangles move. I knew I wanted to do either an ocean or wave theme, where it would be kind of calming to watch. Although I didn’t have an initial sketch of exactly what I wanted my art to look like, I had an idea. I wanted something with moving triangles as well as overlapping objects.

After doing some reasearch on kinds of images or shapes I could use, I found a 3D sphere which I thought would be perfect. After spending sometime figuring out how to rotate it, and adjusting it to my screen, I ended up with this. 

This was actually a really interesting movement of art. Because I liked it so much, I was set out to create a smaller solid sphere to insert inside, and rotate the other way, so It felt like a energy source. However, I later decided I wanted to stick with my original theme of the ocean and work with that.

When creating a custom moving gradient background failed, I decided to find an image online, and rotate it to look like the water was moving. I made sure to rotate the image in the opposite way. When adding a full image, a lot of the details and sides of the sphere go missing (as shown in the final art) because of the Z coordinates. Although this was heart breaking for me, it was almost perfect to what I had envisioned earlier. I still wish to pursue the ‘ball of energy’ art model, but hopefully that will be for another time.

int w = 8;
int seed = 0 ;
int rectWidth = 8;
float m;
PImage photo;

void setup() {
  size(640, 640, P3D);
  rectMode(CENTER);
  photo = loadImage("OceanTheme.jpg");
  photo.resize(800,800);
}
void draw(){
  background(255); 
    pushMatrix();
      translate(width/2, height/2);
      rotate(m);
      imageMode(CENTER);
      image(photo, 0, 0);
    popMatrix();
    m-=0.001;
  

  for (int i = 0; i<width; i+=15) {
      float amplitude2 = TWO_PI;
      float speed2 = .005;
      float granular2 = 0.001;
      float freq2 = (frameCount*speed2) + (i * granular2);
      float angle2 = noise(freq2);
       pushMatrix();
        translate(height/2, width/2, -200);
        rotate(angle2);
        noFill();
        stroke(0, 0, 0);
        strokeWeight(1.5);
        sphere(500);
      popMatrix();
 }
}


Aayush – Snake Game Inspiration

Link To Video

For my second assignment as I was brainstorming I came across a photo of the Nokia 3310 and I remember the snake game that the phone used to have. I was reminded about how complicated the snake got as the game continued as it got longer. For the assignment I then decided to make that exact pattern but the direction and the orientation will be determined by the computer. The framecount determines when to call the change orientation and direction functions. For the orientation, when called it simply changes from x to y or vice versa. For the direction, it is determine by the modulus of a random number.


To make the line more interesting, color is added to the point. Whenever a new point is drawn it is drawn with a new color, when the change color function is called, the red, green and the blue values are changed by 1.  This gives the effect of a smooth color transition.

void setup() {
  size(640, 480);
}

int x = floor(random(640));
int y = floor(random(480));
int orientation = floor(random(10))%2; // 0 -> x, y -> 1
int direction = floor(random(10))%2; // 0 for up or right | 1 for down or left

//colors
int r = floor(random(255));
int rAddition = 1;
int g = floor(random(255));
int gAddition = 1;
int b = floor(random(255));
int bAddition = 1;

void draw() {
  // println(x,y); // debugging code
  int length = floor(random(7)); // to determine of segment
  for (int i=0; i< length; i++)
  {
    strokeWeight(10); // make the point thicker
    drawPoint(); // draw a point
    updateCoordinate();
    offScreenFix();
  }
  int nextInterval = floor(random(25, 60));
  if (frameCount%nextInterval ==0) // to change the direction
  {
    orientation();
    direction();
  }

  changeColor();
}

void offScreenFix() {
  
  //if point off screen
  if (y>478) {
    y-=1;
    println("off screen");
  } else if (y<2) {
    y+=1;
    println("off screen");
  }

  if (x>638) {
    x-=1;
    println("off screen");
  } else if (x<2) {
    x+=1;
    println("off screen");
  }
}


void updateCoordinate() {
  if (orientation == 0) {
    // do x operations
    if (direction == 0) x+=1;
    else if (direction ==1) x-=1;
  } else if (orientation == 1) {
    // do y operations
    if (direction == 1) y+=1;
    else if (direction == 0) y-=1;
  }
}


void orientation() {
  if (orientation==0) orientation = 1;
  else if (orientation==1) orientation = 0;
}

void direction() {  
  direction = floor(random(10))%2;
}

void drawPoint() {
  stroke(r, g, b);
  point(x, y);
}

void changeColor() {
  if (r==255) {
    rAddition = -1;
    r += rAddition;
  } else if (r==0) {
    rAddition = 1;
  }
  if (g==255) {
    gAddition = -1;
  } else if (g==0) {
    gAddition = 1;
  }

  if (b==255) {
    bAddition = -1;
  } else if (g==0) {
    bAddition = 1;
  }
  r += rAddition;
  g += gAddition;
  b += bAddition;
}


Week 2: for() loop artwork

For this exercise I changed some parameters in the for() loop building upon the code we started writing during class. I wanted to experiment more with color and random(). Here, the color of the background is changed on mouse click while the larger ellipses and rectangles change colors randomly. To me, the outcome looks like a whirlwind of confetti. Accidentally, the screen recording captured a song of the RealAD show which I was listening to in the background. This started a new idea for creating a Processing artwork that reacts to sound but this will have to wait until I learn more about Processing and how it can react to different input.

int x = 0;
int ellWidth = 100;
int rectWidth = 20;
color backColor = color(255, 255, 255); // taken from https://forum.processing.org/one/topic/how-can-i-change-background-color-with-mouse-click.html

void setup() {
  size(640, 640);
  rectMode(CENTER);
  ellipseMode(CENTER);
}

void draw () {
  background(backColor);

  for (int x = 0; x<width; x+=ellWidth) {
    float center = height*0.5;
    float amplitude = TWO_PI;
    float speed = 0.01;
    float granular = 0.01;
    float freq = (frameCount*speed) + (x * granular);
    float angle = noise(freq);
    angle *= amplitude;

    pushMatrix();
    translate(x + ellWidth/2, center);
    rotate(angle);
    rotate( map(mouseX, 0, width, 0, TWO_PI));
    noStroke();
    fill(random(255), random(255), random(255));
    ellipse(width/4, height/4, ellWidth, ellWidth);
    popMatrix();
  }

  for (int x = 0; x<width; x+=rectWidth) {
    float center = height;
    float amplitude = TWO_PI;
    float speed = 0.01;
    float granular = .001;
    float freq = (frameCount*speed*2) + (x * granular);
    float angle = noise(freq);
    angle *= amplitude;

    translate(x + rectWidth/2, center);
    rotate(angle);
    rotate( map(mouseX, 0, width, 0, TWO_PI));
    noStroke();
    fill( random(255), random(255), random(255));
    rect(0, 0, rectWidth, 100);
  }
  
  for (int x = 0; x<width; x+=rectWidth) {
    float center = height;
    float amplitude = TWO_PI;
    float speed = 2;
    float granular = .001;
    float freq = (frameCount*speed*2) + (x * granular);
    float angle = noise(freq);
    angle *= amplitude;

    translate(x + 20/2, center);
    rotate(angle);
    rotate( map(mouseX, 0, width, 0, TWO_PI));
    noStroke();
    fill( random(255), random(255), random(255));
    rect(0, 0, rectWidth, 100);
    fill(0);
    ellipse(width/2, height/2, 20, 20);
  }
}

void mousePressed() {
  backColor = color(random(255), random(255), random(255));
}


Psychedelic Geometry :)

float angle;
float grid= 400;
float i=0; 
void setup() {
  size(1080, 900,P3D);
};

void draw() {
 
  for(int x=0;x<=width;x+=grid){
    for(int y=0;y<=height;y+=grid){
  translate(mouseX,mouseY);
rotateX(radians(angle));
rotateY(radians(angle));
i=0; 
  while(i<width){
    i=i+20;
  beginShape();
vertex(i+100,100);
vertex(i+175,50);
vertex(i+250,100);
vertex(i+250,200);
vertex(i+175,250);
vertex(i+100,200);
vertex(i+100,100);
vertex(i+100,200);

endShape();
  };
  
  };
  };
//rotateX(radians(angle));
angle+=1; //does a full rotation
};

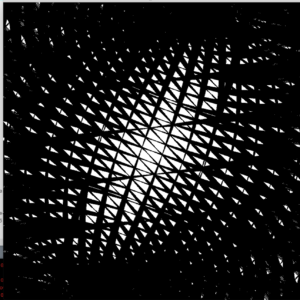
For this assignment,

I went through A LOT of experimentation,

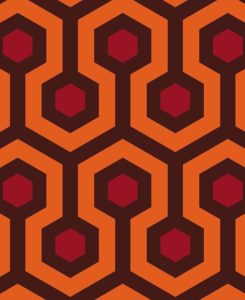
at first, I wanted to recreate this pattern:

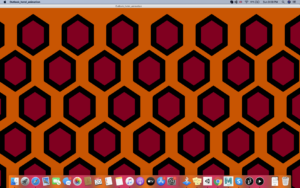
I almost got there:

Then, I didn’t really know what to do with it in terms of animation….

I  discovered the built in P3D  and started different experiments, but  I didn’t know how to integrate more effects while using the While loop, so I experimented further and created the animation at the top of the post.

The inspiration of this post for me was to experiment as much as possible, since it’s been helping me understand the mechanics of the code. And to save different blocks of code on GitHub if I find something interesting I could integrate in a different art piece later.

Because the Path is Not Linear…

My inspiration for this assignment came from two sources:

  • A quote that “success isn’t linear”,
  • Casey Reas’ talk on Chance.

Now, let me explain what I mean.

Human brains are wired in a way to notice only up’s of certain experiences (Kahneman, “Thinking, Fast and Slow”). When looking at success stories of other people, it is oftentimes tempting to simplify their path into a mere collection of linear dots and draw a straight line connecting all. This is why I wanted to challenge this notion through my Processing code, but most importantly, to make a kind reminder to myself, too 🙂

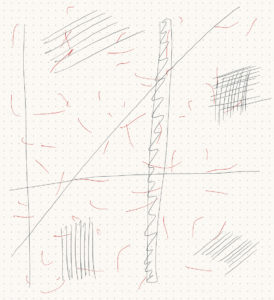
So I took out my iPad and started drawing the image that I was bearing in my head. After looking at some of the examples from the syllabus, I started off with simple, straight lines that were forming a rectangular pattern all throughout the setup window. Then, I decided to add random red lines throughout the screen to perform in a noise-like pattern. All these straight lines serve as a metaphor to a “linear path”.

Initial Sketch of the Idea

While I was implementing my sketch into code, I was listening to the Casey Reas’ talk on Chance which made me think a lot about random chances and possibilities in the meanwhile. I started playing around with my Processing code, challenging this “chance” to finally show in my work. Aaand…it did!

While I was taking this chance, one of my functions stopped working the way I expected it to work, and started to make a blinking effect on the screen instead. I took this as an opportunity to explore my options and made a slight shift to the initial idea.

It took me a while and a lot of web browsing to figure out how to place the red lines on the screen – however, all to turn the intended lines into rectangles and visit the class-example with the noise function and implement a similar one in my code.

So, in the very end, I got the following interpretation: in a black-and-white world where everything seems so linear, sometimes you have to be a red rectangle and take a step back to build your own, non-conventional path.

float x_width, y_height;
float x_coordinate, y_coordinate;
float x_center, y_center;
float lineX, lineY;

void setup(){
  size(640, 480);
  x_width = 10;
  y_height = 10;
  x_coordinate = 10;
  y_coordinate = 10;
  x_center = width/2;
  y_center = height/2;
}

void redNoise(){
  float freq;
  float angle;
  push();
    fill(255, 0, 0);
    noStroke();
    for (int x = 0; x<width; x+=50){
      freq = frameCount*.01 + x*.001;
      angle = noise(freq);
      rotate(angle);
      //rect(x_center, y_center, x_width + 40, y_height + 60);
      rect(mouseX, mouseY, x_width + 40, y_height + 60);
    }
  pop();
}

void drawLines() {
  
  // Section with rectangles
    for (int i = 0; i < width; i++){
      rect(i, y_coordinate, x_width, y_height);
      rect(width-i, i, x_width, y_height+15);
     }
    for (int j = 0; j < height; j++) {
      rect(x_coordinate + 80, j, x_width, y_height);
    }
  
  // Section with horizontal lines/rectangles 
    int numTotal = 10;    
    for (int rowNum = 0; rowNum < numTotal; rowNum++) {
      for (int d_width = 0; d_width < numTotal*6; d_width+=5) {
        rect(3*width/4 + d_width, y_coordinate + 50, 0.5, y_height + 140);
        rect(width/4 + d_width, y_coordinate + 120, 1, y_height+30);
        rect(width/2 + d_width, y_coordinate + 320, 1.5, y_height+75);
      }
    }
    
  // Section with vertical lines/rectangles 
    for (int colNum = 0; colNum < numTotal; colNum++) {
      for (int d_height = 0; d_height < numTotal*4; d_height+=3) {
        rect(3*width/4-50, y_coordinate + 30 + d_height, x_width + 100, 0.5);
        rect(width/8, y_coordinate + 300 + d_height, x_width + 70, 0.3);
      }
    }
  
}

// Blinking function that worked accidentally
  void blink(){
    for(int i = 0; i < width; i++) {
        stroke(random(255), 100);
        line(random(0, width), height/8, i, height/8);
    }
  }

void draw() {
  background(255);
  drawLines();
  redNoise();
  blink();
}


Networks

https://youtu.be/lKP8C1pRbiw

In this work I wanted to display how networks of people are created. The program starts off by creating several dots (people), and then randomly joins them together (relations). That is supposed to symbolize how humans form relations. Note that some of the lines change their color with time, as the relationship status changes as well. Even though people are connected randomly, they are capable of creating dense networks. I used the for loop to create the animation of two dots “coming” to each other.

var points = [];
var lines = [];

function setup() {
  createCanvas(800, 800);
  background(220);
  strokeWeight(5);
}

function draw() {
  if(frameCount%100==0){
    addPoint(floor(random(width)), floor(random(height)));
  }
  if(frameCount%50==0){
    addLine();
  }  
  drawLines();
}

function drawLines(){
  for(i=0;i<lines.length;i++){
    l=lines[i];
    initA=l.p1;
    initB=l.p2;
    vx=abs(initA.x-initB.x)/400;
    vy=abs(initA.y-initB.y)/400;
    tmpA=l.tmpA;
    tmpB=l.tmpB;
    
    if(((abs(initA.x-initB.x)/2)-(abs(initA.x-tmpA.x)))>0){
      if(initA.x>initB.x){
        tmpA.x-=vx;
        tmpB.x+=vx;
      }
      else {
        tmpA.x+=vx;
        tmpB.x-=vx;
      }
      if(initA.y>initB.y){
        tmpA.y-=vy;
        tmpB.y+=vy;
      }
      else {
        tmpA.y+=vy;
        tmpB.y-=vy;
      }
      
    stroke(l.c);
    point(tmpA.x, tmpA.y);
    point(tmpB.x, tmpB.y);
    }  
  }
}

function addPoint(x, y){
  p=new Point(x, y);
  points.push(p);
  stroke(p.c);
  point(p.x, p.y);
}

function addLine(){
  if(points.length>2){
    r1=floor(random(points.length-1));
    r2=floor(random(points.length-1));
    while(r1==r2){
      r2=floor(random(points.length-1));
    }
    p1=points[r1];
    p2=points[r2];
    
    l=new Line(p1, p2);
    lines.push(l);
  }
}

function Point(x, y) {
  this.x=x;
  this.y=y;
  this.c="#".concat((floor(random()*16777215)).toString(16));
}

function Line(p1, p2){
  this.p1=p1;
  this.p2=p2;
  this.tmpA= new Point(p1.x, p1.y);
  this.tmpB= new Point(p2.x, p2.y);
  this.c="#".concat((floor(random()*16777215)).toString(16));
}


Nathan Li

For my first assignment using java, my main goal was to get used to the language. I just finished studying python in the previous semester, so I found that there are some useful similarities while I was coding this project. In general, doing this small exercise proved to be a good introduction to java, helping me develop important coding habits that relate to java.

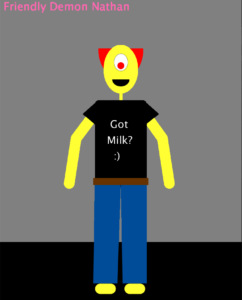
Project wise, we were asked to draw a not-so-accurate self-portrait of ourselves, so I took that requirement to somewhat of an extreme. I never really excelled at detailed intricate art anyways, so I decided to go a bit crazy and draw a demon version of myself. I have one red eye, red hair, and I knew demons can be scary for some people so I threw in some dad styles to cheer the picture up.

A big drawback to this week’s project is that I didn’t try to avoid hard coding that much, I felt like I wanted to start off just getting to know the language. In next week’s project, I want to design my code better and make it much more aesthetically pleasing.

void setup() {
  size(700, 900);
  background(128,128,128);
}

void draw() {

  ground();
  hair();
  face();
  eyes();
  body();
  Nathan();
  Gotmilk();
}

void Nathan() {
  textSize(32);
  fill(255, 102, 178);
  text("Friendly Demon Nathan", 10, 30); 

}

void Gotmilk() {
  textSize(30);
  fill(255, 255, 255);
  text(" Got \nMilk?\n  :)", 310, 370);
}

void face() {
  //skin
  fill(255, 255, 51);
  ellipse(350, 200, 100, 140);
  noStroke();
  
  //mouth
  fill(0, 0, 0);
  noStroke();
  arc(350, 230, 50, 40, 0, PI, PIE);
  
}

void hair() {
  fill(255, 0, 0);
  noStroke();
  arc(350, 140, 130, 180, 0, PI, PIE);
}

void eyes() {
//sclera
  fill(255, 255, 255);  
  stroke(0, 0, 0);
  strokeWeight(0.5);
  ellipse(350, 180, 40, 50);
  
//pupil
  fill(255, 0, 0);  
  noStroke();
  ellipse(350, 190, 20, 20);
  
}

void body() {
  
  //arms
  stroke(255, 255, 51);
  strokeWeight(30);
  line(280, 320, 220, 400);
  stroke(255, 255, 51);
  strokeWeight(30);
  line(220, 400, 200, 530);
  
  stroke(255, 255, 51);
  strokeWeight(30);
  line(420, 330, 470, 400);
  stroke(255, 255, 51);
  strokeWeight(30);
  line(470, 400, 490, 530);
  
  //neck
  stroke(255, 255, 51);
  strokeWeight(9);
  line(350, 270, 350, 290);
  
  //T-shirt
  fill(0,0,0);
  noStroke();
  rect(275, 290, 150, 250, 15);
  
  //pants
  
  fill(0,76,153);
  quad(275, 515, 270, 820, 340, 820, 350, 515);
  fill(0,76,153);
  quad(350, 515, 355, 820, 425, 820, 425, 515);
  
  fill(102,51,0);
  rect(270, 515, 160, 20);
  
  stroke(255, 255, 51);
  strokeWeight(30);
  line(290, 835, 320, 835);
  line(375, 835, 405, 835);


  //sleeves
  noStroke();
  fill(0,0,0);
  triangle(285, 290, 240, 330, 275, 360);
  fill(0,0,0);
  triangle(415, 290, 410, 370, 460, 330);
}

void ground() {
  noStroke();
  fill(0, 0, 0);
  rect(0, 700, 700, 900);
}