Assignment 3 – OOP

Concept 

Using object oriented programming, I was able to create a piece of art which resembles everyday pressure and stress. Each circle, gets a randomly assigned color from the blue end of the spectrum. This is to symbolize the blues everyone faces every once in a while. Additionally, I wanted to implement something which takes away this pressure and so I did.

Code 

This assignment was tricky to some extent as it was the first time I was facing OOP. However, by revising the class material and looking over online resources along with the p5js Reference, I was able to tackle it. I created a class for the circles and included four arguments in the constructor: x and y coordinates, radius and color.  Then using a for loop, I created a program which assigns a random value to these arguments. This was done by this following code:

// Create 100 circles with random positions, sizes, and colors
for (let i = 0; i < 100; i++) {
  let x = random(width);
  let y = random(height);
  let r = random(10, 15);
  let c = color(random(30), random(70), random(255));
  let circle = new Circle(x, y, r, c);
  circles.push(circle);
}

Additionally, as I wanted to add the option of clearing the canvas and resetting the animation, I wrote an if statement using some of the p5js built in functions. This allowed for the animation to be restarted just by pressing space bar. Following is the if statement I used:

function keyPressed() {
  if (key === "space") {
    circle.reset();
  } 
}

Finally, I was left with the final version of my artwork which can be seen below:

Reflection

For this assignment, I felt like I was not able to fully express my creative thought as I was not familiar with the technical aspect of OOP. However, I am glad I was able to finish it and I am eager to learn more about the implications of OOP in generative art.

Assignment 2: WEBGL 3D Art

Concept:

Initially, my concept for the assignment was fairly simple, I wanted to create a mandala by drawing ellipses and lines using the sin and cos function. However, when I got into the process of learning how to use the sin and cos function, I found number of tutorials where these functions were being used to draw 3d shapes. I started with the basic drawings in the webGL renderer and then moved on to making 3d spheres using sin and cos function combined with the beginShape and endShape functions. Once I was able to make a sphere, I tried rotating the accidentally discovered that by keeping the rotation at a certain degree I was able to draw a mandala on the canvas. Hence, I kept the code and added some interactivity to my sketch.

Code and Interactivity:

The code draws two spheres in 3D  using WebGL. In the setup() function , iI changed the canvas with a WEBGL renderer and sets the frame rate to 10.

User can control the camera angle of viewing this shape by simultaneously pressing mouse and moving around in the canvas which is controlled using the orbitControl function. Then I run a loop that generates a random stroke color for each iteration. I rotated the canvas along the X, Y, and Z axes by 90 degrees to achieve the mandala.

Furthermore, I run nested for loops that generates the spheres using the sphere_draw function. This function calculates the position of a vertex on the sphere using spherical coordinates, and adds the vertex to the shape. The spheres are drawn by connecting these vertices. The radius of the second sphere depends on the mouse X position, to create an interactive effect.

This code creates an interactive 3D visualization of two spheres, with the user able to control the camera and view the spheres from different angles and of different radius. Here’s the final sketch:

Future Improvements:

For the sake of more visualisation and Interactivity, I hope to add user controls on the side for adding more spheres, changing color of each sphere and resizing. Moreover, I discovered that I could create mandala using two spheres accidentally which is why I want to work with other 3d shapes to end up in similar accidents.


HW2 – Yerkebulan Imanbayev

Concept:

With this art piece, I tried to explore the idea of excitement. The color palette chosen for the piece was meant to represent a “dormant” state. The excitement is then catalyzed by the clicking of a mouse, which makes the colors brighter and makes the square turn in a different direction.

Coding process:

While thinking of the idea of excitement and how I could visually represent that, I know I wanted to use the concept of rotation and the change of direction to represent some sort of change. The colored lines, which were coded using the “for()” loop were meant to remain static. However, due to a “happy accident”, I put the “strokeWeight” in my “if” loop that was supposed to change the direction of rotation of the square when the mouse was clicked. When I did that, the strokes for the lines became thicker too, creating the visual sensation of lighting up. Accidentally, the result of my mistake perfectly tied back to the idea that I wanted to convey.

The piece of code I’m particularly proud of is
if (mouseX < 235 && mouseX > 165 && mouseY < 235 && mouseY > 165 && mouseIsPressed) {
stroke(166, 245, 237);
strokeWeight(4); //increasing the thickness of the borders of the square and the lights when the mouse is clicked
angle = angle – 1;
rotate(angle);
rect(0,0,70,70);
}
//rotating the square in the anti-clockwise direction when the mouse is clicked

Not only was I able to solve the issue I was facing with my previous assignments where I make the mouse click within certain bounds trigger something, but I was also able to code it in a way that allowed me to change the direction of rotation of the square. On top of that, this was the piece of code that let me somewhat visually represent the concept of excitement.

The code:


Week2: The alternating Wave

    Creating this art piece was a very fun and instructive process. I intended to create a simple and aesthetic piece that is also interactive and fun for the audience. I have used code that allowed me to create a sinus function in order to display an animated wave across the screen. The piece also displays two large circles with changing dimensions that move and morph depending on the coordinates of the mouse.

Both shapes; the circles and the sin wave, move accordingly as the frequency of the wave depends on the radius of the circles and change according to the y-coordinate of the mouse. I have used the code snippets below in order to create the morphing effects of the circles:

let x = mouseX;
let y = mouseY;
let ix = width – mouseX; // Inverse X
let iy = height – mouseY; // Inverse Y
fill(250, 150);
ellipse(x, height/2, y, y);
fill(0, 159);
ellipse(ix, height/2, iy, iy);

Using the variables ix and iy has been useful in creating the inverse and alternating visual effect in the piece, as many of the dimensions used depend on each other. This was a very helpful trick, since it allowed me to link the dimensions of different shapes and, thus making the piece more symmetric, cohesive and aesthetic.

One of the biggest challenges I faced while creating the piece was probably designing the sin wave as I was thinking of having multiple small ones on the screen. But the best decisions turned out to have only one big shifting wave as that takes the centre of the piece.

Assignment 2: Art

Inspiration:

I was inspired to create a collection of 3D cubes after scrolling through a computer art magazine provided to us for ideas. I was struck by the intricate 3D cubes in the magazine. Shown below:

I decided to take on the challenge of creating my own version of the cubes but in 2D form. Although my version is less complex than the original, I added more colors to make it unique. I had a lot of fun working on this project, and I even made it more interactive by allowing the cubes to move with the mouse. I know there is still room for improvement, such as making the cubes change colors when clicked with the mouse, which I look forward to exploring in the future.

Coding Process:

To start, I utilized nested for loops to produce ellipses on the canvas, resulting in a textured appearance. I continued to utilize nested for loops for the nest-like front of the cubes, but found it challenging to apply the technique for creating shapes other than squares and rectangles on the remaining sides of the cube. As a result, I switched to using the quad() function in p5.js to create straightforward, color-filled quadrilaterals for the sides and tops of the cubes. I also made sure that changing the width /height of the canvas does not impact the cubes and used separate variables to determine the cube length to adjust in case the canvas become too big or too large for the cube size. 

For interactivity, I wanted the cubes to move with the cursor and accomplished this by utilizing the mouseX and mouseY variables to determine their positions. Initially, I thought about writing code for each cube with separate positions using the mouseX and mouseY variables. However, after creating the first two cubes, I realized that I could use the translate() function to duplicate the cube in different positions, which was much more efficient than plotting all the coordinates repeatedly for each cube.

Final Output:

Closing remarks:

I had so much fun working on this project and I’m proud of the artistic piece I created. Not only did it sharpen my skills in p5.js, but it solidified my belief that coding can be fun and not just a snooze fest lol. Looking forward to future projects and learning more about Interactive Media!

Creative Art

Concept:

For this assignment, I started by exploring different types of computer graphics art that are possible to create, and I was fascinated by how much we could create and design by coding. From the book “Computer Graphics and Art,” I found the following pieces interesting and went on exploring different methods along this line.


Code and thought process:

To recreate this, I explored many functions which include, the noice(), translation(), and rotate() functions. Well, it took me a time to understand how to use the noice function worked in 1d, 2d, and 3d, and how to add proper resolution scale to smoothen it, but I believe it is one of the best functions that could be used. Following are some of the arts that I created.


After exploring different methods I could use I wanted to create something interactive but at the same time aesthethic so finally I created the following. I am part of that code that allows the mouse interaction.

Reflection& Ideas for improvements :

I would exploring and learning so much in this assignment, although one of the main obstruction for me in completing the assignmnet was that I lost my code when I completed most of it and thus had to start over. But over all was an amazing process. I could definitely could improve this by adding 3D rendering or to give an aesthethic look, by adding more shapes and a gradient background.

Assignment 2

Concept

For this assignment I wanted to include a couple of new elements such as adding sound and user interactivity, all of which I could not incorporate into the previous assignment.

I was interested in the artwork of an anonymous artist called “Banksy” who was known for his street art. He shredded one of his own art pieces in front of an auction house full of people right after it was bought and I have based my artwork on this.  This is his artwork after he had shredded it:

I did not have any particular art concept in mind but I knew I wanted to experiment with iridescent colors and add some sort of shredding effect as he did with his work. So I started off by creating an abstract iridescent element by using moving and color changing shapes. While experimenting with different color effects for the shapes, I came across the blendMode() which alters the colors displayed on the screen by either making them darker or lighter. By passing the argument “BURN” through this function, I was able to achieve this effect of fading/burning of the different colors and shapes into all black as the function increases contrast and makes the darker colors more prominent. I also added the sound of a paper shredder to add that effect of burning/fading, similar to what Banksy did.


Reflection

I think I learnt a lot of new features of p5.js through this assignment as I experimented with loops and color features as well as sound. I am happy with the fact that I was able to make the sound and burning effect work. For future projects, I would like to make use of “rotate()” and “translate()” because I tried using them in this assignment but I was not able to make it work. 


Assignment 2 – Artwork

Concept:

For this assignment, I did some research on generative artworks in p5js. After browsing some of the published work on the blogs found here, I got inspired to create an artwork which will pay homage to old computers, or, more specifically the green letters on black background found in retro devices. This way I was able to connect two different levels of the computer evolution which itself is evidence of our progress.

Code and realization: 

As a person with little experience in coding, this assignment was a great challenge, especially trying to avoid getting stuck into infinite loops as in my case I used an if loop inside of the for loop. The past classes on loops and basic shapes helped me create the grid of lines which are then altered as the mouse cursor moves over them.

Here’s a segment of the code I am especially proud of as it took me several trials and a lot of debugging to get it working:

for (let y = spacing/2; y < height; y += spacing) {
    let offset = map(mouseY, 0, height, -spacing/4, spacing/4);
    if (abs(y - mouseY) < spacing/2) {
      offset = offset * 2;
    }

This part of my program controls how the lines react to the mouse movement, especially if the y coordinate of the line is less than the y coordinate of the mouse.

Final Product: 

Reflection: 

This assignment was a great way to express our creativity and thought process. While I managed to get the program to work and be interactive, I feel like I can improve its interactivity and add more elements in the future.

Assignment 2: Art and Programming

Concept:

Upon watching the video: Casey Rears – Chance Operations, I was quite inspired by the idea of programming fractals. The idea of fractal art has always piqued my interest as it always jelled in between states of chaos and order and it just always looked so mesmerizing. Hence, I decided to go along my assignment by creating a fractal piece of art.

Code and Thought Processes:

When I thought of fractals, my mind instantly went towards shapes such as diamonds, stars and multi-polygon shapes. Hence, after several testing, I decided to create some star like shapes. Upon exploring, p5js does not have a shape for stars, hence, I created a function that would generate a star for me:

function star(x, y, radius1, radius2, npoints) {
  let angle = TWO_PI / npoints;
  let halfAngle = angle / 2.0;
  
  beginShape();
  for (let a = 0; a < TWO_PI; a += angle) {
    let sx = x + cos(a) * radius2;
    let sy = y + sin(a) * radius2;
    vertex(sx, sy);
    
    sx = x + cos(a + halfAngle) * radius1;
    sy = y + sin(a + halfAngle) * radius1;
    vertex(sx, sy);
  }
  endShape(CLOSE);
}

I used this function from https://p5js.org/examples/form-star.html, where it essentially constructs a star shape. The arguments are the x and y coordinates of the shape (which is at the center), and I would have two radius, one for the horizontal shape of the star and one for the vertical shape of the star. I would also have the number of points the star can be. I essentially map the points together to create a star using the unit circle from trigonometry and connecting them together using the vector function.

I knew I was going to overlap my crystals over each other, however I wanted them to have some movement, hence I made them rotate at different speeds. This way it gives this really cool effect where they each sometimes align or sometimes are completely chaotic. It fits well with that chaos/order theme I was going for so it was a great addition. To do this, I created another function called drawCrystals(spin) which would draw a bunch of crystals over each other where spin is just the number of crystals spinning.

function drawCrystal(spin) {  
  for(let i=0; i<spin; i++) {
    rotate(frameCount/-1000);
    
    if (fade<0) fadeAmount=0.005;
    if (fade>255) fadeAmount=-0.005; 
    fade += fadeAmount; 
    fill(0, 0, blue_shades[i], fade);
    
    star(0, 0, ((10*spin + 70) - 10 *i)/2.333, ((10*spin + 70) - 10*i), 4);
  }
}

The size of the shape (determined by the radii) is simply calculated through a series of incremented sizes so that they all look congruent rather than weird shapes and sizes.

I decided to also add a cool fade effect. It’s really awesome because the background is black so it looks like they disappear momentarily and then appear back to life. This fade effect was inspired from another sketch which is linked here: https://editor.p5js.org/remarkability/sketches/rtM08miUD however I tweaked the values so it would fit with my code.

I also filled them with different shades of blue to fill that diamond-ish colouring, plus blue looks cool and is one of my favourite colours.

Finally, in the draw function, I simply just pushed, translated to a random coordinate on the canvas and drew the fractal shape with a random number of fractals and then popped. I repeated this process several times until all the fractals kind of covered the screen. With this, I was happy with my finished product.
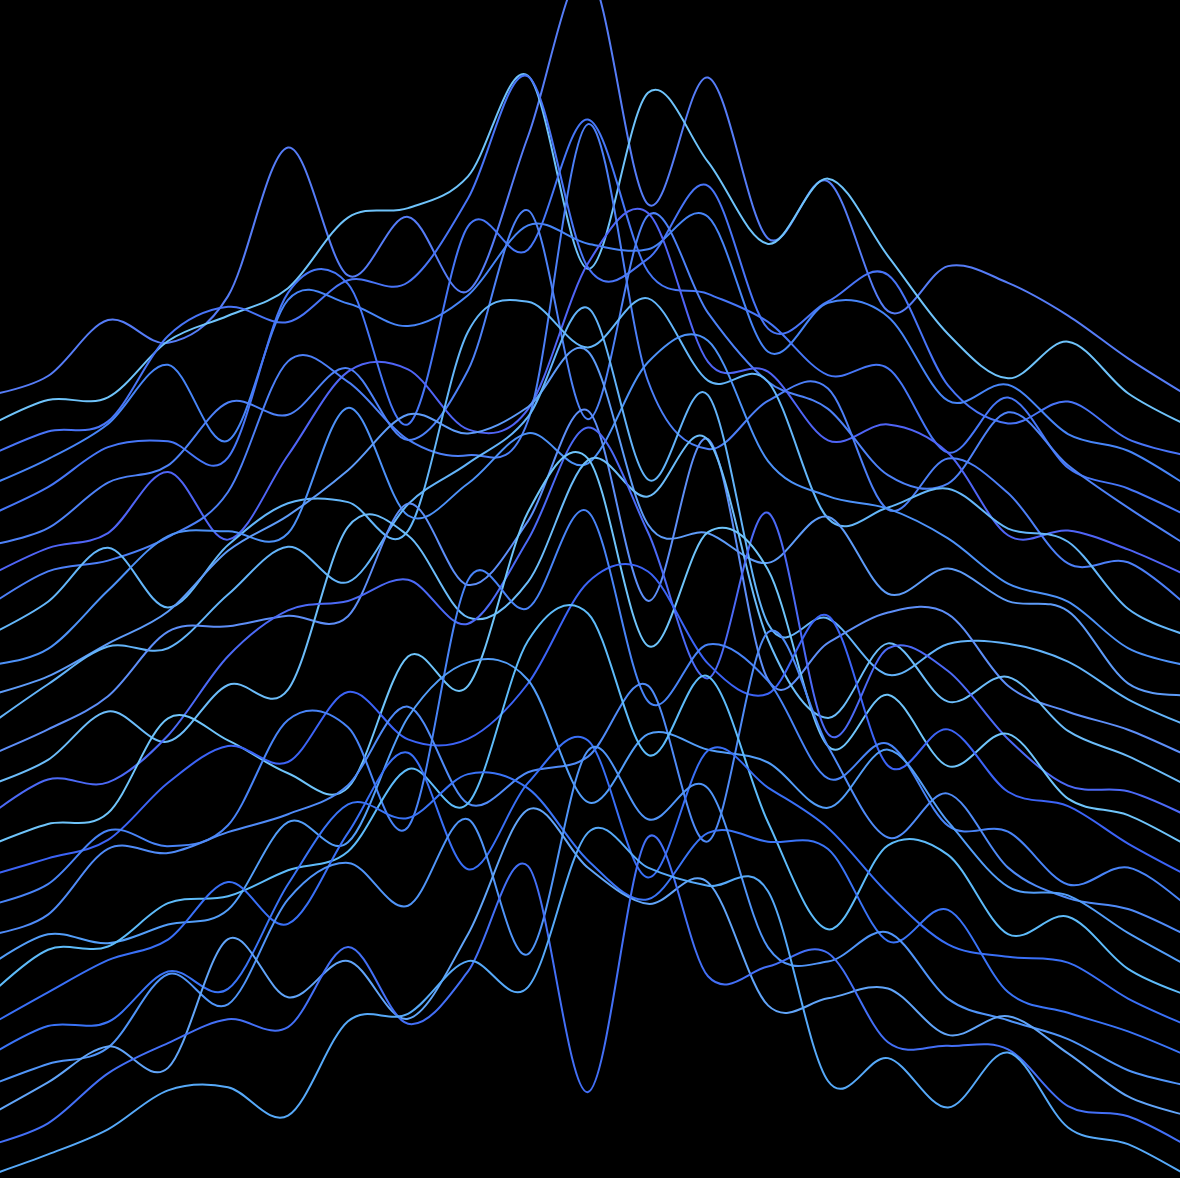
Final Sketch:

Overall Thoughts and Improvements:

Overall, I think i’m happy with how it turned out, it was essence I was looking for when I wanted to create my artwork. Although some improvements I could have added are:

  • Perhaps some sort of glistening effect on the fractals.
  • Perhaps a 3D rendering of the fractals.
  • A cool idea would be where the fractals could grow and shrink at random sizes and intervals.
  • Maybe it would be cool is the fractals could move about the canvas to give it some nice lively effect to the art.

Week 2 – Art

Using For loops and some back and forth with shapes and values, I was able to produce this piece of art:

Below is the code for this project:

function setup() {
  createCanvas(600, 600);
}

function draw() {
   
      if (mouseIsPressed) {
        background(0);
        for(i=0;i<600;i+=10+mouseX/20){
          for(j=0;j<600;j+=10+mouseY/20) {
          fill(i/2,j/2,50)
          rect(i,j,15)
      
          stroke(i,mouseX,j)
          line(i,j,mouseX,mouseY)
          }
        }
      }
      else {
        background(0);
        for(i=0;i<600;i+=10+mouseX/20){
          for(j=0;j<600;j+=10+mouseY/20) {
          fill(i/2,mouseY,mouseX)
          rect(i,j,15)
      
      }
    }
  }
}

I decided to start with the For loop as that is the fundamental concept around which we were to build our program. After which, I decided on squares as my shapes due to their uniformity just being pleasant to look at for me. Once I had my rows and columns of squares, I started messing around with my values and variables, essentially experimenting what different effects I can achieve. I wanted to incorporate some sort of interactivity and decided to utilize the mouseIsPressed function in order to create some effect by clicking and holding the mouse. This led to me adding lines point to the cursor to give a sort of background light rays effect.


I am specifically impressed by how little lines of code it took me to create such a piece. I would initially think such an artwork would require many more lines of code but with some experimenting and utilization of functions, it took only around 30 lines.

There is definitely a lot more that can be done in order to improve this piece. I can definitely utilize different kinds of shapes and add more forms of interactivity. I look forward to seeing how I improve with time and what more I’ll be able to add in the future.