Week 8- Unusual Switch

IDEA DEVELOPMENT

To answer the prompt of this assignment, my goal was to create a simple circuit with an usual switch which would open or close the circuit while being creative  with my idea. I spent sometime thinking of what i could possibly do that’d be unusual.  I was finally able to come up with an idea- to use equipment readily available to me( a cup and teaspoon )

VIDEO


Concept

The circuit is just a basic one made up of wires, a resistor, power source( arduino. board ), an LED, a bread board and a switch. The switch is the only unusual thing about the circuit. Since a switch is anything capable of opening or closing the circuit, i decided to go with a teaspoon and a cup of water. This was to make use of the fact that metals and water are good conductors of electricity. I had the wires ( one connecting to the anode metal strip of the LED and the other connected to the cathode strip ) connected to the spoon and one in the cup containing the water. When the spoon is placed in the cup containing the water, the circuit becomes a closed conducting path which allows the flow of charges to the LED and then it turns on.

Mid-Term Project: Traffic Racer

Midterm Project – Duck Hunt

Duck Hunt sketch: 

For this assignment, I researched retro arcade games and decided I want to make a replica of the classic NES game Duck Hunt. Initially, I started with the background on which I built the rest of the game. Then, I used a sprite sheet that changes the ducks to dead ducks when shot. That was done using the following code, which is also the code that decides the gravity of the falling duck:

if (shot == true) {
  speed = -7;
  speed2 = 0
  push();
  noStroke();
  fill(220);
  duck(deadDuck);
  pop();
  
  if (y > 440) {
    shot = false;
    x = random(5, 580);
    speed = random(4,12);
    speed2 = random(-7,7);
    score += 1;
  }
}

I had several versions of the game until I decided to go with the final one in which you have unlimited ammo but a limited time to shoot as many ducks as possible. This way, the game can be played by anyone, however the score gives it a competitive edge in a sense that players can compete with their own previous score.

Regarding the code and the technical aspect of my assignment, I would say I am most proud of setting the timer to countdown from whatever value we assign to it. This was done with the following code:

fill(0, 0, 0);
  textSize(30);
  text("Time Left:" + timer, 25, 380)
  if (frameCount % 60 == 0 && timer > 0) {
    timer --;
  }
  if (timer == 0) {
    //text("GAME OVER", 200, 200);
    window.location.reload();

The timer additionally ends the game and displays the home screen. This particular switch from the home screen to the game was a problem that I was luckily able to overcome. Additionally, I ran into a problem while using OOP in one of the earlier versions. As I could not fix this problem I decided just to switch up and not use OOP. This is one of the few key changes that should be done to improve the game in the future. Other than this, I should improve the spawning points of the ducks as well as implement another paradigm to run the game including limited ammo, power ups and difficulty levels.

Finally, this game has a lot of space to improve, but it is a good starting point. I personally chose this game in order to recreate the feelings and experience of hunting for ducks on the NES using the gun controllers. I plan on doing this with the help of Arduino.


Midterm Project Documentation(Hit the Island Game)

IDEA

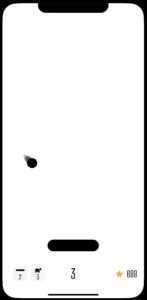
For my midterm project, I decided to create a game out of the options from which we could choose any to create a project. A game that would use all the concepts learned in class so far. I got my inspiration from a game on the apple app store called “Hit the Island”. I always wondered how the game was created and how the developers got it to be interactive with the dynamic island on the iPhone 14 pro series. After taking this class, I have gained enough knowledge to know that the game doesn’t actually interact with the dynamic island but has a bar-shaped object behind the island with which the balls in the game interact.

ORIGINAL GAME

The original game below was developed by Funn Media, LLLC.

Code Structure:
The code is structured into several functions that are responsible for different parts of the game. The main functions are as follows:

createPaddles() – This function creates two paddles, one at the top of the canvas and the other at the bottom.

resetGame() – This function resets the game by clearing the balls array and calling createPaddles() to create new paddles.

setup() – This function initializes the game by creating a canvas, calling resetGame(), and loading images and sounds.

preload() – This function loads images and sounds before the game starts.

introScreen() – This function displays the intro screen with the game title.

endScreen() – This function displays the end screen with the player’s score.

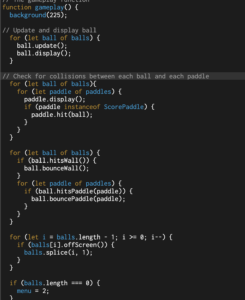
gameplay() – This function handles the main gameplay loop by updating the ball’s position, checking for collisions with walls and paddles, and removing balls that fall off the canvas.

checkKeyPressed() – This function checks for keyboard input and moves the paddle left or right, and launches the ball.

Ball class – This class represents the ball in the game and handles its movement, collision detection, and rendering.

Paddle class – This class represents a paddle in the game and handles its movement, collision detection, and rendering.

How the game is played(functionality)
The game starts with the intro screen and waits for the player to press the “s” key to start the game. Once the game starts, the player can move the paddle left or right using the left and right arrow keys.  The ball bounces off the paddles and the walls of the canvas, and the player scores points by hitting the ball with the top paddle. The game ends when the player loses all their lives, and the end screen displays the player’s score. The player can restart the game by pressing the “p” key or return to the intro screen by pressing the “q” key.

GAME


CODE SNIPPETS

Main gameplay code

CHALLENGES AND FUTURE IMPROVEMENTS

As at now, the game has a lot of bugs and is still in the “beta testing” phase. There are numerous errors to be fixed including the update of score when the ball hits the top paddle, playing of ball sound when the ball hits the roof of the canvas, and the general collision between the ball and the paddles. In a next update, i intend to fix these errors and also add more levels, varying ball speed and increasing the number of balls when the user gets to a certain score.


Midterm – Traveller

The Concept

The idea has been changed a fair bit based on the class discussions I had with the Professor and I decided to revamp the whole game idea. Now, it is an exploration based game, where the player is an alien flying in a UFO, visiting our solar system for the first time. I wanted to be able to create a scaled version of the solar system, but also emphasize on the vastness of space, thus the canvas is kept at a massive size (5000,5000), and all the orbits are drawn relative to their actual distance from the sun, along with the size of the canvas, I also added a scale to aid with this effect. I still wanted to gamify my project, so I also added a TIMED mode, where the player must fly around the vast solar system and find all the planets. After the planets are all discovered, the time it taken is displayed on screen.

The Sketch

Due to the extensive use of the functions scale() and translate(), the experience is best viewed in full screen mode. Here is the link: https://editor.p5js.org/mhh410/full/9DprniReW

The project starts at the home screen,  to give the user control instructions and a storyline, along with two different modes to play. The code itself is structured in a way that I hope it is easy for someone to understand even though it goes up to 900 lines. I did this by creating a bunch of functions in the beginning of the code.
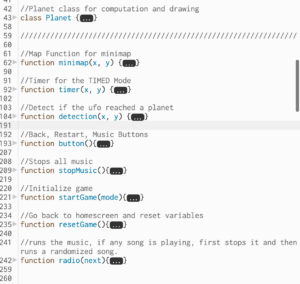
There are several things I am proud in terms of coding.

Firstly, I was able to get to create all the planets in a way that their distances from each other are scaled in a mathematically accurate way.

//Create all Planets
mercury = new Planet(19, 2);
venus = new Planet(36, 4);
earth = new Planet(50, 5);
mars = new Planet(75, 3);
jupiter = new Planet(250, 25);
saturn = new Planet(500, 20);
uranus = new Planet(950, 13);
neptune = new Planet(1500, 11);
pluto = new Planet(1950, 1);

The first number uses a formula I made to convert AU into dimensions I can use in the canvas. I used the formula 0.5(AU) * 100, this was the best way to fit all the different radii of planet orbits into a 5000,5000 scale.

Secondly, another aspect I am proud of is the function to create every planet on a random spot within their orbit.

class Planet {
  constructor(r, s) {
    this.rad = sunRad + r;
    this.size = s;

    let angle = Math.random() * Math.PI * 2;

    this.x = Math.cos(angle) * this.rad;
    this.y = Math.sin(angle) * this.rad;
  }


The math in the Planet class makes sure that a random point x and y always lie on the radius of the orbit corresponding to that planet.

Another aspect I liked working working on was is the radio feature. I wanted to add some tracks to keep the user engaged while they traversed empty space.

//runs the music, if any song is playing, first stops it and then runs a randomized song.
function radio(next){
  if(next==true){
  if(track1.isPlaying()){track1.stop()}
    if(track2.isPlaying()){track2.stop()}
    if(track3.isPlaying()){track3.stop()}
    if(track4.isPlaying()){track4.stop()}
    if(track5.isPlaying()){track5.stop()}
    if(track6.isPlaying()){track6.stop()}
  let num = random(["1","2","3","4","5","6"])
  if(num=="1"){track1.play()}
  if(num=="2"){track2.play()}
  if(num=="3"){track3.play()}
  if(num=="4"){track4.play()}
  if(num=="5"){track5.play()}
  if(num=="6"){track6.play()}
  }
}

This function is triggered when the game mode starts and when a user clicks the music button in-game. The function is meant to play a song at random. When the code runs, all music stops first, and then a track is picked at random.

The Challenges

The project was filled with various challenged, some of them I had anticipated earlier. First of which was figuring out how to incorporate motion into the canvas and zoom in to the ufo moving around. I wanted to use camera() initially but then realized that I can’t use this feature in a 2D canvas. Thats when I moved to using translate() so the whole canvas moves when the keys are struck. Then, I used scale to create the zoom-in effect. Along with that, to extenuate on the motion, I decided to cover the dark canvas with star light.

// starlight creation, parameters based on motion of ufo
function starlight(moveX, moveY) {
  for (let i = 0; i < 500; i++) {
    fill(255, 255, 255, random(100, 255)); // Set the fill to a slightly transparent white
    noStroke();
    starsWidth[i] += moveX;
    starsHeight[i] += moveY;
    ellipse(starsWidth[i], starsHeight[i], random(1, 5)); // Draw a small ellipse at a random location with a random size
  }
}

This starlight function moves all the stars in the back drop in the opposite direction of the motion of the UFO to emphasize on the direction the user is moving around in.

Another major issue was the leaderboard. This was a feature I really wanted to add as a way to track all the quickest times a user has achieved in TIMED mode. I worked on it for ages and tried a bunch of implementation like createWriter(), saveStrings() and local storage, but none of it worked.  I have left my attempts as comments at the end of the code and eventually decided to drop this feature.

 

Midterm Project – Final

Boy Who Cried Wolf: The Game

 To play the game click this link -> Boy Who Cried Wolf: The Game

Link to fully commented code -> Boy Who Cried Wolf: The Game (code)

૮꒰ ˶• ༝ •˶꒱ა. ૮꒰ ˶• ༝ •˶꒱ა  ૮꒰ ˶• ༝ •˶꒱ა. ૮꒰ ˶• ༝ •˶꒱ა. ૮꒰ ˶• ༝ •˶꒱ა

Process

Design

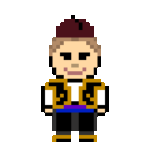
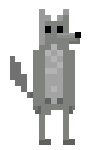
To start, I created a few pixel images that I would use for the game. I created three types of sheep, the shepherd, wolf and the trees. To create the wolf and the sheep, I took inspiration from the web (sheepwolf) but the boy and the trees are original creations. All of the images were created and animated using Piskel.

The boy is dressed in traditional Bosniak male clothing, the fes, vest (prsluk / džemadan), trousers (šalvare / shalwar or čakšire / çakşır), belt (bensilah) and shoes (opanci). The wolf looks very thin which represents his hunger

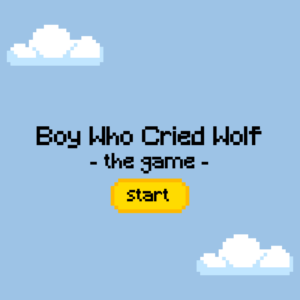
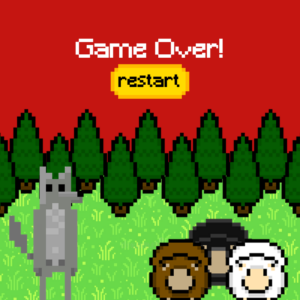
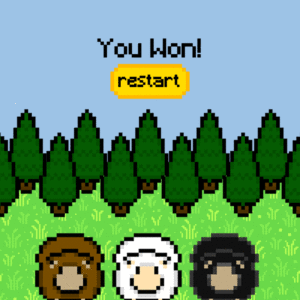
Using the images and Powerpoint (very handy program) , I created the start screen, as well as the winning and losing screens which are pictured below.

Implementation

The implementation process was quite straightforward, get the player to move the sheep in and around the pen. Unfortunately, the logic behind the game was not quite as straightforward. Having completed 90% of the game, I was stuck on the sheep and pen interaction for almost a whole day. Although that might not seem very bad, I was thinking of quite elaborate solutions that would calculate the depth of the interacting shapes which would translate into prohibiting the interaction. In the end, I went with the easiest solution and that is *drumroll* a lot of logical comparisons and arithmetic operations 🙁 . As a Computer Science student, I hate having my code look like a third grade maths notebook. However, running out of time forced me to take extreme measures and settle with the basic approach.

Other than the issues with object interactions, I was quite pleased with the flow of my programming. Although I really dislike working under pressure, working the code out was quite satisfying once I finalised the project.

Reflection

The project was very interesting to work on. Since I have made a simple game before, I knew my way around Object Oriented Programming, but what came as a surprise was that I am not yet capable of understanding the sizing of the canvas I am working on. The game is not at all scaleable. Although the variables such as number of sheep and their size are, the screen will not adapt to the change of values the way it should without going deep into the code and fixing it. In the future, I wish to make my games fully capable of resizing at anyone’s will. This may not be something that is done in re, but understanding the principles of canvas sizing will undoubtedly help me understand the greater scheme of things – responsive web design.

ASSIGNMENT 5- MIDTERM PROJECT PROGRESS

IDEA

For my midterm project, I decided to create a game out of the options from which we could choose any to create a project. A game that would use all the concepts learned in class so far. I got my inspiration from a game on the apple app store called “Hit the Island”. I always wondered how the game was created and how the developers got it to be interactive with the dynamic island on the iPhone 14 pro series. After taking this class, I have gained enough knowledge to know that the game doesn’t actually interact with the dynamic island but has a bar-shaped object behind the island with which the balls in the game interact.

ORIGINAL GAME


The original game below was developed by Funn Media, LLLC.

UI DESIGN

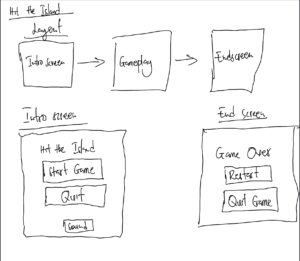
This is the basic form which i want my game to take. On a surface level, the game basically consists of a paddle, a ball and another paddle on top of the screen which i call the island. In the game, the paddle is controlled using the left and right arrow keys. Every time the ball hits the island, the user gains a point. The game ends when the balls fall off the screen.  The game has three different pages. The intro page, the game page and the end page. In the intro page, the user has the option to start the game or quit the game. In the end page or game-over page, which shows after the user has lost the game, the user has the option to restart the game or quit as well.

PROGRESS SO FAR

So far, I have the basic game page set up with the balls and the user-paddle. I also have placeholders( which are basic color backgrounds ) set in place for the intro page and the end page which i am yet to design in either photoshop or illustrator.


CHALLENGES SO FAR AND INTENDED UPDATE

I haven’t encountered any major challenges so far. This is my progress as at now and in the final version of my game, i intend to to have two paddles, the moveable one which i have now and a static one (the island) at the top of the screen just as the original game. Every time the ball hits the paddles, there will be a sound feedback to improve the overall experience of the game. There will also be a background sound and an option for the user to mute the sound in the game or to keep it playing.

Midterm Project: Initial Documentation

Concept & Design

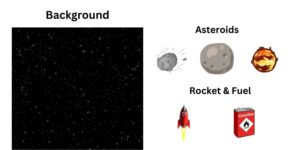
As part of my Mid term project, the idea is to create a game that is similar to the traditional ‘space-ship’ games, combined with the ‘infinite-runner’ game ideology. This would essentially be a canvas, where a rocket starts from the bottom, has freedom to move around, with the background moving, depicting a running environment. The objective would be for the rocket to dodge some meteors falling from the sky, and also to fuel up with cans that become available in intervals.

The graphical objects that I gathered so far are:

Code Structure & Progress

The code structure is intended to be Object Oriented and Modular. As of right now, I have a canvas with a background that repeats itself smoothly and a Rocket that moves around the canvas, wraps around the sides.

The Asteroids will be made to ‘spawn’ with time, and then as soon as they exit the screen, they will be respawned from the top end of the screen again.

Complexity

There will be more clarity of the complexity as I start running into issues, however, the primary objective of mine is to provide controls to the rocket such that it is rotatable. I will have to use mathematical calculations with the ‘right’ and ‘left’ keys to ensure the rocket does not flip its image to the right and left directions, instead it bends at an angle as the right and left keys are pressed. This is a functionality that I shall experiment and figure out!

Another functionality that I envision to add is local storage on the Chrome Browser to keep track of a ‘score’, and record the highest score. Only the highest score shall be saved per device.

Week 4 – Data Visualization

Concept

Having taken MVC last semester, as with many others, spherical coordinates are still stuck in my head. Since my last week’s assignment was space themed, I wished to stick with it for a bit longer. With the inspiration from this p5js sketch and the help of this video, I was able to understand how to plot points using the three axes in p5js. As there are few things to be plotted on the globe compared to the standard map, I decided to concern this project with meteorite landings.

I downloaded my CSV file from the NASA website and cleaned it up in Microsoft Excel such that it contained only the relevant rows, mass, latitude, and longitude. Furthermore, I removed the rows with blank cells so that they do not take up more space than needed.

function preload() {
  meteors = loadTable("M_New.csv", "csv");
}

After plotting the points I was left with the following sketch:

https://editor.p5js.org/ajlasacic/full/yxr9xvKC4

Note: The program is very demanding so I posted only the link in order not to crash the website. By changing the step variable, more landings can be seen.

Challenges

The most challenging part was understanding where the latitude and longitude are supposed to be pasted. Since they were given in degrees in the CSV file, I put the angleMode() to DEGREES. Unfortunately, this plotted the points only on one side of the globe, which took some time to understand why. After reverting back to normal parameters, the points were plotted just right.

let mass = meteors.getColumn(0);
  let lat = meteors.getColumn(1);
  let lng = meteors.getColumn(2);

  for (let i = 2; i < n; i += step) {
    let lat_ = lat[i];
    let lng_ = lng[i];

    strokeWeight(map(mass[i], 0, upper_mass_size, 0.7, 5));
    if (flag == true) {
      stroke(map(mass[i], 0, upper_mass_color, 120, 30), 100, 90);
    } else {
      stroke(255);
    }

    let z = r * cos(lat_);
    let y = r * sin(lat_) * sin(lng_);
    let x = r * sin(lat_) * cos(lng_);
    point(x, y, z);
  }

Another challenge was understanding how to map the size of the magnitude of the meteors on the map. By using the MIN and MAX functions in Excel, I extracted the smallest and biggest values within the dataset and set them as the values of their respective variables. By using the map() function (considerably the best function in p5js), I was able to set different sizes to the points within the sketch. By trial and error method, I was able to conclude 0.7 and 5 were perfect

strokeWeight(map(mass[i], 0, upper_mass_size, 0.7, 5));

Although the meteors in the dataset are quite similar in mass, slight differences can be seen on the graph. Lastly, I wished to create the sphere more interactive by changing colors. The colors were also added using the map() function, but I was stuck on how to change them when the mouse was pressed. By adding a global boolean flag variable, I was able to overcome this issue and change the color by setting its value to true or false.

Reflection

Although I am not quite satisfied with this project, I am grateful that I could achieve its main purpose which was plotting in 3d. I tried adding texture to the sphere to show the countries, but the picture did properly wrap no matter how much I edited it. In the future, I wish to make the plot more readable by adding either country outlines or an earth texture. Overall, I am pleased that I know how to plot in 3d using p5js.


Assignment 4- Generative text

INSPIRATION

In this assignment, out of the two prompts which we could provide a submission for, I decided to go with the “generative text” one. As usual, coming up with what to do was a challenge for me. I spent a lot of time going through YouTube videos and existing samples to draw inspiration from them but could not get any.  While perusing YouTube, I saw a video about Apple’s next big event. That was when it dawned on me that every time I got a new Apple device, the first welcome screen would write the word “hello” in many different languages. See below:

After watching the above video, I decided to recreate something similar to it.

PROCESS 

The code starts by initializing my variables and the array to hold the “hello” translations to be displayed. A word class is created. The Word object is initialized with the first word in the words array. Then, each time the display() method is called, the current word is displayed, and index is incremented. When the index reaches the end of the array, it is reset to 0 so that the words cycle through from the beginning again. Finally, in the draw() function, a new Word object is created every 100 frames using the update index value. To make the words look just like that of Apple’s I had to download and import the “California” font using the preload() and loadFont() functions.  I initially had the translations in so many languages including Japanese, Chinese and some other languages but the font-type I decided to use did not have support for writing in these languages so i had to take them out of my array.

WORK:


FUTURE IMPROVEMENT

In a future version, i intend to add more style to the written texts. I intend to make the display appear as though it is being written by hand just as it is in the original piece by Apple.