CONCEPT
In our last post we had come up with a game for our final project. After some further brainstorming, we thought it would be fun to try something other than a game, considering that this is what we did for our midterms. We thought about making an interactive system that could be experienced by multiple people at the same time. Our idea for the project is now to create a touchable “friendship lamp.” The basic idea is that we will build two lamps using two Arduino boards and LED strips. Each light will be equipped with different settings that can change the light pattern and color. These settings will be able to be manipulated within a program on p5.js, accessed on separate computers by the two users. After one user chooses the settings of their light, they then touch their lamp to send that light to the other user’s lamp. Communication between the two users can be simultaneous and there is no limit to the amount of times they can send each other messages.
THE ROLE OF P5.js
The sketch on p5.js will be a simple program with a few screens that allows the user to control the light they will send. They will be able to choose any color from a color wheel, and they will be able to choose from 3 different light modes: flicker, wave, and pulse. The choices made by the user will be stored by the program, and p5 will then send this data to the board of the other person’s lamp. However, data is not sent until some feedback is received from Arduino, explained in detail in the following section.
THE ROLE OF ARDUINO
A touch sensor and an LED strip would both be included in the Arduino circuit. When touched, the touch sensor transmits a signal to p5js, enabling p5js to transfer data to the Arduino board. Since p5js will be sending data about the color and pattern that the LED strip should light up in, the Arduino board receives this data and turns the light on as requested by the user.
HOW THEY COMMUNICATE
As for the method of communication (serial mode) between the Arduino and p5js, we are still employing wires to transfer data back and forth at the time. However, because the two lamps and users in our original concept must be distanced from one another, we are exploring and, ideally, planning to include Bluetooth modules or, perhaps, an esp32 on our board to help with wireless communication between the two platforms.
PROGRESS
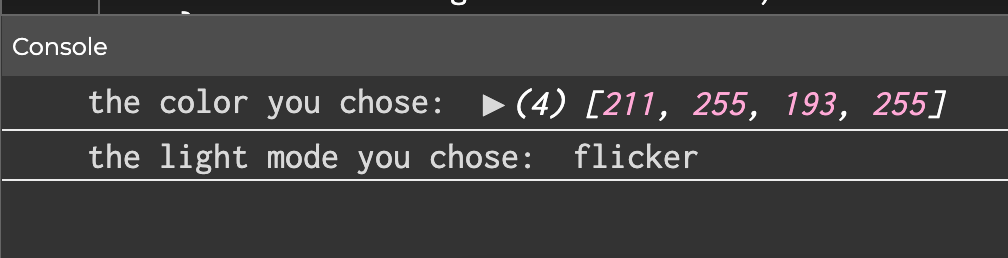
We knew that we weren’t going to be able to have cross communication between two users without wireless Arduino boards, and that we would not be able to implement the touching aspect without an actual tactile sensor. Hence, our plan for this week was to finalize our idea and begin assembling the different components of the system separately. The p5 program is almost complete, with an exception to the code that will send the data to the wireless Arduino board. The sketch is shown below:
At the end of the program, the console prints out the data that would theoretically be sent to Arduino. Including the color value and the light mode. Also, because we do not have the tactile sensor yet, the light is “sent” figuratively by just pressing any key in the third step.
For the Arduino component, we built our strips of 10 LED’s for each lamp and connected them to a board and focused on simply creating three different light modes that could be controlled within the Arduino code, separate from p5. The code that demonstrates how the various light modes are used to enable a flicker, wavy, or fading effect on the LED strip is provided below:
void loop() {
  NeoPixel.clear(); // set all pixel colors to 'off'. It only takes effect if pixels.show() is called
  NeoPixel.show();


  // WAVY
  //turn pixels to green one by one with delay between each pixel
  for (int pixel = 0; pixel < NUM_PIXELS; pixel++) { // for each pixel
    NeoPixel.setPixelColor(pixel, NeoPixel.Color(0, 255, 0)); // it only takes effect if pixels.show() is called
    // if(pixel > 0)
    // {
    //   NeoPixel.show();   // send the updated pixel colors to the NeoPixel hardware.
    //   NeoPixel.clear();
    // }
    NeoPixel.show();   // send the updated pixel colors to the NeoPixel hardware.
    NeoPixel.clear();

    delay(100); // pause between each pixel
  }

  // turn off all pixels for two seconds
  NeoPixel.clear();
  NeoPixel.show(); // send the updated pixel colors to the NeoPixel hardware.
  delay(2000);     // off time


  // FLICKERING:
  //turn on all pixels to red at the same time for two seconds
  for (int pixel = 0; pixel < NUM_PIXELS; pixel++) { // for each pixel
    NeoPixel.setPixelColor(pixel, NeoPixel.Color(255, 0, 0)); // it only takes effect if pixels.show() is called
  }
  NeoPixel.show(); // send the updated pixel colors to the NeoPixel hardware.
  delay(500);     // on time

  // turn off all pixels for two seconds
  NeoPixel.clear();
  NeoPixel.show(); // send the updated pixel colors to the NeoPixel hardware.
  delay(500);     // off time

  //PULSING
  brighten();
  darken();
}


// 0 to 255
void brighten() {
  uint16_t i, j;

  for (j = 0; j < 255; j++) {
    for (i = 0; i < NeoPixel.numPixels(); i++) {
      NeoPixel.setPixelColor(i, 0, 0, j);
    }
    NeoPixel.show();
    delay(10);
  }
  //delay(100);
}

// 255 to 0
void darken() {
  Serial.begin(9600);
  uint16_t i, j;

  for (j = 255; j > 0; j--) {
    for (i = 0; i < NeoPixel.numPixels(); i++) {
      NeoPixel.setPixelColor(i, 0, 0, j);
    }
    NeoPixel.show();
    delay(10);
    Serial.println(j);
  }
  delay(100);
}
Finally, a demo of the different modes is displayed below: