This is to let everyone know that – thanks to Aaron’s help last week – I managed to fix the scoring glitch that I had in my game!
My game logic was missing a lot of elements here and there, which resulted in a massive bug that crashed the whole game.
Fixing a few functions inside the main class and adding id tracking variables and array in mousePressed() helped to resolve this issue.
void mousePressed() {
  // play sound
  click.play();
  for (int i=0; i<cards.length; i++) {
    // only flip cards over if there are less than 2 flipped
    if (amountFlipped<2) {
      // only flip if the card hasn't been flipped
      // and also hasn't been matched (just to be safe)
      if (!cards[i].flipped && !cards[i].matched) {
        // check which card got clicked
        if (cards[i].checkClicked()) {
          // we've flipped it now so increase the amount that have been flipped
          amountFlipped++;
        }
      }
    }
  }
}

// check the IDs of the flipped cards
void checkIDs() {
  // make sure we have two flipped
  // (already checked in mousePressed to make sure we're not counting matched cards)
  if (amountFlipped == 2) {
    // we need to keep track to make sure we check two cards
    // this index does that (we already made sure it's only two just above)
    int thisIndex = 0;
    for (int i=0; i<cards.length; i++) {
      // if the card is flipped, AND is NOT matched
      if (cards[i].flipped && !cards[i].matched) {
        // get that card's ID and its index
        ids[thisIndex] = cards[i].id;
        whichCard[thisIndex] = cards[i].index;
        // increment our local index
        thisIndex++;
      }
    }
    // if we have something for both cards (otherwise one would be -1)
    if (whichCard[0]>=0 && whichCard[1]>=0) {
      // if they match set to matched and increase score
      if (ids[0] == ids[1]) {
        cards[whichCard[0]].matched = true;
        cards[whichCard[1]].matched = true;
        score++;
        if (score == numCards/2){
           scene = 2;
        }
      } else { // otherwise trigger the timer and reset things back to -1
        cards[whichCard[0]].triggerTimer();
        cards[whichCard[1]].triggerTimer();
        ids = new int[]{-1, -1};
        whichCard = new int[]{-1, -1};
      }
      // always reset the amountflipped back to 0 so we can start again
      amountFlipped = 0;
    }
  }
}
Starting something new is always scary. Ever since class on Wednesday, I had this assignment on my mind and I kept questioning how fast I could be able to get accustomed to working with the Arduino Uno. After going through our class recording and playing around with the elements a bit, I felt nostalgic for the days I did Lego robotics in high school and realized that it’s a lot of fun exploring the possibilities that this kit has. Also, I felt like getting feedback from something you’re doing with your hands when you’re trying to debug your code is so helpful! It helped me understand better how what I write is translating into reality.
Idea
So, my first instinct was to create a puzzle based on color theory. Maybe that the user needs to press the yellow and blue buttons to turn on an LED? So I went down that path and decided to make a puzzle that’s inspired by the colors of the rainbow.
Game Play
Puzzle Set-up
A player has 4 buttons and 4 LEDs in front of them, and the goal is to get all four LEDs flashing simultaneously. Before starting they get a few instructions or pointers:
You need six steps to achieve the task
These steps have a specific order/sequence
You can press a maximum of two buttons at the same time
Here’s a riddle to give you a hint:
“You see me in the air
But I am not a kite
I am what’s created
When water refracts light”
(I found this on a children’s riddle website)
Solution
The solution is inspired by the colors of the rainbow which I considered to be (Red, Orange, Yellow, Green, Blue, Violet) ((Sorry, Indigo)). So here are the steps to the solution:
Press Red Button
Press Red + Yellow Buttons
Press Yellow Button
Press Green Button
Press Blue Button
Press Blue + Red Buttons
It has to be in that specific sequence, or else the LEDs won’t flash!
Video Examples
(Just realized I should’ve filmed horizontal videos!)
My solution is highly dependent on the sequence, so if the Red button is pressed in step one, the Red LED turns on to signify the completion of the step. Otherwise, it wouldn’t trigger anything. Here’s an example of me pressing some buttons at the wrong time
Finally, I thought it would be fun if I got someone to test it so my suitemate volunteered! She almost got it from the first time! 🙂
Logic
To transition between steps, I used Switch() and created a variable number called step number to move between the steps of my solution sequence. So, when step number = 0, the puzzle only responds to the play pressing the red button.
Improvement
One point of improvement could be adding another LED that flashes when a wrong button is pressed, to add more feedback for the user. I pointed out where that would be included in my code in the comments.
Also, if I had an extra button, I would make a reset button since the user has to get through the puzzle for it to restart or I have to re-upload the program.
Code
Here’s my commented code!
//introduce LED pin variables
int blueLedPin = 10;
int greenLedPin = 11;
int yellowLedPin = 12;
int redLedPin = 13;


//introduce Button pin variables
int redButtonPin = 7;
int yellowButtonPin = 6;
int greenButtonPin = 5;
int blueButtonPin = 4;

//introduce variable to keep track of steps
int stepNo = 0;


void setup() {
  //set pin modes
  pinMode(redLedPin, OUTPUT);
  pinMode(yellowLedPin, OUTPUT);
  pinMode(greenLedPin, OUTPUT);
  pinMode(blueLedPin,OUTPUT);

  pinMode(redButtonPin, INPUT);
  pinMode(yellowButtonPin, INPUT);
  pinMode(greenButtonPin, INPUT);
  pinMode(blueButtonPin, INPUT);

  Serial.begin(9600);

}

void loop() {
  //creating variables for all button states, to read if button is pressed
  int redButtonState = digitalRead(redButtonPin);
  int yellowButtonState = digitalRead(yellowButtonPin);
  int greenButtonState = digitalRead(greenButtonPin);
  int blueButtonState = digitalRead(blueButtonPin);

  //using a switch function to move between steps, this makes the sequence aspect of the puzzle possible.
  switch (stepNo) {
    // 1st color is red, move must be red button
    case 0:
    // checks if red button is pressed, and turns it on then off accordingly
      if (redButtonState ==  HIGH) {
        digitalWrite(redLedPin, HIGH);
        delay(700);
        digitalWrite(redLedPin, LOW);
        //if the step is performed correctly, it moves on to the next step of the puzzle
        stepNo += 1;
        //here, there's a possibility to add an else if statement, where if any of the other buttons are pressed an
        //additional "error" LED light would flash, indicating a mistake
      }
      break;

    case 1:
    //2nd color is orange, move must be red + yellow buttons
      if (yellowButtonState == HIGH && redButtonState == HIGH) {
        digitalWrite(redLedPin, HIGH);
        digitalWrite(yellowLedPin, HIGH);
        delay(700);
        digitalWrite(redLedPin, LOW);
        digitalWrite(yellowLedPin, LOW);
        stepNo += 1;
      }
      break;
    case 2:
    //3rd color is yellow, move must be yellow button
      if (yellowButtonState == HIGH) {
        digitalWrite(yellowLedPin, HIGH);
        delay(700);
        digitalWrite(yellowLedPin, LOW);
        stepNo += 1;
      }
      break;

    case 3:
    //4th color is green, move must be green button
      if (greenButtonState == HIGH) {
        digitalWrite(greenLedPin, HIGH);
        delay(700);
        digitalWrite(greenLedPin, LOW);
        stepNo += 1;
      }
      break;
    case 4:
    //5th color is blue, move must be blue button
      if (blueButtonState == HIGH) {
        digitalWrite(blueLedPin, HIGH);
        delay(700);
        digitalWrite(blueLedPin, LOW);
        stepNo += 1;
      }
      break;

      case 5:
      //6th color is violet, move must be blue + red buttons
      if (blueButtonState == HIGH && redButtonState == HIGH) {
        //introducing a variable for number of times that all the lights will flash, will use in a while loop
        int flashes = 0;
        //10 flashes when the user finishes the pattern
        while(flashes < 10){
          //flashing technique from class, all LEDs on, delay, LEDs off, delay
        digitalWrite(blueLedPin, HIGH);
        digitalWrite(redLedPin, HIGH);
        digitalWrite(yellowLedPin, HIGH);
        digitalWrite(greenLedPin, HIGH);
        delay(400);
        digitalWrite(blueLedPin, LOW);
        digitalWrite(redLedPin, LOW);
        digitalWrite(yellowLedPin, LOW);
        digitalWrite(greenLedPin, LOW);
        delay(400);
        //adding flashes to eventually exit the while loop
        flashes+=1;}

        //restarts the puzzle
        stepNo = 0;
      }
      break;


  }


}
For this week’s assignment, I decided to create a small reaction game where the user will have to press the button corresponding to the color of the LED light that will be lightened up in a random order within a small interval, which is 3 seconds. When the right button is pressed, it will turn off that LED light and another one will light up again. Sketch of original idea
SETTING IT UP
When it came to setting up the hardware part on the breadboard and microcontroller, surprisingly I did not encounter any difficulties as my setup was overall not that complex or confusing. However, it is after a couple days that I realized I had misplaced one of my pins for the red button one row lower than it should be and this caused me to spend hours figuring out why that one button wouldn’t work.
Also, as seen in the first picture above of my original idea, I originally wanted to place the buttons that are the same color as the LED lights in the same row. But later, I decided it would be more interesting and kind of more difficult for the user if the buttons were not in the same row as the LED lights that were the same color.
CODING
This was where I had the most difficulties in mainly because I was not able to code in this new environment aside from Processing, as we’ve been coding on that for so long now.
Coding for randomly lighting up LED lights
For this section of code for the LED lights to light up randomly, I struggled with it originally as I just simply just told it to choose a random number and turn on that random number in correspondence to the LED light, have a little delay, then light up another random one. But, later, I realized that there was so much more needed in it for it to work, such as the fact that during the delay, it won’t do anything so that means that my buttons will not be able to work, therefore I could not use the delay function.
Luckily, I found the “Blink without Delay” example in Arduino and I incorporated that into my own code while configuring it to include the random element.
Coding for Button Press
When coding for the buttons to turn off the corresponding LED lights, I had the most difficulty in understanding the concept about previous and current button states, where after the button is pressed and released in the current frame, I have to set LOW to the previous button state so that the next time it can fit the condition to be a new button press again. (Not sure if I explained it clearly, but that’s the gist.)
My Code
const int GreenLed = 2;
const int RedLed = 3;
const int YellowLed = 4;

int GreenLedState = LOW;
int RedLedState = LOW;
int YellowLedState = LOW;

const int Redbutton = 10;
const int Yellowbutton = 9;
const int Greenbutton = 8;

int prevGreenButtonState = LOW;
int prevRedButtonState = LOW;
int prevYellowButtonState = LOW;

int randomNum; //pick random light to turn on (from pin 2 to pin 4)

unsigned long previousMillis = 0; // will store last time LED was updated

const long interval = 3000; //interval at which to blink (milliseconds)

void setup() {
  // setup all LED pins as outputs
  for (int i = 2; i < 5; i++) {
    pinMode(i, OUTPUT);
  }

  Serial.begin(9600);
  Serial.println(randomNum);

  //setup all button pins as inputs
  for (int i = 8; i < 11; i++) {
    pinMode(i, INPUT);
  }

}
void loop() {
  LEDLightSequence();
  Greenbuttonpress();
  Redbuttonpress();
  Yellowbuttonpress();
}

void LEDLightSequence() {//code to light up random LED light
  randomNum = random(2, 5);//pick random light to turn on (from pin 2 to pin 4)
  Serial.println(randomNum);
  unsigned long currentMillis = millis();
  // check to see if it's time to blink the LED; that is,
  //save the last time you blinked the LED

  //if the difference between the current time and last time you blinked the LED is bigger than
  //the interval at which you want to blink the LED.
  if (currentMillis - previousMillis >= interval) {
    previousMillis = currentMillis;

    //if the LED is off turn it on and vice versa
    if (randomNum == GreenLed && GreenLedState == LOW) {
      GreenLedState = HIGH;
    } else {
      GreenLedState = LOW;
    }
    // set the LED with the ledState of the variable:
    digitalWrite(GreenLed, GreenLedState);

    if (randomNum == RedLed && RedLedState == LOW) {
      RedLedState = HIGH;
    } else {
      RedLedState = LOW;
    }
    digitalWrite(RedLed, RedLedState);

    if (randomNum == YellowLed && YellowLedState == LOW) {
      YellowLedState = HIGH;
    } else {
      YellowLedState = LOW;
    }
    digitalWrite(YellowLed, YellowLedState);
  }
}

void Greenbuttonpress() {
  int currentGreenbutton = digitalRead(Greenbutton); // check if green button is pressed
  if (currentGreenbutton == HIGH && prevGreenButtonState == LOW) { //if the randm number chosen is 2, the Green LED light is lit and the greenbutton was pressed, turn off the green led light
    if (GreenLedState == HIGH) {
      GreenLedState = LOW;
    }
  }

  digitalWrite(GreenLed, GreenLedState);
  prevGreenButtonState = currentGreenbutton;
}

void Redbuttonpress() {
  int currentRedButton = digitalRead(Redbutton); // check if green button is pressed
  if (currentRedButton == HIGH && prevRedButtonState == LOW) { //if current red button is pressed and the previous red button in the last frame wasn't pressed (wasn't pressed before)
    if (RedLedState == HIGH) { //if the red led light is on
      RedLedState = LOW; //turn the red led light off
    }
  }
  digitalWrite(RedLed, RedLedState);
  prevRedButtonState = currentRedButton; //after button is pressed (HIGH) and released (LOW) in current frame, set LOW to prevButtonstate so next time it can be newly pressed again
}

void Yellowbuttonpress() {
  int currentYellowButton = digitalRead(Yellowbutton); // check if green button is pressed
  if (currentYellowButton == HIGH && prevYellowButtonState == LOW) { //if current red button is pressed and the previous red button in the last frame wasn't pressed (wasn't pressed before)
    if (YellowLedState == HIGH) { //if the red led light is on
      YellowLedState = LOW; //turn the red led light off
    }
  }
  digitalWrite(YellowLed, YellowLedState);
  prevYellowButtonState = currentYellowButton; //after button is pressed (HIGH) and released (LOW) in current frame, set LOW to prevButtonstate so next time it can be newly pressed again
}
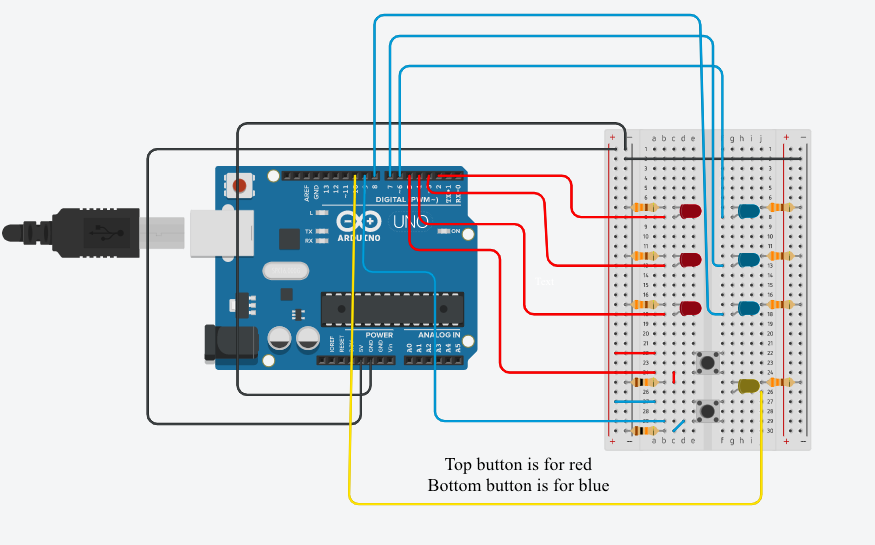
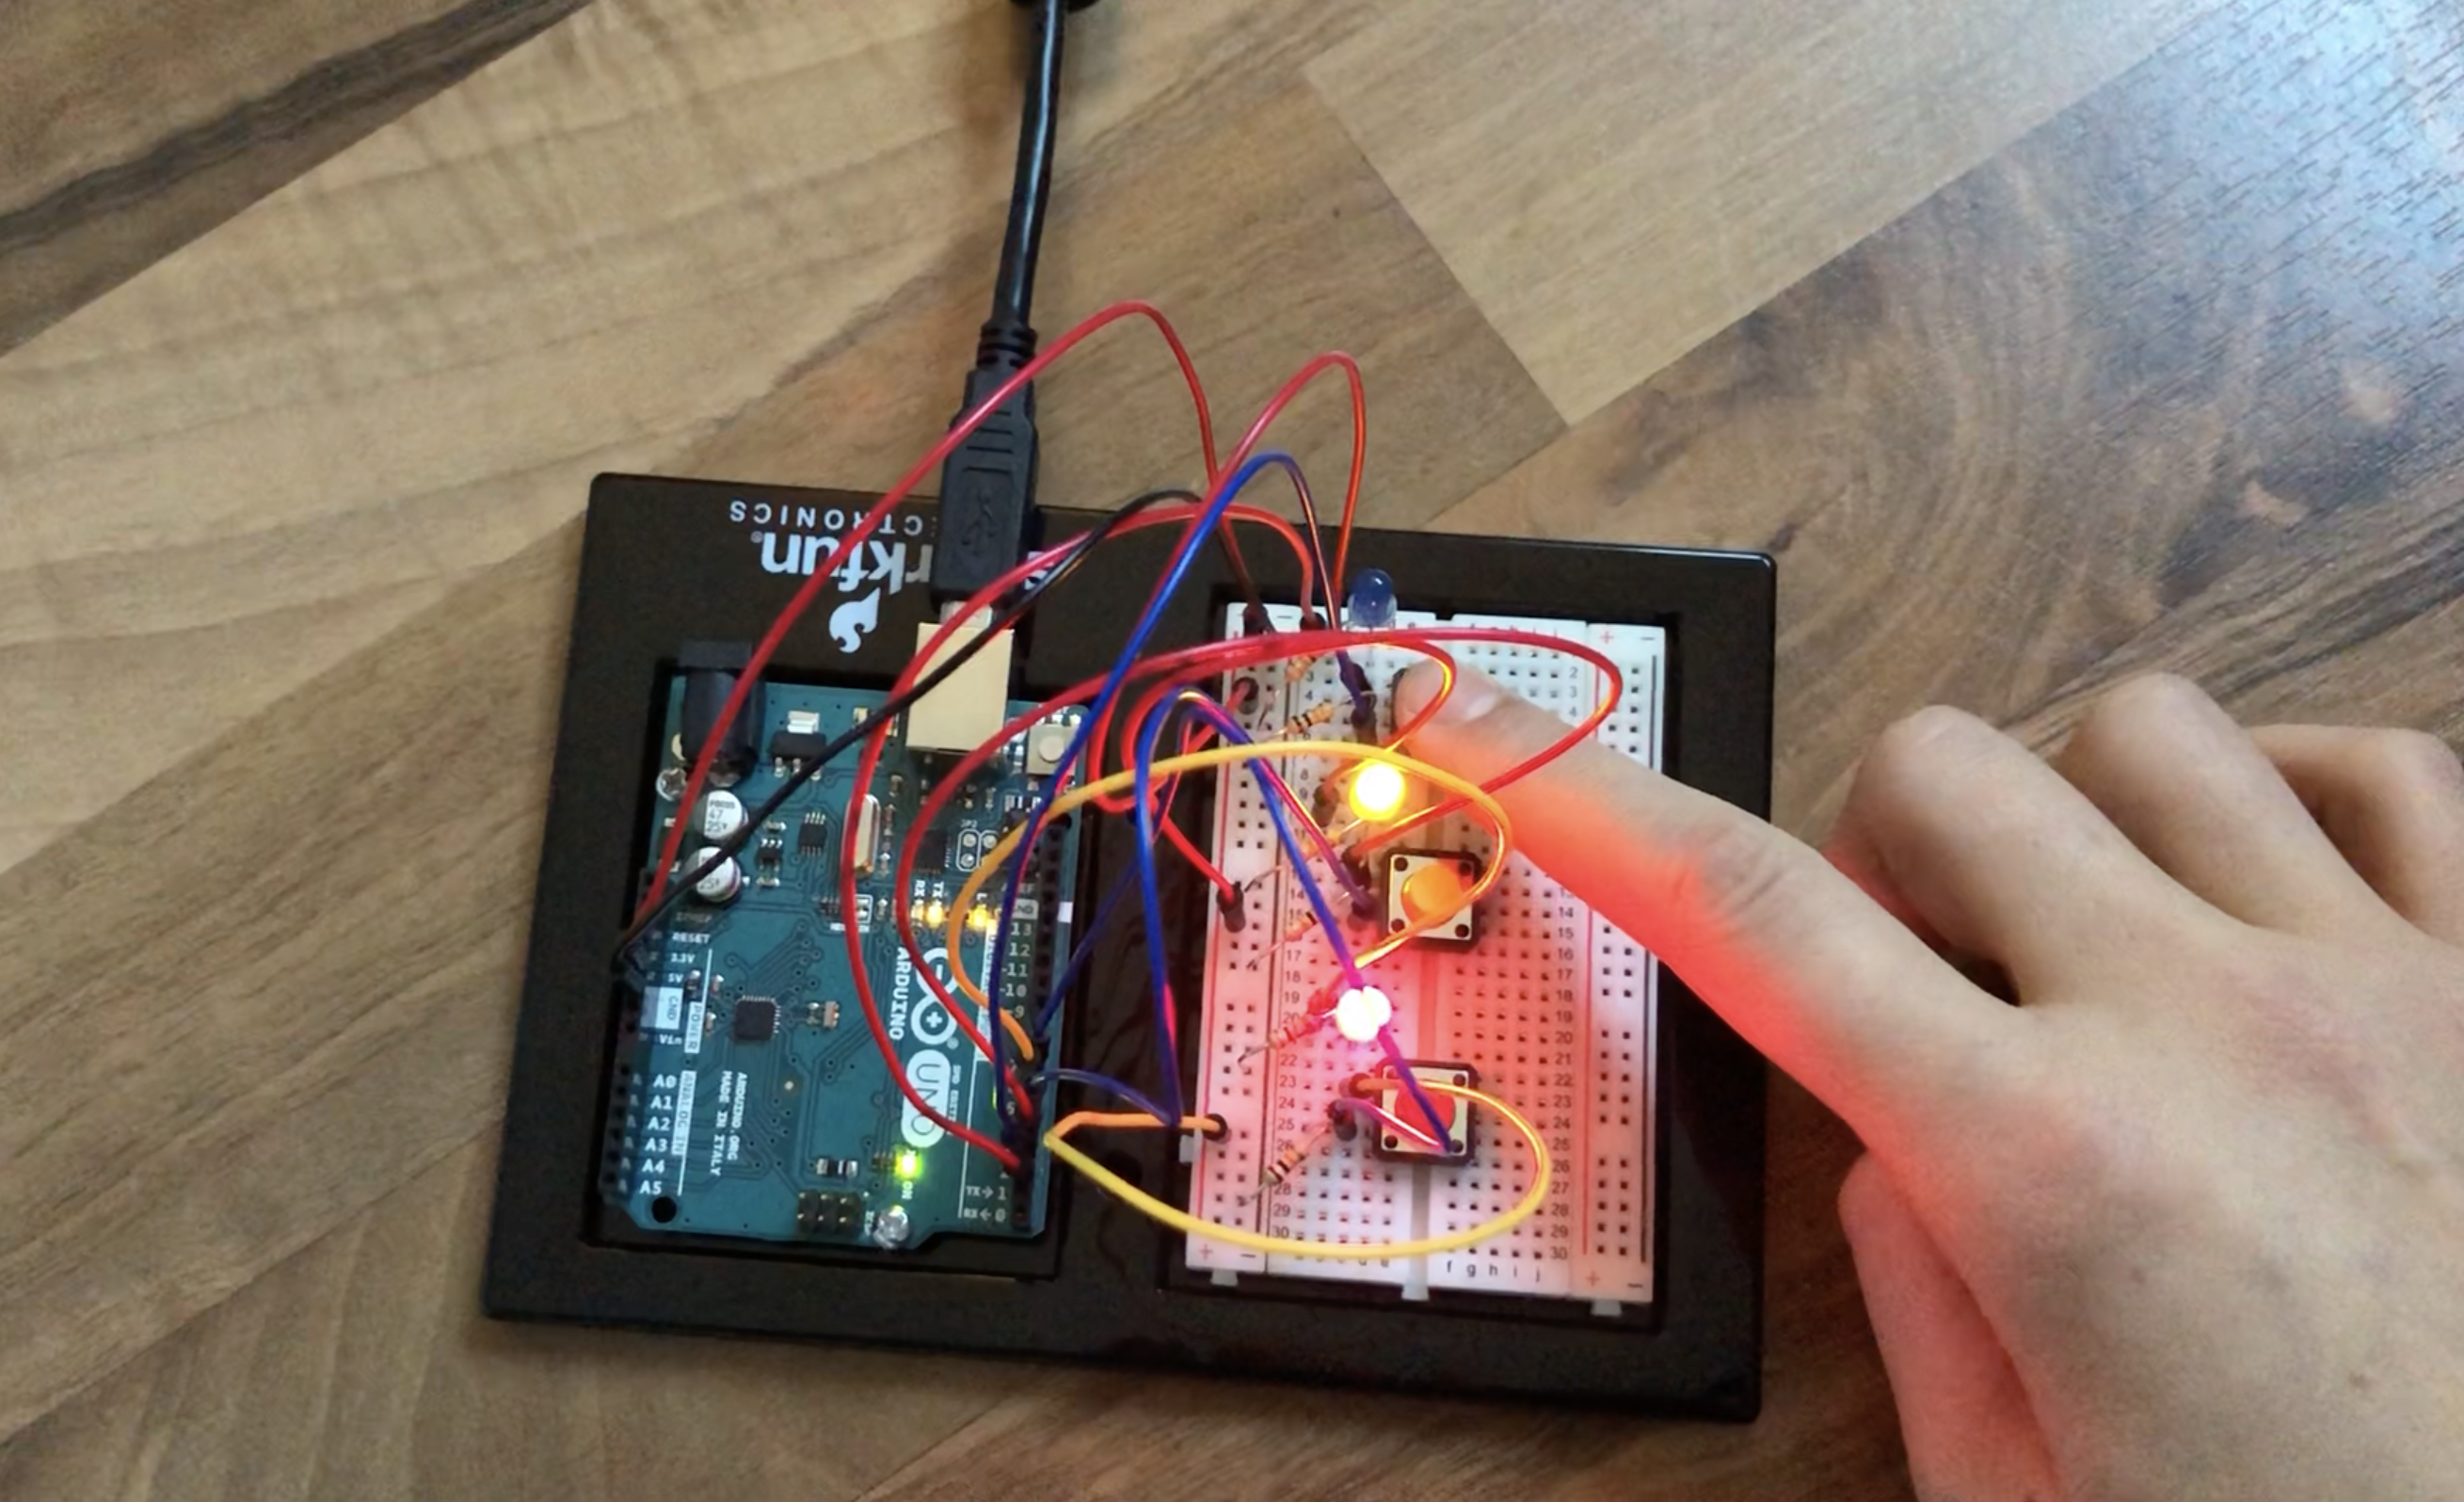
For this week’s assignment, I decided to make some sort of game where you have to press a button before the light reaches the bottom.
The light goes through three colored LEDs before it does reaches the bottom (which is a common yellow LED).
As I said, you have to press the corresponding colored button to “stop” the light from falling. If the light does reach the bottom/yellow LED, all the other colored LEDs will light up at once signaling you lost.
I only did this with 2 buttons, 6 LEDs (3 for each button) + an extra common LED, because including 3 buttons made it way too messy and it wouldn’t fit. However, I do include a version with 3 buttons made on an online simulator at the end.
This is what the circuit looks like for the 2-button version:
code
I define all the pins before setup, including 2 arrays for the LED pins.
In setup(), I set the pins to OUTPUT for the LEDs, and INPUT for the buttons.
I then have two functions right before loop(). One is RED(), the other is BLUE(). They do the exact same thing, except that RED operates on the array of red LEDs, while BLUE operates on the array of blue LEDs.
Inside loop(), I just call these functions based on an if-statement.
int rowN;
int l1 = 2;
int l2  = 3;
int l3 = 4;
int l4 = 5;
int l5  = 6;
int l6 = 7;
int b1 = 8;
int b2 = 9;
int common = 10;
int checkCommon =0; //to check if the common LED is on
int lost = 0; //to check if you lost
int pressed1 = 0; //to check if red button is pressed
int pressed2 = 0; //to check if blue button is pressed
int row1[4] = {l1,l2,l3,common}; //array of red LEDs
int row2[4] = {l4,l5,l6,common}; //array of blue LEDs
void setup() {
  // put your setup code here, to run once:
  for (int i= 0; i<3; i++)
  {
    pinMode(row1[i],OUTPUT);
  }
  for (int i= 0; i<3; i++)
  {
    pinMode(row2[i],OUTPUT);
  }
  pinMode(b1,INPUT);
  pinMode(b2,INPUT);
  pinMode(common,OUTPUT);
  randomSeed(digitalRead(0));
  rowN = int(random(1,3));
}
void RED()
{
  if(pressed1 == 0)
  {
    for (int i= 0; i<4; i++)
    {
      checkCommon=0;
      if (digitalRead(b1) == HIGH)
      {
        pressed1 = 1;
        digitalWrite(row1[i],LOW);
        delay(500);
        break;
      }
      else
      {
        checkCommon =1;
      }
      delay(200);
      digitalWrite(row1[i],HIGH);
      delay(100);
      digitalWrite(row1[i],LOW);
      if (i==3 && checkCommon ==1)
      {
        delay(200);
        digitalWrite(common, LOW);
        lost = 1;
      }
    }
  }
  if (lost == 1)
  {
    for (int i= 0; i<3; i++)
    {
      digitalWrite(row1[i],HIGH);
      digitalWrite(row2[i],HIGH);
    }
    delay(500);
    for (int i= 0; i<3; i++)
    {
      digitalWrite(row1[i],LOW);
      digitalWrite(row2[i],LOW);
    }
    lost = 0;
  }
  if (pressed1 == 1)
  {
    pressed1 = 0;
  }
}
void BLUE()
{
  if(pressed2 ==0)
  {
    for (int i= 0; i<4; i++)
    {
      checkCommon=0;
      if (digitalRead(b2) == HIGH)
      {
        pressed2 = 1;
        digitalWrite(row2[i],LOW);
        delay(500);
        break;
      }
      else
      {
        checkCommon =1;
      }
      delay(200);
      digitalWrite(row2[i],HIGH);
      delay(100);
      digitalWrite(row2[i],LOW);
      if (i==3 && checkCommon ==1)
      {
        delay(200);
        digitalWrite(common, LOW);
        lost = 1;
      }
    }
  }
  if (lost == 1)
  {
    for (int i= 0; i<3; i++)
    {
      digitalWrite(row1[i],HIGH);
      digitalWrite(row2[i],HIGH);
    }
    delay(500);
    for (int i= 0; i<3; i++)
    {
      digitalWrite(row1[i],LOW);
      digitalWrite(row2[i],LOW);
    }
    lost = 0;
  }
  if (pressed2 == 1)
  {
    pressed2 = 0;
  }
}

void loop() {
  // put your main code here, to run repeatedly:
  //red case
  if (rowN == 1)
  {
    RED();
    rowN = int(random(1,3));
  }
  //blue case
  if (rowN == 2)
  {
    BLUE();
    rowN = int(random(1,3));
  }
}
Steps
First, I started out by making the LED arrays and randomly switching between them.
Then, I added the common yellow LED, and made all the other colored LEDs light up at once if the light reaches this common LED. This will mean you lost.
final outcome
Adding the push-buttons and their functionalities gave this final result:
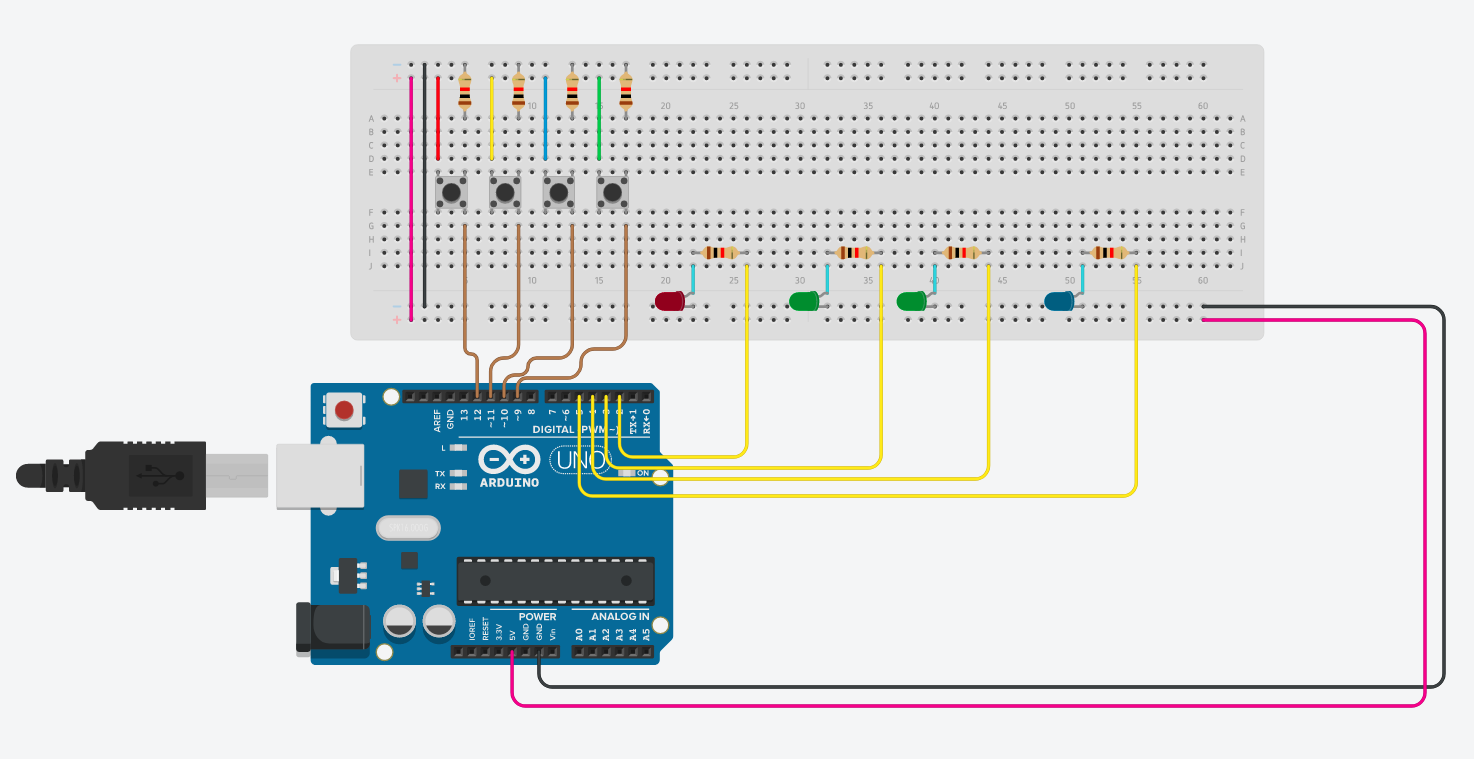
3 buttons version
The assignment asked for at least 3 buttons and at least 3 LEDs, but since three buttons were too hard to fit on the breadboard in my case, I made a version with three buttons on an online simulator.
This is what the circuit looks like
For my project this week, I decided to make a communication system using a series of LEDs and buttons and the ability for you to record your own message in
…
wait for it
….
MORSE CODE
and then play it back as many times as you’d like.
When the Arduino first starts up, the Arduino will flash SOS denoted by:
…—…
and then will wait for actions.
You can record your own message by pressing the blue button. When red led lights up it means that it will record a message when you push buttons. When you push the red button it will flash two green leds and will record a dash, when you push the yellow button it will flash one green led and will record a dot.
You can stop the recording by pushing the blue button, the red led will turn off.
You can play back the message that you just recorded pushing the green button. This will turn on the blue led indicating that you are now in playback mode and will flash the message you just recorded.
You can push the green button as many times as you want to playback the record message.
// use static array to store the recorded codes
int message[500];
int messageSize = 0;
int sos[9] = {0, 0, 0, 1, 1, 1, 0, 0, 0};
int playSos = true;
//pins
int dashPin = 12;
int dotPin = 11;
int recordStopPin = 10;
int playPin = 9;

//one led is dot
//two leds are dash
int led1Pin = 3;
int led2Pin = 2;
int recordPin = 4;
int playingLedPin = 5;

//flags
bool record = false;
bool isPlaying = false;


void setup() {
  Serial.begin(9600);
  pinMode(dashPin, INPUT);
  pinMode(dotPin, INPUT);
  pinMode(recordStopPin, INPUT);
  pinMode(playPin, INPUT);
  pinMode(led1Pin, OUTPUT);
  pinMode(led2Pin, OUTPUT);
  pinMode(recordPin, OUTPUT);
  pinMode(playingLedPin, OUTPUT);
//  play(sos, 9);/
}

void loop() {
  readPin();
  if (record) {
    digitalWrite(recordPin, HIGH);
  } else {
    digitalWrite(recordPin, LOW);
  }
  if (isPlaying) {
    digitalWrite(playingLedPin, HIGH);
    play(message, messageSize);
  } else {
    digitalWrite(playingLedPin, LOW);
  }

  if (playSos) {
    play(sos, 9);
    playSos = false;
  }
}

// register a dash
void registerDash() {
  addDigit(1);
}

// register a dot
void registerDot() {
  addDigit(0);
}

// add the digit to the array
void addDigit(int add) {
  message[messageSize] = add;
  Serial.println(message[messageSize]);
  messageSize++;
}

//
void readPin() {
  if (digitalRead(dashPin) == HIGH && !isPlaying) {
    if (record) {
      registerDash();
    }
    digitalWrite(led1Pin, HIGH);
    digitalWrite(led2Pin, HIGH);
    delay(500);
    digitalWrite(led1Pin, LOW);
    digitalWrite(led2Pin, LOW);
  }
  if (digitalRead(dotPin) == HIGH && !isPlaying) {
    if (record) {
      registerDot();
    }
    digitalWrite(led1Pin, HIGH);
    delay(500);
    digitalWrite(led1Pin, LOW);
  }

  if (digitalRead(recordStopPin) == HIGH && !isPlaying) { //set recording state
    Serial.println("record/stop");
    record = !record;
    delay(500);
  }

  if (digitalRead(playPin) == HIGH && !record) {
    Serial.println("play");
    isPlaying = !isPlaying;
    delay(500);
  }
}

int play(int arr[], int arrSize) {
  for (int i = 0; i < arrSize; i++) {
    if (arr[i] == 1) {
      digitalWrite(led1Pin, HIGH);
      digitalWrite(led2Pin, HIGH);
      delay(500);
      digitalWrite(led1Pin, LOW);
      digitalWrite(led2Pin, LOW);
    }
    if (arr[i] == 0) {
      digitalWrite(led1Pin, HIGH);
      delay(500);
      digitalWrite(led1Pin, LOW);
    }
    delay(500);
  }
  isPlaying = false;
  return 0;
}

//notes
// -1 is invalid
// 0 is a dot
// 1 is a dash
// first button is for registering a dash
// second button is for registering a dot
// third button is to record
// forth button is to play the saved recording
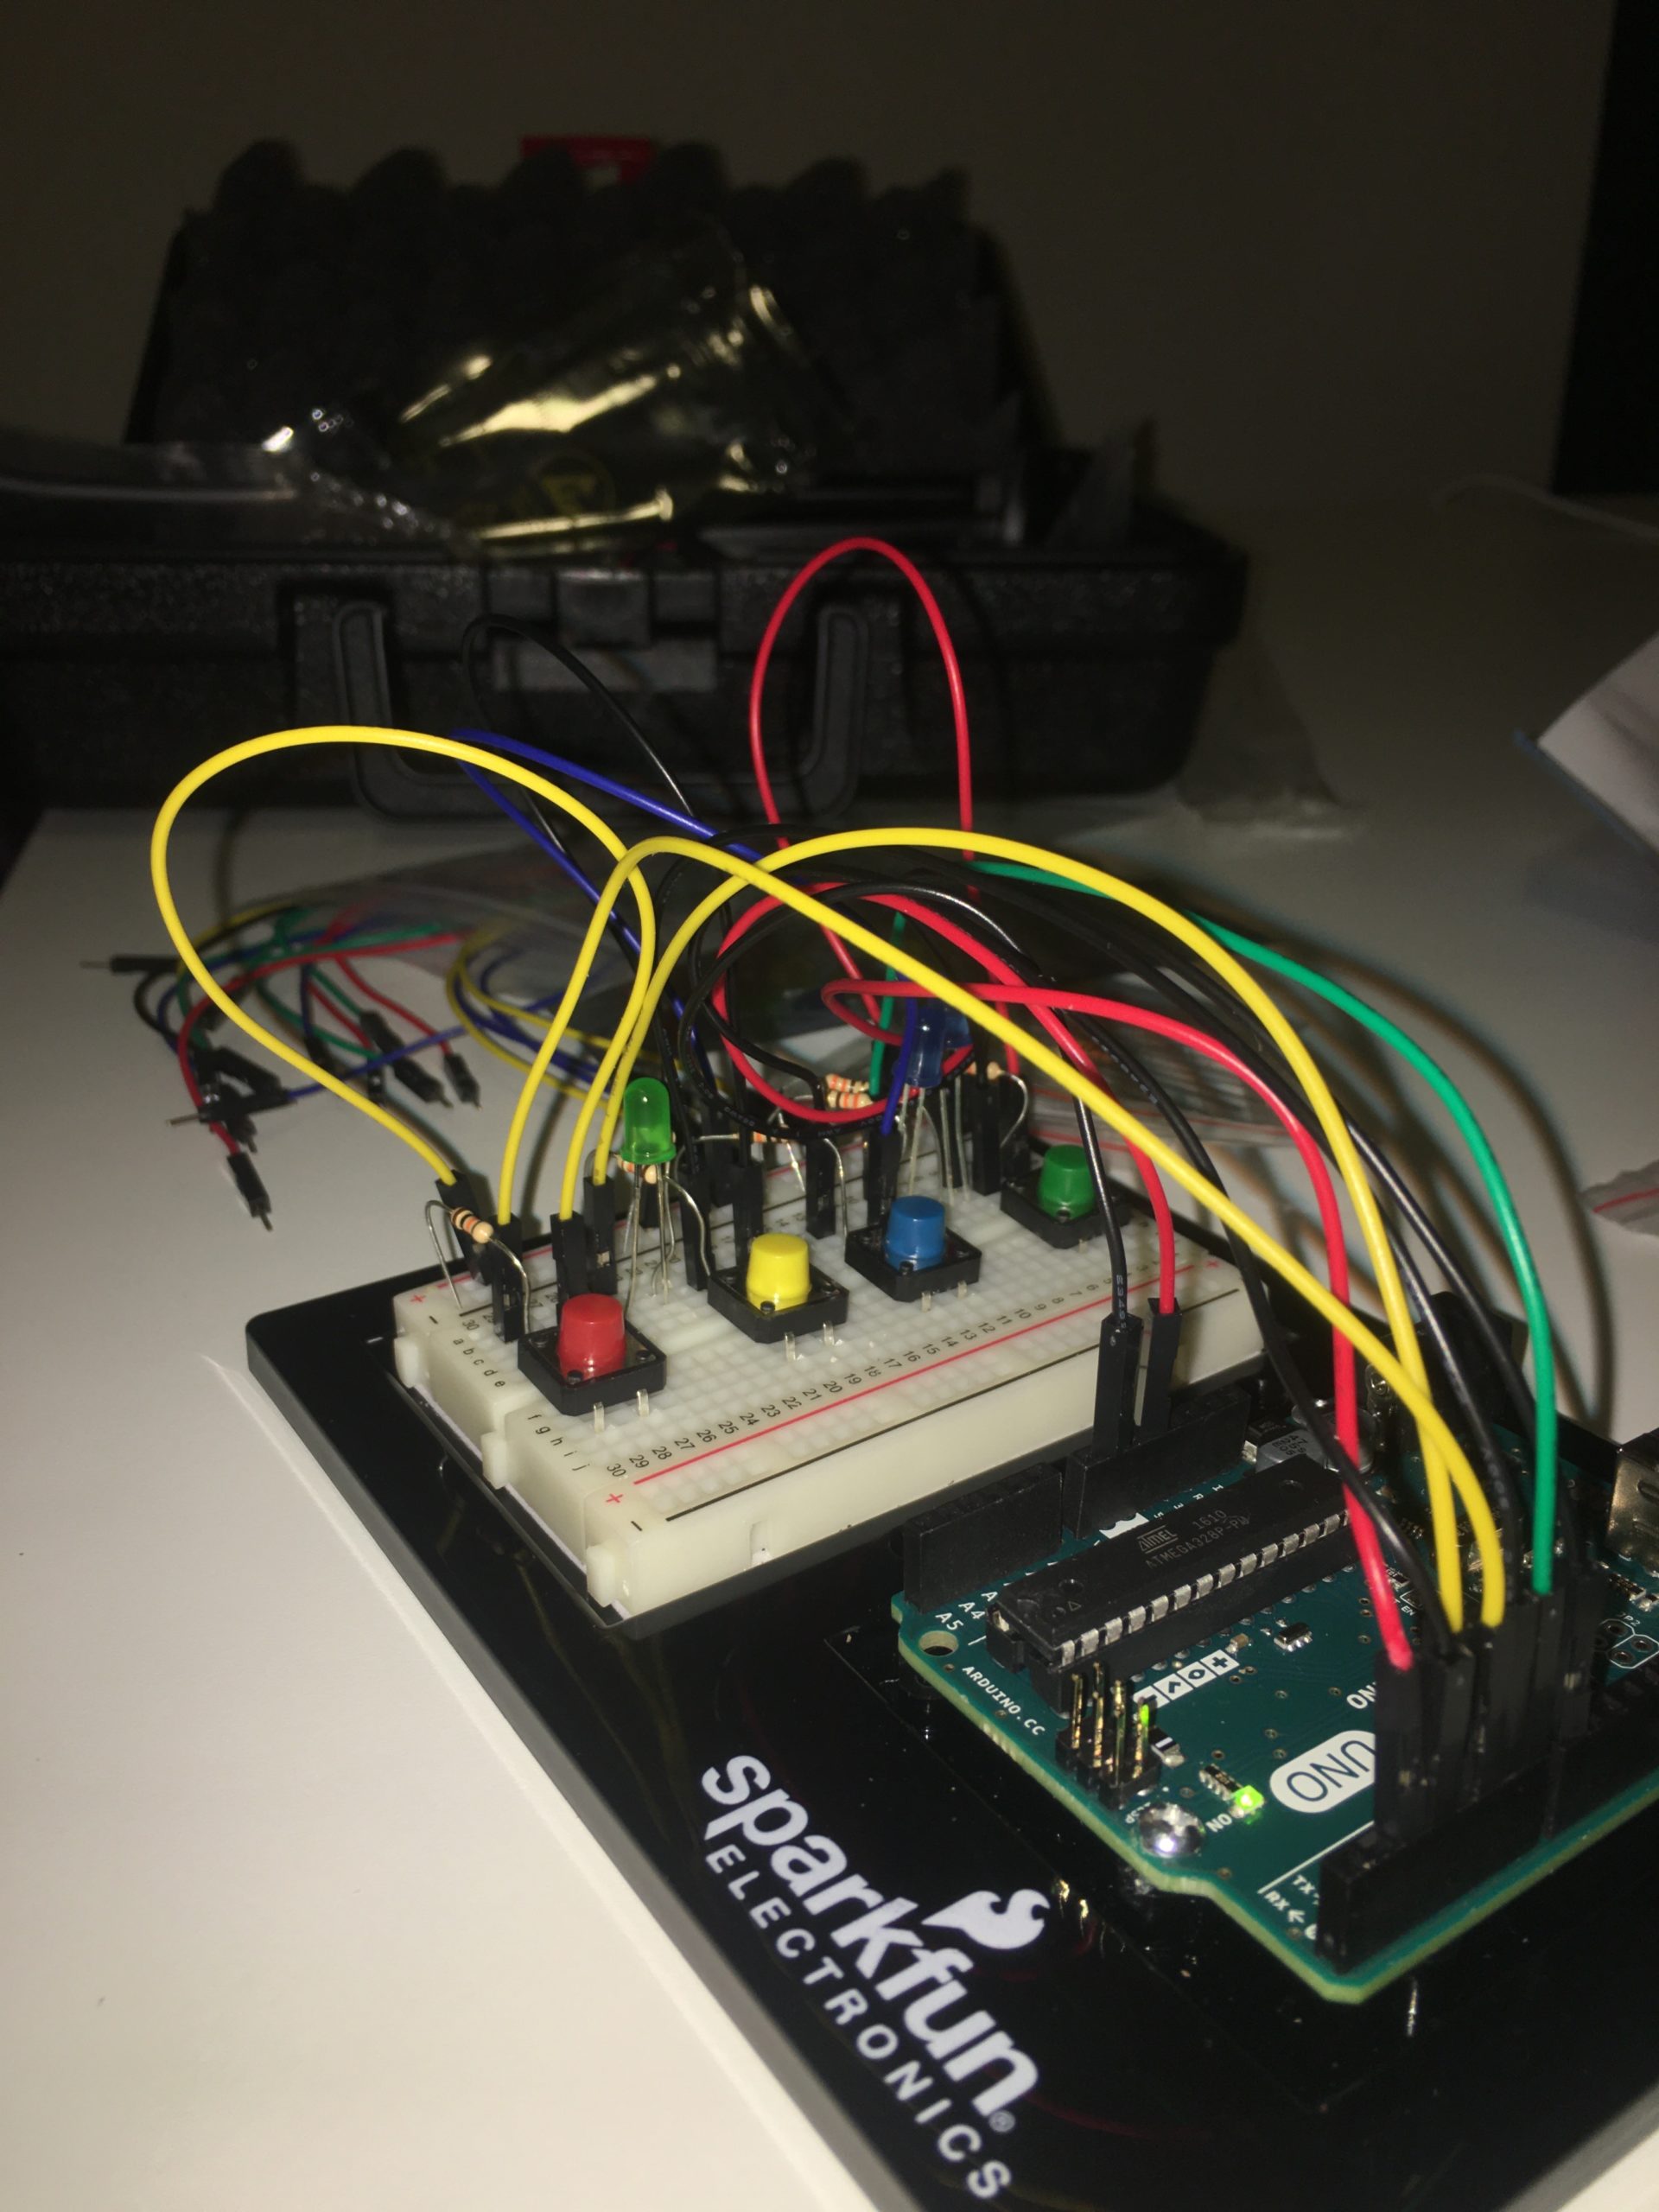
My first idea for this assignment was to create a sort of pattern game where the lights show a pattern, and you are required to mimic that pattern to unlock the fourth (blue light). Unfortunately, I wasn’t entirely sure how to accomplish that, so decided to experiment with other ideas. Here is what my code does:
Red button: turns on each led one at a time, consecutively, then all off.
Blue button: turns all LEDs on at the same time, for 3 seconds then turns them off.
Green button: usually just turns green like a regular switch, but when pushed after the red button, will turn on both green and red
Yellow button: does a pattern where two lights are turned on at once.
This assignment was particularly interesting because when I faced an issue, I was unsure whether I should debug from the code or from the physical board. At some points, even though I was sure that everything in the circuit was working fine, my green button never turned off and I began considering a fault in the circuit. (ultimately it was my code). I also faced a lot of problems getting the initial circuit to work, because of the number of wires and resistors, and small breadboard. Eventually what worked for me was colour coordinating the wires to the colors (i used white for power, instead of red just this time so that I could colour coordinate).
int greenButton = 2;
int greenLed = 3;
int yellowButton = 4;
int yellowLed = 5;
int redButton = 6;
int redLed = 7;
int blueButton = 8;
int blueLed = 9;
int redState = LOW;
int redButtonState = LOW;

void setup() {
  // set pin modes
  pinMode(redLed, OUTPUT);
  pinMode(redButton, INPUT);
  Serial.begin(9600);
  pinMode(greenLed, OUTPUT);
  pinMode(greenButton, INPUT);
  Serial.begin(9600);
  pinMode(yellowLed, OUTPUT);
  pinMode(yellowButton, INPUT);
  Serial.begin(9600);
  pinMode(blueLed, OUTPUT);
  pinMode(blueButton, INPUT);
  Serial.begin(9600);
}


void loop() {
  //green button that lights green regularly, but if pushed after the red button, the red lights up too
  int greenState = digitalRead(greenButton);
  Serial.println(greenLed);
  digitalWrite(greenLed, greenState);
  if (greenState == HIGH && redButtonState == HIGH){
    digitalWrite(redLed, greenState);
    delay(1000);
    redButtonState = LOW;
  }

  int redState = digitalRead(redButton);
  Serial.println(redLed);
  digitalWrite(redLed, redState);

  //yellow makes a pattern appear- two leds at a time
  int yellowState = digitalRead(yellowButton);
  Serial.println(yellowLed);
  digitalWrite(yellowLed, yellowState);
  if (yellowState == HIGH){
    digitalWrite(blueLed, yellowState);
    digitalWrite(yellowLed, yellowState);
    delay(500);
    digitalWrite(greenLed, yellowState);
    digitalWrite(redLed, yellowState);
    delay(500);
  }
  // turns all the leds at once, for 3 seconds
  int blueState = digitalRead(blueButton);
  Serial.println(blueLed);
  digitalWrite(blueLed, blueState);
  if (blueState == HIGH ) {
    digitalWrite(redLed, blueState);
    digitalWrite(greenLed, blueState);
    digitalWrite(yellowLed, blueState);
    delay(3000);
  }

  // turns each led one at a time with a one second delay
  if (redState == HIGH) {
    delay(1000);
    digitalWrite(blueLed, redState);
    delay(1000);
    digitalWrite(greenLed, redState);
    delay(1000);
    digitalWrite(yellowLed, redState);
    delay(1000);
    digitalWrite(redLed, redState);
    delay(1000);
    redButtonState = HIGH;
  }


}
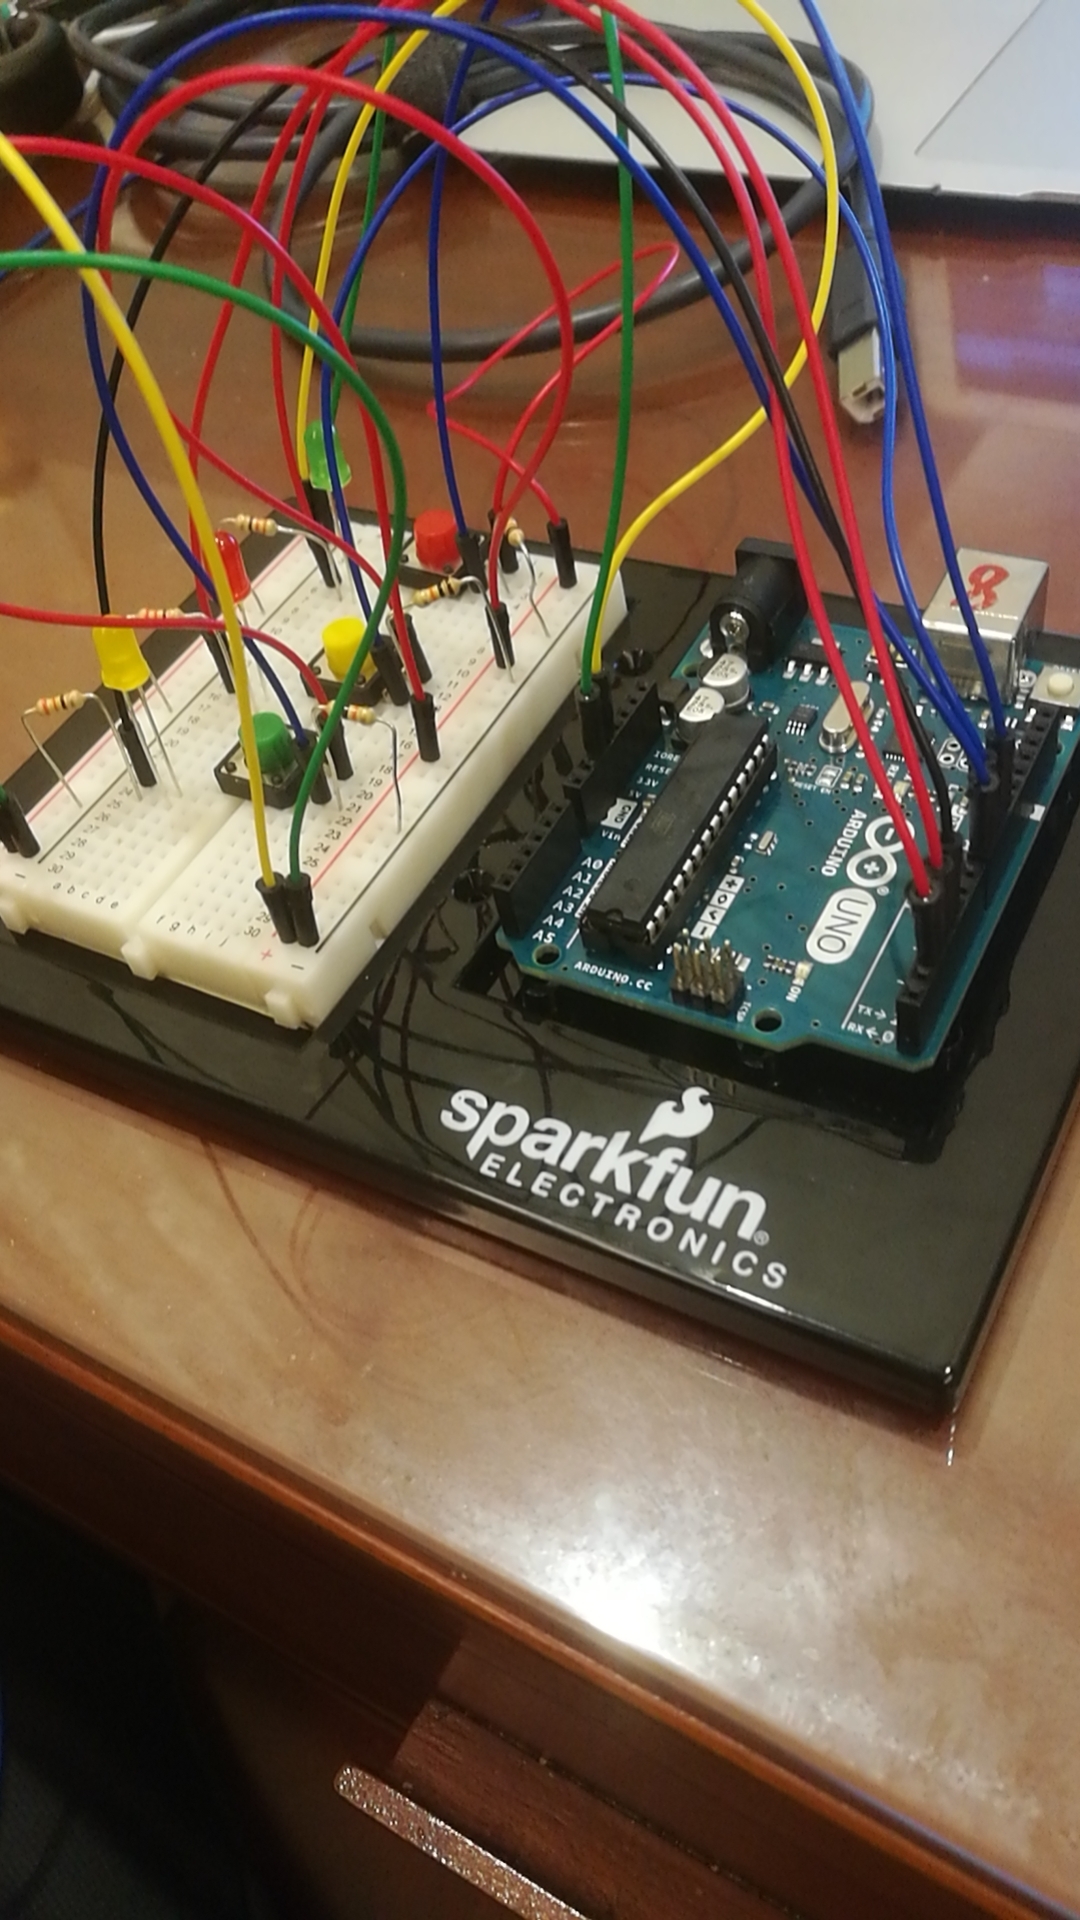
3 hours ago I was sitting in front of my Arduino kit and was absolutely terrified: What on Earth do I do with all these lights and buttons?!!
After a couple of YouTube tutorials and going back to our class recording, I slowly figured out where all these wires go, how to connect a button, and an LED light.
Soo…I managed to get a circuit of 4 buttons and 3 LED lights (let’s call them B1, B2, and G):
button #0 does not trigger anything,
button #3 triggers two lights – B1 and G,
button #2 triggers B1,
button #1 triggers G.
If you may have noticed, B2 cannot be triggered by pressing on any of the single buttons, so there has to be some trick around this! Your task is to figure out which and trigger all three lights at the same time (preferably with a minimum number of buttons pressed).
The solution is to press button #0 and #1 simultaneously to trigger B2 and G, and then press button #3 to trigger B1.
Amina’s Arduino
Here is the code:
// declare pins and buttons
int ledPin1 = 2;
int buttonPin1 = 3;

int ledPin2 = 4;
int buttonPin2 = 5;

int ledPin3 = 7;
int buttonPin3 = 6;

int buttonPin4 = 8;

void setup() {
  // put your setup code here, to run once:
  pinMode(ledPin1, OUTPUT);
  pinMode(buttonPin1, INPUT);
  Serial.begin(9600);

  pinMode(ledPin2, OUTPUT);
  pinMode(buttonPin2, INPUT);
  Serial.begin(9600);
}

void loop() {
  // green light
  int buttonState1 = digitalRead(buttonPin1);
  Serial.println(buttonState1);
  digitalWrite(ledPin2, buttonState1); // HIGH = 1 or true

  // green light
  int buttonState2 = digitalRead(buttonPin2);
  Serial.println(buttonState2);
  digitalWrite(ledPin2, buttonState2);

  // blue light
  int buttonState3 = digitalRead(buttonPin3);
  Serial.println(buttonState3);
  digitalWrite(ledPin3, buttonState3);

  // blue and green
  int buttonState4 = digitalRead(buttonPin4);
  if (buttonState4 == buttonState1)
    digitalWrite(ledPin1, buttonState4);
}
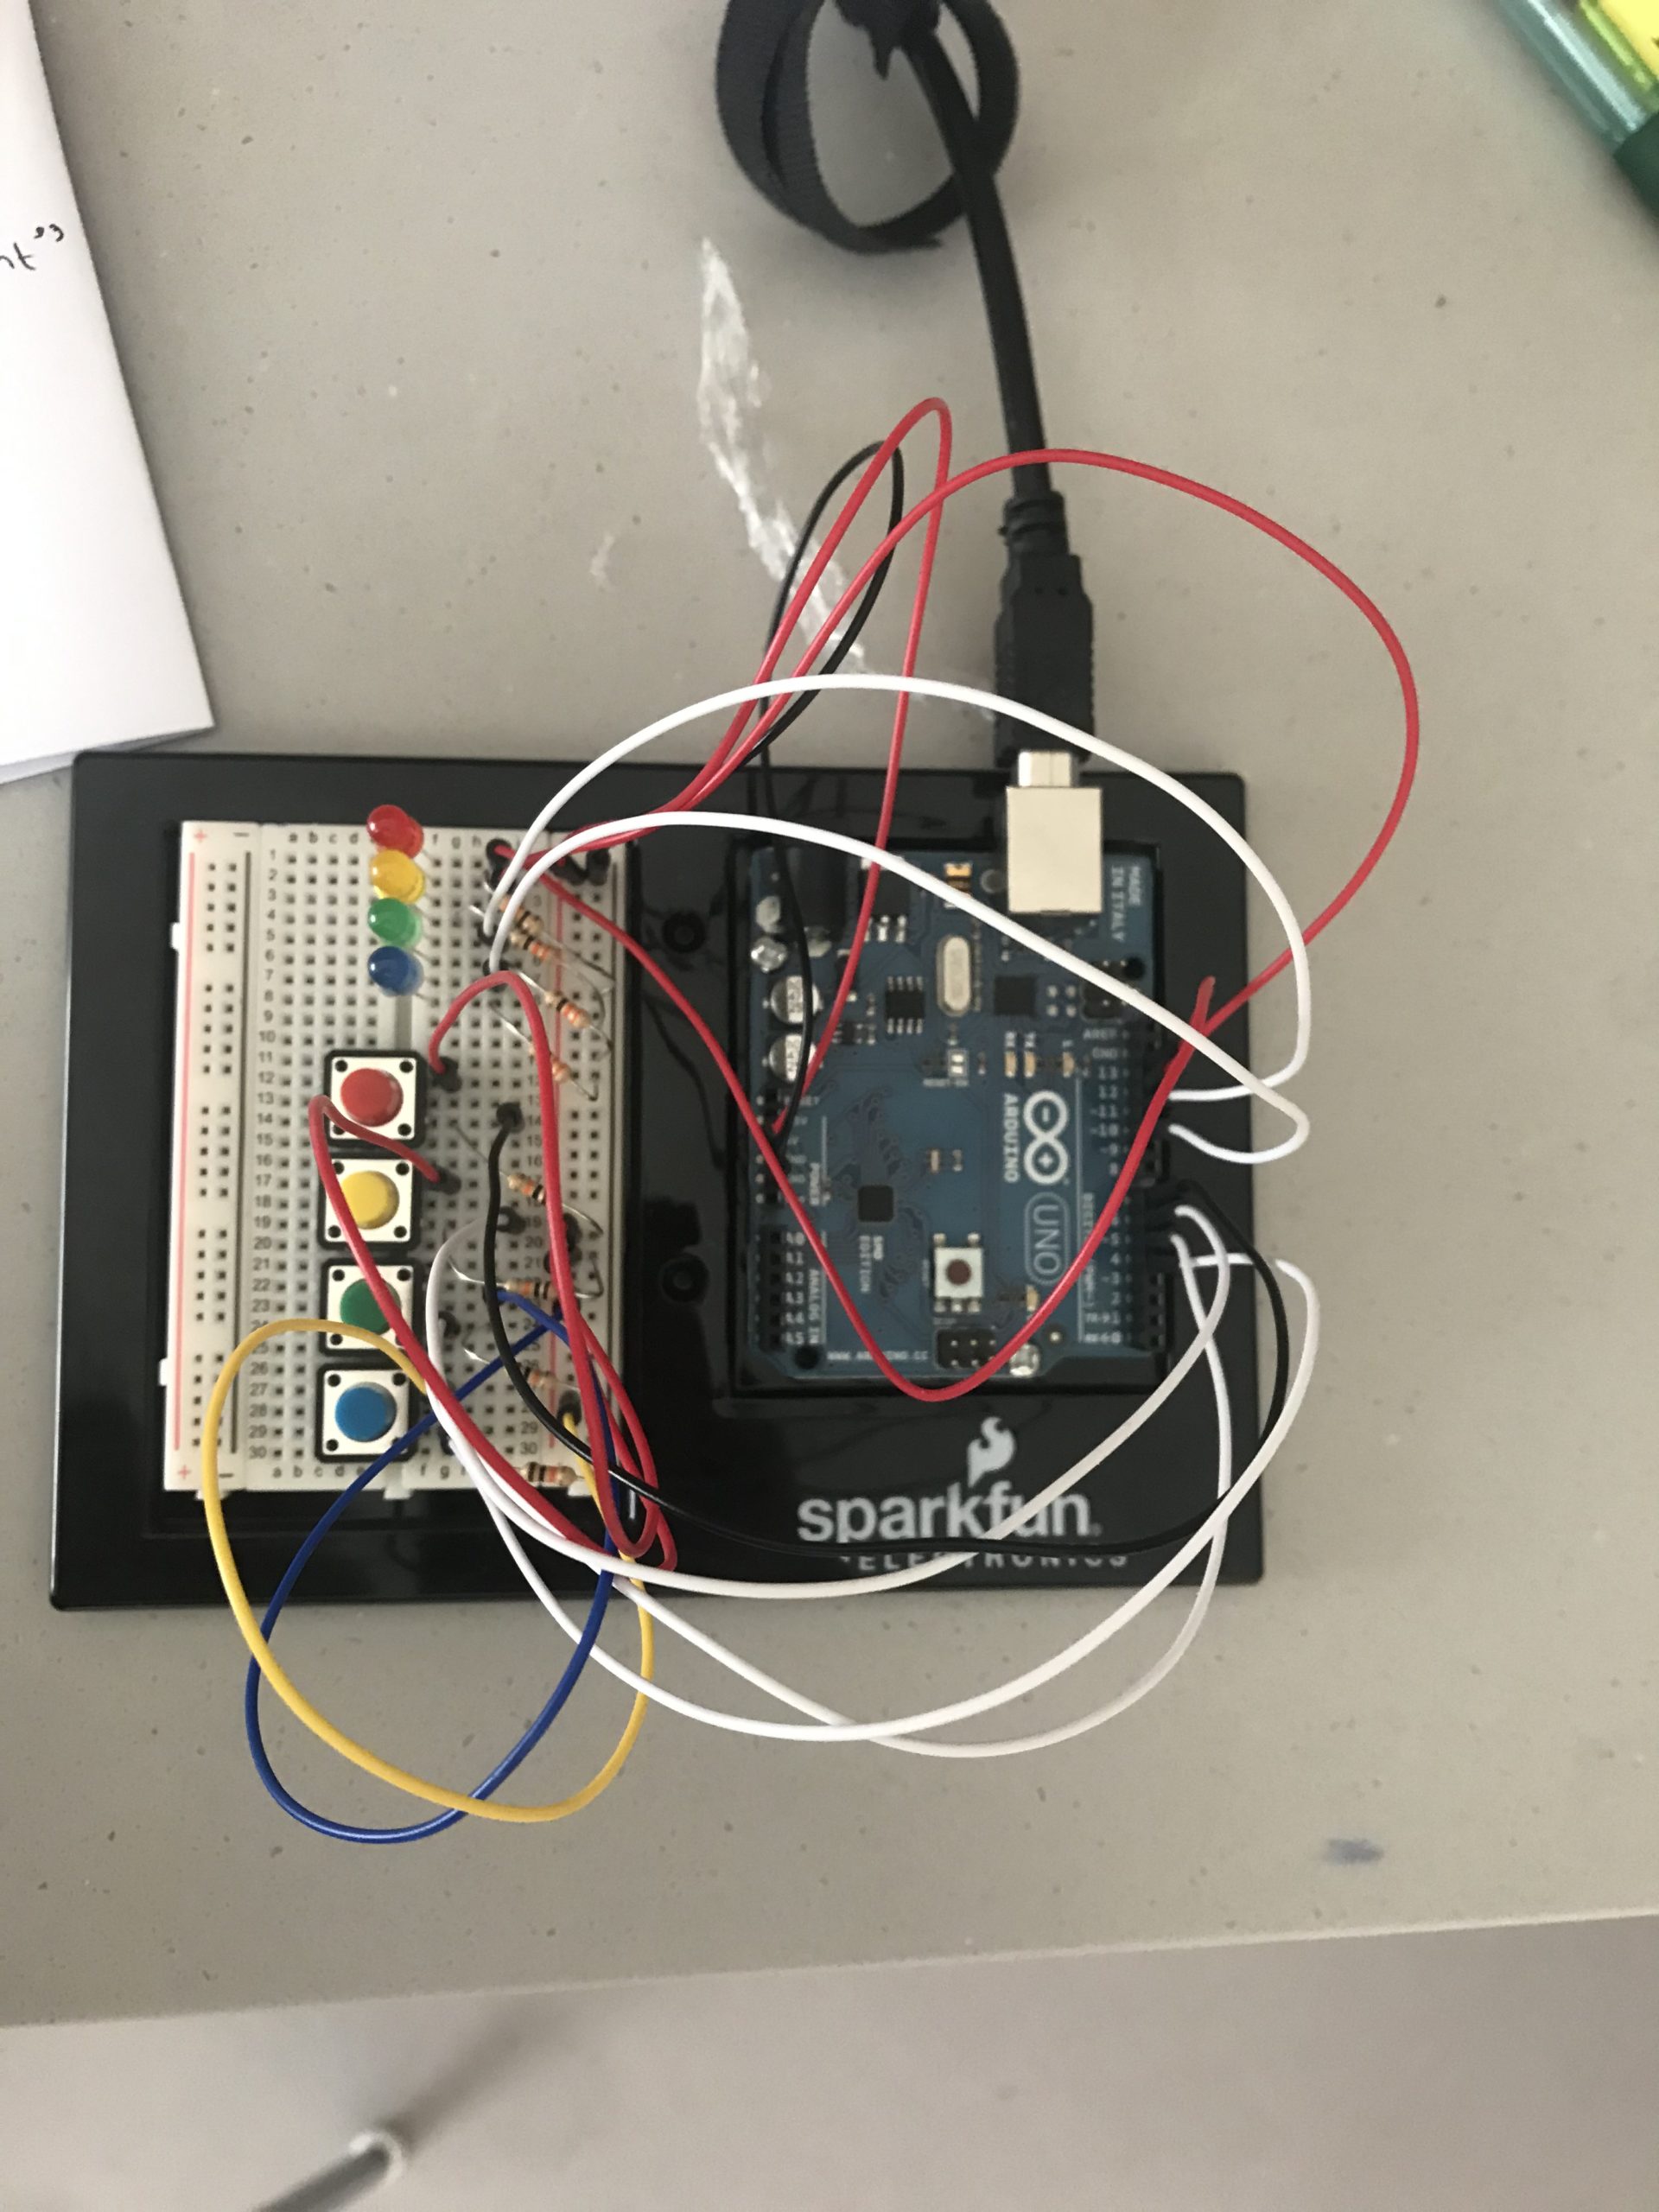
For this first Arduino exercise, I wired up three LEDs and three buttons in parallel. On my board, they are all mapped logically with the same color of button and LED next to each other. But when clicking, this mental mapping does not completely translate to the output. The red and yellow button work as we would expect them to and turn on the red and yellow LED respectively. The blue button, however, turns on both the red and yellow LEDs but not the blue one. How then can we turn on the blue LED?
int blueledPin = 2;
int bluebuttonPin = 3;
int yellowledPin = 4;
int yellowbuttonPin = 5;
int redledPin = 6;
int redbuttonPin = 7;

void setup() {
  //BLUE button + LED
  pinMode(blueledPin, OUTPUT);
  pinMode(bluebuttonPin, INPUT);
  Serial.begin(9600);

  //YELLOW button + LED
  pinMode(yellowledPin, OUTPUT);
  pinMode(yellowbuttonPin, INPUT);
  Serial.begin(9600);

  //RED button + LED
  pinMode(redledPin, OUTPUT);
  pinMode(redbuttonPin, INPUT);
  Serial.begin(9600);
}

void loop() {
  //BLUE button triggers RED and YELLOW LED
  int bluebuttonState = digitalRead(bluebuttonPin);
  Serial.println(bluebuttonPin);
  digitalWrite(redledPin, bluebuttonState);
  digitalWrite(yellowledPin, bluebuttonState);

  //YELLOW button triggers YELLOW LED
  int yellowbuttonState = digitalRead(yellowbuttonPin);
  Serial.println(yellowbuttonPin);
  digitalWrite(yellowledPin, yellowbuttonState);

  //RED button triggers RED LED
  int redbuttonState = digitalRead(redbuttonPin);
  Serial.println(redbuttonPin);
  digitalWrite(redledPin, redbuttonState);

  //if YELLOW and RED button pressed turn on BLUE LED
  if (redbuttonState == yellowbuttonState) {
    digitalWrite(blueledPin, redbuttonState);
    }
}
Solution: Pressing the red and yellow button together will turn on the blue LED.
The project started out as not knowing which artistic direction to take. Initially I wanted to create a tricycle based POV going through the halls of the outlook hotel inspired by the shining.
It was too challenging, so I tried to make a candy based game where when points were won, the character’s waist would grow in size.
I achieved some elements of it. But not fully (you can find the documentation for that in older posts.)
Finally, I decided to combine the two. A ghost going through the out look hotel, to find Johnny in the secret door if he does not collide with the falling candy droplets.
Building upon what I had already, I decided to develop my game much further.
Initial issues
I had many issues at first which include: pressing any key would make Trump move in place, if you held down an arrow key and jumped you stopped moving once you landed, the jump was very abrupt and strictly vertical which was weird for the level of realism in the game, shooting would stop the motion of Trump, and the bullets would appear but not move at all.
Resolving issues, help from Jack
I resolved these issues using many different lines of code where instead of doing most of the work in the main code, I kept creating functions which do the tasks in order for me to be able to keep calling them in multiple situations. I made sure to add “keyCode = …” under each if condition if keyPressed and otherwise just keep direction = direction, which even enabled me to allow motion using w, a, s, d as well. Instead of just using keyPressed in draw loop for all, I used the function one outside to call on the act of shooting and jumping just once whenever the keys are pressed and not every frame.
By asking Jack for some help, we figured out I must also use the keyReleased function outside the draw loop to decide what the game should look like the moment the player releases the important keys to keep the playing going. Jack also helped me with the concept of flying the bullet where I had the code in the main tab and the motion was called upon once in the draw loop but we made it a function in the class instead that is called upon continuously. I also added a small increment/decrement in the x-dimension for Trump when he jumps sideways to make it more realistic.
Jack also introduced the concept of saving the previous frame to me, where I used it to make sure no two bullets are created within a certain amount of frames, and similarly with the coronas. This made the game so much more realistic and intuitive, especially when you keep holding the shooting key.
Further development
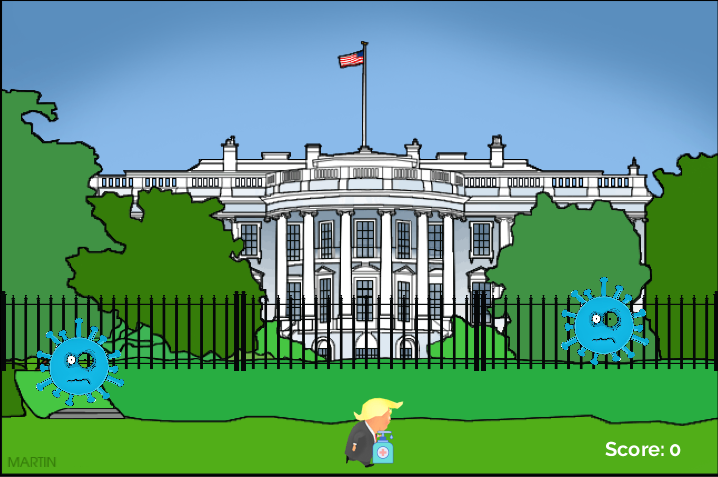
I then brought an image of a sanitizer and made it smaller, and then made it seem as though Trump is holding it in his right hand (because he is right-handed) by ordering the image printing accordingly. I had many options for choosing the corona character but I chose this funky one because it is rather satirical, which is the obvious theme of my game, and because it is visible in the green without disturbing the eye like if it was red.
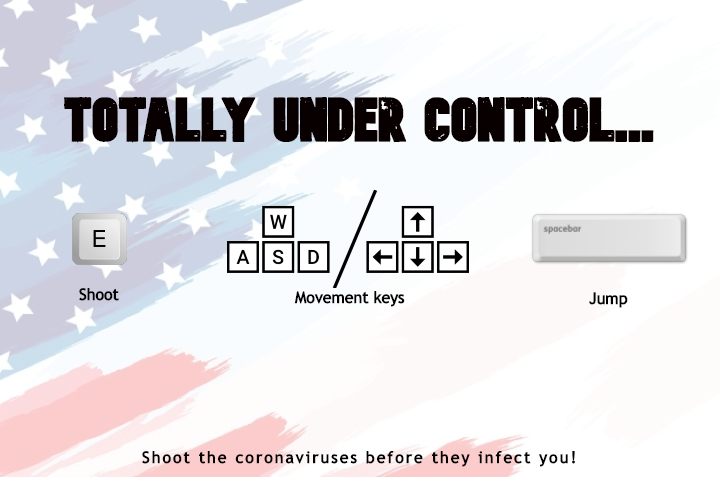
I chose the title based on the actual quote of Trump about COVID-19, and I chose the sentence printed out when you lose as also another quote from Trump about COVID-19, which just fits the theme perfectly. I added the US flag and used an online photo editor called “Pixlr X” to make it more transparent and to add the individual instructions all on the background. I decided to make the instructions visually aesthetic so as to not bore the player and to be very intuitive, and because the game is satirical in nature so it need not be too complicated or serious. I added that face at the end and then added the sound from a YouTube video of a mashup of Trump saying ‘no’ to resemble his hilarious failure and annoyance from getting infected with the virus, which happened in real life despite him making fun of COVID’s repercussions. Also, the sound is annoying to encourage the player to restart the game.
original flag backgroundbackground after edits
I added some sound effects for the shooting (squirt sound), killing a corona particle (pop sound) which were both dropped down in amplitude to not be too noisy, and a background music of the US national anthem but an 8bit version of it from YouTube to go along with the clipart theme of the game while maintaining Trump’s Republican Party’s patriotic notion. The music drops down in volume as soon as you start playing so as to draw you attention to the visuals, so you can hear the pop and squirt sounds, and so it does not become too noisy and loud.
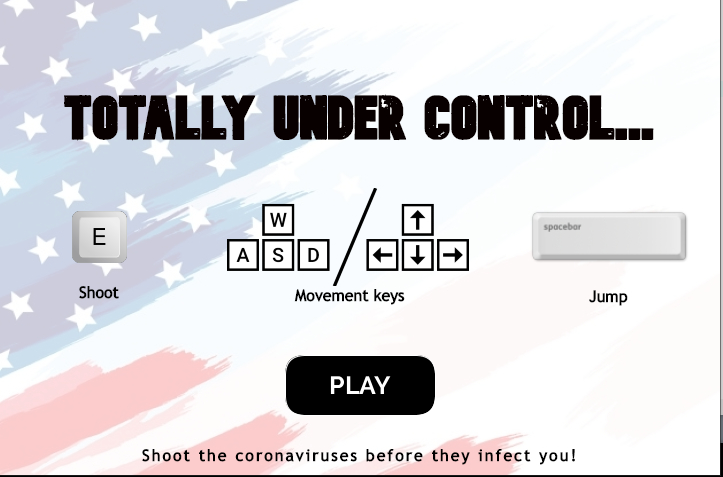
I used processing examples to build the button used for playing the game, making it clickable and changing its color when you hover over it.
As suggested in the class, I added a black fence resembling the real one in the White House to show where exactly Trump cannot run anymore on the ground in a visibly clear manner.
fence I used to show the limit of trump’s motion
Personal Feeling
The game has a fun a political taste to it while being very relevant to our current situation in the COVID-19 pandemic. I am a Muslim Arab man and Trump is a very significant man in my life because of the actions he has done towards immigrants of my race and because he is the president of the most influential country in the world. Even though I am an American citizen, I am still very pissed off by what he has done and I have many loved ones who were harmed by the consequences of his actions. As an Egyptian, our way of expressing emotions is always through satire and comedy, and this is my simple way of expressing how I feel about this man right now in 2020.
starting page with game instructionshow the game itself lookswhat comes up when you lose
import processing.sound.*;    //importing sound library

PImage whiteHouse, sanitizer, laser, corona, trumpBack, americaFlag, fence;     //all images needed
PImage spritesheet;      //sprites of trump
boolean gameOn;        //condition for game
float prevFrame = 0;      //initializing value for previous frame
float randX, randY;      //random numbers for coordinates of creation of corona particles
ArrayList <Laser> lasers;    //initializing arraylist for sanitizer bullets
ArrayList <Corona> coronas;    //initializing array list for corona particles
int score = 0;          //initializing score to 0
PFont f;              //f object for all the texts in the game
int luck;            //randomizing number to make corona particles start motion towards the left or the right
int buttonX, buttonY;      // Position of button
int buttonWidth, buttonHeight;     //dimensions of play button
color buttonColor, baseColor;    //colors of play button
color buttonHighlight;
color currentColor;
boolean buttonOver;
boolean instructions;        //condition for whether instructions page is open or not
SoundFile click, squirt, pop, trumpSound, anthem;      //all sounds in the game

Trump trumps;      //initializing trump character


//button logic inspired from https://processing.org/examples/button.html

void setup() {
  size(720,477);

  instructions = true;      //start game with instructions page
  buttonOver = false;      //start with condition of button pressed false
  gameOn = false;          //don't start game till play is clicked


  f = createFont("Raleway-Bold.ttf",72);      //aesthetic font that fits teh theme

  whiteHouse = loadImage("house4.png");      //white house background pic
  spritesheet = loadImage("trump.png");    //sprites of trump
  sanitizer = loadImage("sanitizer.png");    //sanitizer image
  laser = loadImage("laser.png");            //sanitizer bullet image
  corona = loadImage("corona3.png");          //corona particle image
  trumpBack = loadImage("trumpbackground.jpg");      //trump face when loses image
  americaFlag = loadImage("americaFlag3.jpg");      //america flag background in the beginning with the instructions image
  fence = loadImage("fence4.png");      //black fence image

  click = new SoundFile (this, "click.mp3");      //sound when you click
  squirt = new SoundFile (this, "squirt.mp3");       //sound when you shoot
  pop = new SoundFile (this, "pop.mp3");      //sound when you kill corona particle
  trumpSound = new SoundFile (this, "no.mp3");      //long sound playing when you lose until you click anywhere to restart
  anthem = new SoundFile (this, "anthem (6).mp3");      //8bit anthem background music

  trumps = new Trump(width/2, height -40);        //creates instance of class trump
  lasers = new ArrayList();        //initializes sanitizer bullets list
  coronas = new ArrayList();      //initializes coronas list

  buttonColor = color(0);
  buttonHighlight = color(51);
  baseColor = color(102);
  currentColor = baseColor;
  buttonWidth = 150;
  buttonHeight = 60;
  buttonX = width/2;
  buttonY = 3*height/4 + 30;        //initializations of the button color, color when hovered upon, dimensions, and position

  anthem.loop();      //keep the anthem playing on loop always
  trumpSound.amp(0.001);      //reduce the amplitude of trump sound to nothing so it is not heard now
  trumpSound.loop();      //keep the trump sound playing continuously in the background

  rectMode(CENTER);
  imageMode(CENTER);
}

void draw() {

  if (gameOn == true && instructions == false) {      //if game is one the instructions page is not opened
    //trumpSound.pause();
    background(whiteHouse);
    image(fence, width/6, height -145, width/3, 80);
    image(fence, width/3 + width/6, height -145, width/3, 80);
    image(fence, 2*width/3 + width/6, height -145, width/3, 80);      //draw the fence three times side by side

    if (keyPressed) {
        if (keyCode == DOWN || key == 's') {
          keyCode = DOWN;                    //handling keyCode when key = s is pressed instead, because I use keyCode throughout teh code
          trumps.direction = 0;
          trumps.move();
        }

        else if (keyCode == LEFT || key == 'a') {
          keyCode = LEFT;
          trumps.direction = 3;
          trumps.move();
        }
        else if (keyCode == RIGHT || key == 'd') {
          keyCode = RIGHT;
          trumps.direction = 1;
          trumps.move();
        }

        else if (keyCode == UP || key == 'w') {
          keyCode = UP;
          trumps.direction = 2;
          trumps.move();                                    //handling the moements of trump, whether using keys or using w, a, s, d
        }
        else {
          trumps.direction = trumps.direction;
        }
    }

      if (trumps.direction == 3) {
        pushMatrix();
        translate(trumps.x - 23, trumps.y + 15);
        //rotateY(radians(180));
        image(sanitizer, 0, 0);
        popMatrix();                      //draw sanitizer direction right
      }

       if (trumps.direction == 2) {
        image(sanitizer, trumps.x + 20, trumps.y + 8);      //draw sanitizer direction up
      }


      image(trumps.sprites[trumps.direction][trumps.step], trumps.x, trumps.y);      //drawing trump himself
      trumps.update();                    //calling on gravity

      if (trumps.direction == 1) {
        image(sanitizer, trumps.x + 23, trumps.y + 15);      //draw sanitizer direction left
      }

      if (trumps.direction == 0) {
        image(sanitizer, trumps.x - 15, trumps.y + 20);        //draw sanitizer direction down
      }

      if (frameCount % 100 == 0) {
        if (coronas.size() < 8) {            //setting limit of 8 coronas at a time
           luck = (int)random(100);
           randX = random(100, width - 100);
           randY = random (100, height - (190 + trumps.h));


           Corona temp = new Corona(randX, randY, luck);
           coronas.add(temp);
        }
      }                                                   //create coronas after a certain number of frames at random starting positions and random starting direction of left or right

      for (int i = coronas.size()-1; i >= 0; i--) {
        Corona current = coronas.get(i);
        current.display();
        current.move();                                    //call on functional methods of corona class for each of them

        if (current.checkTrump(trumps.x, trumps.y)) {          //checking if corona collided with trump
          anthem.stop();          //stop the background music
          gameOn = false;          //game condition false
          break;                //break from the conditions to enter others
        }
      }

      for (int i = lasers.size()-1; i >= 0; i--) {
        Laser laser = lasers.get(i);
        laser.display();
        laser.fly();                //call on functional methods of sanitizer bullets for each object

        if (laser.checkEdges()) {        //check if laser is out of frame to remove it
          lasers.remove(laser);
        }

        for (int j = coronas.size()-1; j >= 0; j--){        //iterate through all coronas
          Corona important = coronas.get(j);
          if (laser.checkCollision(important.coronaX, important.coronaY, important.coronaWidth)) {      //if bullet hits corona
            pop.amp(0.1);
            pop.play();      //make pop sound
            coronas.remove(important);       //remove hit corona
            lasers.remove(laser);           //remove the bullet that hit it too
            score += 10;        //increment score by 10
          }
          //pop.stop();
        }

      }

      textAlign(CORNER);
      String Score = "Score: ";          //constantly show score at the corner
      //fill(0);
      //rect(width - 130 , height - 100, textWidth(Score) + 10, 50);
      textFont(f,20);
      fill(255);


      text(Score + score, width - 115, height - 20);        //score text bottom right

  }

  else if (instructions == true && gameOn == false) {        //starting phase of instructions pre-game

    background(255);
    update();

    if (buttonOver) {
      fill(buttonHighlight);            //if mous hovers over button change color
    }
    else {
      fill(buttonColor);
    }

    image(americaFlag, width/2, height/2);        //image of flag with game instructions on it

    stroke(255);
    rect(buttonX, buttonY, buttonWidth, buttonHeight, 20);      //play button

    textFont(f,25);
    textAlign(CENTER, CENTER);
    fill(255);
    String play = "PLAY";          //text in play button to clarify it
    text(play, buttonX , buttonY - 3);
  }

  else if (instructions == false && gameOn == false) {      //if player loses
    anthem.stop();      //stop background music
    //trumpSound.play();
    trumpSound.amp(0.8);      //increase trump saying no to be heard


    background(trumpBack);      //trump's face
    textAlign(CENTER);

    textFont(f,40);
    //same shade as in the flag
    fill(#BF0A30);
    String first = "'This was unexpected...'";
    text(first, width/2 , (height/4) - 90);

    textFont(f,24);
    //same shade as in the flag
    fill(#002868);
    String second = "CLICK ANYWHERE TO TRY AGAIN";
    text(second, width/2 - 5, height/2 + 215);      //game over text

    textAlign(CORNER);
    textFont(f,20);
    fill(0);
    String third = "Score: ";
    text(third + score, width - 115, height -20);      //final score text


  }
}

void keyPressed()
{
   if(key == ' '){
      if (frameCount - prevFrame > 15) {      //only allow jumping constantly after certain number of frames
        prevFrame = frameCount;
        trumps.jump();
      }
   }

   if(key == 'e') {          //shoot sanitizer bullet
   trumps.recoil();           //recoil when trump shoots
      if (frameCount - prevFrame > 20) {        //only allow multiple shooting after certain number of frames if key is held
        squirt.amp(0.2);        //play squirt sound
        squirt.play();
        prevFrame = frameCount;
        Laser temp = new Laser(trumps.x, trumps.y, trumps.direction);        //create new bullet
        lasers.add(temp);      //add it to teh list
      }
    }
}

void update() {
  if ( overButton(buttonX, buttonY, buttonWidth, buttonHeight) ) {      //check if mouse is over the button to change color
    buttonOver = true;
  }
  else {
    buttonOver = false;
  }
}

void keyReleased() {
  if(key == ' ') {          //keep trump in correct direction and keep moving even while/after jumping
    if (trumps.direction == 0) {
        keyCode = DOWN;
      }

      if (trumps.direction == 3 ) {
        keyCode = LEFT;
      }
      if (trumps.direction == 1) {
        keyCode = RIGHT;
      }

      if (trumps.direction == 2) {
        keyCode = UP;
      }
  }

  if(key == 'e') {        //keep trump in correct direction and keep moving even while/after shooting
    //squirt.stop();
    if (trumps.direction == 0) {
        keyCode = DOWN;
      }

      if (trumps.direction == 3 ) {
        keyCode = LEFT;
      }
      if (trumps.direction == 1) {
        keyCode = RIGHT;
      }

      if (trumps.direction == 2) {
        keyCode = UP;
      }
  }
}

boolean overButton(int x, int y, int buttonWidth, int buttonHeight)  {            //check if mouse is over button
  if (mouseX >= x - buttonWidth/2 && mouseX <= x + buttonWidth/2 && mouseY >= y - buttonHeight/2 && mouseY <= y + buttonHeight/2) {
    return true;
  } else {
    return false;
  }
}

void mouseClicked() {
  if (buttonOver) {      //check if mouse is clicked over button then start game

      click.amp(0.3);
      click.play();
      instructions = false;

     if (gameOn == false){        //if mouse is clicked when the game is off, turn it on and reset everything to zero and empty lists
        //trumpSound.stop();
        //instructions = false;
        score = 0;
        gameOn = true;
        anthem.amp(0.4);
        anthem.loop();        //replay background music
        trumpSound.amp(0.001);
        for (int i = coronas.size()-1; i >= 0; i--) {       //reset coronas list
          coronas.remove(i);
        }
        for (int i = lasers.size()-1; i >= 0; i--) {         //reset bullets list
          lasers.remove(i);
        }

    }

  }

}
Corona class, contains three functions: displaying, moving around, and checking if it collided with Trump:
class Corona {
  float coronaX, coronaY;
  float xSpeed;
  float ySpeed;
  float xDirection, yDirection;
  float coronaWidth, coronaHeight;
  int rand;


  Corona(float _x, float _y, int _rand) {

    coronaX = _x;
    coronaY = _y;

    coronaWidth = 100;
    coronaHeight = 100;

    xDirection = 1;
    yDirection = 1;

    xSpeed = 2;
    ySpeed = 2;

    rand = _rand;

  }

  void display() {
    image(corona, coronaX, coronaY, coronaWidth, coronaHeight);      //display corona image
  }

  void move() {

    if (rand > 50) {              //if random number is this then move in right direction
      coronaX += (xSpeed * xDirection);
      coronaY += (ySpeed * yDirection);
    }

    else {                    //if random number is less tha or equal to 50, move in the left direction
      coronaX -= (xSpeed * xDirection);
      coronaY -= (ySpeed * yDirection);
    }

    if ((coronaX + (coronaWidth/2) > width) || (coronaX - (coronaWidth/2) < 0)) {      //if corona hits either walls horizontally switch direction of motion to bounce
      xDirection *= -1;
    }

    if ((coronaY + (coronaHeight/2) > height) || (coronaY - (coronaHeight/2) < 0)) {        //if corona hits either walls vertically switch direction of motion to bounce
      yDirection *= -1;
    }

  }

  boolean checkTrump(float _x, float _y) {          //check if it collided with trump
     float otherX = _x;
     float otherY = _y;
     if (dist(coronaX, coronaY, otherX, otherY) < coronaWidth/2) {
       return true;
     }
     else {
       return false;
     }
  }


}
Sanitizer Class, has 4 functions: displaying the sanitizer bullet, flying the bullet in the appropriate direction, checking if it collided with a corona particle, and checking if it is outside the frame of the game:
//code inspired from https://forum.processing.org/two/discussion/1324/how-to-create-a-bullet-array-for-asteroids-game
class Laser {

  int laserDirection;
  float laserX, laserY;
  float xSpeed;
  float ySpeed;
  float laserWidth, laserHeight;


  Laser(float _x, float _y, int direction) {

    laserDirection = direction;
    xSpeed = 8;
    ySpeed = 8;

    if (laserDirection == 0) {
      laserX = _x - 15;
      laserY = _y + 23;
    }
    if (laserDirection == 1) {
      laserX = _x + 23;
      laserY = _y + 15;
    }
    if (laserDirection == 2) {
      laserX = _x + 23;
      laserY = _y - 15;
    }
    if (laserDirection == 3) {
      laserX = _x - 23;
      laserY = _y + 15;
    }
                                          //initialize direction of laser so it remains so even if trump changes his direction later
    laserWidth = 60;
    laserHeight = 20;

   }

   void display() {
     if (laserDirection == 2){
       pushMatrix();
         translate(laserX, laserY - 20);
         rotate(HALF_PI);
         image(laser, 0, 0, laserWidth, laserHeight);
       popMatrix();

     }                                                  //rotate bullet to shoot up

     else if( laserDirection==0) {
     pushMatrix();
         translate(laserX, laserY + 25);
         rotate(HALF_PI);
         image(laser, 0, 0, laserWidth, laserHeight);
       popMatrix();
     }                                            //rotate bullet to shoot down

     else if ( laserDirection==1){
       image(laser, laserX + 28, laserY - 18, laserWidth, laserHeight);      //bullet shoot right
     }

     else if ( laserDirection==3){
       image(laser, laserX - 28, laserY - 18 , laserWidth, laserHeight);      //bullet shoot left
     }
   }

   void fly() {
     if (laserDirection == 3) {        //left
       laserX -= xSpeed;
     }

     if (laserDirection == 1) {        //right
       laserX += xSpeed;
     }

     if (laserDirection == 2) {        //up
       laserY -= ySpeed;
     }

     if (laserDirection == 0) {        //down
       laserY += ySpeed;
     }
                                                        //movement according to the direction
   }

   boolean checkCollision (float _x, float _y, float w) {      //check collision with corona coordinates
     float otherX = _x;
     float otherY = _y;
     if (dist(laserX, laserY, otherX, otherY + 10) < w/2 ) {
       return true;
     }
     else {
       return false;
     }
   }

   boolean checkEdges() {
     if ((laserX - laserWidth/2 > width) || (laserX + laserWidth/2 < 0) || (laserY - laserHeight/2 > height) || (laserY + laserHeight/2 < 0)) {      //check if laser is outside frame to remove it
       return true;
     }
     else {
       return false;
     }
   }


}
Trump class, has 4 functions: updating the y-position of Trump according to gravity, moving the character around in the appropriate directions, recoiling Trump backwards whenever he shoots to make it more realistic, and jumping:
class Trump {

  PImage[][] sprites;
  int direction = 1;
  int step = 0;
  int w, h;
  float x, y;
  float xspeed = 6;
  float yspeed = 6;
  float gravity;

  Trump(float _x , float _y){
  sprites = new PImage[4][6];

  w = spritesheet.width/6;
  h = spritesheet.height/4;

  gravity = 0.0001;

  for (int y=0; y < 4; y++) {
    for (int x=0; x< 6; x++) {
      sprites[y][x] = spritesheet.get(x*w, y*h, w, h);      //creating each instance's individual sprite from spritesheet
    }
  }

  x = _x;
  y =_y;

  }

  void update() {        //if trump is in the air make him go down through gravity

    if (y - h/2 < height - 190.5) {
      yspeed = yspeed + gravity;
      y += yspeed;
    }
  }

  void move() {
    if (direction == 0) {
      if (y + (h/2) < height) {    //move down until frame limit
          y += yspeed;
      }
    }
    if (direction == 1) {      //right till wall
      if (x + (w/2) < width) {
          x += xspeed;
        }
    }
    if (direction == 2) {      //up till fence
      if (y - (h/2) > height - 189) {
          y -= yspeed;
        }
    }
    if (direction == 3) {      //left till wall
      if (x - (w/2) > 0) {
          x -= xspeed;
        }
    }                                //move according to direction

    if (frameCount % xspeed == 0) {      //transition from one sprite to another
        step = (step+1) % 6;
    }
  }

  void recoil() {        //push trump slightly backwards when he shoots to be more realistic
    if (direction == 0) {      //down
      if (y - (h/2) > height - 189) {    //go up till fence
          y -= yspeed/4;
      }
    }
    if (direction == 1) {      //right
      if (x - (w/2) > 0) {      //left till wall
          x -= xspeed/4;
        }
    }
    if (direction == 2) {      //up
      if (y + (h/2) < height) {    //down till frame limit
          y += yspeed/4;
        }
    }
    if (direction == 3) {      //left
      if (x + (w/2) < width) {      //right till wall
          x += xspeed/4;
        }
    }

    //if (frameCount % xspeed == 0) {
    //    step = (step+1) % 6;
    //}
  }

  void jump() {

    if (y - (h/2) > height - 191) {      //if trump is not already flying make him jump
      y -= 150;

      if (direction == 3 ) {      //if he was moving to left push him slightly to left
        if (x - (w/2) > 0) {
          x-= 20;
        }
      }
      else if (direction == 1) {      //if he was moving to right push him slightly to right
        if (x + (w/2) < width) {
          x += 20;
        }
      }
    }

  }


}

 Sketch of original idea