Final Project Idea

Concept:

The idea is to create a “Crack The Code Safe Game.” There will be a locked mini safe box that the user will need to open by solving a simple math problem on the computer, revealing a secret 4-digit code.

This inspiration came from watching a video about a similar project: Crack The Code Safe.

Components:

  1. Handmade safe box:
    • This box has a lock controlled by an Arduino.
    • There’s a dial on the box connected to the Arduino that the user will use to enter the secret 4-digit code.
  2. Arduino:
    • The Arduino checks if the entered code is correct.
    • It manages locking and unlocking the safe.
  3. p5.js game interface:
    • It’s a simple math game on the computer screen (p5.js). This game helps the user find the 4-digit code for the safe.

User Experience Flow:

  1. Introduction: The user will receive instructions on how to open the safe, both on the computer screen and the safe box. The safe will have different codes for each new game. The user will be able to restart game. But the user cannot see the correct code without at least making one attempt to open the safe.
  2. Gameplay: The user will start playing the game on the computer. Each correct math problem solution reveals a digit of the secret 4-digit code in order. In other words, the user will solve 4 math problems and the answer to each problem is the digits of the secret code.
  3. Code Entry: The user solve the math problem, get a digit, and enter it using the dial on the safe box. Turn the dial to select digits and push it to confirm each one.
  4. Feedback and Unlocking: The Arduino checks the entered code. If it’s right, the safe unlocks, and the user win! If not, the game starts over, and a new secret code will be created.

Week 11 – Reading

The debate between functionality and design has always been an interesting one, and though sometimes it feels like you can only pick one without compromising both, it is very much possible to accomplish both as what Apple did with the iPod. Though most engineers might argue for the case of functionality, I think one very beautiful part of the shared human experience is that humans appreciate beautiful things like a sunset or a well-designed product. Donald Norman has a teapot that is functionally unusable, yet has a place on his countertop because he likes how it looks. Perhaps not everyone is as invested in design as Donald Norman is, that they would give up all functionality for design, but a case can be made for ‘functional enough’ before people start looking at design. Ten different tote bags are functionally all the same, but there might be one specific tote that a person might gravitate to more often. A tote bag with a hole might not be used because it does not perform it’s function well even if it is well-designed, but other than that, the tote bag that is chosen is the one that suits the dress code the best.

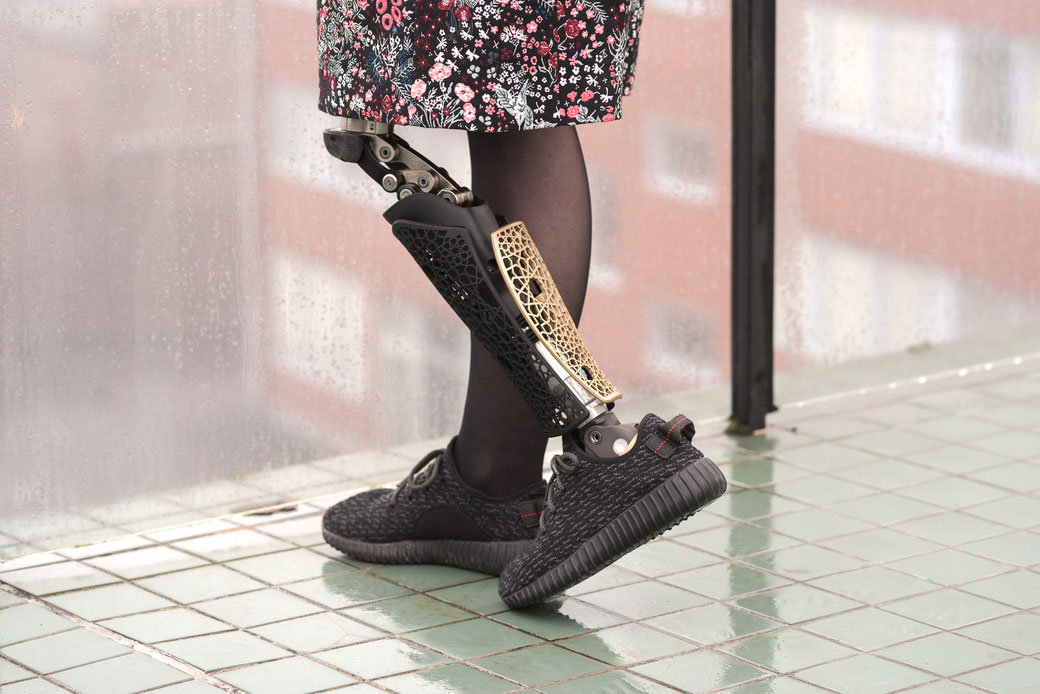
In the case of disability, it is a little strange that design for disability has always been about ‘catching up to a normal human’, and not augmenting them to beyond the capabilities of an average person. Why are leg prosthetics designed to look like bad imitations of flesh, when it could be used as a fashion accessory that able-bodied people are not able to? Why not design hearing aids that can enable superhearing? An able-bodied person is not the standard, and it is always an option to design beyond that, to make disability less of a stigma and instead become something that opens up new possibilities instead of reducing them. Prosthetic covers: Interview with Emelie Strömshed from Anatomic Studios - theactiveamputee

week 11: reading reflection

The reference to Charles Eames really stuck with me. “Design depends largely on constraints” — I think so too. What is good design if not bad design? It is easy to define bad design. It’s a jumble of elements that do not fit together, but forced into a whole that bears a discordant existence. Good design on the other hand, seems harder to articulate, but what cannot be told can be suggested, which seems to be Pullin’s standpoint as he enters the discussion of designing for special needs. Discretion has been appreciated as a design element when designing for disability, but, on the other hand, in the case of eyewear, there is an existing positive image, and so invisibility is not necessarily a consideration here. This is understandable; that every product has a different context surrounding itself and its design should be in accordance. But then Puliln also says, “fashion can be understated, and discretion does not require invisibility.” The discussion that follows illustrates how several parameters interact in defining the constraints of design, and the design of something transcends the thing itself and blends into people’s perception of other, related concepts, as is in the case of the design of eyewear and fashion.

Week 11 – Reading Response

The reading about design and disability really got me thinking. It showed how something as simple as fashion can change how we view things like glasses or other aids for individuals with disabilities. I used to wonder how glasses became a style statement, making people proud to wear them unlike other kinds of devices such as hearing aids. However, I particularly appreciate that the author addresses these devices as earwear and bodywear. They’re just something that people wear like clothes, and those devices hold very sentimental details for the designer, which shouldn’t make the individual feel odd or unusual.

The example of Aimee Mullins is especially an inspiring example that shows how prosthetic legs can be a way to express oneself, which is pretty amazing. It further illustrates how fashion can help designers make special aid devices more normalized and less visible, reducing the stigma of disability.

The main idea that I really liked about this reading is how design can make a huge difference for people with disabilities. Design isn’t just about making things look good; it’s about making life easier and more inclusive for them. Fashion can play a role in making people feel confident about using assistive devices. And when designs are simple, they make life easier for everyone, not just those with disabilities. The idea that simple designs work better, like what Apple does, totally makes sense. Simple things are easier for everyone to use, regardless of age or abilities of individuals. The reading discussed how it’s sometimes better to make designs specifically for one person instead of trying to make something that accommodates everyone.

Week 11 – Production

Teammate: Jiho

1st exercise: 
We used the existing example: Week 11 Bidirectional serial communication(p5js Sketch) to fulfill the 1st exercise. We created a new variable “moveEllipse” to map the alpha value to the canvas width. We then used our variable as the x-position of the ellipse, successfully enabling the ellipse to move from one edge to the other as the potentiometer value increased.

let moveEllipse = map(alpha, 0, 1023, 0, width);
stroke(0);
ellipse(moveEllipse, height / 2, 60);


2nd exercise:
Editing that same example, we added the bouncing ball javascript from p5.js: https://editor.p5js.org/icm/sketches/BJKWv5Tn . The LED becomes brighter when the ball moves towards the right edge of the canvas. Conversely, the LED becomes dimmer when the ball moves towards the left edge of the canvas. We edited the arduino to replace digitalWrite with AnalogWrite to enable the control of the LED brightness.

let x = 320;
let y = 180;
let xspeed = 3;
let yspeed = 2;
let r = 25;

ellipse(x, y, r*2, r*2);
// mapping brightness to canvas width
let rightValue = map(x, 0, width, 0, 255);
right = int(rightValue);

x += xspeed;
y += yspeed;
if (x > width - r || x < r) {
xspeed = -xspeed;
}
if (y > height - r || y < r) {
yspeed = -yspeed;
}
}


3rd exercise: https://youtu.be/YFucULMGidI

I took the main structure of the code from the exercise we looked at in class- where we had to press our spacebar to connect to our board. There, I added the code with the bouncing ball given to us through this link(https://editor.p5js.org/aaronsherwood/sketches/I7iQrNCul).

The approach was to call bounceBall() function once the serial is activated, where p5js will continuously send touch value (1 means it touched the ground and 0 means it’s above ground) to the arduino. In return, the arduino would send lightStatus value (the input read from the light sensor). If the received value is bigger than 500, the wind blows from left to right and right to left if below.

Below are parts of code that highlights the appraoch:
P5js

if (position.y > height-mass/2) {
      velocity.y *= -0.9;  // A little dampening when hitting the bottom
      position.y = height-mass/2;
    touch = 1;
    //////////////////////////////////
    //SEND TO ARDUINO HERE (handshake)
    //////////////////////////////////
    let sendToArduino = touch + "\n";
    console.log(touch);
    writeSerial(sendToArduino);
    touch = 0;
    sendToArduino = touch + "\n";
    writeSerial(sendToArduino);
    }

Arduino

int ledPin = 5;
int lightPin = A1;
int lightStatus;

void setup() {
  Serial.begin(9600);
  pinMode(ledPin, OUTPUT);
  pinMode(lightPin, INPUT);

  // start the handshake
  while (Serial.available() <= 0) {
    digitalWrite(LED_BUILTIN, HIGH);
    Serial.println("0");
    delay(1000);
    digitalWrite(LED_BUILTIN, LOW);
    delay(100);
  }
}

void loop() {
  while (Serial.available()) {
    digitalWrite(ledPin, HIGH);

    int ledLight = Serial.parseInt();
    lightStatus = analogRead(lightPin);
    if (Serial.read() == '\n') {
      digitalWrite(ledPin, ledLight);
      delay(50);
      digitalWrite(ledPin, LOW);
      Serial.println(lightStatus);
      delay(5);
    }
  }
  digitalWrite(LED_BUILTIN, LOW);
}


week 11 – group assignment (maya)

1st exercise: 
We used the existing example: Week 11 Bidirectional serial communication(p5js Sketch) to fulfill the 1st exercise. We created a new variable “moveEllipse” to map the alpha value to the canvas width. We then used our variable as the x-position of the ellipse, successfully enabling the ellipse to move from one edge to the other as the potentiometer value increased.

let moveEllipse = map(alpha, 0, 1023, 0, width);  
//
stroke(0);
ellipse(moveEllipse, height / 2, 60);

2nd exercise:
Editing that same example, we added the bouncing ball javascript from p5.js: https://editor.p5js.org/icm/sketches/BJKWv5Tn . The LED becomes brighter when the ball moves towards the right edge of the canvas. Conversely, the LED becomes dimmer when the ball moves towards the left edge of the canvas. We edited the arduino to replace digitalWrite with AnalogWrite to enable the control of the LED brightness.

//
let x = 320;
let y = 180;
let xspeed = 3;
let yspeed = 2;
let r = 25;

//
  ellipse(x, y, r*2, r*2);
  // mapping brightness to canvas width
  let rightValue = map(x, 0, width, 0, 255);
  right = int(rightValue);
  //
  x += xspeed;
  y += yspeed;
  if (x > width - r || x < r) {
    xspeed = -xspeed;
  }
  if (y > height - r || y < r) {
    yspeed = -yspeed;
  }
}

3rd exercise: https://youtu.be/YFucULMGidI

I took the main structure of the code from the exercise we looked at in class- where we had to press our spacebar to connect to our board. There, I added the code with the bouncing ball given to us through this link: https://editor.p5js.org/aaronsherwood/sketches/I7iQrNCul

The approach was to call bounceBall() function once the serial is activated, where p5js will continuously send touch value (1 means it touched the ground and 0 means it’s above ground) to the arduino. In return, the arduino would send lightStatus value (the input read from the light sensor). If the received value is bigger than 500, the wind blows from left to right and right to left if the value is smaller than 500.

arduino:

int ledPin = 5;
int lightPin = A1;
int lightStatus;

void setup() {
  Serial.begin(9600);
  pinMode(ledPin, OUTPUT);
  pinMode(lightPin, INPUT);

  // start the handshake
  while (Serial.available() <= 0) {
    digitalWrite(LED_BUILTIN, HIGH);
    Serial.println("0");
    delay(1000);
    digitalWrite(LED_BUILTIN, LOW);
    delay(100);
  }
}

void loop() {
  while (Serial.available()) {
    digitalWrite(ledPin, HIGH);

    int ledLight = Serial.parseInt();
    lightStatus = analogRead(lightPin);
    if (Serial.read() == '\n') {
      digitalWrite(ledPin, ledLight);
      delay(50);
      digitalWrite(ledPin, LOW);
      Serial.println(lightStatus);
      delay(5);
    }
  }
  digitalWrite(LED_BUILTIN, LOW);
}

Week 11 – Reading Reflection

In “Design Meets Disability”, I found myself agreeing with most of the author’s arguments, especially when it came to balancing problem-solving and playful exploration in design. However, while I believe that products for people with disabilities could be more playful and focused on aesthetics, I also recognize that personal preferences vary. Some individuals may prefer traditional products that mimic the human body, while others may lean toward more fashionable or visually appealing options. Recognizing this diversity of taste and choice is essential.


Moreover, in exploring the history of design and utility in products for people with disabilities, the reading provided intriguing insights. It was interesting to learn about the various examples, such as glasses becoming more of a fashion item in some cases. This highlights the cultural role that fashion plays in the acceptance of products designed for individuals with disabilities, but it makes sense if you think about it. It is much easier to make glasses look more visually appealing than let’s say crutches because glasses are not as invasive and can sometimes even enhance visuals. From a positively stereotypical perspective, they can sometimes make someone appear smarter or more intellectual, but I cannot think of any appeal in a lot of other products for people with disabilities.

week 11 – reading reflection

I agree with the author’s perspective that adopting a discreet design for “aids” may not be the optimal choice. This approach perpetuates the notion that these aids conflict with societal norms and thereby draw undue attention, and so should be concealed. This inadvertently contributes to the stigmatization of disabilities in general, reinforcing the idea that it is something to be embarrassed about. Nevertheless, I understand that individuals with disabilities may desire discrete designs due to probable negative attention towards their conditions. Society often reacts adversely to things that deviate from the norm, leading some to prefer aids that blend in. Considering the limited market for disability-related products, it may be pragmatic to focus on designs that cater to the majority rather than a smaller fraction of individuals who embrace their disabilities and seek products that stand out.

I resonate with the notion that the lack of stigma surrounding bad eyesight is attributed to the normalization of glasses as a fashion accessory. The integration of glasses into everyday wear, regardless of bad/ good eyesight, has contributed to their acceptance and reduced their visibility as a medical aid. This normalization could serve as a valuable model for the design of other aids, reducing the perception of these devices as conspicuous or abnormal. The article’s observation about the exclusion of designers in the creation of aids, such as prosthetics and hearing aids, is particularly poignant. It seems paradoxical that individuals who themselves may use aids are not involved in their design. This exclusion perpetuates the categorization of aids as purely medical products, further intensifying the stigma associated with bodily “aids”. Inclusion of designers with personal experiences of using aids could offer valuable insights, bridging the gap between functionality and aesthetic appeal and challenging the prevailing stigmas associated with these essential tools.

week 11: class exercise


  1. make something that uses only one sensor  on Arduino and makes the ellipse in p5 move on the horizontal axis, in the middle of the screen, and nothing on arduino is controlled by p5.

I took the existing Arduino and p5 code that we saw in class, and simply added this line in the p5 loop() function:

// move ellipse
ellipse(map(alpha, 0, 1023, 0, 640), width/2, 55, 55);

This allowed me to control the horizontal position of the ellipse by turning the potentiometer.


2. make something that controls the LED brightness from p5Again, starting with the same code, I just made some adjustments. Here’s the relevant part from the p5 code:

if (!serialActive) {
    text("Press Space Bar to select Serial Port", 20, 30);
  } else {
    text("Connected", 20, 30);

    // Print the current values
    text("rVal = " + str(rVal), 20, 50);
    text("alpha = " + str(alpha), 20, 70);
    
    mouseXMapped = map(mouseX, 0, width, 0, 255);
    right = int(mouseXMapped);
    mouseYMapped = map(mouseY, 0, height, 0, 255);
    left = int(mouseYMapped);
  }

This just informs the Arduino of the mouse’s X and Y coordinates.

On the Arduino code, I connected both LEDS to PWM capable ports, and simply added these two lines:

analogWrite(leftLedPin, left);
analogWrite(rightLedPin, right);

The brightness of the left LED increases as the cursor moves to the bottom of the p5 window, and the brightness of the right LED increases as the cursor moves to the right edge of the p5 window.

3. take the gravity wind example (https://editor.p5js.org/aaronsherwood/sketches/I7iQrNCul) and make it so every time the ball bounces one led lights up and then turns off, and you can control the wind from one analog sensorVideo

demo: https://www.youtube.com/shorts/-m7XMTdTVoUI

made the potentiometer control the wind speed (mapped from -1 to 1), and the blue LED blinks whenever the ball comes in contact with the ground. Here’s the complete p5 code, and I left the Arduino code almost untouched, except for a small delay after the LED blinks once, just to make it less jittery.

if (Serial.read() == '\\n') {
      digitalWrite(leftLedPin, left);
      if (left == HIGH) {
        delay (100);
      }
      int sensor = analogRead(A0);
      delay(5);
      int sensor2 = analogRead(A1);
      delay(5);
      Serial.print(sensor);
      Serial.print(',');
      Serial.println(sensor2);
    }


Week 10 Production – Instrument

Concept)
There were two conditions I wanted to meet when creating this instrument
– it should involve both hands
– it should be able to play different notes separately  (i.e. the sound is not continuous)

It naturally made sense to have one of the hands be responsible of how long a note should be played, and the other hand to specify the note. I saw different videos for inspiration and saw instruments that use the distance to decide the note to be played.

Production)

Code)

int trig = 10;
int echo = 11;
int light = 5;
long  duration;
long  distance;
int   buttonState;


void setup() {
  pinMode(echo, INPUT);
  pinMode(trig, OUTPUT);
  pinMode(light, OUTPUT);
  Serial.begin(9600);
}

void loop() {
  digitalWrite(trig, LOW);
  delayMicroseconds(2);
  digitalWrite(trig, HIGH);
  delayMicroseconds(10);
  digitalWrite(trig, LOW);
  duration = pulseIn(echo, HIGH);
  distance = (duration / 2) * 0.0344;
  /*
    duration = time it took for ultrasonic pulse to travel to and back from the object
    distance equation: conversion from duration to distance
    because the duration includes the travel time to and back from the object, 
      divided by 2
    multiplied by 0.0344: speed of sound in air (in room temperature
                            = 343 m/s ==> convert to cm
  */


  int notes[7] = {261, 294, 329, 349, 392, 440, 494};
  //C, D, E, F, G, A, B

  buttonState = analogRead(A1);

  int sound;

  if (distance < 0 || distance > 50 || buttonState < 100) {
      sound = -1;
  } else if (distance <= 5) {
      sound = 0;
  } else if (distance <= 10) {
      sound = 1;
  } else if (distance <= 15) {
      sound = 2;
  } else if (distance <= 20) {
      sound = 3;
  } else if (distance <= 30) {
      sound = 4;
  } else if (distance <= 40) {
      sound = 5;
  } else {
      sound = 6;
  }

  if (sound != -1) {
      digitalWrite(light, HIGH);
      Serial.println(sound);
      tone(12, notes[sound]);
  } else {
      noTone(12);
      digitalWrite(light, LOW);
  }

}

I think the most interesting part of this code was figuring out how to convert the duration to distance, and the distance to different notes.

Future Improvements)
I think it’s be interesting if I can connect a force censor, for instance, to create the beat on the background. Then, it would have a simple instrument that consists of the base beat (like a drum) and the melody part through the hands.