I just wanted to take a short moment to lay out the the details as some has changed.
As I finalized last time, I created a bubble shooter game. As inputs, I am using a potentiometer, force sensor and sound. For sound, I’m not getting it from the arduino but through p5js directly.
The sound is responsible for auto shoot speed. The player would need to shout and scream to slow down the auto shooter- otherwise, the auto shoot will go crazy.
The potentiometer works as the knob to adjust the angle of the shooter.
The force sensor is attached to a glove. The player would have the glove on one hand and hit the ground with their hand to shoot.
There is a leaderboard that shows the top 5 players.
I chose this prompt because I have always wanted a pet but my parents won’t let me have one. Therefore I am doing this prompt as sort of a make up for the thing that I always wanted but never got.
The whole concept is easy. The user as the owner of the pet, interacts with the pet by “talking” to it (typing in messages to “say” to the cat”). After the cat “hears” what the human says, it will evaluate whether the human is being mean or not. This evaluation is achieved through the GPT-3.5-Turbo API. If the cat thinks the human is being mean, it will become less happy, which is represented by decreasing her mood on a scale of 1 to 10, and vice versa. There are two main functions the user can do with the pet for now. One is to talk with it and observe its actions, and the other is an attempt to pet it. If the human chooses to talk with it, a buzzer on the physical CyberCat will start beeping as if responding. The happier the cat is, the slower and calmer the cat’s sound will be. However, if she is very pissed, her sound will be high-speed and rapid. On the other hand, when you try to pet her, it will choose based on its mood. If she is happy (mood 5 or above), she will come towards you until she senses you within 20 centimeters. But if she is not happy, she will back away from you until you are separated for at least 50 seconds.
I also put an “easter egg” in the project, that is if you type in “dance” in the message box, it will give you this sort of “dance” as if trying to catch her own tail.
Video Introduction to Interaction:
Implementation:
The Interaction design is very simple. For the talk function, it is a simple one way transmission. The user inputs through keyboard, and the p5 script processes the input and send message to the Arduino, which responds to the message by making the buzzer beep. For the other, there is a sort of data processing added on top of the other function. after command is given to the Arduino, it will check a condition first, and then act in response to the condition.
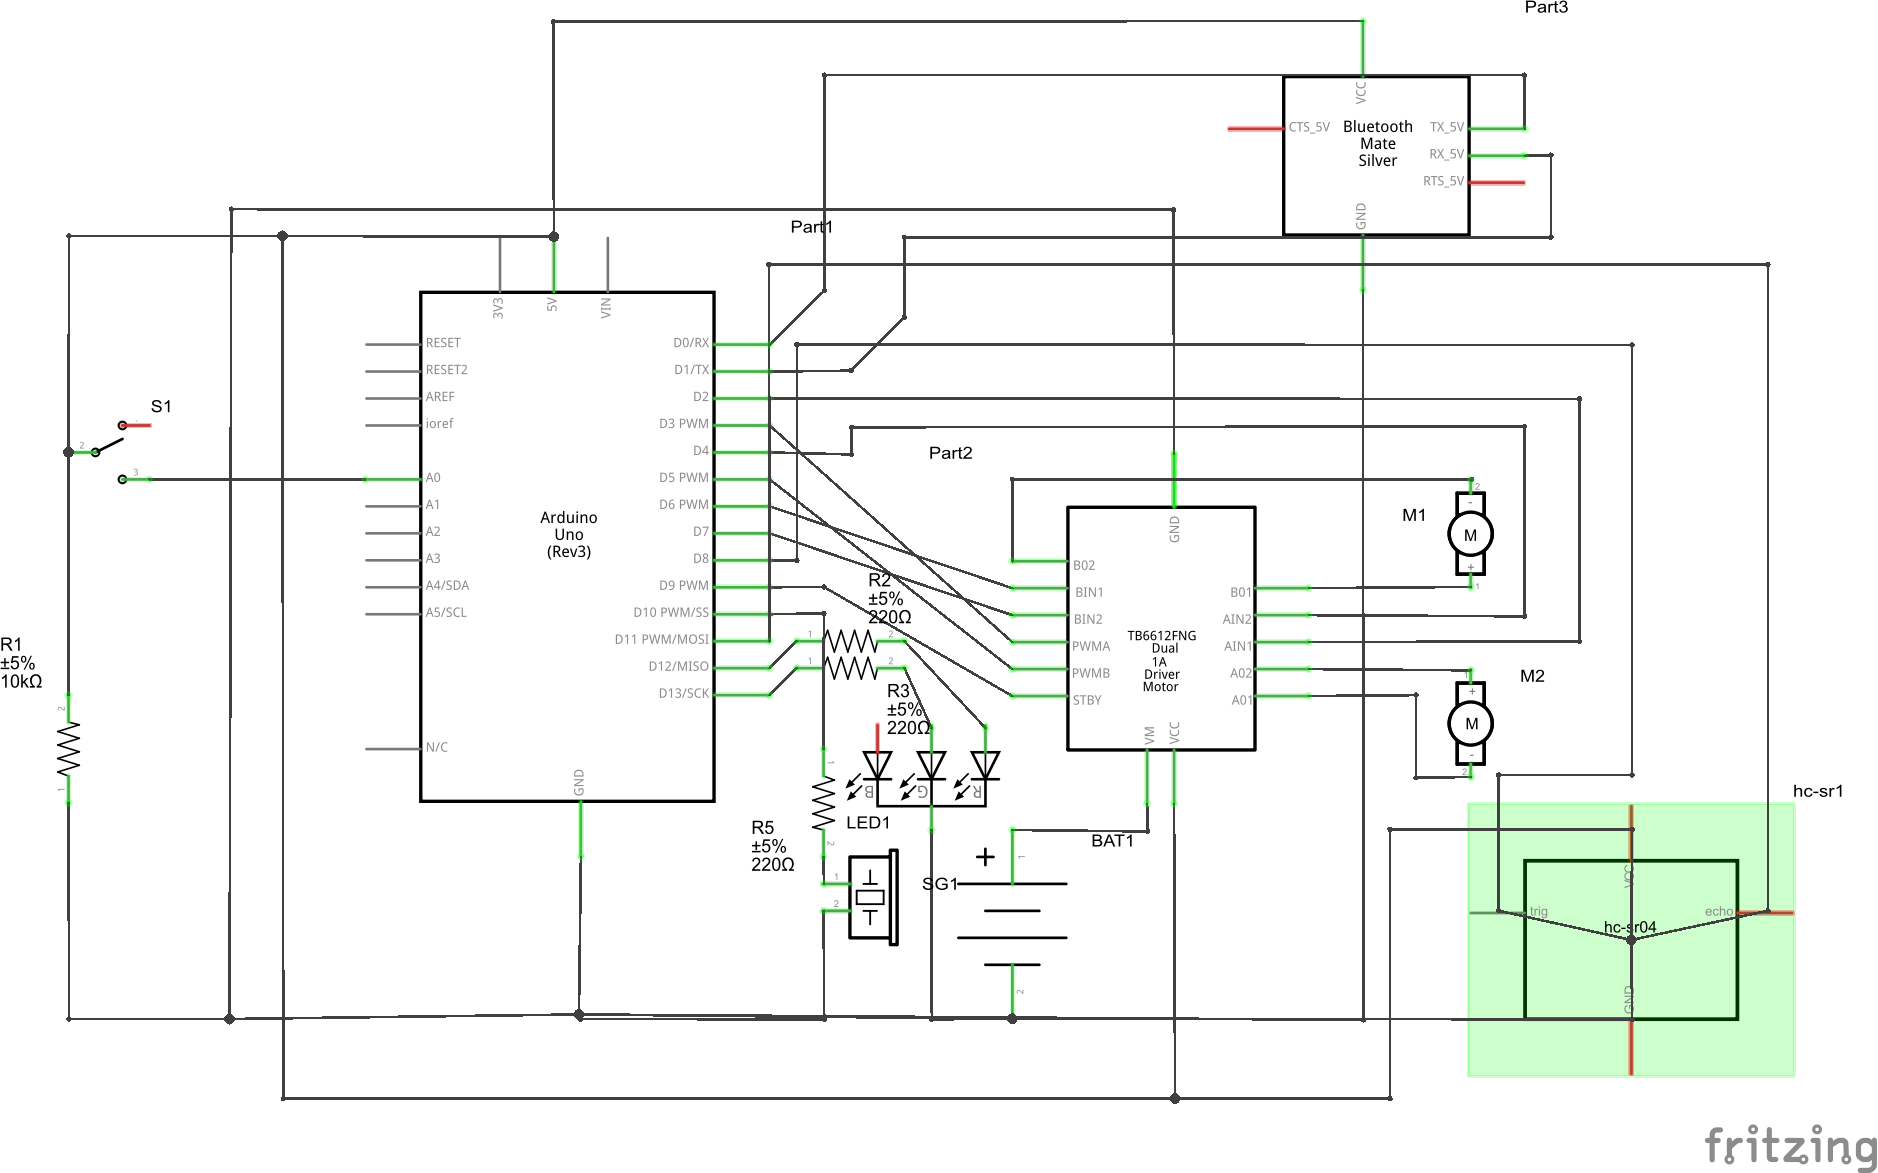
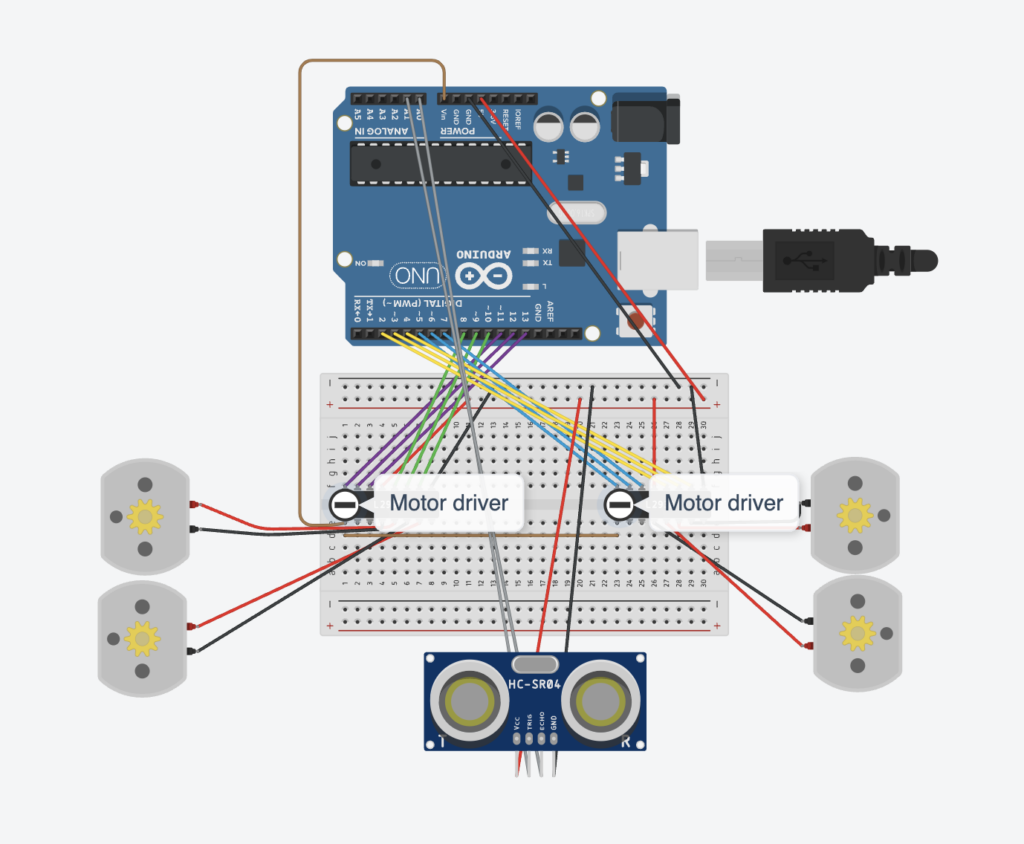
This is the schematic of the project. The pins do not necessarily correspond to the ones in the real implementation but the idea is the same. It includes 7 added parts, which are a BT module HC-06, a motor driver, 2 motors driven by the motor driver, a distance sensor, a buzzer, and an LED. The LED is for signifying the serial connection, the BT module is for wireless connection between Arduino and PC, and the other parts have their own obvious functions. there are many parts of the Arduino code I find worth mentioning, but I guess I will only mention one, that is the loop logic. The code goes like this:
void loop() {


  if (Serial.available() > 0) {
    state = 1;
    analogWrite(greenPin, 255);
    cmd = Serial.parseInt();
    mood = Serial.parseInt();
    if (Serial.read() == '\n') {
      if (cmd == 1) {
        state = 2;
        // beep according to mood
        delay(1000);
        talkResponse(mood);
        delay(1000);
        noTone(buzPin);
        state = 1;
        recieved = 1;
        Serial.println(recieved, state);
      } else if (cmd == 2) {
        state = 2;
        // move according to distance and mood
        delay(1000);
        petResponse(mood);
        state = 1;
        recieved = 1;
        Serial.println(recieved, state);
      } else if (cmd == 3) {
        state = 2;
        //dance
        for(int i = 0; i <3; i++){
          motorDrive(motor1, turnCW, 192);
          motorDrive(motor2, turnCW, 192);
          delay(1000);
          motorDrive(motor1, turnCCW, 192);
          motorDrive(motor2, turnCCW, 192);
          delay(1000);
        }
        motorBrake(motor1);
        motorBrake(motor2);
        state = 1;
        recieved = 1;
        Serial.println(recieved, state);
      } else {
        state = 1;
      }
    }
  }

}
This is also how I did the communication between p5 and Arduino. Usually, the p5 script will send a message to Arduino when an interaction button is pressed. The first number of the message will be the command the Arduino will execute, and it will go inside the if statement to execute the command. After execution, the Arduino will send back two parameters to inform p5 that it has been executed, and more commands can be sent.
Below is the P5 embed:
The p5 sketch has been made to recalculate positions whenever the canvas size is resized, so the full screen will also display perfectly. Basically, the main p5 sketch consists of a start screen, then the main page. on the main page, there is a text area and three buttons. Two of which connect to commands and one is the instructions. The thing that was hardest was the GPT-3.5-Turbo API. It took me a while to learn how to use it and what prompt should I give to make it respond as I want it to. The code is shown below:
let gpt3Endpoint = 'https://api.openai.com/v1/chat/completions';

async function makeOpenAIRequest(userInput) {
  const messages = [
    { role: 'user', content: userInput + "You are a pet, not an assistant. Evaluate my tone and give a response. Your mood is " + currentMood + ". Your mood fluctuates from a range of 1 to 10 where 1 is unhappy and 10 is happy. If the mood is already 10 or 1, no longer increase or decrease it. If you think I am being mean or unfriendly, decrease your mood. Otherwise, increase it. Respond with a format of 'Your cat felt ... and ..., and she ...(something a cat would do). pet mood: ...'. What comes after 'pet mood: ' should always be a number of your current mood." },
  ];

  try {
    const response = await fetch(gpt3Endpoint, {
      method: 'POST',
      headers: {
        'Content-Type': 'application/json',
        'Authorization': `Bearer ${apiKey}`,
      },
      body: JSON.stringify({
        model: 'gpt-3.5-turbo',
        messages: messages,
        max_tokens: 150,
      }),
    });

    const data = await response.json();

    if (data.choices && data.choices.length > 0 && data.choices[0].message && data.choices[0].message.content) {
      chatOutput = data.choices[0].message.content;
      let splitString = split(chatOutput, ':');
      currentMood = int(splitString[1]);
    } else {
      console.error('Invalid OpenAI response:', data);
      chatOutput = 'No valid response from OpenAI.';
    }
  } catch (error) {
    console.error('Error:', error);
    chatOutput = 'An error occurred while generating chat.';
  }
}

let isRequesting = false;

async function generateChat(typedText) {

  if (isRequesting) {
    return; // Don't initiate a new request if one is already ongoing
  }

  isRequesting = true;

  if (typedText!="") {
    await makeOpenAIRequest(typedText);
  } else {
    alert('Please enter a prompt before generating chat.');
  }

  isRequesting = false;
}
This is also the part I am particularly proud of since it is the first time ever I have included AI in one of my projects (Even though I didn’t train it myself).
Area for improvements:
There are many areas for improvement. First of all, The cat is moving on wheels only, making its movements very different from that of a real cat. Also, the current commands we have are very little. maybe in the future, I can add more commands. Another thing is that the AI model I used does not seem smart enough. Its responses sometimes are invalid and unpredictable. I might need to revise and update the prompt so that it does exactly what I asked.
Include some pictures / video of your project interaction
How does the implementation work?
Description of interaction design
Description of Arduino code and include or link to full Arduino sketch
Description of p5.js code and embed p5.js sketch in post
Description of communication between Arduino and p5.js
What are some aspects of the project that you’re particularly proud of?
What are some areas for future improvement?
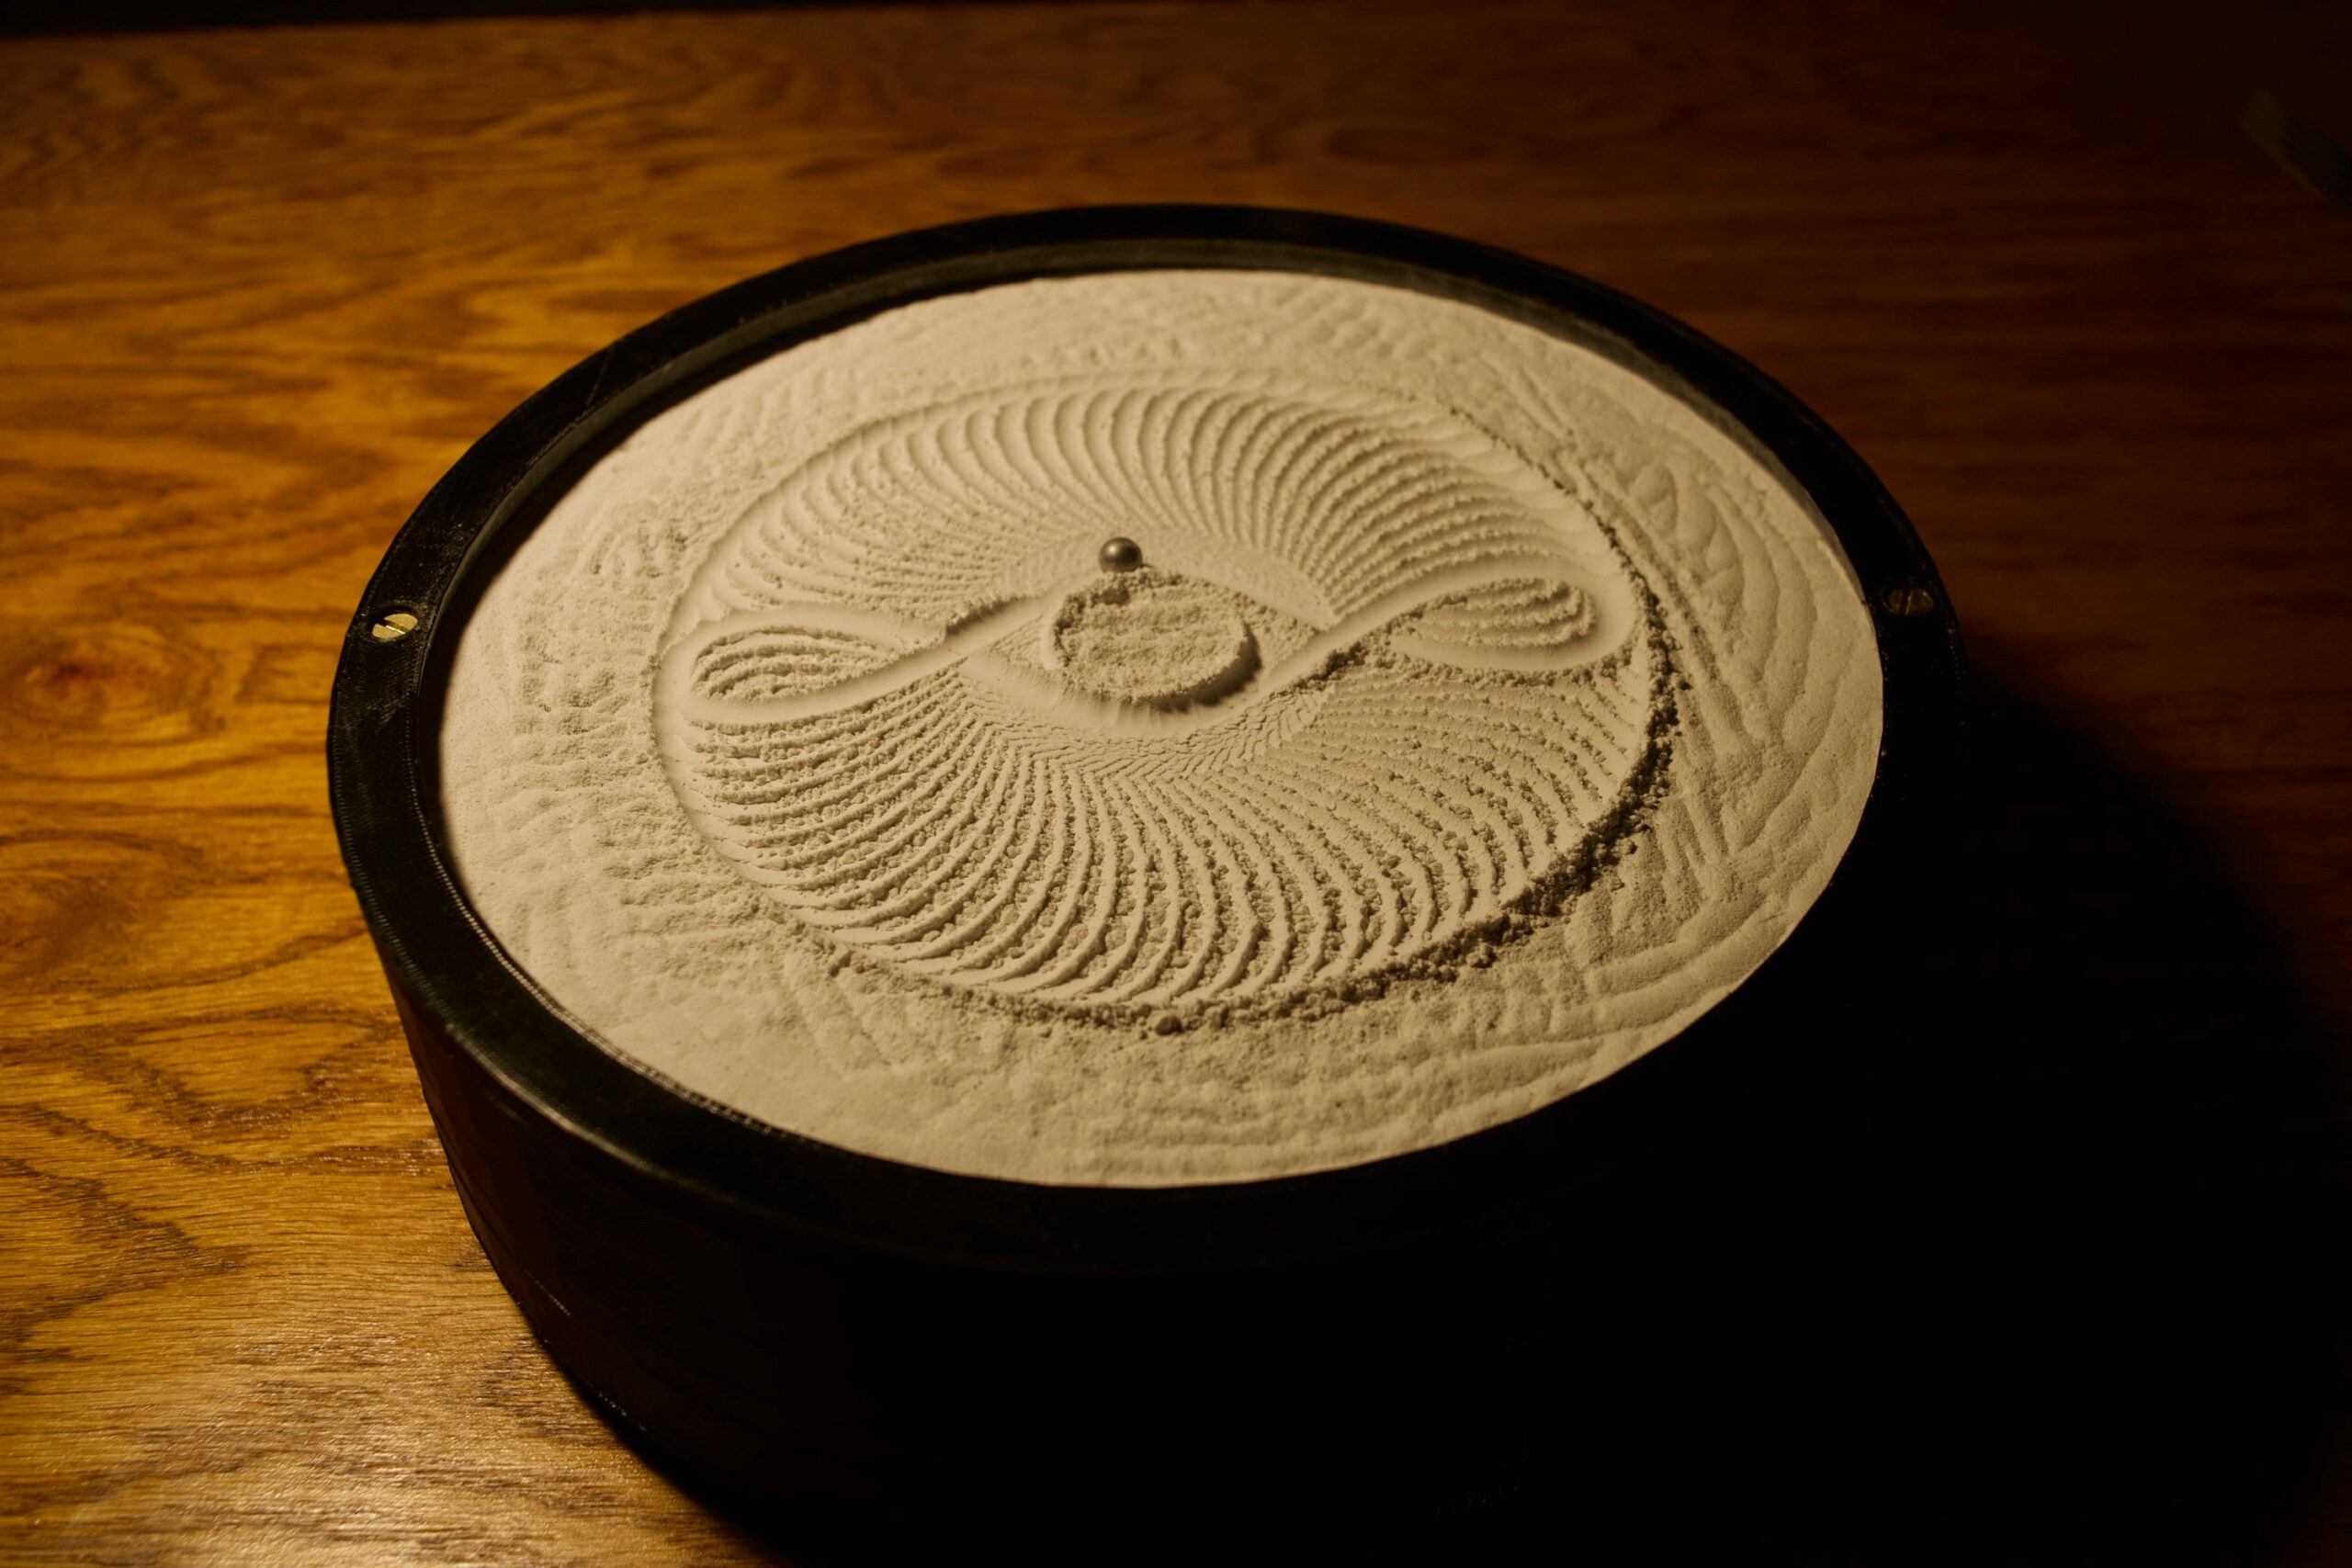
My idea was to creating an art piece using Arduino and p5 that lets user draw pattens on sand, something like this:
I was tempted to change my idea multiple times, because it just seemed too complicated to implement. But I’m glad I stuck with it!
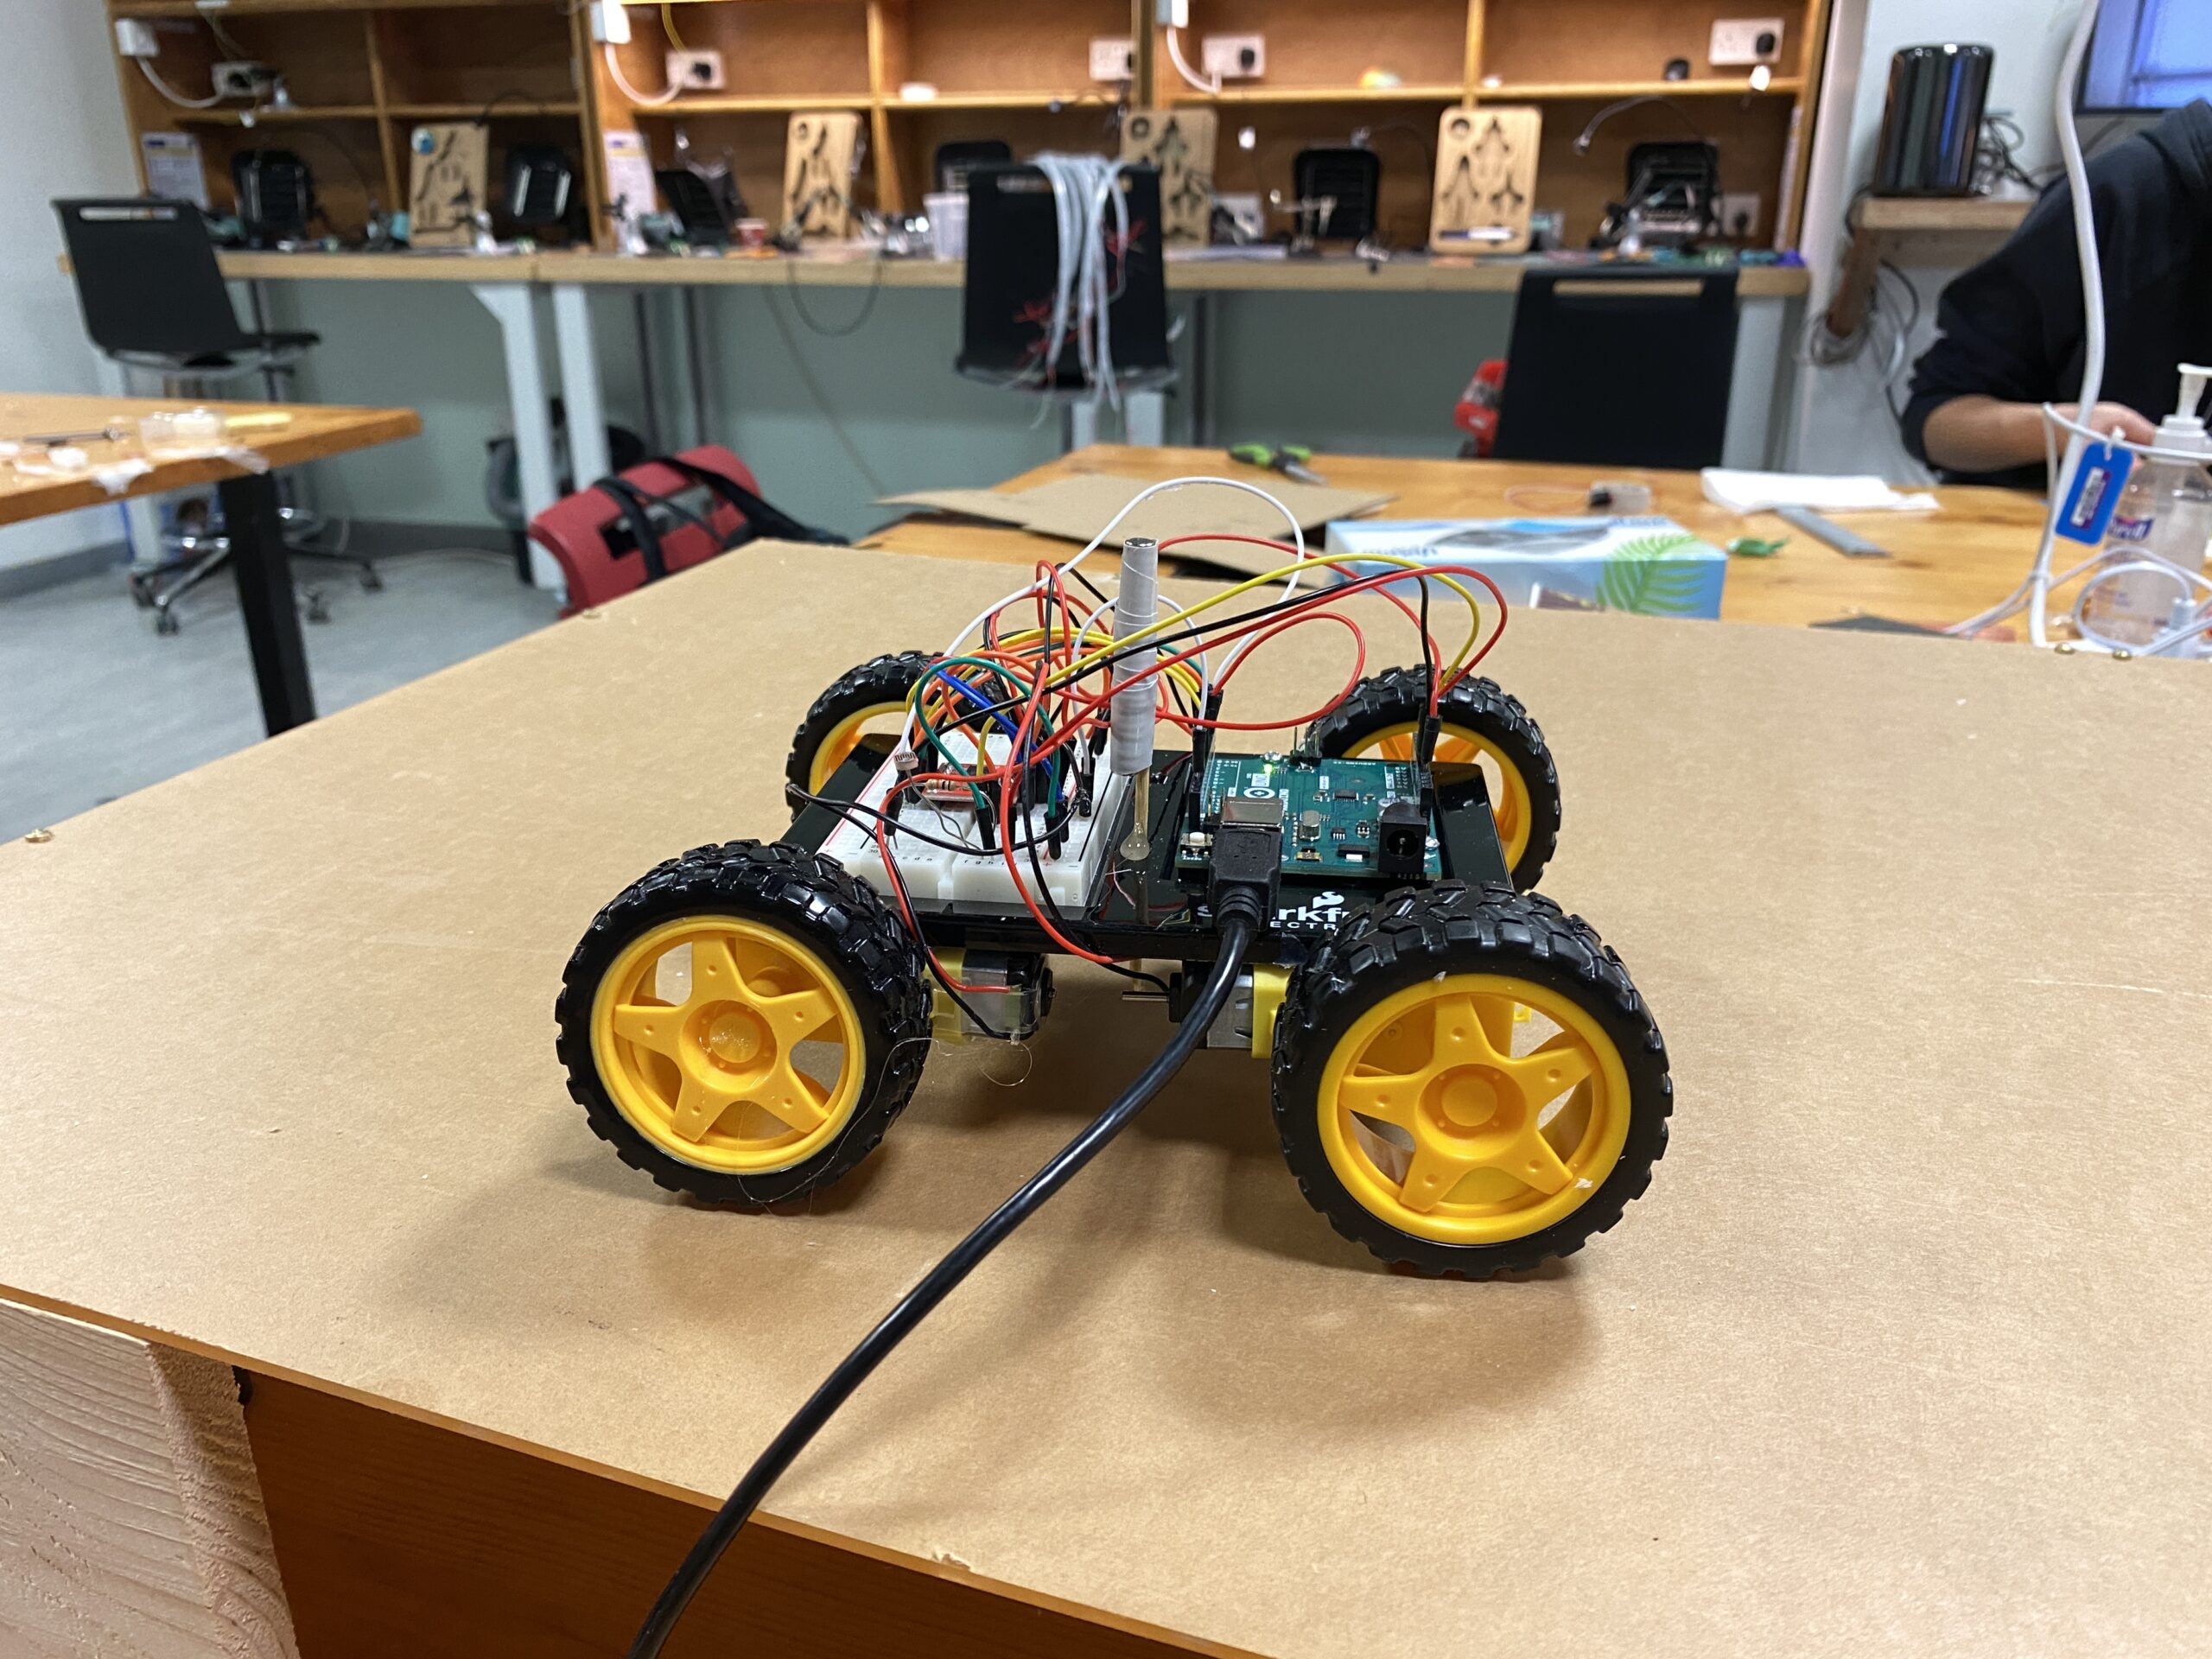
The idea is that there will be something magnetic underneath the platform, hidden from view, and users will be able to move it using an interface. When the magnet underneath the platform moves, the steel ball above will also move with it, leaving patterns on the sand in its wake. In my case, I’ve made a four wheel robot that can go front, back, left, and right.
The white thing sticking out of the robot is a stack of magnets, raised to a height just enough to scrape the bottom surface of the platform. Here’s the Arduino code:
const int ain1Pin = 3;
const int ain2Pin = 4;
const int pwmAPin = 5;

const int bin1Pin = 8;
const int bin2Pin = 7;
const int pwmBPin = 6;


void setup() {
  Serial.begin(9600);
  pinMode(ain1Pin, OUTPUT);
  pinMode(ain2Pin, OUTPUT);

  while (Serial.available() <= 0) {
    Serial.println("0,0");
    delay(300);
    digitalWrite(LED_BUILTIN, LOW);
    delay(50);
  }

  // set speed
  analogWrite(pwmAPin, 255);
  analogWrite(pwmBPin, 255);
}

void loop() {
  while (Serial.available()) {
    int left = Serial.parseInt();
    int right = Serial.parseInt();
    if (Serial.read() == '\n') {
      if (left == 1 && right == 0) {
        analogWrite(pwmAPin, 100);
        analogWrite(pwmBPin, 255);
        digitalWrite(ain1Pin, HIGH);
        digitalWrite(ain2Pin, LOW);
        digitalWrite(bin1Pin, HIGH);
        digitalWrite(bin2Pin, LOW);
      }
      if (left == 1 && right == 1) {
        analogWrite(pwmAPin, 255);
        analogWrite(pwmBPin, 255);
        digitalWrite(ain1Pin, HIGH);
        digitalWrite(ain2Pin, LOW);
        digitalWrite(bin1Pin, HIGH);
        digitalWrite(bin2Pin, LOW);
      }
      if (left == 0 && right == 1) {
        analogWrite(pwmAPin, 255);
        analogWrite(pwmBPin, 100);
        digitalWrite(ain1Pin, HIGH);
        digitalWrite(ain2Pin, LOW);
        digitalWrite(bin1Pin, HIGH);
        digitalWrite(bin2Pin, LOW);
      }
      if (left == -1 && right == -1) {
        analogWrite(pwmAPin, 255);
        analogWrite(pwmBPin, 255);
        digitalWrite(ain1Pin, LOW);
        digitalWrite(ain2Pin, HIGH);
        digitalWrite(bin1Pin, LOW);
        digitalWrite(bin2Pin, HIGH);
      } else if (left == 0 && right == 0) {
        digitalWrite(ain1Pin, LOW);
        digitalWrite(ain2Pin, LOW);
        digitalWrite(bin1Pin, LOW);
        digitalWrite(bin2Pin, LOW);
      }
      int sensor = analogRead(A0);
      delay(5);
      int sensor2 = analogRead(A0);
      delay(5);
      Serial.print(sensor);
      Serial.print(',');
      Serial.println(sensor2);
    }
  }
  digitalWrite(LED_BUILTIN, LOW);
}
Front and back motion is fairly simple — all wheels turn at full speed in the same direction. For left and right, I could’ve just made the wheels on one side turn. But I tried this out, and this created strange 360 degree motions. While the robot was turning, the ball on top of the plane wouldn’t move much. This created a strange user experience. So I thought of the velocity differential of each wheel with respect to the other. If the wheel on this side moves faster than the other side, the robot will turn nicely to this side. That’s how real cars work anyway. I ended up going with this logic, and the ball/robot’s motion is now much much smoother.
I was going to just use two wheels on each side. Two motors work fine with Arduino, as we’ve seen in class. In my first prototype, I had only two wheels, that wasn’t enough power, and the robot’s motion was very slow. So I tried to add two more, but it wouldn’t work, even with another motor driver. The Arduino wouldn’t turn on with four motors and two motor drivers connected. I realized that I didn’t need all four wheels to act independently — the front wheels could just imitate the pair at the back, or vice versa. So I plugged in each front wheel in series with the corresponding back wheel, and it worked great!
On the p5.side, things are much simpler. Here’s the link to the full code.
The user can control the robot’s motion by dragging the mouse, and it creates ripples like this:
I wish I could’ve made the magnet attachment better, though. Right now, it’s just taped to a bamboo skewer, stuck into one of the Sparkfun kit baseplates. A better way to do this would be to make an attachment specifically for this purpose.
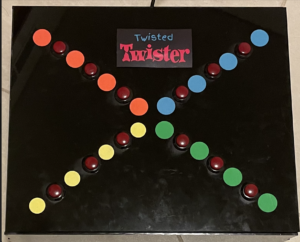
For my final project for this class, I have created Twisted Twister, a version of the popular game twister, that is played with fingers! The challenge is simple – a wheel spins, gives you a color and a hand(left or right) and you press that button with a finger of the respective hand. Every right press gives you a point and every wrong press instantly ends the game. If you manage to have all your fingers successfully on the board, you win!!
Implementation
P5.js : Most of my game is heavily reliant on the p5.js side since I use it to control the entire game logic and display. In the game I have a wheel that spins based on speech recognition. For this I’ve used the p5.speech library that does speech recognition using API functionality. The wheel in itself, is an array of equal divisions of 4 colors. While the wheel is static, there is a black spinner, that’s the one that moves and stops on a particular section and the center of the wheel displays the color. The hand the user has to use is also mentioned on the top with the same color with the intent of making it easier for the user without getting confused with so many bright colors on the screen.
Once the user presses the required switch, they have to continue holding it. I have created an array to track the switches which are already pressed and I compare it with the array of switch states I obtain from the arduino to compare the switch states at various points in the game. If a switch is correct and wasn’t already pressed, the score adds and for a wrong switch the game ends.
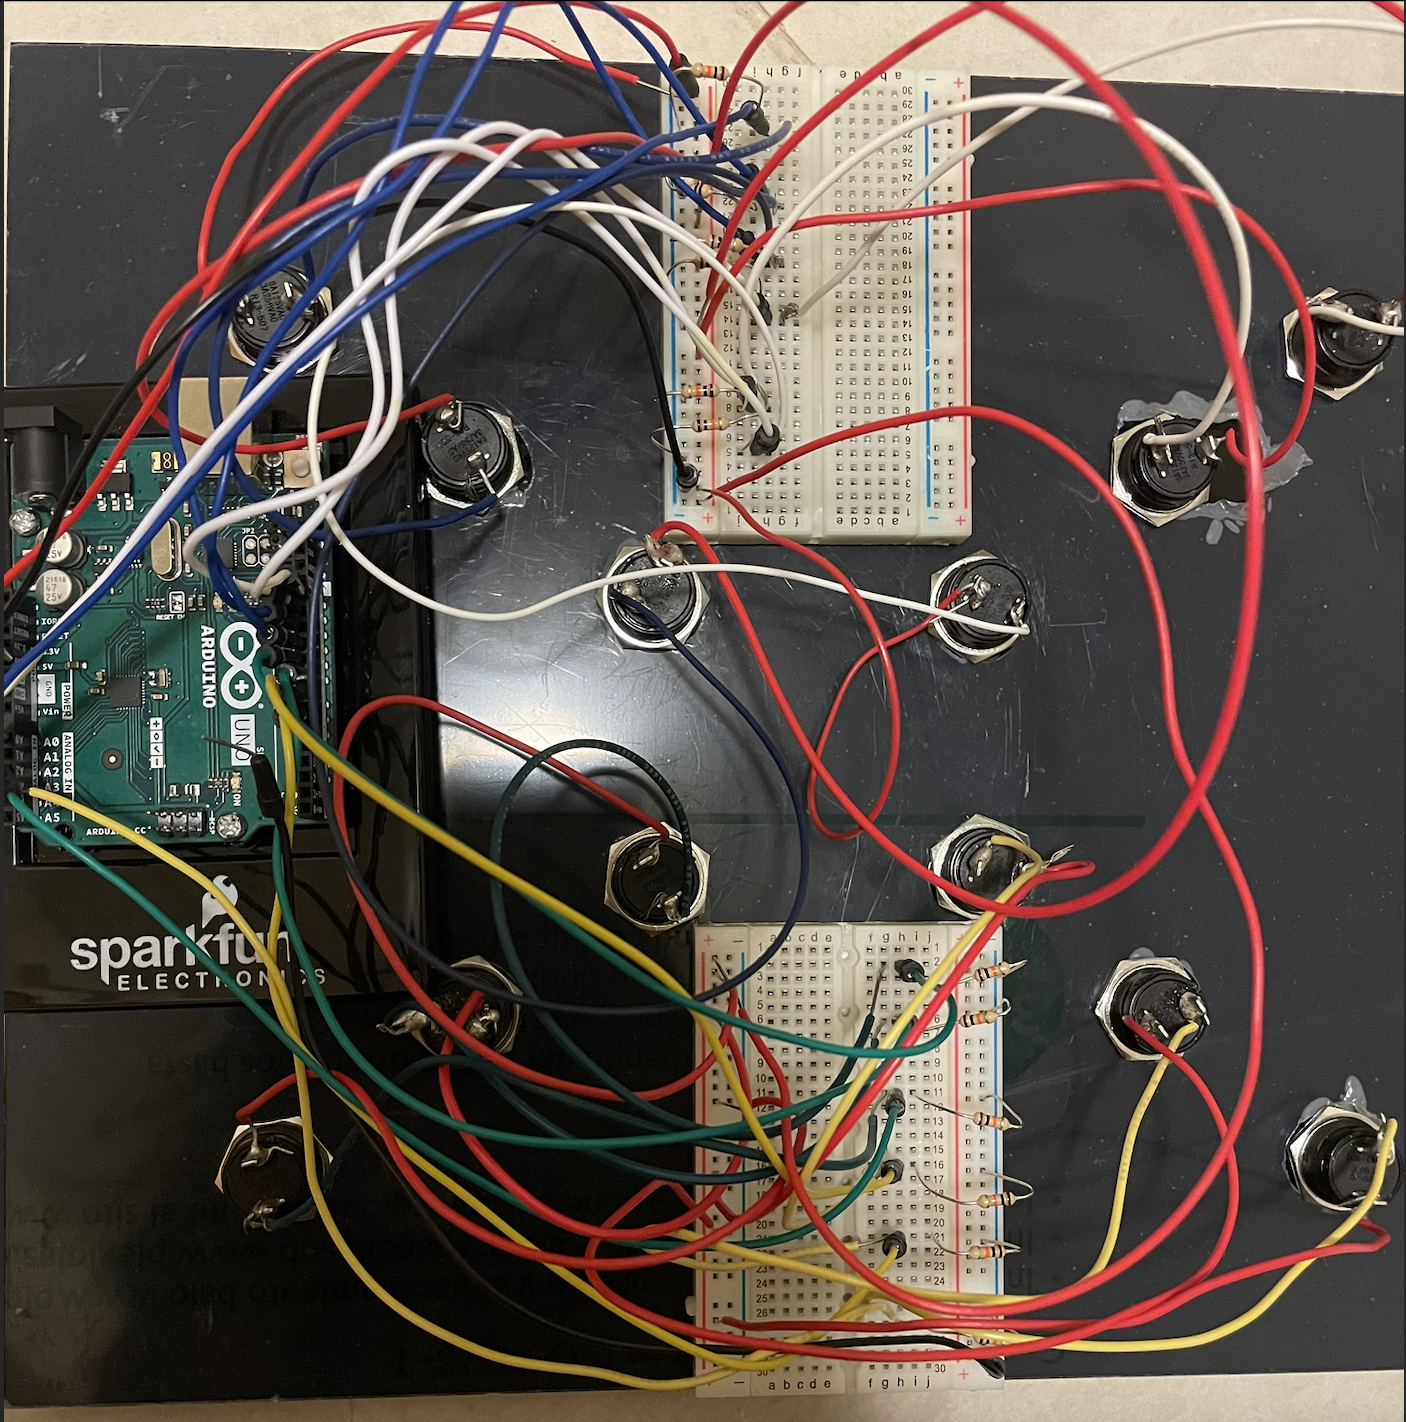
Arduino: From the arduino side, it is pretty simple. I have 12 switches, 3 of each of the 4 colors, whose states I obtain in the form of a string but then use it in p5js in the form of an array.
const int redSwitch1 = 13;
const int redSwitch2 = 12;
const int redSwitch3 = A0;
const int blueSwitch1 = 11;
const int blueSwitch2 = 10;
const int blueSwitch3 = A1;
const int greenSwitch1 = 9;
const int greenSwitch2 = 8;
const int greenSwitch3 = A2;
const int yellowSwitch1 = 7;
const int yellowSwitch2 = 6;
const int yellowSwitch3 = A3;

void setup() {
  Serial.begin(9600);
  pinMode(redSwitch1, INPUT_PULLUP);
  pinMode(redSwitch2, INPUT_PULLUP);
  pinMode(redSwitch3, INPUT_PULLUP);
  pinMode(blueSwitch1, INPUT_PULLUP);
  pinMode(blueSwitch2, INPUT_PULLUP);
  pinMode(blueSwitch3, INPUT_PULLUP);
  pinMode(greenSwitch1, INPUT_PULLUP);
  pinMode(greenSwitch2, INPUT_PULLUP);
  pinMode(greenSwitch3, INPUT_PULLUP);
  pinMode(yellowSwitch1, INPUT_PULLUP);
  pinMode(yellowSwitch2, INPUT_PULLUP);
  pinMode(yellowSwitch3, INPUT_PULLUP);
}

void loop() {
  // creating a comma-separated string to represent the states of all switches
  String switchStates = String(digitalRead(redSwitch1)) + "," +
                        String(digitalRead(redSwitch2)) + "," +
                        String(digitalRead(blueSwitch1)) + "," +
                        String(digitalRead(blueSwitch2)) + "," +
                        String(digitalRead(greenSwitch1)) + "," +
                        String(digitalRead(greenSwitch2)) + "," +
                        String(digitalRead(yellowSwitch1)) + "," +
                        String(digitalRead(yellowSwitch2)) + "," +
                        String(digitalRead(redSwitch3)) + "," +
                        String(digitalRead(blueSwitch3)) + "," +
                        String(digitalRead(greenSwitch3)) + "," +
                        String(digitalRead(yellowSwitch3));

  // sending the string data to p5.js
  Serial.println(switchStates);
  delay(500);

}
Interaction design: In terms of interaction design, constructing the physical aspects and combining p5js and arduino, it was somewhat frustrating because of the amount of errors but also my favorite part of the project (specifically soldering!! I found myself in the lab soldering my million wires at 8am in the morning and it was therapeutic!!).
I have chosen to place the 12 switches in diagonal rows onto an acrylic board. Since I had multiple wires, I decided to make a box so the wires can go inside without causing a visual mess. The laser cutting took a lot of time but eventually worked out (super grateful to all the lab assistants for helping me). I wanted to use switches bigger than the ones in our kit and couldn’t find as many with different colors, I put circle stickers beside these buttons indicating what color they belong to. Assembling and serial communication was easy. The only part of the interaction that took me the most time was the speech recognition. While the code worked perfectly sometimes, it would randomly get disconnected in the middle and it was difficult to come up with an alternative way to control spinning the wheel without speech recognition and hands.
Aspects that I’m proud of
One of my biggest challenges was coming up with an idea for this project. Either the idea was too vague or too ambitious. Once I decided on this game I had constant doubts of whether or not it would be fun but after the laughs during the user testing, I think it would pass off as good enough for a first timer.
In terms of code, I’m really happy with the speech recognition and while I did get a reference for how to make the wheel spin, I had to break the code down and modify it a lot to make it work with my game logic and I’m really happy it worked out finally!! I found a fix for the speech recognition disconnection and now it works almost all the time! I found it relaxing to keep stretching my fingers for playing this game as they’d become stiff from hours of typing!!
Future improvements
I would want to try to blackout the sections of the wheels that are already visited so the user wouldn’t have to pass it manually if the same color appears and there’s no switch of that color left. I want to make my circuit and code more organized that what I currently have. I could also consider adding a microphone closer to the user to make the speech recognition more efficient. Overall I’m really happy with the way it turned out but would love to make this more fun and engaging with more time in hand.
I just finished the prototype, so I haven’t added the sand on top of the platform yet. I’ll just add the sand on the day of the showcase.
I asked my friends to try it out, and I think they liked it (refer to the video above). I just told them how to control the robot (with arrow keys for now, just for testing, even though I have the mouse interaction already programmed). I think if I could incorporate a joystick in the project, it would really come together, and also its use would be very intuitive. But without mouse/keyboard input, there wouldn’t be any use for p5.js, so I had to keep it the way it is now.
Sometimes they would drive the ball off the edge of the platform, and so they suggested adding edges to the platform. I think the edges are important anyway because there’s going to be sand, and without edges the sand will just be everywhere.
I’m still sticking to my original idea, but I’ve changed my process considerably. Instead of using pulleys and belts, I’ve just decided to make a raised platform and have a moving robot underneath it. The robot will have a magnet, which will move the ball above the platform. It will make no difference to the user (hopefully), but will make the implementation much easier. I realized I would also need lots of other tools to execute the idea the way I had originally planned, and I’d have to purchase them myself. If I use a moving robot, I can just use the stuff that’s around the lab.
“Engage in a thrilling race against time with ‘Drive to Survive,’ where your objective is to outlast the clock for three intense minutes. Can you master the controls, avoid crashes, and emerge victorious? But that’s not all – your ultimate goal is to achieve the maximum distance moved by your high-tech car. Each moment is critical as you strive to set a new distance record”
This is what the user actually experiences in my project. On my side, I wanted my project to simulate the experience of driving a manual car by providing complete control through the p5.js sketch. I added a static car window in the sketch that makes the users feel like they’re actually inside the car while controlling it remotely. Also, the sketch provides a gear box, allowing users to adjust the speed as if they are accelerating in a real car. The cool thing about this project is that it aims to seamlessly bring in a webcam, providing users with a live visual experience on p5.js. This goes beyond physical boundaries, allowing for easy remote control, even if the car is far away.
User Testing:
User 1 Testing: Project was not finalized
User 2 Testing: Final Project
Users Feedback:
The two users generally demonstrated an ability to engage with the project without explicit instructions and they quickly grasped the basic mechanics for car movement.
A good comment was about the game interface which is very simple and friendly. Another good comment was about the filter added to the video, which adds a non-realistic mood that suits the game.
I think only one part of the project required additional explanation which is paying attention to how far is the car because it’s all wired connections so there is a risk of losing connection or laptop fall if it’s put, for example, on a table. For that particular issue, I think I should tell the user about it or maybe adding this instruction in the game sketch as well.
Implementation:
Circuit:
Arduino Circuit
P5JS Code & Sketch:
P5JS code can be described as separate blocks of code which are as follows:
Declaring global variables for the game and car control
Pre-loading all the media used in the project (images, audio, …)
Setting up the sketch and view the game state screen
State1: start which is shown in the sketch below where the user chooses to start the game or show instructions.
State2: Instructions which obviously guide the user
State3: game where you experience driving
State4: end screen where your score is displayed
Arduino Code:
The code basically sets up the car functionality. The code starts with identifying the pins used in the circuit for the motor drivers and the ultrasonic distance sensor. Also, I created a separate function for each direction movement. Based on the data received from the sketch, a function is triggered.
//front left
const int ain1Pin = 13;
const int ain2Pin = 12;
const int pwmAPin = 11;
//back left
const int bin1Pin = 8;
const int bin2Pin = 9;
const int pwmBPin = 10;
//front right
const int cin1Pin = 7;
const int cin2Pin = 6;
const int pwmCPin = 5;
//back right
const int din1Pin = 2;
const int din2Pin = 4;
const int pwmDPin = 3;

const int TRIGGER_PIN = A0;
const int ECHO_PIN = A1;

//global
int speed = 0;

void setup() {
  Serial.begin(9600);
  pinMode(ain1Pin, OUTPUT);
  pinMode(ain2Pin, OUTPUT);
  pinMode(bin1Pin, OUTPUT);
  pinMode(bin2Pin, OUTPUT);
  pinMode(cin1Pin, OUTPUT);
  pinMode(cin2Pin, OUTPUT);
  pinMode(din1Pin, OUTPUT);
  pinMode(din2Pin, OUTPUT);
  pinMode (TRIGGER_PIN, OUTPUT);
  pinMode (ECHO_PIN, INPUT);
}

void loop() {

  // Check if data is available from p5.js
  if (Serial.available() > 0) {
    // Read the brightness value from p5.js
    speed = Serial.parseInt();
    int up = Serial.parseInt();
    int down = Serial.parseInt();
    int right = Serial.parseInt();
    int left = Serial.parseInt();
    if(up == 1){
        moveForward();
    }else if(down == 1){
        moveBackward();
    }else if(right == 1){
        moveRight();
    }
    else if(left == 1){
        moveLeft();
    }
    else{
        digitalWrite(ain1Pin, LOW);
        digitalWrite(ain2Pin, LOW);
        digitalWrite(cin1Pin, LOW);
        digitalWrite(cin2Pin, LOW);
        digitalWrite(bin1Pin, LOW);
        digitalWrite(bin2Pin, LOW);
        digitalWrite(din1Pin, LOW);
        digitalWrite(din2Pin, LOW);
    }
  }
  unsigned long duration;
  float distance;
  digitalWrite(TRIGGER_PIN, HIGH);
  delayMicroseconds(1000);
  digitalWrite(TRIGGER_PIN, LOW);
  duration = pulseIn (ECHO_PIN, HIGH);
  distance = (duration / 2.0) / 29.0;
  Serial.println(distance);
}

void moveForward(){
  analogWrite(pwmAPin, speed);
  analogWrite(pwmCPin, speed);
  analogWrite(pwmBPin, speed);
  analogWrite(pwmDPin, speed);
  digitalWrite(ain1Pin, HIGH);
  digitalWrite(ain2Pin, LOW);
  digitalWrite(bin1Pin, HIGH);
  digitalWrite(bin2Pin, LOW);
  digitalWrite(cin1Pin, HIGH);
  digitalWrite(cin2Pin, LOW);
  digitalWrite(din1Pin, HIGH);
  digitalWrite(din2Pin, LOW);
}

void moveBackward(){
  analogWrite(pwmAPin, speed);
  analogWrite(pwmCPin, speed);
  analogWrite(pwmBPin, speed);
  analogWrite(pwmDPin, speed);
  digitalWrite(ain1Pin, LOW);
  digitalWrite(ain2Pin, HIGH);
  digitalWrite(bin1Pin, LOW);
  digitalWrite(bin2Pin, HIGH);
  digitalWrite(cin1Pin, LOW);
  digitalWrite(cin2Pin, HIGH);
  digitalWrite(din1Pin, LOW);
  digitalWrite(din2Pin, HIGH);
}

void moveRight(){
  analogWrite(pwmAPin, 255);
  analogWrite(pwmBPin, 255);
  analogWrite(pwmCPin, 255);
  analogWrite(pwmDPin, 255);
  digitalWrite(cin1Pin, HIGH);
  digitalWrite(cin2Pin, LOW);
  digitalWrite(din1Pin, HIGH);
  digitalWrite(din2Pin, LOW);
  digitalWrite(ain1Pin, LOW);
  digitalWrite(ain2Pin, HIGH);
  digitalWrite(bin1Pin, LOW);
  digitalWrite(bin2Pin, HIGH);
}

void moveLeft(){
  analogWrite(pwmAPin, 255);
  analogWrite(pwmBPin, 255);
  analogWrite(pwmCPin, 255);
  analogWrite(pwmDPin, 255);
  digitalWrite(cin1Pin, LOW);
  digitalWrite(cin2Pin, HIGH);
  digitalWrite(din1Pin, LOW);
  digitalWrite(din2Pin, HIGH);
  digitalWrite(ain1Pin, HIGH);
  digitalWrite(ain2Pin, LOW);
  digitalWrite(bin1Pin, HIGH);
  digitalWrite(bin2Pin, LOW);
}

long microsecondsToCentimeters(long microseconds) {
  return microseconds / 29 / 2;
}
Communication between P5 and Arduino:
The Arduino C code basically receives data from the P5Js sketch and work accordingly. There are 5 variables received that controls the car movement: the four directions (up, down, left, and right) and the speed controlled by the gear box in the sketch. On the other hand, the P5JS sketch receives one value which is the distance of the ultrasonic distance sensor and checks for collisions.
Parts I am proud of:
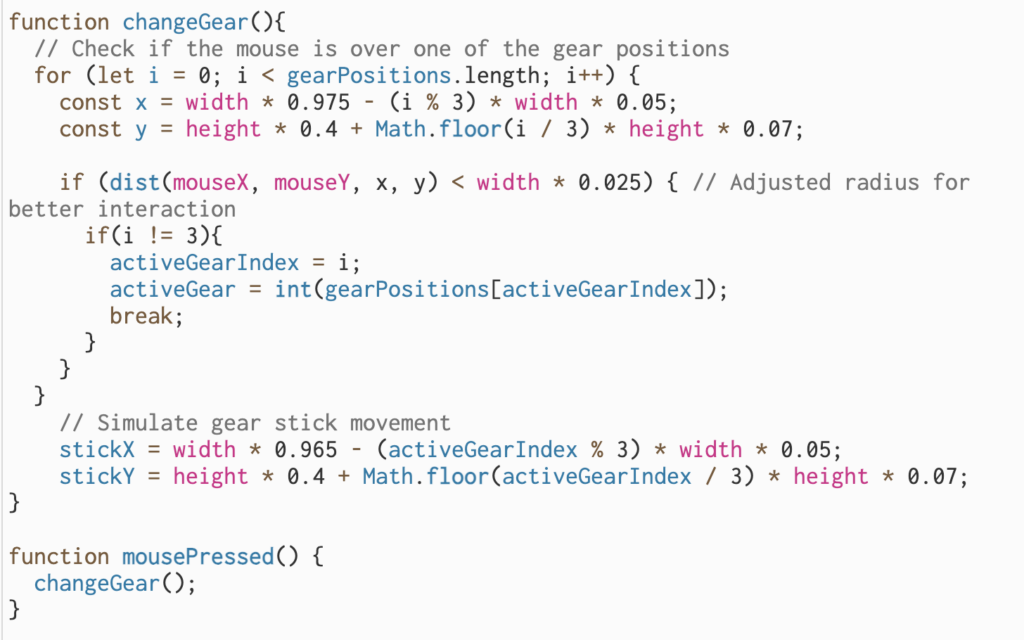
I am proud of the overall output of my project and that I got some hardware control in my skill set. I am particularly proud of two things: the visual design of my game and creating a gear box to control the car speed. For this project, I spent much time trying to improve the visual elements of my game whether through the static elements (car, gearbox, …) or dynamic video feed. I added a filter to my screen which I think it gives a nice effect that perfectly matches the overall experience. For the gear box, it was very challenging to make it and shift from one gear to another, but eventually, I figured it out. Here is the function that does so.
Future Improvements:
One thing that I want to improve in my project in the wired connection because it somehow limits this fun experience. One way is to use a bluetooth module for sending and receiving data. However, the wired connection was still required for connecting the webcam to the laptop and capturing the car view. I am not sure, but maybe there is a wireless webcam somewhere on Earth…
I aimed to delve into recreating a retro game named “Feed Flynn,” blending the Catcher and spaceship Tyrian games into one fun experience. Inspired by the saying “don’t eat the book” and my deep fondness for food, I wanted to craft a game celebrating my love for food—an arcade-style creation I call “Feed Flynn.”
You get points for Feeding Flynn donuts +10,
Burgers ( full Meal ) + 20
Books -3 (why would you even feed Flynn Books ;( )
Flynn also has the ability to shoot bullets to eliminate the books. It’s a 35-second challenge to compete for the highest score, a way to test your skills and challenge your friends for the top spot!
The game adopts a retro vibe with:
A glitchy character sprite
Pixelated character design
Incorporation of music and sound effects
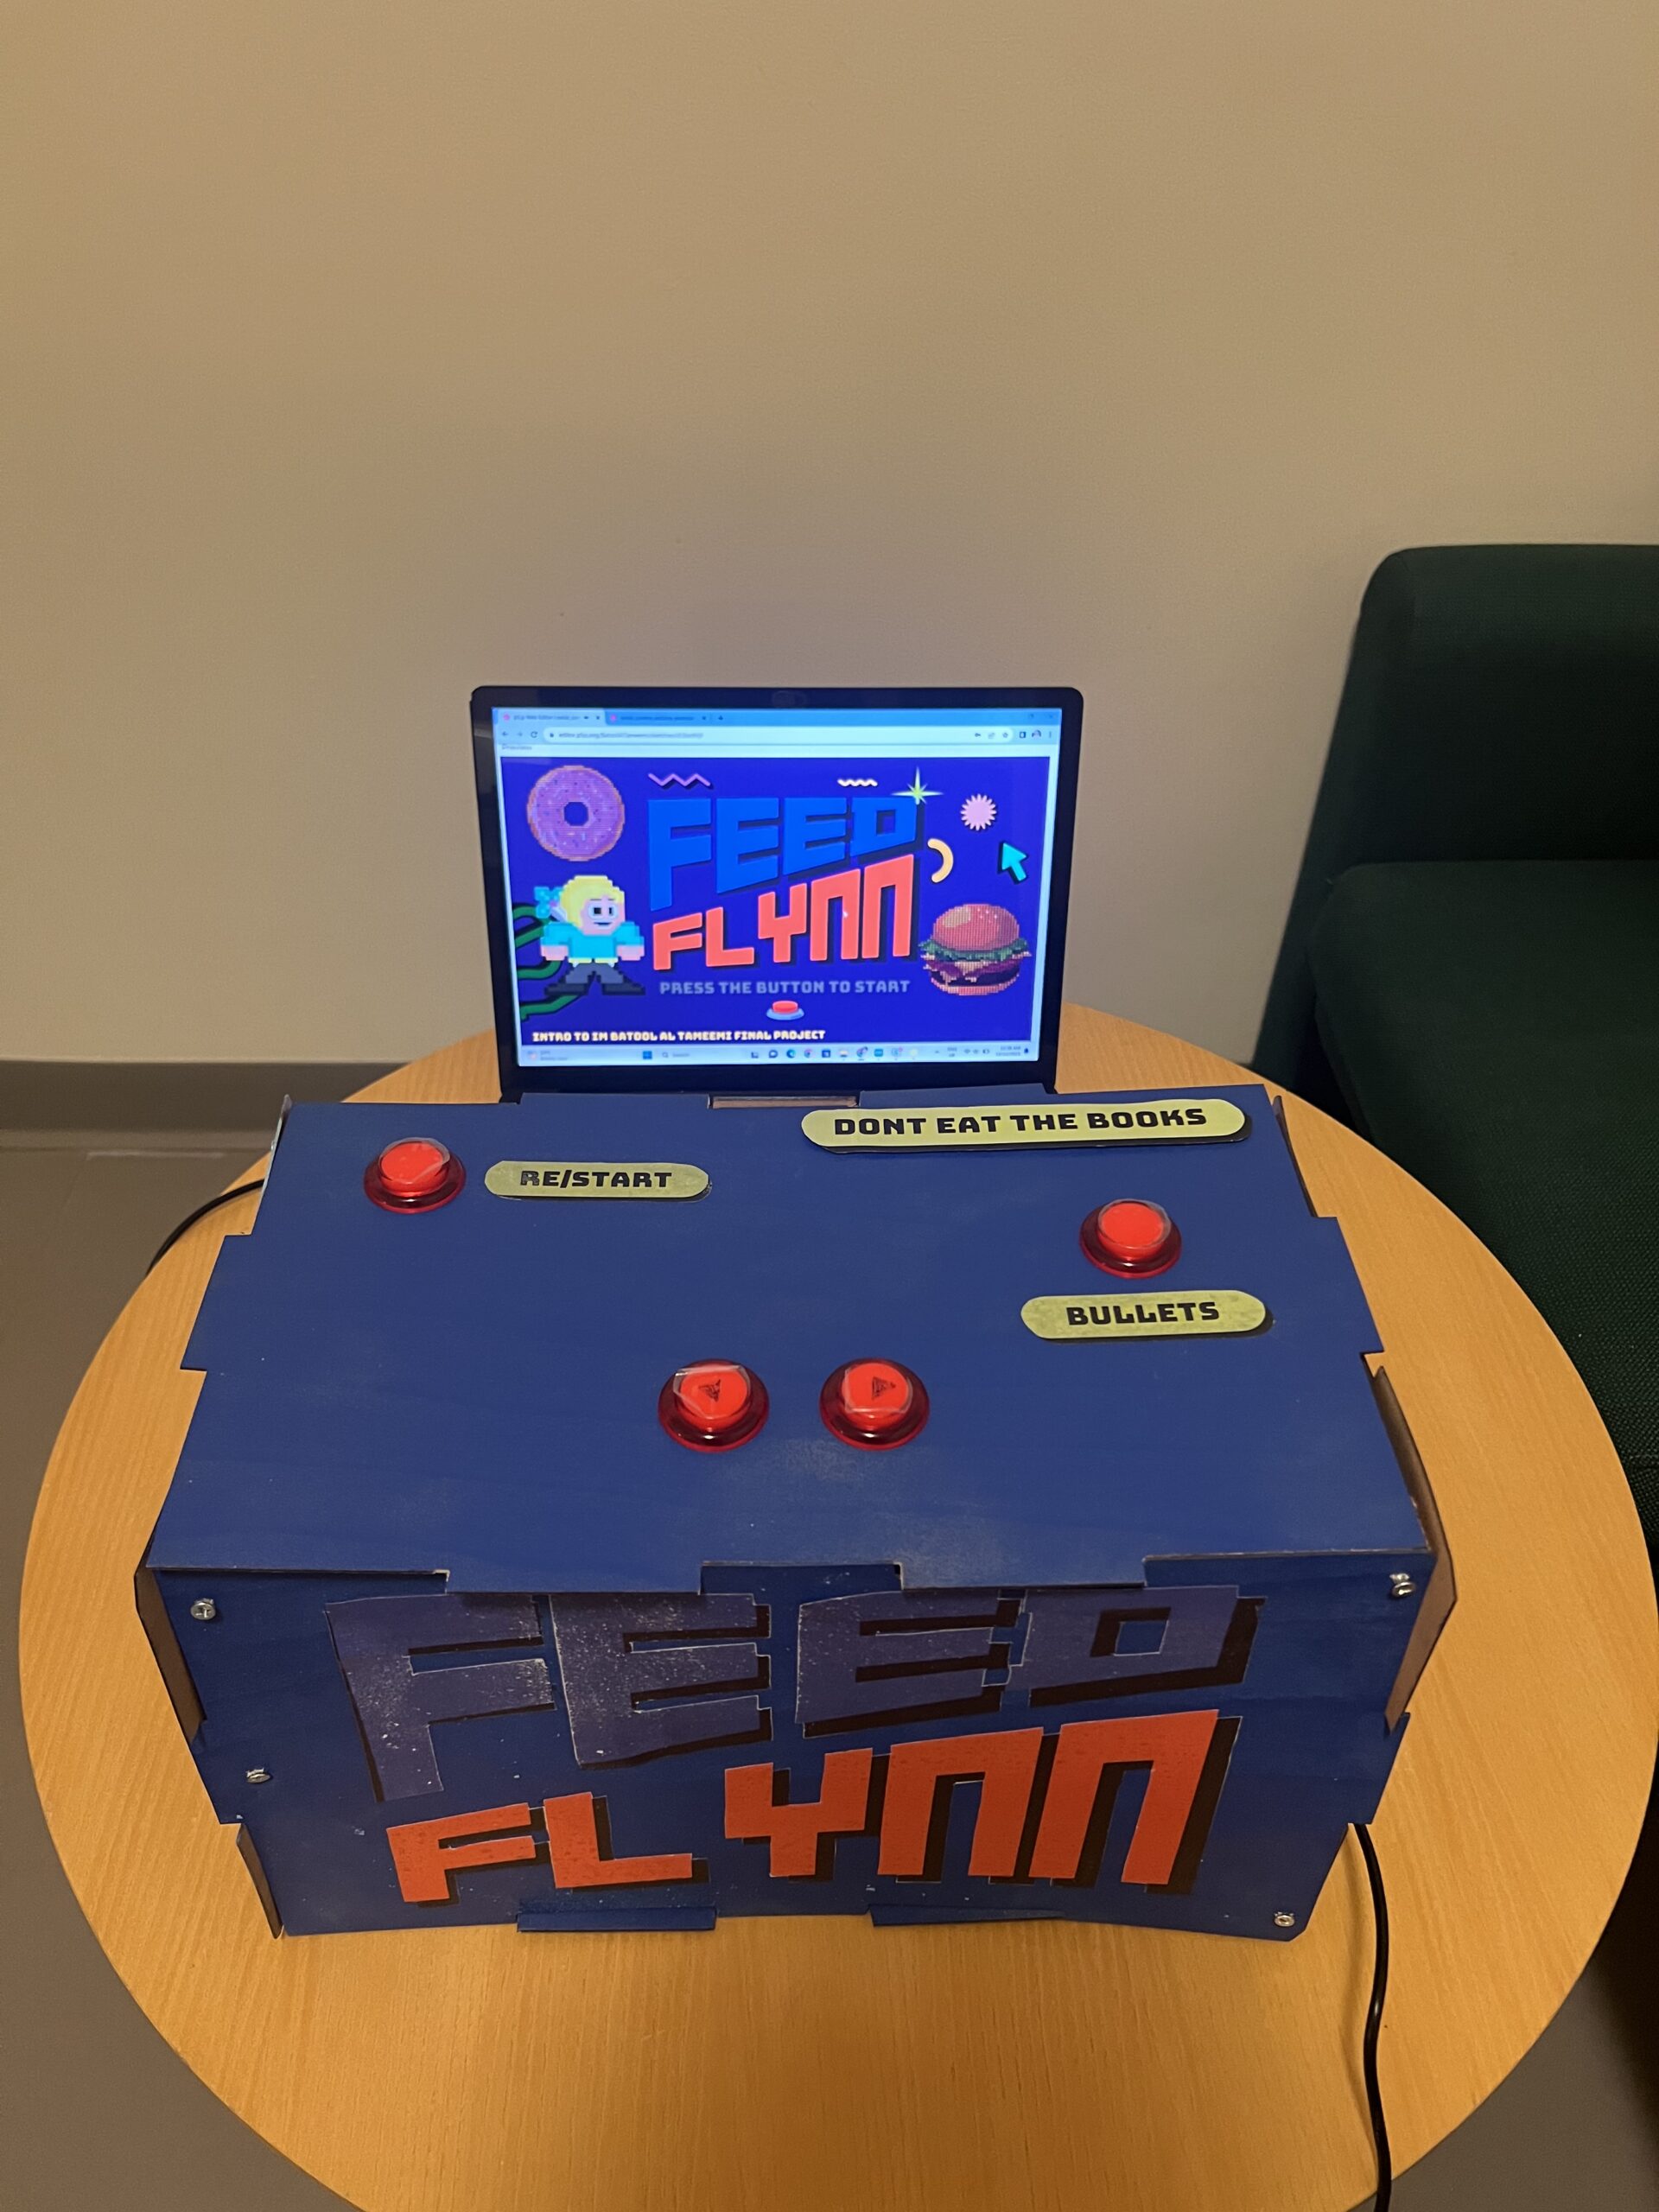
Include some pictures / video of your project interaction
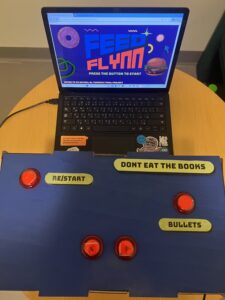
this is how my project hardware is looking ( retro arcade)
I decided to have my single line of instruction Do NOT eat the books on the box; Condensing complex rules into concise, clear instructions often enhances comprehension and user engagement
How does the implementation work?
Description of interaction design
Interaction design involves creating the interface between a user and a system, aiming to optimize the user’s experience. In the context of “Feed Flynn,” the game utilizes four arcade buttons to facilitate the player’s interaction:
Start/Restart Button: This button initiates the game or restarts it once it’s over. It serves as the gateway to engage with the game, allowing the player to enter the gaming experience.
Right/Left Buttons: These two buttons enable the movement of Flynn, the character, within the game. They provide directional control, allowing Flynn to navigate right or left within the gaming environment, dodging falling objects or positioning to catch desired items.
Bullet Firing Button: This button empowers Flynn to shoot bullets in the game. By pressing this button, players can eliminate books, preventing them from being consumed by Flynn and avoiding point deductions. It adds an element of strategy and skill to the gameplay, requiring players to decide when to fire bullets strategically.
Description of Arduino code and include or link to full Arduino sketch
const int buttonStartPin = 2;   // Pin for the start button
const int buttonLeftPin = 3;    // Pin for the left button
const int buttonRightPin = 4;   // Pin for the right button
const int buttonFirePin = 5;    // Pin for the fire button

void setup() {
  Serial.begin(9600);
  pinMode(buttonStartPin, INPUT_PULLUP);
  pinMode(buttonLeftPin, INPUT_PULLUP);
  pinMode(buttonRightPin, INPUT_PULLUP);
  pinMode(buttonFirePin, INPUT_PULLUP);
}

void loop() {
  int startButtonState = digitalRead(buttonStartPin);
  int leftButtonState = digitalRead(buttonLeftPin);
  int rightButtonState = digitalRead(buttonRightPin);
  int fireButtonState = digitalRead(buttonFirePin);

  // Invert button states before sending to serial
  Serial.print(!startButtonState);
  Serial.print(",");
  Serial.print(!leftButtonState);
  Serial.print(",");
  Serial.print(!rightButtonState);
  Serial.print(",");
  Serial.println(!fireButtonState);

  delay(100); // Optional delay to stabilize readings
}
Description of p5.js code and embed p5.js sketch in post
let catcherX, catcherY; // Declaring variables for catcher position
let objects = []; // Array to store falling objects
let objectSpeed; // Variable to control object speed
let gameStarted; // Flag to track game state
let serial; // Serial port communication variable
let points; // Variable to track player points
let startTime; // Start time of the game
let gameDuration; // Duration of the game
let fireButtonState = 0; // State of the fire button
let bullets = []; // Array to store bullets
let backgroundImage; // Variable to hold a background image
let backgroundImage2; // Another background image variable
let backgroundImage3; // Third background image variable
let catcherFrames = []; // Array to store frames of the sprite sheet
let catcherIndex = 0; // Index to track the current frame
let catcherSpeed = 0.2; // Speed of the catcher animation
var gif; // Variable for a GIF element
let catchSound; // Sound variable for catching objects


function preload() {   // Loading assets


  backgroundImage = createImg("https://media.giphy.com/media/v1.Y2lkPTc5MGI3NjExOHlzcmp4MTh1bDJqMTMzbXAyOTAzMHgxcTk0bmUyYXJncXBpd2d4cSZlcD12MV9pbnRlcm5hbF9naWZfYnlfaWQmY3Q9Zw/LV4MGiLrYrNaF3Dpbn/giphy.gif");
  backgroundImage2 = loadImage("2.png");
  backgroundImage3 = loadImage("6.png");
  bungeeFont = loadFont('Bungee-Regular.ttf');
  catcherSheet = loadImage('8.png');
  books = loadImage("3.png");
  donut = loadImage("4.png");
  burger = loadImage("5.png");
  gif = createImg("https://media.giphy.com/media/v1.Y2lkPTc5MGI3NjExNHBldTFuczNob251M3NiNjJ6cGl1aHczM3ZoN2c1em9hdXB5YTJvdSZlcD12MV9pbnRlcm5hbF9naWZfYnlfaWQmY3Q9cw/96t0nzIf5cgGrCdxFZ/giphy.gif");
  gif.hide();

    gameStartSound = loadSound('07. STAGE 2 [PC Engine]-1.mp3');
  gameOverSound = loadSound('33. GAME OVER [PC-9801]-1.mp3');

  catchSound = loadSound('heavy_swallowwav-14682.mp3');

}


 // Setup canvas and initial game conditions
function setup() {
  createCanvas(889, 500);
  catcherX = width / 2;
  catcherY = height - 50;
  objectSpeed = 2;
  gameStarted = 0;
  points = 0;
  gameDuration = 35;
  startTime = millis();

  serial = new p5.SerialPort();
  serial.open('COM6');
  serial.on('data', serialEvent);
}

// Game loop managing different game states
function draw() {

  if (gameStarted === 0 ) {

    // Display the appropriate background image

    backgroundImage.size(889,500);

        if (!gameStartSound.isPlaying()) {
      gameStartSound.play();
    }

  } else if (gameStarted === 1) {

    backgroundImage.hide();
    image(backgroundImage2, 0, 0, width, height);
   gif.show();
  gif.position(catcherX - 100, catcherY - 60);
  gif.size(200,100)
    // Draw catcher and game elements
    drawGame();
  }
}

// Function handling the core game logic and rendering
function drawGame() {
  let currentTime = millis();
  let elapsedTime = (currentTime - startTime) / 1000; // Elapsed time in seconds
  let remainingTime = gameDuration - floor(elapsedTime); // Remaining time in seconds


  textSize(16);
  fill(0);
  textAlign(RIGHT);
  text(`Time: ${remainingTime}`, width - 80, 52);

  fill("rgba(0,255,0,0)");
  noStroke();
  // Draw catcher
  ellipseMode(CENTER); // Set ellipse mode to CENTER
  catcherX = constrain(catcherX, 25, width - 25);
  ellipse(catcherX, catcherY, 50, 50); // Draw a circle for the catcher


  // Generate falling objects continuously
  if (frameCount % 30 === 0) {
    objects.push(...generateObjects(3));
  }

  // Draw falling objects
  for (let obj of objects) {
    drawObject(obj);

    obj.y += objectSpeed;

    // Check for catch
    if (
      obj.y > catcherY - 10 &&
      obj.y < catcherY + 10 &&
      obj.x > catcherX - 25 &&
      obj.x < catcherX + 25
    ) {
      handleCatch(obj);
    }
  }

    fill(0);
  // Display points
  textSize(16);
  text(`Points: ${points}`, 170 , 50);
  textFont(bungeeFont);


  // Handle bullets
  handleBullets();

  // Check for game over
  if (millis() - startTime >= gameDuration * 1000) {
    displayGameOver();
  }
}

// Handling keyboard input for catcher movement
function keyPressed() {
  const catcherSpeed = 5;
  if (keyCode === LEFT_ARROW) {
    catcherX -= catcherSpeed;
  } else if (keyCode === RIGHT_ARROW) {
    catcherX += catcherSpeed;
  }
}

// Handling serial port events for game control
function serialEvent() {
  let data = serial.readLine();
  if (data !== null) {
    let states = data.split(',');
    let startButtonState = parseInt(states[0]);
    let leftButtonState = parseInt(states[1]);
    let rightButtonState = parseInt(states[2]);
    fireButtonState = parseInt(states[3]);

    const catcherSpeed = 10;
    if (startButtonState === 1) {
      if (gameStarted !== 1) {
        gameStarted = 1;
        points = 0; // Reset points to zero when the game starts
        startTime = millis();
      }
    }

    if (gameStarted) {
      if (leftButtonState === 1) {
        catcherX -= catcherSpeed;
      } else if (rightButtonState === 1) {
        catcherX += catcherSpeed;
      }
    }
  }
}

// Generating falling objects
function generateObjects(numObjects) {
  let generatedObjects = [];
  for (let i = 0; i < numObjects; i++) {
    let type;
    let rand = random();
    if (rand < 0.2) {
      type = 'square';
    } else if (rand < 0.6) {
      type = 'circle';
    } else {
      type = 'triangle';
    }
    let obj = {
      x: random(width),
      y: random(-50, -10),
      type: type,
    };
    generatedObjects.push(obj);
  }
  return generatedObjects;
}

// Drawing and displaying falling objects
function drawObject(obj) {
  fill("rgba(0,255,0,0)");
  noStroke();

  if (obj.type === 'triangle') {
    ellipse(obj.x, obj.y, 30, 30);
    image(books, obj.x - 45, obj.y - 35, 90, 55);
  } else if (obj.type === 'circle') {
    ellipse(obj.x, obj.y, 30, 30);
    image(donut, obj.x - 39, obj.y - 22.5, 80, 45);
  } else if (obj.type === 'square') {
    ellipse(obj.x - 10, obj.y - 10, 30, 30);
    image(burger, obj.x - 60, obj.y - 45, 100, 60);
  }}

// Handling catcher interaction with falling objects
function handleCatch(obj) {
  if (obj.type === 'triangle') {
    points -= 3;
  } else if (obj.type === 'circle') {
    points += 10;
  } else if (obj.type === 'square') {
    points += 20;
  }
catchSound.play(); // Play the sound when the catcher catches an object
  objects.splice(objects.indexOf(obj), 1);
}


  // Handling bullet mechanics
function handleBullets() {
  if (fireButtonState === 1) {
    bullets.push({ x: catcherX, y: catcherY });
  }

  for (let i = bullets.length - 1; i >= 0; i--) {
    let bullet = bullets[i];
    bullet.y -= 5;
    fill(255, 0, 0);
    ellipse(bullet.x, bullet.y, 5, 10);

    for (let j = objects.length - 1; j >= 0; j--) {
      let obj = objects[j];
      if (dist(bullet.x, bullet.y, obj.x, obj.y) < 15 && obj.type === 'triangle') {
        objects.splice(j, 1);
        bullets.splice(i, 1);
        points += 5;
      }
    }

    if (bullet.y < 0) {
      bullets.splice(i, 1);
    }
  }
}

  // Displaying the game over screen
function displayGameOver() {

  gameStartSound.stop();

  gameOverSound.play();
    fill(0);
  // Display game over screen
  textFont(bungeeFont);
  image(backgroundImage3, 0, 0, width, height);
  console.log("Game Over");
  textAlign(CENTER);
  textSize(24);
  fill(0);
  text("Game Over", width / 2, height / 2 - 90) ;
  text(`Your Score: ${points}`, width / 2, height / 2 );
  gameStarted = 2;
  gif.hide();
}
Describtion of the code:
Variables: Various variables are declared to manage game elements such as catcher position, falling objects, game state, time, sound, and image assets.
preload(): Preloading assets like images, sounds, and fonts before the game starts.
setup(): Initializing the canvas size, setting initial game conditions like catcher position, object speed, and game duration, as well as initializing the serial port communication.
draw(): The main game loop that manages different game states and calls specific functions based on the game state.
drawGame(): Handles the core game logic and rendering. Manages time, displays game elements, generates falling objects, checks for collisions, and handles points and game over conditions.
keyPressed(): Listens for keypress events to control the catcher’s movement.
serialEvent(): Handles events from the serial port for game control (button presses, etc.).
generateObjects(): Generates falling objects of different types (triangle, circle, square).
drawObject(): Draws and displays the falling objects based on their types (triangle, circle, square) using images.
handleCatch(): Manages the interaction between the catcher and falling objects, updating points and removing caught objects.
handleBullets(): Handles the bullet mechanics, allowing the catcher to shoot at falling objects, awarding points upon successful hits.
displayGameOver(): Displays the game over screen, stops game sounds, shows the final score, and resets game states.
Description of communication between Arduino and p5.js
At first, I struggled a lot with understanding serial communication. It was hard, and it made it tough to communicate well for the project. But when I asked for help and used the p5 .exe desktop app better, things got easier. Learning how to use it properly helped me improve how I communicated for the project.
What are some aspects of the project that you’re particularly proud of?
I’m really happy with the graphics! Being a graphic designer, I put a lot of effort into creating Flynn and the game design. It was super fun to work on this video game, and I don’t think it’ll be my last! This time around, I loved playing with pixels, making animations, and exploring different pixel art styles for that cool retro theme.
I also noticed a visual connection between my Midterm Game “CatsAway” and this project. Both have this joyful vibe and a surreal feel, especially flying around and munching on books, which is part of my art style.
What are some areas for future improvement?
Accessibility: I’m aiming to ensure the game is accessible to a wider audience by making it compatible across different devices or platforms. This improvement will make the game available to more players, which is a goal I’m focused on.
My project is finally coming along! After a lot of debugging, failed laser cutting attempts and design fixes, I finally have something to test with my friends!
My project, a single player, finger version twister game has a wheel that spins based on the User saying start-stop and then displays the colors and the hand they need to use and the users just press the switches. Having all the fingers on the board correctly is a win and any wrong attempt is an immediate end to the game.
Are they able to figure it out? Yes, it was evident from the instructions page on what they had to do.
Where do they get confused and why? There wasn’t anything as confusing that they found as it was easy to navigate. The only part of it that was confusing the first time I tested this were the switches. Since the switches are maroon in color they get mistaken as the red buttons. However my intent is to have colored stickers around each button to show which color it belongs too.
Do they understand the mapping between the controls and what happens in the experience? Yes they were able to understand this as the wheel showed which color and even the hand depicted the color on screen making it easier to follow. Sometimes it got a little tricky but that is part of the game where you need a few seconds to process the color and hand when you see so many together.
What parts of the experience are working well? What areas could be improved?
The colors, switches, scores are working well. My only problem is the speech recognition. It is very conditional as sometimes it worked flawlessly and sometimes it just wouldn’t recognize the words, As you can see in the videos below. Since there isn’t anything wrong with the code, I’m not sure how to fix it so I’m looking for alternate ways to control this without the usage of hands since that is not possible. It can get a little frustrating if the person has to keep saying start and stop to get it right and finally get the wheel moving, it might also be too loud. So I’m thinking of shifting it to just one word thats easily capturable and then the wheel would automatically stop after 2 seconds to slightly make this better. But apart from this I will try to see if i can use any other sensors to fix this issue as I want the experience to be as interactive as it is with the sound.
What parts of your project did you feel the need to explain? How could you make these areas more clear to someone that is experiencing your project for the first time?
The maroon colored switches! I’m not sure if i should paint them as that would ruin the feel of it. Maybe i can try cutting the stickers and pasting them on the switches to make this clearer.
Are they able to figure it out? Where do they get confused and why? Do they understand the mapping between the controls and what happens in the experience?
Some users did not know when to start playing the Skeeball machine after interacting with the p5.js sketch.
Some users also did not know how to play the skeeball machine, and it was a little frustrating for them as they kept missing the targets.
What parts of the experience are working well? What areas could be improved?
Users loved the instant feedback from hitting a target in the skeeball machine, and in general most users loved the p5.js sketch as they liked the art style and animations. They also liked the high score list.
The ball would sometimes get stuck in the machine, so users would be confused when the ball would not return.
What parts of your project did you feel the need to explain? How could you make these areas more clear to someone that is experiencing your project for the first time?
I often had to manually remove the ball from the machine when it got stuck. I could improve this experience by making the ball return mechanism work better, but I was not able to figure out a way of fixing it 100% of the time in the 2 hours I’ve spent trying to fix this thing.
I also had to show many users how to roll the ball, as some users would try to throw the ball which is not the intended way of playing. I could improve this by adding a screen to the front of the targets, so the only way to hit the targets is by rolling the balls up the ramp.