Reading Response – A Brief Rant on the Future of Interaction Design & Responses

“Let’s start using our hands”

The article written by Victor was an inspiring one that allowed me to take a step back in all the wild technologic advancements. Recently, we have been extremely indulged in creating technologies that do not require any touch using our hands – and, we call that the technologic advancement.

Take virtual reality (VR) as an example. In a virtual reality experience, we are given a controller (or controllers) held by our hands to manipulate what we see. VR has been regarded as one of the technologic innovation that people believe it has extended our experience in the virtual world. However, in the experience, our hands are not actually “feeling” the feedback that we manipulate in the VR experience. And, the myriads of tricks that the hands do are limited to pressing the button and moving/rotating your arm/wrist. So, the VR experience maybe a new insight for our visual and auditory senses, but at the cost of limiting some physical senses.

… we’ve just created a future where people can and will spend their lives completely immobile.

The reason why I brought up the example above is to provide an additional example to the direction that Victor indicates from the statement above. It is for a fact that the advancement of our technology continues simplify the interactions that use our physical body and disconnects the natural feedback that we used to get from a medium. And, by “channeling all interaction through a single fingerwe will slowly become more dependent on machines do perform different tasks – and when the moment comes to do all these tasks that the machine does for us by ourselves, I afraid that we will not be able to or rather we do not remember how. Thus, I strongly believe, as partakers of the technologic innovations and crafters of dynamic media, people should be wary of this issue when they are developing a new medium.

Midterm Project Proposal – LoopMusicBox

For the midterm project, my ideas centers on creating an interactive piece using analog sensors and different sounds. The LoopMusicBox will be a an enclosed box with three labeled buttons for discoverability (SAVE, PLAY, RESET), a buzzer/disc, and a proximity sensor that allows the user to create music with notes decided with the user’s physical movement.

When the piece is powered, the buzzer will play a note where the user can simultaneously change the frequency of the note depending on the mapped value from the sensor – the close your hand is to the sensor, the higher the frequency of the played note.

When the user presses the SAVE button, the program will save the note with the respective frequency at the time the button is pressed and places in an array of saved notes. The user will continue the process until the PLAY button is pressed.

When the user presses the PLAY button, the program will play the notes that are saved in the array until the RESET button is pressed. Then, when the RESET button is pressed, the program resets and it restarts the process from beginning.

Group project with Rick

Greetings friends!

For this weekly assignment, we have created a music buzzer with a bpm bird.

We have made the song “All star” using piano notes and tone.h to make
make it sound like the actual song. It took a long time to make it because I had to make a list of notes manually from the music score. Rick made a BPM bird using a servo to hit the beat once per 400ms, and in combination it sounded on sync. The problems that we’ve encountered was that servo.h and tone.h are not compatible with one another due to the inner-timer that these libraries use. We tried to look into the tone.h library to find the respective frequencies of the notes, but due to the delay issue, we had to separate the servo and the buzzer on separate Arduino boards to make it work properly.

Source Codes:

#include <Servo.h>

unsigned long previousMillis = 0;
const long interval = 7;
int angle = 0;

Servo myservo;

void setup() {
  myservo.attach(5);
}

void loop() {
  myservo.write(angle);
  unsigned long currentMillis = millis();
  if (currentMillis - previousMillis >= interval) {
    previousMillis = currentMillis;
    angle = (angle + 1) % 64;
  }
}
#include<Tone.h>
//                  0       1         2         3         4       5       6       7         8       9
int notes[11] = {NOTE_C4, NOTE_D4, NOTE_E4, NOTE_F4, NOTE_G4, NOTE_A4, NOTE_B4, NOTE_C5, NOTE_D5, NOTE_E5, 0};
int i = 0;
int duration[90] = {4, 2, 2, 4, 2, 2, 2, 4, 2, 2, 2, 2, 4, 2, 2, 2, 2, 2, 2, 2, 2, 6, 4,
                    2, 2, 2, 2, 2, 2, 2, 2, 2, 4, 2, 2, 2, 2, 2, 2, 4, 2, 2, 4, 2, 2, 4, 4, 4,
                    2, 4, 1, 1, 2, 4, 1, 1, 2, 4, 4, 2, 4, 2, 4, 1, 1, 2, 4, 1, 1, 2, 4, 4, 2, 4,
                    4, 4, 2, 2, 2, 8, 2, 2, 2, 2, 8, 4, 2, 4, 4, 16
                   };
int note[90] = {4, 8, 6, 6, 5, 4, 4, 7, 6, 6, 5, 5, 4, 4, 8, 6, 6, 5, 5, 4, 4, 2, 10,
                4, 4, 8, 6, 6, 5, 5, 4, 4, 7, 6, 6, 5, 5, 4, 4, 8, 6, 6, 5, 4, 4, 5, 2, 10,
                6, 4, 4, 2, 4, 4, 4, 2, 4, 4, 4, 6, 10, 6, 4, 4, 2, 4, 4, 4, 2, 4, 4, 4, 6, 10,
                6, 8, 7, 6, 5, 5, 4, 4, 5, 4, 6, 5, 4, 5, 2, 10
               };
Tone player;

void setup() {
  player.begin(3);
}

void loop() {
  player.play(notes[note[i % 90]], duration[i % 90] * 100);
  delay(duration[i % 90] * 100 + 20);
  i++;
}


Reading Response – The Design of Everything

The Design of Everyday Things
The Psychopathology of Everyday Things (Chapter 1)
Don Norman

As an individual who views design as a critical part of developing a digital product, I agreed with many parts of Norman’s writing. Indulging in both the front-end area of web development and the logical parts of computer science, I understand the common quarrel between engineers and designers that Norman mentioned in the early parts of the chapter. For instance, Norman’s analogy of engineers and designers reminded me of my experience in working with both developers and designers for building a website. For the most part, the designers would want a certain outlook of the website that they created in regards to the user’s expectations. They would create personas to show the prediction of different interactions and use them to support their designs. On the other hand, the developers will only comment on the practicality or eligibility in putting the design into code – if certain parts are redundant or practically impossible, the developers will not accept the design. Then, the whole arguments falls into a repeated loop.

Moreover, nowadays we see a lot of machines that has no considerations for the users. One example would be an android phone. As someone who has used both an iPhone and an android phone, I felt that the android phones have countless functionalities that are not only hard to use, but also too complicated. A typical Samsung phone would have more than 10 variation of finger motions that were rather discomforting to use and 15  pre-installed applications that I did not know what they were for. When used correctly, these features can be of great use, but they are just futile affordances  without the necessary signifiers.

So, I believe that the human-centered design is a crucial aspect when it comes to any products that we use. If the products were designed based on “the needs, capabilities, and behavior” (Norman, 7) of the users, it will be easier to predict how the users will interact with the product, detect any problems beforehand, and make the overall interaction gratifying. One of the examples I have found was the use of personas. Personas are hypothetical users based on a user type, and personas are used in order to identify the possible user experience scenarios. By using personas, we can design the product centered to the users according to their needs and predicted problems and making”the collaboration of person and the device feel wonderful” (Norman, 7).

Charge the LEDs with Your Taps! – Analog Sensors & LEDs

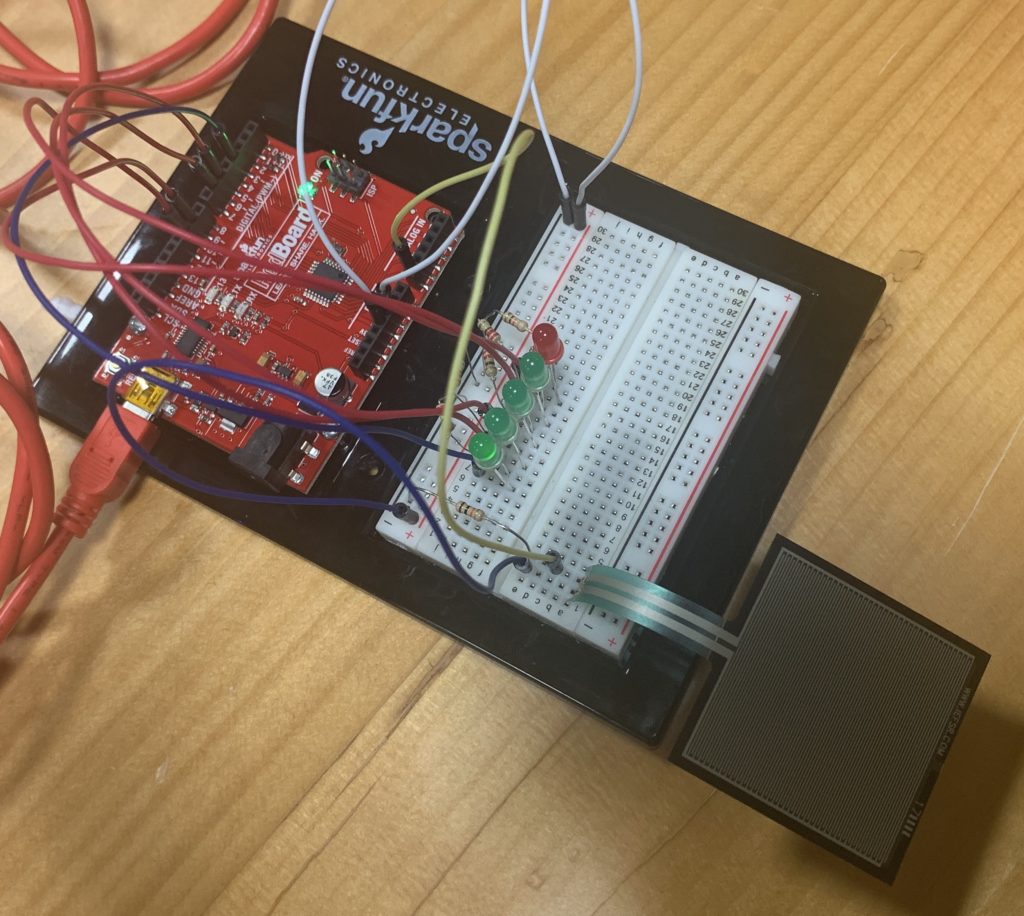
Regarding analog sensors, I was curious how I can mimic one of the games where you have to tap countless times in order to win. At the same time, I thought of the idea that portrays a battery charging by tapping. So, the circuit I have made is a similar but simpler version where I utilized the pressure sensor and five LEDs to create the following experience for the users.

In the beginning, the problem I had was controlling the light of the LEDs. I was used to writing digitalWrite as an indicator for turning the LEDs on and off, but it did not allow me to control the faintness of the lights. After some research into Arduino, I figured out that I can manipulate the brightness of the LEDs by using analogWrite, where it would take the pin and the level of brightness (from 0 to 255) as arguments. By putting it together with the mapped value from the sensor, I was able to display a general fading of the LEDs.

However, the problem did not stop here. Through user testing, I realized that people can lit up the LEDs by just pressing onto the pressure sensor. So, I made a change to use the computedPressureValue, the difference between current value from the pressure sensor to the previous value, to increment the brightness. When the pressure difference is negative, meaning that the previous value is larger than the current value, it meant that the pressure is decreasing and the finger is lifted off from the sensor. Thus, only tapping on the sensor will slowly brighten the LEDs.

Below are the snapshot of the circuit, a run-through of the experience, and the code for the circuit.

The Circuit Layout of the Assignment

// Variables for LED Pin Outputs
const int ledPinOne = 3;
const int ledPinTwo = 5;
const int ledPinThree = 6;
const int ledPinFour = 9;
const int ledPinFive = 10;

// Variables for LED States
bool ledStateOne = true;
bool ledStateTwo = false;
bool ledStateThree = false;
bool ledStateFour = false;
bool ledStateFive = false;
bool ledStateComplete = false;

// Number of LED that the has lit up
int ledCount = 0;

// The number of blinking of LEDs after all five LEDs has lit up
int completedTask = 0;

// Previous value of the readings for the pressure sensor
int prevPressureValue = 0;

// Raw value for brightness
int brightness = 0;

void setup() {
  pinMode(ledPinOne, OUTPUT);
  pinMode(ledPinTwo, OUTPUT);
  pinMode(ledPinThree, OUTPUT);
  pinMode(ledPinFour, OUTPUT);
  pinMode(ledPinFive, OUTPUT);
  Serial.begin(9600);
}

void loop() {
  // ---- COMPUTATION OF VARIABLE ---- //
  // The brightness is computed by using a modulus of 200 so that it has the max-limits of 200.
  int computedBrightness = brightness % 200;
  
  int pressureValue = analogRead(A0);
  
  // The pressure sensor has a min. and max. values of 0 and 1010, which I have mapped for conversion from 0 to 100.
  int currentPressureValue = map(pressureValue, 0, 1010, 0, 100);

  // In order to increase the brightness for each tabs, I have used to difference of current and previous pressure values.
  int triggerPressureValue = currentPressureValue - prevPressureValue;

  if (triggerPressureValue < -10) {
    brightness += 2;
  }

  // ---- CONDITIONAL CHECKS FOR LED STATES & BRIGHTNESS ---- //

  if (ledStateFive) {
    analogWrite(ledPinFive, computedBrightness);
    if (computedBrightness > 190) {
      ledStateFive = false;
      ledCount += 1;
    }
  }

  if (ledStateFour) {
    analogWrite(ledPinFour, computedBrightness);
    if (computedBrightness > 190) {
      ledStateFour = false;
      ledStateFive = true;
      ledCount += 1;
      brightness = 0;
    }
  }

  if (ledStateThree) {
    analogWrite(ledPinThree, computedBrightness);
    if (computedBrightness > 190) {
      ledStateThree = false;
      ledStateFour = true;
      ledCount += 1;
      brightness = 0;
    }
  }

  if (ledStateTwo) {
    analogWrite(ledPinTwo, computedBrightness);
    if (computedBrightness > 190) {
      ledStateTwo = false;
      ledStateThree = true;
      ledCount += 1;
      brightness = 0;
    }
  }

  if (ledStateOne) {
    analogWrite(ledPinOne, computedBrightness);
    if (computedBrightness > 190) {
      ledStateOne = false;
      ledStateTwo = true;
      ledCount += 1;
      brightness = 0;
    }
  }

  // ---- THE PROCESS AFTER ALL FIVE LEDS ARE LIT UP ---- //

  if (ledCount == 5) {
    brightness = 0;
    while (completedTask < 10) {
      for (int i=0; i<6; i++) {
        analogWrite(ledPinOne, brightness);
        analogWrite(ledPinTwo, brightness);
        analogWrite(ledPinThree, brightness);
        analogWrite(ledPinFour, brightness);
        analogWrite(ledPinFive, brightness);
        brightness += 18;
        delay(20);
      }
      for (int i=0; i<6; i++) {
        analogWrite(ledPinOne, brightness);
        analogWrite(ledPinTwo, brightness);
        analogWrite(ledPinThree, brightness);
        analogWrite(ledPinFour, brightness);
        analogWrite(ledPinFive, brightness);
        brightness -= 18;
        delay(20);
      }
      completedTask += 1;
    }
  // Reset variable values to repeat the experience
    completedTask = 0;
    ledCount = 0;
    brightness = 0;
    ledStateOne = true;
    analogWrite(ledPinOne, 0);
    analogWrite(ledPinTwo, 0);
    analogWrite(ledPinThree, 0);
    analogWrite(ledPinFour, 0);
    analogWrite(ledPinFive, 0);
  }

  // ---- SETTING PREVIOUS PRESSURE VALUE WITH THE CURRENT VALUE BEFORE NEW LOOP ---- //
  
  prevPressureValue = currentPressureValue;
}


Reading Response – The Art of Interactive Design

In the reading, The Art of Interactive Design by Chris Crawford, it details a clear distinction between reactive and interactive, which is a crucial idea that resolves around when describing interactivity. And, Crawford offers a definition of interactivity as a process that involves listening, thinking and speaking – in other words, input, process, and output. Recalling back to the conversation about “what is interactive” in a previous class, we once mentioned that everything surrounding us – anything that deals with our five intrinsic senses – are interactive. However, even though Crawford indicates that interactivity can be subjective, it became evident that not everything around us are interacting with us – rather we are reacting to the things around us. For instance, as one of the medium brought up in the class, the magnetic door would not be considered interactive because there is no thinking involved in the process.

A Switch for Fitness: Pushup-Switch

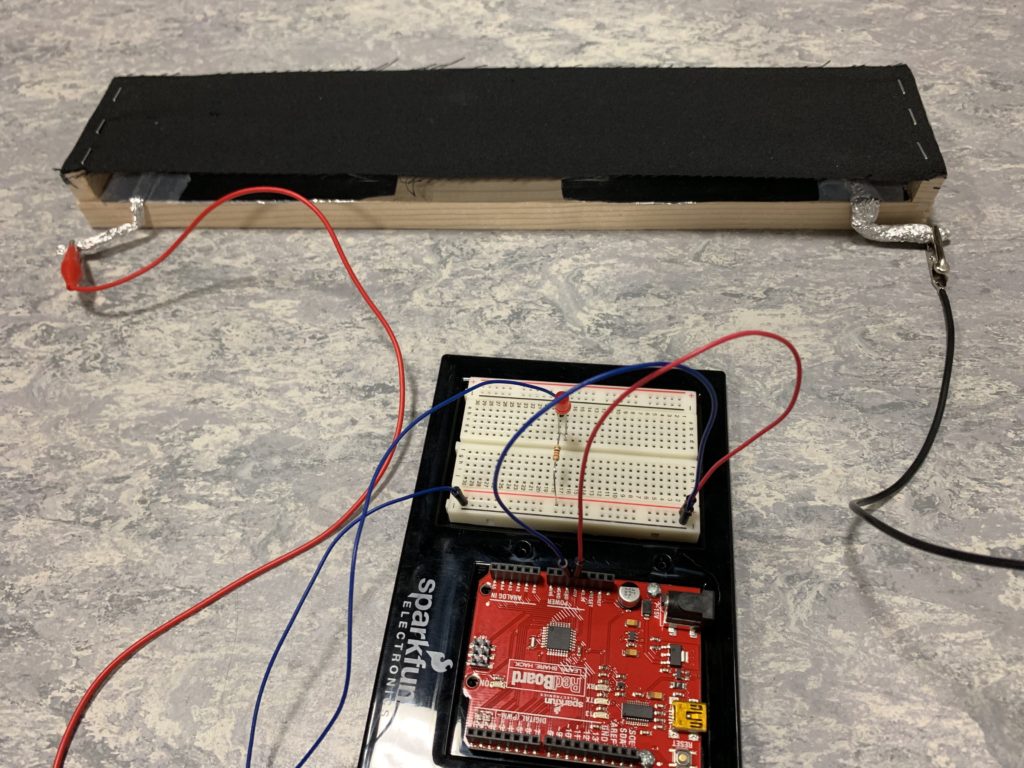
The General Outlook of the Pushup Switch

“Switch without the use of hands” was what we were asked to create for our first assignment. In the process of making the circuit, the assignment reminded me of the time when I was in the military where people would frequently cheat the number of pushups they do. Since the pushups were counted by human eyes, it was hard for people to know whether a pushup was done correctly. With this switch, we will know whether the person is doing the push up right.

For this switch, there is a wooden base with disconnected foils on the surface. The cloth on top has a foil placed beneath, and when the cloth touches the surface of the base, the circuit becomes complete.