We’ve made significant strides in achieving much of what was demonstrated, but it hasn’t reached the level of convenience we hoped for. Take Siri on iPhones, for instance. Despite its heavy advertisements, it’s not as frequently used in reality and isn’t convenient enough to be highlighted as an important feature. Its limited usability in public or noisy settings restricts its practicality. Similarly, the flashy concept of drawing in the air showcased in the video lacks real-world applicability. In professional settings, more practical, industrial-grade alternatives would likely be preferred.
However, considering the video was made nine years ago, it serves as a benchmark for our progress toward the creator’s vision. The idea of a singular device for all tasks is closer to reality today. Many functionalities showcased, like summoning a taxi, scheduling appointments, using voice commands for messages, and even unlocking a Tesla car, are now accessible through modern phones. While data isn’t projected on transparent glass yet and smart glasses aren’t widely available, we’re moving towards more advanced technologies where convenience triumphs over merely looking impressive. The focus is shifting to inventions that truly serve convenience rather than flashy devices with limited practicality.
Thinking about the Microsoft Productivity Vision video and Bret Victor’s thoughts, it feels like there’s a big question about where technology is heading. The video shows a future where everything is super connected and digital, but it made me worry about losing the real experiences that make us human. Bret Victor’s point about wanting more tangible and inclusive interactions with technology makes sense. He’s saying that we shouldn’t sacrifice the good things about being human just to make technology more efficient.
It’s interesting to note that Victor grew up in a different time, which shapes his views. I get that the ‘Pictures behind Glass’ way of doing things is familiar and easy, especially for someone like me who grew up in the digital age. Still, Victor’s idea of finding a balance between the physical and digital world seems like a smart move. The challenge is to make technology work with us, enhancing our experiences instead of taking away from them. Looking at new innovations, like a pen turning physical notes into digital copies, shows a step in that direction. In short, Victor’s thoughts push us to think about how we can have the best of both worlds in our tech-filled future.
As I dove into the second article, what struck me was how people had such different reactions to where interactive media is headed. One response “My child can’t tie his shoelaces, but can use the iPad.” shows the influence of technology on people. It’s just a simple example about a child using ipad but it has more beyond it. Our interaction with technology is a double-wedged weapon. Hence, we should carefully try to use technology to have a positive impact on our life rather than negatively affecting it.
Concept:
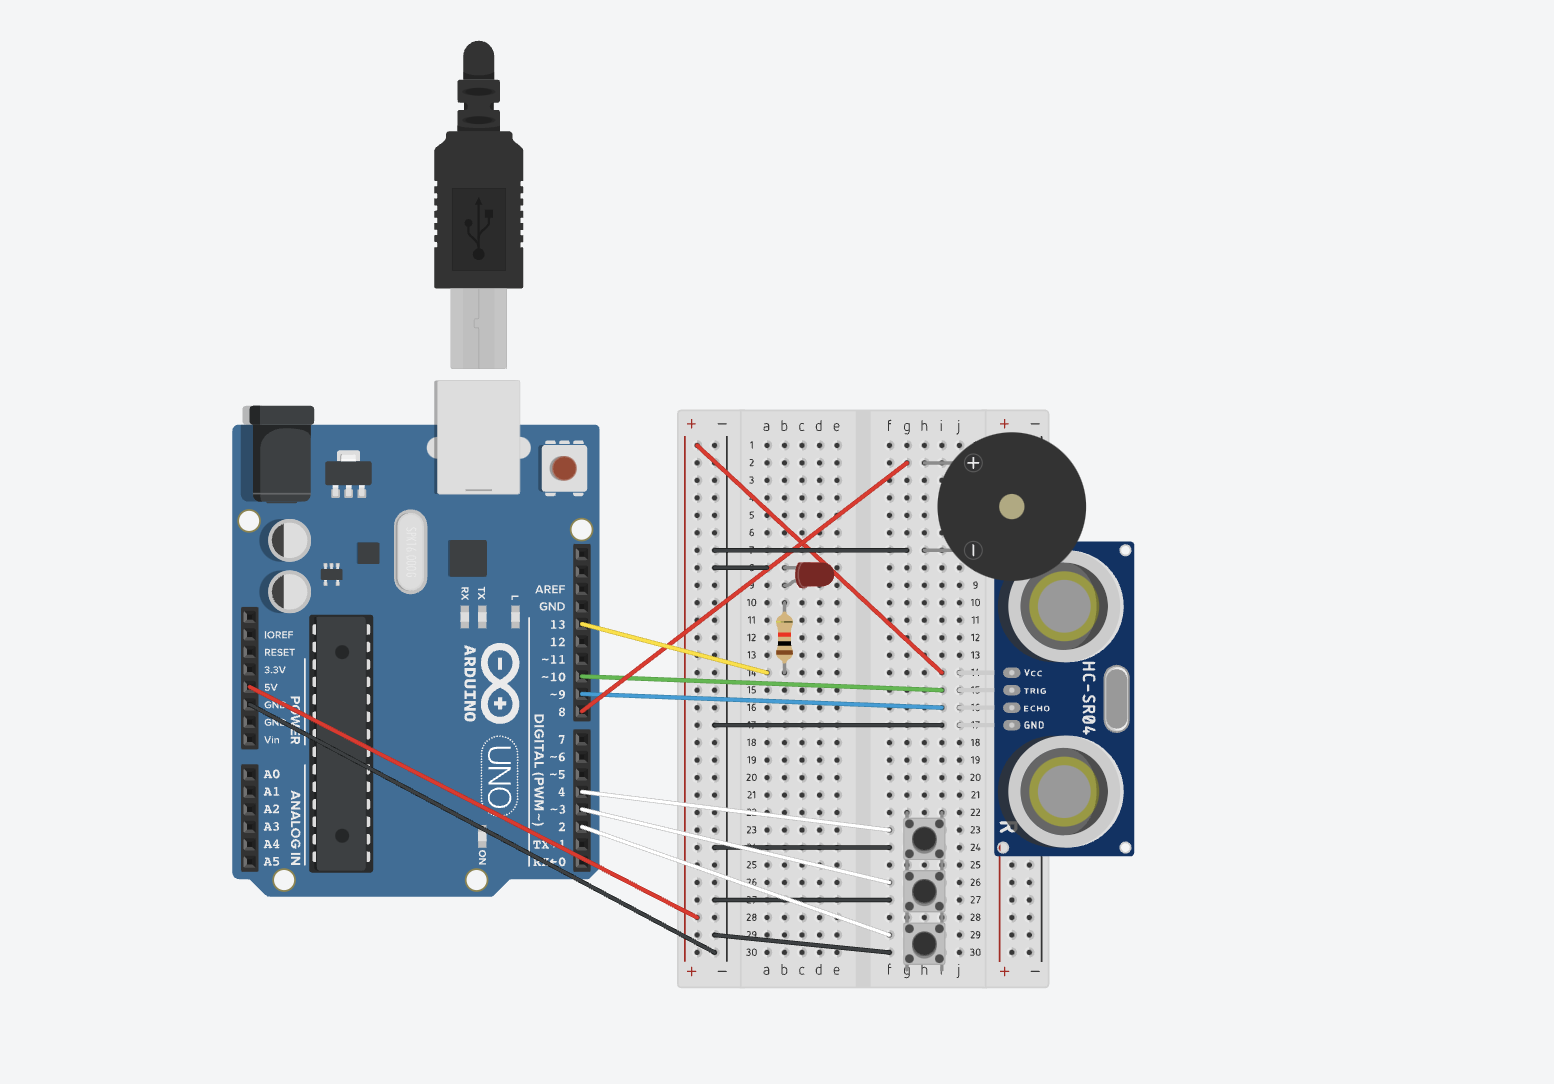
Our musical is sort of a 3 note piano with 3 octaves. There are three buttons that each play a specific note (A, B and C), and an ultrasonic sensor to measure the distance which in turn specifies the octave the user wants to play the notes in (3,4,5). The nearest interval plays the notes in the third octave, the next plays the notes in the fourth interval which sounds higher than the first interval and the last interval plays the notes in the fifth interval which sound higher than the middle interval. The buttons are controlled by switches that act as our main digital input and trigger specific notes depending on the secondary input which is the analog input from the ultrasonic sensor that specifies the octave to play the notes. We have also included an LED light that blinks when the instrument is first started and when the user has exceeded the range of the input from the ultrasonic sensor.
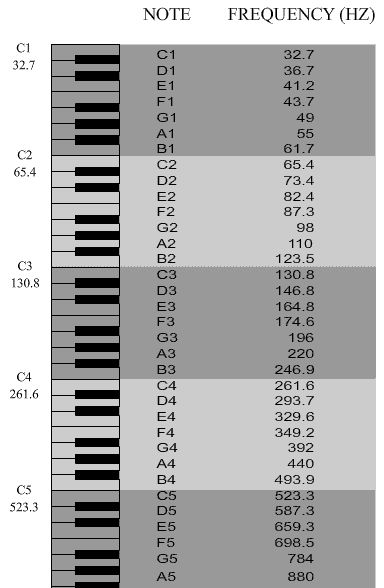
Notes played: A3, A4, A5, B3, B4, B5, C3, C4, C5.
Process & Highlights:
It was an interesting process trying to figure out how to connect everything together the right way and to get the ultrasonic sensor to work as expected, but once we figured everything out it was pretty easy to follow through the code. It helped to work as a team because we brainstormed the idea together and worked on the logic of the code and implemented it together which was more fun than working individually. I would say the highlight was finally getting it to work the way we wanted it to.
Here is a video demo of our instrument:
Code:
const int trigPin = 9;
const int echoPin = 10;
const int ledPin = 13;
const int buzzerPin = 8;
const int switchPin1 = 2; // Pin for the first switch
const int switchPin2 = 3; // Pin for the second switch
const int switchPin3 = 4; // Pin for the third switch

float duration, distance;

// Melodies
#include "pitches.h"

int melody11 = NOTE_C3;
int melody12 = NOTE_C4;
int melody13 = NOTE_C5;
int melody21 = NOTE_A3;
int melody22 = NOTE_A4;
int melody23 = NOTE_A5;
int melody31 = NOTE_B3;
int melody32 = NOTE_B4;
int melody33 = NOTE_B5;


void playNote(int melody){
  tone(buzzerPin, melody, 800);
  delay(1000);
}

void setup() {
  pinMode(trigPin, OUTPUT);
  pinMode(echoPin, INPUT);
  pinMode(ledPin, OUTPUT);
  pinMode(buzzerPin, OUTPUT);
  pinMode(switchPin1, INPUT_PULLUP);
  pinMode(switchPin2, INPUT_PULLUP);
  pinMode(switchPin3, INPUT_PULLUP);
  Serial.begin(9600);
}

void loop() {
  digitalWrite(trigPin, LOW);
  delayMicroseconds(2);
  digitalWrite(trigPin, HIGH);
  delayMicroseconds(10);
  digitalWrite(trigPin, LOW);

  duration = pulseIn(echoPin, HIGH);
  distance = (duration * 0.0343) / 2;


  if (distance < 10) {
    Serial.println("Distance: 1");
    digitalWrite(ledPin, HIGH);   // Turn on the LED

    if (digitalRead(switchPin1) == LOW) {
      playNote(melody11);
    } else if (digitalRead(switchPin2) == LOW) {
      playNote(melody21);
    } else if (digitalRead(switchPin3) == LOW) {
      playNote(melody31);
    }

  } else if (distance < 20) {
    Serial.println("Distance: 2");
    digitalWrite(ledPin, HIGH);   // Turn on the LED

    if (digitalRead(switchPin1) == LOW) {
      playNote(melody12);
    } else if (digitalRead(switchPin2) == LOW) {
      playNote(melody22);
    } else if (digitalRead(switchPin3) == LOW) {
      playNote(melody32);
    }

  } else if (distance < 30) {
    Serial.println("Distance: 3");
    digitalWrite(ledPin, HIGH);   // Turn on the LED
    digitalWrite(ledPin, LOW);
    digitalWrite(ledPin, HIGH);
    if (digitalRead(switchPin1) == LOW) {
      playNote(melody13);
    } else if (digitalRead(switchPin2) == LOW) {
      playNote(melody23);
    } else if (digitalRead(switchPin3) == LOW) {
      playNote(melody33);
    }

  } else {
    Serial.println("Distance: 4");
    //Blink
    digitalWrite(ledPin, LOW);    // Blink the LED
    digitalWrite(ledPin, HIGH);
    digitalWrite(ledPin, LOW);
    digitalWrite(ledPin, HIGH);
    digitalWrite(ledPin, LOW);
    digitalWrite(ledPin, HIGH);
    digitalWrite(ledPin, LOW);
    noTone(buzzerPin);             // Turn off the buzzer
  }
}
Reflections:
We found this exercise a bit harder than the previous one but it was more fun to implement. If we could change one thing about our instrument, it would be to maybe have a screen display the note being played as well as more buttons to replicate an actual piano with more octaves.Additionally, we would love to find a way to incorporate more creativity within.
Our musical is sort of a 3 note piano with 3 octaves. There are three buttons that each play a specific note (A, B and C), and an ultrasonic sensor to measure the distance which in turn specifies the octave the user wants to play the notes in (3,4,5). The nearest interval plays the notes in the third octave, the next plays the notes in the fourth interval which sounds higher than the first interval and the last interval plays the notes in the fifth interval which sound higher than the middle interval. The buttons are controlled by switches that act as our main digital input and trigger specific notes depending on the secondary input which is the analog input from the ultrasonic sensor that specifies the octave to play the notes. We have also included an LED light that blinks when the instrument is first started and when the user has exceeded the range of the input from the ultrasonic sensor. We included the pitches.h header file that was used in the example shown in class to get the notes played.
Notes played: A3, A4, A5, B3, B4, B5, C3, C4, C5.
Process & Highlights:
It was an interesting process trying to figure out how to connect everything together the right way and to get the ultrasonic sensor to work as expected, but once we figured everything out it was pretty easy to follow through the code. It helped to work as a team because we brainstormed the idea together and worked on the logic of the code and implemented it together which was more fun than working individually. I would say the highlight was finally getting it to work the way we wanted it to.
Here is a video demo of our instrument:
Code:
const int trigPin = 9;
const int echoPin = 10;
const int ledPin = 13;
const int buzzerPin = 8;
const int switchPin1 = 2; // Pin for the first switch
const int switchPin2 = 3; // Pin for the second switch
const int switchPin3 = 4; // Pin for the third switch

float duration, distance;

// Melodies
#include "pitches.h"

int melody11 = NOTE_C3;
int melody12 = NOTE_C4;
int melody13 = NOTE_C5;
int melody21 = NOTE_A3;
int melody22 = NOTE_A4;
int melody23 = NOTE_A5;
int melody31 = NOTE_B3;
int melody32 = NOTE_B4;
int melody33 = NOTE_B5;


void playNote(int melody){
  tone(buzzerPin, melody, 800);
  delay(1000);
}

void setup() {
  pinMode(trigPin, OUTPUT);
  pinMode(echoPin, INPUT);
  pinMode(ledPin, OUTPUT);
  pinMode(buzzerPin, OUTPUT);
  pinMode(switchPin1, INPUT_PULLUP);
  pinMode(switchPin2, INPUT_PULLUP);
  pinMode(switchPin3, INPUT_PULLUP);
  Serial.begin(9600);
}

void loop() {
  digitalWrite(trigPin, LOW);
  delayMicroseconds(2);
  digitalWrite(trigPin, HIGH);
  delayMicroseconds(10);
  digitalWrite(trigPin, LOW);

  duration = pulseIn(echoPin, HIGH);
  distance = (duration * 0.0343) / 2;


  if (distance < 10) {
    Serial.println("Distance: 1");
    digitalWrite(ledPin, HIGH);   // Turn on the LED

    if (digitalRead(switchPin1) == LOW) {
      playNote(melody11);
    } else if (digitalRead(switchPin2) == LOW) {
      playNote(melody21);
    } else if (digitalRead(switchPin3) == LOW) {
      playNote(melody31);
    }

  } else if (distance < 20) {
    Serial.println("Distance: 2");
    digitalWrite(ledPin, HIGH);   // Turn on the LED

    if (digitalRead(switchPin1) == LOW) {
      playNote(melody12);
    } else if (digitalRead(switchPin2) == LOW) {
      playNote(melody22);
    } else if (digitalRead(switchPin3) == LOW) {
      playNote(melody32);
    }

  } else if (distance < 30) {
    Serial.println("Distance: 3");
    digitalWrite(ledPin, HIGH);   // Turn on the LED
    digitalWrite(ledPin, LOW);
    digitalWrite(ledPin, HIGH);
    if (digitalRead(switchPin1) == LOW) {
      playNote(melody13);
    } else if (digitalRead(switchPin2) == LOW) {
      playNote(melody23);
    } else if (digitalRead(switchPin3) == LOW) {
      playNote(melody33);
    }

  } else {
    Serial.println("Distance: 4");
    //Blink
    digitalWrite(ledPin, LOW);    // Blink the LED
    digitalWrite(ledPin, HIGH);
    digitalWrite(ledPin, LOW);
    digitalWrite(ledPin, HIGH;
    digitalWrite(ledPin, LOW);
    digitalWrite(ledPin, HIGH);
    digitalWrite(ledPin, LOW);
    noTone(buzzerPin);             // Turn off the buzzer
  }
}
Reflections:
We found this exercise a bit harder than the previous one but it was more fun to implement. If we could change one thing about our instrument, it would be to maybe have a screen display the note being played as well as more buttons to replicate an actual piano with more octaves.Additionally, we would love to find a way to incorporate more creativity within.
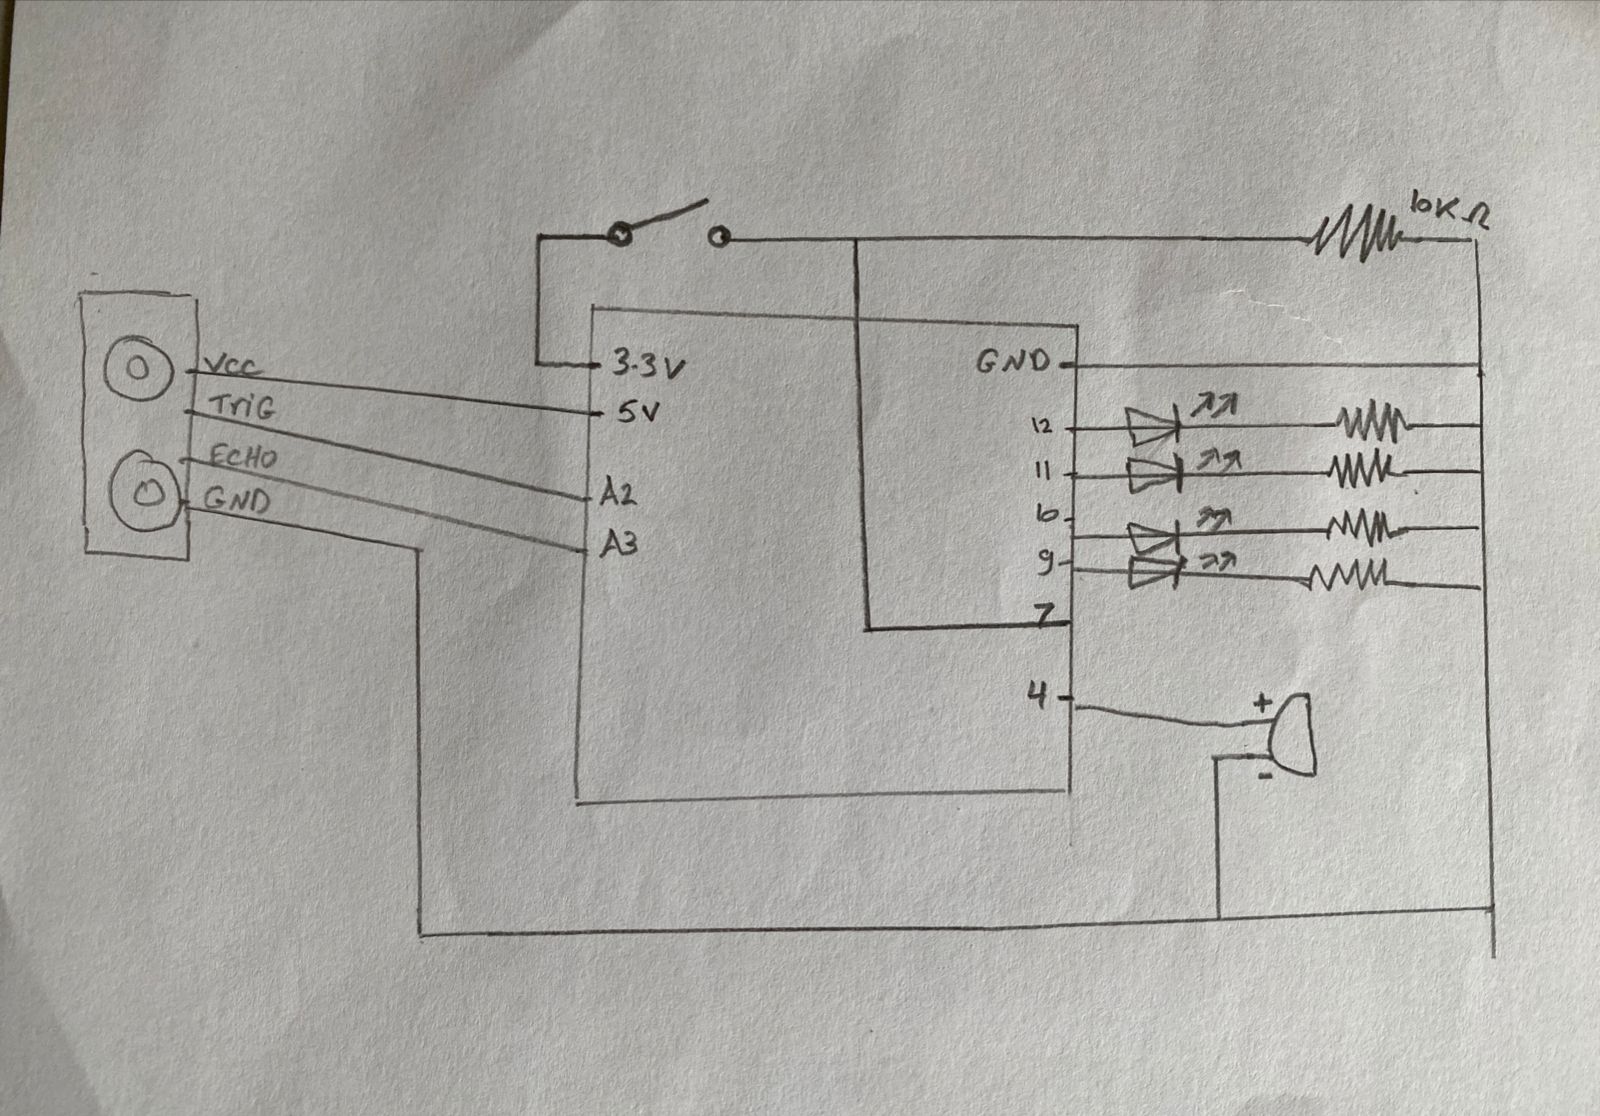
Our assigment idea was sparked by a common scenario we all encounter – parking a car in reverse. In discussing the challenges of accurately judging the distance, my partner and I realized the potential hazards and the lack of a reliable solution. Considering how much we rely on the beeping sensor in our own cars for safe parking, we envisioned a solution to bring this convenience to everyone. Imagine a situation where you can’t live without that reassuring beep when you’re reversing. That’s precisely the inspiration behind our assigment – a beeping sensor and a light that mimics the safety we’ve come to depend on, implemented with a car toy to illustrate its practical application.
Required Hardware
– Arduino
– Breadboard
– Ultrasonic distance sensor
– Red LED
– 10k resistor
– Piezo speaker
– Jumper wires
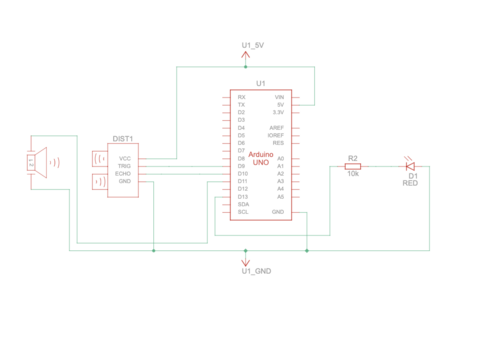
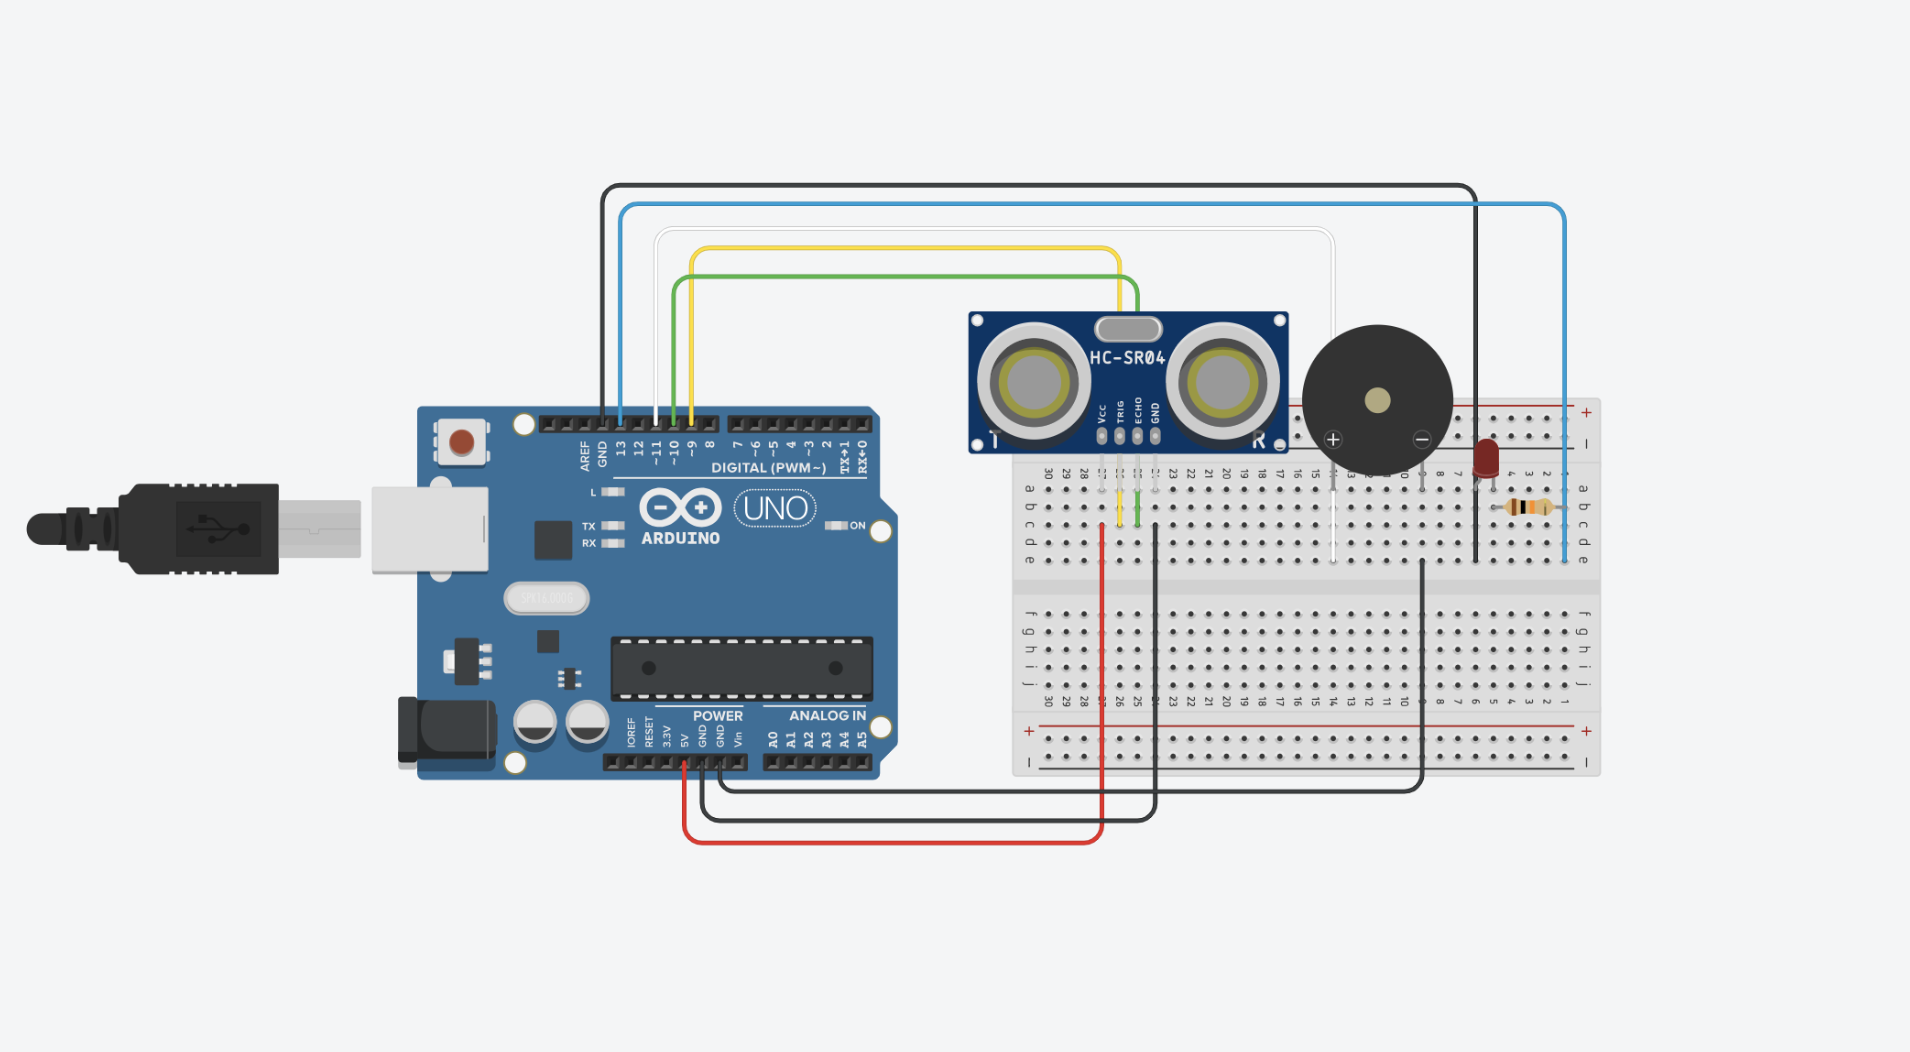
Schematic Diagram:
Circuit Diagram:
Setting Up the Components
Ultrasonic Distance Sensor Connections:
VCC to 5V
TRIG to digital pin 9
ECHO to digital pin 10
GND to GND on the Arduino
Speaker Connections:
Positive side to digital pin 11
Negative side to GND
LED Connections:
Cathode to GND
Anode to digital pin 13 via a 10k resistor
Coding the Logic
// defines pins numbers
const int trigPin = 9;
const int echoPin = 10;
const int buzzerPin = 11;
const int ledPin = 13;

// defines variables
long duration;
int distance;
int safetyDistance;

// Define pitches for the musical notes
int melody[] = {262, 294, 330, 349, 392, 440, 494, 523};

void setup() {
  pinMode(trigPin, OUTPUT); // Sets the trigPin as an Output
  pinMode(echoPin, INPUT);  // Sets the echoPin as an Input
  pinMode(buzzerPin, OUTPUT);
  pinMode(ledPin, OUTPUT);
  Serial.begin(9600); // Starts the serial communication
}

void loop() {
  // Clears the trigPin
  digitalWrite(trigPin, LOW);
  delayMicroseconds(2);

  // Sets the trigPin on HIGH state for 10 microseconds
  digitalWrite(trigPin, HIGH);
  delayMicroseconds(10);
  digitalWrite(trigPin, LOW);

  // Reads the echoPin, returns the sound wave travel time in microseconds
  duration = pulseIn(echoPin, HIGH);

  // Calculating the distance
  distance = duration * 0.034 / 2;

  safetyDistance = distance;
  if (safetyDistance <= 5) {
    // Play a musical note based on distance
    int index = map(safetyDistance, 0, 5, 0, 7); // Map distance to array index
    tone(buzzerPin, melody[index]); // Play the note
    digitalWrite(ledPin, HIGH);
  } else {
    noTone(buzzerPin); // Stop the tone when not close
    digitalWrite(ledPin, LOW);
  }

  // Prints the distance on the Serial Monitor
  Serial.print("Distance: ");
  Serial.println(distance);
}
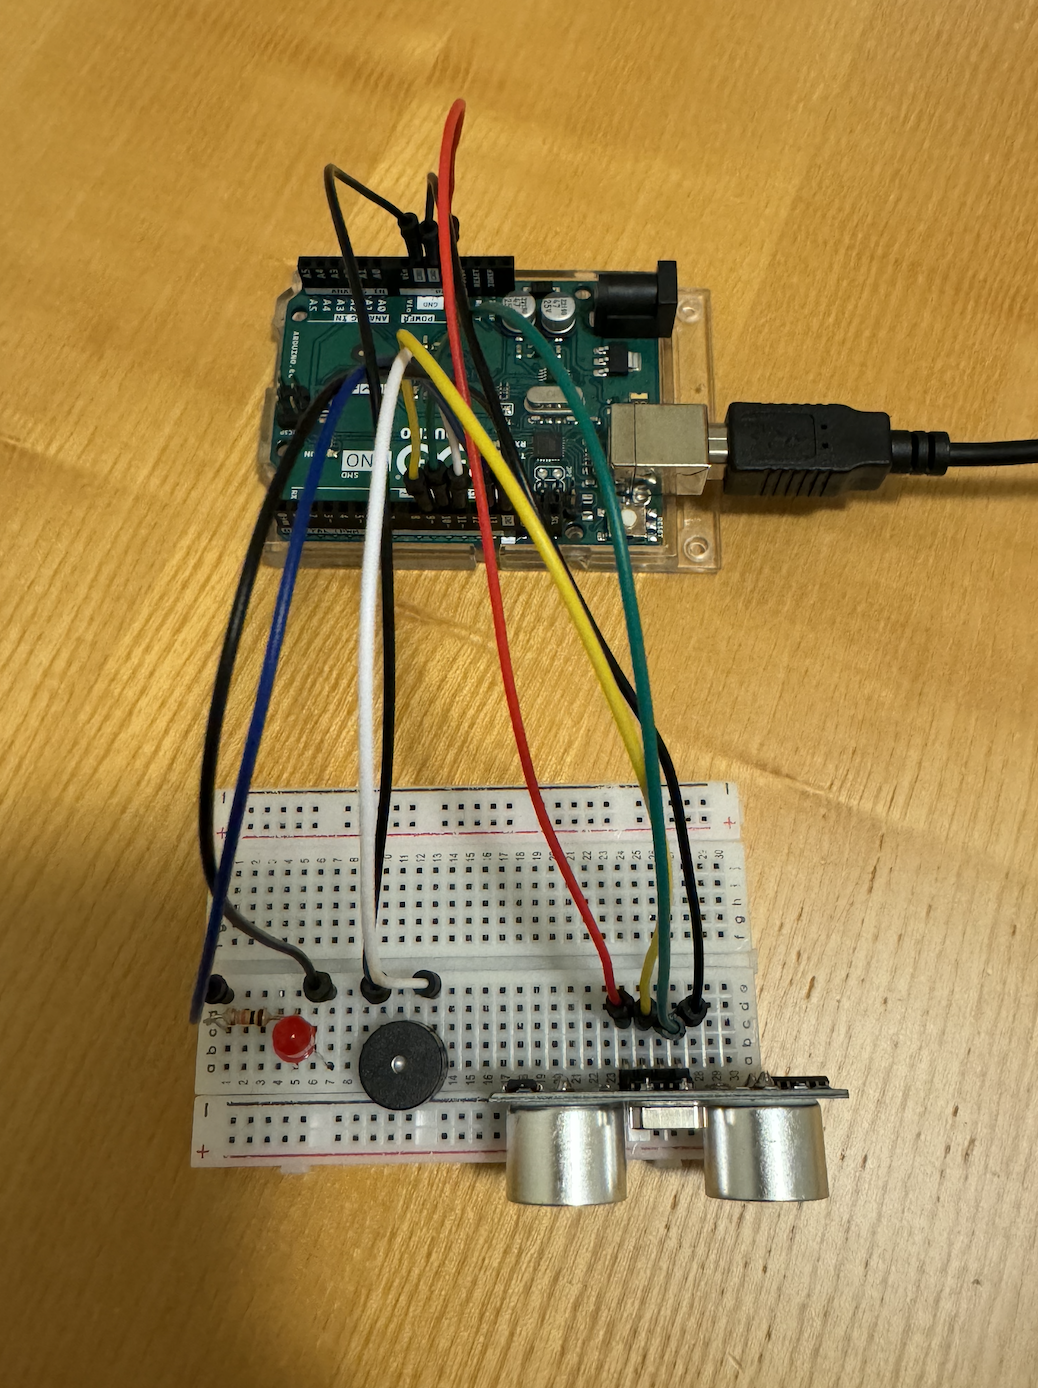
Hardware Implementation:
Video Illustration:
Video Illustration 2 (using melody)
Working Explanation and Conclusion
The ultrasonic distance sensor measures the gap between the car and the sensor on the breadboard. When the distance diminishes below a predefined threshold (5 units in our design), the buzzer emits a warning sound, and the red LED illuminates, acting as a clear visual cue for the driver to halt. This Arduino-based system seamlessly combines hardware and software, offering an elegant solution to a common problem. In creating this assignment, we’ve not only simplified the process of reverse parking but also contributed to enhancing overall safety, turning our initial conversation into a tangible, practical innovation.
Our assigment idea was sparked by a common scenario we all encounter – parking a car in reverse. In discussing the challenges of accurately judging the distance, my partner and I realized the potential hazards and the lack of a reliable solution. Considering how much we rely on the beeping sensor in our own cars for safe parking, we envisioned a solution to bring this convenience to everyone. Imagine a situation where you can’t live without that reassuring beep when you’re reversing. That’s precisely the inspiration behind our assigment – a beeping sensor and a light that mimics the safety we’ve come to depend on, implemented with a car toy to illustrate its practical application.
Required Hardware
– Arduino
– Breadboard
– Ultrasonic distance sensor
– Red LED
– 10k resistor
– Piezo speaker
– Jumper wires
Schematic Diagram
Circuit Diagram
Setting Up the Components
Ultrasonic Distance Sensor Connections:
VCC to 5V
TRIG to digital pin 9
ECHO to digital pin 10
GND to GND on the Arduino
Speaker Connections:
Positive side to digital pin 11
Negative side to GND
LED Connections:
Cathode to GND
Anode to digital pin 13 via a 10k resistor
Coding the Logic
// defines pins numbers
const int trigPin = 9;
const int echoPin = 10;
const int buzzerPin = 11;
const int ledPin = 13;

// defines variables
long duration;
int distance;
int safetyDistance;

// Define pitches for the musical notes
int melody[] = {262, 294, 330, 349, 392, 440, 494, 523};

void setup() {
  pinMode(trigPin, OUTPUT); // Sets the trigPin as an Output
  pinMode(echoPin, INPUT);  // Sets the echoPin as an Input
  pinMode(buzzerPin, OUTPUT);
  pinMode(ledPin, OUTPUT);
  Serial.begin(9600); // Starts the serial communication
}

void loop() {
  // Clears the trigPin
  digitalWrite(trigPin, LOW);
  delayMicroseconds(2);

  // Sets the trigPin on HIGH state for 10 microseconds
  digitalWrite(trigPin, HIGH);
  delayMicroseconds(10);
  digitalWrite(trigPin, LOW);

  // Reads the echoPin, returns the sound wave travel time in microseconds
  duration = pulseIn(echoPin, HIGH);

  // Calculating the distance
  distance = duration * 0.034 / 2;

  safetyDistance = distance;
  if (safetyDistance <= 5) {
    // Play a musical note based on distance
    int index = map(safetyDistance, 0, 5, 0, 7); // Map distance to array index
    tone(buzzerPin, melody[index]); // Play the note
    digitalWrite(ledPin, HIGH);
  } else {
    noTone(buzzerPin); // Stop the tone when not close
    digitalWrite(ledPin, LOW);
  }

  // Prints the distance on the Serial Monitor
  Serial.print("Distance: ");
  Serial.println(distance);
}
Hardware Implementation
Video Illustration (Initial idea with beeping sound)
Video Illustration 2 (using melody)
Working Explanation and Conclusion
The ultrasonic distance sensor measures the gap between the car and the sensor on the breadboard. When the distance diminishes below a predefined threshold (5 units in our design), the buzzer emits a warning sound, and the red LED illuminates, acting as a clear visual cue for the driver to halt. This Arduino-based system seamlessly combines hardware and software, offering an elegant solution to a common problem. In creating this assignment, we’ve not only simplified the process of reverse parking but also contributed to enhancing overall safety, turning our initial conversation into a tangible, practical innovation.
The first reading was definitely intriguing and despite its somewhat comical tone, I believe it highlights an important issue that is growing ever so prevalent in our contemporary times. Pictures under Glass technology, I believe, isn’t a so far-fetched notion and could potentially occur in the nearer future. Technological advancements are facilitated for human convenience and so ultimately, I feel as though it’s used to increasingly replace human capabilities. In the case of the first reading, ‘pictures under glass’ undermines human capability of touch and it overlooks the importance of tactile richness. Stimulation, especially new stimulation, is vital for strengthening neural pathways and promoting cognitive growth and as such, these novel experiences contribute to cultivating a shaper mind, creating a foundation for a more resilient and adaptable cognitive capacity. However if such experiences are massively condensed to something homogenous like this picture under glass technology, we lose such cognitive abilities. In this sense, whilst technological advancement is good, it is worrying as it feels like we are on a path of neurological de-evolution.
In delving into the second reading, the contrasting reactions among readers regarding the trajectory of interactive media resonates with the profound (aforementioned) notion. The shared call for a forward-thinking approach, aligning innovation with our human experiences, I believe, becomes even more relevant in this context. Such a notion ultimately strikes a chord with my concerns about the impact of technology on our lives. The discussion on the potential loss of creativity and emotional depth in a future dominated by touchscreens and voice commands prompts personal reflection on the role of technology in my own experiences. Navigating this dynamic landscape, the reflections serve as both a call to action and a personal invitation to consciously shape a future where technology enhances, rather than diminishes, the richness of both physical and emotional existence.
“The Future of Interactive Design” was an entertaining and reflective read about the future of interaction in digital products. I agree with all of the points made by the author, and I found his disappointment with the obsession with touchscreens in Future Technology very relatable. Watching the Microsoft productivity video reminded me of the hilarious fan creations of future video game consoles such as the infamous “Xbox 720” that you have probably seen 14 years ago. It is funny to see that this whole obsession with glassy touch screens and the use of hand motions represents a certain period of the past more than accurately representing the future of interactivity.
Moreover, his points about the feelings with hands also made me reflect on the usage of everyday objects. I always had a strong preference for physical books rather than PDFs, but I never cared enough to think about it. It is pretty obvious though, that the sensation of the paper in your hands and the weight of the book makes the interaction way more pleasant than just staring at a screen and moving your fingers. I suppose that explanation works for many other objects as mentioned by the text, and from now on I will make sure to appreciate dynamic mediums much more. As a side note, I also related to the author’s frustrations with the response text. Not everything has to provide a solution, sometimes expressing problems is just as valuable. After all, we need to start somewhere if we want to change the course of how things are going, and for that reason, I admire the author’s text even more.
The first reading, “A Brief Rant on the Future of Interaction Design,” delves into the future of technology and how Bret Victor has a problem with it. Victor reveals how the future they are portraying consists of swiping through a touchscreen for every task. He believes that this limits the use of our hands as we aren’t doing anything with them other than swiping. Victor wants to see a future where we can grab, throw, hold, and feel technology rather than just swiping through a screen. Reflecting back on this reading, I completely disagree with Victor’s narrative. The whole point of technology innovation is to make things more accessible and user-friendly. It is supposed to make tasks easier to do and faster as well. If all we’re doing with our hands is swiping, is that really a bad thing? Victor’s issue is that we’re not using our hands enough. In reality, we’re using our hands to do a lot of other things like cooking, laundry, making our bed, etc. So if we’re using our hands to do all these things, is it really bad that the innovation of technology means all we’re doing with just technology is swiping? Moreover, Victor also fails to take into account that technology, where we don’t require using much of our body, is beneficial to several people of determination who may have a hard time interacting with limited mobility or cognitive function.
The second reading, “Responses: A Brief Rant on the Future of Interaction Design,” is a response posted by Brent Victor where he responds to the questions he received after posting the initial rant. However, his responses to most of the questions don’t even look like responses but rather an angry teenager responding to hate comments. By mentioning that he is no longer going to respond to any more questions, it is as though he has turned off the comments on his Instagram post due to fear of being shamed by the public. One question someone asked was about using voice for more interactive technology. Victor responded by saying that we should just use our voice for asking questions and issuing commands. With that logic, one could respond by stating that why don’t we just use our hands as well for doing tasks like cooking, laundry, etc.? Why do we need to use more of them for interactive technology? The whole rant by Victor made no sense and it is not a surprise that he no longer works in making such technology.
The main connecting factor between both these readings is that it was written by Brent Victor, who only thinks that he is right and everyone else is wrong. In both these readings, Victor wants the future of technology to be less user-friendly and more handsy. It is as though Victor thinks the future of technology revolves around his needs and desires alone rather than the needs and desires of the rest of the world.
Team members: Fady John (fje3683) and Victor Alves Gomes Nadu (va2269).
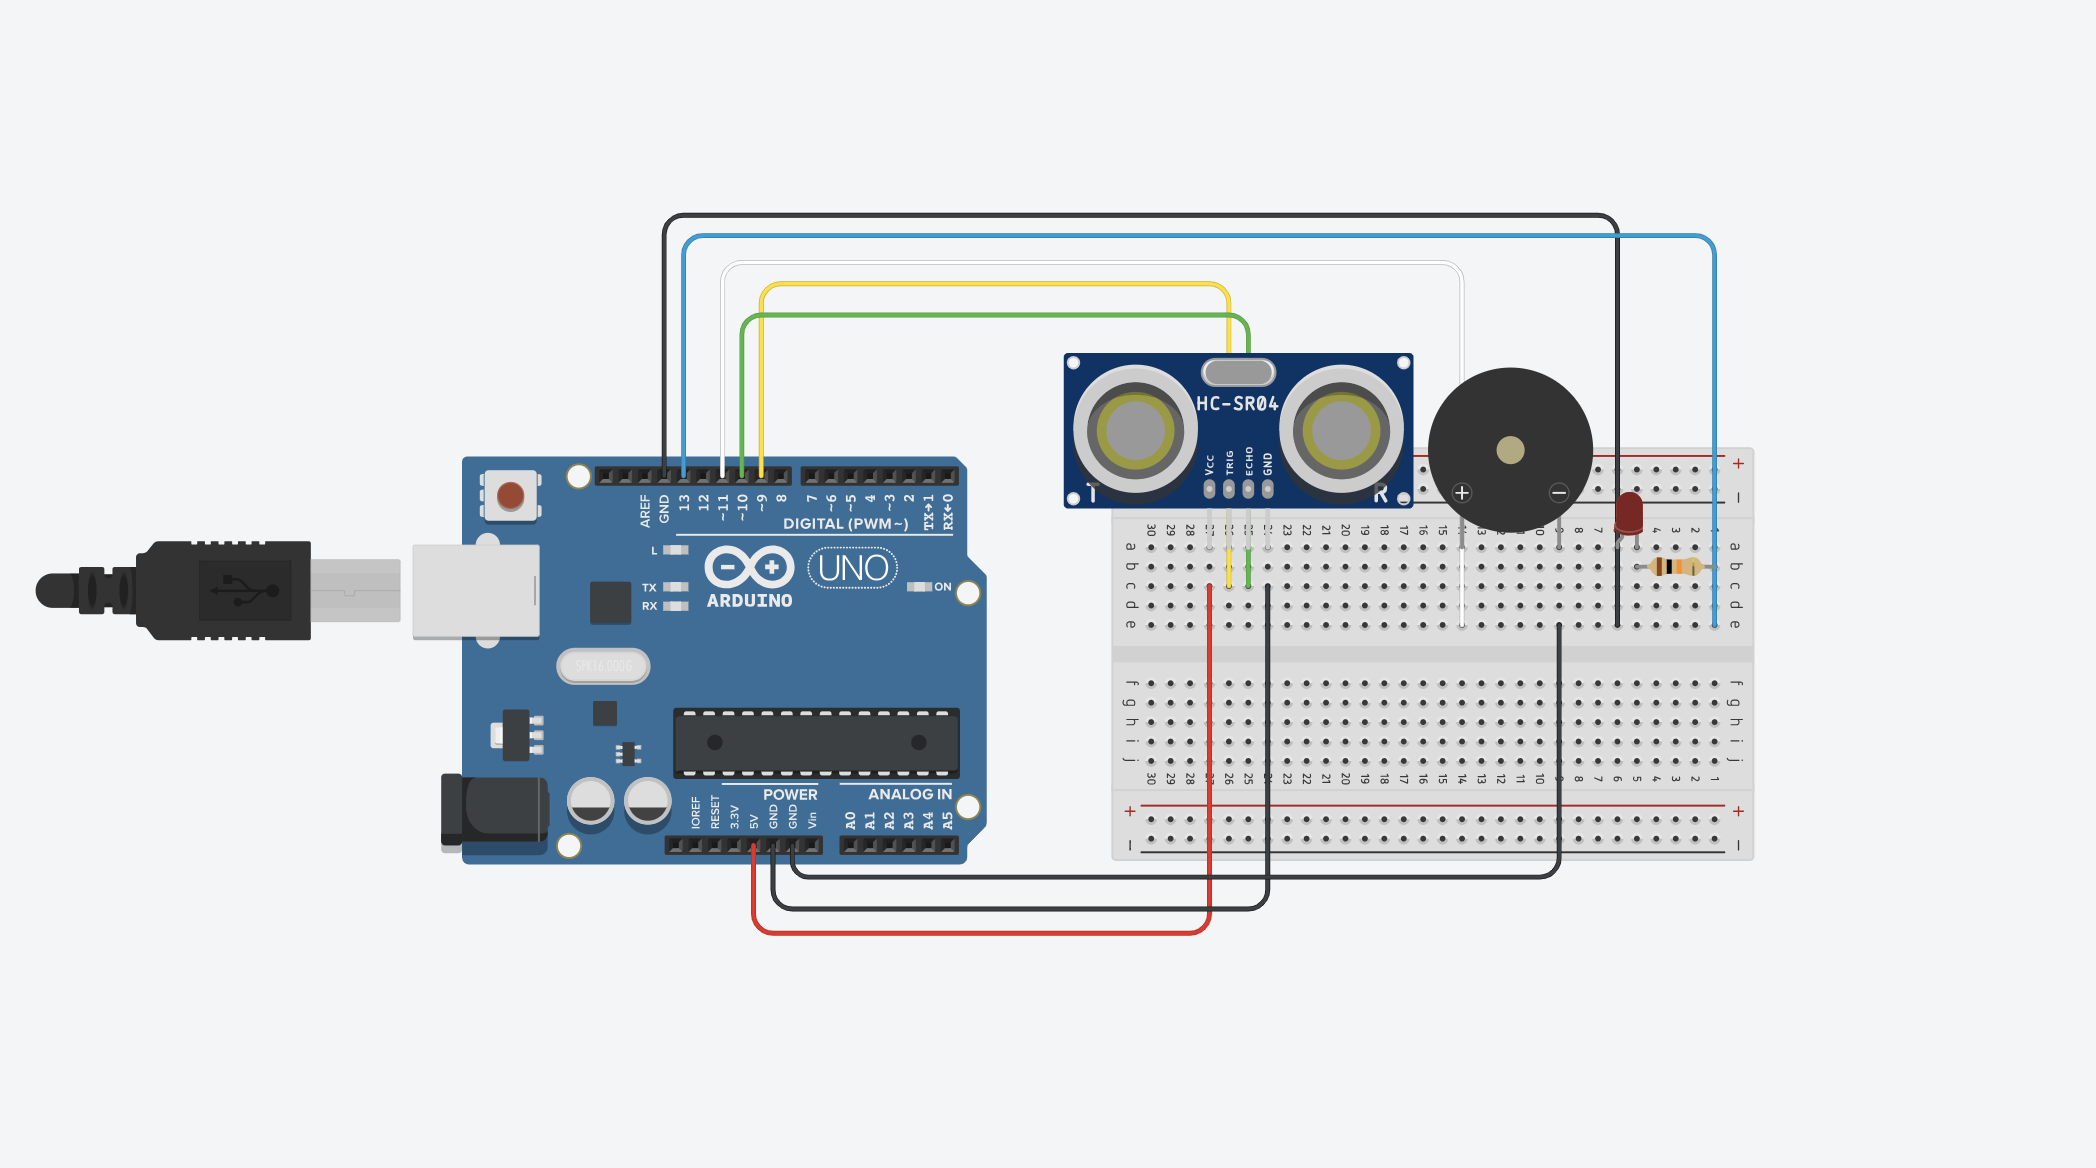
For our instrument project, we have decided to create a piano that plays different tones of the musical scale depending on the measured distance that someone is from the sensor. To build the instrument on the breadboard, we utilized an ultrasonic sensor, LEDs, resistors, and jumper wires, creating an interactive and dynamic musical experience. The analog ultrasonic sensor was responsible for measuring the distance, allowing for an intuitive interaction with the piano. As the user moves closer or farther away, the musical output changes, providing a unique take on the instrument. As for the LEDs, they add a visual element to the project besides also offering an understanding of the distance-based musical scale since they light up corresponding to the played notes.
Code
In the code, we defined the specific pins used for each LED and provided the notes in the musical scale in the form of an array.
// notes in the musicalScale:

int musicalScale[] = {

262, 294, 330, 349, 392, 440, 493, 523

};

int ledPins[] = {

9, 12, 11, 10, 9, 12, 11, 10

};

void setup() {

Serial.begin(9600);

pinMode(trigPin, OUTPUT);

pinMode(echoPin, INPUT);

}
Schematic
Reflections and improvements
Initially, we planned to create drums, but we ended up settling on a piano since that was a more feasible and practical instrument. As for improvements, currently, the distance sensor is not that accurate, which is something that could be worked on. Other than that, we have managed to create something fun and so we are proud of our work.