Week 11 – Arduino and P5 + Final Project Concept

Exercises

Exercise 1

For exercise 1, we used a light sensor. As brightness of light in the surrounding was changed, the ball moved along the horizontal axis in p5. Higher the brightness, the farther right the ball moved.

The values from the light sensor roughly ranged between 0 and 500,000 so we mapped them between 0 and width of the screen and used the mapped value as x-coordinate of the ellipse

//Exercise 1 P5js Code

let ellipseX; // Variable to store ellipse's x-coordinate

function setup() {
  createCanvas(400, 400); // Create a canvas of 800x400 pixels
  ellipseX = width / 2; // Set initial x-coordinate of ellipse to middle of the screen
  noStroke(); // No stroke for the ellipse
}

function draw() {
  
  background(220); // Refresh background on each frame
  fill(255, 0, 0); // Set fill color to red
  ellipse(ellipseX, height / 2, 50, 50); // Draw ellipse at current x-coordinate and middle of the screen
  
  if (!serialActive) {
    text("Press Space Bar to select Serial Port", 20, 30);
  } else {
    text("Connected", 20, 30);}
}


function keyPressed() {
  if (key == " ") {
    // important to have in order to start the serial connection!!
    setUpSerial();
  }   
}

// this callback function
function readSerial(data) {
  ////////////////////////////////////
  //READ FROM ARDUINO HERE
  ////////////////////////////////////

  if (data != null) {
    // make sure there is actually a message
    // split the message
    console.log(data);
    console.log("fromArduino");
   
    let fromArduino = split(trim(data), ",");
    // if the right length, then proceed
    if (fromArduino.length == 1) {
      // only store values here
      // do everything with those values in the main draw loop
      console.log("working");
//values from light sensor roughly ranged between 0 and 500,000 so map them between 0 and width of the screen
//use the mapped value as x-coordinate of the ellipse
      ellipseX = map(data,0,500000, 0,width);
    }

    //////////////////////////////////
    //SEND TO ARDUINO HERE (handshake)
    //////////////////////////////////
   let sendToArduino = fromArduino + "\n";
   writeSerial(sendToArduino);
  }
}
//Exercise 1 Arduino Code 

void setup() {
  Serial.begin(9600); // Start serial communication at 9600 bps

  pinMode(LED_BUILTIN, OUTPUT);
// start the handshake
  while (Serial.available() <= 0) {
    //digitalWrite(LED_BUILTIN, HIGH); // on/blink while waiting for serial data
    Serial.println("0,0"); // send a starting message
    delay(300);            // wait 1/3 second
    //digitalWrite(LED_BUILTIN, LOW);
    delay(50);
  }
}
void loop() {

  // wait for data from p5 before doing something
    while (Serial.available()) {
    digitalWrite(LED_BUILTIN, HIGH); // led on while receiving data

  // Read sensor value
  int sensorValue = analogRead(A0);
   Serial.print(sensorValue);
  // Map sensor value to screen width (e.g. 0 to 800 pixels)
  int screenValue = map(sensorValue, 0, 1023, 0, 800);

  // Send mapped value to p5.js
  Serial.println(screenValue);

  delay(50); //    for stability
}
digitalWrite(LED_BUILTIN, LOW);
}

Exercise 2

For this exercise, we used a slider in p5 to control brightness of the LED. Value of slider ranged between 0 and 255 and these values were sent to Arduino and used as brightness for the LED.

//Exercise 2 P5js Code
let slider;
function setup() {
   createCanvas(400, 400); // Create a canvas of 800x400 pixels
  slider = createSlider(0, 255, 0);
  slider.position(160,height/2); // Set the position of the slider
  slider.style('width', '80px'); // Set the width of the slider
 
  
  noStroke(); // No stroke for the ellipse
}
function draw() {
  
  background(255); // Refresh background on each frame
  
  if (!serialActive) {
    text("Press Space Bar to select Serial Port", 20, 30);
  } else {
    text("Connected", 20, 30);}
}
function keyPressed() {
  if (key == " ") {
    // important to have in order to start the serial connection!!
    setUpSerial();
  }   
}
// this callback function
function readSerial(data) {
    ////////////////////////////////////
    //READ FROM ARDUINO HERE
    ////////////////////////////////////
    //////////////////////////////////
    //SEND TO ARDUINO HERE (handshake)
    //////////////////////////////////
    console.log(slider.value());
    let sendToArduino = slider.value() + "\n";
    writeSerial(sendToArduino);
  
}
//Exercise 2 Arduino Code

const int ledPin =3;
int brightness = 0;
void setup() {
  Serial.begin(9600); // Start serial communication at 9600 bps

  pinMode(LED_BUILTIN, OUTPUT);
  pinMode(ledPin, OUTPUT);
// start the handshake
  while (Serial.available() <= 0) {
    digitalWrite(LED_BUILTIN, HIGH); // on/blink while waiting for serial data
    Serial.println("0,0"); // send a starting message
    delay(300);            // wait 1/3 second
  }
}
void loop() 
{
  // wait for data from p5 before doing something
    while (Serial.available()) 
    {
    digitalWrite(LED_BUILTIN, HIGH); // led on while receiving data
    int brightness = Serial.parseInt(); //get slider value from p5
    Serial.println(brightness); //just to view the value
    
     if (Serial.read() == '\n') {
       analogWrite(ledPin, brightness); //set brightness of LED
     
      }else
      {
        digitalWrite(LED_BUILTIN, HIGH);
      }
    }
}

Exercise 3

For this exercise, we used a potentiometer to control the wind. The potentiometer’s values ranged between 0 and 1023. So, for any value less than 500, wind moved the ball forward/wind blew to right. We added this layer that if value was between 500 and 600, wind stopped so the ball stopped. Finally, if value was above 600, wind blew in opposite direction moving the ball in the opposite direction.

For LED part, we used a flag called heightOfBall. Whenever ball touched the ground, this flag was set to zero. Otherwise, it was set to one. This was sent to Arduino to check whenever ball bounced. When this happened, LED would be turned on. Otherwise it would be turned off.

//Exercise 3 P5js Code

let velocity;
let gravity;
let position;
let acceleration;
let wind;
let drag = 0.99;
let mass = 50;
let heightOfBall = 0;

function setup() {
  createCanvas(640, 360); // Create a canvas of 800x400 pixels
 
  noFill();
  position = createVector(width/2, 0);
  velocity = createVector(0,0);
  acceleration = createVector(0,0);
  gravity = createVector(0, 0.5*mass);
  wind = createVector(0,0); 
}

function draw() {
  background(215);
  fill(0);
  
  if (!serialActive) {
    text("Press Space Bar to select Serial Port", 20, 30);
  } else 
  {
    text("Connected. Press s to jump.", 20, 30);
  
  applyForce(wind);
  applyForce(gravity);
  velocity.add(acceleration);
  velocity.mult(drag);
  position.add(velocity);
  acceleration.mult(0);
  ellipse(position.x,position.y,mass,mass);
  //heightOfBall set to zero whenever ball is touching the ground. Otherwise it is set to 1.
  if (position.y > height-mass/2) {
      velocity.y *= -0.9;  // A little dampening when hitting the bottom
      position.y = height-mass/2;
    heightOfBall = 0;
    } else {
      heightOfBall = 1;
    }
  }
}
function applyForce(force){
  // Newton's 2nd law: F = M * A
  // or A = F / M
  let f = p5.Vector.div(force, mass);
  acceleration.add(f);
}

function keyPressed() {
  if (key == " ") {
    // important to have in order to start the serial connection!!
    setUpSerial();
  }   
  else if (key=='s'){
    mass=random(15,80);
    position.y=-mass;
    velocity.mult(0);
  }
}

// this callback function
function readSerial(data) {
    ////////////////////////////////////
    //READ FROM ARDUINO HERE
    ////////////////////////////////////
  
     if (data != null) {
    // make sure there is actually a message
    
    let fromArduino = split(trim(data), ",");
    
       // if the right length, then proceed
    if (fromArduino.length == 1) {
//sensor value is the input from potentiometer
      let sensorVal = int(fromArduino[0]);
      console.log("Sensor value: ")
      console.log(sensorVal);

//sensor values range between 0 and 1023
//for any sensor value less than 500, make wind move ball forward/wind blows to right
      if (sensorVal <500){
        wind.x=1
      }
//if sensorVal between 500 and 600, wind stops so ball stops
      else if(sensorVal >=500 && sensorVal < 600){
        wind.x = 0
      }
//if sensorVal over 600, wind blows in opposite direction moving ball to left
      else {
        wind.x =-1
      }
          //////////////////////////////////
          //SEND TO ARDUINO HERE (handshake)
          //////////////////////////////////
    }

//send heightOfBall to arduino to indicate if ball is on the floor or not
    let sendToArduino = heightOfBall  + "\n";
    writeSerial(sendToArduino);
  }
}
//Exercise 3 Arduino code

const int poten_pin = A0;
const int ledPin =3;

void setup() {

  Serial.begin(9600); // Start serial communication at 9600 bps
  pinMode(LED_BUILTIN, OUTPUT);
  pinMode(ledPin, OUTPUT);
  pinMode(poten_pin, INPUT);

  // start the handshake
  while (Serial.available() <= 0) {
    digitalWrite(LED_BUILTIN, HIGH); // on/blink while waiting for serial data
    Serial.println("0,0"); // send a starting message
    delay(300);            // wait 1/3 second
    digitalWrite(LED_BUILTIN, LOW); 
    delay(50);
  }
}
void loop() 
{
  // wait for data from p5 before doing something
    while (Serial.available()) 
    {
      digitalWrite(LED_BUILTIN, HIGH);
      digitalWrite(ledPin, LOW);
//read the position of ball from p5
      int position = Serial.parseInt();
    
      if (Serial.read() == '\n') {
        // Read potentiometer value
      int sensorValue = analogRead(poten_pin);
      //send value to p5
      Serial.println(sensorValue);
      }
//if ball is touching the ground i.e. height is zero, turn LED on
      if (position == 0)
      {
        digitalWrite(ledPin, HIGH);
      }
      else{
        digitalWrite(ledPin, LOW);
      }
    }
      digitalWrite(LED_BUILTIN, LOW); 
    }

Video for Exercise 3:

Teammate: Ramsha Bilal

Final Project Proposal

I have decided to take inspiration from one of the classic mobile  games of the past generations: Flappy Bird!

Flappy Bird became popular due to how made it made people when they could just never get the mechanics down for the game.

This of course led many people to break their phones and scream loudly. Well with my idea, you get to let out your energy while playing my game. I will be connecting a microphone up to my own version of this game where, in order to make the character fly, you have to scream into the mic!

SO best prepare your vocal cords and have a drink to soothe them afterwards for when my game eventually comes to fruitition!


Week 10: Arduino-P5 exercises (Youssef-Arslan)

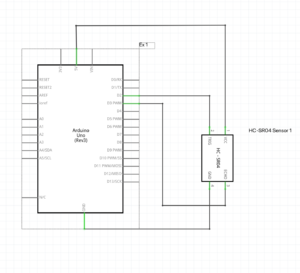
Exercise 1: Make something that uses only one sensor on Arduino and makes the ellipse in p5 move on the horizontal axis, in the middle of the screen, and nothing on Arduino is controlled by p5.

P5 link: https://editor.p5js.org/Arslan108/sketches/DVc3r1-YY Arduino script:

// defines pins numbers
const int trigPin = 9;
const int echoPin = 10;
// const int ledPin = 3;
// int duty = 10;
// defines variables
long duration;
int distance;
void setup() {
  pinMode(trigPin, OUTPUT); // Sets the trigPin as an Output
  // pinMode(ledPin, OUTPUT); // Sets the trigPin as an Output
  pinMode(echoPin, INPUT); // Sets the echoPin as an Input
  Serial.begin(9600); // Starts the serial communication
}
void loop() {
  // Clears the trigPin
  digitalWrite(trigPin, LOW);
  delayMicroseconds(2);
  // Sets the trigPin on HIGH state for 10 micro seconds
  digitalWrite(trigPin, HIGH);
  delayMicroseconds(10);
  digitalWrite(trigPin, LOW);
  // Reads the echoPin, returns the sound wave travel time in microseconds
  
  duration = pulseIn(echoPin, HIGH);
  // Calculating the distance
  distance = duration * 0.034 / 2;
  // Prints the distance on the Serial Monitor * 0.034 / 2
  // analogWrite(ledPin, duty);
  Serial.println(distance);
  delay(150);
}

The Ball class defines the properties and methods for the ball, including its position, velocity, and radius. The update() method updates the ball’s horizontal position and velocity according to the gravity, bounce factor, and the sensor value that is taken from the ultrasonic distance sensor. The show() method is responsible for displaying the ball on the canvas.

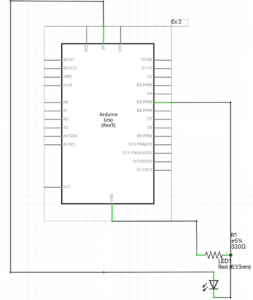
Exercise2: Make something that controls the LED brightness from p5

P5 link: https://editor.p5js.org/Arslan108/sketches/rSn6NmdHy. Arduino script:

int ledPin = 3;


void setup() {
  pinMode(ledPin, OUTPUT);
  Serial.begin(9600);
  // put your setup code here, to run once:
  

}

void loop() {
  while (Serial.available()) {
    // digitalWrite(LED_BUILTIN, HIGH); // led on while receiving data

    int duty = Serial.parseInt();
    if (Serial.read() == '\n') {
      analogWrite(ledPin, duty);
    }
 

}
}

The code allows the control the intensity of the light emitted by the LED depending on the Y coordinate of the mouse. The higher the Y-coordinate is the brighter the LED is.

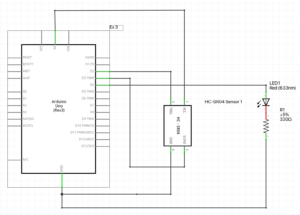
Exercise 3: Make something that controls the LED brightness from p5.

P5 link: https://editor.p5js.org/Arslan108/sketches/yhLl1hYsD. Arduino script:

// defines pins numbers
const int trigPin = 9;
const int echoPin = 10;
const int ledPin = 4;
// int duty = 10;
// defines variables
long duration;
int distance;
void setup() {
  pinMode(trigPin, OUTPUT); // Sets the trigPin as an Output
  pinMode(ledPin, OUTPUT); // Sets the trigPin as an Output
  pinMode(echoPin, INPUT); // Sets the echoPin as an Input
  Serial.begin(9600); // Starts the serial communication
}
void loop() {
  // Clears the trigPin
  digitalWrite(trigPin, LOW);
  delayMicroseconds(2);
  // Sets the trigPin on HIGH state for 10 micro seconds
  digitalWrite(trigPin, HIGH);
  delayMicroseconds(10);
  digitalWrite(trigPin, LOW);
  // Reads the echoPin, returns the sound wave travel time in microseconds
  
  duration = pulseIn(echoPin, HIGH);
  // Calculating the distance
  distance = duration * 0.034 / 2;
  // Prints the distance on the Serial Monitor * 0.034 / 2
  int duty = Serial.parseInt();
    if (Serial.read() == '\n') {
      digitalWrite(ledPin, duty);
    }
  Serial.println(distance);
  delay(150);
  // digitalWrite(ledPin, low);
}

We have kept the code form exercise 1 but we have added the lines that send the light up order to the LED, every time the ellipse get in contact with the right or the left borders of the canvas.

let sendToArduino = light + "\n";
writeSerial(sendToArduino);
light = 0;


Serial Control

1 & 3

Something that uses only one sensor on Arduino and makes the ellipse in p5 move on the horizontal axis, in the middle of the screen and nothing on Arduino is controlled by p5.
Taking the gravity wind example (https://editor.p5js.org/aaronsherwood/sketches/I7iQrNCul) and make it so every time the ball bounces one led lights up and then turns off, and you can control the wind from one analog sensor

2

Using a slider to control the LED brightness from p5

Arduino Code

int ledPin = 2; // connect LED to pin 9
int brightness = 0;

void setup() {
  Serial.begin(9600); // start serial communication
  pinMode(ledPin, OUTPUT); // set LED pin as an output
}

void loop() {
  // read incoming serial data
  if (Serial.available() > 0) {
    brightness = Serial.read(); // read the incoming value
    brightness = constrain(brightness, 0, 255); // constrain the value between 0 and 255
    analogWrite(ledPin, brightness); // set the LED brightness
  }
  delay(10); // wait a short time before repeating the loop
}

P5.js code

let slider; // slider to control LED brightness
let serial;

function setup() {
  serial = new p5.SerialPort();
  
  serial.open("COM3");
  
  createCanvas(400, 400); // create a canvas
  slider = createSlider(0, 255, 0); // create a slider
  slider.position(50, 50); // set the position of the slider
}

function draw() {
  background(220); // clear the canvas

  let val = slider.value(); // get the slider value
  text("LED Brightness: " + val, 50, 50); // display the brightness value

  // send data to Arduino over serial
  if (frameCount % 10 == 0) { // limit the rate of sending data to avoid overloading the serial port
    serial.write(val); // send the slider value over serial
  }
}


Final Project Proposal – Arcade Games!

For the purposes of the Final Project, in order to satisfy the requirements of an interactive system which requires systems of listening, thinking, and speaking from at least 2 parties, and should make use of Arduino and P5Js, we have preliminarily thought of developing an ‘Arcade Game’ console.

While the intricacies are not fine tuned yet, the initial idea is to develop an Extensive Game in p5Js, not a simple one, but an elaborate game with multiple levels which is very challenging. For this, we have though of a childhood favorite called ‘PacXon’ which is similar to PacMan but involves a relatively free space with area to capture. To have a sense of a similar game, we can look here (https://www.gamesbutler.com/game/29933/pacxon-deluxe/)

We believe creating this would require some algorithms, and extremely complex state machines with the utility of power-ups, and would develop our Object Oriented Programming skills in P5Js to an advanced level.

Moving forward, we would then develop a ‘JoyStick’ for this game, that would be designed for the purposes of this game. As an idea, the JoyStick would be a breadboard with multiple buttons for left, right, up, and down movements as well as a Potentiometer to control speeds, and a Piezo Buzzer to produce vibration like sounds on collisions for ‘Haptic Feedback’. We would also incorporate multiple LEDs and different notes of sounds with the state machines, realizing the mechanism to play the required tone at the appropriate time.

The idea is still in works and we are open to feedback!

The project is intended to be completed by Ishmal Khalid, Zunair Viqar, and Abraiz Azhar.

Final Project Proposal

Concept

I am considering expanding my sound project for the final project by creating a table piano with enhanced features. The piano will be based on either an ultrasonic sensor or a pressure sensor. The concept is to integrate P5.js code as a game. The start screen will allow users to choose between three modes: free mode, game mode, and record mode.

In free mode, users can play the piano for as long as they want and try to figure out a tune on their own. Record mode will be an extension of free mode, where each key played by the user will be stored within P5.js and can be played back by pressing a button.

In game mode, users will be presented with a pre-set tune, including its sound, the keys to be played, and the order in which they should be played. The goal will be for the user to memorize the tune/keys and then play it on the piano. Correctly played tunes will earn points, while pressing the wrong key will result in a buzzer sound and the need to start over. Users will have the option to replay the tune or skip to a new one.

To add more challenge, game mode may have different difficulty levels such as easy, medium, and hard, with tunes of varying lengths and number of keys. The fastest player in each category will have their name displayed on the screen throughout the exhibition, motivating others to beat the record.

Week 11 – Serial Communication (In-Class Exercises)

Exercise 1:

During the exercise, we had to use an Arduino with an analog sensor to manipulate a feature in P5js based on the readings. We opted for an ultrasonic sensor to achieve this, where the data obtained was utilized to shift an ellipse along its horizontal axis in P5js.

CODE FOR P5JS

//declare variables for the dimensions and coordiantes of ellipse
let ellipseXcord;
let ellipseYcord;
let ellipseRadius;

function setup() 
{
  createCanvas(500, 500); //create canvas
  background(100);
  textDisplay();
  //set the initial ellipse to be in the centre
  ellipseXcord = width/2;
  ellipseYcord = height/2;
  ellipseRadius = height/10;
}

//displays this text in the starting
function textDisplay()
{
  text("PRESS ANY KEY TO START SERIAL PORT", width/2 - 109, height/2 - 5);
}

function draw() 
{
  background(220);
  if (serialActive) //if the serial is active
  {
    ellipse(ellipseXcord, ellipseYcord, ellipseRadius, ellipseRadius); //then keep changing the coordinates of ellipse bases on ellipseXcord
  }
  else //if the serial is not active
  {
    textDisplay(); //then display the text with instructions
  }
}

function readSerial(data) //call back function
{
  if (data != null) //if the data received is not null
    {
      ellipseXcord = map(data, 300, 1500, ellipseRadius, width - ellipseRadius); //map the value of the data and then update the variable
      //do it with ellipse radius because dont want half the circle off the screen
    }
}

function keyPressed() //if any key is pressed, then set up serial
{
  setUpSerial();
}

CODE FOR ARDUINO

const int pingPin = 2; //Trigger Pin of Ultrasonic Sensor
const int echoPin = 3; //Echo Pin of Ultrasonic Sensor
long distance = 0; //will contain the distance of the object

void setup() {
  //Start serial communication at 9600 baud
  Serial.begin(9600);

  //Set the ultrasonic sensor pins as output and input respectively
  pinMode(pingPin, OUTPUT);
  pinMode(echoPin, INPUT);
}

void loop() {
  //Send a short low pulse
  digitalWrite(pingPin, LOW);
  delay(2); //delay to avoid complications
  digitalWrite(pingPin, HIGH); //sends a high pulse for 10 microseconds
  delay(10);
  digitalWrite(pingPin, LOW); //turn off the ping pin
  distance = pulseIn(echoPin, HIGH); //Measure the duration of the ultrasonic pulse and calculate the distance
  Serial.println(distance); //print it in the serial (P5js)
}

EXERCISE 2

In this particular exercise, the primary objective was to control the LEDs on an Arduino board through P5js code. We utilized the left and right arrow keys, which functioned as input devices to alter the dimness of the bulb. The code starts off with the LED at its maximum brightness but as the right arrow key is pressed, the brightness keeps decreasing. When the left arrow key is pressed, the brightness starts increasing again.

CODE FOR P5JS

let dimnessCounter = 0; //this will control the brightness and dimness of the LED

function setup() 
{
  createCanvas(400, 400);  //create canvas
}


function textDisplay() //display text in the starting
{
  text("PRESS SPACE TO START SERIAL PORT", width/2 - 109, height/2 - 5);
}

function draw() 
{
  
  background(100);  //grey background
  
  if (serialActive) //if serial is active
  {
    text("CONNECTED!", width/2 - 27, height/2 - 5); //tell the user that it is connected
    text("PRESS RIGHT ARROW TO LOWER BRIGHTNESS!", width/2 - 130, height/2 + 15); //give instructions on how to control brightness
  }
  else
  {
    textDisplay(); //display instructions on how to start serial is not active
  }
}


function keyPressed() //built in function
{ 
  if (key == " ") //if space is pressed then
  {
    setUpSerial(); //setup the serial
  }
  else if (keyCode == LEFT_ARROW) //if left arrow pressed
  {
    if (dimnessCounter != 0) //check if brightness is not already at the lowest
    {
      dimnessCounter = dimnessCounter - 50; //if not then decrease by 50
    }
  }
  else if (keyCode == RIGHT_ARROW) //for the right key
  {
    if (dimnessCounter != 250) //check if dimness not at the maximum
    {
      dimnessCounter = dimnessCounter + 50; //increase dimness by 50
    }
  }
    
}

//callback function
function readSerial(data) 
{
    let sendToArduino = dimnessCounter + "\n"; //add the next line to dimness counter
    writeSerial(sendToArduino); //write serial and send to arduino
}

CODE FOR ARDUINO

//declare variables
const int LED_PIN = 5;
int dimness = 0; //contains the dimness fothe LED

void setup() 
{
  Serial.begin(9600); // Start serial communication at 9600 baud

  pinMode(LED_PIN, OUTPUT); //declare pin to be output

  while (Serial.available() <= 0) 
  {
    Serial.println("CONNECTION ESTABLISHED"); // send a starting message
  }
}
void loop() 
{
  //wait for p5 to do something
    while (Serial.available()) //when serial is available
    {
      dimness = Serial.parseInt(); //parse the dimness from the serial to the variable
      Serial.println(dimness); //checking purposes

      if (Serial.read() == '\n') //since the "\n" would be present in the serial, read that and
      {
        analogWrite(LED_PIN, dimness); //write it to the LED
      }
    }
}

EXERCISE 3

In this exercise, we were tasked with creating an interactive p5js program that simulates a bouncing ball, which changes direction based on a variable called ‘wind.’ The ball bounces on the floor and we needed to detect when it hit the floor, so we could turn an LED on. For the second part of this exercise, we used an analog sensor (ultrasonic sensor) to control the wind variable. We set a default value in which the ball would stay in the middle of the screen. When the object is moved to the right from the center, the ball would move to the right, and when moved to the left, the ball would move to the left.

CODE FOR P5JS

//declare variables
let velocity;
let gravity;
let position;
let acceleration;
let wind;
let drag = 0.99;
let mass = 50;
let LEDvalue = 1401;
let goRight = 0;
let goLeft = 0;
let first

function setup() {
  createCanvas(1000, 360); //create canvas
  noFill();
  position = createVector(width/2, 0);
  velocity = createVector(0,0);
  acceleration = createVector(0,0);
  gravity = createVector(0, 0.5*mass);
  wind = createVector(0,0);
}

function textDisplay()
{
  text("PRESS SPACE TO START SERIAL PORT", width/2 - 109, height/2 - 5); //display the appropriate text in the start
}

function draw() {
  background(255);
  if (serialActive) //if the serial is active
  {
    applyForce(wind);
    applyForce(gravity);
    velocity.add(acceleration);
    velocity.mult(drag);
    position.add(velocity);
    acceleration.mult(0);
    ellipse(position.x,position.y,mass,mass);
    if (position.y > height-mass/2)  //if the ball touches the bottom
    {
      velocity.y *= -0.9;  // A little dampening when hitting the bottom
      position.y = height-mass/2;
      LEDvalue = 1401; //take LED value to be 1401 because we dont want the value (1) to be lurking in the serial and then affecting the wind values

    }
    else
    {
      LEDvalue = 1400; //when the LED is off
    }
    
  }
  else
  {
    fill(0);
    textDisplay();
  }
}

function applyForce(force){
  // Newton's 2nd law: F = M * A
  // or A = F / M
  let f = p5.Vector.div(force, mass);
  acceleration.add(f);
}

function keyPressed(){
  if (key==' '){ //if space is pressed, then serial is set up
    setUpSerial();
  }
  
  if (keyCode == DOWN_ARROW) //if down arrow is pressed
  {
    //mass etc is changed
    mass=random(15,80);
    position.y=-mass;
    velocity.mult(0);
  }
}

function readSerial(data) //call back function
{
  let sendToArduino = LEDvalue + "\n"; //sends value of LED to arduino with \n added
  writeSerial(sendToArduino); //write to arduino
  
  
  if (data != null) //if the data is not null and something is received
  {
    console.log(data);
    if (data > 1450) //if the distance is greater than 1450, then
    {
      wind.x = 1; //the ball/wind goes right
    }
    else if (data < 1350) //if the distance is less than 1350
    {
      wind.x = -1; //the ball/wind goes left
    }
  } 
}

CODE FOR ARDUINO

//declare variables
const int LED_PIN = 4;
int LEDvalue = 0; //will contain whether or not the LED should be on or off
int distance = 0; //will contain the distance by ultrasonic sensor
const int pingPin = 2; //Trigger Pin of Ultrasonic Sensor
const int echoPin = 3; //Echo Pin of Ultrasonic Sensor

void setup() 
{
  Serial.begin(9600); // Start serial communication at 9600 baud

  pinMode(LED_PIN, OUTPUT); //pin mode is output

  //Set the ultrasonic sensor pins as output and input respectively
  pinMode(pingPin, OUTPUT);
  pinMode(echoPin, INPUT);

  while (Serial.available() <= 0) 
  {
    Serial.println(1400); //connection establishment. 1400 so that the wind values do not change
  }
}

void loop() 
{
  //wait for p5js
    while (Serial.available()) 
    {
      sensorReading(); //reads data from the sensor

      LEDvalue = Serial.parseInt(); //parsing from the serial written data from p5js

      if (LEDvalue == 1400) //if the LED value is 1400
      {
        digitalWrite(LED_PIN, LOW); //then turn off the LED
      }
      else if (LEDvalue == 1401) //if the LED value is 1401
      {
        digitalWrite(LED_PIN, HIGH); //then turn on the LED
      }
    }
}

//Function to read the ultrasonic sensor and measure distance
void sensorReading()
{
  //Send a short low pulse
  digitalWrite(pingPin, LOW);
  delay(2); //delay to avoid complications
  digitalWrite(pingPin, HIGH); //sends a high pulse for 10 microseconds
  delay(10);
  digitalWrite(pingPin, LOW); //turn off the ping pin
  distance = pulseIn(echoPin, HIGH); //Measure the duration of the ultrasonic pulse and calculate the distance
  Serial.println(distance); //print the serial from distance
}

VIDEO

Assignment 8: Serial Communication – In Class Exercises

Exercise 1

During the exercise, we utilized an Arduino with an analog sensor to manipulate a feature in p5js based on the readings. We opted for an ultrasonic sensor to achieve this, where the data obtained was utilized to shift an ellipse along its horizontal axis in p5js.

Code P5js:

//declare variables for the dimensions and coordinates of ellipse
let ellipseXcord;
let ellipseYcord;
let ellipseRadius;

function setup()
{
createCanvas(500, 500); //create canvas
background(100);
textDisplay();
//set the initial ellipse to be in the centre
ellipseXcord = width/2;
ellipseYcord = height/2;
ellipseRadius = height/10;
}

//displays this text in the starting
function textDisplay()
{
text("PRESS ANY KEY TO START SERIAL PORT", width/2 - 109, height/2 - 5);
}

function draw()
{
background(220);
if (serialActive) //if the serial is active
{
ellipse(ellipseXcord, ellipseYcord, ellipseRadius, ellipseRadius); //then keep changing the coordinates of ellipse bases on ellipseXcord
}
else //if the serial is not active
{
textDisplay(); //then display the text with instructions
}
}

function readSerial(data) //call back function
{
if (data != null) //if the data received is not null
{
ellipseXcord = map(data, 300, 1500, ellipseRadius, width - ellipseRadius); //map the value of the data and then update the variable
//do it with ellipse radius because dont want half the circle off the screen
}
}

function keyPressed() //if any key is pressed, then set up serial
{
setUpSerial();
}

Code Arduino:
const int pingPin = 2; //Trigger Pin of Ultrasonic Sensor
const int echoPin = 3; //Echo Pin of Ultrasonic Sensor
long distance = 0; //will contain the distance of the object

void setup() {
//Start serial communication at 9600 baud
Serial.begin(9600);

//Set the ultrasonic sensor pins as output and input respectively
pinMode(pingPin, OUTPUT);
pinMode(echoPin, INPUT);
}

void loop() {
//Send a short low pulse
digitalWrite(pingPin, LOW);
delay(2); //delay to avoid complications
digitalWrite(pingPin, HIGH); //sends a high pulse for 10 microseconds
delay(10);
digitalWrite(pingPin, LOW); //turn off the ping pin
distance = pulseIn(echoPin, HIGH); //Measure the duration of the ultrasonic pulse and calculate the distance
Serial.println(distance); //print it in the serial (P5js)
}

Exercise 2

In this particular exercise, the primary objective was to control the LEDs on an Arduino board through p5js code. The process involved utilizing the left and right arrow keys, which functioned as input devices to alter the brightness of the bulb.

Code P5js:
let dimnessCounter = 0; //this will control the brightness and dimness of the LED

function setup()
{
createCanvas(400, 400); //create canvas
}

function textDisplay() //display text in the starting
{
text("PRESS SPACE TO START SERIAL PORT", width/2 - 109, height/2 - 5);
}

function draw()
{

background(100); //grey background

if (serialActive) //if serial is active
{
text("CONNECTED!", width/2 - 27, height/2 - 5); //tell the user that it is connected
text("PRESS RIGHT ARROW TO LOWER BRIGHTNESS!", width/2 - 130, height/2 + 15); //give instructions on how to control brightness
}
else
{
textDisplay(); //display instructions on how to start serial is not active
}
}

function keyPressed() //built in function
{
if (key == " ") //if space is pressed then
{
setUpSerial(); //setup the serial
}
else if (keyCode == LEFT_ARROW) //if left arrow pressed
{
if (dimnessCounter != 0) //check if brightness is not already at the lowest
{
dimnessCounter = dimnessCounter - 50; //if not then decrease by 50
}
}
else if (keyCode == RIGHT_ARROW) //for the right key
{
if (dimnessCounter != 250) //check if dimness not at the maximum
{
dimnessCounter = dimnessCounter + 50; //increase dimness by 50
}
}

}

//callback function
function readSerial(data)
{
let sendToArduino = dimnessCounter + "\n"; //add the next line to dimness counter
writeSerial(sendToArduino); //write serial and send to arduino
}

Code Arduino:
//declare variables
const int LED_PIN = 5;
int dimness = 0; //contains the dimness fothe LED

void setup()
{
Serial.begin(9600); // Start serial communication at 9600 baud

pinMode(LED_PIN, OUTPUT); //declare pin to be output

while (Serial.available() <= 0)
{
Serial.println("CONNECTION ESTABLISHED"); // send a starting message
}
}
void loop()
{
//wait for p5 to do something
while (Serial.available()) //when serial is available
{
dimness = Serial.parseInt(); //parse the dimness from the serial to the variable
Serial.println(dimness); //checking purposes

if (Serial.read() == '\n') //since the "\n" would be present in the serial, read that and
{
analogWrite(LED_PIN, dimness); //write it to the LED
}
}
}

Exercise 3

In this exercise, we were tasked with creating an interactive p5js program that simulates a bouncing ball, which changes direction based on a variable called ‘wind.’ The ball bounces on the floor and we needed to detect when it hit the floor, so we could turn an LED on. For the second part of this exercise, we used an analog sensor (ultrasonic sensor) to control the wind variable. We set a default value in which the ball would stay in the middle of the screen. When the sensor is moved to the right from the center, the ball would move to the right, and when moved to the left, the ball would move to the left.

Code P5js:
//declare variables
let velocity;
let gravity;
let position;
let acceleration;
let wind;
let drag = 0.99;
let mass = 50;
let LEDvalue = 1401;
let goRight = 0;
let goLeft = 0;
let first

function setup() {
createCanvas(1000, 360); //create canvas
noFill();
position = createVector(width/2, 0);
velocity = createVector(0,0);
acceleration = createVector(0,0);
gravity = createVector(0, 0.5*mass);
wind = createVector(0,0);
}

function textDisplay()
{
text("PRESS SPACE TO START SERIAL PORT", width/2 - 109, height/2 - 5); //display the appropriate text in the start
}

function draw() {
background(255);
if (serialActive) //if the serial is active
{
applyForce(wind);
applyForce(gravity);
velocity.add(acceleration);
velocity.mult(drag);
position.add(velocity);
acceleration.mult(0);
ellipse(position.x,position.y,mass,mass);
if (position.y > height-mass/2) //if the ball touches the bottom
{
velocity.y *= -0.9; // A little dampening when hitting the bottom
position.y = height-mass/2;
LEDvalue = 1401; //take LED value to be 1401 because we dont want the value (1) to be lurking in the serial and then affecting the wind values

}
else
{
LEDvalue = 1400; //when the LED is off
}

}
else
{
fill(0);
textDisplay();
}
}

function applyForce(force){
// Newton's 2nd law: F = M * A
// or A = F / M
let f = p5.Vector.div(force, mass);
acceleration.add(f);
}

function keyPressed(){
if (key==' '){ //if space is pressed, then serial is set up
setUpSerial();
}

if (keyCode == DOWN_ARROW) //if down arrow is pressed
{
//mass etc is changed
mass=random(15,80);
position.y=-mass;
velocity.mult(0);
}
}

function readSerial(data) //call back function
{
let sendToArduino = LEDvalue + "\n"; //sends value of LED to Arduino with \n added
writeSerial(sendToArduino); //write to Arduino

if (data != null) //if the data is not null and something is received
{
console.log(data);
if (data > 1450) //if the distance is greater than 1450, then
{
wind.x = 1; //the ball/wind goes right
}
else if (data < 1350) //if the distance is less than 1350
{
wind.x = -1; //the ball/wind goes left
}
}
}

Code Arduino:
//declare variables
const int LED_PIN = 4;
int LEDvalue = 0; //will contain whether or not the LED should be on or off
int distance = 0; //will contain the distance by ultrasonic sensor
const int pingPin = 2; //Trigger Pin of Ultrasonic Sensor
const int echoPin = 3; //Echo Pin of Ultrasonic Sensor

void setup()
{
Serial.begin(9600); // Start serial communication at 9600 baud

pinMode(LED_PIN, OUTPUT); //pin mode is output

//Set the ultrasonic sensor pins as output and input respectively
pinMode(pingPin, OUTPUT);
pinMode(echoPin, INPUT);

while (Serial.available() <= 0)
{
Serial.println(1400); //connection establishment. 1400 so that the wind values do not change
}
}

void loop()
{
//wait for p5js
while (Serial.available())
{
sensorReading(); //reads data from the sensor

LEDvalue = Serial.parseInt(); //parsing from the serial written data from p5js

if (LEDvalue == 1400) //if the LED value is 1400
{
digitalWrite(LED_PIN, LOW); //then turn off the LED
}
else if (LEDvalue == 1401) //if the LED value is 1401
{
digitalWrite(LED_PIN, HIGH); //then turn on the LED
}
}
}

//Function to read the ultrasonic sensor and measure distance
void sensorReading()
{
//Send a short low pulse
digitalWrite(pingPin, LOW);
delay(2); //delay to avoid complications
digitalWrite(pingPin, HIGH); //sends a high pulse for 10 microseconds
delay(10);
digitalWrite(pingPin, LOW); //turn off the ping pin
distance = pulseIn(echoPin, HIGH); //Measure the duration of the ultrasonic pulse and calculate the distance
Serial.println(distance); //print the serial from distance
}

Video:

Week 11 – Arduino and P5 + Final Project Concept

Exercises

Exercise 1

For exercise 1, we used a light sensor. As brightness of light in the surrounding was changed, the ball moved along the horizontal axis in p5. Higher the brightness, the farther right the ball moved.

The values from the light sensor roughly ranged between 0 and 500,000 so we mapped them between 0 and width of the screen and used the mapped value as x-coordinate of the ellipse

//Exercise 1 P5js Code

let ellipseX; // Variable to store ellipse's x-coordinate

function setup() {
  createCanvas(400, 400); // Create a canvas of 800x400 pixels
  ellipseX = width / 2; // Set initial x-coordinate of ellipse to middle of the screen
  noStroke(); // No stroke for the ellipse
}

function draw() {
  
  background(220); // Refresh background on each frame
  fill(255, 0, 0); // Set fill color to red
  ellipse(ellipseX, height / 2, 50, 50); // Draw ellipse at current x-coordinate and middle of the screen
  
  if (!serialActive) {
    text("Press Space Bar to select Serial Port", 20, 30);
  } else {
    text("Connected", 20, 30);}
}


function keyPressed() {
  if (key == " ") {
    // important to have in order to start the serial connection!!
    setUpSerial();
  }   
}

// this callback function
function readSerial(data) {
  ////////////////////////////////////
  //READ FROM ARDUINO HERE
  ////////////////////////////////////

  if (data != null) {
    // make sure there is actually a message
    // split the message
    console.log(data);
    console.log("fromArduino");
   
    let fromArduino = split(trim(data), ",");
    // if the right length, then proceed
    if (fromArduino.length == 1) {
      // only store values here
      // do everything with those values in the main draw loop
      console.log("working");
//values from light sensor roughly ranged between 0 and 500,000 so map them between 0 and width of the screen
//use the mapped value as x-coordinate of the ellipse
      ellipseX = map(data,0,500000, 0,width);
    }

    //////////////////////////////////
    //SEND TO ARDUINO HERE (handshake)
    //////////////////////////////////
   let sendToArduino = fromArduino + "\n";
   writeSerial(sendToArduino);
  }
}
//Exercise 1 Arduino Code 

void setup() {
  Serial.begin(9600); // Start serial communication at 9600 bps

  pinMode(LED_BUILTIN, OUTPUT);
// start the handshake
  while (Serial.available() <= 0) {
    //digitalWrite(LED_BUILTIN, HIGH); // on/blink while waiting for serial data
    Serial.println("0,0"); // send a starting message
    delay(300);            // wait 1/3 second
    //digitalWrite(LED_BUILTIN, LOW);
    delay(50);
  }
}
void loop() {

  // wait for data from p5 before doing something
    while (Serial.available()) {
    digitalWrite(LED_BUILTIN, HIGH); // led on while receiving data

  // Read sensor value
  int sensorValue = analogRead(A0);
   Serial.print(sensorValue);
  // Map sensor value to screen width (e.g. 0 to 800 pixels)
  int screenValue = map(sensorValue, 0, 1023, 0, 800);

  // Send mapped value to p5.js
  Serial.println(screenValue);

  delay(50); //    for stability
}
digitalWrite(LED_BUILTIN, LOW);
}

Exercise 2

For this exercise, we used a slider in p5 to control brightness of the LED. Value of slider ranged between 0 and 255 and these values were sent to Arduino and used as brightness for the LED.

//Exercise 2 P5js Code

let slider;
function setup() {
   createCanvas(400, 400); // Create a canvas of 800x400 pixels
  slider = createSlider(0, 255, 0);
  slider.position(160,height/2); // Set the position of the slider
  slider.style('width', '80px'); // Set the width of the slider
 
  
  noStroke(); // No stroke for the ellipse
}

function draw() {
  
  background(255); // Refresh background on each frame
  
  if (!serialActive) {
    text("Press Space Bar to select Serial Port", 20, 30);
  } else {
    text("Connected", 20, 30);}
}


function keyPressed() {
  if (key == " ") {
    // important to have in order to start the serial connection!!
    setUpSerial();
  }   
}

// this callback function
function readSerial(data) {
    ////////////////////////////////////
    //READ FROM ARDUINO HERE
    ////////////////////////////////////

    //////////////////////////////////
    //SEND TO ARDUINO HERE (handshake)
    //////////////////////////////////
    console.log(slider.value());
    let sendToArduino = slider.value() + "\n";
    writeSerial(sendToArduino);
  
}
//Exercise 2 Arduino Code

const int ledPin =3;
int brightness = 0;
void setup() {
  Serial.begin(9600); // Start serial communication at 9600 bps

  pinMode(LED_BUILTIN, OUTPUT);
  pinMode(ledPin, OUTPUT);
// start the handshake
  while (Serial.available() <= 0) {
    digitalWrite(LED_BUILTIN, HIGH); // on/blink while waiting for serial data
    Serial.println("0,0"); // send a starting message
    delay(300);            // wait 1/3 second
  }
}
void loop() 
{
  // wait for data from p5 before doing something
    while (Serial.available()) 
    {
    digitalWrite(LED_BUILTIN, HIGH); // led on while receiving data
    int brightness = Serial.parseInt(); //get slider value from p5
    Serial.println(brightness); //just to view the value
    
     if (Serial.read() == '\n') {
       analogWrite(ledPin, brightness); //set brightness of LED
     
      }else
      {
        digitalWrite(LED_BUILTIN, HIGH);
      }
    }
}

Exercise 3

For this exercise, we used a potentiometer to control the wind. The potentiometer’s values ranged between 0 and 1023. So, for any value less than 500, wind moved the ball forward/wind blew to right. We added this layer that if value was between 500 and 600, wind stopped so the ball stopped. Finally, if value was above 600, wind blew in opposite direction moving the ball in the opposite direction.

For LED part, we used a flag called heightOfBall. Whenever ball touched the ground, this flag was set to zero. Otherwise, it was set to one. This was sent to Arduino to check whenever ball bounced. When this happened, LED would be turned on. Otherwise it would be turned off.

//Exercise 3 P5js Code

let velocity;
let gravity;
let position;
let acceleration;
let wind;
let drag = 0.99;
let mass = 50;
let heightOfBall = 0;

function setup() {
  createCanvas(640, 360); // Create a canvas of 800x400 pixels
 
  noFill();
  position = createVector(width/2, 0);
  velocity = createVector(0,0);
  acceleration = createVector(0,0);
  gravity = createVector(0, 0.5*mass);
  wind = createVector(0,0); 
}

function draw() {
  background(215);
  fill(0);
  
  if (!serialActive) {
    text("Press Space Bar to select Serial Port", 20, 30);
  } else 
  {
    text("Connected. Press s to jump.", 20, 30);
  
  applyForce(wind);
  applyForce(gravity);
  velocity.add(acceleration);
  velocity.mult(drag);
  position.add(velocity);
  acceleration.mult(0);
  ellipse(position.x,position.y,mass,mass);
  //heightOfBall set to zero whenever ball is touching the ground. Otherwise it is set to 1.
  if (position.y > height-mass/2) {
      velocity.y *= -0.9;  // A little dampening when hitting the bottom
      position.y = height-mass/2;
    heightOfBall = 0;
    } else {
      heightOfBall = 1;
    }
  }
}
function applyForce(force){
  // Newton's 2nd law: F = M * A
  // or A = F / M
  let f = p5.Vector.div(force, mass);
  acceleration.add(f);
}

function keyPressed() {
  if (key == " ") {
    // important to have in order to start the serial connection!!
    setUpSerial();
  }   
  else if (key=='s'){
    mass=random(15,80);
    position.y=-mass;
    velocity.mult(0);
  }
}

// this callback function
function readSerial(data) {
    ////////////////////////////////////
    //READ FROM ARDUINO HERE
    ////////////////////////////////////
  
     if (data != null) {
    // make sure there is actually a message
    
    let fromArduino = split(trim(data), ",");
    
       // if the right length, then proceed
    if (fromArduino.length == 1) {
//sensor value is the input from potentiometer
      let sensorVal = int(fromArduino[0]);
      console.log("Sensor value: ")
      console.log(sensorVal);

//sensor values range between 0 and 1023
//for any sensor value less than 500, make wind move ball forward/wind blows to right
      if (sensorVal <500){
        wind.x=1
      }
//if sensorVal between 500 and 600, wind stops so ball stops
      else if(sensorVal >=500 && sensorVal < 600){
        wind.x = 0
      }
//if sensorVal over 600, wind blows in opposite direction moving ball to left
      else {
        wind.x =-1
      }
          //////////////////////////////////
          //SEND TO ARDUINO HERE (handshake)
          //////////////////////////////////
    }

//send heightOfBall to arduino to indicate if ball is on the floor or not
    let sendToArduino = heightOfBall  + "\n";
    writeSerial(sendToArduino);
  }
}

Arduino

//Exercise 3 Arduino code

const int poten_pin = A0;
const int ledPin =3;

void setup() {

  Serial.begin(9600); // Start serial communication at 9600 bps
  pinMode(LED_BUILTIN, OUTPUT);
  pinMode(ledPin, OUTPUT);
  pinMode(poten_pin, INPUT);

  // start the handshake
  while (Serial.available() <= 0) {
    digitalWrite(LED_BUILTIN, HIGH); // on/blink while waiting for serial data
    Serial.println("0,0"); // send a starting message
    delay(300);            // wait 1/3 second
    digitalWrite(LED_BUILTIN, LOW); 
    delay(50);
  }
}
void loop() 
{
  // wait for data from p5 before doing something
    while (Serial.available()) 
    {
      digitalWrite(LED_BUILTIN, HIGH);
      digitalWrite(ledPin, LOW);
//read the position of ball from p5
      int position = Serial.parseInt();
    
      if (Serial.read() == '\n') {
        // Read potentiometer value
      int sensorValue = analogRead(poten_pin);
      //send value to p5
      Serial.println(sensorValue);
      }
//if ball is touching the ground i.e. height is zero, turn LED on
      if (position == 0)
      {
        digitalWrite(ledPin, HIGH);
      }
      else{
        digitalWrite(ledPin, LOW);
      }
    }
      digitalWrite(LED_BUILTIN, LOW); 
    }


Video for Exercise 3:

Teammate: Mohid Raza

Final Project Proposal

For the final project, I am planning to make a musical instrument. While I do not have the exact image in mind, I want to use input from different sensors, for example touch and distance sensors, to allow user to control the music.

Elements:

  1. Live sketching/sound visualization on P5 screen using sensor input
  2. Sound control using sensor input
  3. Motor-controlled moving music record controlled by sensor input

other possible:

  • drawing options on p5 screen
  • sound options
  • buttons/LEDs

P5

The P5 screen will first present instructions on how to use the instrument. Once the experience begins, the screen will show a visualization of the music created using input from the sensors. This way, every user will, in a way, create an art piece that is theirs. So, not only can the user change their motion/touch to change the output sound but to also add something to their sketch. Also, P5 will have some buttons that, when pressed, will send output to Arduino – for example LEDs light up when Start button is pressed or if sensor value exceeds a threshold or maybe different tone/sound/volume options available on screen that will be used to change the output melody.

Arduino

For the Arduino end, as mentioned, sensors and buttons will be arranged in a box. I might integrate a motor as well that moves something, for example a music record, according to the sensor values.

Inspiration

Inspiration for the visualization for sound came from this really creative website: https://patatap.com/.

One instrument that inspired me to want to use distance sensors is a Theremin that is a non-contact instrument. I find the instrument both fascinating and beautiful and I would love to create something close to it.

Ennio Morricone - The Ecstasy of Gold - Theremin & Voice - YouTube

Final Project Proposal

Concept

For the final project, me and Sanjana are thinking of creating a Virtual Fruit Ninja. We want to take the concept of this mobile game to the next level by creating an immersive and interactive game experience allowing players to slice fruits virtually with their hands! The following project and our love for the game fruit ninja is the inspiration for this project: (https://naziafakhruddin.medium.com/gesture-controlled-flower-art-with-ml5-js-posenet-and-p5-js-61b98fa3fc68)

For this project, we are thinking of using the ml5 library, built on top of Tensor.js, and the PoseNet function to accurately track the position of the player’s hand in real time through the camera video. The goal is to create a seamless integration between the player’s hand movements and a virtual sword or blade in the game, simulating the experience of slicing real fruits with a knife.

The game mechanics will be intuitive and engaging. Players can wave their hands across the screen to slice the fruits as they appear, and the PoseNet function will accurately track their hand movements in real time, providing precise and responsive slicing actions. We will also leverage p5.js to create visually appealing graphics and animations, creating an engaging game environment that enhances the overall gameplay experience.

Challenge

One of the main challenges of this project will be optimizing the game’s performance to ensure smooth gameplay and minimize latency. We will need to carefully understand the output of the PoseNet model and use the information to update the virtual sword’s position and orientation in real-time.

Final Project Preliminary Concept – Experience Nature Through Arduino & P5JS

Concept

The inspiration for this idea came from the different colored LEDs included in our kits. I saw each representing a different element/object in nature (blue-water, red-fire, yellow-sun, green-earth/plants), and I delved deeper into that to develop my idea. I would like to create a system in which the user can interact with the Arduino and see on the screen and on the Arduino their interaction with ‘nature’. Similarly to my midterm project, “Zen Garden”, I find nature to be very relaxing and an important component of life – and technology somewhat draws us away from nature by taking up a lot of what could potentially be ‘outdoors time’. This is my way of once again bringing nature to the technology.

Implementation

For the implementation, I intend to have a switch to switch between the different elements – or 4 switches so the used chooses which element they would like. P5js will show simulations of rain for water, fire, leaves falling off a tree for plants, and the sun and its rays for the sun. To create a slightly more immersive feel, I will use the RGB LED which will light up in the appropriate color, and animate dimness and brightness according to what is on the screen. Furthermore, there will be a potentiometer with which the user can control a different magnitude for each element. For water – the amount of raindrops, for fire – how large the fire is, for plants – the wind direction in which leaves fall, and for the sun – the number of sun rays shown.