Musical Instrument: Light Sensitive Tabla

Idea:

Khadija and I created a unique version of the tabla, a pair of hand drums commonly used in traditional South Asian music.

The Tabla: Paired Drum of South Asia - Center for World Music

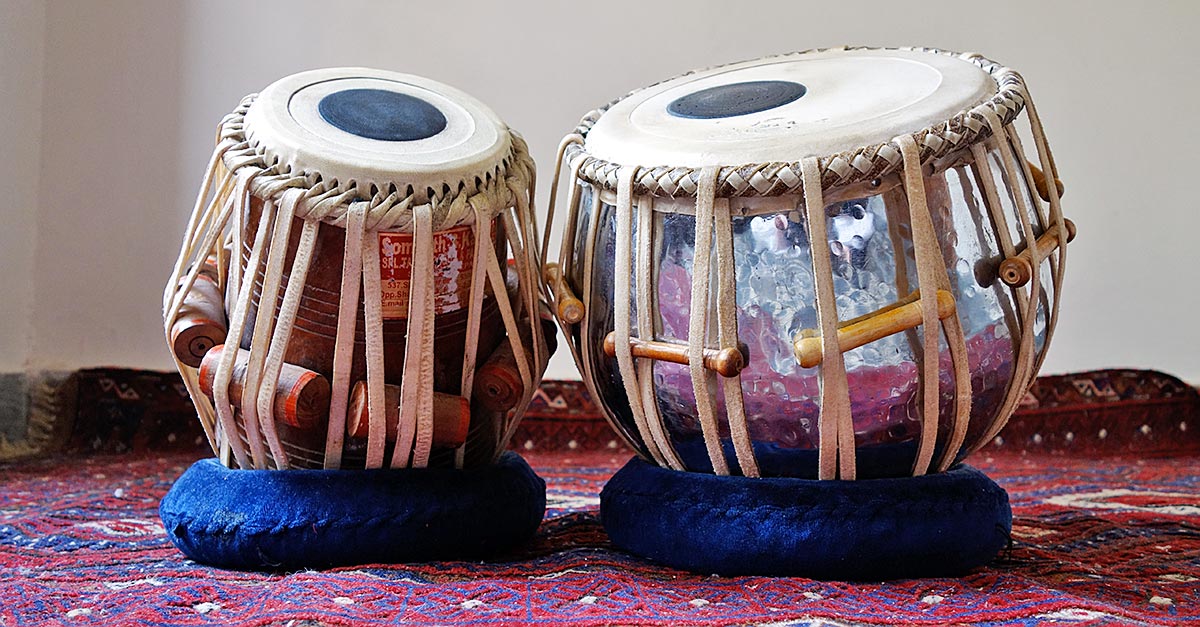
Initially, we thought of recreating the same instrument with the use of pressure sensor resistors but then we decided to make it light-sensitive. Our vision was to make the tabla come alive with an ethereal quality, allowing it to be played not by hand, but by the interaction of light. It was an interesting and fun project that resulted in a unique musical instrument.

Code:

#include "pitches.h"

//==========First resistor=============
int photoPin1 = A0;
int speakerpin = 7;

int melody[] = {

  NOTE_G4, NOTE_A4, NOTE_G4, NOTE_F4, NOTE_D4, NOTE_F4, NOTE_G4,
  NOTE_G4, NOTE_A4, NOTE_G4, NOTE_E4, NOTE_D4, NOTE_E4, NOTE_F4,
  NOTE_F4, NOTE_G4, NOTE_F4, NOTE_D4, NOTE_C4, NOTE_D4, NOTE_E4,
  NOTE_E4, NOTE_F4, NOTE_E4, NOTE_D4, NOTE_C4, NOTE_D4, NOTE_E4,
  NOTE_G4, NOTE_G4, NOTE_G4, NOTE_A4, NOTE_G4, NOTE_F4, NOTE_D4, NOTE_D4
};
//==========Second resistor=============
int photoPin2 = A1;
int speakerpin2 = 4;
int melody2[] = {

  NOTE_G4, NOTE_F4, NOTE_D4, NOTE_G4, NOTE_D4, NOTE_F4, NOTE_G4,
  NOTE_G4, NOTE_D4, NOTE_E4, NOTE_G4, NOTE_C4, NOTE_E4, NOTE_G4,
  NOTE_G4, NOTE_G4, NOTE_F4, NOTE_A4, NOTE_G4, NOTE_D4, NOTE_D4,
  NOTE_E4, NOTE_E4, NOTE_A4, NOTE_F4, NOTE_E4, NOTE_C4, NOTE_F4,
  NOTE_G4, NOTE_F4, NOTE_G4, NOTE_A4, NOTE_D4, NOTE_E4, NOTE_D4, NOTE_F4
};

void setup() {
  pinMode(speakerpin, OUTPUT);
  Serial.begin(9600);
}

void loop() {
  //====================First Speaker
  int lightRaw = analogRead(photoPin1);

  int light = map(lightRaw, 0, 700, -12, 35);

  if (light > 0 && light<33) 
  {
    tone(speakerpin, melody[light], 500);
  }
  else if(light == 35 || light < 33){
    noTone(speakerpin);
  }
  //===================Second Speaker
  int lightRaw2 = analogRead(photoPin2);

  int light2 = map(lightRaw2, 0, 700, -12, 35);

  if (light2 > 0 && light2<33) 
  {
    tone(speakerpin2, melody2[light2], 500);
  }
  else if(light2 == 35 || light2 < 33){
    noTone(speakerpin2);
  }

}

Process:

Initially, we began the project by connecting a single light sensor to a speaker. The main challenge we encountered was mapping the readings from the light sensor to play the correct melody from an array of notes. During the process of setting these thresholds, we decided to make the instrument turn off in bright conditions and start playing sound when the light sensor was covered by a hand in dimmer conditions. This approach created a similar hand action to that of hitting the tabla with the hand, resulting in a more authentic and natural playing experience.

After the initial phase, we decided to expand our project by adding another light sensor to take readings of the surrounding light. However, we faced a challenge when we realized that the changes in light conditions on the two light sensors were not being accurately reflected by the single speaker we were using. To solve this issue, we decided to divide the instrument into two separate speakers, with each speaker connected to one light sensor individually. This allowed for more distinct and clear sound production based on the readings of each light sensor.
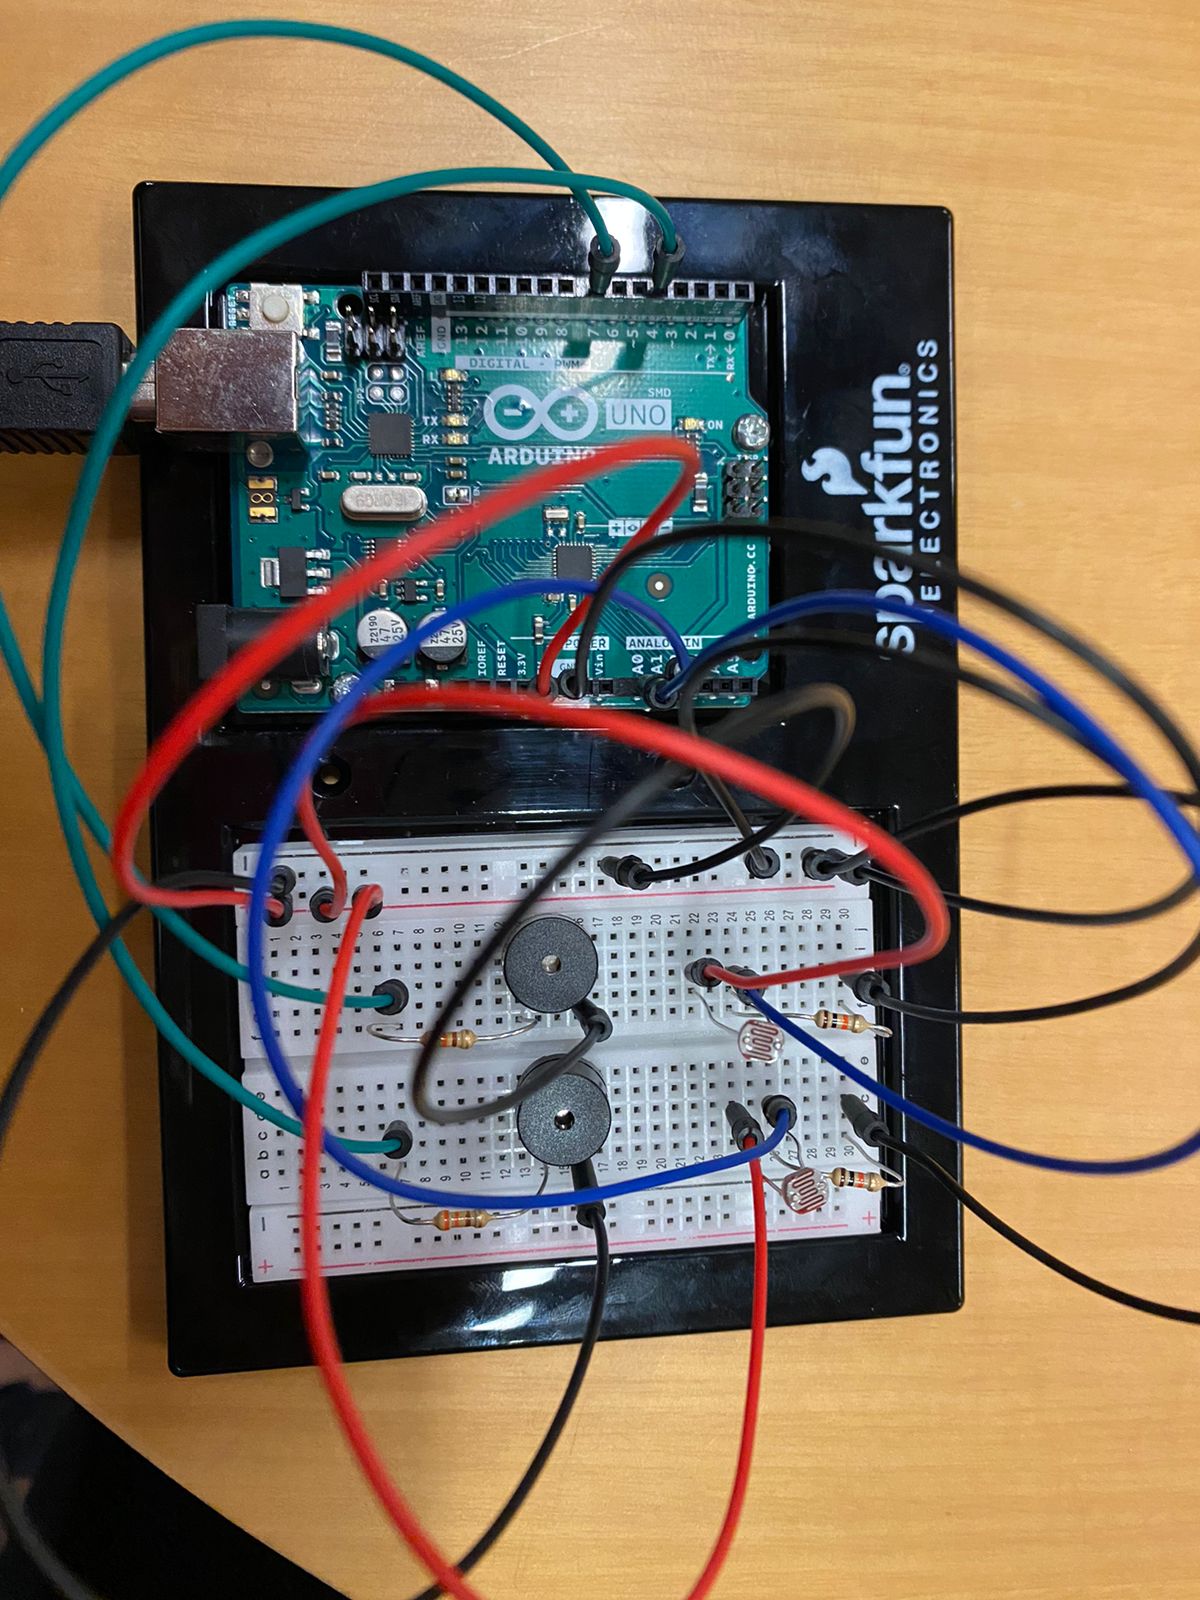
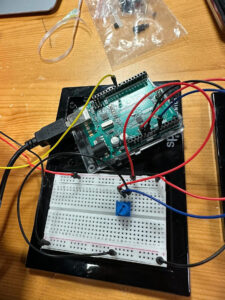
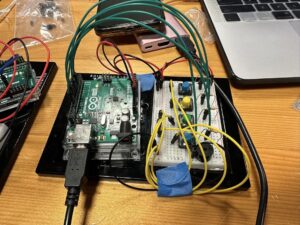
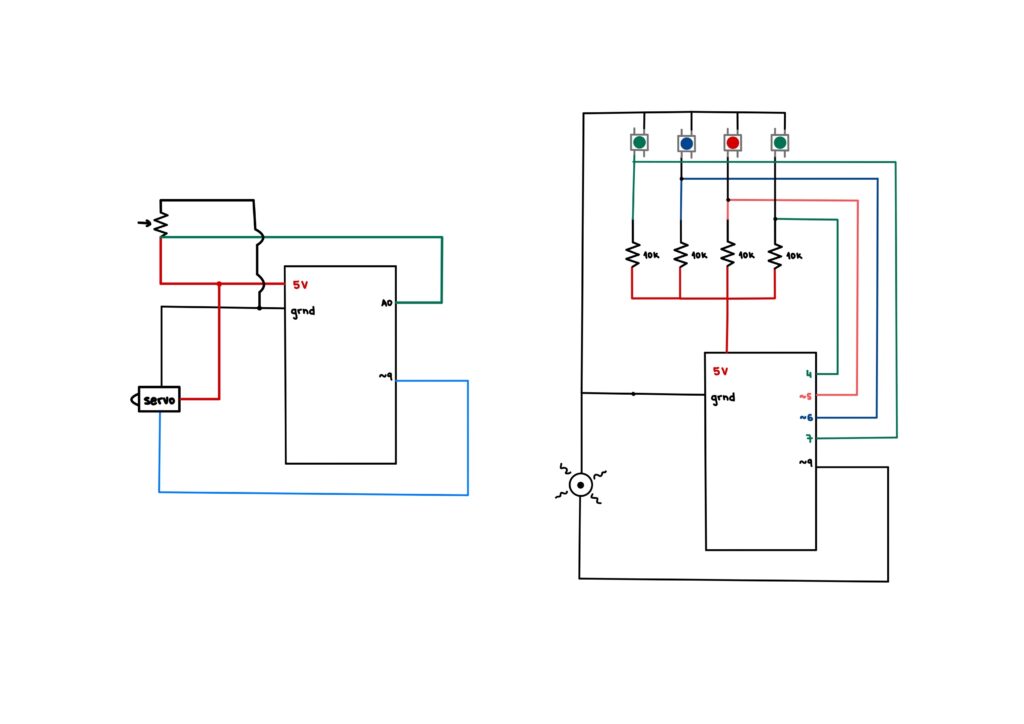
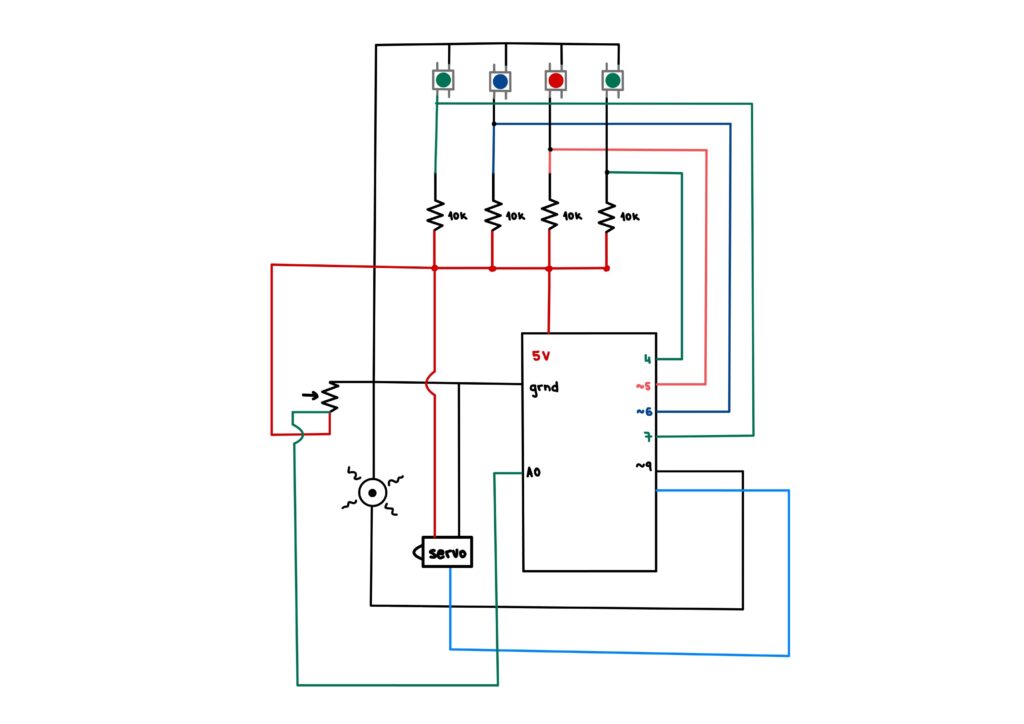
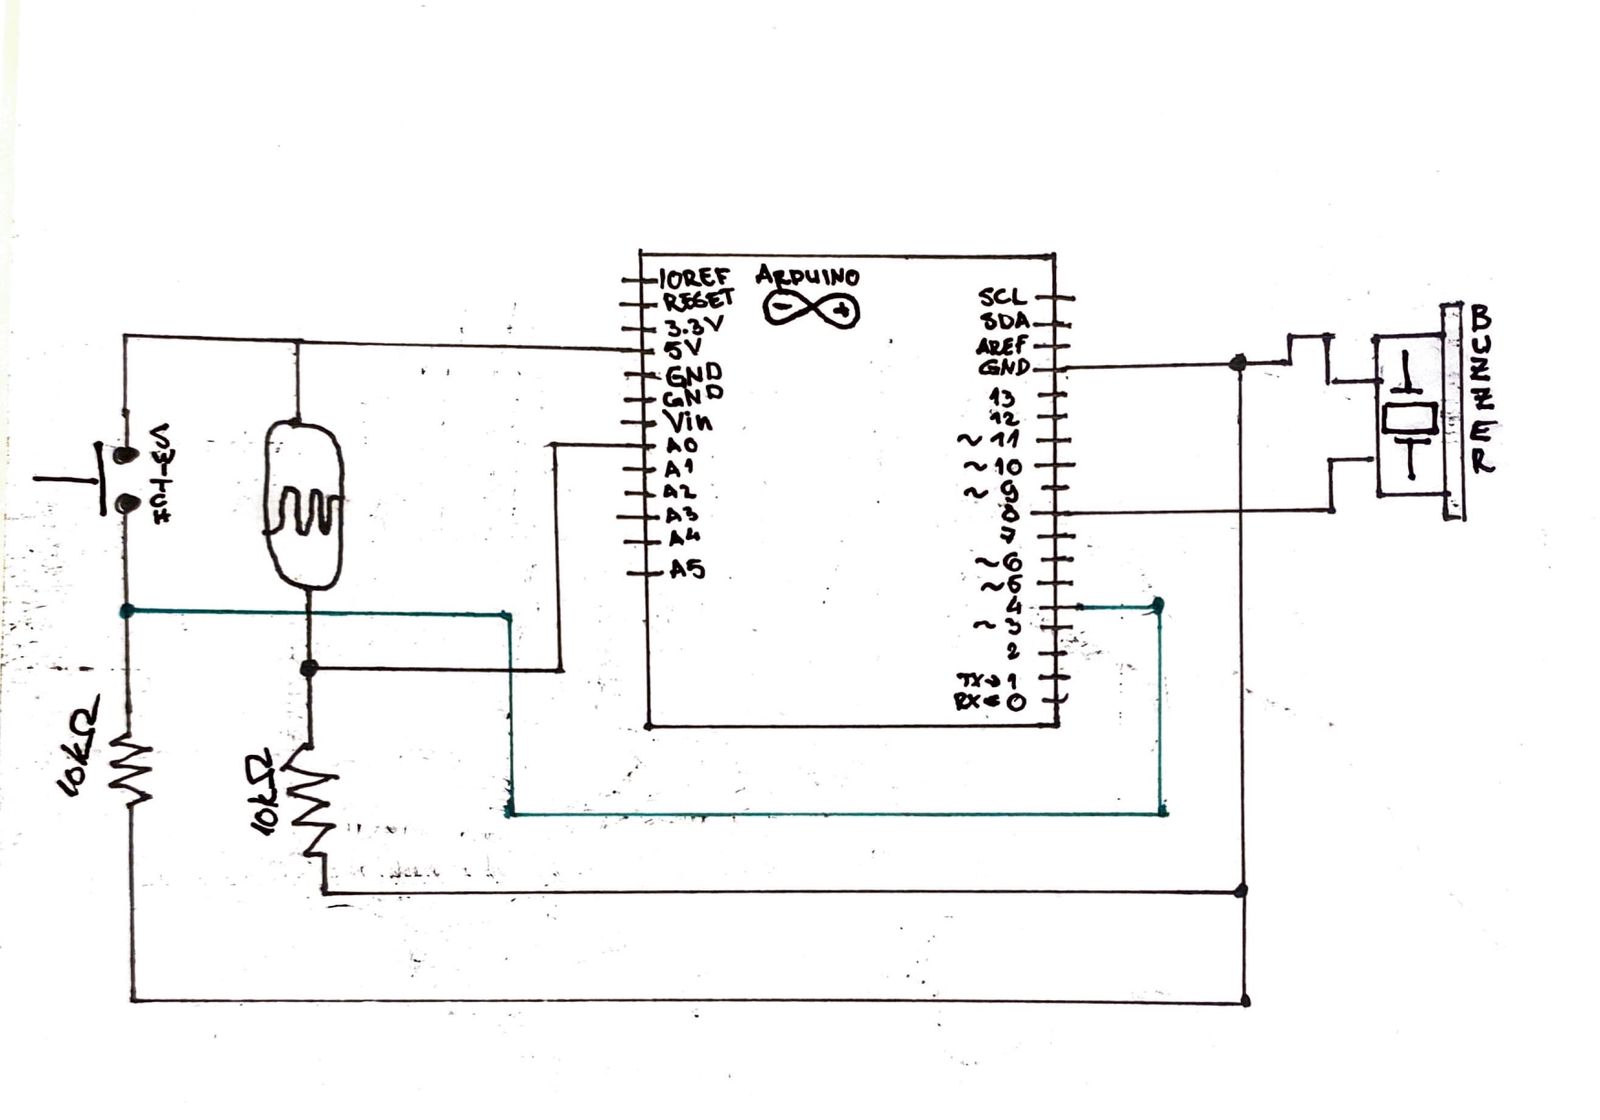
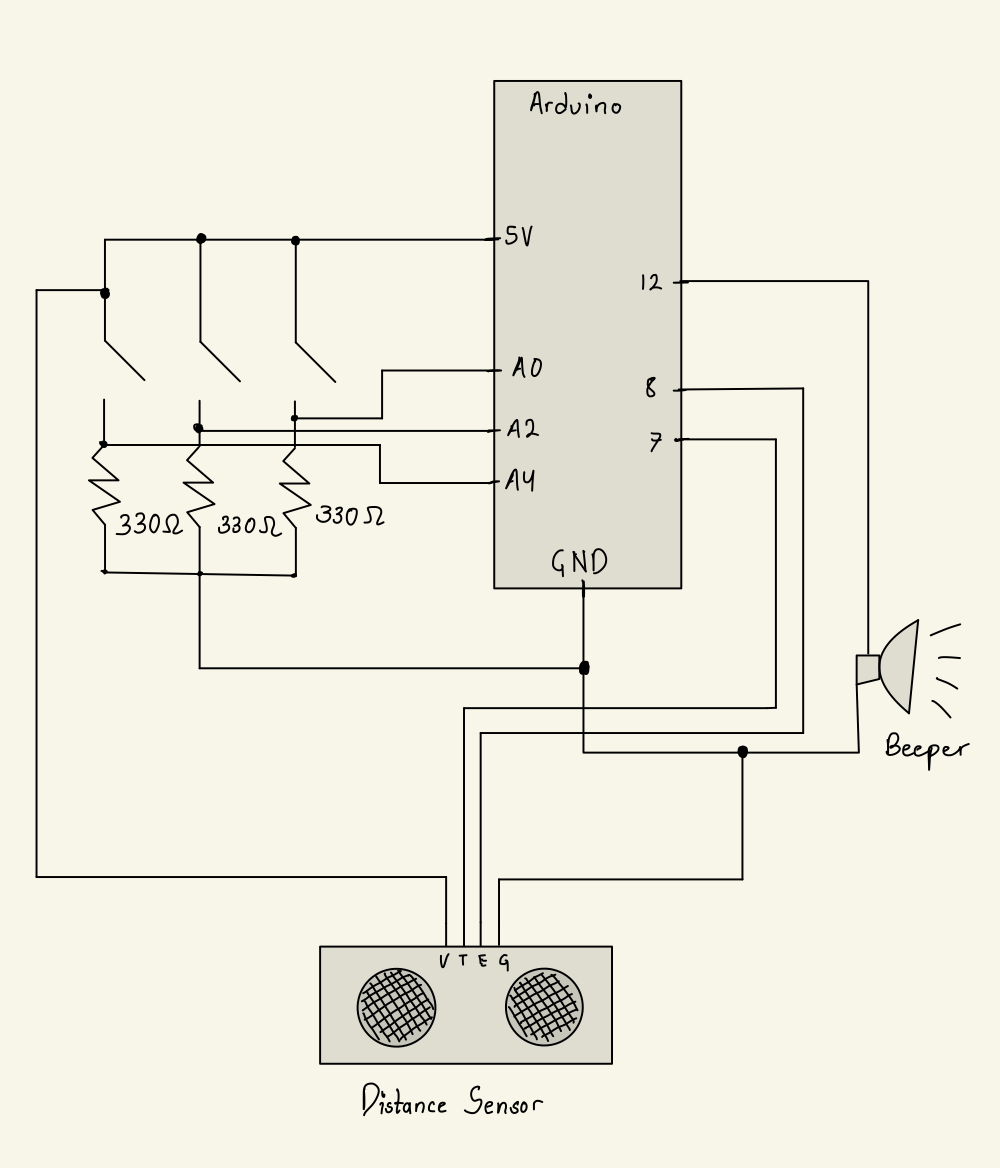
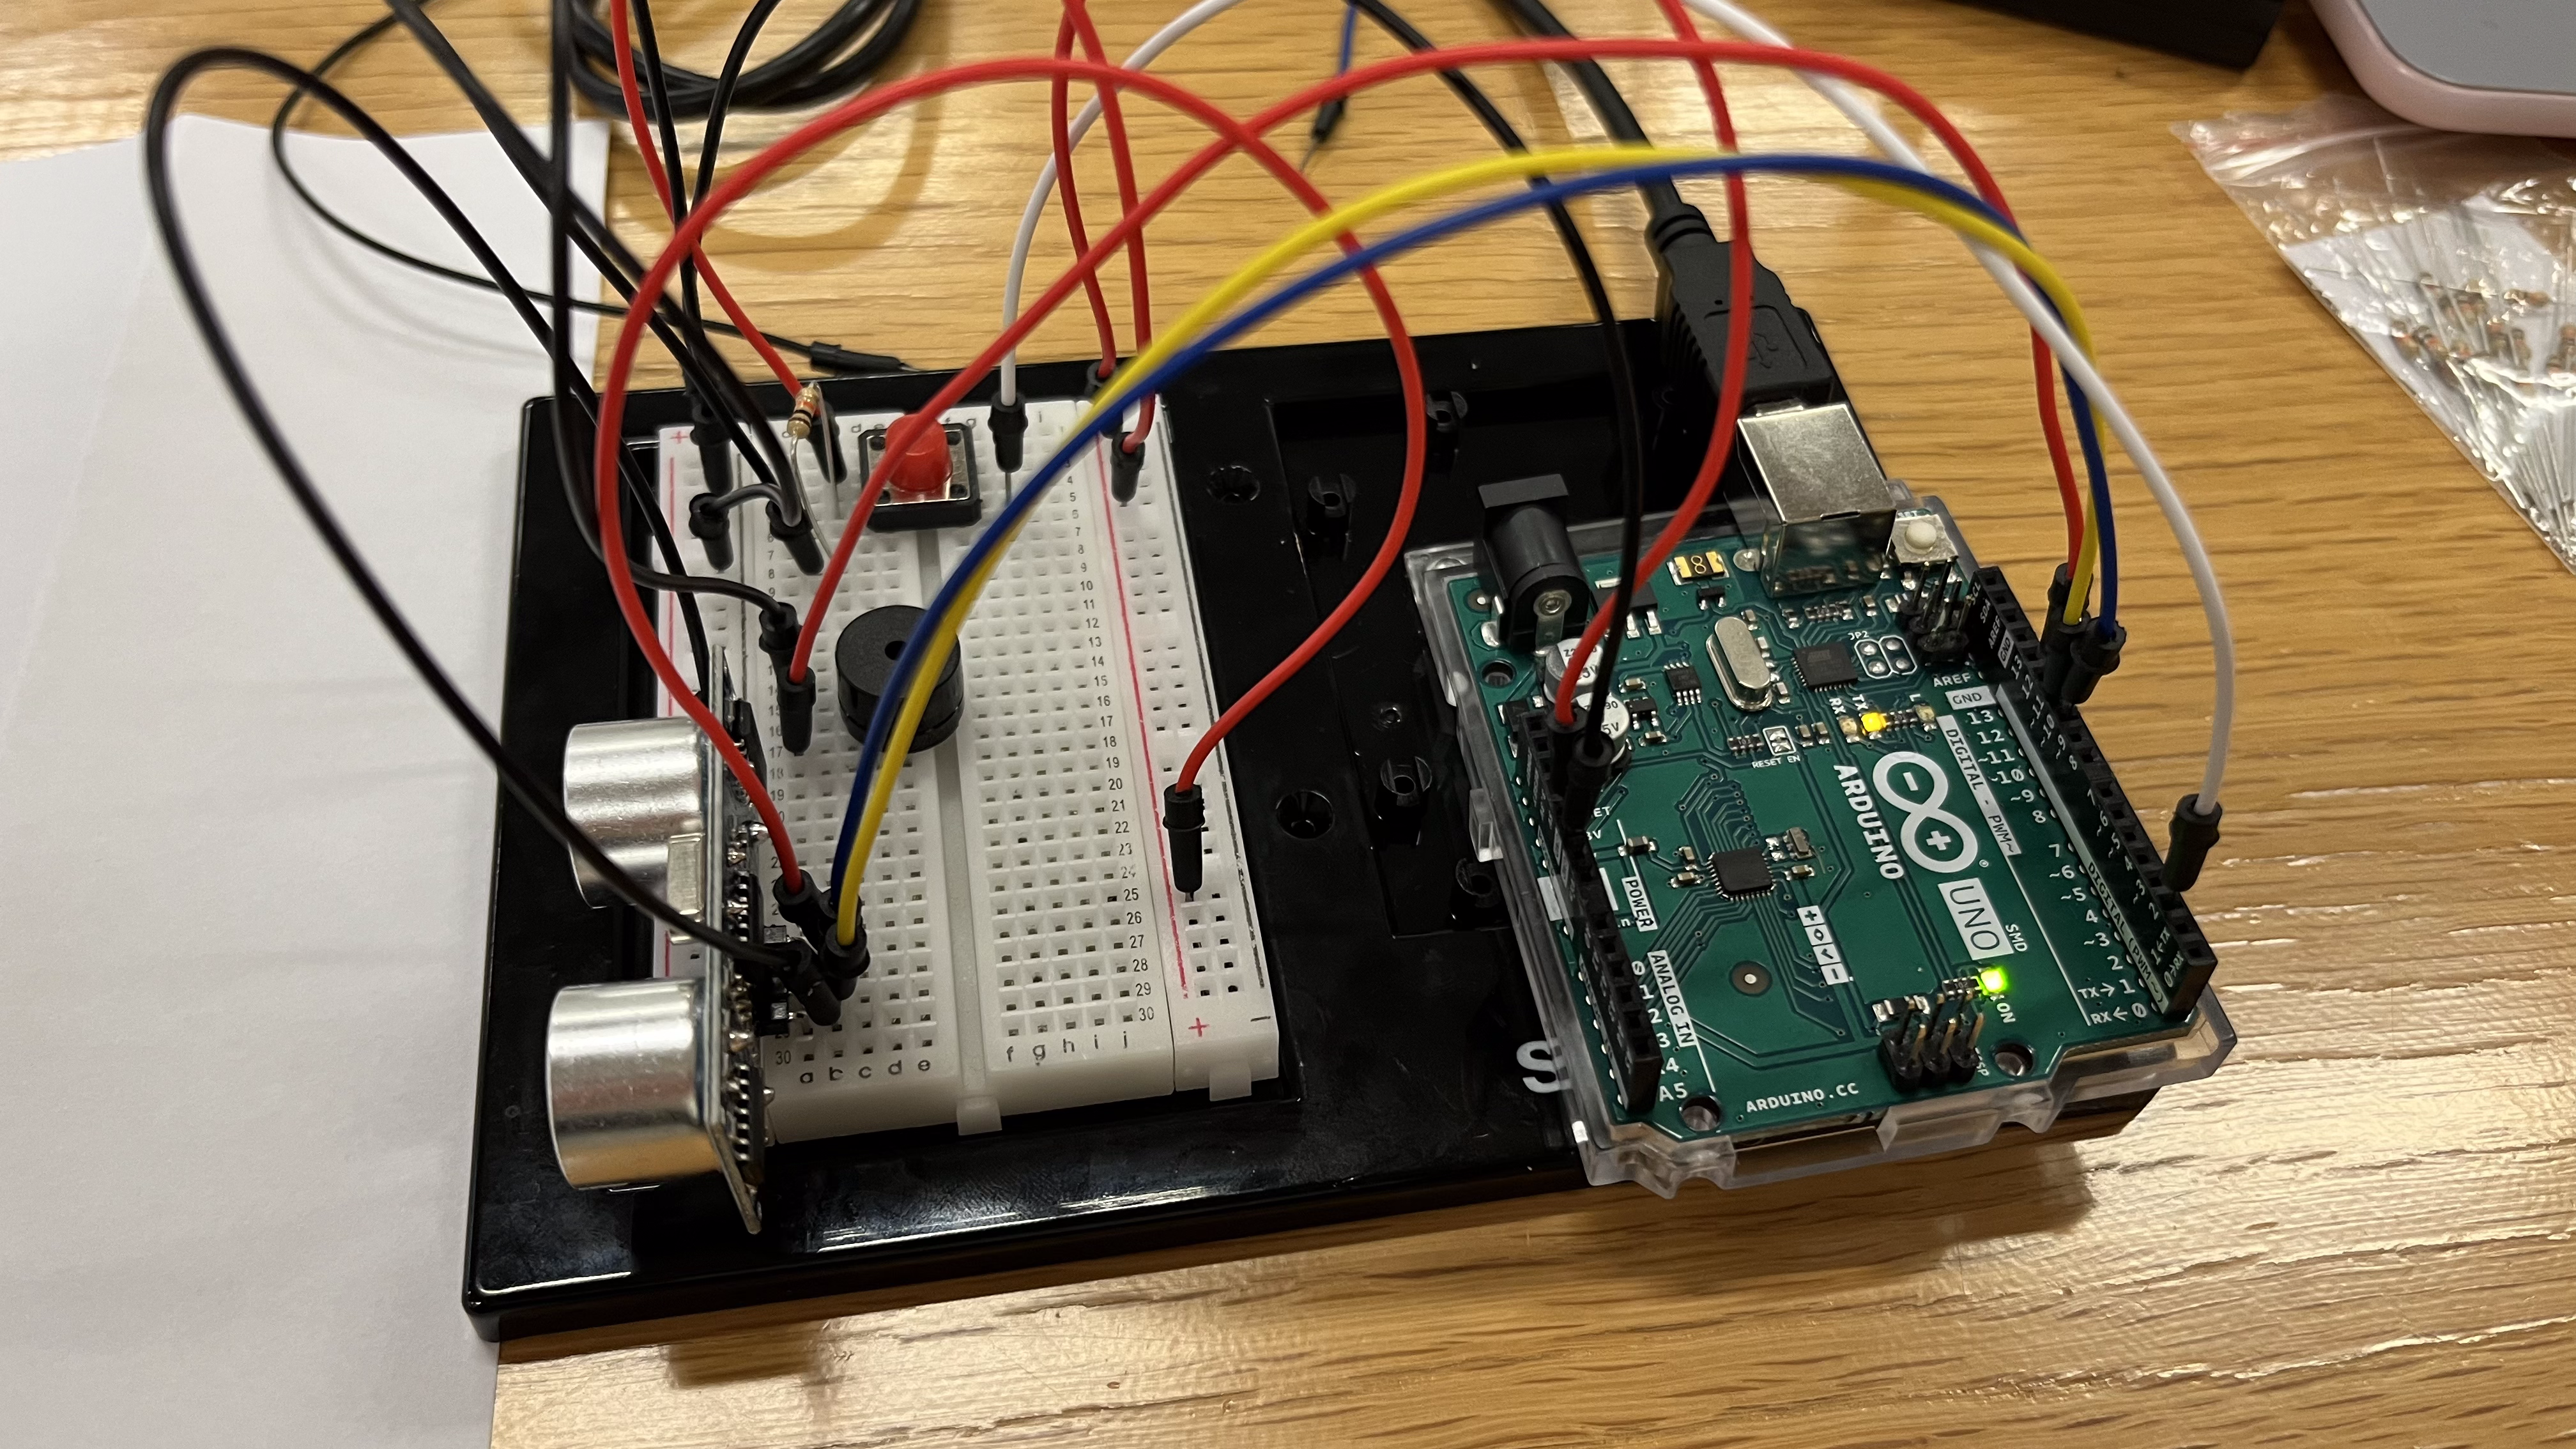
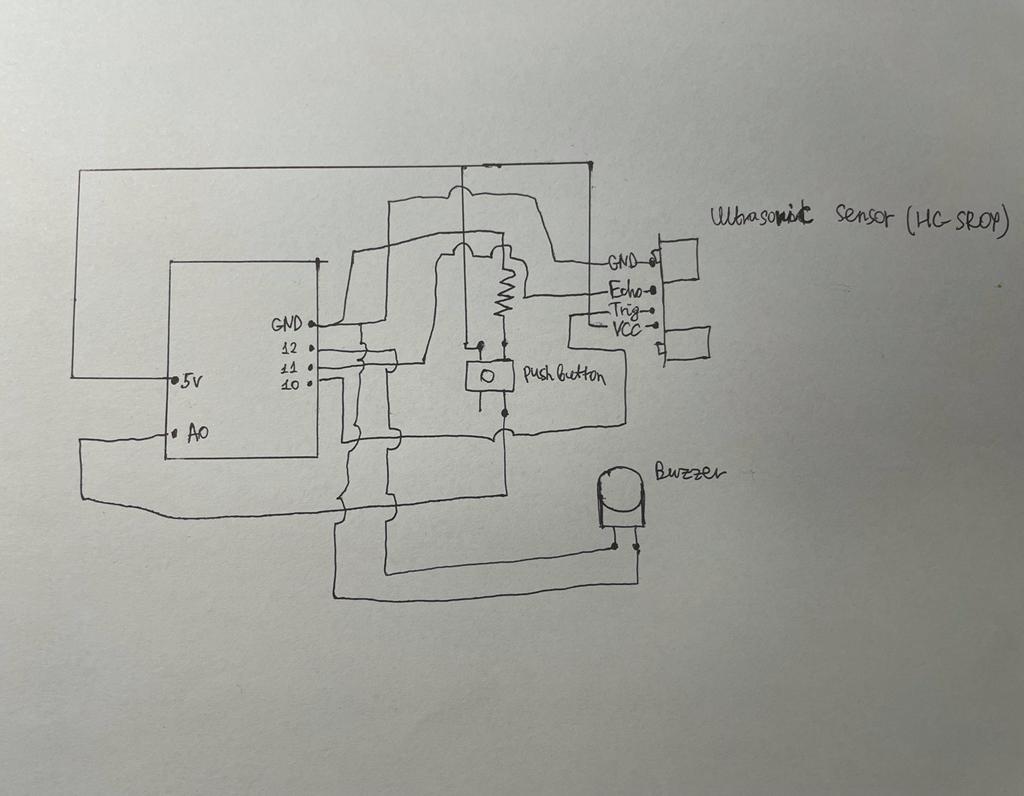
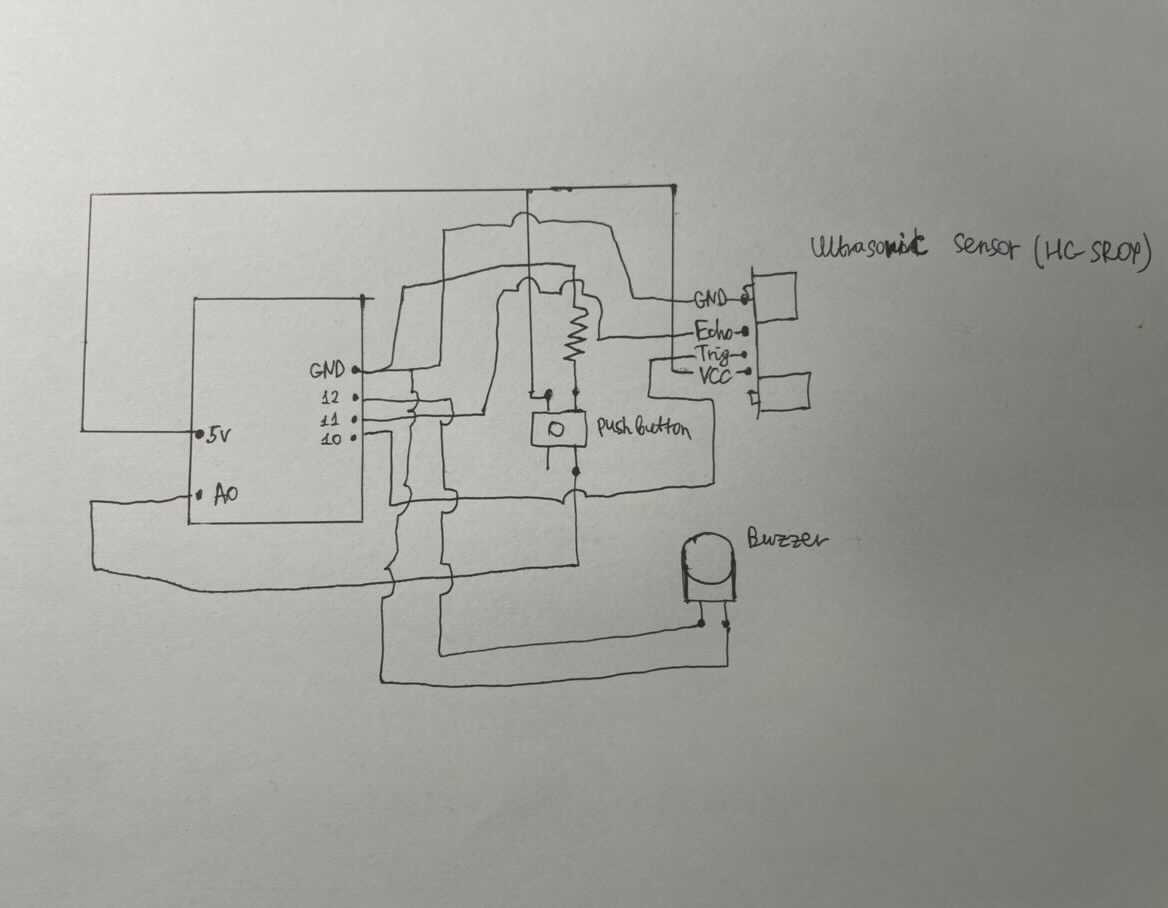
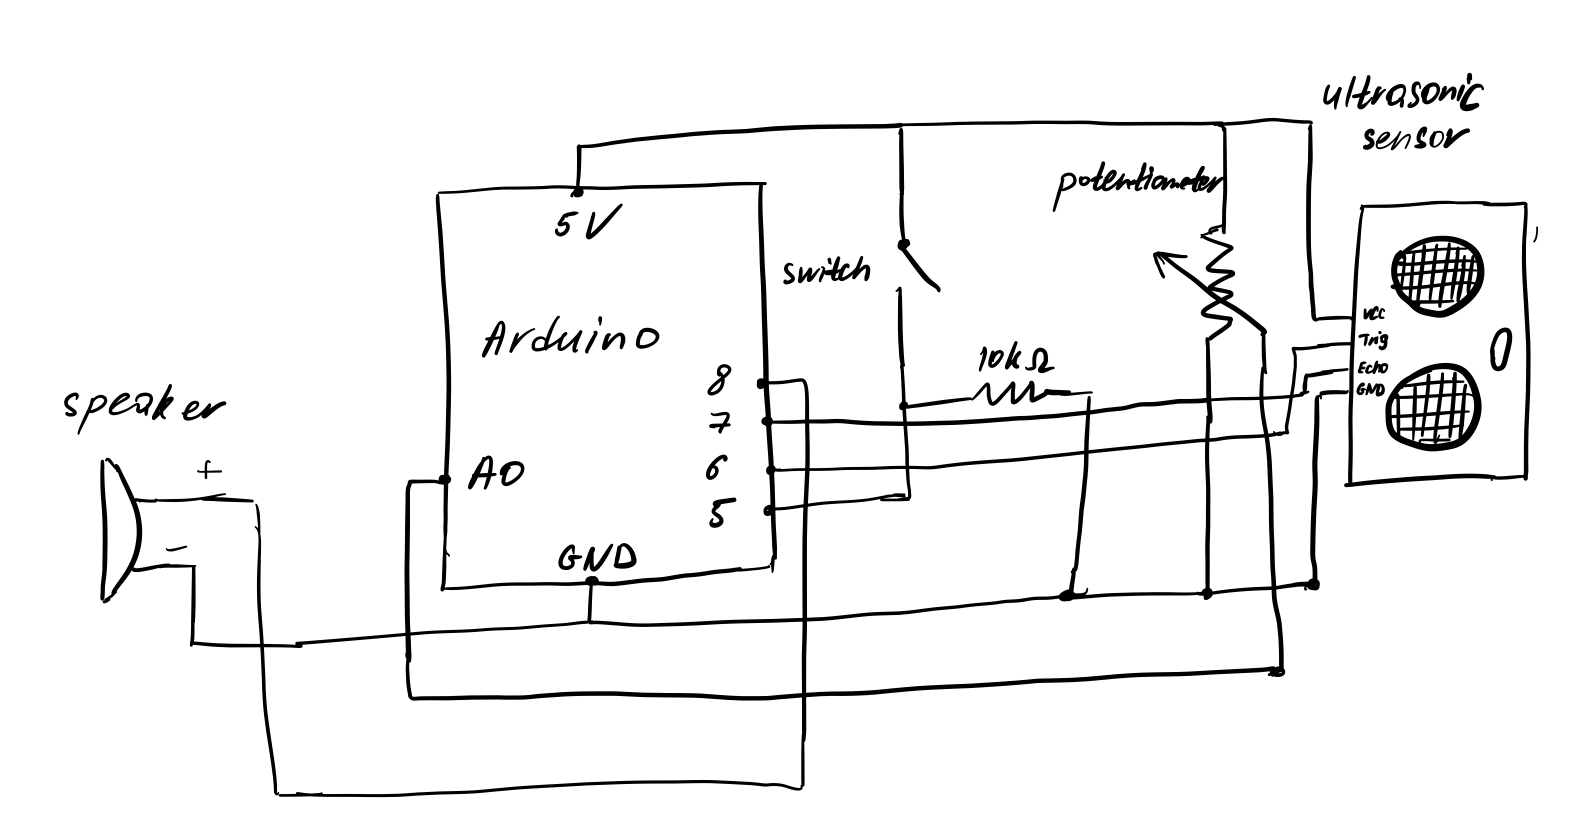
Circuit:

Demo:

Week 9 – Musical Instrument

by Ajla and Hana

Concept

This week’s assignment was to create a simple musical instrument using the Arduino. Hana and Ajla decided to create a simplified piano and drum. In order to do so, we utilized switches and a servo motor. We controlled the speed of the servo motor using a potentiometer. The notes are played by pressing the buttons. The buttons stop producing noise when released.

Implementation

To implement our musical instrument, we used a potentiometer, switches, a piezoelectric buzzer, resistors, wires and an Arduino. By connecting the switches in parallel we were able to preserve voltage across all components. Even though it was possible to connect everything on one breadboard, we decided to separate it in order to make the instrument user friendly. Furthermore, since many digital inputs were used, the separation ensured that there would not be any overcrowding while presenting the final product.The sketches below show both the two Arduino setup we used and one Arduino setup.

The code was written for both Arduino. Hana wrote the code for the switches and Ajla wrote the code for the drum. The drum was made using a metal screw, silk ribbon and tape which was attached to the servo hand. By pressing the four switches, notes, stored in an array, were played. The drum hit a piece of cardboard in order to produce noise.

Two Arduino
One Arduino

Here is the code for playing the notes:

// if button1 is pressed, playes first note
  if(button1State==1) {
    tone(9, notes[0]);
  }

// if button2 is pressed, playes second note

  if(button2State==1) {
    tone(9, notes[1]);
  }

// if button3 is pressed, playes third note

  if(button3State==1) {
    tone(9, notes[2]);
  }

// if button4 is pressed, playes fourth note

  if(button4State==1) {
    tone(9, notes[3]);
  }

// if buttons are release, no note is played

  if(button1State==0 && button2State==0  && button3State==0 && button4State==0) {
    noTone(9);
  }
  
  
  delay(1);  // delay in between reads for stability

Here is the code that ran the servo in a 90 degree range:

void loop() {
  int p_value  = analogRead(p_meter);

  int value = map(p_value, 0, 1024, 10, 20);
  for (int i=45; i<90; i += value) {
    pos1 = 0 + (i*2);          // servo1 from 0 to 90 degrees
    myservo1.write(pos1);      // move the servo
    delay(50);  
  }
 
  for (int i=45; i<90; i += value) {
    pos1 = 90 - i*2;           // servo1 from 90 to 0 degrees
    myservo1.write(pos1);      // move the servo
    delay(50);
  }
}

Challenges

The assignment came with a few challenges. Firstly, since the piezoelectric buzzer cannot take multiple inputs at once, it was important to play each note once, without pressing others since that would destroy the quality of the sound. Secondly, the notes play continuously if the button is pressed, even once. That is why we added the last if statement that checks whether all buttons are not pressed, in which case it plays no sound. Thirdly, the servo is quite tricky to use at high speeds. It gets more imprecise as the speed goes up. So, controlling it with the potentiometer was quite hard to do precisely. Lastly, since the angle of motion changes as the speed increases, it was hard to mount the servo on anything as it would immediately fall down once the speed was changed. This became quite frustrating that we decided to just hold the servo in the end to showcase the tempo of the “drum”. All in all, this assignment came with quite a few challenges. Some of them we tried to attempt and won, such as the notes, but some of them remain to be defeated due to the lack of time and materials we had at the time of making this project.

Reflection (Ajla)

I am not very musically inclined. That is why it was quite hard to come up with any ideas for this project and why I wish the theme was a bit more open. However, I have learned quite a bit by attempting this project. The servo, although precise at low speeds, is something that gave me quite a headache when connected to a potentiometer. Since it rotates only 180 degrees, there is a limited amount of freedom I had while working on it which is something I do not like as a Computer Science major. The code could not make up for its shortcomings and I became quite frustrated because of that. However, it is important to learn from such experiences and try again in the future. Although I finished this assignment, I plan to work with theservo more in the future such as to learn how to make up for the drawbacks of its hardware.

Week 10 – Light Theremin (Stefan and Arslan)

Concept:

For this assignment, we wanted to create a version “Theremin” that will be linked with the light sensor and will produce sound based on the light intensity received by the sensor on Arduino board. Additionally, we’ll add the switch to this Light Theremin to change the frequency of the sound and to play different sounds using the light sensor. The frequency only changes while the button is pressed, we did this to change tune while playing the theremin which makes it easier for the user to play different tone from both frequencies. In short, the analog in takes values from the light sensor and these values are converted within a certain limit to be played through the buzzer. When the button is pressed, the limit of these values changes and thus giving us the tone of higher frequency.

SCHEMATIC:
Video:

Code:

// create variable to hold sensor value
int sensorValue;
// UNO's analog read sensors use "analog to digital converter" (ADC),
// which means it divides the reading coming from the sensor (0 to 5 volts) into 1024 equal steps.
// Thus, the reading from our photoresistor could range from 0 to 1023,
// however it is unlikely to use the full range so we will calibrate it.
// For now, create variables to hold the high and low value for our photoresistor range,
// make them the opposite of the max/min values and we will calibrate them down.
int sensorLow = 1023;
int sensorHigh = 0;
// set the LED pin, 13 is the built in LED
const int ledPin = 13;
int switchFreq = 4;
int switchVal;


void setup() {
 
 
  pinMode(ledPin, OUTPUT);
  pinMode(switchFreq, INPUT);
 
  digitalWrite(ledPin, HIGH);
 
  delay(500);
 
  digitalWrite(ledPin, LOW);
  delay(500);
  digitalWrite(ledPin, HIGH);
  delay(500);  
  digitalWrite(ledPin, LOW);
  delay(500);
  digitalWrite(ledPin, HIGH);

  // after it blinks for 2 seconds, its time to calibrate the photoresistor readings
  // create a loop with while() that lasts for 5000 ms to calibrate the light sensor according the setting,
  while (millis() < 5000) {
    // use analogRead() to get a reading from the photoresistor,
    sensorValue = analogRead(A0);
    // create two conditions using if() to calibrate the max and min sensor values,
    // raise the sensorHigh if the current reading is higher:
    if (sensorValue > sensorHigh) {
      sensorHigh = sensorValue;
    }
    // lower the sensorLow if the current reading is lower:
    if (sensorValue < sensorLow) {
      sensorLow = sensorValue;
    }
  }
 
  // turn the LED off, calibration is done!
  digitalWrite(ledPin, LOW);
}


void loop() {
  //read the input from A0 and store it in a variable
  sensorValue = analogRead(A0);
  switchVal = digitalRead(switchFreq);

  // map(currentValue, oldRange1, oldRange2, newRange1, newRange2)
  // I reverse their order (high, low) so that shading the photoresister will cause a higher tone.
  // the new range is the range of Hz to use to produce sound, which for UNO can be from 31 to 65535 Hz.
  // I set it from 0 to 300, which is a more normal sound range and if a button is pressed I change the values between 500 to 1000
  // since we start at 0, full light will make no tone, full shade will make the highest tone.
  if (switchVal == HIGH){
  int pitch = map(sensorValue, sensorHigh, sensorLow, 500, 1000);
  tone(8, pitch, 10);
  }
  else{
    int pitch = map(sensorValue, sensorHigh, sensorLow, 0, 300);
    tone(8, pitch, 10);
  }
  // use the tone function to create sound in the piezo,
  // tone(pin#, value, milliseconds)
 

  // add a delay to make the current tone sustained for a few ms to adjust the quality of the tone
  delay(15);
}

Future improvements:

For future, we want to use more than 2 limits of frequencies and we want to add instruments that could be switched using the button. After completing this project, we realised that playing sound using the light sensor is easier than any other sensor since it only requires basic movements of hands to block the light or allow the light to the sensor. Thus, in future, we’d like to add more instruments like electric guitar frequencies and allow users to switch between these instruments using the switch buttons.


Week 9 – BuzzBoard

BuzzBoard By Majid and Hassan

Concept

For our project, we aimed to create a unique musical instrument using distance tracking sensors and buttons. After brainstorming various ideas, we were inspired to design a piano-like instrument that could be played by two hands, one is distance tracked and the other is pressing the buttons. There are 7 notes and 3 different octaves that can be played. The notes are determined by the distance and the octave is based on which button is pressed.

implementation

We decided to use ultrasonic sensor for detecting the hand distance and buttons for controlling different notes of the piano. The Arduino was also connected to a piezo sensor for producing the piano sounds. Once the circuit assembly was complete, we tested the circuit to ensure the sensors and buttons were working and registered properly. Then we programmed the buttons to play different octaves of the notes.

Deciding which note to be played is at the core of our code. We did so through making a list of if conditions. First we checked what was the last button pressed, to decide the octave we are playing the notes in. After that, based on the distance from the ultrasonic sensor, in increments of 3cm, we chose a note to be played. For example, here is how the notes are played if the last button pressed was 2:

  if(lastButton == 2){
  if (distance < 3) {
    tone(8,NOTE_A4,noteDuration);
  } else if (distance >= 3 && distance < 6) {
    tone(8,NOTE_B4,noteDuration);
  } else if (distance >= 6 && distance < 9) {
    tone(8,NOTE_C4,noteDuration);
  } else if (distance >= 9 && distance < 12) {
    tone(8,NOTE_D4,noteDuration);
  }
  else if (distance >= 12 && distance < 15) {
    tone(8,NOTE_E4,noteDuration);
  }
      else if (distance >= 15 && distance < 18) {
    tone(8,NOTE_F4,noteDuration);
  }
      else if (distance >= 18 && distance < 21) {
    tone(8,NOTE_G4,noteDuration);
  }
}

Challenges

One of the main challenges we encountered during the project was calibrating the distance sensors to play different notes. We had to experiment with different threshold values and distances for the different notes and octaves.

The Demo

Assignment 7 – BuzzBoard

BuzzBoard By Hassan and Majid

Concept

For our project, we aimed to create a unique musical instrument using distance tracking sensors and buttons. After brainstorming various ideas, we were inspired to design a piano-like instrument that could be played by two hands, one is distance tracked and the other is pressing the buttons. There are 7 notes and 3 different octaves that can be played. The notes are determined by the distance and the octave is based on which button is pressed.

implementation

We decided to use ultrasonic sensor for detecting the hand distance and buttons for controlling different notes of the piano. The Arduino was also connected to a piezo sensor for producing the piano sounds. Once the circuit assembly was complete, we tested the circuit to ensure the sensors and buttons were working and registered properly. Then we programmed the buttons to play different octaves of the notes.

Deciding which note to be played is at the core of our code. We did so through making a list of if conditions. First we checked what was the last button pressed, to decide the octave we are playing the notes in. After that, based on the distance from the ultrasonic sensor, in increments of 3cm, we chose a note to be played. For example, here is how the notes are played if the last button pressed was 2:

  if(lastButton == 2){
  if (distance < 3) {
    tone(8,NOTE_A4,noteDuration);
  } else if (distance >= 3 && distance < 6) {
    tone(8,NOTE_B4,noteDuration);
  } else if (distance >= 6 && distance < 9) {
    tone(8,NOTE_C4,noteDuration);
  } else if (distance >= 9 && distance < 12) {
    tone(8,NOTE_D4,noteDuration);
  }
  else if (distance >= 12 && distance < 15) {
    tone(8,NOTE_E4,noteDuration);
  }
      else if (distance >= 15 && distance < 18) {
    tone(8,NOTE_F4,noteDuration);
  }
      else if (distance >= 18 && distance < 21) {
    tone(8,NOTE_G4,noteDuration);
  }
}

Challenges

One of the main challenges we encountered during the project was calibrating the distance sensors to play different notes. We had to experiment with different threshold values and distances for the different notes and octaves.

The Demo

Home Work 10 – Sarthak and Yerk (AutoTune)

AutoTune

Concept:

For this project, we were inspired by AutoTune. AutoTune allows you to take a certain musical key and make sure all the notes are aligned within that key, thereby perfecting the sound.

Execution: 

For the circuit, we used a buzzer, three switches, and a distance sensor. Initially, we used the key of C major and the note C as our reference point. Having calculated the mathematic relationships that exist between notes in a major key, we assigned different intervals of distance to different notes for that key. For instance, if the user’s hand is 0-5 cm away from the sensor, the circuit will play a C note. If the hand is 5-10 cm away, the circuit will play a D note. This method does not let notes that do not belong in the C major key to be played, which perfects the sound of the board. Just like AutoTune.

When the yellow button is pressed, the key that is being played is transposed up a half step. So if the user is playing in a C major key, once the yellow button is pressed, the user will now play in D flat major. The green button executes the opposite effect – it transposes the key down a half step. If a user is playing in F major, upon pressing the button, they will play in E major.

Finally, if the blue button is pressed, the user will now play in the natural minor key, completely changing the mathematical relationships that underlie the notes. For instance, if the user was playing in the G major key, once they press the button, they will hear the G minor key. This process goes the other way around: if the button is pressed again, the user will go back to the major key.

Circuit: 


Code:

int note_c = 262;

const int beeperPin = 12;
const int trigPin = 7;
const int echoPin = 8;
const int yellowSwitch = A0;
const int greenSwitch = A2;
const int blueSwitch = A4;

const int division = 5;

int flag = 1;

// this is the number of notes in an octave
const int num = 8;

int all_notes[num];

int getDistance() {
  // this bit of code was taken from https://howtomechatronics.com/tutorials/arduino/ultrasonic-sensor-hc-sr04/

  // calculating the distance between the user and the sensor
  digitalWrite(trigPin, LOW);
  delayMicroseconds(2);

  digitalWrite(trigPin, HIGH);
  delayMicroseconds(10);
  digitalWrite(trigPin, LOW);

  int duration = pulseIn(echoPin, HIGH);
  int distance = duration * 0.034/2;

  Serial.print("Distance: ");

  return distance;
}

int getNote(int distance) {
  int index = distance / division;

  return all_notes[index];
}

void makeMajorKey() {
  // making an array of all the notes in an octave given in the major key.
  all_notes[0] = note_c;
  int n = 1;
  for (int i = 1; i < num; i++) {
    // the third and seventh note change is a half step.
    if ((n % 3 == 0 && n % 6 != 0) || n % 7 == 0){
      all_notes[i] = all_notes[i-1] * pow(2, 1.0/12.0);
    } else {
      all_notes[i] = all_notes[i-1] * pow(2, 1.0/6.0);
    }
    n++;
  }
}

void makeMinorKey() {
  // making an array of all the notes in an octave in the minor key.
  all_notes[0] = note_c;
  int n = 1;
  for (int i = 1; i < num; i++) {
    // the second and fifth note change is a half step.
    if ((n % 2 == 0 && n % 4 != 0 && n % 6 != 0 && n % 8 != 0) || n % 5 == 0){
      all_notes[i] = all_notes[i-1] * pow(2, 1.0/12.0);
    } else {
      all_notes[i] = all_notes[i-1] * pow(2, 1.0/6.0);
    }
    n++;
  }
}

void setup() {
  pinMode(beeperPin, OUTPUT);
  pinMode(trigPin, OUTPUT);
  pinMode(echoPin, INPUT);
  pinMode(yellowSwitch, INPUT);

  Serial.begin(9600);

  makeMajorKey();
}

void loop() {
  // PipeLine
  // get the distance of an object
  int distance = getDistance();
  if (distance <= division * num) {
    // create note for that distance
    int note_to_play = getNote(distance);

    // play the note
    tone(beeperPin, note_to_play);

    // switch to transpose up
    int yellow_state = digitalRead(yellowSwitch);

    // switch to transpose down
    int green_state = digitalRead(greenSwitch);

    // switch to toggle between major and natural minor key
    int blue_state = digitalRead(blueSwitch);

    if (yellow_state == HIGH) {
      // transposing the key of the instrument a half-step up, when the switch is clicked.
      note_c = note_c * pow(2, 1.0/12.0);
      makeMajorKey();
    }

    if (green_state == HIGH) {
      // transposing the key of the instrument a half-step down, when the switch is clicked.
      note_c = note_c / pow(2, 1.0/12.0);
      makeMajorKey();
    }

    // changes major key to natural minor key and vice versa.
    if (blue_state == HIGH) {
      if (flag == 1) {
        makeMinorKey();
        flag = 0;
      } else {
        makeMajorKey();
        flag = 1;
      }
    }
  }
}


Video:

Future Improvements: 

One of the issues with the current board is that the code may register the clicking of the button as multiple clicks, even if the user had pressed the button once. With the yellow and the green buttons, this leads to a higher or a lower transposition than expected. With the blue button, there are instances when it simply skips over the shift to the minor key because it registers one click as two. In the future, we want to work toward eliminating that inconvenience.


Home Work 10 – Sarthak and Yerk (AutoTune)

AutoTune

Concept:

For this project, we were inspired by AutoTune. AutoTune allows you to take a certain musical key and make sure all the notes are aligned within that key, thereby perfecting the sound.

Execution: 

For the circuit, we used a buzzer, three switches, and a distance sensor. Initially, we used the key of C major and the note C as our reference point. Having calculated the mathematic relationships that exist between notes in a major key, we assigned different intervals of distance to different notes for that key. For instance, if the user’s hand is 0-5 cm away from the sensor, the circuit will play a C note. If the hand is 5-10 cm away, the circuit will play a D note. This method does not let notes that do not belong in the C major key to be played, which perfects the sound of the board. Just like AutoTune.

When the yellow button is pressed, the key that is being played is transposed up a half step. So if the user is playing in a C major key, once the yellow button is pressed, the user will now play in D flat major. The green button executes the opposite effect – it transposes the key down a half step. If a user is playing in F major, upon pressing the button, they will play in E major.

Finally, if the blue button is pressed, the user will now play in the natural minor key, completely changing the mathematical relationships that underlie the notes. For instance, if the user was playing in the G major key, once they press the button, they will hear the G minor key. This process goes the other way around: if the button is pressed again, the user will go back to the major key.

Circuit: 

Code:

int note_c = 262;

const int beeperPin = 12;
const int trigPin = 7;
const int echoPin = 8;
const int yellowSwitch = A0;
const int greenSwitch = A2;
const int blueSwitch = A4;

const int division = 5;

int flag = 1;

// this is the number of notes in an octave
const int num = 8;

int all_notes[num];

int getDistance() {
  // this bit of code was taken from https://howtomechatronics.com/tutorials/arduino/ultrasonic-sensor-hc-sr04/

  // calculating the distance between the user and the sensor
  digitalWrite(trigPin, LOW);
  delayMicroseconds(2);

  digitalWrite(trigPin, HIGH);
  delayMicroseconds(10);
  digitalWrite(trigPin, LOW);

  int duration = pulseIn(echoPin, HIGH);
  int distance = duration * 0.034/2;

  Serial.print("Distance: ");

  return distance;
}

int getNote(int distance) {
  int index = distance / division;

  return all_notes[index];
}

void makeMajorKey() {
  // making an array of all the notes in an octave given in the major key.
  all_notes[0] = note_c;
  int n = 1;
  for (int i = 1; i < num; i++) {
    // the third and seventh note change is a half step.
    if ((n % 3 == 0 && n % 6 != 0) || n % 7 == 0){
      all_notes[i] = all_notes[i-1] * pow(2, 1.0/12.0);
    } else {
      all_notes[i] = all_notes[i-1] * pow(2, 1.0/6.0);
    }
    n++;
  }
}

void makeMinorKey() {
  // making an array of all the notes in an octave in the minor key.
  all_notes[0] = note_c;
  int n = 1;
  for (int i = 1; i < num; i++) {
    // the second and fifth note change is a half step.
    if ((n % 2 == 0 && n % 4 != 0 && n % 6 != 0 && n % 8 != 0) || n % 5 == 0){
      all_notes[i] = all_notes[i-1] * pow(2, 1.0/12.0);
    } else {
      all_notes[i] = all_notes[i-1] * pow(2, 1.0/6.0);
    }
    n++;
  }
}

void setup() {
  pinMode(beeperPin, OUTPUT);
  pinMode(trigPin, OUTPUT);
  pinMode(echoPin, INPUT);
  pinMode(yellowSwitch, INPUT);

  Serial.begin(9600);

  makeMajorKey();
}

void loop() {
  // PipeLine
  // get the distance of an object
  int distance = getDistance();
  if (distance <= division * num) {
    // create note for that distance
    int note_to_play = getNote(distance);

    // play the note
    tone(beeperPin, note_to_play);

    // switch to transpose up
    int yellow_state = digitalRead(yellowSwitch);

    // switch to transpose down
    int green_state = digitalRead(greenSwitch);

    // switch to toggle between major and natural minor key
    int blue_state = digitalRead(blueSwitch);

    if (yellow_state == HIGH) {
      // transposing the key of the instrument a half-step up, when the switch is clicked.
      note_c = note_c * pow(2, 1.0/12.0);
      makeMajorKey();
    }

    if (green_state == HIGH) {
      // transposing the key of the instrument a half-step down, when the switch is clicked.
      note_c = note_c / pow(2, 1.0/12.0);
      makeMajorKey();
    }

    // changes major key to natural minor key and vice versa.
    if (blue_state == HIGH) {
      if (flag == 1) {
        makeMinorKey();
        flag = 0;
      } else {
        makeMajorKey();
        flag = 1;
      }
    }
  }
}

Video:

Future Improvements: 

One of the issues with the current board is that the code may register the clicking of the button as multiple clicks, even if the user had pressed the button once. With the yellow and the green buttons, this leads to a higher or a lower transposition than expected. With the blue button, there are instances when it simply skips over the shift to the minor key because it registers one click as two. In the future, we want to work toward eliminating that inconvenience.

Week 10 – Musical Instrument

Concept

Our project is a musical instrument that uses an ultrasonic sensor to measure the distance between the sensor and an object and plays different notes based on the distance. A note is played when a push button is pressed. The distance measurement is then mapped to an array of notes to play on a piezo buzzer.


IMPLEMENTATION

We have started from setting up a circuit that uses next components: ultrasonic sensor, piezo buzzer, 10 jumper wires, pushbutton, and 10k resistor. The ultrasonic sensor was used to measure the distance of the object from the instrument, and the piezo buzzer was used to play the musical notes based on the measured distance. The pushbutton was used to activate the instrument and play the notes, and the 10k resistor was used as a resistor for the button. We connected all these components using jumper wires to establish a circuit that would form the foundation for the instrument.

We have then moved onto adding a code component. In the setup() function we have set the pinMode for each of the pins used in the circuit. We have also used the Serial.begin() function to start serial communication between the Arduino and the computer, which would allow us to view debug messages.

The first part of the loop function was used to read the distance measurement from the ultrasonic sensor using the pulseIn() function. We then used this distance measurement to calculate which note to play on the piezo buzzer. We mapped the distance to a note by dividing the range of distances by the number of notes we wanted to play (in this case, five).

The code then checked the state of the pushbutton using the digitalRead() function. If the pushbutton was not pressed, the piezo buzzer would not play any sound, and a message would be printed to the serial monitor. If the pushbutton was pressed, the corresponding note would play on the piezo buzzer, and a message indicating the button’s state and the note being played would be printed to the serial monitor.

// 
// Project name: "HW7: Musical Instrument"
// Names: Adina & Aibar
// Class: Intro to IM
// Professor: Michael Shiloh
//

int trigPin = 10;
int echoPin = 11;
int buttonPin = 2;
int buzzerPin = 12;

long duration;
long distance;

int buttonState;

void setup() {
  //distance pins
  pinMode(echoPin, INPUT);
  pinMode(trigPin, OUTPUT);
  //button pin
  pinMode(buttonPin, INPUT);
  //buzzer pin
  pinMode(buzzerPin, OUTPUT);

  Serial.begin(9600);
}

void loop() {
  digitalWrite(trigPin, LOW); //triggers on/off and then reads data
  delayMicroseconds(2);
  digitalWrite(trigPin, HIGH);
  delayMicroseconds(10);
  digitalWrite(trigPin, LOW);
  
  duration = pulseIn(echoPin, HIGH);
  distance = (duration / 2) * .0344; //speed of sound converted into cms

  int notes[5] = {261, 294, 329, 349, 392}; //array of notes
  //          mid  C    D    E    F    G 

  buttonState = digitalRead(buttonPin);
  if (buttonState == 0) { //if not pressed
    noTone(12);
    Serial.println("button not pressed");
  }

  else if ((buttonState == 1)) {  //if pressed
    int sound = map(distance, 0, 30, 0, 5);  //map distance to the array of notes
    tone(buzzerPin, notes[sound]);  //play a note
    //checking if works through serial monitor
    Serial.print("button pressed, ");
    Serial.print(buttonState);
    Serial.print(", ");
    Serial.println(sound);
  }
}

Schematic Diagram

VIDEO DEMO

If the video window doesn’t show, use this link to see the demo of the musical instrument.


CHALLENGES AND SOLUTIONS

Our biggest challenge was ensuring that the distance reader could detect the object in front of it accurately. When the reader did not detect the object correctly, the instrument played a weird sound that sounded like a very high pitch, which was not the sound we were hoping to achieve. It took several attempts to get the distance reader to work correctly. A solution that we came up with was decreasing the max distance when mapping the sound to the distance and using a solid object like the back of the phone, rather than a hand. By decreasing the maximum distance for the object, we were able to make sure that the distance reader could pick up on the object’s presence.


HW7: Musical Instrument

CONCEPT

Our project is a musical instrument that uses an ultrasonic sensor to measure the distance between the sensor and an object and plays different notes based on the distance. A note is played when a push button is pressed. The distance measurement is then mapped to an array of notes to play on a piezo buzzer.

IMPLEMENTATION

We have started from setting up a circuit that uses next components: ultrasonic sensor, piezo buzzer, 10 jumper wires, pushbutton, and 10k resistor. The ultrasonic sensor was used to measure the distance of the object from the instrument, and the piezo buzzer was used to play the musical notes based on the measured distance. The pushbutton was used to activate the instrument and play the notes, and the 10k resistor was used as a resistor for the button. We connected all these components using jumper wires to establish a circuit that would form the foundation for the instrument.

We have then moved onto adding a code component. In the setup() function we have set the pinMode for each of the pins used in the circuit. We have also used the Serial.begin() function to start serial communication between the Arduino and the computer, which would allow us to view debug messages.

The first part of the loop function was used to read the distance measurement from the ultrasonic sensor using the pulseIn() function. We then used this distance measurement to calculate which note to play on the piezo buzzer. We mapped the distance to a note by dividing the range of distances by the number of notes we wanted to play (in this case, five).

The code then checked the state of the pushbutton using the digitalRead() function. If the pushbutton was not pressed, the piezo buzzer would not play any sound, and a message would be printed to the serial monitor. If the pushbutton was pressed, the corresponding note would play on the piezo buzzer, and a message indicating the button’s state and the note being played would be printed to the serial monitor.

// 
// Project name: "HW7: Musical Instrument"
// Names: Adina & Aibar
// Class: Intro to IM
// Professor: Michael Shiloh
//

int trigPin = 10;
int echoPin = 11;
int buttonPin = 2;
int buzzerPin = 12;

long duration;
long distance;

int buttonState;

void setup() {
  //distance pins
  pinMode(echoPin, INPUT);
  pinMode(trigPin, OUTPUT);
  //button pin
  pinMode(buttonPin, INPUT);
  //buzzer pin
  pinMode(buzzerPin, OUTPUT);

  Serial.begin(9600);
}

void loop() {
  digitalWrite(trigPin, LOW); //triggers on/off and then reads data
  delayMicroseconds(2);
  digitalWrite(trigPin, HIGH);
  delayMicroseconds(10);
  digitalWrite(trigPin, LOW);
  
  duration = pulseIn(echoPin, HIGH);
  distance = (duration / 2) * .0344; //speed of sound converted into cms

  int notes[5] = {261, 294, 329, 349, 392}; //array of notes
  //          mid  C    D    E    F    G 

  buttonState = digitalRead(buttonPin);
  if (buttonState == 0) { //if not pressed
    noTone(12);
    Serial.println("button not pressed");
  }

  else if ((buttonState == 1)) {  //if pressed
    int sound = map(distance, 0, 30, 0, 5);  //map distance to the array of notes
    tone(buzzerPin, notes[sound]);  //play a note
    //checking if works through serial monitor
    Serial.print("button pressed, ");
    Serial.print(buttonState);
    Serial.print(", ");
    Serial.println(sound);
  }
}


VIDEO DEMO

If the video window doesn’t show, use this link to see the demo of the musical instrument.

CHALLENGES AND SOLUTIONS

Our biggest challenge was ensuring that the distance reader could detect the object in front of it accurately. When the reader did not detect the object correctly, the instrument played a weird sound that sounded like a very high pitch, which was not the sound we were hoping to achieve. It took several attempts to get the distance reader to work correctly. A solution that we came up with was decreasing the max distance when mapping the sound to the distance and using a solid object like the back of the phone, rather than a hand. By decreasing the maximum distance for the object, we were able to make sure that the distance reader could pick up on the object’s presence.

HW | Musical Instrument

Group: Dariga Shokayeva, Vladimir Sharkovski

Concept

We created a musical instrument which plays beats. Our instrument is very versatile:

  • The distance sensor allows you to easily control the frequency of the tone, without having to touch anything. Therefore you can play both very low tones and very high ones.
  • The potentiometer allows you control the duration of the beats, from 20 milliseconds to half a second. Therefore you can play both a rapidfire almost continual beat, or a slow jazzy beat.
  • The button allows you to shift the frequency of the tone to a higher range while the button is pressed. Therefore you can quickly surprise the listener with your melodies.
Circuit Diagram


Video demo
Code
// Pin positions.
const int potPin = A0;
const int buttonPin = 5;
const int trigPin = 6;
const int echoPin = 7;
const int speakerPin = 8;

// Other constants.
const int minDistance = 0;
const int maxDistance = 20;

const int toneDurationMin = 30;
const int toneDurationMax = 500;

const float toneDelayFactor = 1.3f;

void setup() {
  pinMode(potPin, INPUT);
  pinMode(buttonPin, INPUT);
  pinMode(trigPin, OUTPUT);
  pinMode(echoPin, INPUT);
  pinMode(speakerPin, OUTPUT);
}

long getSensorDistance() {
  // Send pulse.
  digitalWrite(trigPin, LOW);
  delayMicroseconds(2);
  digitalWrite(trigPin, HIGH);
  delayMicroseconds(10);
  digitalWrite(trigPin, LOW);
  // Read pulse duration.
  long duration = pulseIn(echoPin, HIGH);
  // Calculate distance from duration.
  long distance = (double)duration * 0.034 / 2.0;

  return distance;
}

void loop() {
  // Get distance and constrain it.
  long distance = getSensorDistance();
  distance = constrain(distance, minDistance, maxDistance);
  
  // Map distance to tone frequency.
  int toneFreqMin, toneFreqMax;
  int buttonState = digitalRead(buttonPin);

  if (buttonState == LOW) {
    toneFreqMin = 20;
    toneFreqMax = 400;
  } else {
    toneFreqMin = 300;
    toneFreqMax = 1500;
  }

  int toneFrequency = map(distance, minDistance, maxDistance, toneFreqMin, toneFreqMax);

  // Calculate time to play the tone based on the potentiometer position.
  int potPosition = analogRead(potPin);
  int toneDuration = map(potPosition, 0, 1023, toneDurationMin, toneDurationMax);

  // Play the tone, then wait some time.
  int waitTime = toneDuration * toneDelayFactor;
  tone(speakerPin, toneFrequency, toneDuration);
  delay(waitTime);
}
Reflection

It was challenging to figure out how the ultrasonic distance sensor worked, because it has 4 pins to set up. We also had to do some math, using the speed of sound, to convert the duration produced by the sensor into a proper distance.

Also, it took a lot of work to figure out the proper ranges for the minimum and maximum frequency for the instrument to play. Too high frequencies were irritating.

One way to improve the instrument is to think about ways to make it easier to use (more accessible). Right now it is a bit awkward to control the potentiometer and button with one hand, while using the other hand with the sensor. Also, it would be convenient to have a way to mute the speaker, or even control its volume.