Victor ‘ranted’ in his post to remind us how our current definition of interactivity is limited to glassy touch screens that do not utilize our touch senses to their full potential. He argues that texture, the ‘feel’ of things is not accompanied within these slidy screens.
Although he does not include solutions and was writing the article purely to raise awareness, I believe he asked important questions. One idea that I am fond of is to think of these designs as tools that react to our hands.
Tony Stark in his lab. Disney Marvel.
Hiro presenting nanobots. Disney.
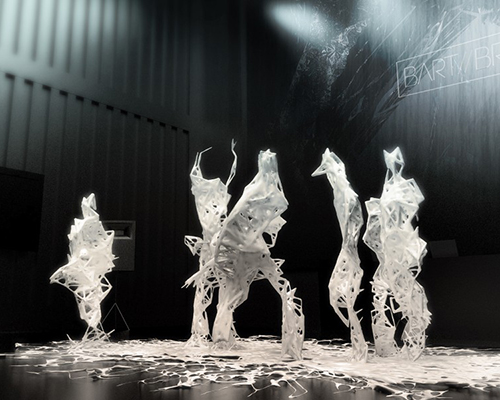
Imagine this: a breed between nanobots from Disney’s Big Hero 6 and holograms used by Tony Stark in his research lab. The hologram can sketch schematics in thin air, and then magically materialize from the nanobots. It would become an interactive object, that can be touched, felt, scrubbed, and molded only limited by the user’s imagination.
Any sufficiently advanced technology is indistinguishable from magic. – Arthur c. clarke
Although it may still take centuries away with dozens of research, prototypes, and testing before we can commercially mass produce this kind of technology, perhaps we can pick a point or two from Victor’s argument to take the current developments into an alternative shape and features.
Concept:
SoundSculpt will be an interactive music controller that allows users to sculpt and manipulate sounds in real-time using physical objects and sensors. Inspired by the concept of sculpting, users can mold and shape musical compositions by interacting with a variety of tactile inputs connected to an Arduino board. The project aims to provide an intuitive and immersive platform for music creation, where users can explore their creativity through hands-on experimentation.
Inspiration:
The inspiration for this project comes from the desire to bridge the gap between traditional musical instruments and digital music production tools. Drawing inspiration from sculptors who mold physical materials into expressive forms, SoundSculpt will empower users to sculpt sonic landscapes using tangible inputs. The project also takes inspiration from the growing maker movement and DIY culture, where individuals seek to build and customize their own interactive devices.
How it Works: Hardware Setup:
– SoundSculpt consists of a variety of physical inputs, such as rotary knobs, sliders, sensors, etc, all connected to an Arduino board.
– Each physical input is mapped to a specific parameter or function within the accompanying P5 sketch, allowing users to control various aspects of the music, such as pitch, volume, tempo, and effects.
P5 Audio Generation:
– The P5 sketch generates and manipulates audio in response to the user’s interactions with the physical inputs.
– Users can select from a range of synthesized sounds, samples, and effects presets, which can be dynamically modulated and layered to create complex musical textures.
– P5’s audio libraries enable real-time processing and playback, ensuring that users experience immediate feedback as they interact with the controller.
Real-time Interaction:
– As users manipulate the physical inputs, the Arduino continuously reads sensor data and sends corresponding control signals to the P5 sketch.
– Users can experiment with different combinations of inputs to sculpt evolving musical compositions, adjusting parameters on-the-fly to explore new sonic possibilities.
– SoundSculpt encourages exploration and improvisation, allowing users to discover emergent patterns and melodies through playful interaction.
Visual Feedback:
– To enhance the user experience, SoundSculpt will provide visual feedback in the form of dynamic visualizations and graphical representations of sound parameters.
– Visual elements, such as waveform displays, frequency spectra, and animated effects, respond in real-time to changes in the music, offering users additional insight into the sonic transformations they’re creating.
While Bret Victor’s critique offers valuable insights into the shortcomings of current interaction design, it overlooks some practical challenges in implementing his proposed solutions. While advocating for whole-hand interactions and universal design is commendable, transitioning from fingertip-centric interfaces to more complex tactile and gestural inputs may prove difficult in practice. In this case, designers would need to navigate usability concerns and ensure that new interfaces remain accessible to all users, including those with disabilities.
Moreover, when Victor emphasizes the importance of grounding interaction design in human biology, his vision may overlook the rapid evolution of technology and user expectations. While incorporating aspects of human behavior is essential, it’s also crucial to balance this with advancements in digital capabilities and user preferences. Striking this balance requires careful consideration and experimentation to ensure that technology remains both intuitive and innovative.
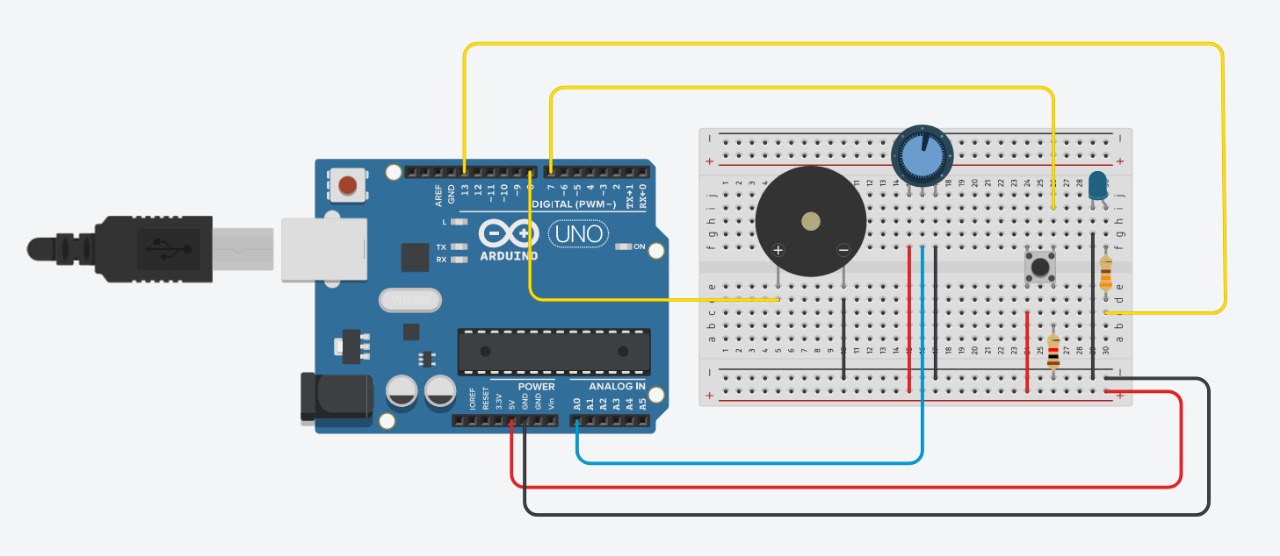
For this assignment, we were inspired by the popular “Rick Rolling” meme. Essentially, this is a meme that tricks the viewer by surprisingly playing the song “Never Gonna Give You Up” by Rick Astley. Therefore, we decided to create a music box which plays this song when it’s opened.
How it works
For the music box, we had multiple components. First, we used a photoresistor to detect brightness (open box) and darkness (closed box), which would determine whether to play the song or not. Then, we had a Piezo buzzer to actually play the notes of the song. Moreover, we added a LED light that blinks to the rhythm of the music. We also added a button which when pressed, would change the speed at which the music plays. Finally, we used a potentiometer to control the volume of the music. In the code, we divided the song into the intro, verse, and chorus.
Components
1 x Photoresistor
1 x Piezo buzzer
1 x LED Light
1 x Button
1 x Potentiometer
3 x 330 ohm resistors
1 x 10K ohm resistor
Wires
Arduino and Breadboard
Demo
Code Snippets
Our code is quite long, so here are some snippets:
This is an example of how we have created arrays for each part of the song. This is specifically for the chorus, but we also have them for the intro and the verse. We have one array for the melody, which is determined by the frequencies we have defined, and one for the rhythm, which determines the duration of each note when later multiplied with the beat length.
This is our setup function, which initializes the pins and the serial communication, and sets an interrupt on the button (which then trigger our getFaster function).
void   setup()
{
  pinMode(piezo, OUTPUT);
  pinMode(led, OUTPUT);
  pinMode(button,   INPUT_PULLUP); // high voltage when button is not pressed; low voltage when pressed
  pinMode(sensor, INPUT);
  attachInterrupt(digitalPinToInterrupt(button), getFaster, FALLING); // interrupt activates when pin is pressed
  digitalWrite(led, LOW);
  Serial.begin(9600);
  flag   = false;
  a = 4;
  b = 0;
  threshold = analogRead(sensor) + 200; // adding a value to the sensor reading to control how much darkness/brightness is necessary for the music to start playing
}
This is our loop function, which ensures that the sensor value is constantly being read and that the song plays when it is bright enough/pauses when it is dark.
void loop()
{
  int sensorreading = analogRead(sensor);
   if (sensorreading < threshold) { // play when there is brightness
    flag = true;
  }
   else if (sensorreading > threshold) { // pause when there is darkness
    flag = false;
   }

  // play next step in song when flag is true, meaning it is bright enough
  if (flag == true) {
    play();
   }
}
This is part of our play function, which determines which part of the song plays and the corresponding melody/rhythm.
void play() {
  int notelength;
  if (a == 1 || a == 2) {
     // intro
    notelength = beatlength * song1_intro_rhythmn[b];
    if   (song1_intro_melody[b] > 0) {
      digitalWrite(led, HIGH); // LED on
      tone(piezo,   song1_intro_melody[b], notelength);
    }
    b++;
    if (b >= sizeof(song1_intro_melody)   / sizeof(int)) {
      a++;
      b = 0;
      c = 0;
    }
And finally, our getFaster function to increase tempo by the decreasing the beat length when the button is pressed.
void getFaster()   { // decrease beat length in order to increase tempo
  beatlength = beatlength   / 2;
  if (beatlength < 20) { // loop back to original tempo
    beatlength   = 100;
  }
Concept: This project aims to create a physically interactive version of the popular game Fruit Ninja using Arduino and P5.js. Instead of swiping on a touchscreen, players will use a glove equipped with flex sensors to control the game through hand gestures.
Components:
Arduino: An Arduino board will be used to read data from the flex sensors on the glove.
Flex Sensors: These sensors will be attached to the glove’s fingers, detecting the bending motion when the player performs slicing gestures.
P5.js: P5.js will be used to create the game environment, display the fruits, and detect collisions between the virtual sword (player’s hand) and the fruits.
Gameplay:
Calibration: The player will initially calibrate the system by performing various hand gestures, allowing the Arduino to establish a baseline for each sensor and determine the range of motion.
Fruit Slicing: Fruits will appear on the screen, similar to the original game. The player will slice through the air with their hand, and the flex sensors will detect the bending of the fingers.
Data Transmission: The Arduino will send data from the flex sensors to P5.js via serial communication.
Collision Detection: P5.js will analyze the sensor data and determine if the player’s “virtual sword” (hand movement) intersects with a fruit on the screen.
Feedback: Successful slices will result in visual and auditory feedback, such as the fruit splitting apart and a slicing sound effect.
Scoring: The game will keep track of the player’s score based on the number of fruits sliced and the accuracy of their movements.
Challenges:
Sensor Calibration: Ensuring accurate and consistent readings from the flex sensors will be crucial for responsive gameplay.
Gesture Recognition: Developing an algorithm in P5.js to reliably translate sensor data into slicing actions will require careful design and testing.
Latency: Minimizing lag between the player’s movements and the game’s response is essential for a smooth and enjoyable experience.
Potential Enhancements:
Haptic Feedback: Integrating vibration motors into the glove could provide physical feedback when the player slices a fruit, further enhancing immersion.
Reading Bret Victor’s passionate critique of interaction design felt like he was voicing my own frustrations. Why do so many interfaces feel clunky and unnatural, forcing us to think like computers instead of them adapting to us? His call for a future where technology interacts with us as seamlessly as human speech resonated deeply.
The comparison he draws between current interfaces and the early days of written language is particularly powerful. It highlights the vast potential for improvement and reminds us that we’re still in the infancy of designing truly intuitive and human-centered interactions.
Victor’s vision connects with projects like the Tangible Media Group’s shape-shifting displays, where the digital and physical blend seamlessly. It’s exciting to imagine a future where interacting with technology is as natural as speaking or gesturing.
This rant is a powerful call to action. It challenges us to break free from limitations and create technology that empowers and inspires. It’s a future I’m eager to contribute to, where technology enhances our lives instead of holding us back.
This project provided valuable insights into the potential of technology in musical expression and exploration. Despite its seemingly simple design, utilizing two push buttons for sound generation and an ultrasound sensor for frequency modulation, the project unveiled a range of creative possibilities and highlighted areas for further development.
The incorporation of the ultrasound sensor was particularly intriguing. By translating physical distance into audible frequencies, the sensor effectively transformed space into a controllable musical parameter. This interaction proved to be a captivating demonstration of how technology can facilitate new forms of musical interaction and expression. The concept invites further exploration, prompting questions about the potential for incorporating additional sensors to create a multi-dimensional instrument responsive to a wider range of environmental stimuli.
// Check if distance is within range for playing sound
if (distance < 200 && distance > 2) {
   // Map distance to frequency
   int frequency = map(distance, 2, 200, 200, 2000);
   tone(buzzerPin, frequency); // Play sound at calculated frequency
 } else {
   noTone(buzzerPin); // Stop sound if distance is out of range
 }
While the project successfully demonstrated the feasibility of generating sound through Arduino, the limitations of pre-programmed sounds became evident. The lack of nuance and complexity inherent in such sounds presents a challenge for creating truly expressive and dynamic musical experiences. This observation underscores the need for further exploration into sound generation techniques, potentially involving machine learning or other advanced algorithms, to expand the sonic palette and introduce more organic and evolving soundscapes.
For the final project, I am quite conflicted between the following two ideas: A platformer that uses light to move platforms or a Wario Ware like game which uses as much of the interactive mediums from Arduino as possible.
A platformer that uses light to move platforms
This project would be inspired by the simple mechanics of a platformer game like Super Mario Bros., but the difference is that, aside from only walking, the player possesses the power to interact with platforms through the use of light. This would be possible with the use of a photoresistor.
The game would consist of a set of three levels in P5, with the player only having three lives through the whole session. As for the controls, it would use a pair of two buttons to control the movement while a dedicated flashlight, that is close, is going to assist in moving the platforms. The platforms will have a set axis to move, and although simple and monotonous, obstacles such as flying bullets or damaging movable obstacles can also be included.
Figure #1 Image used for reference regarding the flashlight (Englishscone, 2018).
A Wario Ware like game using Arduino
Wario Ware is a video game developed by Nintendo that debuted in 2003. It presents a series of video games which include moving an umbrella to make sure a cat does not get wet to shaking the hand of a dog. All of this is done through the use of the characteristic touch screen capabilities of a Nintendo device. Therefore, the approach to this game using Arduino would be to randomize the set of minigames and prepare all the needed inputs in the Arduino devices.
For example, in P5, if a minigame requires that the player presses the button 10 times quickly, the player has to do so in the button that is near the Arduino. The other scenario as well is if the player needs to turn off the light in the minigame, which in this case would be done by covering the photoresistor.
The issue itself in this game would lie in how to convey rapidly what kind of input does the game want, as well as providing the Arduino input controls attractively.
Figure #2 Some of the minigames presented in Wario Ware (Nintendo, 2003-Present day).
Conclusion
As always, all of these ideas will possibly change. Nevertheless, if this is given the time to properly experiment on the possibility of completing the selected project, then there is a guaranteed level of success only if ambitions are controlled and the video game is iterated multiple times.
The readings provided for this week gives an interesting reflection on the current state of Interaction Design and what lies ahead. Contrary to the rant given by the author, I do believe (at least in a sense) that technologies that follows the design of “Picture under glass” can be both helpful and intuitive, but when used something else is lost: The human feedback.
In my daily life, the only touchscreen-based device that I use exclusively is my iPhone. The rest is through other physical mediums, such as keyboards and mouse. The key difference in them is that some can provide a greater level of feedback than the other, while still providing giving the same function. A book in a iPad is still going to display what I want to read, but the smell, the feel, the weight, and the feeling of possession are lost.
It is a bit sad how we are also seeing our society shift from a more human feedback to what it seems to be more robotic and productive. Take into consideration Microsoft’s “Productivity Future Vision”, a future where productivity reigns over the interactional design that fills the human being with the necessary non-visual feedback that tells the current state of the object. Regardless of this. Nevertheless, by raising awareness (as the author indicates) we can make sure that we still value projects that aim for the user to be more in touch with the inner-self; in control through the use of sensory cues other than the sense that one gets from touching a glass touch.
Push the button, it screams. Turn the knob, and it screams even louder. For this week, we decided to create a sound/musical instrument that is controlled by a button and potentiometer.
Concept
We decided to call our machine, “Mr.Problematico” because of the issues we encountered while building this machine. The premise is simple: We have a potentiometer that controls the pitch and a button that plays/stops the music.
How it works
In the code, we mapped the potentiometer to 20 different notes. Then, we created an if-else statement, which plays a music function playMusic, whenever the button is pressed and does not play the music whenever it is not pressed.
In the music function, we played the note based on the value received by the potentiometer (value) and turned on the light as well.
 // Map the potentiomenter values according to the list length.
  int note = map(pontValue, 0, 1023, 1, 21);
  // If button is pressed, then play a sound according to the potentiometer.
  if (buttonState == HIGH) {
    playMusic(note);
    //Serial.print("HIGH \n");
  }
  else if (buttonState == LOW) {
    //Serial.print("LOW \n");
  }
}
//Play the tune, wait a specific time and light the LED according to the
//arrays of melodies and duration. In other words, the LED and the sounds generated are synchronized.
void playMusic(int value) {
  int noteDuration = 1000 / noteDurations[value];
  digitalWrite(13, HIGH);
  tone(8, melody[value], noteDuration);
  digitalWrite(13, LOW);
  delay(noteDuration);
}
Closing Remarks
During our building time, we spent a lot of hours trying to figure out why our machine decided to stop very long when we executed the music function. After some consultation, the delay function delays the whole machine rather than the code line. We tried to play and go around trying to fix this weird delay. We figured out that by missing a resistor to the button that messed up the whole circuit, before eventually creating the machine above. It was not completely the code’s fault but rather our miss information.
We’re quite proud of this project. Looking forward to the final project!