Assignment 2: Fireworks Frenzy


(Click on screen)

For this assignment, I wanted to create something that looks appealing but is interactive as well. Ever since we learnt loops and manipulating speed and colors, I wanted to create a display of fireworks, because fireworks are something I admire not just as a kid but even now.

When the user clicks on the canvas, a new firework is created at that position. The firework ascends from below the screen, and when it reaches its designated height, it explodes into a burst of lines, each growing in length until it reaches a random maximum length. Once a firework is exploded, it is removed.

I implemented this by using an array to store and delete the fireworks and an array for the lines for each firework. I used 5 for loops: the first one is to iterate over the fireworks array and call the functions (in reverse order since we are deleting items), the second one is to iterate over the lines array and increase their length, the third one is to recheck that all lines reached its max length and updating the ‘done’ flag (this was to fix some glitches), the fourth one is to have the lines of the firework at different angles around the center, the fifth one is to find the endpoint of each line using the length and angle to finally create the firework.

I am happy with the entire code since I had to learn how arrays and functions work to implement this. What helped was that I am familiar with using arrays in Python and C++. The part that I am particularly proud of though is the function that brings everything together, since I had to recall how polar coordinates work to find the endpoint of a line:

function showFirework(firework) {
  R = random(10,250);
  G = random(10,250);
  B = random(10,250);
  stroke(R,G,B);
  strokeWeight(2);
  fill(R,G,B);
  if (!firework.isExploded) {
    ellipse(firework.x, firework.y, firework.radius * 2, firework.radius * 2); //center of firework
  } 
  else {
    for (let i = 0; i < firework.lines.length; i++) {
      //determining end point of line using angle and length
      const xEnd =
        firework.x +
        cos(radians(firework.lines[i].angle)) * firework.lines[i].length; //polar coordinates
      const yEnd =
        firework.y +
        sin(radians(firework.lines[i].angle)) * firework.lines[i].length;
      line(firework.x, firework.y, xEnd, yEnd);
    }
  }
}

Overall, I am satisfied with the output. In the future, I would like to make it more realistic by adding some fireworks using particle explosion as well as adding sound.

Week 2 Reading Response: Casey Reas

I found Casey Reas’ talk on Chance Operations highly interesting. As a biologist, the part I myself found most interesting was Reas’ Tissue work, which was based on neuroscientist Valentino Baitenberg’s Vehicles: Experiments in Synthetic Psychology and On the Texture of Brains, books that have become hallmarks in conceiving emergent behaviors from even simple sense-response loops in cybernetics, like a vehicle moving towards the nearest light source. I found it interesting how the different ways of wiring the sensory and motor “neurons” had an impact mainly on the vehicles’ behavior on approaching the light source and beyond. I also loved how he was able to create pretty good-looking artwork just from tracing the random paths of these vehicles, though I realize that he probably had to run it several times more than the number of prints in order to get the most aesthetically consistent results.

Another part that I found interesting was Rosalind Kraus’ scathing review of modernist grid art, a review that Reas unexpectedly cherished. I skimmed over Kraus’ original article (which is 15 pages long) and found that a lot of the seemingly negative aspects of grid art were less coincidental and more deliberate. This is especially true for the complaint about grids being temporally removed from all art preceding it. As Reas mentions in his talk, a lot of modern, postwar art was born from the feelings of despair against both modern science and historical traditions, both of which had combined into the vitriol that fuelled the World Wars. Thus, it only makes sense that art produced in this period similarly reject the traditions that art was built on, becoming abstract to the highest degree in the form of grids.

Assignment 1: Self-Portrait

Overview
For my first assignment, I was tasked with creating a self-portrait using p5 code. I used the different shape functions available within p5 to draw my portrait, such as: ellipses for the face and body, rectangles for the glasses, ghitra, and part of the tarboosha, triangles for the nose and other part of the tarboosha, and a curve for the mouth. I used a picture of myself from Flag Day as a reference image.

Code Highlight
I do not particularly favor any part of my code in specific, but if I had to choose one part, I’d choose the glasses, because it was more time consuming to align the different parts together:

// Draw Glasses
strokeWeight(3);
fill(GlassesColor);
rect(100, 90, 40, 25, 5);
rect(160, 90, 40, 25, 5);  
line(140, 98, 160, 98);
strokeWeight(1);

Reflection
This is an extremely basic drawing with no special functions or complexities. Looking to the future, I definitely have the ability to make a more accurate representation of myself while adding some interactive elements to make the portrait more fun.


Week 2 Assignment: Agar Plate

I got the idea for this assignment while working with bacterial cultures in the lab. The random generation of shapes we did in class kind of reminded me of how bacterial colonies form on agar plates. So, I started by just getting the color of the agar and the bacterial colonies right, similar to the image below.

Colonies of E. coli growing on agar plate. Colonies appear as off-white dots on the yellowish agar 
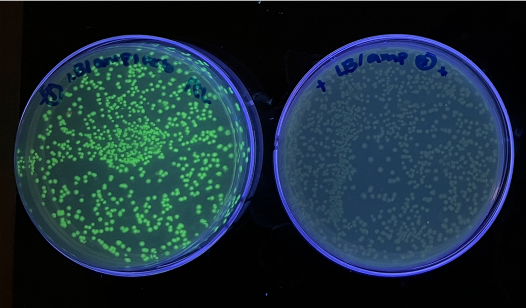
Fig.: E. coli growing on an agar plate

This is when I also started with experimenting with the randomGaussian() function instead of the regular random() function. This allowed the generation of random positions that were more concentrated towards a central position, basically forming what would be a “3D bell curve”, which usually represents biological growth better than true randomness. And adding translucency to the background gave the effect of some colonies gradually “dying” as new ones “grew”.

However, this alone didn’t look good enough. Off-white colonies on a yellowish background could only look somewhat interesting. That’s when I came across photos of microbial art and also remembered work I did in a class with bacteria that were engineered to be bioluminescent using a Green Fluorescent Protein (GFP) from jellyfish.

Microbial Art depicting a beach scene made with fluorescent bacteria2 plates growing E. coli bacteria. Colonies in plate on left express GFP in an LB/Ampicillin/Arabinose medium. Colonies growing in regular LB/Ampicillin medium do not express GFP
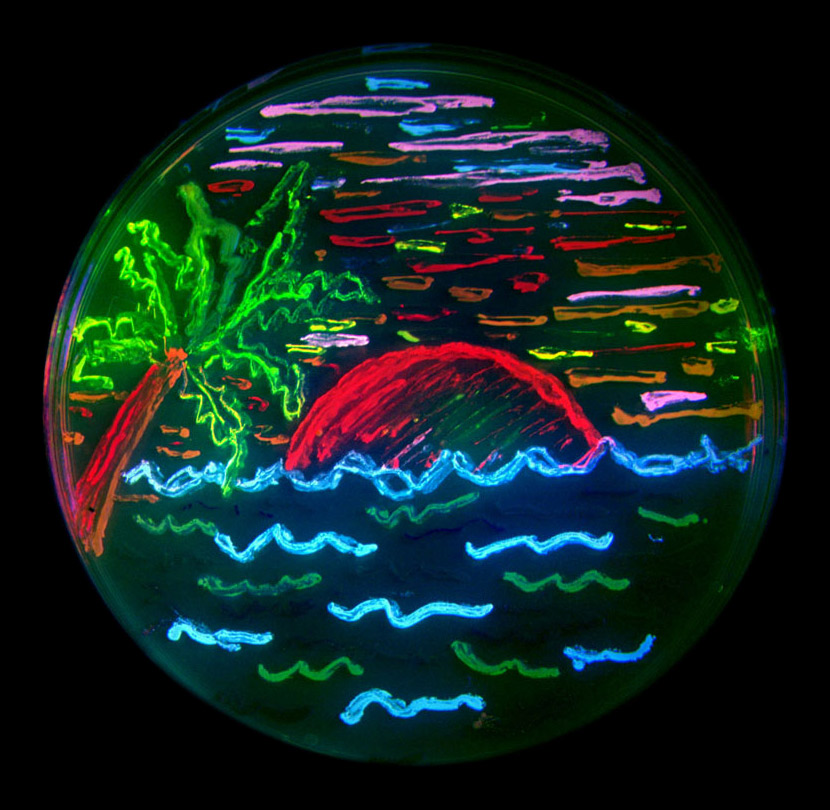
Fig.: (a) Microbial Art from the lab of Prof. Roger Tsien (discoverer of GFP)
(b) Plates with GFP-expressing bacteria under black light grown by me

I wanted to incorporate this in the assignment without losing out on the essence of the original appearance of the colonies. Fortunately, this was easy enough with just an if statement that changed the color variables, and a button that toggled the “UV blacklight” between on/off states.

Next, I wanted to add a bit of interactivity to the project, to allow a user to actually create some microbial art instead of having the colonies just randomly generate in a circle in the centre of the viewport. I decided to create discs that were meant to simulate carbohydrate-impregnated paper discs that can be added to agar plates. These special paper discs gradually diffuse the energy source into the agar, instead of the agar already having an energy source in it. In microbiology, this allows for experiments on how different microbes respond to different energy sources. In this project, it allowed me to easily localize the generation of colonies around multiple user-defined points.

I created a class for the discs, which would allow me to quickly generate them when a mouseClicked() event is triggered, while allowing its properties to be used as a basis for the randomGaussian() functions to generate the colonies. This was my first foray into OOP in JavaScript, and the differences from Python took me by surprise.

The next part was arguably the hardest. I wanted to give the user an option to freeze the plate in time and view their resulting artwork. In the lab, we perform a process called fixation that uses formaldehyde or glutaraldehyde to prevent further growth or death of cells, preserving them for as long as we need them, so it would be cool to give that option to the user too. However, including this feature in a way that did not interfere with the UV toggle was challenging. The easiest way to go about doing this is to use the noLoop() function which interrupts the draw() loop. But in that case, the user was stuck with their last UV setting, whether on or off, as that was also part of the draw loop. Instead, I settled on a compromise, using a multidimensional array to capture colony position and size information for every colony of every disk for the last 2 generations. This data was used to recreate the last 2 generations in the “fixed plate”. While this drastically cut down on the number of visible colonies, I was happy with this compromise as it still allowed to toggle between UV on/off states after the plate was fixed.

if (!fixed) {
    background(plateColor);
    // create arrays to store colony position and size information
    prevColonies = colonies;
    colonies = [];
    for (
      let d = 0, colonyX, colonyY, colonyR, colonySpecs;
      d < discs.length;
      d++
    ) {
      // discs
      fill(discColor);
      discs[d].display();
      // create sub-array to store specific info for each disc
      colonies.push([]);
      // bacterial colonies
      for (let i = 0; i < numColonies; i++) {
        // Gaussian random to ensure aggregation towards discs
        colonyX = randomGaussian(discs[d].x, spread);
        colonyY = randomGaussian(discs[d].y, spread);
        colonyR = random(2, 15);
        colonySpecs = { x: colonyX, y: colonyY, r: colonyR }; // dictionary containing colony info
        colonies[d].push(colonySpecs);
        stroke(colonyBorder);
        strokeWeight(3);
        fill(colonyColor);
        ellipse(colonyX, colonyY, colonyR);
      }
}

The finishing touches were just adding another button to clear the plate (basically a reset button that resets everything to setup state), tweaking the colors, adding conditions for when the discs could be placed (with warnings for when they couldn’t), and setting up simple counters that would very slowly increase the number of generated colonies and how spread out they were from the disc.

The final result can be seen below. Remember that you cannot interact with the plate when it is being irradiated with UV (that’s a skin cancer risk waiting to happen) or when it’s fixed (well, the bacteria are dead already).

Overall, I am very happy with this assignment. It feels like I found a creative way to present laboratory processes that I work with on a regular basis as a Biology major. If there were any changes I would like to make to it in the future, it would probably be in converting the bacteria to objects as well for easier manipulation. I would also like to include a feature to choose the agar and species growing on it, which can allow experimentation with various interesting colors, such as those produced by some bacteria on blood agar, or by various purple, blue, and other colored bacteria or fungi.

Assignment #2 – Reading Response

This talk was very interesting to me, particularly the parts about chance in art and code.

The second Reas started talking about Jean Arp’s artwork, the one about dropping the pieces of paper and just leaving them there, I immediately thought of the concept of “happenings”. Allan Kaprow introduced “happenings” in the 50s as an artistic event which employs randomness and improvisation, particularly in performance art. They typically required the participation of the audience, so the spontaneity of the happenings and the random environments in which they unfolded created an unpredictable result – one that Arp’s work resonates with. I was happy to see that Reas mentioned John Cage and Marcel Duchamp, as they are the predecessors of happenings. John Cage invented the technique of “prepared piano”, in which he would place different items on piano strings in order to change the way they sound. Marcel Duchamp emphasized the role of the viewer in art, affecting the way audience participation contributed to the artwork. His idea, which Reas evokes, that this kind of randomness and chance allows in a way to take a stand against authority, power, and order and to come back to our chaotic nature, is very striking to me.

Moving on to chance in code, I had actually never thought about it. Although I cannot say that chance in code is a happening, I really felt like it resonated with this “fight” against order and rationality. Reas says: “the idea of using a rational machine to do something unexpected was at the time very subversive”. In the demos he shows next, it is then interesting to see how the slightest randomizing in code impacts the images generated. Although codes are very structured, it is then very easy to create something completely unpredictable. This, then, echoes the very unpredictable nature of the results that happenings tried to achieve. In one of the demos, he mentions how one of the codes once mirrored creates images that we start giving meaning to, whether we see a face, a skull, an animal… It reveals how we as a society can make meaning out of art that perhaps was meant to have another meaning, or no meaning at all.

Assignment #2 – Code – ☆Trichromatic Dance☆

For this assignment, I was inspired by one of the films I watched in my first film studies class: Synchromy (dir. Norman McLaren, 1971). This film is  a series of rectangles/squares/lines that vary in position, size, and color – each corresponding to the specific part of the soundtrack. I liked this film as it redefined art for me, particularly avant-garde/experimental film which is the field I lean towards nowadays. I just never thought this is what film could look like until I watched this. Here is the link to the film so you can have an idea:

The visuals were actually not made with a PC. In fact, they were done by scratching over the soundtrack of the film (impressive!), and I thought it could be cool to see how this would work through code instead. Obviously, my artwork is much less elaborate and has no music, but I was visually inspired:

For the color transitions, I used chatGPT to help me understand how to do them. Here is a snippet of the code I incorporated:

let r = sin(frameCount * 0.012 + PI / 2) * 127 + 128;
let g = sin(frameCount * 0.06) * 127 + 128;
let b = sin(frameCount * 0.03 + PI / 2) * 127 + 128;

fill(r, g, b);

First, I set the variables ‘r’, ‘g’, and ‘b’ to animate the three colors (which I then plugged into the ‘fill’ function). I then understood that using the sine function is what will create the oscillation of the colors between 0 and 255. The ‘frameCount’ argument, which is then modified, accounts for the frame rate. As we have seen in class, the generic frame rate is usually 60. By multiplying it, this changes the speed at which the colors transition. The smaller the number by which it is multiplied, the greater the frame rate will be, the quicker the colors will change. For each series (column) of rectangles, I just picked random numbers between 0.01 and 0.09 to multiply ‘frameCount’ with, in order to have different speeds for each ‘r’,’g’, and ‘b’ components of each series. Then, the ‘PI’, ‘PI/2’, and ‘PI/4’ arguments allowed to determine at which phase the sine wave would start. Modifying the phase offset in each series (randomly too) also allowed me to vary the starting color of each column. Finally, the ‘sin()’ function is all multiplied by ‘127+128’. At first, I didn’t really understand why I had to write ‘127+128’ instead of just ‘255’. Then, I used chatGPT to understand that because the sine wave oscillates between -1 and 1, first multiplying it by 127 allowed to get a range between -127 and 127. Then, 128 would be added, and because 128-127=1 and 128+127=255, we could get the range of 1 to 255 which fits the color components of RGB.

It was overall super interesting to learn how to make this, as well as to try and understand how the ‘sin()’ function works altogether in order to create the color transitions. Unfortunately, I accidentally wrote ‘y >= 0’ in one of the for loops at some point towards the end of my code, and I think it sent my code into an infinite loop as the sketch completely froze and I was unable to retrieve any of it. But well, it was a lesson that I had to learn eventually and honestly I had fun practicing all over again.

Assignment 2 – Structured chaos

So basically, after watching the lecture about art and randomness, I wanted to create something chaotic. It does seem as if it doesn’t make sense and everything is random, while in reality, everything is moving using a calculated noise that makes a grey-scale artwork.

Literally, anyone who would say “oh it’s random stuff that doesn’t make sense” I will totally tell him: yes it is. Art sometimes never makes sense and has no purpose other than being chaotic. But, every time you run the code, you will get a totally different output, a different set of squares, different numbers, and of course, different offsets. And there is actually a chance to fill out the screen fully with the squares.

To create the noisy squares that appear like segments I used the noise function.

for(let i =0; i < 500; i+=50){
     for(let j =0; j < 500; j+=50){
        n = noise( (i+xOffset)*0.005, (j*yOffset)*0.005);
          n*=j;

        rect(n, j, 20,20);
  }

The noise function tries to create randomness in a way that is connected to the randomness that was generated before and after. So as I said, all this nonsense is literally structured and calculated.


Assignment 2 – Reading Response

While watching Casey Reas’s video on chance operation, I found the idea of using chance operation to infuse randomness into an otherwise ridged practice of programing remarkable. Nature is the mother of randomness, so I found the idea of combining randomness and programing to create art compelling.

Casey’s quote, attributing machines as instruments of state control, resonated with me; this perspective was not something I had considered before. The utilization of randomness in creating art emerges as a reaction to the historical backdrop of the second World War. This transformation of machines from tools of control to instruments fostering unique, unpredictable artistic expressions intrigued me deeply. Thus, creating art using randomness is making something of an entirely different nature.

The concept of creating something of an entirely different nature through randomness in art challenges conventional notions. Chance operations in music redefine the boundaries of creativity, offering a departure from the controlled and predictable, emphasizing the individuality of each performance, both for the composer and the listener.

The notion of a book filled with a million random digits struck me as amusing, reflecting the technical constraints of the era it originated from. In those times, it was a necessity to have such a compilation for various applications. However, the landscape of randomness has evolved with the advent of modern mathematics, particularly through the development of pseudorandom functions. This progress has rendered the need for a physical book of a million random digits obsolete.

Amidst the evolution of generating randomness, there are also inventive methods that capture one’s imagination. Personally, I find Cloudflare’s lavalamp wall to be a fascinating and creative approach. The utilization of the unpredictable movements of liquid in lavalamps to generate random data adds a touch of artistry to the otherwise technical realm of randomness. The video highlighted how randomness could be harnessed to create art, but it’s equally fascinating to observe how art, in turn, contributes to the realm of randomness.

Week 2 Reading Response – Ordered Chaos

I am fascinated by Reas’ talk on generative art, particularly on how within the randomness of computer-generated images, there can be modifiers and parameters that are adjustable to ensure a desirable output.

In the talk, Reas starts by showcasing images that are generated randomly using computer codes, with them having distinct overarching themes. When I observed the images, a question struck my mind: can these images represent psychological states? Given how there are parameters we can adjust to control the ‘noise’ as Reas mentioned, then it certainly would be possible for these images to represent some kind of mental image.

When he displayed the screen, it struck me that the program used to generate the images was Processing or something similar. Because of this, I am interested to see how it can be done and if our class would discuss this topic.

Reading Reflection – Linh Tran – Week 2 – Digital Art Identification

What defines art? Since the rise of technology and digital world, the art world is gradually shifted from classical arts, the unchangeable details imprint on physical paper, to the digital art pieces, in which the picture is generated by various algorithms. Throughout the talk, Casey Raes displays examples of different art pieces that are made from randomized algorithms. However, this raises the question whether the randomized algorithm creates a unique artwork since the details are generated and produced a different texture. In other words, it is important to understand the line that distinguishes a new art piece.

As in the talk, a single algorithm can produce different behavior and artistic presentation. For example, in one of the scenes, with the same algorithm that is repeatedly re-compiled, the details are output in different angles, shapes and colors. However, it remains obvious that the art pieces are made from the same algorithm because their style and texture combinations stay the same. Therefore, while it is fascinating that the art piece will change with time and space, it seems to me that the algorithm is the one defines digital art. This is because the algorithm controls how the details in the artwork react with each other. Hence, it makes more sense to identify with the constructed algorithm than the randomized display.