Week 11: Lullaby Box by Sihyun and Linh

Concept

While brainstorming for this assignment, we decided that we would like to make a project that utilizes the photocell and the buttons. The photocell changes its resistance value depending on the light intensity. And this inspired us to explore interactions between light presence and absence. We came up with a cute project called the “Lullaby Box”, which plays nursery rhymes when the photocell is covered and a button is pressed. This project features yellow, red, and green buttons, each corresponding to different songs: ‘Mary Had a Little Lamb,’ ‘Twinkle Twinkle Little Star,’ and ‘Happy Birthday Song,’ respectively. The rationale for the songs playing only when the photocell is covered is tied to the project’s purpose: to soothe children to sleep in the dark.

Schematics and Diagram
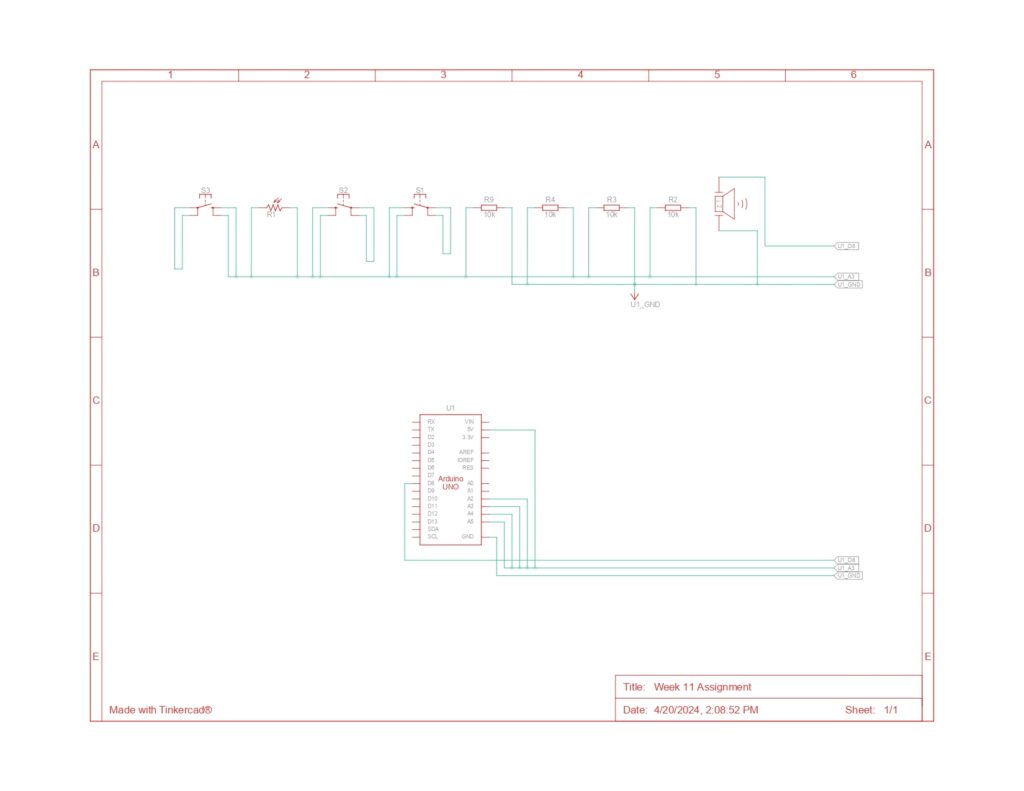
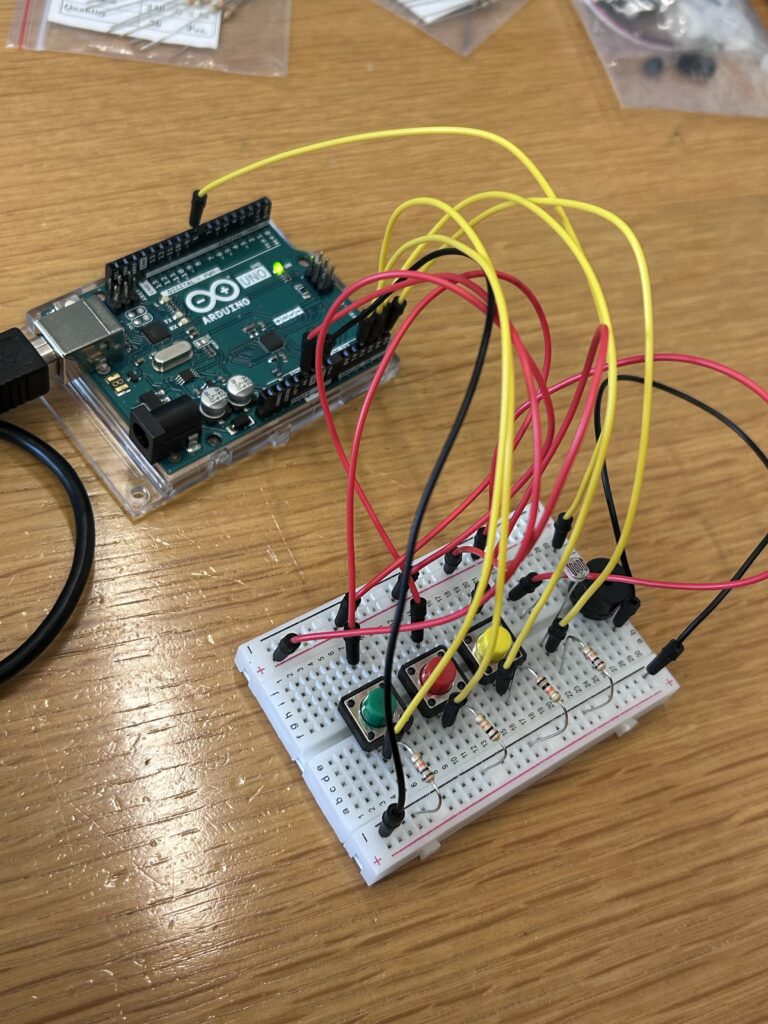
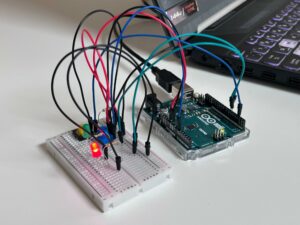
The circuit consists of three main parts: the light sensor, the Piezo Speaker, and the buttons. The light sensor is connected to port A5 for analog reading. It acts as a button in the circuit, allowing the song to play when the photocell is covered. The buttons are the main controller of this assignment. They are connected to ports A2, A3, and A4 for digital reading. The song will only play when the photocell is covered (its value is low) and the button is pressed. Each button is responsible for a different song that will be played by the Piezo Speaker (connected to port 8 for digital output).

Arduino Code

#include "pitches.h"
//mary had a little lamb
int melody1[] = {
  NOTE_E4, NOTE_D4, NOTE_C4, NOTE_D4, NOTE_E4, NOTE_E4, NOTE_E4, NOTE_D4, NOTE_D4, NOTE_D4,
  NOTE_E4, NOTE_G4, NOTE_G4, NOTE_E4, NOTE_D4, NOTE_C4, NOTE_D4, NOTE_E4, NOTE_E4, NOTE_E4,
  NOTE_E4, NOTE_D4, NOTE_D4, NOTE_E4, NOTE_D4, NOTE_C4
};
// twinkle twinkle little star 
int melody2[]={
  NOTE_C4, NOTE_C4, NOTE_G4, NOTE_G4, NOTE_A4, NOTE_A4, NOTE_G4, NOTE_F4, NOTE_F4, NOTE_E4,
  NOTE_E4, NOTE_D4, NOTE_D4, NOTE_C4, NOTE_G4, NOTE_G4, NOTE_F4, NOTE_F4, NOTE_E4, NOTE_E4,
  NOTE_D4, NOTE_G4, NOTE_G4, NOTE_F4, NOTE_F4, NOTE_E4, NOTE_E4, NOTE_D4, NOTE_C4, NOTE_C4,
  NOTE_G4, NOTE_G4, NOTE_A4, NOTE_A4, NOTE_G4, NOTE_F4, NOTE_F4, NOTE_E4, NOTE_E4, NOTE_D4,
  NOTE_D4, NOTE_C4
};
// happy birthday 
int melody3[] = {
  NOTE_G4, NOTE_G4, NOTE_A4, NOTE_G4, NOTE_C5, NOTE_B4,
  NOTE_G4, NOTE_G4, NOTE_A4, NOTE_G4, NOTE_D5, NOTE_C5,
  NOTE_G4, NOTE_G4, NOTE_G5, NOTE_E5, NOTE_C5, NOTE_B4, NOTE_A4,
  NOTE_F5, NOTE_F5, NOTE_E5, NOTE_C5, NOTE_D5, NOTE_C5
};


int noteDurations[] = {
  4, 4, 4, 4, 4, 4, 2, 4, 4, 2, 4, 4, 2, 4, 4, 4, 4, 4, 4, 4, 4, 4, 4, 4, 4, 1
};
int noteDurations2[] = {
  4,4,4,4,4,4,2,4,4,4,4,4,4,2,4,4,4,4,4,4,2,4,4,4,4,4,4,2,4,4,4,4,4,4,2,4,4,4,4,4,4,2
};

int noteDurations3[] = {
  8, 8, 4, 4, 4, 2,
  8, 8, 4, 4, 4, 2,
  8, 8, 4, 4, 4, 4, 4,
  8, 8, 4, 4, 4, 2
};


void setup() {
  Serial.begin(9600);
  pinMode(A4, INPUT); // yellow switch

}

void loop() {
  int sensorValue= analogRead(A5);
  int yellowButtonState = digitalRead(A4);
  int redButtonState = digitalRead(A3);
  int greenButtonState= digitalRead(A2);
  // Serial.println(sensorValue);
  if (sensorValue<=800){
  if (yellowButtonState == HIGH) {
    // Play the melody only if the button is pressed
    for (int thisNote = 0; thisNote < 26; thisNote++) {
      // Check the button state inside the loop
      yellowButtonState = digitalRead(A4);
      if (yellowButtonState == LOW) {
        noTone(8);
        break; // Exit the loop if the button is released
      }

      int noteDuration = 1000 / noteDurations[thisNote];
      tone(8, melody1[thisNote], noteDuration);
      int pauseBetweenNotes = noteDuration * 1.30;

      // Use non-blocking delay
      int startTime = millis();
      while (millis() - startTime < pauseBetweenNotes) {
        // Update the button state
        yellowButtonState = digitalRead(A4);
        if (yellowButtonState == LOW) {
          noTone(8);
          break; // Stop the tone if the button is released
        }
      }
      noTone(8); // Ensure the tone is stopped after the loop
    }
  }
  else if (redButtonState == HIGH) {
    // Play the melody only if the button is pressed
    for (int thisNote = 0; thisNote < 42; thisNote++) {
      // Check the button state inside the loop
      redButtonState = digitalRead(A3);
      if (redButtonState == LOW) {
        noTone(8);
        break; // Exit the loop if the button is released
      }

      int noteDuration = 1000 / noteDurations2[thisNote];
      tone(8, melody2[thisNote], noteDuration);
      int pauseBetweenNotes = noteDuration * 1.30;

      // Use non-blocking delay
      int startTime = millis();
      while (millis() - startTime < pauseBetweenNotes) {
        // Update the button state
        redButtonState = digitalRead(A3);
        if (redButtonState == LOW) {
          noTone(8);
          break; // Stop the tone if the button is released
        }
      }
      noTone(8); // Ensure the tone is stopped after the loop
    }
  }
    else if (greenButtonState == HIGH) {
    // Play the melody only if the button is pressed
    for (int thisNote = 0; thisNote < 25; thisNote++) {
      // Check the button state inside the loop
      greenButtonState = digitalRead(A2);
      if (greenButtonState == LOW) {
        noTone(8);
        break; // Exit the loop if the button is released
      }

      int noteDuration = 1000 / noteDurations3[thisNote];
      tone(8, melody3[thisNote], noteDuration);
      int pauseBetweenNotes = noteDuration * 1.30;

      int startTime = millis();
      while (millis() - startTime < pauseBetweenNotes) {
        // Update the button state
        greenButtonState = digitalRead(A2);
        if (greenButtonState == LOW) {
          noTone(8);
          break; // Stop the tone if the button is released
        }
      }
      noTone(8); // Ensure the tone is stopped after the loop
    }
  }
   else {
    noTone(8); // Ensure the tone is stopped if not in the loop
  }
}}

Firstly, we initialize the code with arrays of the melody we will play. There are 3 different songs: ‘Mary Had a Little Lamb,’ ‘Twinkle Twinkle Little Star,’ and ‘Happy Birthday Song’. Each song will have one array for the notes and another array for the note durations.

Next, we initialized all the input readings at A2, A3, A4, and A5 for the buttons and the photocell. To run the songs, we continuously check for the value of the photocell to allow the buttons to turn on the songs. If the photocell is covered (the value is low), the song will play according to the buttons. For each note that is about to play, the code will check for the state of the button whether it is pressed or not. If the button is not pressed, the song will stop playing immediately.

Built Circuit Based on the Diagram

Demonstration of the Final Outcome

Challenges and Reflection 

 We genuinely enjoyed tackling this assignment, despite its initial challenges. Creating the melodies was particularly tricky since neither of us is knowledgeable about musical composition and notes. Eventually, we grasped what was required and made progress.

A weird issue arose while we were constructing the circuits for this project. To determine the resistance value of the photocell, we attempted to use code and the serial monitor. However, we discovered that the photocell was malfunctioning. Initially, we suspected errors in our coding or circuit assembly. Despite repeatedly consulting past lecture slides, re-uploading the code, and rebuilding the circuit, we couldn’t pinpoint any mistakes. Then, quite mysteriously, the photocell began functioning correctly after another code upload. We still don’t understand the cause of this issue. Aside from this strange incident, we encountered no significant problems throughout the project

For improvement, we would like to add more button switches and songs for the variety of choices.  In this way, the range of songs that the Lullaby box can offer would make this project more entertaining to play with during the nap time of children. Also, we think it would be nice if we could change the volume through the potentiometer. We think that this would enhance user control, allowing the sound level to be easily modified to suit the environment and preferences of the user.



Week 11 | Final Project Ideas – GryoMaze

In my final project, I wanted to create a maze game called GyroMaze. It would be a single-player game, where the player controls the ball with a physical input and drives it from the start to finish point.

Concept & Inspiration

I am super inspired by the gyroscope shrine from Nintendo’s Legend of Zelda: Breath of the Wild, where the player uses the Switch’s gyroscope feature to control the maze and drive the ball around.

However, unlike the video game, the player in GryoMaze would control the ball rather than the maze itself. The concept is similar, turn around the gyroscope device and drive the ball around.

Implementations & Things that would help me

I have been always curious about gyro scopes ever since I started the physical part of this class. For this project, I believe attaching the gyro device to a glove and letting the player control the ball from it would be super awesome!

In my midtern, I utilized p5 play to make the endless runner game Pyro Dancer. Likewise, this project would also use the same library due to its extensive features that would help me a lot (I am looking at you, physics >:) ).

I have also been exploring other options regarding gyro scope. But for now, this game seems very doable for me and intriguing. I also have checked the materials that I would require such as LCD Screens, Gyro Acceloremeters, etc. and booked the on Arts Booking system.

Notes

There are a few concerns that I am aware of. Mostly, I am also working on another class final project and the timings are conflicting with this class, so I will try my best to accomodate both projects.

Using gyro scopes would probably involve a lot of maths, so I will mostly require consulting with the professor or IM Lab assistants to see how feasible my idea is. Regardless, I’m very excited for this final project because it is an idea that i’ve been eager to build!

Resources

6 DOF IMU (3 axis accelerometer, 3 axis gyroscope), Arduino, OpenGL, Python, complementary filter (youtube.com)

How To Make DIY Arduino Gesture Control Robot At Home (youtube.com) (GLOVE INSPO)

How to Use Gyroscopes on the Arduino – Ultimate Guide to the Arduino #43 (youtube.com)

Week 10 – Reading Reflection

“Physical Computing’s Greatest Hits (and Misses)” provides a comprehensive overview of some projects and their applications in the area of physical computing. The examples explore from musical instruments like the Theremin to more advanced concepts like robotics. Each project showcases innovative ways of interfacing with technology through physical gestures or interactions. However, it also makes me think that there are limitations for these successes. For instance, while projects like video mirrors or body-as-cursor offer good ways of interaction, they often lack meaningful engagement or structured feedback. Similarly, remote hugs aim to convey emotions over a network but struggle to replicate the warmth and intimacy of physical touch humans have. Hence, these examples highlight the challenge of bridging the gap between technological capability and human experience in physical computing.

The reading “Making Interactive Art: Set the Stage, Then Shut Up and Listen” presents an analysis against providing explicit interpretations in interactive art. It emphasizes the importance of allowing the audience to engage with the artwork independently, without being directed on how to interpret or interact with it. This notion resonates with several real-life experiences, such as the role of a director working with actors in a theater play. In both scenarios, providing too much guidance or interpretation can suppress creativity and limit the potential for meaningful engagement. Instead, the author suggests creating an environment that encourages exploration and interpretation. Just as actors bring their unique interpretation to a role, audiences bring their own perspectives and emotions to interactive artworks. Therefore, by stepping back and allowing for open interpretation and interaction, artists can facilitate richer and more personal connections between their work and their audience.

Week 10 Reading Reflection

Reflection on “Physical Computing’s Greatest Hits (and misses)”

In “Physical Computing’s Greatest Hits (and misses),” the complex interplay between user interaction and physical computing physics is masterfully broken down. The article examines the ways in which different initiatives seek to build a connection between digital response and human engagement. The investigation of technologies that aid in meditation strikes me as particularly noteworthy. Being a tech and mindfulness fan, I find it fascinating and a little frightening that an essentially qualitative experience can be quantified. Are these devices making the spiritual journey better, or are they just turning it into a set of numbers? This query calls for a more thorough examination of technology’s place in settings that are often designated for pure human experience.

“Digital Wheel Art,” another noteworthy initiative that was highlighted, demonstrates how technology may democratize the creation of art, particularly for people with restricted mobility. It serves as a sobering reminder that technological accessibility is a bridge to equality and self-expression rather than merely a feature. This, together with the creative Sign Language gloves, strengthens my conviction that technology, when used carefully, can serve as a potent force for inclusion rather than just serving a practical purpose.

These illustrations highlight a more general insight that was brought to light by the reading: interactive installations are more than just impressive technical feats; they also reveal human stories and arouse feelings. Therefore, interactive art’s value lies not only in its technological prowess but also in its capacity to speak to our common humanity and elicit a wide range of emotions.

Reflection on “Making Interactive Art: Set the Stage, Then Shut Up and Listen”

With regard to the function of the artist in the age of interactive media, “Making Interactive Art: Set the Stage, Then Shut Up and Listen” presents an interesting perspective. According to the reading, interactive art ought to be a conversation rather than a monologue—a platform for engagement rather than only observation. This speaks to me, especially when it comes to the fear that an artist may have that their creations would be misinterpreted or inappropriately used. The act of giving up control and letting the audience add their own interpretations to the work is evidence of the transformational potential of art.

The spectrum of engagement that creators struggle with is highlighted by the tension between interaction and set narrative, such as that seen in video games or visual novels. These media contest the idea that interactive equals natural, unscripted experiences, proposing instead that the audience’s interpretation and the artist’s intention are complementary elements of a nuanced dialogue.

Thinking about this makes me wonder about the fine line that all artists have to walk. In order to create an environment where art and audience can collaboratively generate meaning, curation involves more than just designing the experience. It also involves managing the lack of direction. It’s a subtle, yet audacious, gesture of faith in the audience’s ability to connect with the work of art, giving each encounter a distinct personality. My comprehension of interactive art has grown as a result of this study, and I now have a greater respect for the bravery and vulnerability that these works of art require.

Week 10 Assignment – light sensor

This projects concept is related to automatic lights, where a sensor detects the amount of light in its surroundings and according to it, it switches lights on and off. So for this assignment, I decided to implement this technique:

This is the code that I used to implement this method:

int photoSensorPin = A0;
int buttonPin = 2;
int ledPin1 = 9;
int ledPin2 = 10;
void setup() {
  pinMode(photoSensorPin, INPUT);
  pinMode(buttonPin, INPUT);
  pinMode(ledPin1, OUTPUT);
  pinMode(ledPin2, OUTPUT);
}
void loop() {
  int sensorValue = analogRead(photoSensorPin);
  int buttonState = digitalRead(buttonPin);
  if (buttonState == HIGH) {
    digitalWrite(ledPin1, LOW);
    digitalWrite(ledPin2, HIGH);
  } else if (sensorValue < 512) {
    digitalWrite(ledPin1, HIGH);
    digitalWrite(ledPin2, LOW);
  } else {
    digitalWrite(ledPin1, LOW);
    digitalWrite(ledPin2, LOW);
  }
}


Reading Response 7

The article “Physical Computing’s Greatest Hits (and misses)” offers an exploration of various classes of physical computing projects and the dynamics between implementation and engagement. The concept of “Meditation Helpers” caught my attention as someone interested in cognitive psychology and mindfulness. While these devices aim to guide users into a meditative state by measuring physiological indicators like heart rate and breath rate or stress through measuring sweat gland activity, I wonder about their effectiveness. Can technology truly facilitate mindfulness, or does it risk reducing meditation to a quantifiable metric? The reading prompted me to consider the role of technology in spiritual practices and whether it enhances or detracts from the essence of meditation. Another example that I found to be very innovative was Younghyun Chung’s “Digital Wheel Art”. I have always raised the question of accessibility in interactive installations. However, his project demonstrates that by utilizing technology to track and interpret bodily movements, individuals who may have limited mobility or dexterity can also engage in interactive experiences with greater ease and independence. Thus, physical computing can be leveraged to create inclusive and accessible solutions for individuals with disabilities. Another example of this is Sign Language gloves, which attempt to convert the motions of sign language into written or spoken words, which can help people who are deaf or hard of hearing to communicate easier with a hearing person.

Furthermore, the article prompted me to reconsider the essence of interactive art and its intrinsic connection to human emotions and experiences. The idea that interactive art should evoke feelings and thoughts rather than merely showcase technological prowess struck a chord with me. It reminded me that the true essence of art lies in its ability to stir emotions and provoke introspection, fostering a collaborative relationship between the artist and the audience. Overall, the article sparked a renewed curiosity in exploring the delicate balance between technical innovation and human connection in interactive art.


The article “Making Interactive Art” resonated with me deeply, particularly its emphasis on allowing the audience to interpret and engage with the work independently. It reminded me of my own experiences with interactive art installations, where the most impactful moments occurred when I was given the freedom to explore and interact without being told what to think or do. Like I mentioned earlier, art is truly interactive when there is open conversation between the artist and the viewer. In simple terms: show, don’t tell.

I appreciated the comparison the author drew between designing interactive art and directing actors in a performance. It highlighted the importance of providing the audience with tools and cues to guide their interaction while allowing room for individual interpretation and discovery. However, I found myself questioning whether there might be instances where some level of guidance or interpretation could enhance the audience’s experience without detracting from their autonomy. For example, some modern artworks look like random nonsense to me before I’m told the hidden meaning. 

Week 10 – Interactive/traditional switches

Project Concept:

Drawing inspiration from everyday objects and interactions, this assignment presents a simple light switch and dimmer found in most houses around the world. I’m reimagining these familiar components in a playful and interactive way using Arduino and LEDs. The dynamics consists of a modern twist on traditional controls, where pressing a button toggles the red LED while turning a knob adjusts the brightness of the green LED.

Materials:

  • Arduino Uno board
  • Jumper wires
  • Green LED
  • Red LED
  • Two 330 ohm resistors
  • One 10k ohm resistor
  • Push button
  • Potentiometer

Implementation: 

The circuit reflects the simplicity and functionality of a traditional light switch and dimmer. The push button acts as the on/off switch for the red LED, providing tactile feedback similar to pressing a light switch. Meanwhile, the potentiometer emulates the rotary dial of a dimmer, allowing users to adjust the brightness of the green LED by turning the knob.

Schematics:


Code:

const int SENSOR_PIN = A0; // Analog input pin for sensor controlling red LED brightness
const int CONTROL_PIN = 2; // Digital input pin for control button to switch LED colors
const int RED_LED = 5;  // Digital output pin for LED (red)
const int GREEN_LED = 6;  // Digital output pin for LED (green)

int redBrightness = 0; // Red LED brightness controlled by sensor
bool buttonPressed = false; // Button state
int colorIndex = 0; // Index of current color

void setup() {
  pinMode(SENSOR_PIN, INPUT);
  pinMode(CONTROL_PIN, INPUT_PULLUP);
  pinMode(RED_LED, OUTPUT);
  pinMode(GREEN_LED, OUTPUT);
}

void loop() {
  // Read sensor value to control brightness of red LED
  redBrightness = analogRead(SENSOR_PIN) / 4; // Divide by 4 to map 0-1023 to 0-255
  
  // Set the brightness of the red LED
  analogWrite(RED_LED, redBrightness);
  
  // Check control button state
  if (digitalRead(CONTROL_PIN) == LOW) {
    if (!buttonPressed) {
      // Toggle color index
      colorIndex = (colorIndex + 1) % 2;
      buttonPressed = true;
      
      // Turn on green LED when button is pressed
      digitalWrite(GREEN_LED, HIGH);
    }
  } else {
    buttonPressed = false;
    // Turn off green LED when button is released
    digitalWrite(GREEN_LED, LOW);
  }
}


Video Demonstration:

Reflection and Improvements:

Finally, I’m satisfied with the project outcome, as it bridges the gap between simplicity and innovation, reimagining everyday objects in a playful and interactive manner while showcasing the creative potential of Arduino-based projects. Some improvements are as follow:

  • Experiment with different button and knob designs to enhance user experience and aesthetic appeal.
  • Integrate additional sensors, such as light sensors or temperature sensors, to create more dynamic lighting effects and automation capabilities.

production assignment week 10

This project allows us to control the brightness of two LEDs – one red and one green – using a potentiometer and a push button.

Here’s what you’ll see in the video:
An Arduino Uno board.
A potentiometer, acting as a dimmer switch.
A push button for an instant override.
Two LEDs, red and green, responding to our commands.

How does it work?
Let’s dive into the details:
The Potentiometer: As you turn the knob, it sends varying voltage values to the Arduino. The code interprets these values and maps them to control the brightness of the LEDs. Turning one way brightens the green LED while dimming the red, and vice versa.
The Push Button: This acts as an override switch. No matter what the potentiometer setting is, pressing the button instantly turns the red LED on to full brightness.

Technical Insights:
The project utilizes the Arduino’s analog input capabilities to read the potentiometer values and its PWM (Pulse Width Modulation) functionality to control the LED brightness.
The push button is connected to a digital input pin, allowing the Arduino to detect button presses and trigger the override function.

void loop() {
  int sensorValue = analogRead(A0);
  buttonState = digitalRead(btn);
    brightness = map(sensorValue,0,1023,0,255);

  brightness2 = map(sensorValue,0,1023,255,0);

  analogWrite(led,brightness);
    analogWrite(led2, brightness2);

  if (buttonState == HIGH) {
      analogWrite(led,255);
  }

  Serial.println(sensorValue);

}


Week 10 | Beyond Ideas

I started picking up my first console when I was around four years old. It was Nintendo’s Gameboy Advance console. To this day, I still remember my first time inserting the cartridges, booting up the machine, and blasting hours and hours into Pokémon FireRed. The feeling of being immersed into an alternate world despite it being on a screen a few inches wide, and with few buttons to press, still blows my mind.

Nintendo-Game-Boy-Advance-Purple-FL

Gameboy Advance. Nintendo.

Even if it’s just 8 buttons, the console opened a rift to a new reality

Igoe clarifies that interactivity should be a gateway to endless possibilities rather than a fixated destination. Similarly, the console’s interactiveness only goes as far as the buttons and screen, yet game developers utilize those mechanics to propel the user one step closer to experiencing the Kanto Region (Pokémon FireRed’s world).

Video games, to me, are a new type of art–a premature one that is. Unlike paintings, books, or movies, it is a medium of art that takes shape by the user, rather than the author. Plus, because of how young they are, there is still room for the medium to grow.

I was thinking about how physical computing machines mentioned in Igoe’s post are not commercialized. Because these are new ideas, they still require rigorous testing and adjustments to fit our society. Yet, video game console challenges this idea. Floor dances, gloves, VR headsets, all these new devices are the pillars of future technologies. Hence, is it not better for us to embrace it as soon as possible?

Week 10 Reading Response: Tom Igoe

Making Interactive Art: Set the Stage, Then Shut Up and Listen

This was a pretty interesting look into interactive media as a participatory media. Often artists tend to be afraid of their art being assigned a wrong meaning, and artistic clarifications usually keep popping up well after a work is created (JK Rowling is a particularly glaring example). It stems from a fear that our own beliefs, our own creation, will be inevitably challenged by the audience. This is even more true for something that involves even more two-way communication, like an interactive art showcase. Even in our own documentation, it is tempting to include an exact user guide of how to “use” our art. And while user guides are helpful for products, they might not have the same effect in art.

That is not to say however, that all interactive art has to be fully participatory and unscripted. This again goes back to the debate we had when discussing Chris Crawford’s The Art of Interactive Design. Once again, the question pops up of whether interactive is participatory, or whether it has to be organic. For example, a lot of games are deeply scripted, and while it may be argued that playing the game is an organic experience of its own, it doesn’t change the fact that in a lot of games, you will be seeing most, if not all, the events that are meant to happen. Visual novels are another example. By most definitions of interactivity, they are not interactive, being no better than picture books. Yet, they do feel interactive in their own way.

At the end of the day, it is up to the artist and what compromise they make between interactivity and meaning.

Physical Computing’s Greatest Hits (and misses)

This was a nice look at different classes of physical computing projects and the benefits and challenges of each. Usually, there seems to be a common theme where there is a compromise between implementation and engagement. Relatively simpler projects like the theremin, floor pad, video mirrors, and Scooby Doo paintings may be easier to implement and more common, but they also lose engagement quickly. On the other hand, more complex mechanical pixels, body/hand cursors, multi-touch interfaces and fields of grass may be more engaging but often run into implementation or maintenance issues that take away some of the charm. In a way, my main takeaway from the article was that rather than your physical computing mechanism, what is more important is the story and how the mechanisms tie in to the story being told.