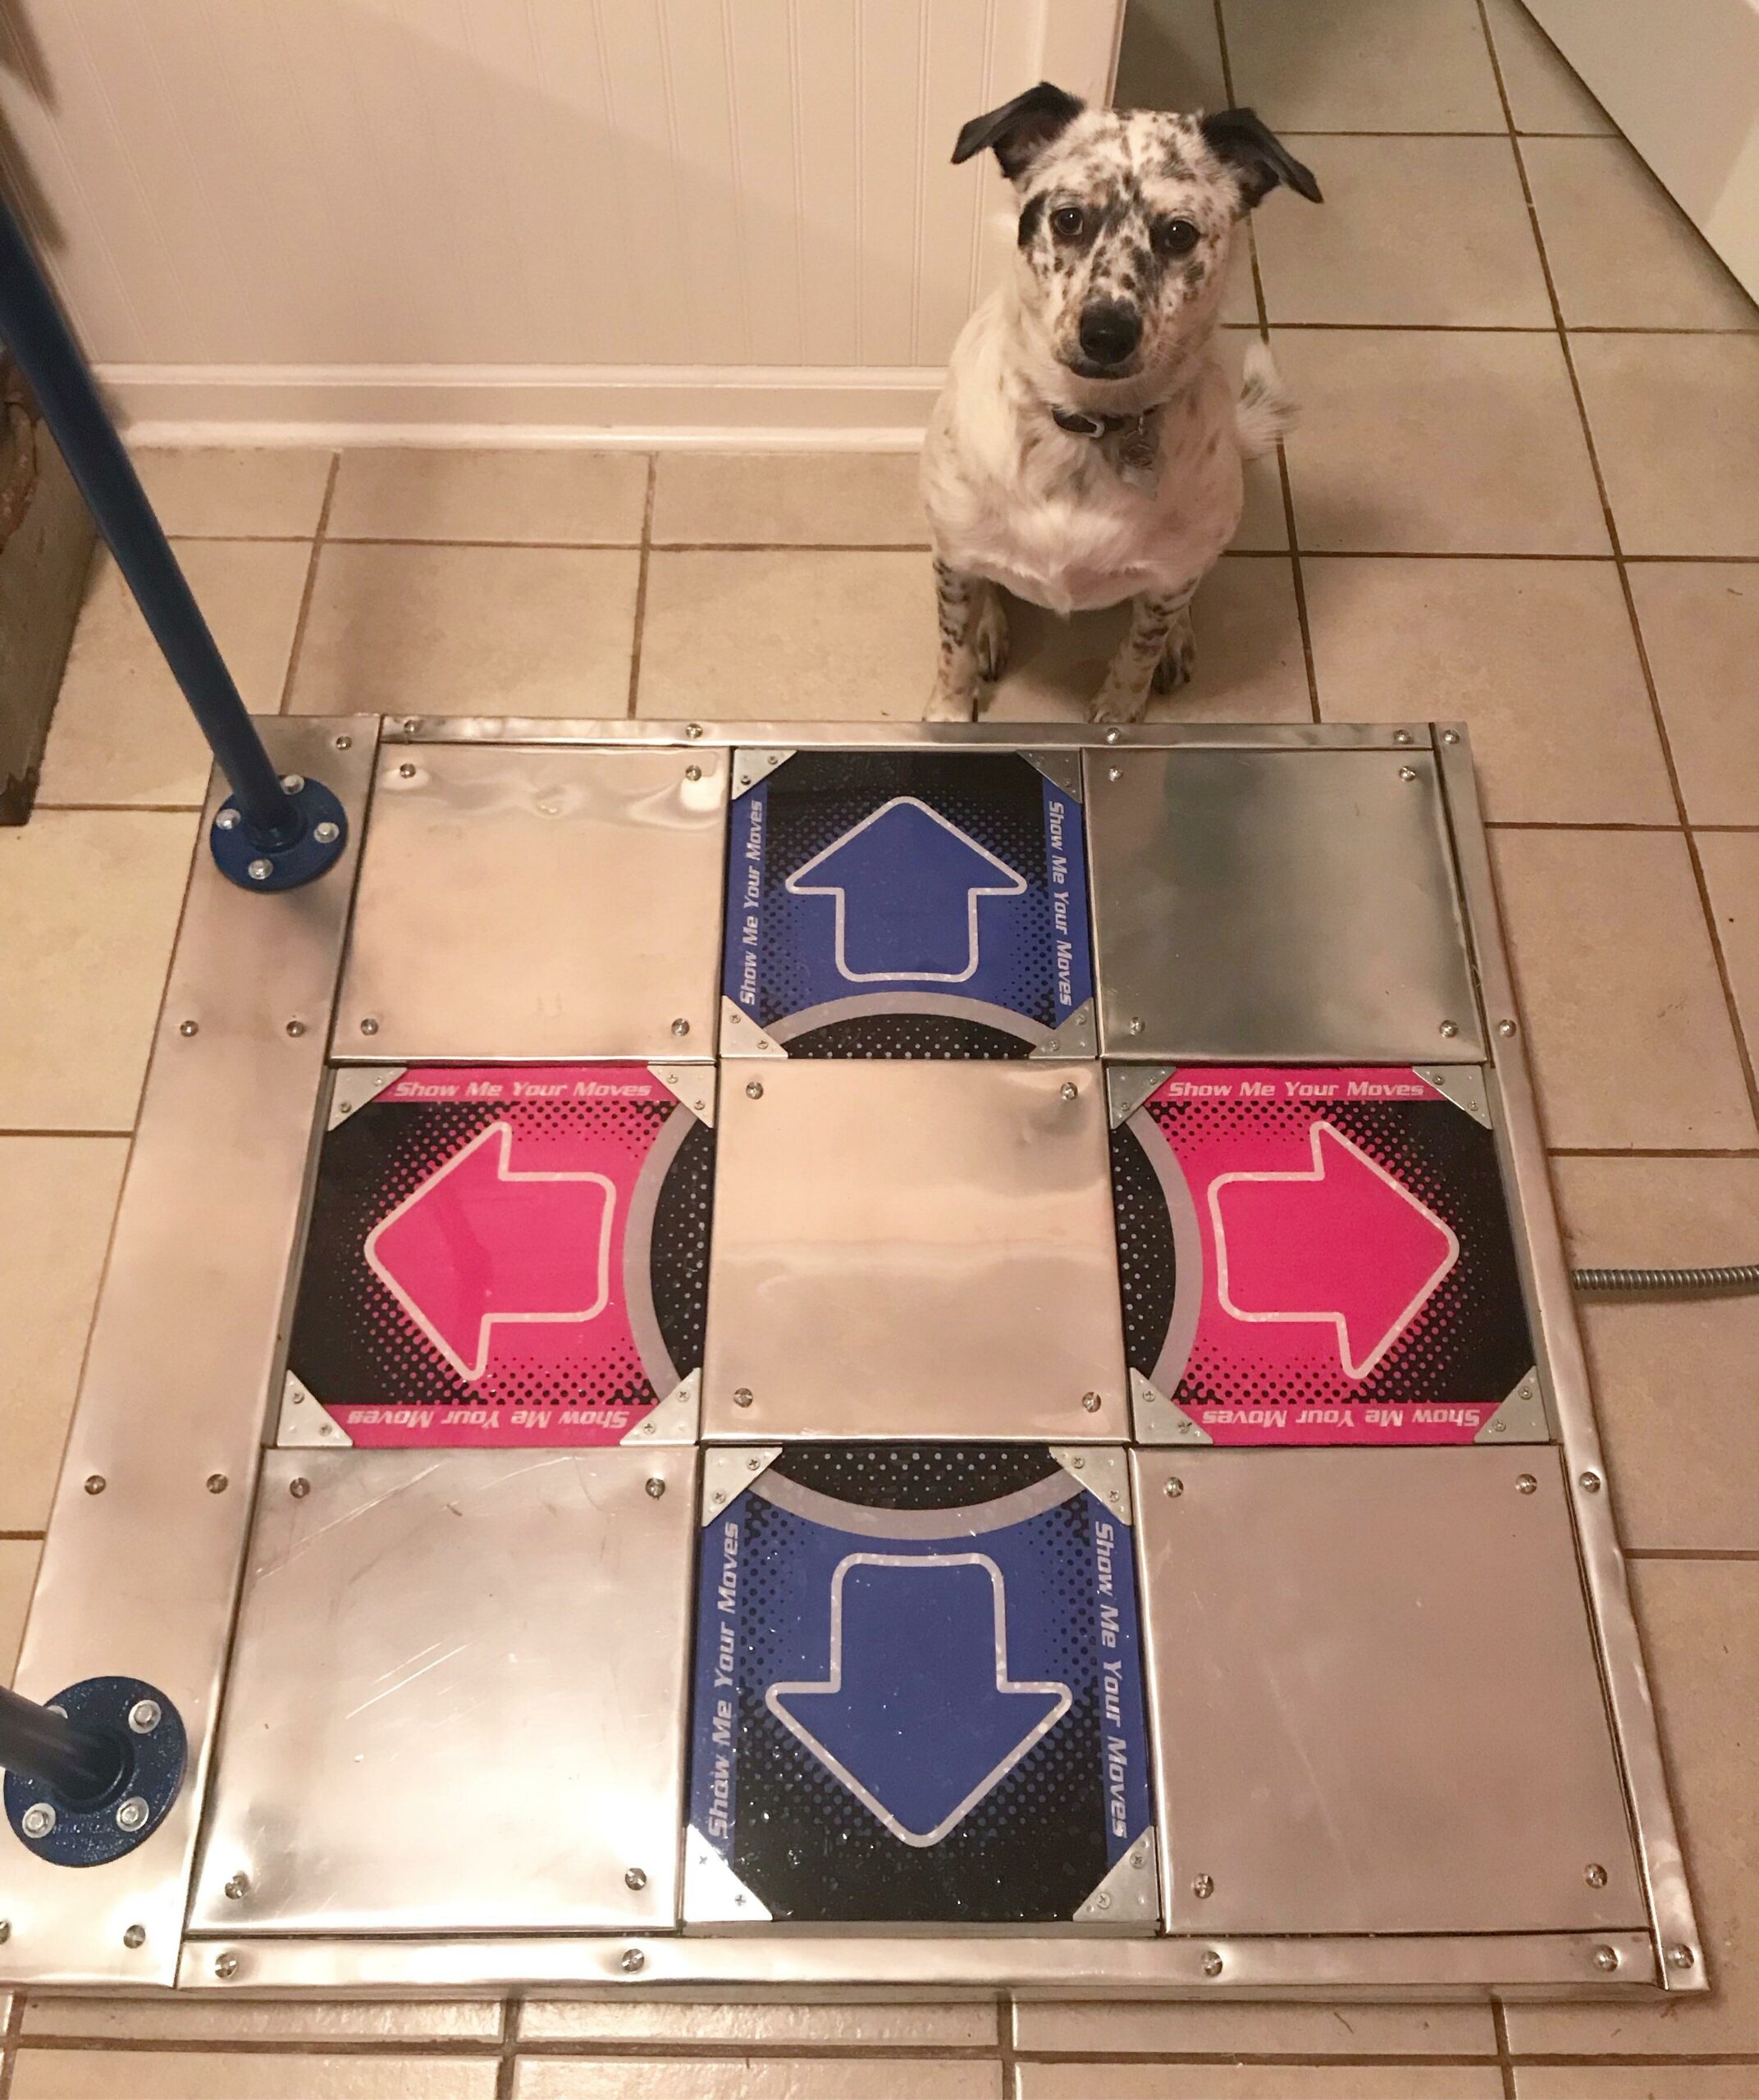
For my finally project, I was inspired by a classic Japanese video game called “Dance Revolution.” In this game, the user hears a song and has to tap on the right tiles of the platform that is under them in order to win the game: the tiles on which the person has to tap on appear faster and the game becomes harder over time. However, to put my own spin on the project, I decided to reverse the idea, and create “Dance Evolution.” In this game, the user will not be given a prior song but rather a set of tiles that they have to press on, similar to the original, and construct the song themselves.
picture taken from https://www.reddit.com/r/DanceDanceRevolution/comments/85guhf/my_self_made_ddr_pad_gallery_and_howto_in_comments/
The tiles will be modeled after the iconic “Dance Revolution” tiles.
Implementation:
The user will construct the song with the help of a set of successive arrows that they have to tap on, which in turn represent a certain instrument. After tapping, these instruments will be layered and will start turning into an actual song. The trick is that the user has to tap on the arrows/tiles in a timely manner, as the time slot for a successful tap will shrink over time. The user wins if they are able to tap on all tiles correctly and create the song that consists of all instruments: the beat, the bass, the chords, the melody, the pad, etc. The user loses if they do not tap on the tile on time, thereby ruining the structure of the song.
The instruments will most likely be generated using p5.js, in order to add an element of randomness and unpredictability so that the melodies and the beats heard in one round of the game will be different in another round. The user will also have the possibility of changing the key of the song by using a distance sensor, allowing them to hear the song in different renditions of their own volition.
For the final project I wanted to do something with drawings and LEDs. So I went with the simple idea of transferring a drawing in p5Js to outputs in LED patterns. I will play around with what other features I could add such as adding colour, brightness (using the alpha in p5Js), gradients, and more.
The project is aimed at entertaining the user, through lightings and real-time feedback as they explore the potential of controlling LEDs through drawing something on the screen.
Implementation
For the user input of the drawings, I will use p5Js and prompt the user to draw something onto the canvas, providing them with colour options. I am also exploring the idea of taking a real-time picture of them and showing their silhouettes through the LED patterns.
As for the physical LED pattern, I will be using Arduino to map the pixels onto their corresponding LED. It will not be a one-to-one mapping as it would take an absurd amount of LEDs otherwise. For the latter idea of a real-time picture, I am planning on roughly mapping their outlines onto the LED.
let xVal = 0; //initializing the X value for the position

function setup() {
  createCanvas(640, 480);
}

function draw() {
  background(230);
  if (!serialActive) {
    text("Press Space Bar to select Serial Port", 20, 30);
  } else {
    // draw an ellipse
    ellipse(xVal, height/2, 100, 50); //giving the ellipse the value of the x position initialized above

  }
}

function keyPressed() {
  if (key == " ") {
    // important to have in order to start the serial connection!!
    setUpSerial();
  }
}

function readSerial(data) {
  if (data != null) {
    xVal = map(data, 0, 500, 0, width); //mapping the values received from the photosensor to control the X position of the ellipse
    console.log(data);
  }
}
const int pSensor = A0;

void setup() {
  pinMode(pSensor, INPUT);
  Serial.begin(9600);
}

void loop() {
  int val = analogRead(pSensor); //initializing the value received from the sensor
  Serial.println(val); //sending the value of the sensor to p5js
}
Video:
Exercise 2
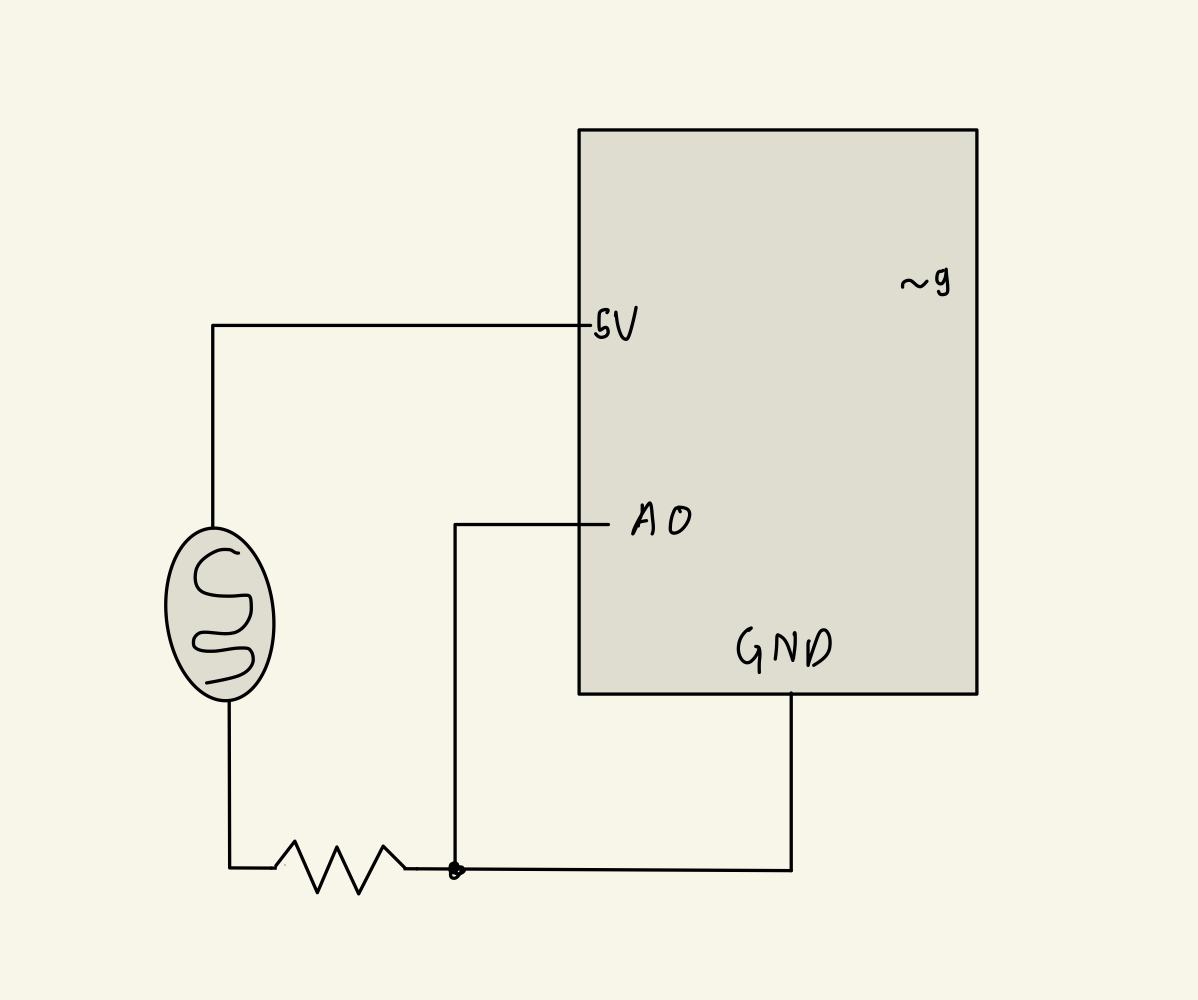
Scheme:
Code:
//p5js code

let change = 0; //initializing the variable for the distance between two consecutive center points of the rectangle
let previousX; //initializing the variable for the X dimension of the previous position of the rectangle
let previousY; //initializing the variable for the Y dimension of the previous position of the rectangle

function setup() {
  createCanvas(640, 480);
  textSize(18);
  textAlign(CENTER);
  previousX = 0;
  previousY = 0;
}

function draw() {
  background('red');

  if (!serialActive) {
    fill('white');
    text("Press Space Bar to select Serial Port", width/2, height/2);
  } else {
    fill('white');
    rectMode(CENTER);
    rect(mouseX, mouseY, 200,200); //controlling the center of the rectangle with the mouse
    fill('black');
    text("Move as fast as you can to control the brightness of the LED", width/2,20);
    getChange(); //calling the function that will track the distance between the two consecutive positions of the rectangle
  }

}

//calculating the distance of two consecutive rectangle positions
function getChange(){
  change = floor(sqrt(pow((mouseX - previousX),2) + pow((mouseY - previousY),2)));
  previousX = mouseX;
  previousY = mouseY;
}

function keyPressed() {
  if (key == " ") {
    setUpSerial();
  }
}

function readSerial(data) {
  if (data != null) {
    console.log(change);
    writeSerial(change); //sending the value of the distance two control the LED brightness
  }
}
const int led = 9;

void setup() {
  // put your setup code here, to run once:
  pinMode(led, OUTPUT);
  Serial.begin(9600);

  while (Serial.available() <= 0) {
    Serial.println("0");
    delay(300);
  }
}

void loop() {
  while (Serial.available()) {
    int brightness = Serial.parseInt(); // read the incoming data as an integer
    analogWrite(led, brightness); // set the LED brightness based on incoming data
    Serial.println();
  }
}
Video:
Exercise 3
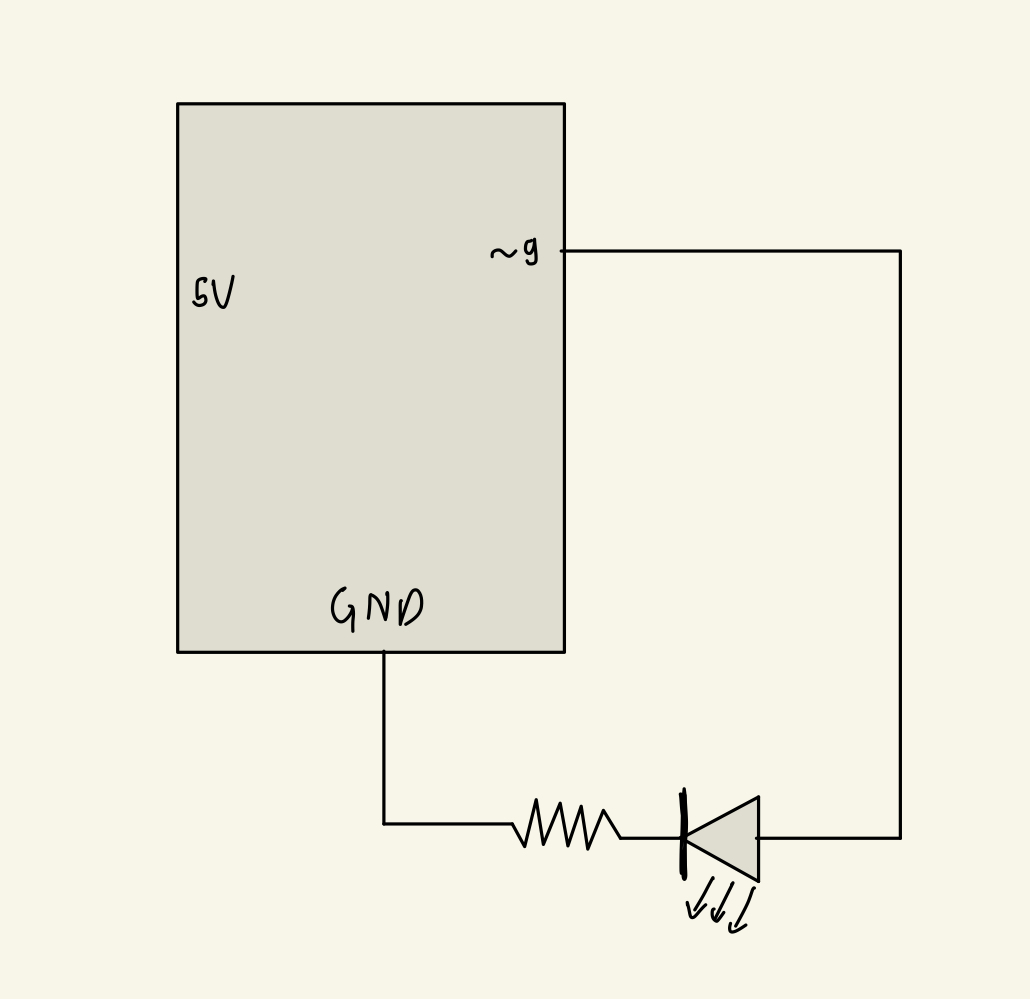
Scheme:
Code:
//p5js code

let velocity;
let gravity;
let position;
let acceleration;
let wind;
let drag = 0.99;
let mass = 50;

let ard_wind = 1; //initializing the wind speed
let bit;

function setup() {
  createCanvas(640, 360);
  position = createVector(width / 2, 0);
  velocity = createVector(0, 0);
  acceleration = createVector(0, 0);
  gravity = createVector(0, 0.5 * mass);
  wind = createVector(0, 0);
  bit = 0; //initializing the value for the LED
}

function draw() {
  background(255);

  if (!serialActive) {
    text("Press Space Bar to select Serial Port", 20, 30);
  } else {
    applyForce(wind);
    applyForce(gravity);
    velocity.add(acceleration);
    velocity.mult(drag);
    position.add(velocity);
    acceleration.mult(0);
    ellipse(position.x, position.y, mass, mass);

    if (position.y > height - mass / 2) {
      velocity.y *= -0.9; // A little dampening when hitting the bottom
      position.y = height - mass / 2;
      bit = 1; //lighting up the LED upon collision with "the ground"
    } else {
      bit = 0; //turning off the LED when the ball is not touching "ground"
    }
  }
}

function applyForce(force) {
  // Newton's 2nd law: F = M * A
  // or A = F / M
  let f = p5.Vector.div(force, mass);
  acceleration.add(f);
}

function keyPressed() {
  if (keyCode == LEFT_ARROW) {
    wind.x = ard_wind * -1; //when left arrow is pressed, the velocity of the wind attains a negative value and the ball moves to the left
  }
  if (keyCode == RIGHT_ARROW) {
    wind.x = ard_wind; //when the right arrow is pressed, the velocity of the wind attains a positive value and the ball moves to the right
  }
  if (keyCode == DOWN_ARROW) {
    mass = random(15, 80);
    position.y = -mass;
    velocity.mult(0);
  }
  if (key == " ") {
    // important to have in order to start the serial connection!!
    setUpSerial();
  }
}

function readSerial(data) {
  if (data != null) {
    let sen = bit + "\n";
    writeSerial(sen); //sending the values to light up or turn off the LED

    ard_wind = map(data, 0, 300, 0, 10); // mapping the data received from arduino to a sensible range for the wind velocity
    console.log(ard_wind);
  }
}
const int led = 12;
const int photoSensor = A0;

void setup() {
  // put your setup code here, to run once:
  Serial.begin(9600);
  pinMode(led, OUTPUT);
  pinMode(photoSensor, INPUT);

  while (Serial.available() <= 0) {
    Serial.println(0);
    // delay(300);
  }
}

void loop() {
  while (Serial.available() > 0) {
    int bit = Serial.parseInt(); // read the incoming data as an integer
    digitalWrite(led, bit); // set the LED brightness based on incoming data

 //send the values of the photosensor to p5js
    int val = analogRead(photoSensor);
    Serial.println(val);
  }
}
let xVal = 0; //initializing the X value for the position

function setup() {
  createCanvas(640, 480);
}

function draw() {
  background(230);
  if (!serialActive) {
    text("Press Space Bar to select Serial Port", 20, 30);
  } else {
    // draw an ellipse
    ellipse(xVal, height/2, 100, 50); //giving the ellipse the value of the x position initialized above

  }
}

function keyPressed() {
  if (key == " ") {
    // important to have in order to start the serial connection!!
    setUpSerial();
  }
}

function readSerial(data) {
  if (data != null) {
    xVal = map(data, 0, 500, 0, width); //mapping the values received from the photosensor to control the X position of the ellipse
    console.log(data);
  }
}
const int pSensor = A0;

void setup() {
  pinMode(pSensor, INPUT);
  Serial.begin(9600);
}

void loop() {
  int val = analogRead(pSensor); //initializing the value received from the sensor
  Serial.println(val); //sending the value of the sensor to p5js
}
Video:
Exercise 2
Scheme:
Code:
//p5js code

let change = 0; //initializing the variable for the distance between two consecutive center points of the rectangle
let previousX; //initializing the variable for the X dimension of the previous position of the rectangle
let previousY; //initializing the variable for the Y dimension of the previous position of the rectangle

function setup() {
  createCanvas(640, 480);
  textSize(18);
  textAlign(CENTER);
  previousX = 0;
  previousY = 0;
}

function draw() {
  background('red');

  if (!serialActive) {
    fill('white');
    text("Press Space Bar to select Serial Port", width/2, height/2);
  } else {
    fill('white');
    rectMode(CENTER);
    rect(mouseX, mouseY, 200,200); //controlling the center of the rectangle with the mouse
    fill('black');
    text("Move as fast as you can to control the brightness of the LED", width/2,20);
    getChange(); //calling the function that will track the distance between the two consecutive positions of the rectangle
  }

}

//calculating the distance of two consecutive rectangle positions
function getChange(){
  change = floor(sqrt(pow((mouseX - previousX),2) + pow((mouseY - previousY),2)));
  previousX = mouseX;
  previousY = mouseY;
}

function keyPressed() {
  if (key == " ") {
    setUpSerial();
  }
}

function readSerial(data) {
  if (data != null) {
    console.log(change);
    writeSerial(change); //sending the value of the distance two control the LED brightness
  }
}
const int led = 9;

void setup() {
  // put your setup code here, to run once:
  pinMode(led, OUTPUT);
  Serial.begin(9600);

  while (Serial.available() <= 0) {
    Serial.println("0");
    delay(300);
  }
}

void loop() {
  while (Serial.available()) {
    int brightness = Serial.parseInt(); // read the incoming data as an integer
    analogWrite(led, brightness); // set the LED brightness based on incoming data
    Serial.println();
  }
}
Video:
Exercise 3
Scheme:
Code:
//p5js code

let velocity;
let gravity;
let position;
let acceleration;
let wind;
let drag = 0.99;
let mass = 50;

let ard_wind = 1; //initializing the wind speed
let bit;

function setup() {
  createCanvas(640, 360);
  position = createVector(width / 2, 0);
  velocity = createVector(0, 0);
  acceleration = createVector(0, 0);
  gravity = createVector(0, 0.5 * mass);
  wind = createVector(0, 0);
  bit = 0; //initializing the value for the LED
}

function draw() {
  background(255);

  if (!serialActive) {
    text("Press Space Bar to select Serial Port", 20, 30);
  } else {
    applyForce(wind);
    applyForce(gravity);
    velocity.add(acceleration);
    velocity.mult(drag);
    position.add(velocity);
    acceleration.mult(0);
    ellipse(position.x, position.y, mass, mass);

    if (position.y > height - mass / 2) {
      velocity.y *= -0.9; // A little dampening when hitting the bottom
      position.y = height - mass / 2;
      bit = 1; //lighting up the LED upon collision with "the ground"
    } else {
      bit = 0; //turning off the LED when the ball is not touching "ground"
    }
  }
}

function applyForce(force) {
  // Newton's 2nd law: F = M * A
  // or A = F / M
  let f = p5.Vector.div(force, mass);
  acceleration.add(f);
}

function keyPressed() {
  if (keyCode == LEFT_ARROW) {
    wind.x = ard_wind * -1; //when left arrow is pressed, the velocity of the wind attains a negative value and the ball moves to the left
  }
  if (keyCode == RIGHT_ARROW) {
    wind.x = ard_wind; //when the right arrow is pressed, the velocity of the wind attains a positive value and the ball moves to the right
  }
  if (keyCode == DOWN_ARROW) {
    mass = random(15, 80);
    position.y = -mass;
    velocity.mult(0);
  }
  if (key == " ") {
    // important to have in order to start the serial connection!!
    setUpSerial();
  }
}

function readSerial(data) {
  if (data != null) {
    let sen = bit + "\n";
    writeSerial(sen); //sending the values to light up or turn off the LED

    ard_wind = map(data, 0, 300, 0, 10); // mapping the data received from arduino to a sensible range for the wind velocity
    console.log(ard_wind);
  }
}
const int led = 12;
const int photoSensor = A0;

void setup() {
  // put your setup code here, to run once:
  Serial.begin(9600);
  pinMode(led, OUTPUT);
  pinMode(photoSensor, INPUT);

  while (Serial.available() <= 0) {
    Serial.println(0);
    // delay(300);
  }
}

void loop() {
  while (Serial.available() > 0) {
    int bit = Serial.parseInt(); // read the incoming data as an integer
    digitalWrite(led, bit); // set the LED brightness based on incoming data

 //send the values of the photosensor to p5js
    int val = analogRead(photoSensor);
    Serial.println(val);
  }
}
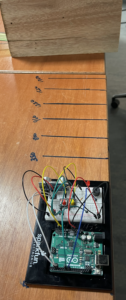
Moeez and I collaborated on a project and aimed to push our limits. Our goal was to create a table piano using an ultrasonic sensor, a sensor we had never used before. As we reminisced about our experiences with musical instruments, we recognized the hassle the school music band encountered carrying bulky and expensive pianos around. To tackle this issue, we came up with a solution: a table piano. We attached the sensor and the Arduino to the table and marked lines on the table using a scale and a marker. A fixed point was established at the end to indicate the piano’s length. We divided the piano into seven notes and utilized the Serial Monitor to determine the distance for each “Piano Key.” Afterwards, we researched online and discovered the notes that play “Jingle Bells” and assigned them to the keys in the table piano. To enhance the piano’s functionality, we included two buttons – one to switch the sensor on and off and the other to play “Jingle Bells” automatically. The first button controlled the sensor and simultaneously controlled the LED as well. This was done to allow the user to know when the sensor is on and when it is off. The second button was implemented as an auto-tune feature to enable users to listen to the tune first and then practice the keys themselves to replicate the tune. The good thing about this piano is that you can add or remove as many keys as you want and practice on specific keys too. Additionally, it is beginner-friendly and portable.
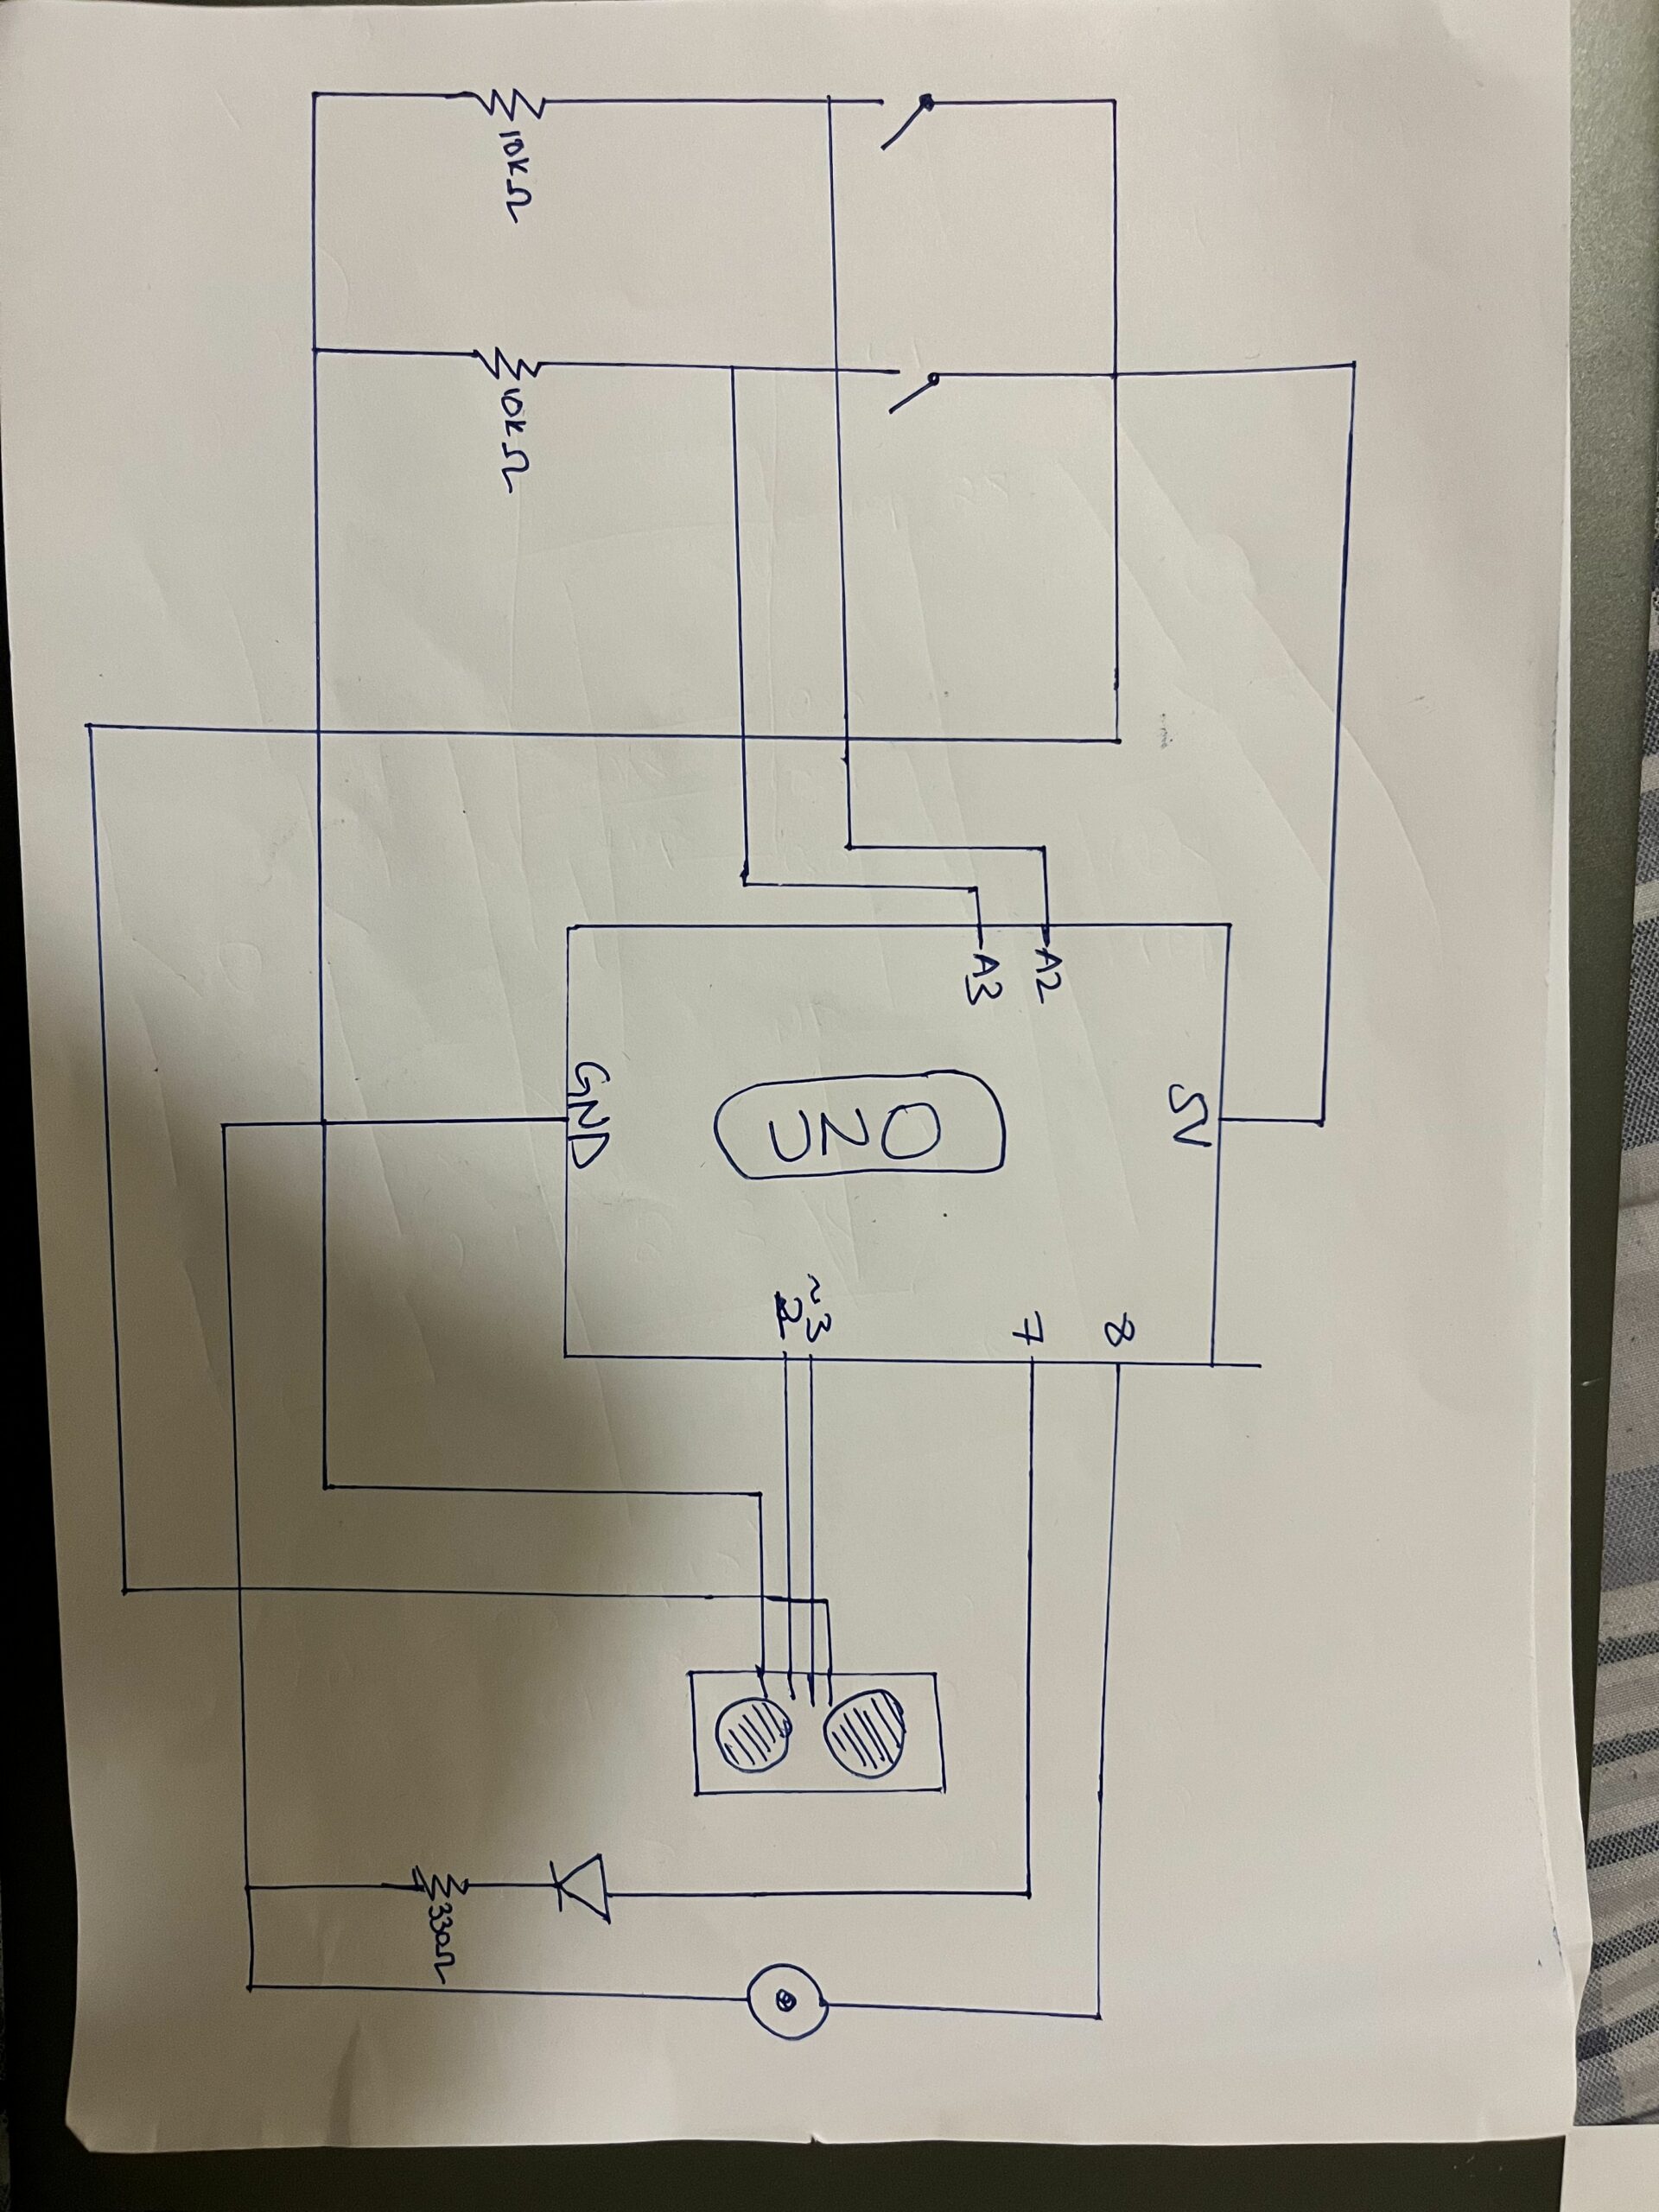
Code and Circuit:
As we built-up upon previous class knowledge of how circuits and Arduino code works, we found the implementing process to be relatively easy. The code and circuit looks like this:
//Define the pins used for the ultrasonic sensor, buzzer, buttons, and LED
const int pingPin = 2; //Trigger Pin of Ultrasonic Sensor
const int echoPin = 3; //Echo Pin of Ultrasonic Sensor
const int buzzerPin = 8;
const int redButton = A3;
const int yellowButton = A2;
const int LEDbutton = 7;

//Initialize variables used in the program
int pressed = 0;
long distance = 0;
int redPosition = 0;
int yellowPosition = 0;
int redCount = 1;
int yellowCount = 1;

//Include the pitches library for generating tones
#include "pitches.h"

void setup()
{
 //Start serial communication at 9600 baud
 Serial.begin(9600);

 //Set the ultrasonic sensor pins as output and input respectively
 pinMode(pingPin, OUTPUT);
 pinMode(echoPin, INPUT);

 //Set the button pins as inputs and the LED pin as an output
 pinMode(redButton, INPUT);
 pinMode(yellowButton, INPUT);
 pinMode(LEDbutton, OUTPUT);

 //Turn off the LED initially
 digitalWrite(LEDbutton, LOW);
}

void loop()
{
  //Read the positions of the red and yellow buttons
  redPosition = digitalRead(redButton);
  delay(100); //add delay to avoid double reading accidentally
  yellowPosition = digitalRead(yellowButton);
  delay(100);

  //Increment the appropriate button count if a button is pressed
  if (redPosition == HIGH)
  {
    redCount++;
  }

  if (yellowPosition == HIGH)
  {
    yellowCount++;
  }

  //Play Jingle Bells and turn off the LED if both button counts are even (both buttons pressed)
  if (redCount % 2 == 0 && yellowCount % 2 == 0)
  {
    digitalWrite(LEDbutton, LOW); //LED turned off to tell that sensor turned off
    jingleBells();
  }
  else if (redCount % 2 == 0) //if only the red button is pressed and the count is even
  {
    sensorReading(); //then start the sensor
    digitalWrite(LEDbutton, HIGH); //turn on LED to indicate the sensor is on
  }
  else if (yellowCount % 2 == 0) //if yellow button is pressed and is even
  {
    jingleBells(); //play Jingle Bells
    digitalWrite(LEDbutton, LOW); //turn off LED to indicate sensor is off
  }
  else
  {
    digitalWrite(LEDbutton, LOW); //if none of the buttons were pressed and no counter was even
    noTone(8); //play nothing
  }
}

//Function to read the ultrasonic sensor and play a tone based on the distance measured
void sensorReading()
{
  //Send a short low pulse
  digitalWrite(pingPin, LOW);
  delay(2); //delay to avoid complications
  digitalWrite(pingPin, HIGH); //sends a high pulse for 10 microseconds
  delay(10);
  digitalWrite(pingPin, LOW);
  distance = pulseIn(echoPin, HIGH); //Measure the duration of the ultrasonic pulse and calculate the distance
  distanceNotes(distance); //play the notes based on the distance
  delay(408);
}

//function that plays jingle bells automatically
void jingleBells()
{
  tone(buzzerPin, NOTE_E4, 400);
  delay(408);
  tone(buzzerPin, NOTE_E4, 400);
  delay(408);
  tone(buzzerPin, NOTE_E4, 400);
  delay(408);
  tone(buzzerPin, NOTE_E4, 400);
  delay(408);
  tone(buzzerPin, NOTE_E4, 400);
  delay(408);
  tone(buzzerPin, NOTE_E4, 400);
  delay(408);
  tone(buzzerPin, NOTE_E4, 400);
  delay(408);
  tone(buzzerPin, NOTE_G4, 400);
  delay(408);
  tone(buzzerPin, NOTE_C4, 400);
  delay(408);
  tone(buzzerPin, NOTE_D4, 400);
  delay(408);
  tone(buzzerPin, NOTE_E4, 400);
  delay(408);
  tone(buzzerPin, NOTE_F4, 400);
  delay(408);
  tone(buzzerPin, NOTE_F4, 400);
  delay(408);
  tone(buzzerPin, NOTE_F4, 400);
  delay(408);
  tone(buzzerPin, NOTE_F4, 400);
  delay(408);
  tone(buzzerPin, NOTE_F4, 400);
  delay(408);
  tone(buzzerPin, NOTE_F4, 400);
  delay(408);
  tone(buzzerPin, NOTE_E4, 400);
  delay(408);
  tone(buzzerPin, NOTE_E4, 400);
  delay(408);
  tone(buzzerPin, NOTE_E4, 400);
  delay(408);
  tone(buzzerPin, NOTE_E4, 400);
  delay(408);
  tone(buzzerPin, NOTE_D4, 400);
  delay(408);
  tone(buzzerPin, NOTE_D4, 400);
  delay(408);
  tone(buzzerPin, NOTE_E4, 400);
  delay(408);
  tone(buzzerPin, NOTE_D4, 400);
  delay(408);
  tone(buzzerPin, NOTE_G4, 400);
  delay(408);
  yellowCount++; //yellow count increments to stop the tune from playing again (not on loop)
}

void distanceNotes(long distance)
{
  if (distance >= 1750) //if the distance is greater than 1750
  {
    noTone(8); //then dont play anything
    pressed = 0; //reinitialize the key pressed variable to 0 so other keys can be pressed
  }
  else if (distance >= 1520 && pressed == 0) //for each distance, there is a specific note
  {
    tone(buzzerPin, NOTE_E4, 400);
    pressed = 1; //do this to avoid the same note being played repeatedly
  }
  else if (distance >= 1220 && pressed == 0)
  {
    tone(buzzerPin, NOTE_G4, 400);
    pressed = 1;
  }
  else if (distance >= 960 && pressed == 0)
  {
    tone(buzzerPin, NOTE_C4, 400);
    pressed = 1;
  }
  else if (distance >= 800 && pressed == 0)
  {
    tone(buzzerPin, NOTE_D4, 400);
    pressed = 1;
  }
  else if (distance >= 350 && pressed == 0)
  {
    tone(buzzerPin, NOTE_F4, 400);
    pressed = 1;
  }
  else if (distance < 350 && pressed == 0)
  {
    tone(buzzerPin, NOTE_B0, 400);
    pressed = 1;
  }
}
Final Product:
The final circuit and implementation looks like this:
Future Improvements:
For the future, we would want to get better ranged sensors to increase the length of the piano. Moreover, an idea that came to our minds a bit too late was allowing the user to press a button and then record what they have played. Then pressing another button would play the tune they have played for them to fully analyze their progress. In the future, we would want to add other tunes that the user could access using different buttons for practice. Additionally, the user accessing different preset keys could also be a possible improvement. Apart from all of this, the Jingle Bells function could have been implemented better using an array and a for-loop.
Zaid and I collaborated on a project and aimed to push our limits. Our goal was to create a table piano using an ultrasonic sensor, a sensor we had never used before. As we reminisced about our experiences with musical instruments, we recognized the hassle the school music band encountered carrying bulky and expensive pianos around. To tackle this issue, we came up with a solution: a table piano. We attached the sensor and the Arduino to the table and marked lines on the table using a scale and a marker. A fixed point was established at the end to indicate the piano’s length. We divided the piano into seven notes and utilized the Serial Monitor to determine the distance for each “Piano Key.” Afterwards, we researched online and discovered the notes that play “Jingle Bells” and assigned them to the keys in the table piano. To enhance the piano’s functionality, we included two buttons – one to switch the sensor on and off and the other to play “Jingle Bells” automatically. The first button controlled the sensor and simultaneously controlled the LED as well. This was done to allow the user to know when the sensor is on and when it is off. The second button was implemented as an auto-tune feature to enable users to listen to the tune first and then practice the keys themselves to replicate the tune. The good thing about this piano is that you can add or remove as many keys as you want and practice on specific keys too. Additionally, it is beginner-friendly and portable.
Code and Circuit:
As we built-up upon previous class knowledge of how circuits and Arduino code works, we found the implementing process to be relatively easy. The code and circuit looks like this:
//Define the pins used for the ultrasonic sensor, buzzer, buttons, and LED
const int pingPin = 2; //Trigger Pin of Ultrasonic Sensor
const int echoPin = 3; //Echo Pin of Ultrasonic Sensor
const int buzzerPin = 8;
const int redButton = A3;
const int yellowButton = A2;
const int LEDbutton = 7;

//Initialize variables used in the program
int pressed = 0;
long distance = 0;
int redPosition = 0;
int yellowPosition = 0;
int redCount = 1;
int yellowCount = 1;

//Include the pitches library for generating tones
#include "pitches.h"

void setup()
{
 //Start serial communication at 9600 baud
 Serial.begin(9600);

 //Set the ultrasonic sensor pins as output and input respectively
 pinMode(pingPin, OUTPUT);
 pinMode(echoPin, INPUT);

 //Set the button pins as inputs and the LED pin as an output
 pinMode(redButton, INPUT);
 pinMode(yellowButton, INPUT);
 pinMode(LEDbutton, OUTPUT);

 //Turn off the LED initially
 digitalWrite(LEDbutton, LOW);
}

void loop()
{
  //Read the positions of the red and yellow buttons
  redPosition = digitalRead(redButton);
  delay(100); //add delay to avoid double reading accidentally
  yellowPosition = digitalRead(yellowButton);
  delay(100);

  //Increment the appropriate button count if a button is pressed
  if (redPosition == HIGH)
  {
    redCount++;
  }

  if (yellowPosition == HIGH)
  {
    yellowCount++;
  }

  //Play Jingle Bells and turn off the LED if both button counts are even (both buttons pressed)
  if (redCount % 2 == 0 && yellowCount % 2 == 0)
  {
    digitalWrite(LEDbutton, LOW); //LED turned off to tell that sensor turned off
    jingleBells();
  }
  else if (redCount % 2 == 0) //if only the red button is pressed and the count is even
  {
    sensorReading(); //then start the sensor
    digitalWrite(LEDbutton, HIGH); //turn on LED to indicate the sensor is on
  }
  else if (yellowCount % 2 == 0) //if yellow button is pressed and is even
  {
    jingleBells(); //play Jingle Bells
    digitalWrite(LEDbutton, LOW); //turn off LED to indicate sensor is off
  }
  else
  {
    digitalWrite(LEDbutton, LOW); //if none of the buttons were pressed and no counter was even
    noTone(8); //play nothing
  }
}

//Function to read the ultrasonic sensor and play a tone based on the distance measured
void sensorReading()
{
  //Send a short low pulse
  digitalWrite(pingPin, LOW);
  delay(2); //delay to avoid complications
  digitalWrite(pingPin, HIGH); //sends a high pulse for 10 microseconds
  delay(10);
  digitalWrite(pingPin, LOW);
  distance = pulseIn(echoPin, HIGH); //Measure the duration of the ultrasonic pulse and calculate the distance
  distanceNotes(distance); //play the notes based on the distance
  delay(408);
}

//function that plays jingle bells automatically
void jingleBells()
{
  tone(buzzerPin, NOTE_E4, 400);
  delay(408);
  tone(buzzerPin, NOTE_E4, 400);
  delay(408);
  tone(buzzerPin, NOTE_E4, 400);
  delay(408);
  tone(buzzerPin, NOTE_E4, 400);
  delay(408);
  tone(buzzerPin, NOTE_E4, 400);
  delay(408);
  tone(buzzerPin, NOTE_E4, 400);
  delay(408);
  tone(buzzerPin, NOTE_E4, 400);
  delay(408);
  tone(buzzerPin, NOTE_G4, 400);
  delay(408);
  tone(buzzerPin, NOTE_C4, 400);
  delay(408);
  tone(buzzerPin, NOTE_D4, 400);
  delay(408);
  tone(buzzerPin, NOTE_E4, 400);
  delay(408);
  tone(buzzerPin, NOTE_F4, 400);
  delay(408);
  tone(buzzerPin, NOTE_F4, 400);
  delay(408);
  tone(buzzerPin, NOTE_F4, 400);
  delay(408);
  tone(buzzerPin, NOTE_F4, 400);
  delay(408);
  tone(buzzerPin, NOTE_F4, 400);
  delay(408);
  tone(buzzerPin, NOTE_F4, 400);
  delay(408);
  tone(buzzerPin, NOTE_E4, 400);
  delay(408);
  tone(buzzerPin, NOTE_E4, 400);
  delay(408);
  tone(buzzerPin, NOTE_E4, 400);
  delay(408);
  tone(buzzerPin, NOTE_E4, 400);
  delay(408);
  tone(buzzerPin, NOTE_D4, 400);
  delay(408);
  tone(buzzerPin, NOTE_D4, 400);
  delay(408);
  tone(buzzerPin, NOTE_E4, 400);
  delay(408);
  tone(buzzerPin, NOTE_D4, 400);
  delay(408);
  tone(buzzerPin, NOTE_G4, 400);
  delay(408);
  yellowCount++; //yellow count increments to stop the tune from playing again (not on loop)
}

void distanceNotes(long distance)
{
  if (distance >= 1750) //if the distance is greater than 1750
  {
    noTone(8); //then dont play anything
    pressed = 0; //reinitialize the key pressed variable to 0 so other keys can be pressed
  }
  else if (distance >= 1520 && pressed == 0) //for each distance, there is a specific note
  {
    tone(buzzerPin, NOTE_E4, 400);
    pressed = 1; //do this to avoid the same note being played repeatedly
  }
  else if (distance >= 1220 && pressed == 0)
  {
    tone(buzzerPin, NOTE_G4, 400);
    pressed = 1;
  }
  else if (distance >= 960 && pressed == 0)
  {
    tone(buzzerPin, NOTE_C4, 400);
    pressed = 1;
  }
  else if (distance >= 800 && pressed == 0)
  {
    tone(buzzerPin, NOTE_D4, 400);
    pressed = 1;
  }
  else if (distance >= 350 && pressed == 0)
  {
    tone(buzzerPin, NOTE_F4, 400);
    pressed = 1;
  }
  else if (distance < 350 && pressed == 0)
  {
    tone(buzzerPin, NOTE_B0, 400);
    pressed = 1;
  }
}
Final Product:
The final circuit and implementation looks like this:
Future Improvements:
For the future, we would want to get better ranged sensors to increase the length of the piano. Moreover, an idea that came to our minds a bit too late was allowing the user to press a button and then record what they have played. Then pressing another button would play the tune they have played for them to fully analyze their progress. In the future, we would want to add other tunes that the user could access using different buttons for practice. Additionally, the user accessing different preset keys could also be a possible improvement. Apart from all of this, the Jingle Bells function could have been implemented better using an array and a for-loop.
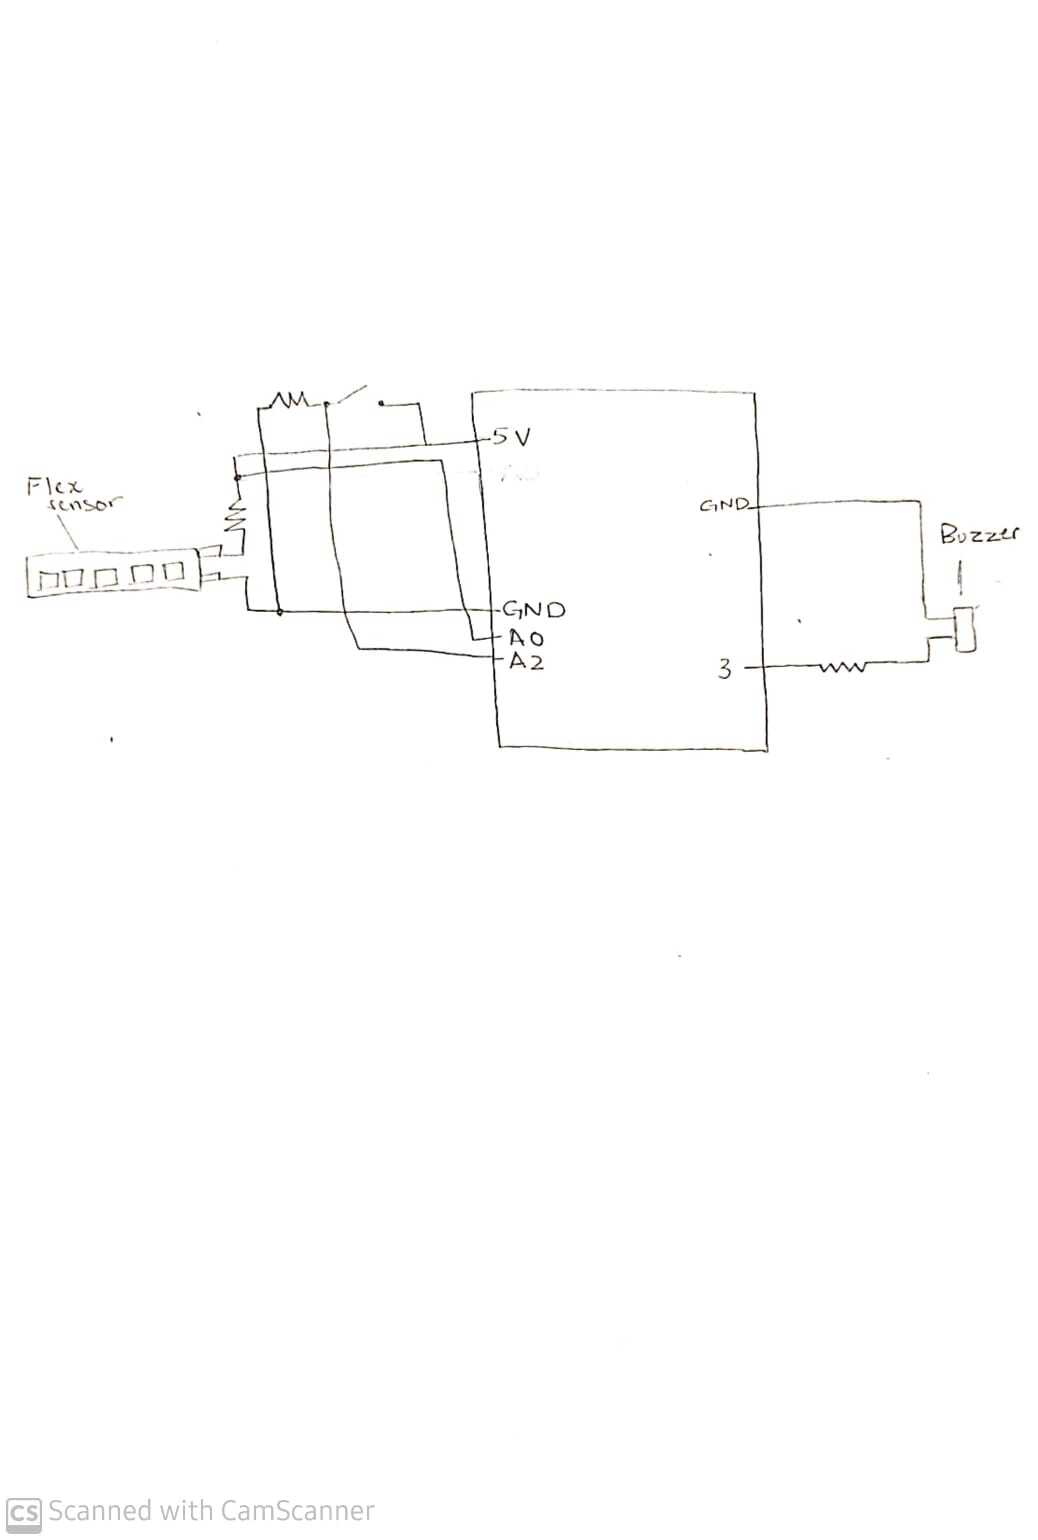
For this assignment, we wanted to make a musical instrument that was controlled by a user’s motion. So, we came up with the idea of changing the output tone based on the input from a flex sensor. For this, we attached a flex sensor to a glove so that when a user wears the glove and bends their hand, the input changes, and depending on how much the user bends their hand, the tone changes. To implement this, we saved a number of notes in an array. The input from the flex sensor is mapped to values between 0 and the size of the array so that for different measurements of the ‘bend’ of the hand, a different number is obtained after mapping and a note is picked from the array at that number. Moreover, we used a switch to play another tone, so that when the switch is turned on, a different tone made up of a set of notes is played. When the switch is turned off, the user can control the output melody using their hand. We played with different durations and frequencies until we found the one we liked.
Schematic
Video
Code
#include "pitches.h"
const int Buzzer1=3;
const int flexPin = A0;
int value;
//array of notes
int melody[] = {
  NOTE_E5, NOTE_D5, NOTE_C5, NOTE_D5, NOTE_E5, NOTE_E5, NOTE_E5,
  NOTE_D5, NOTE_D5, NOTE_D5, NOTE_E5, NOTE_G5, NOTE_G4, NOTE_E5,
  NOTE_D5, NOTE_C5, NOTE_D5, NOTE_E5, NOTE_E5, NOTE_E5, NOTE_E5,
  NOTE_D5, NOTE_D5, NOTE_E5, NOTE_D5, NOTE_C5
};
void setup()
{
  Serial.begin(9600);
  pinMode(Buzzer1, OUTPUT);
  pinMode(A2, INPUT);
}
void loop()
{
  int button = digitalRead(A2);
  //when button is pressed, play a predefined tone (happy brithday music)
  if (button == HIGH)
  {
    Serial.print("SWITCH ON\n");
    //tone(Buzzer1, 200, 1200);
    // play a melody using tone()
  tone(Buzzer1, NOTE_C4, 250); delay(250);
  tone(Buzzer1, NOTE_C4, 250); delay(250);
  tone(Buzzer1, NOTE_D4, 500); delay(500);
  tone(Buzzer1, NOTE_C4, 500); delay(500);
  tone(Buzzer1, NOTE_F4, 500); delay(500);
  tone(Buzzer1, NOTE_E4, 1000); delay(1000);

  tone(Buzzer1, NOTE_C4, 250); delay(250);
  tone(Buzzer1, NOTE_C4, 250); delay(250);
  tone(Buzzer1, NOTE_D4, 500); delay(500);
  tone(Buzzer1, NOTE_C4, 500); delay(500);
  tone(Buzzer1, NOTE_G4, 500); delay(500);
  tone(Buzzer1, NOTE_F4, 1000); delay(1000);
  }
  //if button is not pressed, read value from flex sensor
  //map the value to a number that is within 0 and the max index of array melody
  //use this mapped value as an index and play the note from that particular index
  else if (button == LOW)
  {
    Serial.print("OFF\n");

  value= analogRead(flexPin);
  // Serial.print("\nvalue is: ");
  // Serial.print(value);
  int size = sizeof(melody)/sizeof(melody[0]);
  value = map(value, 850, 1050, 0, size);

  tone(Buzzer1,melody[value],1200);
  //Serial.print("\n Note is: " );
  //Serial.print(melody[value]);
  delay(300);
  }
}
Future Improvements
For later, we can improve by first attaching the flex sensor inside the glove more securely so that the instrument produces more consistent sounds. Also, we can add an additional buzzer with the switch to play a sound continuously in the back while the user uses the flex sensor to add more sounds on top of it.
For this assignment, we wanted to make a musical instrument that was controlled by a user’s motion. So, we came up with the idea of changing the output tone based on the input from a flex sensor. For this, we attached a flex sensor to a glove so that when a user wears the glove and bends their hand, the input changes, and depending on how much the user bends their hand, the tone changes. To implement this, we saved a number of notes in an array. The input from the flex sensor is mapped to values between 0 and the size of the array so that for different measurements of the ‘bend’ of the hand, a different number is obtained after mapping and a note is picked from the array at that number. Moreover, we used a switch to play another tone, so that when the switch is turned on, a different tone made up of a set of notes is played. When the switch is turned off, the user can control the output melody using their hand. We played with different durations and frequencies until we found the one we liked.
Schematic
Video
Code
#include "pitches.h"

const int Buzzer1=3;
const int flexPin = A0;
int value;

//array of notes
int melody[] = {
  NOTE_E5, NOTE_D5, NOTE_C5, NOTE_D5, NOTE_E5, NOTE_E5, NOTE_E5,
  NOTE_D5, NOTE_D5, NOTE_D5, NOTE_E5, NOTE_G5, NOTE_G4, NOTE_E5,
  NOTE_D5, NOTE_C5, NOTE_D5, NOTE_E5, NOTE_E5, NOTE_E5, NOTE_E5,
  NOTE_D5, NOTE_D5, NOTE_E5, NOTE_D5, NOTE_C5
};

void setup()
{
  Serial.begin(9600);
  pinMode(Buzzer1, OUTPUT);
  pinMode(A2, INPUT);
}

void loop()
{
  int button = digitalRead(A2);
  //when button is pressed, play a predefined tone (happy brithday music)
  if (button == HIGH)
  {
    Serial.print("SWITCH ON\n");
    //tone(Buzzer1, 200, 1200);
    // play a melody using tone()
  tone(Buzzer1, NOTE_C4, 250); delay(250);
  tone(Buzzer1, NOTE_C4, 250); delay(250);
  tone(Buzzer1, NOTE_D4, 500); delay(500);
  tone(Buzzer1, NOTE_C4, 500); delay(500);
  tone(Buzzer1, NOTE_F4, 500); delay(500);
  tone(Buzzer1, NOTE_E4, 1000); delay(1000);

  tone(Buzzer1, NOTE_C4, 250); delay(250);
  tone(Buzzer1, NOTE_C4, 250); delay(250);
  tone(Buzzer1, NOTE_D4, 500); delay(500);
  tone(Buzzer1, NOTE_C4, 500); delay(500);
  tone(Buzzer1, NOTE_G4, 500); delay(500);
  tone(Buzzer1, NOTE_F4, 1000); delay(1000);
  }
  //if button is not pressed, read value from flex sensor
  //map the value to a number that is within 0 and the max index of array melody
  //use this mapped value as an index and play the note from that particular index
  else if (button == LOW)
  {
    Serial.print("OFF\n");

  value= analogRead(flexPin);
  // Serial.print("\nvalue is: ");
  // Serial.print(value);
  int size = sizeof(melody)/sizeof(melody[0]);
  value = map(value, 850, 1050, 0, size);

  tone(Buzzer1,melody[value],1200);
  //Serial.print("\n Note is: " );
  //Serial.print(melody[value]);
  delay(300);
  }
}
Future Improvements
For later, we can improve by first attaching the flex sensor inside the glove more securely so that the instrument produces more consistent sounds. Also, we can add an additional buzzer with the switch to play a sound continuously in the back while the user uses the flex sensor to add more sounds on top of it.
The ultimate surprise party gadget. I have had this idea after my friend’s surprise birthday party. This gadget detects when the person passes in front of the ultrasonic motion sensor and automatically plays the famous birthday song tune and lights up three LEDs that create the festive vibes. The music machine also played a different tune depending on where the detected person (or teddy bear) is situated. Thus, the gadget will play different tune depending on the where the person is. This allows the music machine to keep playing different melodies throughout the party and set the party mood.
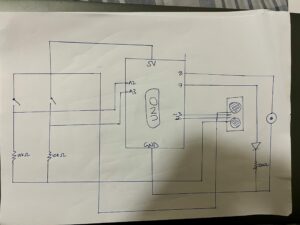
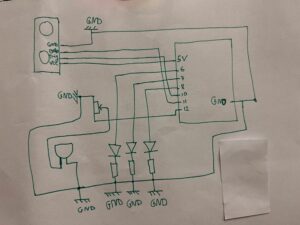
circuit :
the circuit includes ultrasonic motion sensor, buzzer, 3 LEDs, 3 resistors, variable resistor, Arduino uno.
I have included the variable resistor as it allows to adjust the volume of the buzzer. The LEDs are wired in parallel as it allow to for the LEDs to light up alternatively and create a light pattern. The diagram below describes all the wiring in the circuit:
Arduino script:
The biggest challenge I found while setting the script was making the LEDs light up simultaneously as the buzzer is on, but also creating some sort of pattern when the LED light up. I ended up solving that problem by creating a function Playtune() that gets called from inside the void Loop(). This allows both tasks to be done with interfering with each other.
int trig = 10;
int echo = 11;
long duration;
long distance;

// Define the LED pins
int led1 = 6;
int led2 = 7;
int led3 = 8;

// Define the Happy Birthday tune
int tune1[] = {264, 264, 297, 264, 352, 330};
int tune2[] = {264, 264, 297, 264, 396, 352};
int Newtune[] = {392, 330, 330, 349, 392, 392, 392, 440, 392, 349, 330, 294};


int tune1Length = sizeof(tune1) / sizeof(tune1[0]);
int tune2Length = sizeof(tune2) / sizeof(tune2[0]);
int NewtuneLength = sizeof(jaws) / sizeof(Newtune[0]);

void lightUpLed(int led, int duration) {
  digitalWrite(led, HIGH);
  delay(duration);
  digitalWrite(led, LOW);
}

void playTune(int tune[], int tuneLength) {
  for (int i = 0; i < tuneLength; i++) {
    tone(12, tune[i]);

    // Light up the LEDs in a rhythmic pattern
    lightUpLed(led1, 150);
    lightUpLed(led2, 150);
    lightUpLed(led3, 150);

    noTone(12);
    delay(50);
  }
}

void setup() {
  pinMode(echo, INPUT);
  pinMode(trig, OUTPUT);
  pinMode(led1, OUTPUT);
  pinMode(led2, OUTPUT);
  pinMode(led3, OUTPUT);
  Serial.begin(9600);
}

void loop() {
  digitalWrite(trig, LOW);
  delayMicroseconds(2);
  digitalWrite(trig, HIGH);
  delayMicroseconds(10);
  digitalWrite(trig, LOW);
  duration = pulseIn(echo, HIGH);
  distance = (duration / 2) * .0344;    // 344 m/s = speed of sound. We're converting into cm

  if (distance > 0 && distance <= 35) {
    if (distance <= 15) {
      playTune(tune1, tune1Length);
      playTune(tune2, tune2Length);
    }
    else {
       playTune(Newtune, NewtuneLength);
    }
  }
}
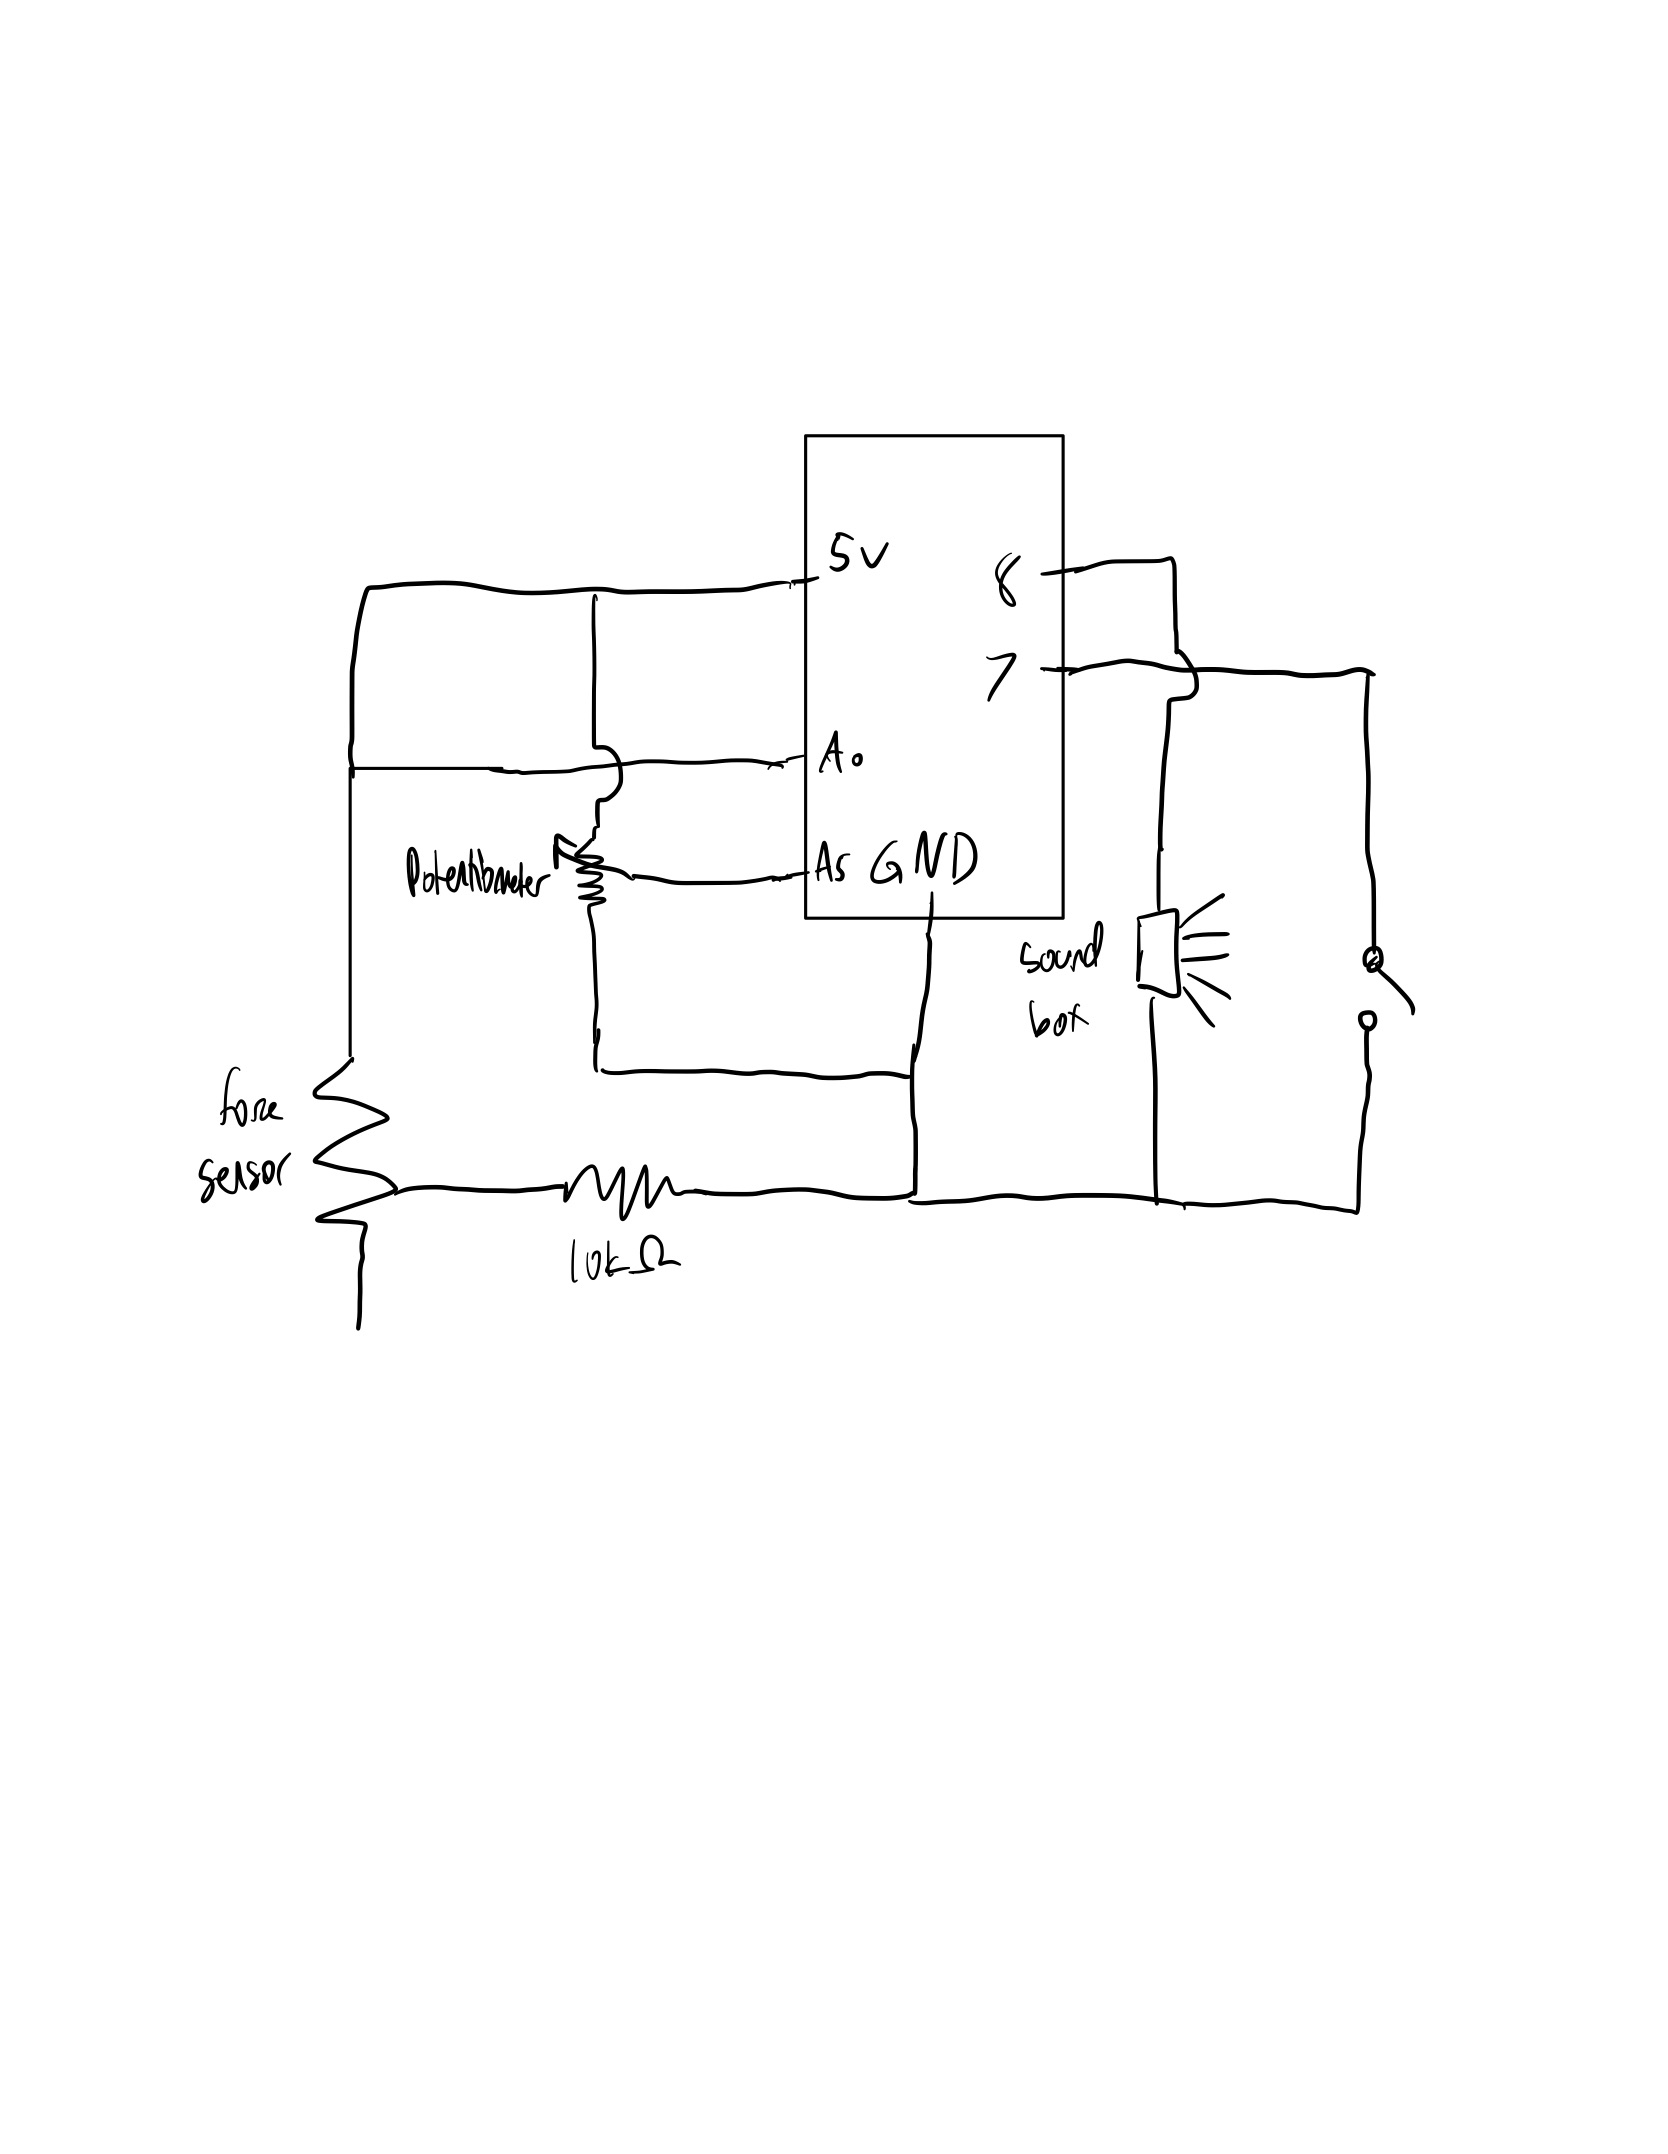
For my instrument, I used three different sensors. The force meter, potentiometer, and a switch. Originally, I wanted to read different inputs using a motor, but since I couldn’t, I used the potentiometer as the main dial that read the input to translate into pitches. The input from force meter would then decide on whether to play the notes and in which octave. The switch would change the mode of the instrument from playing designated musical notes to free range pitch.
When the switch is off, the potentiometer takes care of the main pitch from the range of notes of C to B. By turning the dial of the potentiometer from low to high, the instruments will play the notes from C to B. Then, the force meter, depending on how strong the force input is, decides on the octave of the note. For example, in my code, if force input is lower than 500 but higher than 200, it will play notes in the range of C3 to B3. All the notes are preloaded in the notes array before setup, and in this mode of the instrument, it only plays those designated musical notes. When the switch in on, the instrument will be put on a different mode where the pitch is not limited to a designated note but will be a number combined by the current potentiometer input and the force meter input. Therefore, the pitch made from this mode can be freely chosen by how strong you press the force meter and what the dial of the potentiometer is pointing at.
Circuit Diagram
Future Improvements:
In the future, I would like to use some other dial format analog sensor like the motor I initially planned. I would also think of some other creative ways to use other sensors like the bend sensor or etc.. While I used the alligator clips to incorporate the switch to my circuit, later in the future I would also like to learn soldering so I can stably add more sensors to my circuit.