Final Project: Whack-A-Note

Concept:

My project is a whack-a-mole game with a rhythm game element where users have to hit the mole at a specific time when a mole’s shadow(a node) aligns with the mole. Users, while the song is playing, must hit the mole whenever the shadow of it

Implementation:

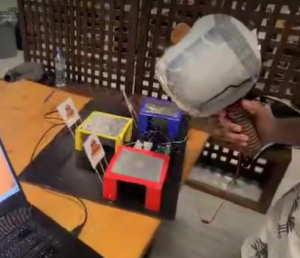
My hardware part of the project is basically a giant system of three switches. Each wire of the circuit connected to its respective digital inputs are attached to an tin foil and left as an uncompleted circuit. The circuit is only closed when the hammer, connected to power, hits the tin foil and completes the circuit, sending a HIGH signal through the digital input. In the UI, the p5 reads a music score and randomly generates nodes related to the notes and rhythm and creates an array. Each node in that array will move towards the designated hit zone, and if the node is aligned with the hit zone, then users can connect the physical circuit to send the signal that the mole was whacked. If the correct mole was whacked, then the user will win points, but if mole was not whacked or the incorrect mole was whacked, then users will lose points. Each song has its specific array of nodes, so the users can achieve a certain max score, and if the user loses more than -1000 points, then the game will be over.

Codes:

-p5js

let musicOne;
let musicTwo;
let musicThree;
let noteImg;
let bg;
let title;
let gameOverSign;
let moleSize = 100;
let shadowImg = [];
let moleImg;
let musicDelay = [4.8, 3.3, 5];
let gameOver = false;
let musicArr = [];
let mole = [];
let colorMole = ["red", "yellow","blue"];
let hit = false;
let score = 0;
let noteArr = [];
let shadowsArr = []
let hitArr = [0, 0, 0];
let firstrun = true;
let startGame = false;
let choice;


function preload(){
  bg = loadImage('bg.png');
  moleImg = loadImage("download.png");
  shadowImg[0] = loadImage("shadowRed.png");
  shadowImg[1] = loadImage("shadowYellow.png");
  shadowImg[2] = loadImage("shadowBlue.png"); 
  shadowImg[3] = loadImage("download.png");
  noteImg = loadImage("note.png");
  gameOverSign = loadImage("gameOver.png")
  title = loadImage("title.png")
  
  musicOne = loadSound("starWars.mp3");
  musicTwo = loadSound("zelda.mp3");
  musicThree = loadSound("canon.mp3");
  
  musicArr.push(musicOne);
  musicArr.push(musicTwo);
  musicArr.push(musicThree);
}

function setup() {
  createCanvas(windowWidth, windowHeight);
  textFont("Comic Sans MS");
  textSize(20);
}

function windowResized() {
  resizeCanvas(windowWidth, windowHeight);
}

function draw() {
  //background image of the game
  //choose a song to play
  background(bg);
  if(!startGame){
    image(title, (windowWidth/2) - windowWidth/16 * 7, (windowHeight/4) - windowHeight/8, windowWidth/8 * 7, windowHeight/3 * 2);
    let stringOne = "Star Wars Theme";
    let stringTwo = "Zelda Theme";
    let stringThree = "Canon";
    fill("white");
    text(stringOne, (windowWidth/4) - (textWidth(stringOne)/2), (windowHeight/18) * 11);
    text(stringTwo, (windowWidth/2) - (textWidth(stringTwo)/2), (windowHeight/18) * 11);
    text(stringThree, (windowWidth/4) * 3 - (textWidth(stringThree)/2), (windowHeight/18) * 11);
    
    image(noteImg, (windowWidth/4) - 55, (windowHeight/10) * 7, 100, 100)
    image(noteImg, (windowWidth/2) - 55, (windowHeight/10) * 7, 100, 100)
    image(noteImg, (windowWidth/4) * 3 - 55, (windowHeight/10) * 7, 100, 100)
  }
  else{
    displayGame();
  }
}

function displayGame(){
  if (!serialActive) {
    text("Press Z to select Serial Port", 20, 30);
  }
  else{
    if(!musicArr[choice].isPlaying() && firstRun){
      musicArr[choice].play(musicDelay[choice]);
      firstRun = false;
    }
    
    if(shadowsArr.length > 0 && score > -1000){
      if(gameOver){
        gameOver = false;
      }
      for(let i = 0; i < 3; i++){
        mole[i].display();
      }
      
      strokeWeight(5);
      
      //setLineDash([5, 10, 30, 10]);
      //line(100, 0, 100, windowHeight);
      text("Score: " + score, windowWidth/5 * 4, windowHeight/40 * 3);
      for(let i = 0; i < shadowsArr.length; i++){
        shadowsArr[i].display();
      }
      //console.log(shadowsArr.length)
    }
    else{
      fill("white");
      musicArr[choice].stop();
      firstRun = false;
      let scoreText = "Score: " + score;
      image(gameOverSign, windowWidth/2 - windowWidth/16 * 5, windowHeight/4 - windowWidth/16 * 2, windowWidth/8 * 5, windowWidth/8 * 3);
      let longText = "Press R to Play Again!";
      //text(shortText, 200 - textWidth(shortText)/2, 100);
      text(longText, windowWidth/2 - textWidth(longText)/2, windowHeight/8 * 7)
      text(scoreText, windowWidth/2 - textWidth(scoreText)/2, windowHeight/4 * 3);
      for(let i = 0; i < shadowsArr.length; i++){
        shadowsArr.splice(i,1);
      }
      gameOver = true;
    }
  }
  
  
  killShadow();

}

function keyPressed(){
  if (keyCode == 90) {
    setUpSerial();
  }
  if (keyCode == 82){
    if(gameOver == true){
      startGame = false;
      score = 0;
    }
  }
  if (keyCode == 70) {
    toggleFullscreen();
  }
}

function readSerial(data) {
  if (data != null) {
    let fromArduino = split(trim(data), ",");
    if (fromArduino.length == 3) {
      for(let i = 0; i < 3; i++){
        hitArr[i] = int(fromArduino[i]);
      }
    }
  }
}


function killShadow(){
  for(let i = 0; i < shadowsArr.length; i++){
    if(shadowsArr[i].x < 40){
      shadowsArr.splice(i, 1);
      score -= 100; 
    }
  }
}

class shadow{
  constructor(x, y){
    this.x = x;
    this.y = (windowHeight/4) * y;
    this.id = y;
    this.hitVal = false;
  }
  
  display(){
    fill("white");
    if(this.x > 50){
      image(shadowImg[this.id - 1], this.x - moleSize/2, this.y - moleSize/2, moleSize, moleSize);
      if(this.x <100){
        this.hitVal = true;
        image(shadowImg[3], this.x - moleSize/2, this.y - moleSize/2, moleSize, moleSize);
      }
      
    }
    this.x -= 2;
  }
}

class Mole{
  constructor(y){
    this.x = 50;
    this.y = (windowHeight/4) * y;
    this.id = y;
  }
  
  search(){
    if(shadowsArr[0].hitVal == true && shadowsArr[0].id == this.id)
      return true;
    else
      return false;
  }
  
  checkHit(){
    if(hitArr[this.id - 1] == 1){
      if(this.search()){
        score += 100;
        hitArr[this.id - 1] = 0;
        shadowsArr.splice(0, 1);
      }
      else{
        score -= 100;
        hitArr[this.id - 1] = 0;
      }
    }
  }
  
  display(){
    if(!gameOver){
      //image(moleImg, this.x - moleSize/2, this.y - moleSize/2, moleSize, moleSize);
      setLineDash[0];
      fill("black")
      ellipse(this.x, this.y + 20, 70, 40)
    }
    this.checkHit();
  }
}

function mouseClicked(){
  if(!startGame){
    for(let i = 1; i < 4; i++){
      mole.push(new Mole(i));
    }
    if(mouseY > (windowHeight/10) * 7 && mouseY < (windowHeight/10) * 7 + 100){
      if(mouseX > (windowWidth/4) - 55 && mouseX < (windowWidth/4) + 55){
        choice = 0;
        loadNotes(choice);
        startGame = true;
      }
      else if(mouseX > (windowWidth/2) - 55 && mouseX < (windowWidth/2) + 55){
        choice = 1;
        loadNotes(choice);
        startGame = true;
      }
      else if(mouseX > (windowWidth/4) * 3 - 55 && mouseX < (windowWidth/4) * 3 + 55){
        choice = 2;
        loadNotes(choice);
        startGame = true;
      }
    }
  }
}

function loadNotes(x){
  let xCo = windowWidth; 
  firstRun = true;
  let datas = [];
  let notes = [];
  let rhythm = [];
  if(x == 0){
    datas = data1;
  }
  if(x == 1){
    datas = data2;
  }
  if(x == 2){
    datas = data3;
  }
  for(let i = 0; i < datas.length; i++){
    if(i % 2 == 0){
      let temp = 0;
      for(let j = 0; j < datas[i].length; j++){
        temp += datas[i].charCodeAt(j);
      }
      temp = (temp % 3) + 1;
      notes.push(temp);
    }
    else{
      if(datas[i] > 0){
        rhythm.push(datas[i] * 20);
      }
      else{
        rhythm.push(datas[i] * 15);
      }
    }
  }
  
  for(let i = 0; i < notes.length; i++){
    shadowsArr.push(new shadow(xCo, notes[i]));
    xCo += rhythm[i];
  }
}

function toggleFullscreen() {
  let fs = fullscreen(); // Get the current state
  fullscreen(!fs); // Flip it!
}

function setLineDash(list) {
  drawingContext.setLineDash(list);
}


-arduino

int lastButton1State = LOW;
int lastButton2State = LOW;
int lastButton3State = LOW;

int buttonState1;
int buttonState2;
int buttonState3;

unsigned long lastDebounceTime1 = 0;
unsigned long lastDebounceTime2 = 0;
unsigned long lastDebounceTime3 = 0;
unsigned long debounceDelay = 20;


void setup() {
  Serial.begin(57600);
  pinMode(10, INPUT);
  pinMode(9, INPUT);
  pinMode(8, INPUT);
}

void loop() {

  int readingOne = digitalRead(10);
  int readingTwo = digitalRead(9);
  int readingThree = digitalRead(8);

  // check to see if you just pressed the button
  // (i.e. the input went from LOW to HIGH), and you've waited long enough
  // since the last press to ignore any noise:

  // If the switch changed, due to noise or pressing:
  if (readingOne != lastButton1State) {
    // reset the debouncing timer
    lastDebounceTime1 = millis();
  }
  if (readingTwo != lastButton2State) {
    // reset the debouncing timer
    lastDebounceTime2 = millis();
  }
  if (readingThree != lastButton3State) {
    // reset the debouncing timer
    lastDebounceTime3 = millis();
  }

  if ((millis() - lastDebounceTime1) > debounceDelay) {
    // whatever the reading is at, it's been there for longer than the debounce
    // delay, so take it as the actual current state:

    // if the button state has changed:
    if (readingOne != buttonState1) {
      buttonState1 = readingOne;

      // only toggle the LED if the new button state is HIGH
      if (buttonState1 == HIGH) {
        Serial.print(readingOne);
        Serial.print(",");
        Serial.print(readingTwo);
        Serial.print(",");
        Serial.println(readingThree);
      }
    }
    
  }

  if ((millis() - lastDebounceTime2) > debounceDelay) {
    // whatever the reading is at, it's been there for longer than the debounce
    // delay, so take it as the actual current state:

    // if the button state has changed:
    if (readingTwo != buttonState2) {
      buttonState2 = readingTwo;

      // only toggle the LED if the new button state is HIGH
      if (buttonState2 == HIGH) {
        Serial.print(readingOne);
        Serial.print(",");
        Serial.print(readingTwo);
        Serial.print(",");
        Serial.println(readingThree);
      }
    }
    
  }

  if ((millis() - lastDebounceTime3) > debounceDelay) {
    // whatever the reading is at, it's been there for longer than the debounce
    // delay, so take it as the actual current state:

    // if the button state has changed:
    if (readingThree != buttonState3) {
      buttonState3 = readingThree;

      // only toggle the LED if the new button state is HIGH
      if (buttonState3 == HIGH) {
        Serial.print(readingOne);
        Serial.print(",");
        Serial.print(readingTwo);
        Serial.print(",");
        Serial.println(readingThree);
      }
    }
    
  }
  lastButton1State = readingOne;
  lastButton2State = readingTwo;
  lastButton3State = readingThree;
}


Communication:

Whenever the user whacks a mole, the arduino, through serial communication, sends an array with three elements. In that array, the element with the array position that correlates to the mole number that was hit will be 1 and the rest that wasn’t hit will be 0. P5, constantly reading for this data, will take the data and update the targetHit array which will contain exactly that same data from arduino. When a shadow note reaches the designated hit zone, the mole instance will automatically check for the targetHit array and if the targetHit array matches the the id of the shadow mole, then the user will score a point. If the targetHit array does not match the id, then the user will lose a point. If the targetHit array was not updated at all, then p5 will recognize that the user didn’t hit any moles and user will lose a point. The communication from p5 to arduino was not necessary for my project, so there is none.

Aspects I am proud of:

Overall, I generally like the idea that physically completing a circuit with a non-traditional switch to make a serial communication since this was an activity we started the arduino chapter with. Also for some unexplainable reason, I really like the idea of whacking something to make something work. I am also very proud of my object orienting programming of the shadow node instance and mole instance interacting with each other to check whether the shadow node is within the designated hit zone and confirming whether the arduino’s sent information matches with the shadow id. That part took some time coming up with the mechanism that worked, but once I did, throughout the project, the mechanism worked like a charm. Lastly, I really like the arrangement of the nodes correlating to the music since I specifically used an algorithm that took the music score and translated the notes to either 1, 2, or 3 by changing the note to its ASCII code and remainder dividing it by 4. Then, I used the length of that note to decide the distance between it and its next node to match the rhythm of the node and the music, and last but not least, I manually tweaked some of the nodes and rhythms so that it specifically matched to some parts of the song. To be honest, this manual peaking took a huge portion of my time spent in this project.

Improvements:

Originally, I wanted to add more to this project by having more hittable nodes, adding another hitting element to use gloves instead of hammers to make the  game more dynamic and interesting, but unfortunately, the technical difficulties of having two hitting objects made it almost impossible to implement, and adding more hittable objects required too much time and resources. The technical difficulty was that the methodology of adding another hitting object was to add another power connected circuit differentiated by different level of resistance, which would then require analog reading instead of digital reading, and this didn’t work out with my existing switch debouncing mechanism and therefore I had to give up on this improvement. However, given more time and information, I would like to add this improvement which would add a whole new spectrum of dynamicness of the game.

Final Project: Final Report

Concept:

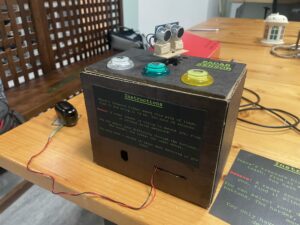
To summarize, my final project is a game I like to call Treasure Hunt! In this game there is a pile of random items all over the desk, among these random items is one piece of TREASURE. Your goal is to retrieve that treasure. However, there is a radar sensor moving back and forth constantly trying to detect you. The goal is to get this treasure before the radar detects you and before the time runs out! Hence, you got to hide or run away to avoid the radar’s range.

Implementation:

Arduino:

For the arduino aspect of my final project, I used several components:

  • A servo motor which would be the radar sensor moving back and forth consistently.
  • An ultrasonic sensor which would be mounted on the servo motor and this would be used to detect the distance of the user from the radar sensor.
  • A force sensor to detect whether the treasure has been picked up or not. If it was 0 for 1 second, that indicates that the treasure has been found and that you won the game!
  • Three arcade LED switches to change the difficulty of the game. Depending on which buttons were pressed, that would change the speed of the servo motor, hence the radar sensor would move much faster and would be harder to avoid the radar’s range in time.
  • I also added an LED which is used for debugging and also managing whether the treasure has been set on the force sensor before starting the game. This is because if we started the game and the treasure wasn’t on the force sensor properly, then the game would simply declare the user has won and it wouldn’t make sense.

p5js:

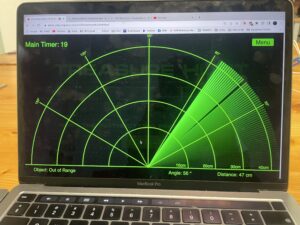
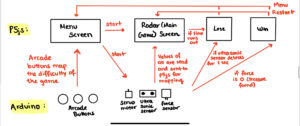
The main aspect of p5js was the map out a visual aid for the radar sensor and to also map out the different stages of the game to Arduino, whether than being the main menu, losing screen, winning screen or the main game screen.

For the main radar screen, it would have the entire mapping of the radar sensor moving back and forth. It also contains details such as whether the object is in range or out of range, the degree of rotation, the distance from the sensor so the user can see how the radar maps them out.

It spins and maps out a green line attempting to detect the user, if the user is detected, it would map out a red line to indicate this and if they are detected for 1 second, then they lose. Else if there were to pick up the treasure then they win!

They can also go back to the menu from this screen to change their difficulty if they wish

Arduino and p5js Interactivity:

I made a little map of how Arduino and p5js map together:

Aspects I’m Proud of:

I would say i’m very proud of how the mapping between the radar sensor through the Arduino and p5js turned out. Visually on the p5js it looks very cool, especially with a really cool blur effect I added on p5js. That way it makes it seem like an actual radar sensor. The mapping between all the different phases of the game are really well done especially through all the values from the Arduino to p5js.

I would say I’m also very proud of how the actual radar sensor box looks like, it looks very cool and the design is very awesome in my opinion. I would also say that the arcade buttons are a very nice touch to display the difficulty of the game. This is because when pressed it lights up indicating which difficulty it is, making it easy for the user to understand what difficulty they have.

Aspects I would Improve:

As per the improvement aspect of the entire project, there are several:

  • I would have loved to implement a physical computing aspect for the win/lose stage of the project. My initial ideas were that if you won, then it would activate a servo motor waving a white flag to signify that the radar sensor admits defeat. Also if they lost, then another servo motor would be activated which would unwind a scroll with a picture saying you lost or something. These ideas would’ve been really cool however, because of the time, I was not able to implement these ideas and was forced to simply put a “you lose” or “you win” screen through p5js. However, next time if possible, will definitely implement.
  • I would have loved to also improve the quality of the box, perhaps use wood or acrylic or something or stronger material so that the entire product looks much nicer to look at rather than cardboard.
  • There is this bug where suppose you lost or won a game, then you would have to wait for the Servo motor to map back to the beginning before you can do anything again. I couldn’t find a solution for this and I think this could also be improved.

Video – Testing on my Own:

Video – User Testing Video:

Video – User Testing #2:

Link to p5js Code:

https://editor.p5js.org/awesomeadi00/sketches/KGKN8f8wE

Arduino Code:

#include <Servo.h>. 

//PINS: 
const int Radar_ServoPin = 10;   

const int echoPin = 9;    
const int trigPin = 8;

const int w_switch = A3;
const int g_switch = A2;
const int y_switch = A1;

const int w_led = 4;
const int g_led = 5;
const int y_led = 6;    

const int pressurePin = A0;
const int pressureLED = 2;

//Global Variables: 
int w_switchVal;
int g_switchVal;
int y_switchVal;
int pressureVal;
unsigned long duration;
int distance;
int difficulty = 1;
int loseBool = 0;

//All game states below are exactly as shown in p5js
int gameState;
int menuState = 0;
int radarState = 1;
int winState = 2;
int loseState = 3;

//Servo object for controlling the servo motor
Servo RadarServo; 

//====================================================================================================================================
void setup() {
  //Begin the serial monitor to p5js at 9600 baud
  Serial.begin(9600);

  //Setting the pinmodes for the ultrasonic sensor
  pinMode(trigPin, OUTPUT);  
  pinMode(echoPin, INPUT);   
  
  //Seting the pinmodes for the arcade switch pins
  pinMode(w_switch, INPUT);
  pinMode(g_switch, INPUT);
  pinMode(y_switch, INPUT);
  
  //Setting the pinmodes for the LEDs in the arcade buttons
  pinMode(w_led, OUTPUT);
  pinMode(g_led, OUTPUT);
  pinMode(y_led, OUTPUT);

  //Output mode for the pressureLED, this will check whether the pressure sensor is active or not.
  pinMode(pressureLED, OUTPUT);

  //Attaching the servos to arduino 
  RadarServo.attach(Radar_ServoPin);  
  RadarServo.write(0);

  //Setup for the game, sets the easy difficulty on by default (difficulty = 1) and sets up the menu screen.
  digitalWrite(w_led, HIGH);
  gameState = 1;

  // Blinks the pressureLED in case the Serial Connection between p5js and Arduino has not been made (debugging)
  while (Serial.available() <= 0) {
    digitalWrite(pressureLED, HIGH);
    Serial.println("0,0"); 
    delay(300);     
    digitalWrite(pressureLED, LOW);
    delay(50);
  }
}

//====================================================================================================================================
void loop() {
  // This checks while the serial connection is available from p5js, then it will parse the gamestate from p5js to arduino. 
  while(Serial.available()) {
    int p5js_gameState = Serial.parseInt();
    if(Serial.read() == '\n') {
      gameState = p5js_gameState;
    }
  }

  //Based on the gamestate from p5js, it will map out exactly what to do on Arduino.
  if(gameState == menuState) {setDifficulty();}
  else if(gameState == radarState) {radarActivate();}
  Serial.println();
}

//====================================================================================================================================
//This functions is only called during the Main Menu. It checks which buttons are pressed to map the speed of the radar, hence setting the difficulty.
void setDifficulty() {
  //If the pressure is greater than 50, then it will switch on the pressureLED to indicate that the user still needs to find it. Else it will switch off indicating they won.
  pressureVal = analogRead(pressurePin);
  if(pressureVal > 200) {digitalWrite(pressureLED, HIGH); }
  else {digitalWrite(pressureLED, LOW); }

  //Reads all the values for all three buttons
  int y_sstate = digitalRead(y_switch);
  int g_sstate = digitalRead(g_switch);
  int w_sstate = digitalRead(w_switch);

  //If the yellow button is pressed, it will switch that on and set hard difficulty to 3
  if(y_sstate == HIGH) {
    digitalWrite(y_led, HIGH);
    digitalWrite(g_led, LOW);
    digitalWrite(w_led, LOW);
    difficulty = 3;
  }

  //If the green button is pressed, it will switch that on and set medium difficulty to 2
  else if(g_sstate == HIGH) {
    digitalWrite(y_led, LOW);
    digitalWrite(g_led, HIGH);
    digitalWrite(w_led, LOW);
    difficulty = 2;           
  }

  //If the white button is pressed, it will switch that on and set easy difficulty to 1
  else if(w_sstate == HIGH) {
    digitalWrite(y_led, LOW);
    digitalWrite(g_led, LOW);
    digitalWrite(w_led, HIGH);
    difficulty = 1;
  }
  Serial.println(difficulty);
}

//====================================================================================================================================
//This function will only be called if the game has started and thus the radar will become active. 
void radarActivate() {
  //Rotates the servo motor from 0 to 180 degrees
  for(int i = 0; i <= 180; i+=difficulty){ 
    pressureVal = analogRead(pressurePin);    //Reads the pressure value to determine if the user has won or not.
    if(pressureVal > 200) {digitalWrite(pressureLED, HIGH); }
    else {digitalWrite(pressureLED, LOW); }
    
    if(gameState == winState || gameState == loseState) {
      RadarServo.write(0); 
      break; 
    }

    RadarServo.write(i);                      
    delay(30);
    distance = calculateDistance();           //Calculates the distance measured by the ultrasonic sensor for each degree. 

    //Sending p5js the degree of rotation of the servo, the distance and the pressure value from the Arduino.
    Serial.print(i+difficulty);              //Sends the current degree to p5js
    Serial.print(",");                  //Sends comma character for indexing in p5js
    Serial.print(distance);             //Sends the distance value to p5js
    Serial.print(",");                  //Sends comma character for indexing in p5js
    Serial.println(pressureVal);          //Sends the pressure value to p5js
  }

  // Repeats the previous lines from 180 to 0 degrees (moving it backwards)
  for(int i = 180; i > 0; i-=difficulty){ 
    pressureVal = analogRead(pressurePin); 
    if(pressureVal > 200) {digitalWrite(pressureLED, HIGH); }
    else {digitalWrite(pressureLED, LOW); }

    if(gameState == winState || gameState == loseState) {
      RadarServo.write(0); 
      break; 
    }

    RadarServo.write(i);
    delay(30);
    distance = calculateDistance();

    Serial.print(i-difficulty);
    Serial.print(",");
    Serial.print(distance);
    Serial.print(",");
    Serial.println(pressureVal);
  }
  Serial.println();
}

//====================================================================================================================================
//Function for calculating the distance measured by the Ultrasonic sensor
//Issue with the sensor is that for objects extremely far away, it takes virtually 69ms to come back and translate to distance
//This is way too long hence, for each increment on the Radar Servo, it would take 69ms.
//Perhaps wrap some board 90cm away from the sensor around in 180˚ so it maps that out and nothing else that's far.
int calculateDistance(){ 
  //Sets the trigPin on LOW for 2 microseceonds.
  digitalWrite(trigPin, LOW); 
  delayMicroseconds(2);
  //Sends a signal from the triggering transducer for 10 microsends.
  digitalWrite(trigPin, HIGH); 
  delayMicroseconds(10);
  digitalWrite(trigPin, LOW);
  
  //Reads the echoPin and returns the sound wave travel time in microseconds. 
  duration = pulseIn(echoPin, HIGH); 

  //The distance will be calculated in cm, hence cm = (microseconds/2)/29
  distance = (duration/2)/29;
  return distance;
}


Week 14: User Testing: Whack A Note

Adi was my tester for my prototype before finalizing the whole project. My project is very straightforward, so minimal explanation was necessary and he got used to playing the game very quick. He liked that the nodes matched the music that was playing in rhythm and enjoyed the experience in both easier song and the harder song. Although he didn’t get to finish throughout the harder song, “Canon”, but since that is part of the purpose of that song, it worked out as I expected. Again, I felt the need to explain the connection between my two different elements of rhythm game and the whack-a-mole game, so after the user testing, I made a slight change in the UI where the mole picture was changed to a hole, and the shadow node would change to a mole picture when it was apt to hit it for score.

Final Project Final Documentation

Concept and Design:

For my final project, I created a table piano using the ultra sonic sensor and connected it to the P5js interface. The start screen allows users to choose between three modes: free mode, game mode, and record mode. 

In free mode, users can play the piano for as long as they want and try to figure out a tune on their own. Every time a note is pressed on the piano, the P5js interface shows a different picture for each note so that the experience is more immersive. The free mode allows the user to practice their skills and be as creative as they want to be. 

Record mode as the name suggests records and store each key played by the user and the concatenation of these notes then can be played back in the form of a tune. This allows the user to listen back to what they play and make amends to what needs to be changed in the future. This proves to be a good tool for those who like to be precise and perfect.

In game mode, numbers fall from the sky, and the user would have to press the appropriate number on the table piano. The game eventually keeps getting harder as the score increases. The game gets harder in the form of game speed and the spacing between the numbers. Every un-pressed note/number will result in losing a life and after a certain number of lives lost, the game ends. The current score of the user and the high score of the user is also displayed at the same time encouraging the users to get more competitive in a healthy way. The game mode is basically created to add some fun to piano playing and also to build muscle memory of where what keys are and strong reflexes. This would in turn help the user with reading off of music sheets while playing actual pianos. 

Final Product

Interaction Design:

The project is designed in a way that makes it much more interactive as compared to my previous projects in the class. From the hardware connected to Arduino to the software element in P5js, everything is interactive. The main theme of the project is a table piano and users have to use their hands to play keys and notes. This allows the user to get a different feel of the project as compared to simple buttons on a keyboard or keys on a touch screen phone. When it comes to the P5js user interface, it is designed in a way, that gives full control to the user. There are buttons that change color when you hover over it, suggesting that it is a button. There are instruction screens in all three modes and all the screens have back buttons as well that allow the user to go back to the home screen. Furthermore, before recording, stopping while recording, or playing the recorded tone, the user can use interactive buttons provided to control all of these functions. The user can also see their score going up and lives decreasing while playing the game. In the end, the game has an option of being restarted as well.

Description of P5js code:

The P5js code is developed using Object Oriented Programming to keep the work flow easier, manageable, more efficient. Two classes have been created: the noteDrop class and the Game class. The noteDrop class handles the movements and functionality of a single falling note. On the other hand, the game class is where all the game logic is implemented. The objects of the noteDrop class are stored in an array and then the array is used in various ways depending on the game state. 

To keep track of the different game states, variables and boolean values have been used. These variables are updated based on user input and the game logic. Additionally, messages are sent to and received from Arduino to synchronize the game state. This allows for better user experience where the hardware and software work in perfect harmony.

To ensure a smooth flow of the game, I have also implemented a preload function that loads all the necessary assets before the game begins. This helps to prevent any issues with lag or delays during gameplay.

In order to make the code more manageable and easier to understand, the game has been divided into functions and different game states. This also allows for easier editing and maintenance of the codebase. Here is the code:

new p5(); //to counter the issue with random function

//declare global variables
let highscore = -1;
let globalGameSpeed = 1.5;
let gameObject;
let menuBackgroundPicture1; 
let menuBackgroundPicture2; 
let menuBackgroundPicture3;
let menuBackgroundPicture4; 
let endBackgroundPicture;
let recordScreen1;
let recordScreen2;
let recordScreen3;
let recordScreen4;
let recordScreen5;
let freeScreen0;
let freeScreen1;
let freeScreen2;
let freeScreen3;
let freeScreen4;
let freeScreen5;
let freeScreen6;
let freeScreen7;
let freeScreen8;
let freeScreen9;
let freeScreen10;
let freeScreen11;
let freeScreen12;
let freeScreen13;
let freeScreen14;
let freeScreen15;
let freeScreen16;
let gameScreenBG;
let gameInstructions;
let num1;
let num2;
let num3;
let num4;
let num5;
let num6;
let num7;
let num8;
let num9;
let num10;
let num11;
let num12;
let num13;
let num14;
let num15;
let num16;

let playfair_font; //declare the font named playfair
let background_music;

function preload() //preload all the assets
{
  menuBackgroundPicture1 = loadImage("menu_background1.png");
  menuBackgroundPicture2 = loadImage("menu_background2.png");
  menuBackgroundPicture3 = loadImage("menu_background3.png");
  menuBackgroundPicture4 = loadImage("menu_background4.png");
  endBackgroundPicture = loadImage("end_game.png");
  playfair_font = loadFont("playfairDisplay_font.ttf");
  recordScreen1 = loadImage("record_instruction1.png");
  recordScreen2 = loadImage("record_instruction2.png");
  recordScreen3 = loadImage("record_instruction3.png");
  recordScreen4 = loadImage("record_instruction4.png");
  recordScreen5 = loadImage("record_instruction5.png");
  
  freeScreen0 = loadImage("free01.png");
  freeScreen1 = loadImage("free1.png");
  freeScreen2 = loadImage("free2.png");
  freeScreen3 = loadImage("free3.png");
  freeScreen4 = loadImage("free4.png");
  freeScreen5 = loadImage("free5.png");
  freeScreen6 = loadImage("free6.png");
  freeScreen7 = loadImage("free7.png");
  freeScreen8 = loadImage("free8.png");
  freeScreen9 = loadImage("free9.png");
  freeScreen10 = loadImage("free10.png");
  freeScreen11 = loadImage("free11.png");
  freeScreen12 = loadImage("free12.png");
  freeScreen13 = loadImage("free13.png");
  freeScreen14 = loadImage("free14.png");
  freeScreen15 = loadImage("free15.png");
  freeScreen16 = loadImage("free16.png");
  
  gameScreenBG = loadImage("gameModeBG.png");
  gameInstructions = loadImage("gameModeinstructions.png");
  
  num1 = loadImage("num1-removebg-preview.png");
  num2 = loadImage("num2-removebg-preview.png");
  num3 = loadImage("num3-removebg-preview.png");
  num4 = loadImage("num4-removebg-preview.png");
  num5 = loadImage("num5-removebg-preview.png");
  num6 = loadImage("num6-removebg-preview.png");
  num7 = loadImage("num7-removebg-preview.png");
  num8 = loadImage("num8-removebg-preview.png");
  num9 = loadImage("num9-removebg-preview.png");
  num10 = loadImage("num_a-removebg-preview.png");
  num11 = loadImage("num_b-removebg-preview.png");
  num12 = loadImage("num_c-removebg-preview.png");
  num13 = loadImage("num_d-removebg-preview.png");
  num14 = loadImage("num_e-removebg-preview.png");
  num15 = loadImage("num_f-removebg-preview.png");
  num16 = loadImage("num_g-removebg-preview.png");
  
  background_music = loadSound("music2.mp3");
}


class NoteDrop //noteDrop class that commands the movement of each note
{
  constructor(x, y, noteWidth, noteHeight, noteNumber, canvasWidth, canvasHeight) //constructor initializes everything
  {
    this.note_x = x;
    this.note_y = y;
    this.note_height = noteHeight;
    this.note_width = noteWidth;
    this.canvas_width = canvasWidth;
    this.canvas_height = canvasHeight;
    this.visible = false;
    this.note_number = noteNumber;
  }
  
  movement() //movement of the note from top to bottom of the canvas
  {
    this.note_y = this.note_y + globalGameSpeed; //
    if ((this.note_y + this.note_height >= 0) && (this.note_y + this.note_height <= 20)) //as soon as the bottom of the note enters the canvas
    {
      this.visible = true; //make it visible and this allows for catching it
    }
  }
  
  display() //displays the note
  {
    this.movement();
    if (this.visible == true) //only display the note if it is visible
    {
      if (this.note_number == 1) //for each note
      {
        image(num1, this.note_x, this.note_y); //display its appropriate picture
      }
      else if (this.note_number == 2)
      {
        image(num2, this.note_x, this.note_y);
      }
      else if (this.note_number == 3)
      {
        image(num3, this.note_x, this.note_y);
      }
      else if (this.note_number == 4)
      {
        image(num4, this.note_x, this.note_y);
      }
      else if (this.note_number == 5)
      {
        image(num5, this.note_x, this.note_y);
      }
      else if (this.note_number == 6)
      {
        image(num6, this.note_x, this.note_y);
      }
      else if (this.note_number == 7)
      {
        image(num7, this.note_x, this.note_y);
      }
      else if (this.note_number == 8)
      {
        image(num8, this.note_x, this.note_y);
      }
      else if (this.note_number == 9)
      {
        image(num9, this.note_x, this.note_y);
      }
      else if (this.note_number == 10)
      {
        image(num10, this.note_x, this.note_y);
      }
      else if (this.note_number == 11)
      {
        image(num11, this.note_x, this.note_y);
      }
      else if (this.note_number == 12)
      {
        image(num12, this.note_x, this.note_y);
      }
      else if (this.note_number == 13)
      {
        image(num13, this.note_x, this.note_y);
      }
      else if (this.note_number == 14)
      {
        image(num14, this.note_x, this.note_y);
      }
      else if (this.note_number == 15)
      {
        image(num15, this.note_x, this.note_y);
      }
      else if (this.note_number == 16)
      {
        image(num16, this.note_x, this.note_y);
      }
    }
  }
}

class Game //game class contains all the functionality and game attributes
{
  constructor()
  {
    //defines canvas dimensions
    this.canvasWidth = 800;
    this.canvasHeight = 600;
    
    //defines note dimensions
    this.noteWidth = 75;
    this.noteHeight = 75;
    
    this.gameHealth = 10;
    this.gameScore = 0;
    
    //these arrays contain various note numbers. They are two different arrays in order to avoid overlap of notes
    this.notes1 = [1, 2, 3, 4, 5, 6, 7, 8];
    this.notes2 = [9, 10, 11, 12, 13, 14, 15, 16];
    
    this.noteArray = []; //contains the arrays that are displayed
    this.recordArray = []; //contains the array that is recorded (not used since array now recorded in arduino)
    
    //boolean variables to control the game
    this.recordBool = false;
    this.playBool = false;
    this.playingScreen = false;
    this.instructionsBool = true;
    this.backgroundNumber = 0;
    
    this.arrayCounter = 0;
    this.notesInAnArray = 8;
    this.clickCount = 0;
    
    //dimensions of various buttons
    this.menuButtonWidth = 282
    this.menuButtonHeight = 56;
    this.menuButtonX = 38;
    this.menuButton1Y = 357;
    this.menuButton2Y = 445;
    this.menuButton3Y = 533;
    
    this.recordButtonX = 212;
    this.recordButtonY = 369;
    this.recordButtonWidth = 393;
    this.recordButtonHeight = 80;
    
    this.homeButtonX = 22;
    this.homeButtonY = 33;
    this.instructionButtonX = 690;
    this.instructionButtonY = 33;
    this.homeButtonWidth = 95;
    this.homeButtonHeight = 40;
    
    //used to increase game speed
    this.difficultyParameter = 20;
    
    this.gameState = "menuScreen";
    
    this.noteSpacing = 2.5; //this is the random spacing between notes in order to increase difficulty
    
    for (let i = 0; i < this.notesInAnArray; i++) //constructs and initializes note objects
    {
      this.noteArray[i] = new NoteDrop(random(0, this.canvasWidth - this.noteWidth), (i + 1)*(-this.noteHeight * this.noteSpacing), this.noteWidth, this.noteHeight, this.notes1[i], this.canvasWidth, this.canvasHeight);
    }
  }
  
  rainMovement() //rain like movement of notes from the top of canvas to the bottom
  {
    for (let i = 0; i < this.notesInAnArray; i++)
    {
      this.noteArray[i].display();
      fill(0,0,0);
      
      if (this.noteArray[i].note_y > this.canvasHeight && this.noteArray[i].visible == true) //if the note is not caught and goes below canvas
      {
        this.gameHealth = this.gameHealth - 1; //you lose a life
        if (this.gameHealth == 0) //if the lives go to zero
        {
          this.gameState = "endScreen"; //the game ends
        }
        this.noteArray[i].visible = false; //the note also becomes invisible
      }
      
      if (this.noteArray[i].note_y > this.canvasHeight) //as soon as the note goes below the canvas
      {
        this.arraySwitch(i); //switch its number and it should re-emerge at the top of the canvas
      }
    }
  }
  
  arraySwitch(indexOfArray) //this function changes the note numbers in order to make them random and avoid overlap
  {
    if (this.arrayCounter % 2 == 0) //arrayCounter keeps track of what array of notes is being used
    {
      //if array counter is even that means first array is being used and so
      this.noteArray[indexOfArray].note_number = this.notes2[indexOfArray]; //you change the array note numbers and get them from notes2 array
      this.noteArray[indexOfArray].note_y = this.noteArray[this.notesInAnArray -1].note_y - ((indexOfArray + 1) * (this.noteHeight * this.noteSpacing)); //change the y value and ensure all of them are almost equidistant and there is no overlap
      this.noteArray[indexOfArray].note_x = random(0, this.canvasWidth - this.noteWidth); //the x coordinates are random
      this.noteArray[indexOfArray].visible = false; //ensure that the visibility is off
    }
    else
    {
      //same thing here but the notes are taken from the first array instead of the second one
      this.noteArray[indexOfArray].note_number = this.notes1[indexOfArray];
      this.noteArray[indexOfArray].note_y = this.noteArray[this.notesInAnArray -1].note_y - ((indexOfArray + 1) * (this.noteHeight * this.noteSpacing));
      this.noteArray[indexOfArray].note_x = random(0, this.canvasWidth - this.noteWidth);
      this.noteArray[indexOfArray].visible = true;
    }
    
    if (indexOfArray == this.notesInAnArray - 1) //when all the 8 notes in an array have gone beneath the canvas, 
    {
      shuffle(this.notes1, true); //shuffle both arrays and
      shuffle(this.notes2, true);
      this.arrayCounter = this.arrayCounter + 1; //increment the counter to now go for the other array
    }
  }
  
  recordNotes(valueOfNote) //records the value of notes and appends them to the array (not used)
  {
    append(this.recordArray, valueOfNote);
  }
  
  playRecordedNotes() //plays all the notes that are recorded
  {
    let noteString = "102\n"; //sends a message to arduino and allows arduino to know when to play the notes
    writeSerial(noteString);
    
    this.playBool = true; //the game is now in playing mode
    this.recordBool = false; //and not in recording mode
  }
  
  display() //display function of the whole game
  {
    if (this.gameState == "menuScreen") //if the game is in menu mode
    {
      image(menuBackgroundPicture1, 0, 0); //display the menu picture
      //and if the mouse hovers over a button, change the color of the button
      if (mouseX >= this.menuButtonX && mouseX <= this.menuButtonX + this.menuButtonWidth && mouseY >= this.menuButton1Y && mouseY <= this.menuButton1Y + this.menuButtonHeight)
      {
        image(menuBackgroundPicture2, 0, 0);
      }
      else if (mouseX >= this.menuButtonX && mouseX <= this.menuButtonX + this.menuButtonWidth && mouseY >= this.menuButton2Y && mouseY <= this.menuButton2Y + this.menuButtonHeight)
        {
          image(menuBackgroundPicture3, 0, 0);
        }
      else if (mouseX >= this.menuButtonX && mouseX <= this.menuButtonX + this.menuButtonWidth && mouseY >= this.menuButton3Y && mouseY <= this.menuButton3Y + this.menuButtonHeight)
        {
          image(menuBackgroundPicture4, 0, 0);
        }
    }
    else if (this.gameState == "gameScreen") //if game mode is on
    {
      if (this.instructionsBool == true) //see if the instructions page is up
      {
        image(gameInstructions, 0, 0); //provide instructions to the user
      }
      else //else it would be game mode
      {
        image(gameScreenBG, 0, 0); //add the background to the game
        this.rainMovement(); //make sure the notes keep falling
        textSize(15);
        fill(255,255, 255);
        text("SCORE: ", 10, 20); //display score
        text(this.gameScore, 75, 20);
        text("LIVES: ", this.canvasWidth - 87, 20); //display lives
        text(this.gameHealth, this.canvasWidth - 30, 20);
      }
    }
    else if (this.gameState == "freeScreen") //if the game is in free mode
    {
      this.freeModeBackgrounds(); //display different backgrounds for different notes played
    }
    else if (this.gameState == "recordScreen") //if the game is in record mode
    {
      if (this.recordBool == false && this.playBool == false) //see if its the first page
      {
        image(recordScreen1, 0, 0); //then display the "start recording" image
        if (mouseX >= this.recordButtonX && mouseX <= this.recordButtonX + this.recordButtonWidth && mouseY >= this.recordButtonY && mouseY <= this.recordButtonY + this.recordButtonHeight)
        {
          image(recordScreen2, 0, 0); //hovering over the button would change the button color
        }
      }
      else if (this.recordBool == true && this.playBool == false) //if the button is pressed, then start recording
      {
        let valueOfState = "98\n"; //tell arduino that the game is now in recording mode so that it changes state as well
        writeSerial(valueOfState);
        image(recordScreen3, 0, 0); //show image that says stop recording and play
        if (mouseX >= this.recordButtonX && mouseX <= this.recordButtonX + this.recordButtonWidth && mouseY >= this.recordButtonY && mouseY <= this.recordButtonY + this.recordButtonHeight)
        {
          image(recordScreen4, 0, 0); //hovering over the button changes the button color
        }
      }
      else if (this.recordBool == false && this.playBool == true) //when the button is pressed that says stop recording
      {
        image(recordScreen5, 0, 0); //image is display that says playing
        this.playRecordedNotes(); //recorded notes are then played
      }
    }
    else if (this.gameState == "endScreen") //when the lives are lost and game ends
    {
      let stateOfArduino = "103\n"; //tell the arduino that game has ended (sets arduino back to the start position)
      writeSerial(stateOfArduino);
      image(endBackgroundPicture, 0, 0); //show game end image
      if (this.gameScore > highscore) //calculate if you have a highscore
      {
        highscore = this.gameScore; //if yes then change the highscore value to your current score
      }
      fill(255, 255, 255);
      textSize(23);
      text("HIGH SCORE: ", 295, 365); //display high score
      text(highscore, 460, 365);
      text("YOUR SCORE: ", 295, 475); //display your score
      text(this.gameScore, 460, 475);
    }
    else
    {
      background(255, 0, 0);
    }
  }
  
  backgroundVariableChange(keyValue) //changes the background variable based on the data received
  {
    this.backgroundNumber = keyValue;
  }
  
  freeModeBackgrounds() //the background variable is used to display appropriate pictures for each note
  {
    if (this.backgroundNumber == 0) //every note has a different picture associated with it
    {
      image(freeScreen0, 0, 0);
    }
    else if (this.backgroundNumber == 1)
    {
      image(freeScreen1, 0, 0);
    }
    else if (this.backgroundNumber == 2)
    {
      image(freeScreen2, 0, 0);
    }
    else if (this.backgroundNumber == 3)
    {
      image(freeScreen3, 0, 0);
    }
    else if (this.backgroundNumber == 4)
    {
      image(freeScreen4, 0, 0);
    }
    else if (this.backgroundNumber == 5)
    {
      image(freeScreen5, 0, 0);
    }
    else if (this.backgroundNumber == 6)
    {
      image(freeScreen6, 0, 0);
    }
    else if (this.backgroundNumber == 7)
    {
      image(freeScreen7, 0, 0);
    }
    else if (this.backgroundNumber == 8)
    {
      image(freeScreen8, 0, 0);
    }
    else if (this.backgroundNumber == 9)
    {
      image(freeScreen9,0, 0);
    }
    else if (this.backgroundNumber == 10)
    {
      image(freeScreen10, 0, 0);
    }
    else if (this.backgroundNumber == 11)
    {
      image(freeScreen11, 0, 0);
    }
    else if (this.backgroundNumber == 12)
    {
      image(freeScreen12, 0, 0);
    }
    else if (this.backgroundNumber == 13)
    {
      image(freeScreen13, 0, 0);
    }
    else if (this.backgroundNumber == 14)
    {
      image(freeScreen14, 0, 0);
    }
    else if (this.backgroundNumber == 15)
    {
      image(freeScreen15, 0, 0);
    }
    else if (this.backgroundNumber == 16)
    {
      image(freeScreen16, 0, 0);
    }
  }
  
  
  notePressed(keyValue) //this is used in game Mode - keyValue is the key pressed on the table piano sent by arduino to p5js
  {
    for (let i = 0; i < this.notesInAnArray; i++) //in all the arrays
    {
      if (this.noteArray[i].visible == true) //if the note is visible (on screen)
      {
        if (keyValue == this.noteArray[i].note_number) //check if the key pressed matches a note
        {
          this.gameScore = this.gameScore + 1; //increase the game score
          this.noteArray[i].visible = false; //make the visibility false
          if (this.gameScore % this.difficultyParameter == 0 && this.noteSpacing > 1.5) //make the game harder but not very hard
          {
            this.noteSpacing = this.noteSpacing - 0.3; //decrease the distance between the notes
            globalGameSpeed = globalGameSpeed + 0.5; //increase game speed
          }
          break; //avoid checking other keys because already one has been found
        }
      }
    }
  }
}

//setup function
function setup() {
  createCanvas(800, 600); //creates canvas of desired size
  textFont(playfair_font); //use the playfair font to keep everything consistent
}

gameObject = new Game(); //create object of the game class

function draw() { 
  background(220); //arbitary background for debugging
  // if (gameObject.gameState == "menuScreen") //only play the music when the user is in the menu
  // {
    if (!background_music.isPlaying()) //ensure the music keeps looping forever
    {
      background_music.play(); //but also ensures that it doesnt start from the start every time
    }
  // }
  // else //if the game is in any other state
  // {
  //   if (background_music.isPlaying()) //check if the music is playing
  //   {
  //     background_music.stop(); //if yes then stop the music
  //   }
 // }
  gameObject.display(); //displays all the screens
}

function keyTyped() //key typed built in function
{
  
  if (gameObject.gameState == "endScreen") //when the game has ended
  {
      if (key === 'h' || key === 'H') //you can press h to return to home/restart game
      {  
        gameObject = new Game(); //a new object is assigned to the variables and the constructor initializes everything
      }
  }
  
  if (gameObject.gameState == "menuScreen") //if the game is in menu screen
  {
    if (keyCode == ENTER) //use enter to 
    {
      setUpSerial(); //set up serial
    }
  }
  return false;
}

function readSerial(data) //callback function for read serial
{
  if (data != null) //if the data is good
  {
      if (gameObject.gameState == "gameScreen") //if game mode is on
      {
        if (data >= 1 && data <= 16) //and the data is between the range we want (the keys)
        {
          gameObject.notePressed(data); //tell the game that a note has been pressed and which one
        }
      }
      
      if (gameObject.gameState == "recordScreen" && gameObject.recordBool == true) //if the game is in record mode and is recording
      {
        if (data >= 1 && data <= 16) //if any note is pressed
        {
          gameObject.recordNotes(data); //record the notes (not used)
        }
      }
    
    if (gameObject.gameState == "freeScreen") //if the game is in free mode
    {
      if (data >= 1 && data <= 16) //and the data is what we want
      {
        gameObject.backgroundVariableChange(data); //we know a note has been played and so change the backgrounds
      }
    }
  }
}

function mouseClicked() //mouseclicked function
{
  if (gameObject.gameState == "menuScreen") //if the game is in menu screen
    {
      //whatever button is pressed, change the gameState to that specific state
      if (mouseX >= gameObject.menuButtonX && mouseX <= gameObject.menuButtonX + gameObject.menuButtonWidth && mouseY >= gameObject.menuButton1Y && mouseY <= gameObject.menuButton1Y + gameObject.menuButtonHeight)
      {
        gameObject.gameState = "freeScreen";
        let screenState2 = "97\n"; //tell arduino that we are in free mode now
        writeSerial(screenState2);
      }
      else if (mouseX >= gameObject.menuButtonX && mouseX <= gameObject.menuButtonX + gameObject.menuButtonWidth && mouseY >= gameObject.menuButton2Y && mouseY <= gameObject.menuButton2Y + gameObject.menuButtonHeight)
      {
        gameObject.gameState = "gameScreen";
        gameObject.instructionsBool = true;
      }
      else if (mouseX >= gameObject.menuButtonX && mouseX <= gameObject.menuButtonX + gameObject.menuButtonWidth && mouseY >= gameObject.menuButton3Y && mouseY <= gameObject.menuButton3Y + gameObject.menuButtonHeight)
      {
        gameObject.gameState = "recordScreen"; //change the mode to record mode
      }
    }
  
  if (gameObject.gameState == "recordScreen") //if the game is in record mode
  {
    //check to see if the button is pressed or not and then change boolean variables accordingly
    if (mouseX >= gameObject.recordButtonX && mouseX <= gameObject.recordButtonX + gameObject.recordButtonWidth && mouseY >= gameObject.recordButtonY && mouseY <= gameObject.recordButtonY + gameObject.recordButtonHeight && gameObject.recordBool == false && gameObject.playBool == false)
    {
      gameObject.recordBool = true;
      gameObject.clickCount = 0; //this is so that button is not accidentally double clicked
    }
    else if (mouseX >= gameObject.recordButtonX && mouseX <= gameObject.recordButtonX + gameObject.recordButtonWidth && mouseY >= gameObject.recordButtonY && mouseY <= gameObject.recordButtonY + gameObject.recordButtonHeight && gameObject.recordBool == true && gameObject.playBool == false)
    {
      gameObject.clickCount++;
      if (gameObject.clickCount >= 3)
      {
        gameObject.recordBool = false;
        gameObject.playBool = true;
        gameObject.playingScreen = true;
      }
    }
  
    if (mouseX >= gameObject.homeButtonX && mouseX <= gameObject.homeButtonX + gameObject.homeButtonWidth && mouseY >= gameObject.homeButtonY && mouseY <= gameObject.homeButtonY + gameObject.homeButtonHeight && gameObject.playingScreen == true)
    {
      gameObject.playingScreen = false;
      gameObject.gameState = "menuScreen"; //go to the menu state if the home button is pressed
    }
  }
  
  if (gameObject.gameState == "freeScreen") //if the game is in free mode
  {
    if (mouseX >= gameObject.homeButtonX && mouseX <= gameObject.homeButtonX + gameObject.homeButtonWidth && mouseY >= gameObject.homeButtonY && mouseY <= gameObject.homeButtonY + gameObject.homeButtonHeight)
    {
      //if the home button is pressed
      gameObject.backgroundNumber = 0; //reinitalize variable so that instruction screen pops up again
      gameObject.gameState = "menuScreen"; //go back to menu state
      let screenState3 = "104\n"; //tell arduino that we are going back to menu screen
      writeSerial(screenState3);
    }
  }
  
  if (gameObject.gameState == "gameScreen") //if the game is in game mode
  {
    if (gameObject.instructionsBool == true && mouseX >= gameObject.instructionButtonX && mouseX <= gameObject.instructionButtonX + gameObject.homeButtonWidth && mouseY >= gameObject.instructionButtonY && mouseY <= gameObject.instructionButtonY + gameObject.homeButtonHeight)
    {
      //if the instructions button is pressed
      gameObject.instructionsBool = false; //set the boolean to false
      let gameScreenState = "99\n"; //tell arduino that we are in game mode now
      writeSerial(gameScreenState);
    }
    
    if (gameObject.instructionsBool == true && mouseX >= gameObject.homeButtonX && mouseX <= gameObject.homeButtonX + gameObject.homeButtonWidth && mouseY >= gameObject.homeButtonY && mouseY <= gameObject.homeButtonY + gameObject.homeButtonHeight)
    {
      //if the home button is pressed
      gameObject.instructionsBool = true; //ensure the next time instruction page pops up
      gameObject.gameState = "menuScreen"; //go back to menu screen mode
      let stateOfArduino2 = "103\n"; //tell arduino as well that you have gone back to menu screen mode
      writeSerial(stateOfArduino2);
    }
  }
}

remove();

Description of Arduino Code:

The program reads data from an ultrasonic sensor and responds by generating tones through a buzzer and turning on an LED. The program has four different states, menu mode, game mode, record mode, and free mode, which are determined by input from the P5js interface.

In the beginning, the code defines the pins for the ultrasonic sensor, buzzer, buttons, and LED, and initializes several variables used in the program, including pressed, distance, arduinoState, recordCounter, and recordArray.

The first state is menu mode, indicated by arduinoState == 100. In this mode, the program waits for input from the connected P5js program. If it receives the value 99, it changes the state to game mode, if it receives 98, it changes the state to record mode, and if it receives 97, it changes the state to free mode.

In game mode, the program turns on the LED to indicate that the ultrasonic sensor is working, reads sensor data, and generates tones based on the distance measured. It also checks for input from the P5js program and leaves the state if it receives the value 103.

In record mode, the program reads data from the ultrasonic sensor, turns on the LED, and waits for input from the P5js program. If it receives the value 102, it plays back the recorded notes stored in recordArray, resets the state to menu mode, and sets recordCounter to 0.

In free mode, the program reads data from the ultrasonic sensor, turns on the LED, and checks for input from the P5js program. It leaves the state if it receives the value 104.

Finally, the playRecordedNote() function is called in the loop() function to generate tones based on the notes stored in recordArray. The function maps the values in the array to specific frequencies and durations using the tone() function.

All over the place, the Serial.read() function is used to skip over irrelevant data that may be present in the serial. Also the break feature is used excessively to break out of the serial.available() loop once the required value is read. Here is the code:

//Define the pins used for the ultrasonic sensor, buzzer, buttons, and LED
const int pingPin = 2; //Trigger Pin of Ultrasonic Sensor
const int echoPin = 3; //Echo Pin of Ultrasonic Sensor
const int buzzerPin = 8;
const int LEDbutton = 7;

//Initialize variables used in the program
int pressed = 0;
long distance = 0;
int arduinoState = 100;
int recordCounter = 0;
int recordArray[100];

int stateValue = 0; //helps change the state of Arduino (sent by p5js)

//Include the pitches library for generating tones
#include "pitches.h"

void setup()
{
 //Start serial communication at 9600 baud
 Serial.begin(9600);

 //Set the ultrasonic sensor pins as output and input respectively
 pinMode(pingPin, OUTPUT);
 pinMode(echoPin, INPUT);

 //Set the LED pin as an output
 pinMode(LEDbutton, OUTPUT);


 //Turn off the LED initially
 digitalWrite(LEDbutton, LOW);
}

void loop() 
{
  if (arduinoState == 100)  //menu mode
  {
    digitalWrite(LEDbutton, LOW); //this means that the sensor is not working
    while (Serial.available()) //if serial is available
    {
      stateValue = Serial.parseInt(); //then parseInt and see what p5js has sent us
      if (stateValue == 99) //game mode
      {
        arduinoState = 99; //set arduino state to 99 as well which is game mode
        digitalWrite(LEDbutton, LOW);
        break; //we have the state so we can now go to that state       
      }
      else if (stateValue == 98) //record mode
      {
        arduinoState = 98; //set arduino to record mode as well
        digitalWrite(LEDbutton, LOW);
        break; //we have the state so we can leave
      }
      else if (stateValue == 97) //free mode
      {
        arduinoState = 97; //set arduino state to free mode
        digitalWrite(LEDbutton, LOW);
        break; //we have the state so we can leave
      }
    }    
  }
  else if (arduinoState == 99) //game Mode
  {
    sensorReading(); //start the sensor
    digitalWrite(LEDbutton, HIGH); //turn on LED to indicate the sensor is on

    while (Serial.available()) //if serial is available
    {
        int changeOfState = Serial.parseInt(); //use the parseInt functiion
        if (changeOfState == 103) //if the value is 103, this means that the p5js program has left the game Mode
        {
          arduinoState = 100; //so arduino can also leave the game mode state
          break;
        }
        Serial.read(); //keep reading and ignoring the serial values until 103 is reached
    }
  }
  else if (arduinoState == 98)
  {
    digitalWrite(LEDbutton, HIGH); //turn on LED to indicate the sensor is on
    sensorReading(); // start the sensor
    int dataNote;

    while (Serial.available()) //see if serial is available
    {
        int playSound = Serial.parseInt(); //parse the serial for integer
        if (playSound == 102) //if it is 102, we know that p5js wants us to play the recorded sound
        {
          for (int i = 0; i < recordCounter; i++)  //go through the array that has recorded notes
          {
            playRecordedNote(recordArray[i]); //play each note
            recordArray[i] = 0; //then empty that location for the next time
          }
          arduinoState = 100; //go back to state 100 which is menu state
          recordCounter = 0; //initialize the record counter to 0 as well for the next time
          break; //break the loop
        }
        Serial.read();
      }
  }
  else if (arduinoState == 97) //if you are in free mode
  {
    sensorReading(); // start the sensor
    digitalWrite(LEDbutton, HIGH); //turn on LED to indicate the sensor is on

    while (Serial.available()) //check if serial is available
    {
        int stateChange = Serial.parseInt(); //parse the serial for integers
        if (stateChange == 104) //if it is 104
        {
          arduinoState = 100; //p5js has left free mode and is in menu mode so arduino does the same
          break;
        }
        Serial.read(); //keep reading serial to ignore irrelevant information
    }    
  }
}

void playRecordedNote(int valueOfNote) //play recorded notes
{
  if (valueOfNote == 1)
  {
    tone(buzzerPin, NOTE_C4, 400); //for 400ms
  }
  else if (valueOfNote == 2)
  {
    tone(buzzerPin, NOTE_E4, 400);
  }
  else if (valueOfNote == 3)
  {
    tone(buzzerPin, NOTE_G4, 400);
  }
  else if (valueOfNote == 4)
  {
    tone(buzzerPin, NOTE_A4, 400);
  }
  else if (valueOfNote == 5)
  {
    tone(buzzerPin, NOTE_C5, 400);
  }
  else if (valueOfNote == 6)
  {
    tone(buzzerPin, NOTE_D5, 400);
  }
  else if (valueOfNote == 7)
  {
    tone(buzzerPin, NOTE_E5, 400);
  }
  else if (valueOfNote == 8)
  {
    tone(buzzerPin, NOTE_G5, 400);
  }
  else if (valueOfNote == 9)
  {
    tone(buzzerPin, NOTE_A5, 400);
  }
  else if (valueOfNote == 10)
  {
    tone(buzzerPin, NOTE_B5, 400);
  }
  else if (valueOfNote == 11)
  {
    tone(buzzerPin, NOTE_D6, 400);
  }
  else if (valueOfNote == 12)
  {
    tone(buzzerPin, NOTE_E6, 400);
  }
  else if (valueOfNote == 13)
  {
    tone(buzzerPin, NOTE_G6, 400);
  }
  else if (valueOfNote == 14)
  {
    tone(buzzerPin, NOTE_A5, 400);
  }
  else if (valueOfNote == 15)
  {
    tone(buzzerPin, NOTE_B5, 400);
  }
  else if (valueOfNote == 16)
  {
    tone(buzzerPin, NOTE_C5, 400);
  }
  else 
  {
    tone(buzzerPin, NOTE_C5, 400);
  }
  delay(408); // a small delay so it sounds nice
}

//Function to read the ultrasonic sensor and play a tone based on the distance measured
void sensorReading()
{
  //Send a short low pulse
  digitalWrite(pingPin, LOW);
  delay(2); //delay to avoid complications
  digitalWrite(pingPin, HIGH); //sends a high pulse for 10 microseconds
  delay(10);
  digitalWrite(pingPin, LOW);
  distance = pulseIn(echoPin, HIGH); //Measure the duration of the ultrasonic pulse and calculate the distance
  distanceNotes(distance); //play the notes based on the distance
  delay(100);
}

void distanceNotes(long distance) 
{
  if (distance >= 2920) //if the distance is greater than 2920
  {
    noTone(8); //then dont play anything
    Serial.println(0); //send 0 to serial to indicate nothing is being played
    pressed = 0; //reinitialize the key pressed variable to 0 so other keys can be pressed
  }
  else if (distance >= 2800 && pressed == 0) //for each distance, there is a specific note
  {
    tone(buzzerPin, NOTE_C5, 400);
    if (arduinoState == 98) //f the arduino is in record mode
    {
      recordArray[recordCounter] = 16; //record the note number in the array
      recordCounter++; //increment counter for the future
    }
    Serial.println(16); //print the serial and send to p5js for it to be dealt with appropriately
    pressed = 1; //do this to avoid the same note being played repeatedly 
  }
  else if (distance >= 2600 && pressed == 0)
  {
    tone(buzzerPin, NOTE_B5, 400);
    Serial.println(15);
    pressed = 1;
    if (arduinoState == 98)
    {
      recordArray[recordCounter] = 15;
      recordCounter++;
    }
  }
  else if (distance >= 2420 && pressed == 0)
  {
    tone(buzzerPin, NOTE_A5, 400);
    Serial.println(14);
    pressed = 1;
    if (arduinoState == 98)
    {
      recordArray[recordCounter] = 14;
      recordCounter++;
    }
  }
  else if (distance >= 2260 && pressed == 0)
  {
    tone(buzzerPin, NOTE_G6, 400);
    Serial.println(13);
    pressed = 1;
    if (arduinoState == 98)
    {
      recordArray[recordCounter] = 13;
      recordCounter++;
    }
  }
  else if (distance >= 2060 && pressed == 0)
  {
    tone(buzzerPin, NOTE_E6, 400);
    Serial.println(12);
    pressed = 1;
    if (arduinoState == 98)
    {
      recordArray[recordCounter] = 12;
      recordCounter++;
    }
  }
  else if (distance >= 1960 && pressed == 0)
  {
    tone(buzzerPin, NOTE_D6, 400);
    Serial.println(11);
    pressed = 1;
    if (arduinoState == 98)
    {
      recordArray[recordCounter] = 11;
      recordCounter++;
    }
  }
  else if (distance >= 1690 && pressed == 0)
  {
    tone(buzzerPin, NOTE_B5, 400);
    Serial.println(10);
    pressed = 1;
    if (arduinoState == 98)
    {
      recordArray[recordCounter] = 10;
      recordCounter++;
    }
  }
  else if (distance >= 1515 && pressed == 0)
  {
    tone(buzzerPin, NOTE_A5, 400);
    Serial.println(9);
    pressed = 1;
    if (arduinoState == 98)
    {
      recordArray[recordCounter] = 9;
      recordCounter++;
    }
  }
  else if (distance >= 1345 && pressed == 0)
  {
    tone(buzzerPin, NOTE_G5, 400);
    Serial.println(8);
    pressed = 1;
    if (arduinoState == 98)
    {
      recordArray[recordCounter] = 8;
      recordCounter++;
    }
  }
  else if (distance >= 1180 && pressed == 0)
  {
    tone(buzzerPin, NOTE_E5, 400);
    Serial.println(7);
    pressed = 1;
    if (arduinoState == 98)
    {
      recordArray[recordCounter] = 7;
      recordCounter++;
    }
  }
  else if (distance >= 1005 && pressed == 0)
  {
    tone(buzzerPin, NOTE_D5, 400);
    Serial.println(6);
    pressed = 1;
    if (arduinoState == 98)
    {
      recordArray[recordCounter] = 6;
      recordCounter++;
    }
  }
  else if (distance >= 825 && pressed == 0)
  {
    tone(buzzerPin, NOTE_C5, 400);
    Serial.println(5);
    pressed = 1;
    if (arduinoState == 98)
    {
      recordArray[recordCounter] = 5;
      recordCounter++;
    }
  }
  else if (distance >= 660 && pressed == 0)
  {
    tone(buzzerPin, NOTE_A4, 400);
    Serial.println(4);
    pressed = 1;
    if (arduinoState == 98)
    {
      recordArray[recordCounter] = 4;
      recordCounter++;
    }
  }
  else if (distance >= 530 && pressed == 0)
  {
    tone(buzzerPin, NOTE_G4, 400);
    Serial.println(3);
    pressed = 1;
    if (arduinoState == 98)
    {
      recordArray[recordCounter] = 3;
      recordCounter++;
    }
  }
  else if (distance > 310 && pressed == 0)
  {
    tone(buzzerPin, NOTE_E4, 400);
    Serial.println(2);
    pressed = 1;
    if (arduinoState == 98)
    {
      recordArray[recordCounter] = 2;
      recordCounter++;
    }
  }
  else if (distance <= 310 && pressed == 0)
  {
    tone(buzzerPin, NOTE_C4, 400);
    Serial.println(1);
    pressed = 1;
    if (arduinoState == 98)
    {
      recordArray[recordCounter] = 1;
      recordCounter++;
    }
  }
}

Communication Between Arduino and P5js:

P5js and Arduino are fully connected in this implementation. They communicate with each other to ensure that the program runs smoothly and there is harmony between the software and hardware components of the project. The project has various modes that allows for a greater user experience and so the program is divided in a way that breaks down different modes in game states. This goes for both P5js and Arduino. P5js sends data to Arduino that allows for mode changes in the Arduino program. Without P5js communicating the state it is on, Arduino would have never been able to sync with the program. P5js also tells Arduino when to start recording, stop recording, and then when to play the recorded tune. It also sends data to Arduino in order to communicate when to turn the sensor on or off. Arduino, on the other hand, in the game mode calculates the distance using its ultrasonic sensor and then evaluates what note each distance corresponds to and then finally sends it to P5js interface. The interface then uses the data to either play the game and “catch the notes.” Furthermore, in the free mode as well, Arduino filters out the bad data and then sends only the right notes to P5js in order to be displayed using various images. 

Reflection and Improvement

I’m particularly proud of the user interface that I have designed for the project. I put a lot of thought and effort into making it user-friendly and intuitive, while also allowing for complete freedom and interactivity. The buttons and other interactive features really make the interface come alive, and I think users will find it enjoyable to use.

In addition to the user interface, I am also really proud of how I tackled the game states in the project. Initially, I was worried that I wouldn’t be able to get everything done in time, but through lots of user testing and feedback, I was able to create a code that I’m actually really proud of. The game states add a level of complexity and depth to the project, and I think users will appreciate the extra challenge.

Finally, I’m really happy with the arraySwitch function that I developed for the project. It was a difficult task to create two different arrays with different types of notes and then switch between them every time one array was exhausted. But in the end, it was definitely worth it because it ensures that the same note won’t come up twice in a row, which makes the game more interesting and challenging. 

I am very proud of the end result of my project, but there are still areas that I can improve on. For instance, I expected the ultrasonic sensor to be more accurate, but I was disappointed with the level of precision it provided. In addition, using the ultrasonic sensor made it difficult for users to play notes quickly, as the hand gestures required were awkward and unlike those used for a normal piano. In the future, I will need to explore alternative sensor options to improve user experience.

Another area for improvement would be to incorporate more buttons or LEDs on the Arduino side of the project to make it more interactive. This would enhance the overall experience for users and make it more engaging. Finally, time management was a significant challenge for me during this project, and as a result, I was unable to 3D print or craft a box for the Arduino. As a result, the aesthetics of the final product (hardware) were what I had in mind. In the future, I will need to better manage my time to ensure that I have enough time to complete all aspects of the project, including the aesthetics.

User Testing

According to my friend’s testing of my project, they had some initial confusion with the user interface, as there were no back buttons and some buttons didn’t respond when hovered over. Additionally, they had trouble understanding when to start playing the notes and what each mode was meant for. However, through incorporating their feedback, I was able to make improvements to the instructions screen and provide clearer information on the interface, which ultimately led to a more interactive and controllable experience. My friend found the P5js portion of the program to be smooth and bug-free, which is working well.

On the other hand, my friend had issues with the sensor as it registered a note even while their hand was still moving in front of it. I had to explain to them that only one finger/hand should be used, and it needed to move out of the way of the sensor for the next note to be played. To make this clearer to future users, I could include instructions on the interface or have a printed paper with the instructions. However, the best solution would be to use a different sensor altogether to avoid these issues in the future.

Final Project: Space Explorer

Concept

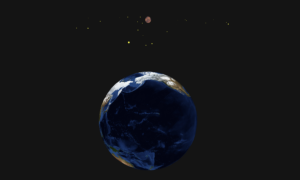
Many of us are fascinated with space and all the heavenly objects floating around far away from us. Our Earth is one of many objects in space. I wanted to make an interactive environment where we could look at these planets and admire their beauty, while also learning a few facts about them.  Hence, I used WEBGL in p5Js to create a 3D space where I could spawn planets and stars which one can explore.

Implementation

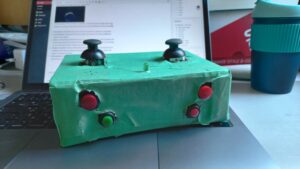
My implementation of the project is divided into p5Js and Arduino, and has very simple controls, aesthetic visuals, with immersive audio.

Interactive Design

The design of the project is simple. The visual component of the project features a dark space with the nine planets in the solar system (including Pluto) and the Sun. I tried to make it to scale as much as possible but still remaining reasonable with user experience.With regards to interactivity, I created a controller that lets the user move around in 3D space and look around. Here are the features of the controller:

  1. Movement: (Joystick) the user can move around in a plane in a 3D space.
  2. Look Around: (Joystick) the user can pan the camera to look at different angles in the space.
  3. Zoom: (momentary Switch) the user can zoom in and out. This provides the third dimensional movement in the z-axis. After a certain point of zooming in, the controls and the visuals are mirrored.
  4. Pointer to Earth: (Switch) this helps the user in navigation and directional feedback. This also increases the spatial awareness; the idea of where the player is relative to Earth.
  5. Information: (Switch) this will provide the user with some facts about the planet they are closest to.

Arduino

The Arduino provides controller access for the movement and changes in the p5Js. It takes inputs from the joystick and switches, processes it, and sends it to the p5Js as a suitable string of information.

// Movement using joystick
const int x_pos = A0;
const int y_pos = A1;

// zoom in and out
const int z_in = 12;
const int z_out = 11;

// Camera movement
const int camera_x = A5;

// pointer to earth button
const int pointer = 2;

// information about the planet
const int info = 7;

// LED
const int led = 5;

const int n = 7; // number of button inputs the user provides

int send_list[n];

int input_pins[n];

void setup() {
  Serial.begin(9600);

  pinMode(x_pos, INPUT);
  pinMode(y_pos, INPUT);

  pinMode(camera_x, INPUT);

  pinMode(z_in, INPUT);
  pinMode(z_out, INPUT);

  pinMode(pointer, INPUT);

  pinMode(info, INPUT);

  pinMode(led, OUTPUT);

  input_pins[0] = x_pos;
  input_pins[1] = y_pos;
  input_pins[2] = camera_x;
  input_pins[3] = z_in;
  input_pins[4] = z_out;
  input_pins[5] = pointer;
  input_pins[6] = info;

  while (Serial.available() <= 0) {
    Serial.println(0);
    delay(300);
  }
}

void get_user_input() {
  send_list[0] = analogRead(x_pos);
  send_list[1] = analogRead(y_pos);
  send_list[2] = analogRead(camera_x);
  for (int i = 3; i < n; i++) {
    send_list[i] = 0;
    if (digitalRead(input_pins[i]) == HIGH) {
      send_list[i] = 1;
    }
  }
}

void send_input() {
  String to_send = "";
  for (int i = 0; i < n-1; i++) {
    to_send += String(send_list[i]) + ",";
  }
  to_send += String(send_list[n-1]) + "\0";

  Serial.println(to_send);
}

void loop() {
  while (Serial.available() > 0) {
    // get user input and parse to send it to p5js.
    get_user_input();
    send_input();

    // receive response from p5js
    int response = Serial.read();
    analogWrite(led, response);
  }
}

It also receives a confirmation from p5Js that the devices is connected. This can be visually seen from the LED which lights up when the connection is made.

The code first gets all the input and creates an array of them.

p5Js

My project is p5Js heavy. The code lets the user connect to Arduino and receive control information to make changes in the canvas. It creates multiple planets which are basically spheres with different sizes, positions, and textures onto them. Each planet then rotates on its axis and are tilted to some degree. The planets are made stationary relative to the Sun, to make navigation and finding the planets easier.

I used the WEBGL library, to create the 3D space and made the camera movable and responsive of the players movement. This created the effect/ feature of moving in the 3D environment.

The code features multiple classes: Player, Camera, Sun, Planet, Info, Star which creates most of the functionality and visuals in the project. I separated out the Arduino interaction into a separate file, arduino.js to make debugging easier.

Communication

The communication between Arduino and P5Js is intuitive. When the Arduino senses change in the controller, it extract the values of the state the controller is in. These values are then stored into an the send_list array. All the values in this array is then converted into a string separated by commas. This string is then sent to P5Js for further processing.

void get_user_input() {
  send_list[0] = analogRead(x_pos);
  send_list[1] = analogRead(y_pos);
  send_list[2] = analogRead(camera_x);
  for (int i = 3; i < n; i++) {
    send_list[i] = 0;
    if (digitalRead(input_pins[i]) == HIGH) {
      send_list[i] = 1;
    }
  }
}

void send_input() {
  String to_send = "";
  for (int i = 0; i < n-1; i++) {
    to_send += String(send_list[i]) + ",";
  }
  to_send += String(send_list[n-1]) + "\0";

  Serial.println(to_send);
}

The P5Js then receives this string, and parses it to retrieve all the individual values of all the input devices in the controller. These are then stored in separate variable and used to control the objects on the canvas .

function readSerial(data) {
  if (data != null) {    
    
    // get the information from the arduino
    let nums = data.split(",");
    let len = nums.length;
    
    // parsing the received string to get the useful numbers
    let x = 0;
    for (let i = 0; i < len; i++) {
      user_input[x] = parseInt(nums[i], 10);
      x++;
    }
    
    // continuing the conversation between p5js and arduino
    writeSerial("10");
  }
}

After the information is received, P5Js then sends in a confirmation to Arduino to send in more information. This confirmation also determines the brightness of the LED which lights up when P5Js reciprocates back to the Arduino.

Code I am proud of

The hardest part of the entire project was to figure out the movement in 3D space. I had to first learn the orientation of the camera, then move objects using some arrow keys, and make the movement consistent with where the camera was looking at.

This was very confusing. The problem was, when you move without incorporating the camera into the movement, you would always move the same way, no matter where the camera is pointing towards. For instance, you press UP arrow to move forward. Then you change the camera angle to look behind. When you press UP arrow again, instead of you moving forward, you would move backward.

This problem was overcome by having an angle attribute to the player which would map to the camera as such:

class Camera {
  constructor() {
    // distance between the camera and the virtual player (invisible)
    this.distance = 400;
  }
  
  // creates the camera and determines the position, where the camera is looking at and at what orientation.
  make() {
    camera(this.distance * cos(player.angle) + player.pos.x, this.distance * sin(player.angle) + player.pos.y, this.distance/2, player.pos.x, player.pos.y, player.pos.z, 0, 0, -1);
  }
}

Notice in the above code, the angle is an attribute to the player. It controls where the camera is looking at and where the player moves, as seen in the code below.

// we are in the move() function in the Player class
this.pos.x += move_mag * cos(theta + this.angle - PI/2);
this.pos.y += move_mag * sin(theta + this.angle - PI/2);

Credit: I got the idea of the solution through videos of JS64 Youtube Channel.

Future Improvement

There are a lot of things that I could do with this project. I realised that this project is sort of incomplete, although it serves it purpose of being educational, interactive, and aesthetically pleasing. However, to make it more engaging, I could turn it into a game where, I introduce a character who has to search for more inhabitable planets in the vast expanse of space. I could also link it with my Midterm game, as the theme of space travel is similar.

This project only incorporates the solar system, albeit not entirely since it lacks asteroids, moons and comets. I could expand it more to have more planets and better the spatial awareness so that the player is not lost.

Week 14: User Testing

For my latest version of the final project, Aditya was my user tester. He had seen my project before, but had never used to the controls from the Arduino. My Arduino provides navigation controls for the space exploration in p5Js. I did not say what each controls did, and had him figure out on his own.

Feedback

I received some very useful feedback from Aditya. He did take some time to figure out the controls,  but he commented that the movement was “smooth”.

He liked the visuals and the overall project. However, he also pointed out some improvements I could make.

  1. He suggested I add some kind of music in the background so that the user is engaged and immersed.
  2. The movement was pretty slow and would eventually loose user’s interest.

By observing Aditya, I learnt that his previous experience with controllers, much like mine (similar functionality to X-Box controller),  was making it confusing for him to grasp the movement on screen. There is not much I could do to fix this issue, except let him get the hang of it.

Final Project – User Testing

In order to gather feedback on the usability of my project, I conducted a user interaction test by having people try the project without any prompts or instructions. The purpose of this test was to evaluate how intuitive the design was and how well users were able to understand the mapping between the controls and the resulting experience.

Overall, the results of the test were mixed. Some users were able to figure out the controls quickly and enjoyed the experience, while others struggled to understand how the controls worked and what their effect on the project was. A common area of confusion was the use of the two potentiometers, as some users were unsure of which one controlled the horizontal and vertical movement of the line.

Despite the challenges some users faced, there were several areas of the project that worked well. Many users enjoyed the retro feel of the etch-a-sketch and appreciated the unique green and black design. The feedback on the physical controls was also positive, as users found them easy to use and responsive.

Based on the results of the user interaction test, there are several areas that could be improved in the project. One approach could be to provide more detailed instructions or visual aids to help users understand the controls and how they affect the project. Another potential improvement could be to add a feature that allows users to save and share their creations, adding a new level of engagement and creativity to the project. Also, the knobs of the potentiometers should be made bigger so the users can control them more easily.

Week 13 – Final Project: User Testing

I successfully integrated Arduino and p5js to create most of my project. Initially, I created the game on p5js and used keyboard input. Later, I modified the program to accept input from an Arduino flex sensor, which worked seamlessly.

Moeez tested the game without any instructions from me and found it to be smooth and playable. However, he had some confusion regarding the direction to tilt the flex sensor as the value of the sensor differs for each direction. Once I provided him with the correct direction, the game felt even smoother. Although the flex sensor was not in a fixed position during testing, it will be attached to a glove in the final version. This will ensure that the sensor is always in the correct position and can only be bent in one direction (towards the user’s clenched fist).

Currently, the game dynamics are working well and are quite smooth and playable. I have also designed a cover page for the as posted below:

However, I still need to add functionality that responds to feedback from p5js by using two LEDs: a green LED for successful bridge crossing and a red LED for failure. I also plan to fix the flex sensor into the glove to provide a better gaming experience.

Although I needed to provide instructions to Moeez regarding the direction to tilt the flex sensor during testing, this will be resolved once the sensor is fixed to the glove. Additionally, I have already added an instruction page to make the game easier to understand. Overall, the game is simple to play and requires minimal attention to instructions. Anyone can quickly learn to play and enjoy the game.

Week 12 – User Testing

Progress so far
So far, I have developed the basis of my program in  Arduino and P5. I have connected a single button. When pressed, a sound associated with that button is played in p5. An animation, associated with that specific sound is also displayed in p5 and then the canvas when the button is released has a randomly placed circle every time the button is pressed. This is to create a sound and p5 canvas that the user can design and control.

Next, I will add at least three more buttons in the same way. each will have a unique sound and animation attached to it and will allow the user to draw different things on the canvas. I will also add a flex sensor to control a background sound from a buzzer or from p5.

The project concept is based on traditional South Asian music so sound effects will be from instruments such as sitar, rubab, drums, and flute. Also, the background music will also complement these sounds. The project aims to promote accessibility therefore it visualizes sound for those who cannot hear so they can use it in their own unique way to design the canvas.

User Testing

So far, the project is running well. Due to several deadlines and a heavy workload, I could not do a lot of the work for this project but the basis of the idea is implemented and it will be easier to implement from here on.

The user was able to easily understand the interface and the circuit. However, I will add more elements to the interface such as instructions on how to use it for better understanding.

I am particularly proud that my project is accessible and will pay tribute to music from my home country Pakistan. That is why Im excited to further develop it to completion.

Here are details of the Arduino and P5 ends of the project:

Arduino

For the Arduino end, as mentioned, sensors and buttons will be arranged in a box. I might integrate a motor as well that moves something, for example, a music record, according to the sensor values.

Inputs and Outputs:

  • From light sensor – will send it to p5
  • From distance sensor/potentiometer – will send it to p5/use to control the volume of the buzzer
  • From buttons – will light up corresponding LEDs and send to p5
  • From P5 – indication if instrument turned on/off from p5 screen – use to turn corresponding power LED on/off
  • LEDs to indicate if the instrument is on or if any button is pressed (feedback)
  • Buzzer (to play background sound/button sounds)

P5

The P5 screen will first present instructions on how to use the instrument. Once the experience begins, the screen will show a visualization of the music created using input from the sensors. This way, every user will, in a way, create an art piece that is theirs. So, not only can the user change their motion/touch to change the output sound but also to add something to their sketch. Also, P5 will have some buttons that, when pressed, will send output to Arduino – for example, LEDs light up when the Start button is pressed or if the sensor value exceeds a threshold or maybe different tone/sound/volume options available on the screen that will be used to change the output melody.

Inputs and outputs

  • Use light sensor value from Arduino to change tone type and screen background color
  • Use inputs from buttons that Arduino sends to draw shapes/patterns on the screen


User Testing : Final Project

User Test results:

I had my friend try the game by just giving her a general idea of the game. I forgot to mention that she had to pair the Arduino board first by pressing the space bar so that is definitely something i will keep in mind when finalizing the user interface for the project. I had explained to her how to use the card against the ultrasonic sensor because I had not yet designed the board for it. I think it was working fine but the movement of the car was glitching a little bit due to the tilt of the card and unstable hand movements. Because of the random motion of the card against the ultrasonic sensor and lack of proper hardware, the car movement was haphazard and missing the ‘game end’ condition.

I think this is particular user testing helped me realize a lot of the issues with my design. I had not laid out clear instructions for the Arduino board connection which meant that for someone who was new to this sort of implementation, starting the game would not have been possible. The lack instructions on how to navigate the card and the limits of the card distance was also another factor I had not yet implemented which I had to verbally explain to my friend.

I am however happy with the serial output from Arduino because I was experiencing issues before with consistent output to p5.js and that has been sorted out now. I am also happy with the p5.js visuals as I was able to extensively work on that as well and make it fitting to the theme.


Further work:

I think the number one thing I will focus on for now is fixing the haphazard motion of the car due to the unstable card motion. I am thinking of limiting the movement of the card by placing it in slider that I have yet to design. This will make sure that the card does not tilt and stay within the limit of horizontal distance that I have chosen for the game.

I also need to add the LEDs so that there is a green light for when the game is in ‘game state’ and red for when it has not yet started. I need to refine the p5.js code by adding last final components. I have yet to add music, code to send data to Arduino for the LEDs, and edit the interfaces further.

I also need to add instructions for the Arduino board connection at the start of the game and then instructions to navigate the card holder and its movements as well.