Let’s Party

Overall Experience
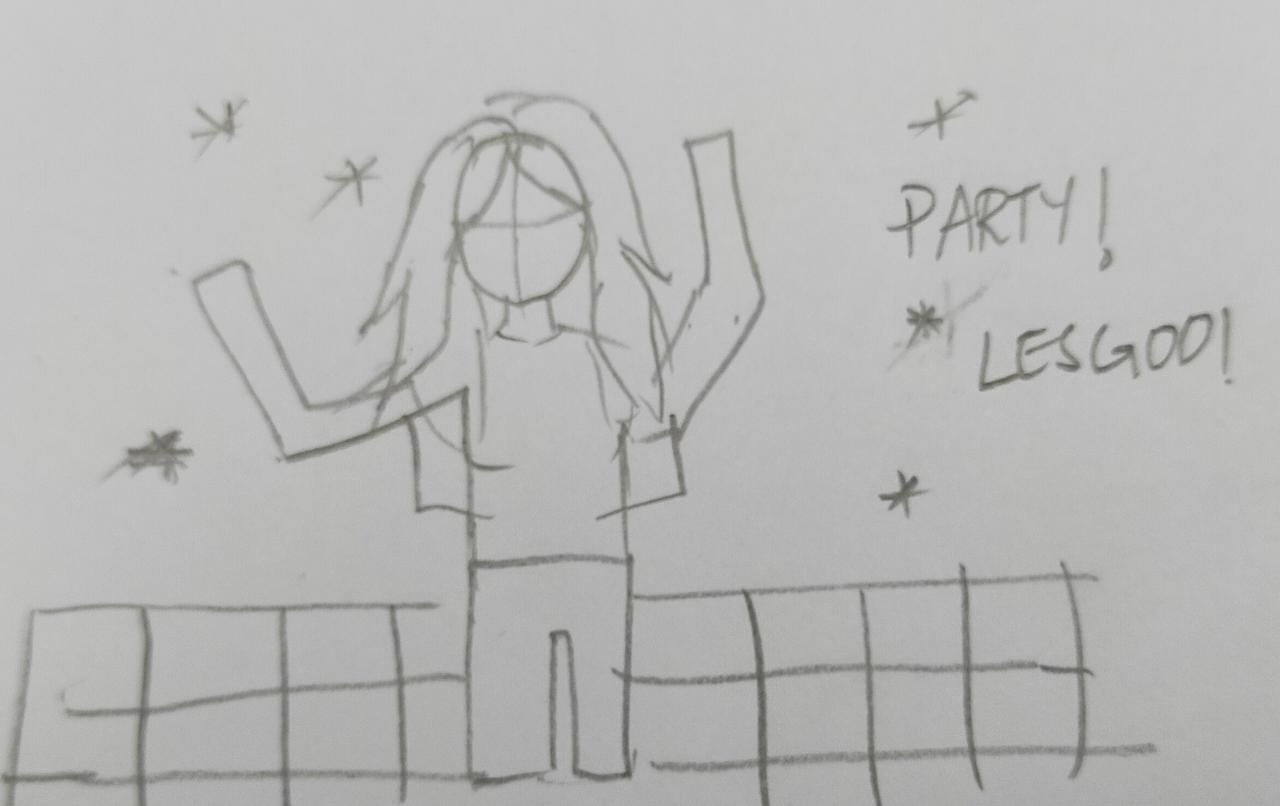
Even though I am a CS major, I started my coding journey only after coming to NYUAD. But all the CS courses I have taken so far don’t involve a creative expression of thoughts and imagination, but this course started off itself with an interesting assignment – to code a self-portrait. I wanted my self-portrait to reflect my vibes, so I wanted the theme to be related to a party.

Process and Progress
Initially, I just explored different functions and methods that I could use to make my theme alive. So, I added a colorful dance floor, for which I used 2d arrays to arrange the rectangles and then used drawingContext.shadowBlur to give a realistic shadow effect, which turned out good. Then I wanted the background to shine, like with lights, so I added little white ellipses in the background.

function disco(Y) {
  for (let x = 0; x <= 600; x += 30) {
    for (let y = Y; y <= 400; y += 30) {
      drawingContext.shadowBlur = 20;
      drawingContext.shadowColor = color(random(255));
      fill(random(255), random(255), y);
      rect(x, y, 30, 30);
    }
  }
}

function sparkle() {
  fill(255);
  noStroke();
  for (let i = 0; i < 100; i++) {
    ellipse(random(width), random(height), random(1, 6));
  }
}

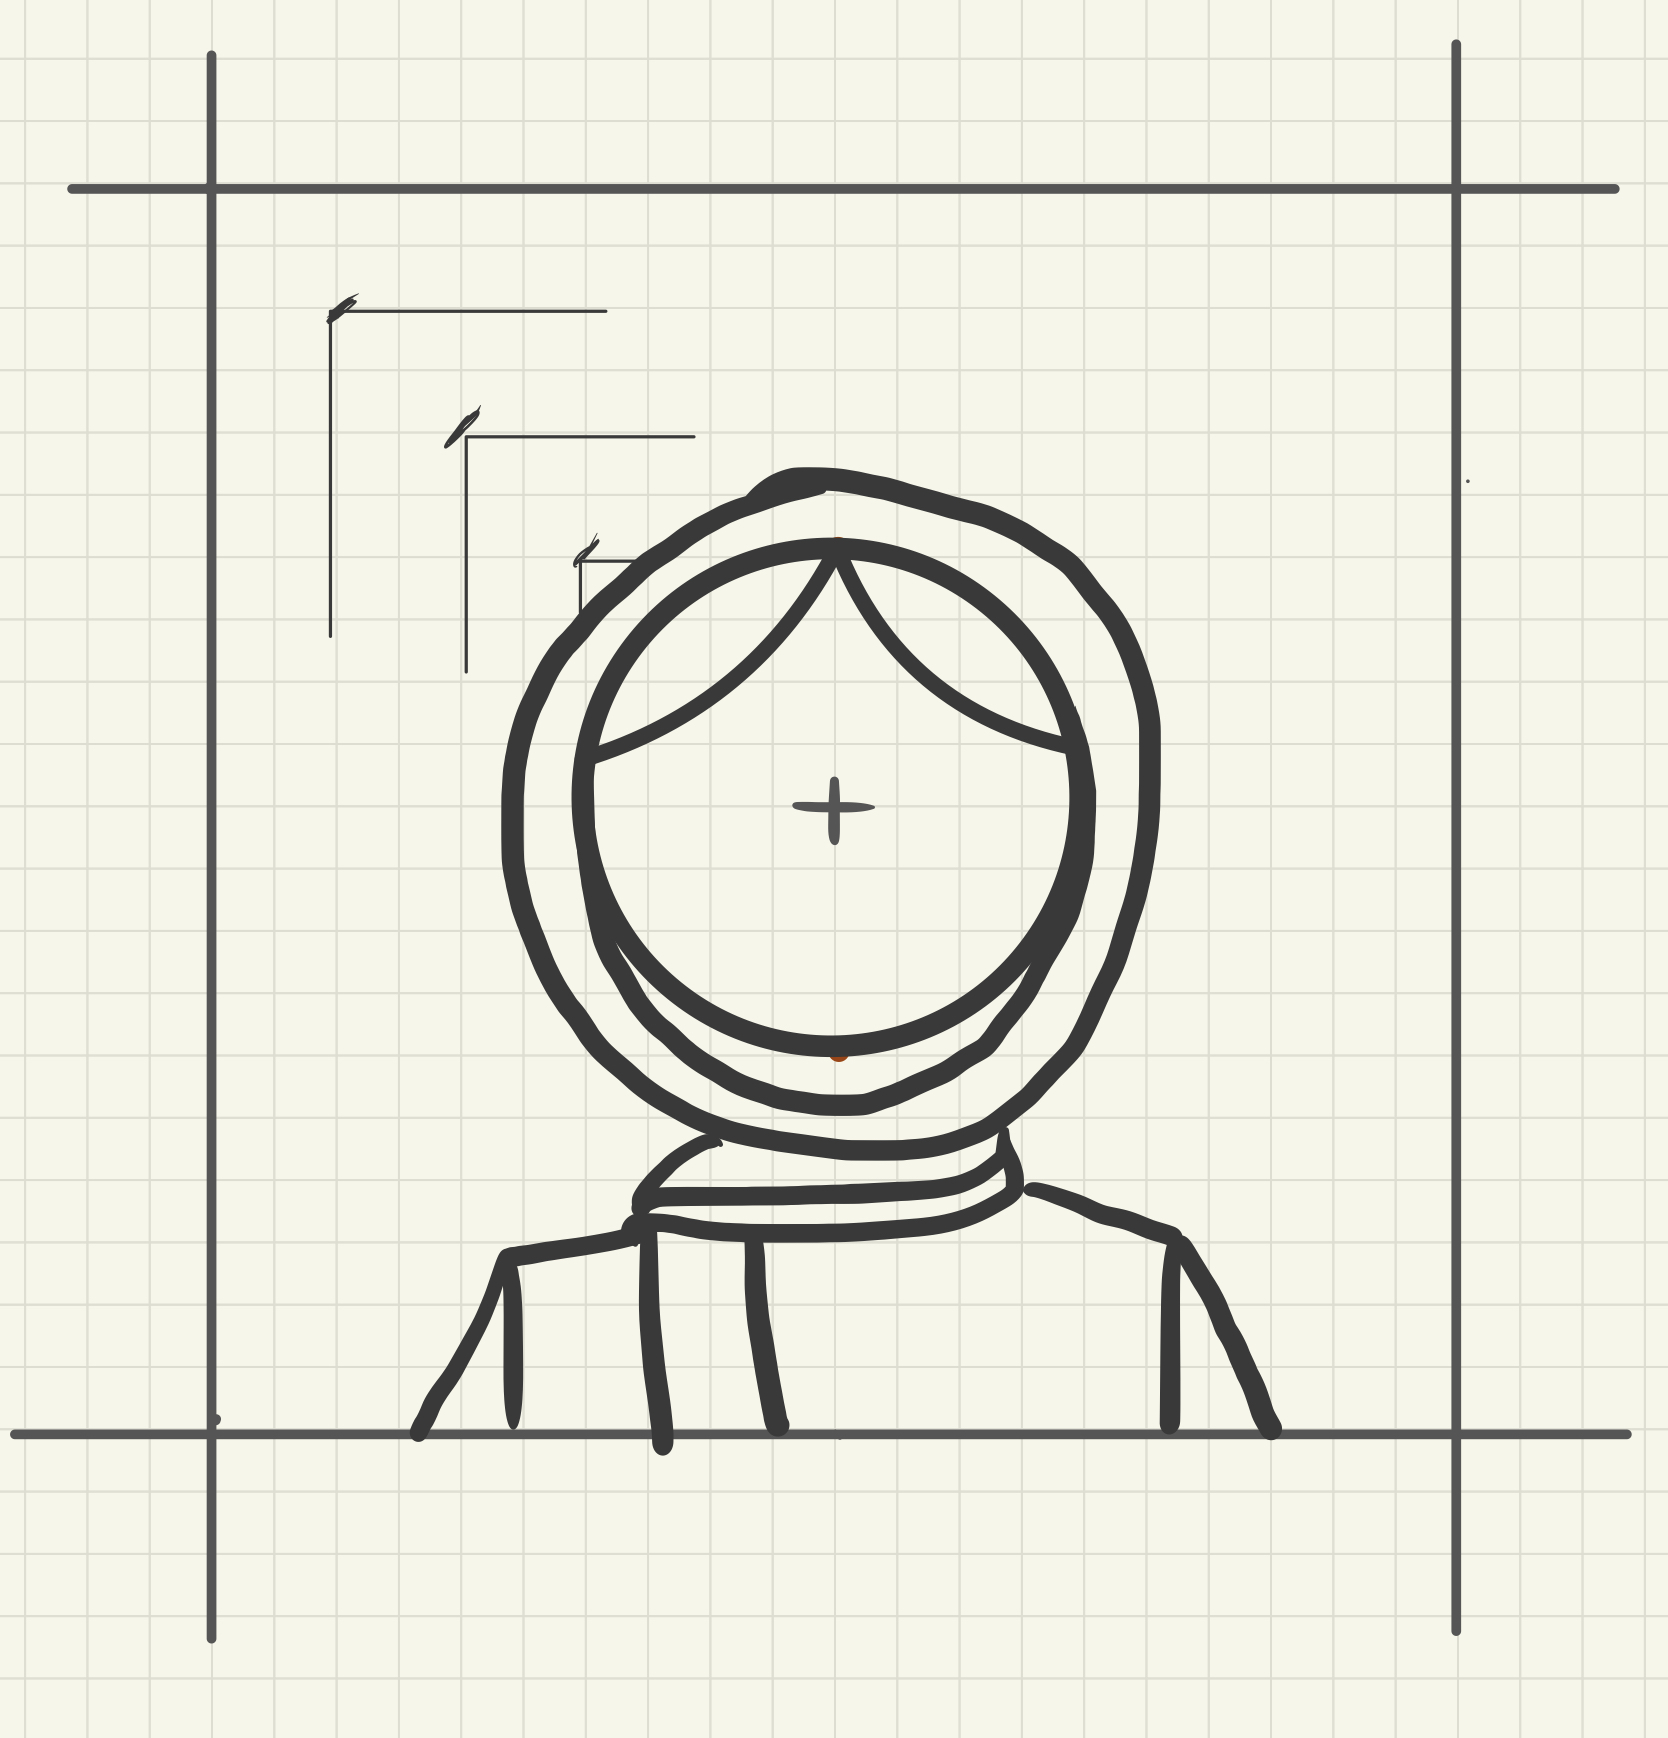
As for drawing myself, in the beginning, the task was to identify which shapes would be the best to use and understand how to use them – rectangles, circles, triangles, ellipses, Bezier curves, Bezier vertices, curves, and arcs. Using Bezier curves and vertices was my favorite. The most difficult part for me was the arms to have two parts of the arm properly rotate. I explored the constrain function and used it to constrain the arms to a region. At first, I found it hard to get the logic on how I could use this function to constrain the parts of the arm and rotate them properly. But I am happy I could figure that out in the end.

function moveHands() {
  strokeWeight(20);
  stroke(25);

  //left arm
  line(245, 180, constrain(mouseX - 70, 175, 325), constrain(mouseY, 150, 250));
  line(
    constrain(mouseX - 70, 175, 325),
    constrain(mouseY, 150, 250),
    constrain(mouseX, 150, 350),
    constrain(mouseY + 10, 50, 300)
  );

  //right arm
  line(
    width - 250,
    180,
    constrain(mouseX + 70, 325, 425),
    constrain(mouseY, 150, 250)
  );
  line(
    constrain(mouseX + 70, 325, 425),
    constrain(mouseY, 150, 250),
    constrain(mouseX, 250, 450),
    constrain(mouseY + 10, 50, 300)
  );

  strokeWeight(1);
  noStroke();
}

Reflection
There is so much more to learn and explore that I can never say my project is fully perfect. Each time I found something or tried something, I kept feeling that I should expand my project more and more. I looked forward to exploring much more in this class and letting my creative side explore.

Week 1 – Self Portrait

Self-Portrait
For the first assignment, we were asked to make a self-portrait using p5js. For this, I wanted to create a drawing that reflects my personality. I am usually bright and cheerful and tend to get excited about little things – so I wanted to represent this in my self-portrait. With this assignment, I also aimed to familiarize myself with as many p5js features and tools as possible.


Process
For this, I first went through the p5js reference to learn about the colors and different shape tools (ellipse, triangle, quad, bezier, curves, etc.) and practiced them to get a grip on how to draw lines and shapes. Then, I used a bottom-up approach by starting with the most minor facial features and building them up to the whole face, hair, and then the background and interactivity. I used ellipse to draw the eyes, quad for the nose and neck, and then arcs for the lips. Then I used bezier and quad for the hair and so on. With the face, I felt like I could not get as intricate because it would have required a lot more lines/shadows, etc and I found the process tiring. However, the next part was my favorite – it was the background, borders, and interactivity. For this, I got to use for-loops and experiment with different backgrounds and color schemes before I landed on one that I liked best. I initially tried multi-colored quads in the background, then a check background made with a for loop, and finally the pastel-colored stripes.

Interactivity
Something I really wanted to add was an element of randomness in my design – hence the moving circles in the background that randomly change positions when the mouse is pressed. Moreover, their concentration varies relative to the position of the mouse. As you slide the mouse toward the top-right corner, the circles become more saturated and as you move further along the x and y axis, they grow further apart.

I also added other interactions when the mouse is pressed and moved. One is the moving circles. On top of that, the face also smiles bigger, the eyebrows rise, the pupils dilate, and the cheeks become pinker when the mouse is pressed displaying the excitement the avatar feels when seeing the moving circles. Also, some strokes appear as well.

Code

function setup() {
  createCanvas(500, 500);
}

function draw() {
  
  
  let faceX = 250, faceY=210, faceWidth = 180, faceHeight=220;
  background('#C8C7D7');
  
  //background stripes
  noStroke();
  let b = true;
  for(let i=0; i<500; i+=10){
    for (let y=0; y<500; y+=10){
      if(b==true)
      {fill('#EDECF2')
      b=false;}
    else{
      b=true; 
      fill('#C8C7D7');}
    rect(i,y,10,10)
    }
  }
  let c=true;
  for(let i=0; i<500; i+=20){
    for (let y=0; y<500; y+=20){
      if(c==true)
      {fill('#C8C7D7')
      c=false;}
    else{
      b=true; 
      fill('#EDECF2');}
    rect(i,y,10,10)
    }
  }
 
  //background circles when mouse is pressed
  if(mouseIsPressed){
    stroke(205)
  for(let i = 0; i<100; i++)
   {
     fill('#A89DBD')
     num1= random(5);
     num2 = random(5);
     ellipse(mouseX*num1,mouseY*num2, 15, 15);
   }
}
  
  //hair 
  fill("#4d2511");
  quad(150, 150, 350, 150, 400, 400, 100, 400);
  fill(255, 213, 173);
  quad(200, 230, 300, 230, 320, 280, 180, 280);
  
  //face
  noFill()
  noStroke()
  arc(250, 350, 100, 80, 0, PI);
  stroke(0)
  fill(252, 210, 155);
  ellipse(faceX,faceY,faceWidth,faceHeight); 
  fill(252, 210, 155);
  
  //neck
  noStroke()
  quad(220, 280, 280, 280, 300, 360, 200, 360);
  
  //eyes
  fill(255)
  ellipse(215,190, 35,30 )
  ellipse(285,190, 35,30)
  fill(0);
  ellipse(215,190, 20,25);
  ellipse(285,190, 20,25);
  fill(255);
  
  //eye balls
  ellipse(219,193, 8,8);
  ellipse(289,193, 8,8);
  
  //eye balls dilate when mouse is pressed
  if(mouseIsPressed)
    {
    ellipse(219,193, 10,10);
    ellipse(289,193, 10,10);
    }

  //nose
  fill(250, 188, 130);
  quad(260,250, 240,250, 250,210, 260,250);
  line(260,250, 250, 210);
  line(240,250, 250, 210);
  line(240,250, 260,250);
  
   
  //eyebrows
  //eyebrows raised if mouse is pressed
  if (mouseIsPressed){
    fill('rgb(146,63,8)')
    rect(200,150, 30,8)
  rect(270,150, 30,8)
  }
  else{
  fill('#4A2500')
  rect(200,160, 30,8)
  rect(270,160, 30,8)}
  
  //hair
  noStroke()
  fill("#4A2500");
  bezier(250,100, 50, 100, 180, 250, 100,400);
  bezier(250,100, 450, 100, 320, 250, 400,400);
  
  //lips
  fill('darkred')
  noFill();

  //lips get bigger/smile when mouse is pressed
  if (mouseIsPressed){
    fill(180, 13, 61);
    arc(250, 265, 50, 50, 0, PI);
  }
  else{
  fill(180, 13, 61);
  arc(250, 270, 50, 30, 0, PI);
  }
 
  
  //blush when mouse is pressed
  if (mouseIsPressed){
    fill('rgb(250,187,129)');
  ellipse(200,250,25,15);
  ellipse(300,250,25,15);
  }
  noStroke(); 
  
  if(mouseIsPressed)
    { stroke(240); }
  
  x=10
  for(let i =0;i<20;i++){
  fill('#D8E2EB')
  ellipse(x,20,40,60);
  ellipse(x,480,40,60);
  ellipse(0,x,60,40);
  ellipse(500,x,60,40);
  x=x+30;
  }
  //bow on head
  fill('#A89DBD')
  quad(140,130, 190,170, 190,130, 140,170)
  
  fill(120);
  text('Press and move the cursor...', 10, 485);
}


Reflection
Overall, the process was very insightful and allowed me to practice a range of p5js features. When I started out, I felt the process is boring but as I delved more into the programming concepts such as using for loops or random, and when I played around with the features, especially to create interactivity, it actually became very interesting and fun!

In the future, I want to improve further by using other features. For example, I came across Blendmode which I found very interesting but I could not learn much about it in the scope of this project. Thus, I want to learn about it and its other features later.

Week 1: Self-Portrait

Overview:

For this assignment, I tried to utilize basic programming principles and primitive shapes to create a portrait of myself using p5.js.  I started my work with a preliminary sketch to figure out which shapes best represent different aspects of my facial features. When drawing it on the p5.js,  I relied mainly on the shapes such as circles, triangles, rectangles, arcs, and ellipses. Additionally, even though we weren’t asked to implement animation or any kind of interactivity, I decided to add some minor touches and make my avatar a bit interactive. Overall, this assignment helped me get familiar with the p5.js platform and understand how to translate complex designs and features into simple, primitive shapes.


Concept:

My concept for this assignment was creating a cartoon-style version of myself. It may not be 100% realistic, but I tried to convey my main facial features such as oval-roundish head, brown hair and eyes, round eyes, long neck, and etc. I also wanted to keep it realistic and minimalistic, therefore I didn’t add any special effects or accessories (except for a necklace).

Preliminary sketch:

Code:

The highlights of my code would be pupils that follow the direction of the mouse and a mouth that imitates talking when the mouse is clicked. I was inspired by a “Koala portrait” provided as a sample example in the homework description, so I decided to apply a similar concept to my work as well. The main idea behind moving pupils is that the location of the circles that are forming my pupils are dependent on the X and Y coordinate of the mouse. Those X and Y locations are multiplied by a small scalar number (in my case, it’s 0.02) and are added to the center of the circles.

With regards to the talking mouth animation, the shape of the mouth depends on whether the mouse is clicked or not. When it is clicked, the arc that is forming the mouth is drawn a bit thinner, but when it is not, the arc has a larger width.

I’m also proud of how proportions of different facial features turned out to be. All of these proportions were calculated with regards to the center of the ellipse that is forming my head.


Future Improvements:

One of the ideas for future improvements would be adding more details to my face such as eyelashes, make-up,  a detailed outline of the lips, etc. I would also work on my bangs as they didn’t turn out as much realistic as I wanted them to be. In terms of interactivity,  I think that making the eyelids close occasionally when talking (i.e. once in 7 mouse clicks) would make the talking animation more realistic.


Week 1 – Self-Portrait

After a couple hours of hard work and experimenting with shapes and guessing coordinates, I was finally able to create my very own self-portrait!


You can find the code for this sketch below:

function setup() {
rectMode(CENTER)
createCanvas(600, 600);
}

function draw() {
background(1, 22, 80);
fill(0,127,15)
rect(300,470,600,300)

//Neck
fill(232, 190, 172)
rect(300,420,100,60)

//Face
fill(232, 190, 172)
ellipse(300,250,300,320)


//Eyes
fill(255)
ellipse(240,220,60,40)
ellipse(360,220,60,40)
fill(0)
ellipse(240,220,20,20)
ellipse(360,220,20,20)
fill(255)
ellipse(245,220,7,7)
ellipse(365,220,7,7)

//Nose
triangle(300, 260, 300, 280, 300, 240)

//Mouth
fill(200,0,0)
arc(300,320,100,100,0,HALF_PI*2,CHORD)

//Eyebrows
strokeWeight(3);
line(215,190,260,190)
line(335,190,380,190)

//Hair
fill(0)
arc(300,165,250,170,PI,TWO_PI)
fill(0)
triangle(330,165,350,120,350,186)
triangle(350,165,370,120,370,186)
triangle(370,165,390,120,390,186)

//Body
rect(298,597,400,300)
fill(232, 190, 172)
triangle(250,447,350,447,300,520)

}

The face and eyes were relatively simple to code in, I just needed to utilize ellipses with varying stretches to create the shape of the face and eyes. So are the nose and eyebrows as they are just a simple line. For the hair and mouth, I utilized the arc method and put in arguments to turn them into semi-circles creating the mouth and hair. I also added some triangles in the hair to add some personality to the hair. I also used a triangle to create the effect of a V-neck shirt for the torso. My fashion is basically just black clothes, so I fittingly gave myself a black shirt. I then created a midnight night sky as the background just to round out the whole sketch!

I am just proud of myself that I managed to calculate the correct coordinates of where to put each shape relatively quickly. It was definitely one of the bigger challenges I imagined but ended up not posing much of an issue. For the future, I definitely do think i can improve the facial shape and add more interactive features to give this self-portrait more of a personality.


Self-Portrait

As someone who has only ever coded in CS assignments involving complex and detailed task requirements, this particular assignment gave me freedom to explore all kinds of possibilities when it came to creating a self-portrait using shapes and lines through code. I was initially confused on how to add details using only shapes but as I experimented with different sketches, it started to make more sense.

Process

I had drawn a line art sketch to get an idea of the different shapes I will have to use and drew them on a grid so that it’s easier for me to translate that into code. 


I used a circle and bezier curve to create the face shape and the use of control points for the curve proved to be the biggest learning point for me in this assignment. I used the bezier curve in almost every element, from face shape to eyebrows and shadows, and it was interesting when tweaking the control points along the x or y axis would create the effect I wanted. 

I also learnt how to use the translate() and rotate() functions, which were initially tricky to understand. I used them to locate the blush ellipses because I wanted them at an angle. It took me some time to realize that using these two functions causes all the elements after them to be relocated and so I tried to use them at the very end of the code. 

As for the background, I wanted some sort of movement in the portrait so I created clouds and incremented(or decreased for the second one) their x coordinates to depict movement from one end to another.

Reflection

I really enjoyed working on this assignment and I think I was able to grasp the basics of p5.js . However, I do believe there is a lot left to experiment with and I would like to do so in the upcoming assignments. I think I could have done better in this assignment by adding more interactivity through either clicking on the canvas or with the cursor hovering on it. I would love to try similar things and introduce more interactivity in my next assignments.

Assignment 1 – Self-Portrait

Concept

We had to create a self-portrait, so I tried to make an animated version of myself which turned out to be a very fun process. The code sets up the canvas using createCanvas(400, 400) and uses the draw() function to render the face. The face, eyebrows, eyes, nose, hair, ears, beard, lips, shirt, and neck are created using various shapes such as ellipses, triangles, arcs, rectangles, and lines. The fill color and stroke color of each shape is set using the fill() and stroke() functions. The background() function sets the background color to a light gray color. The color of the shirt changes from black to different shades of white and black as the fill() is set to random(255) when the mouse is clicked on the canvas. Also, the eyes blink once every second as the frameCount()% 60 will be true once every second. The code also contains commented out lines that would create a grid for reference, but this is not displayed in the final output. This helped in the positioning of the facial features.

Code

let blink = false;
let color1 = 0;
let color2 = 0;
let color3 = 0;
function setup() {
  createCanvas(400, 400);
}

function draw() {
  
//background
background(51, 102, 153);
  noStroke();
  for (let i = 0; i < 400; i += 20) {
    fill(102, 153, 204);
    ellipse(200, 200, 400 - i, 400 - i);
  }

fill(194, 150, 130);
  noStroke();
  let face = ellipse(200,160,180,200);
  fill('white');
  let eyel = ellipse(165,140,35,15);
  let eyer = ellipse(240,140,35,15);

 fill(50, 60, 60);

//   eyebrows
  stroke(21, 19, 19);
  strokeWeight(3.5);
  noFill();
  arc(165, 130, 45, 5, PI, TWO_PI, OPEN);
  arc(240, 130, 45, 5, PI, TWO_PI, OPEN);
  
  //eyeball
  noStroke();
//   fill(0);
//   ellipse(165, 140, 15, 15);
//   ellipse(240, 140, 15, 15);
//   fill(255);
//   ellipse(164, 136, 5, 5);
//   ellipse(239, 136, 5, 5);

  
 if (frameCount % 60 == 0) {
    blink = !blink;
  }

  if (!blink) {
    fill(0);
    ellipse(165, 140, 15, 15);
    ellipse(240, 140, 15, 15);
    fill(255);
    ellipse(164, 136, 5, 5); // left eye ball
    ellipse(239, 136, 5, 5); // right eye ball
  } else {
    fill(194, 150, 130);
    ellipse(165, 140, 35, 15);
    ellipse(240, 140, 35, 15);
  }
  
  
  //nose
  fill(194, 150, 130);
  stroke(21, 19, 19);
  strokeWeight(1.5);
  triangle(200, 155, 193, 190, 207, 190); // nose tip

  //Hair
  fill('black');

  arc(200, 110, 160, 120, PI, 0);

  triangle(230,67,210,67,250,120);
  triangle(240,67,220,67,260,120);
  triangle(250,67,230,67,270,120);
  triangle(260,71,240,60,280,120);
  
  
  //Ears
  fill(194, 150, 130); // set fill color to match the face
  noStroke();
ellipse(100, 160, 20, 40); //left ear
ellipse(300, 160, 20, 40); //right ear
  
  // Beard
stroke(0); // set stroke color to black
strokeWeight(2.5);
for (let i = 115; i < 175; i += 3) {
    line(i, 180, i + 8, 115 + (i*0.88));
}

for (let i = 115; i < 175; i += 3) {
    line(400 - i, 180, 400 - (i + 8), 115 + (i*0.88));
}
for (let i = 180; i < 220; i += 3) {
    line(i, 200, i, 210);
}
for (let i = 180; i < 224; i += 3) {
    line(i, 220, i, 260);
}

  
//Lips
fill(184,63,63); // set fill color to red
noStroke();
arc(200, 210, 40, 30, 0, PI, CHORD);
  
  
  //shirt
   // fill("#151E3D"); // dark blue


  fill(color1,color2,color3);
  rect(125, 260, 150, 140);
  rect(95, 260, 30, 100); // left sleeve
  rect(275, 260, 30, 100); // right sleeve


  //neck 
  fill(194, 150, 130);
  rect(181, 260, 40, 30, 5);
  

//grid for refernce
//     stroke(0); // set stroke color to black
//   strokeWeight(1); // set stroke weight to 1 pixel
  
//   // draw horizontal grid lines
//   for (let i = 0; i <= 400; i += 20) {
//     line(0, i, 400, i);
//   }
  
//   // draw vertical grid lines
//   for (let i = 0; i <= 400; i += 20) {
//     line(i, 0, i, 400);
//   }
  
}
function mouseClicked() {
  if (color1 === 0) {
    color1 = random(255);
  } else {
    color1 = 0;
  }
  if (color2 === 0) {
    color2 = random(255);
  } else {
    color2 = 0;
  }
  if (color3 === 0) {
    color3 = random(255);
  } else {
    color3 = 0;
  }
}


Reflection/Future Improvements

This code provides a basic outline for an animated face and could be used as a starting point for further development. Some potential improvements for the code include adding more details to the face, such as the eyes’ pupils and reflections, more defined eyebrows, and additional shading to add depth. Adding more hair styles, clothing, or accessories to personalize the character. Incorporating user input to allow for customization of features, such as hair style, eye color, or clothing. Improving the overall structure and organization of the code, such as using functions to keep the code more modular and easier to maintain. Overall, there is room for further development and improvement in this code. I learned the usage of basic shapes, functions and some forms of interactivity which I implemented. The assignment was so open-ended that I just wanted to add more and more stuff.

Assignment 1: Self Portrait

Overall Experience

For our first assignment, we were tasked with creating a self-portrait. As someone with little art skill, all I could think of was drawing a face that resembled me. I am not quite sure if I succeeded though ;D. Coding for me has always been tedious hours of writing code and handling data files but the artistry of this assignment was the complete opposite. Playing around with basic shapes and putting them together into a face, also accessorizing was really fun.  

Process and Progress

I started with an elliptical shape for my face and then added two more for the eyes. To portray my brows, I discovered that simple lines with a strokeWeight of 5 produced the appropriate thickness. It was the placement of eyelashes that I first realized that finding coordinates for drawing a simple line was not as easy as it seemed and I looked up for coordinates of p5.js. https://editor.p5js.org/prewiredonline/sketches/mA6XRFf-G. This is where I got what I was looking for and it eased my way through the rest of the portrait. I think the turning point of my sketch was this stage where the eyelashes were in the making and the coordinate plotting made it easier for me:

This is how my final portrait looks like: 

Reflection

I am pleased with my initial p5.js project, but I see room for improvement by incorporating animations into my self-portrait. I look forward to experimenting with these elements in my future assignments. This project was a great step for me in the Interactive Media world and I can’t wait to tackle more cool interactive projects in the future!


Assignment 1: Self Portrait

Overview:

For this assignment, we were asked to draw a self portrait using the basic functions built into p5.JS. I started by drawing a rough sketch of what I wanted my self portrait to look like. For the self portrait, I tried to highlight the main features of my face. I think my spectacles are one of the very important feature of my face so I decided to add these to the portrait. Furthermore, while coding and looking at the examples that were provided to us, I decided to add some interactive features to the portrait. Overall, the assignment was really fun and helped me in understanding some of the key concepts of p5.JS.

Concept & Process:

The concept for my self portrait was fairly simple. I wanted to make sure that I add all the key features of my face and give it a animated look. I tried adding curly hair but it turned out to be really difficult and the results that I got after that weren’t really satisfying so I just went ahead with normal hair. I just used arc over my head to make it look like hair. As I mentioned earlier, spectacles were really important to me so I spent fair amount of time fixing them around the eyes. I used arc function and line to make it look more realistic. Moving on, for the nose and the lips, I used arc to make both of these. For the ears, I just rotated the arc and added those arcs on the both sides of my face. Furthermore, I added a neck and shirt using the rect function. I added the arms on the both sides by increasing the stroke weight and drawing lines next to the shirt. This turned out to be really realistic and allowed me to get the look that I wanted from this self-portrait.

Interactivity:

Inspired by the examples, I decided to add some interactive features to the portrait. For the background, whenever the mouse is moved around the canvas, ellipses are drawn of different colors. This required to run a for loop within the draw function and generate random values between 0 and 255 for r,g and b to later use them in the fill function. Furthermore, similar to the of “Koala portrait” example, I decided to make the eyes move in the same direction where the pointer goes on the canvas. This was fairly simple and all that required was to multiply the coordinates of the pointer  on the canvas with a very small constant  and add it to the coordinates of the ellipse that I had drawn for the pupils. This allowed me keep the pupil within the eyes and add this simple interactivity. Lastly, when the mouse key is pressed, the color of the shades is changed to random colors to create a cool effect. Again, I generated three random values for the r g and b using a for loop and the random function of p5.js to use these values in the fill function.

Future Improvements:

In future, I want to learn change this portrait from an animated one to a more realistic one. I hope to learn how to make curly hair and add it to this portrait. Furthermore, I’d like to add better and more artistic animations for the background. I would love to design better nose and ears using the points or any other function that allows me give them a more realistic touch. I hope to learn these skills and implement them on this portrait.Here’s how the final portrait look like:


Assignment 1: Self Portrait

For my first assignment, we were tasked with creating a self portrait of ourselves using p5js. I’ll be honest, I’d say this was a pretty nice intro and learning experience to p5js and arguably one of the funniest moments i’ve had when it came to coding.

I’ve always done coding with a serious intent and I think that took the fun away from my projects, hence I wanted my portrait to reflect that. Thus, I decided to just wing it and make the funniest, interactive and outgoing portrait I could think of XD.

Portrait:

Idea and Process: 

My initial thought was that I want my portrait to have movement instead of just a static image because then it sort of brings it to life. I first drew myself using some basic shapes such as circles, ellipses, bezier curves etc. However, I had difficulty thinking of how I could incorporate this movement idea with myself.

After thinking and reviewing some of the examples, I figured I could try making my eyes follow the user’s cursor, that way it’s pretty fun and fits that movement aspect. For this idea, I decided to create the pupils at the center of the eye and it would sort of be constrained within the radius of the eye depending on the X and Y coordinate of the user’s mouse. I used some calculations for this as shown below:

circle(103+(0.03*mouseX), 187+(0.03*mouseY), 20);
circle(161+(0.03*mouseX), 187+(0.03*mouseY), 20);

I wanted to have a little bit of fun and add my own humour (pretty cursed) into the portrait so I added the impostor from the hit game Among Us into the portrait cause why not I thought it’d be funny. I used a variety of shapes such as ellipses and rectangles to construct it.

Later on, I decided, why not add a feature for if the user presses the mouse. I didn’t know exactly what to do but I figured I would piece it together as I went along coding.

As time passed I decided it would be funny if the impostor basically turned into some epileptic god, so I used the random() function to continuously change its colour. I also decided to edit my facial features and add golden hair (sort of resembling Goku going super saiyan) to add to the chaos and kinda act like I was ascending.

However, it still looked plain to me, hence, I decided to add some cool flickering stars in the background by using a for loop which would constantly add ellipse-like stars in the background at random points on the canvas as shown:

if(mouseIsPressed) {
   background("black"); 
   for (var i = 0; i < 10; i++) {
       var size = random(5, 15);
       ellipse(random(width), random(height), size, size);
   }
}

Overall Thoughts: 

Overall, I found it quite interesting with how many functions there were. One cool function I found was the translation function (used on the floating among us) which also added to the movement aspect of my portrait.

Dealing with shapes was tricky because I didn’t know which coordinates I had to put them at or where I would have to alter the control points for curves. Hence, I decided to add a sort of coordinate tracker for my cursor because I figured it would be really handy to when where I would like to place all of my shapes and curves, hence I added one on the top left.

One thing I would definitely improve is organizing my code. Most of the functions I used, the arguments were hard-coded and I feel like I could’ve used traits such as width and height to organize my code space. I could have also used functions such as drawFace() or drawClothes() to further organize my code.

Nonetheless, i’m no expert at art but this was a super awesome and fun assignment and I feel like I developed a strong foundation for some of the basic functions used in p5js.

Week 1 Self Portrait

Concept

I, for one, am not much of an artist. I hate having to draw specific lines and shape because I am always bad at details. That is why for this assignment, I decided to get creative with what a “face” is. As the assignment directions describe, I decided to stay far away from a realistic face and focus more on practicing what I can do with p5js. The motive for this portrait is this picture:

a self portrait through a shattered glass. Unfortunately, I don’t have the artistic skills, nor coding skills to replicate this painting on p5js, so I decided to use simple shapes and arcs to recreate my own self portrait.

Making Process

I didn’t have a full picture of what I was going to make from the beginning so it was very much coming up with new ideas as I working. Initially, I split the canvas with rectangles using a for loop and then I thought I could use this different sections as a gradation of colors so I set the color fill variable with the iterator in order to achieve that. Since the canvas was split in 12 different rectangles, I created an array of size 12 and use the iterator to find the color value stored in the array to make gradually changing color scheme. Then I built the face structure using the arc element also using the for loop I set for creating the split in the canvas. One issue with this method however, is that each arc from the four sections (x < 250 & y < 250, x  > 250 & y < 250, x < 250 & y > 250, x > 250 & y > 250) are all identical. While it does look haphazard because of this, I decided to leave it like this because a) for this assignment I focused more on getting used to p5js so I wanted to keep the for loop iteration in my drawing, b) this had an unintended modern art sensation which I thought was cool. So since I got this modern art looking progress going on, I decided to stick with that theme and incorporate simple shapes to represent my facial features: circles for eyes, triangle for nose, and an arc for my mouth. When I was done with the facial features, I realized that the result looked a little too simple. So to spice things up, I decided to make the facial features move which leads to the next section of my documentation.

Challenge

Turns out, making shapes move in certain behavior on the canvas was much more difficult than I expected. My initial assumption on how to make this work was to make a variable for the x and y position parameters and increase or decrease them. However, when I quickly learned that the shapes didn’t move as I suspected, I had go through a lot of trial and error to try to fix the bugs and get what I wanted. After time, I managed to fix the nose and mouth motion using a speed variable that would be added to the x and y position parameters. If the shape position would reach the left/right or top/bottom end, the speed variable would be multiplied by -1 so the shape motion would go opposite direction and loop so that it would move consistently. The real challenge, however, was the eye motion going in circles. For this one, I couldn’t figure out how to have a shape move in circles, so I did some research. Thankfully, I found a source code online that managed to make this happen

(https://editor.p5js.org/kchung/sketches/SJkdHhWUQ)

so I referred to this code and learned the sin() function and cos() function with an increasing angle variable according to radian to make a shape move in circle.

let x1 = 225 + 25 * sin(angle);
let y1 = 200 + 25 * cos(angle);
let x2 = 325 + 40 * cos(angle);
let y2 = 150 + 40 * sin(angle);

circle(x1,y1, 50);  
circle(x2,y2, 50);

angle += 0.0314;


Wrapping Up

After the challenging parts, I decided to add some sprinkles on the product like changing up the stroke colors and the weight or make a warming up in color gimmick using the angle variable I set for the circle motion. For colors, I knew I wanted to use red, green, and blue because they are the RGB (I know its cheesy but still I thought it was cool). For the color in the background being blue was pure coincidence after playing with the gradation effect so I was left with red and green which each became the color for the nose and the mouth. For the eye color being yellow, I just thought it was a nice color match.

Reflection

Looking back on working on this assignment, I was able to use some of the the basic coding knowledge that I knew beforehand such as conditions, iteration, arrays, etc.. but I also learned a lot about p5js coding environment and its unique functions like how the draw() function behaves or the shape elements. Through this assignment I was reminded a lot about processing which I learned in my freshman year in Intro to CS. As for future possible improvements, I know for sure my code is a hot mess with no comments, very haphazardly organized, and not the most efficient so I hope to be able to code a little more cleanly and in a better way next time, and also learn & utilize more of what p5js can offer.