Week 2: Generative Art

Concept:

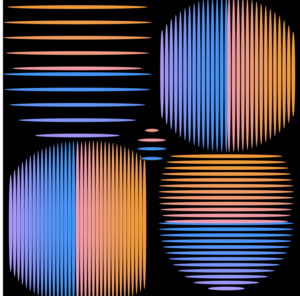
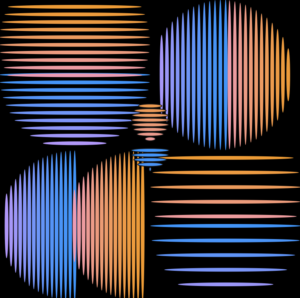
For this assignment, my concept was to create a dynamic generative art by using just a one shape – ellipse. I was interested in how ellipse can be manipulated to create an outline of various figures such as circles, triangles, blobs, etc.

As I started to play around with the ellipses, I was stuck on the problem of how I can make the ellipses follow the outline of a circle. After using some math, I eventually succeeded in forming the half-circle with ellipses, and then I applied the similar logic with x-axis reflection to form the other half.

I tried to utilize the concepts that we learned during the previous classes (translation, rotation, randomization, etc.) as much as possible, so I ended up creating an interesting form of generative art composed of 4 large and 1 small vibrating circles. The frame rate can be manipulated to change the speed of vibrations, in my case it is set to 5. The vibrations are achieved by manipulating the gaps between the ellipses and their width as well.

As for the color choice, I wanted to match the dynamic concept and the “wavy” vibe it gave, so I chose a black color for the background and a gradient color for the ellipses forming circles, which is achieved by manipulating the RGB values.

Code:

A code that I’m particularly proud of is the one where I draw circle by forming it from ellipses.  I used the Pythagorean theory (x^2+y^2=z^2) to get the length of a line that connects  two points in the circle which lie on the same line, and which is parallel to the diameter of the circle.  I used the for loop to gradually increment the width of the ellipse, and used x-axis reflection to form the other half of the circle.

//function to draw the circles
function drawCircle(radius,gap,upperCircleI){

  for(i=0; i<91; i+=gap){
    let circleWidth = 5;
    
    //upper part of the circle
    fill(255,150,2*i);
    ellipse(width/4, 10+i, 2*(sqrt(radius*radius -   upperCircleI*upperCircleI)), circleWidth);
    upperCircleI-=gap;
    
    
    //lower part of the circle
    fill(2*i,150,255);
    ellipse(width/4, 100+i, 2*(sqrt(radius*radius - i*i)), circleWidth);
    
  } 
}


Reflection and future improvement:

One of the ways this artwork could be improved is by increasing the size of the circles (i.e. making it 8×8) and applying a rotation effect that will make the circles rotate about the origin point. Another possible improvement would be randomizing the size and locations of the circles to create a more dispersed and random images.


Assignment 2

Concept

This code creates a canvas and displays a rainy scene with clouds and raindrops. The position of the x coordinate of the ellipse is set to 10 and the position of the y coordinate of the ellipse is set to 70. The sound of rain is preloaded and the setup function creates the canvas and sets the frame rate to 20. The function “raindrops” takes in two arguments, xPosition and ySpeed, and implements gravity by increasing the ySpeed by 0.05 and adding it to the yPosition. The ellipse is drawn at the updated x and y positions. The for loop in the draw function displays three clouds using multiple ellipses and creates falling raindrops using the raindrops function with random x positions and speeds. The code also plays the sound of rain every 15 frames.

Code

let xPosition = 10; // Position of x coordinate of ellipse
let yPosition =70; // Position of y coordinate of ellipse
let gravityAcceleration = 0.05; // gravity acc set to 0.05
function setup() {
  createCanvas(400, 400);
  rainSound.play(); // playing sound
frameRate(20); // to control the speed of rain
}

function preload() { // preloading sound of rain
    soundFormats('mp3');
 	rainSound = loadSound('heavy-rain-nature-sounds-8186.mp3');
 }
function raindrops(xPosition,ySpeed){
  fill('#C4D3DF ');
  ySpeed = ySpeed + gravityAcceleration; // implementing gravity
  yPosition = yPosition + ySpeed;
   ellipse(xPosition,yPosition,6,10);
  if(yPosition > 450) // to make the rain drops fall again when the rain drops go past 450 in the canvas
{
 yPosition =70;
  ySpeed = 0;
}

}

function draw() {
  
  background("#9099a1");
  if (frameCount % 15 == 0)
  {
    rainSound.play(); //sound of rain plays
  }
  
  fill(255, 255, 255, 200); // opacity set to 200 and color is white
  noStroke();
  
  for (let i = 0; i < 3; i++) { //making three clouds with ellipses
    let x = 70 + i * 130;
    let y = 70;
    
    ellipse(x, y, 80, 80);
    ellipse(x - 30, y, 80, 80);
    ellipse(x + 30, y, 80, 80);
    ellipse(x - 15, y - 20, 80, 80);
    ellipse(x + 15, y - 20, 80, 80);
  }


for (let i = 10; i < 400; i+=10) //rain drops looped with different x position and  different speeds
{
  raindrops(random(0,400),random(0,10)); 
}

}


Reflection and Future Improvements

Overall, it was a very fun project to work on as I tried to implement a Rain Storm. I tried to make it using what we have studied so far but learned the use of gravity to make the rain fall. Implementing gravity was the best part of the project. There are several areas where improvements could be made to enhance the realism and overall quality of the code. For instance, the raindrops could be made more random in both their appearance and speed to create a more realistic simulation. Instead of hardcoding the raindrops and clouds, the code could be optimized by using arrays and loops to create them, making the code more efficient and scalable. Furthermore, the code could be extended to include other elements such as lightning or wind, adding to the overall atmosphere of the rainy scene. Another area for improvement is adding user interactivity, such as the ability for the user to control the volume of the sound or the size of the raindrops. The code provides a basic foundation for creating a rainy scene, but there is still room for development and improvement to create an even more immersive and engaging experience.

weekly assignment 2

Concept

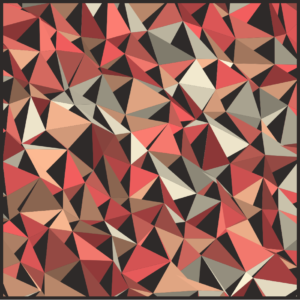
For this assignment, I wanted to make an art that is hectic, colorful, and mesmerizing which is what comes to my mind when I think of media art. First, I read through the old computer arts magazine for inspiration and one piece of art got stuck in my head which was:
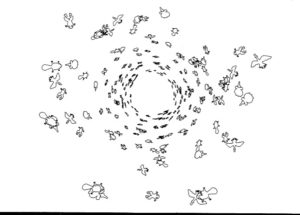
I really liked this piece because the shapes looked like it was spiraling towards the center which feels infinitely faraway. Thus, I decided to implement some spiraling component in my art piece with motion and color. At first, I wanted to have a bezier curve squiggling towards the center from all directions, making a huge squiggling circle. But manipulating with multiple bezier curves turned out to be very difficult so ended up with two bezier curves moving across the canvas, squiggling using the random function which I decided to keep. The shape I wanted to spiral was a circle simply because the shapes were going to orbit around the center in a circle. The color of the background and the circle shapes were randomly set using a random function and were randomly changed as well by calling the random color function which added/subtracted each RGB value randomly.

Code

* IF YOU CLICK THE CENTER CIRCLE, YOU CAN SEE THE PAUSE MENU

in the pause menu, you can control the toggleLeft and toggleRight variable which determines the distance between each circle’s orbit and has a default value of 10. You can also control the sin factor which is the constant multiplied to the sin component that determines the orbit and has a default value of 1/2.

The code has several sections. First, there is the initial section of establishing the global variables and setup function that sets up a random color for the background. Second, the draw function has a two conditional branches based on the boolean variable onOff where if this is true the drawTrue function will be called and thus drawn, and if it is false, drawPaused function will be called and the art will be paused.

function draw() {
  if(onOff > 0)
    drawTrue();
  else{
    drawPaused();
  }
  button = circle(300,300,10);
}

onOff variable can be switched true and false by clicking the button circle in the center. Third, the functions mouseClicked and drawPaused are functions that deal with pausing gimmick and changing the sin factor variable and toggle variables. Lastly, the drawTrue function which is the code that runs the art has also two compartments: one that deals with the squiggling bezier curves and one that draws the circles. The bezier curve gimmick really caused me a headache because initially I didn’t understand how it worked so after trial and error, I made a two separate bezier drawing functions: one going from top left corner to lower right and one vice versa. Both of these functions take a direction parameter and an array of parameter which have four elements for the four parameters of bezier shape which are randomly added/subtracted to make the bezier curve squiggle. The other component that deals with the orbiting circles use the for loop to draw 200 circles orbiting around using the sin() cos() function to constantly move the circle around the orbit. To diversify the speed between each 0rbit, I created an array of angles where each element is the speed of the orbit.

for(let i = 0; i < 100; i++){
    let x1 = 0;
    let y1 = 0;
    strokeWeight(1);
    if(i % 2 == 0){
      x1 = 300 + toggleLeft * i * sin(angle[i]);
      y1 = 300 + toggleLeft * i * cos(angle[i]);
    }
    else{
      x1 = 300 + toggleRight * i  * cos(angle[i]);
      y1 = 300 + toggleRight * i * factor * sin(angle[i]);
    }
    randomColor(colorsCircle);
    fill(colorsCircle[0], colorsCircle[1], colorsCircle[2])
    circle(x1, y1, i * 1);
    circle(y1, x1, i * 1);
  }
  
  for(let j = 0; j < 100; j++){
    angle[j] += 0.0314 + (j * 0.001);
  }

And this is my full code:

let onOff = 1;
let xMotion = 0;
let yMotion = 0;
let colors = [0,0,0];
let colorsCircle = [0,0,0];
let paramsA = [0,0,0,0];
let paramsB = [0,0,0,0];
let counter = 0;
let toggleLeft = 10;
let toggleRight = 10;
let factor = 1/2;

let angle = [];

function setup() {
  createCanvas(600, 600);
  for(let i = 0; i < 3; i++){
    colors[i] = random(0,255);
  }
  for(let j = 0; j < 100; j++){
    angle.push(j);
  }
}

function draw() {
  if(onOff > 0)
    drawTrue();
  else{
    drawPaused();
  }
  button = circle(300,300,10);
}

function mouseClicked(){
  if(dist(mouseX, mouseY, 300, 300) <= 10)
    onOff *= -1;
  else if(dist(mouseX, mouseY, 110,400) <= 20 && toggleLeft > 1){
    toggleLeft--;
    console.log(toggleLeft);
  }
  else if(dist(mouseX, mouseY, 160,400) <= 20 && toggleLeft < 10){
    toggleLeft++;
    console.log(toggleLeft);
  }
  else if(dist(mouseX, mouseY, 420,400) <= 20 && toggleRight > 1){
    toggleRight--;
    console.log(toggleRight);
  }
  else if(dist(mouseX, mouseY, 510,400) <= 20 && toggleRight < 10){
    toggleRight++;
    console.log(toggleRight);
  }
  else if(dist(mouseX, mouseY, 100,525) <= 25){
    factor = 1/2;
  }
  else if(dist(mouseX, mouseY, 300,525) <= 25){
    factor = 1;
  }
  else if(dist(mouseX, mouseY, 500,525) <= 25){
    factor = 2;
  }
}

function drawPaused(){
  background(255);
  textSize(100);
  fill(0);
  
  text('Paused', 150, 200);
  triangle(100, 400, 120, 380, 120, 420);
  triangle(170, 400, 150, 380, 150, 420);
  triangle(430, 400, 450, 380, 450, 420);
  triangle(500, 400, 480, 380, 480, 420);
  
  fill(255);
  rect(75, 500, 50,50);
  rect(275, 500, 50,50);
  rect(475, 500, 50,50);
  
  
  textSize(25);
  fill(0);
  text('1/2', 80, 525);
  text('1', 290, 525);
  text('2', 480, 525);
  
  text("Toggle Left", 75, 350);
  text("Toggle Right", 400, 350);
  text("Sin Factor", 250, 470);
  
}

function drawTrue(){
  background(colors[0], colors[1], colors[2]);
  fill(colors[0],colors[1],colors[2])
  stroke(colors[0]);
  strokeWeight(10);
  
  if(xMotion < 610 && yMotion > -10){
    xMotion ++;
    yMotion --;
  }
  else{
    xMotion = -10;
    yMotion = 610;
    paramsA = [0,0,0,0];
    paramsB = [0,0,0,0];
  }
  
  if(counter == 10){
    randomColor(colors);
    counter = 0;
    randomParam(paramsA);
    randomParam(paramsB);
  }
  drawBezierX(xMotion, paramsA);
  drawBezierY(yMotion, paramsB);
  counter++;
  
  for(let i = 0; i < 100; i++){
    let x1 = 0;
    let y1 = 0;
    strokeWeight(1);
    if(i % 2 == 0){
      x1 = 300 + toggleLeft * i * sin(angle[i]);
      y1 = 300 + toggleLeft * i * cos(angle[i]);
    }
    else{
      x1 = 300 + toggleRight * i  * cos(angle[i]);
      y1 = 300 + toggleRight * i * factor * sin(angle[i]);
    }
    randomColor(colorsCircle);
    fill(colorsCircle[0], colorsCircle[1], colorsCircle[2])
    circle(x1, y1, i * 1);
    circle(y1, x1, i * 1);
  }
  
  for(let j = 0; j < 100; j++){
    angle[j] += 0.0314 + (j * 0.001);
  }
}

function randomColor(colorsArr){
  for(let i = 0; i < 3; i++){
    colorsArr[i] += random(-15,15);
  }
}

function drawBezierX(dirX, param){
  bezier(dirX + param[0], dirX + param[0], dirX + 10, dirX + 10 + param[1], dirX + 20, dirX + 20 + param[2], dirX + 30,dirX + 30 + param[3]);
}
function drawBezierY(dirY, param){
  bezier(dirY + param[0], dirY + param[0], dirY + 10, dirY + 10 + param[1], dirY + 20, dirY + 20 + param[2], dirY + 30, dirY + 30 + param[3]);
}

function randomParam(param){
  for(let i = 0; i < 4; i++){
    param[i] += random(-30,30);
  }
}

Reflection

Like the last assignment, for this assignment, I didn’t have a concrete plan on what I wanted to create through p5js but rather I did a lot of exploring, meddling, and experimenting with the code and stumbling upon many gimmicks that I didn’t intend but looked cool. After two practices, I found myself getting more and more used to this language and how to create and use functions and the draw function to achieve what I want. I also learned and got used to the interactive part of the p5js with mouseClicked function and how to have a panel with set of buttons on the canvas using this function.

Week 2 – Artwork using Loops

Concept 

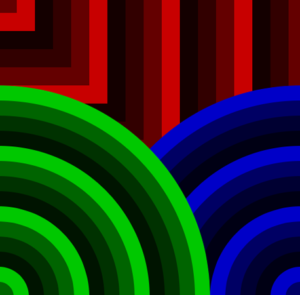
For this artwork, I wanted to create layers on top of each other that merge to form a piece of art. Each layer was developed using repeating shapes with a for or while loop. This was inspired by some geometric artworks I found online. While most of them had one repeating element such as a circle or square, I thought why not make several layers and merge them to form a different art piece? Some work that inspired me is:

Interactivity
Moreover, I wanted to create a monochromatic art piece with a pop of color that the user can add. So, the entire piece is shades of black and white and these colors blink/alternate. Moreover, the user can press the mouse to add colored circles throughout the canvas however, these disappear when the mouse is released. But a glimpse of them can be seen in the back through the spaces in the previous layers. This way, the users’ interactions bring a pop of color to the otherwise monochrome canvas.
Another form of interaction I added was a slider that allows the user to change how fast or slow the artwork blinks by changing the frame rate.

My Artwork


Code

Code I am particularly proud of is the following:

function getCircles(posX,posY,circleWidth) {

//alternate color of each circle between black and a random value between black and white
colorBlack = true;
noStroke();

//loop 20 times, each time increasing the width of the circle centered at x and y
for (let i = 20; i>0; i--) {
//alternating colors
if (colorBlack == true)
{
colorBlack=false;
fill(random(10),random(15),random(15));
}
else {
colorBlack = true; 
fill(random(255));
}
//making the ellipse
ellipse(posX,posY, circleWidth*i, circleWidth*i);
}
}
//draw a flower at x and y using rotating ellipses
function drawFlower(posX,posY){
  
  noStroke();

  for (let i = 0; i < 10; i ++) {
    fill(0,127);
    
    ellipse(posX,posY,10, 60);
    rotate(PI/5);
  }
}

//helper function to draw a flower 
function drawFlowers(posX,posY)
{
  translate(posX,posY);
  drawFlower(0,0);
}

//function to create a bunch of flowers in bottom-left
function getFlowers(){
  drawFlowers(50, 350);
  drawFlowers(30, 30);
  drawFlowers(-60, 10);
  drawFlowers(0, -80);
}

With these functions, I used loops to create blinking circles and flowers using rotate and translate as well. As a whole, the assignment turned out to be very fun to make.

Reflection and future improvements

I found this assignment to be exciting as I got to play around with loops – which is something I really enjoyed doing in the first assignment too. Also, it allowed me to express my creativity and further enhance my artwork using interactivity. Some aspects I can improve in the future include optimizing my code further to use loops to position the flowers and the sets of circles on the canvas. For now, I hard-coded the positions but in the future, I want to make the canvas more responsive by using values that are in terms of the width and height variables. Further, I want to learn how to use make the number of elements on the canvas increase/change with time.

Week 2 – Generative Art

Inspiration & Execution

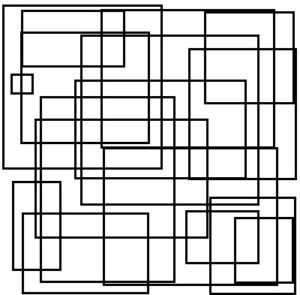
I was looking through the documents given in the syllabus for inspiration, and as I was looking at the patterns and shapes, I was transported back to my childhood days spent playing around in Microsoft Paint. Back then, I did not have access to the internet, and as someone with no artistic skills, I would just randomly draw rectangles of different sizes over and over again.  The “painting” that I used to make on Microsoft Paint looked somewhat like this:

This experience inspired me to try and recreate those old drawings, but this time using only my keyboard. I was able to use the random number generator that was taught in class, combined with my own research on frame rates and frame counts, to create a piece that alternates between black and white backgrounds. I did not want a single rectangle appearing every frame so I played around with a for-loop till I found the perfect balance between the number of rectangles per frame and the frameRate. I also subtracted 50 from the random numbers generated for the x-coordinates so that some of the rectangles start outside of the frame.  The final product looks like this:

Reflection

Even though this is a simple piece and I spent way less time on this than my first project (self-portrait), I still like it much more because of how connected I feel to this. Something that I am particularly proud of this time is that I was able to implement all that I had initially thought. Moreover, adding a pop sound every time a pair of rectangle pops was something new to me and I am really proud of that as well. Something that I would like to possibly change for the future is to add interactivity to it and instead of just being black and white, I would want to add different colored rectangles with different opacity in order to make it more colorful. Furthermore, I would want to randomly select different shapes (and hopefully add a better sound instead of the “annoying” pop sound).

Week 2: Generative Art

Concept

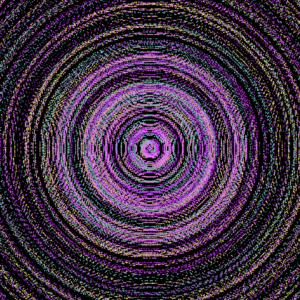
The idea of the project was to simulate stars in the night sky. Due to the rotation of the Earth, if we were to point a camera at a clear night sky full of stars, we would capture the movements of the stars. This movement resembles a circle with the centre at the North Star. I proceeded with the image of multiple concentric yellow circles which transformed to become more colourful as I wrote the code. The final image also resembled the rings on a heavenly body, such as Saturn. Also, if one were to look at it closely, it also appears to resemble an impressionist version of mandala art.

Code

Tracing the path of hundreds of stars was the most critical and the most difficult process in the project. In order to do it, I had to move the stars independently of one another. The simplest solution was to make each of the star as a single object. Thus, I made a class called Star and added attributes to it.

class Star {
  constructor() {
    // each star will have a random distance from the center
    this.radius = random(width);
    
    // each star has a random co-ordinate relative to the center
    this.xpos = center_x + random(-this.radius, this.radius);
    this.ypos = center_y + random(-this.radius, this.radius);
    
    // Calculating the angle of the star relative to the center.
    // A random constant is multiplied because without it the stars seems to only assume angle between -90 and 90 degrees. Try running the draw() function without this constant only once.
    this.angle = atan((center_y - this.ypos)/(center_x - this.xpos))*random(4, 9);
  }
  
  // function to display the star
  show() {
    noStroke();
    // changing color with respect to the count variable
    if (count % 100 === 0) {
      fill(color(random(10, 255), random(10, 255), random(100, 255)));
    }
    
    // star has a random diameter.
    circle(this.xpos, this.ypos, random(1, 3));
  }
}

This way, each star would have its own x-position, y-postition, radius and angle which can be modified independently of the others.

I proceeded to create hundreds of stars which would be displayed onto the canvas.

// count will change the color of the path traced by the stars.
let count = 1;

let num_of_stars = 200;

// co-ordinates of the center from where the stars will trace a circle
let center_x, center_y;

// will contain all the star objects.
let all_stars = [];

function setup() {
  createCanvas(700, 700);
  background(0);
  
  // centering the stars on the geometric center of the canvas
  center_x = width/2;
  center_y = height/2;
  
  // creating stars and appending it to the array
  let i = 0;
  while (i < num_of_stars) {
    all_stars[i] = new Star();
    i++;
  }
  
  // always start the trace with yellow.
  fill("yellow");
}

The while loop would create new stars and append it to the all_stars array.

function draw() {
  // modifying the attributes of each star, one at a time
  for (let i = 0; i < all_stars.length; i++) {
    let current_star = all_stars[i];
    
    // tracing a circle from center using the radius and the cosine and sine function
    current_star.xpos = center_x + current_star.radius * cos(current_star.angle);
    current_star.ypos = center_y + current_star.radius * sin(current_star.angle);
    
    // displaying the star onto the canvas
    current_star.show();
    
    // varying the angle to trace a circle
    current_star.angle += 0.01;
  }
  
  // incrementing count which is used in changing the color of the stars.
  count += 0.5;
}

The for loop will loop through all the stars, changes their attributes (essentially their position which traces a circle) and display them onto the canvas. The stars made a circle, as I implemented the change in x and y position through their polar co-ordinates counterpart in terms of radius and angle.

current_star.xpos = center_x + current_star.radius * cos(current_star.angle);
current_star.ypos = center_y + current_star.radius * sin(current_star.angle);

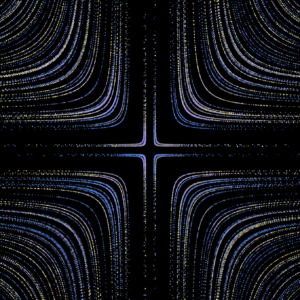
These two lines of code can be modified to create various other patterns and curves. For example, if we square the cos and sin in the function, we would receive a thicker circle, almost pixelated.

This looks almost like a mandala art (but not quite). Similarly, if we invert the cos and sin function (power -1), we would get something that resembles a top-down view of a well lit road junction.

Future Improvement

While I was messing around with the functions, I realised that there were many combinations that could be form with it. The two aforementioned modifications were two of the most noticeable ones. This called upon an improvement into the code, which has to do with the interactivity of the art. The idea would be to allow user to chose the function they would want to use. For instance, have a button to change the function from a cosine to a tangent.

HW 1 – Self portrait – Yerkebulan Imanbayev

This was the first sketch I have ever created using coding, and my main focus was exploring shapes and colors. The arc is the most prominent shape used in this sketch, as it is also something I had difficulty using. In general, the coordinate system turned out to be some sort of guessing game for me because I had very little awareness as to where my shapes would end up. However, after a bit of practice, I gained more understanding of the coordinate system used in p5.js. My main issue with the project was the conception of the sketch, as I made the mistake of starting out with the code, as opposed to the idea. This is something I hope to work on in the future because I want to have a more clear picture in my head of what I’m creating before delving into the coding.

I am particularly proud of this bit of code:

fill(239, 182, 242);
arc(240, 420, 130, 200, QUARTER_PI + HALF_PI, QUARTER_PI, OPEN);

It took me some time to figure out how the arc works because of its start and stop angles; however, eventually I was able to create a symmetrical open arc that would represent the clothes I am wearing in the portrait.

Youssef’s self portrait

Self portrait project using P5.js. I made this image using different shapes and images. I also managed to add text to it, in order to add the ‘NYU’ on the shirt. It was very interesting working on this project, as it actually allowed me to understand the P5 grid system and how to create and locate different shapes on the canvas. The main challenge I faced was drawing the hair as I had to change the coordinates of each circle in order to create the curly hair effect. I believe that there is probably better way to draw the hair maybe using bezier curves, or different shapes that would give a more realistic look. I however, find this design using circles more fitting in this case as it goes well with the style of the face of the rest of the face.

I am happy about how the torso turned out with the design of the NYU Logo. I also attempted to add an actual picture in the background to create a whole University student vibe with the portrait.

One of the issues I faced was probably overlaying different shapes on the canvas, especially with the neck and the NYU logo. However, I found out the order of the code affects the layer of the shape on the canvas.

One challenge I solved was the code for the Logo. In the beginning, I was thinking I had to create it using different shapes. But, I found out that with this chunk of code I can facilitate the whole issue:

//NYU
textAlign(CENTER, CENTER);
textSize(50);
fill(255);
text(“NYU”, 250, 460);

Assignment 1 – Self Portrait

As I started the assignment, I had a bunch of trouble with the parameters of shapes that I used as well as the coordinate system. Thankfully, I was able to overcome this obstacle by consulting with the p5js Reference. I also used Owen Roberts’ grid code to help me position the shapes properly.

Initially, my idea was to recreate my passport photography in a minimalistic manner. I used a variety of shape primitives in p5 to make this happen and I also explored using RGB and Hex codes for color. Additionally, I wanted a piece of the portrait to represent NYU so I researched the RGB values of the NYU purple and used it as the background.

The following code was used to get the desired result:

function setup() {
  createCanvas(400, 400);
  background(87, 6, 140);
}

function draw() {
  //ears
  fill(232, 190, 172);
  stroke(0);
  ellipse(110, 200, 30, 60);
  ellipse(290, 200, 30, 60);

  //neck
  fill(232, 190, 172);
  stroke(0);
  rect(170, 290, 60, 80);

  //body
  fill("#5A5A5A");
  rect(75, 320, 250, 200, 40);
  fill(232, 190, 172);
  stroke(0);
  arc(200, 320, 80, 40, 0, PI, CHORD);
  fill(232, 190, 172);
  noStroke(0);
  arc(200, 320, 60, 40, 0, PI);

  //face
  fill(232, 190, 172);
  stroke(0);
  ellipse(200, 200, 180, 200);
  //eyes
  fill(255);
  ellipse(160, 180, 50, 30);
  ellipse(240, 180, 50, 30);
  fill("#1569C7");
  ellipse(160, 180, 20, 20);
  ellipse(240, 180, 20, 20);
  fill(0);
  ellipse(160, 180, 8, 8);
  ellipse(240, 180, 8, 8);
  //eye shine
  fill(255);
  ellipse(165, 175, 5, 5);
  ellipse(245, 175, 5, 5);
  // nose
  fill("#9F7967");
  noStroke(0);
  quad(190, 215, 210, 215, 220, 225, 180, 225);
  fill(0);
  ellipse(194, 220, 7, 7);
  ellipse(205, 220, 7, 7);
  stroke(0);
  line(210, 164, 210, 215);
  //hair
  fill("#c89f73");
  noStroke(0);
  ellipse(200, 108, 173, 65);
  triangle(110, 180, 115, 100, 150, 110);
  triangle(290, 180, 285, 100, 250, 110);
  //mouth
  fill(231, 106, 106);
  stroke(0);
  arc(200, 260, 60, 13, 0, PI);
  arc(200, 260, 60, 8, PI, 0);
  fill(0);
  stroke(0);
  line(170, 260, 230, 260);
}

As visible from the code I also played around with the outline of the used shapes.

Following is the final version of the self portrait.

In retrospect, this was a great assignment as an introduction to p5 and I really enjoyed doing it! In the future, I would like to focus more on making artwork interactive as I have a few ideas I would like to explore such as psychedelic art.

Self-Portrait

Overall Experience

In the first assignment for “Introduction to Interactive Media,” I was eager to dive in and see what the course had in store. As someone who typically prefers to stick to science, I was excited to challenge myself and explore my creative side. Being pushed out of my comfort zone and into the realms of creative programming was a very enjoyable experience to say the least. I was excited to see how p5.js could help me bring my ideas to life and add a unique interactive component to my personal projects. Consequently, working with tool allowed me to imagine the potential for creating interactive and engaging games in the future. One idea that instantly came to mind was an NYUAD themed “Dress Up” game or a game for the bookstore to try on merchandise while shopping online. The initial challenge of using basic shapes to create a realistic portrait was tough, but I was excited to take on the challenge and expand my skills. Additionally, This project not only honed my technical skills, but it also sparked my imagination and allowed me to tap into my inner creativity.

Work Process

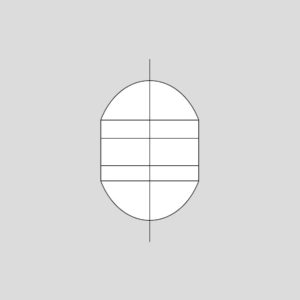
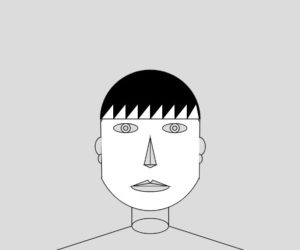
I initially started by creating a canvas of (500, 415) and after some research on how artists create portraits I added a few reference lines to the self-portrait for ease of location, symmetry, and to get the proportions right. I did not want the face shape to be a perfect ellipse so I added a few triangles with strokeWeight(0). At this stage the face shape looked like:

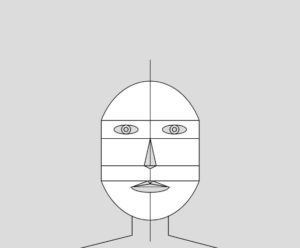
Although it took me a while to understand how layering works in order to hide the rectangles, I was pretty satisfied with my progress. Then I revisited the concepts of arcs, ellipses, rectangles, and lines in order to create the basic structure of eyes, nose, lips and the body. I found drawing the lips to be hardest till this step because it was a combination of three triangles and an arc. It took me a while to figure out how to use the angles in order to change the orientation of the arcs/semi-circles. The reference lines helped save time as I did not have to constantly figure out the co-ordinates. After this step, my self-portrait looked like:

Now came the most crucial step which was ensuring that I had a good hairstyle. Even in real life I have struggled with sticking to a single hairstyle so for this portrait I chose the hairstyle I had back in grade four. I am glad I was able to come up with an equation in a for-loop that saved me from all the manual labor it would have taken me to create the hair effect. The code that I used was:

This led me to successfully make the hair style I was looking for. I also added ears using the arc() function and found this to be very challenging as I could not get the shape right but eventually the portrait started looking like:

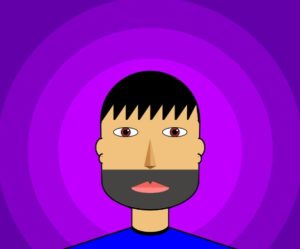
After that it was all about coloring and making small adjustments. After this project I realized how difficult it can be to choose the right colors and how colors can make or break the project. I tried using three ways to choose colors i.e. RGB, Hexadecimal, and writing the name of the color in string. I am very proud of how I used concepts of simultaneous equations and gradient of lines to figure out where the two lines of the shoulder would meet, in order for me to color them right. After coloring , adding a beard and changing the background, the portrait looked like:

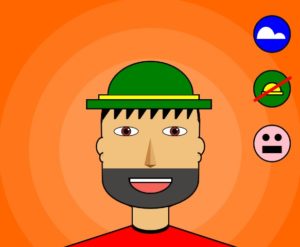
This was supposed to be my final submission but I was enjoying p5.js so much that I wanted to experiment with it more. I was really fascinated by the animations that professor showed us in class and hence I wanted to add something to my portrait as well. I added three buttons to the portrait that add/remove a hat, change the season (background) while also changing the color of the shirt respectively, and add/remove smile from the face. I wanted to show how I am most “happy” when I am wearing my “hat” on a beach in the middle of “summers.” The following picture is a depiction of a happy me:

I had a lot of fun ensuring the buttons worked and the animations in them changed as the button is pressed as well. So the final product looks like the following:

Reflection

I really enjoyed the whole process and this project has enabled me to connect more with my creative side. I am glad that I was forced to get out of my comfort zone. For future projects, I would want to continue certain things such as making separate functions for each of the component as that made editing the code really easy. Furthermore, I would want to continue using reference lines or use the mouseX/mouseY values for getting coordinates. There are a few things that I feel I could have improved. One of them is making the portrait look more realistic and I feel like I could have done that by making use of the bezier curves. I found them very difficult to use in this project. Apart from that, I would want to add more unique ways of making the project interactive and more user-friendly. In the future, I would want to every project to have a story and meaning behind it and I look forward to the remaining assignments.