Audio Wave

Introduction:
For this assignment, I wanted to explore how to use sound in p5js and learn how to use object-oriented programming creatively. While exploring my options, I found some ways to do audio visualization, which I found pretty interesting, and then I went on to explore.

Coding and Process
First of all, I learned how to import sounds, use them, and their different functions. Then I familiarized myself with the syntax of object-oriented programming and how to use the classes in p5js. For practice, I tried to make bouncy particles and add features. So, after learning everything, I explored different ways to create audio visualization and took inspiration from the following pictures to recreate an audio-responsive wave with particles around it. Then I learned to use FFT objects and the different functions related to them. It took me time to understand how this works, but the result paid off, I believe.


The part of the code I am proud of is the waveform and how the particles respond to the audio.

let wave = fft.waveform(); //Returns an array of amplitude values (between -1.0 and +1.0)
stroke(random(255), random(255), random(255));

fft.analyze();
amp = fft.getEnergy(20, 200); //Returns the amount of volume at a specific frequency, using which we could use to control the behaviour of particle and thier responsiveness

strokeWeight(2);
beginShape();
//to built the waveform so we use the applitudes and that we got before and then use this to make the wave
for (let i = 0; i <= width; i++) {
  let index = floor(map(i, 0, width, 0, wave.length / 2));
  let x = i;
  let y = wave[index] * 100 + height / 2;
  vertex(x, y);
}
endShape();

let p = new Particle(2);
particles.push(p);

//creates the particle around the wave form
for (let i = 0; i < particles.length; i++) {
  if (!particles[i].edge()) {
    particles[i].move(amp > 100);
    particles[i].show();
  } else {
    particles.splice(i, 1); //if the particle is out of the space then delete it from the array
  }

Final Project

Here’s my code!

Reflection and future improvements

I really enjoyed doing this assignment and exploring my options. The project could be improved by adding more layers or by making a circular waveform and adding more details.


Assignment 3: The Sea

Inspiration:

Reference: “Seascales — Catherine Jou”. 2023. Catherine Jou. http://www.catherinejou.com/p5-piano

Initially, I planned to implement Object-Oriented Programming (OOP) with moving insects like butterflies in a forest setting, but it proved to be too complex, so I decided to save that idea for later. Instead, I resorted to the underwater world and created a basic animation of elliptical fish swimming across the screen. The picture I got inspired by is attached above. I added water waves to the scene and kept the sea monotone. However, I only used fish in this project and this is one area where I realized that I could improve my assignment by adding a variety of organisms.

Process:

I used two classes in my code, one for the waves and the other for the fish. For the wave class I learned about new functions in p5.js using sine to make waves. A few of these functions are the vertex(), beginShape(), endShape(). 

While trying to make a few waves move in the right direction and a few in the left direction I accidentally made them vibrate to and fro which resulted in a better and more realistic vibratory motion for the water waves. Therefore, unlike fish which intentionally move from one direction to another, the water waves follow a different movement. 

I used the same idea of wrapping that we learned in class for the fish and made sure they reappeared when they left the canvas or in other words went offscreen(). I also watched a youtube video which mentioned ‘drawingContext.shadowBlur’ to give a glow effect to the objects drawn and I used it in my draw() function to give more definition to the sketch. Other than that I made a basic ship using quad() and triangle() functions. The starry effect on the night sky is also an output of a basic for loop and the random() function together. 

Final Output:

Week 3 – Generative Art with OOP

Concept

As we talked about chaos and order in class, I felt inspired to incorporate these themes in my next art piece. I was also inspired by the rotating hypercubes we looked at in class and wanted to add cubes to my art. Combining these elements, I came up with a streak of cubes exuding from a sphere. An array of cube objects are created and they are translated along the canvas. My love for randomness really influenced this project as this streak of cubes randomly moved around with the sphere while each individual cube rotated as well. Also, the cubes and the sphere are assigned random colors. These rotations and the translations, have a certain order to them, but when the mouse is pressed, the canvas becomes more chaotic! The translations are random within a range of values allowing for a very random and pretty streak of cubes that rotate and rapidly change positions on the screen. There is also a random shooting star that appears and floats on the screen when the mouse is pressed. Also, pressing the mouse also changes the stroke colors and shape colors to shades of grey further enhancing a chaotic effect – it gives a warping effect such as that when space or time is warped by a black hole.

Art and Code

Here is the artwork:

Here is my code:

//define some global variables
gnumOfCubes=80;
gboxWidth = 10; 
gboxHeight = 10;
gboxDepth= 10;
tx=20; //translation along x axis
ty=10; //translation along y axis

//to draw a bunch of cubes
let gCubeArray =[];

function setup() {
  createCanvas(400, 400, WEBGL);
  background(20);
}
function rotateElement()
{
  rotateX(frameCount * 0.01);
  rotateY(frameCount * 0.01);
}
function draw() {
  
  //refresh background so that previously drawn cubes disappear
  background(20);
  
  //for rotation of the elements
  rotateElement();
  
  //when mouse pressed
  if (mouseIsPressed) {
    // a star appears and randomly moves across the screen 
    star = new shootingStar(mouseX,mouseY,50,50,4,7);
    star.update();
    star.display();
    
    //also, color and stroke should become shades of grey when mouse pressed
    fill(random(255));
    stroke(random(255));
  }
  else
    {
      //if not pressed, keep all colors and stroke is black
      stroke(0);
      fill(random(255),random(255),random(255));
    }
  
  //draw a sphere in the center
  sphere(30);
  
  //draw cubes that exude out of the center of the canvas and from a streak by repeatedly translating them 
  drawCubes(gCubeArray,-tx,-ty);
  
  //if mouse is pressed, choose random values for translation along x and y to create a chaotic effect and then draw cubes
 if (mouseIsPressed)
   {
     tx=random(-10,10);
     ty=random(-10,10);
     drawCubes(gCubeArray,-tx,-ty);
   }
  
  //draw a circle to accompany the tip of the streak of cubes
  fill('white');
  ellipse(0,0,50,50);
}

//class for cubes
class Cube{
   constructor(width, height, depth, size){
     this.width = width;
     this.height = height;
     this.depth = depth;
     this.size = size;
   }
  display(){
    rotateElement();
    if (mouseIsPressed)
    {
      fill(random(255));
    }
    else
    {
      fill(random(255),random(255),random(255));
    }
    //use box from WEBGL mode to create the cubes
    box(this.width, this.height, this.depth, this.size);
  }
}

//a shooting star that appears when mouse is pressed and randomly moves around
class shootingStar{
  constructor(x,y, width,height, xSpeed, ySpeed){
    this.x=x;
    this.y=y;
    this.width=width;
    this.height =height; 
    this.xSpeed=xSpeed;
    this.ySpeed=ySpeed;
  }
  
  display(){
    fill('white');
    ellipse(this.x, this.y, this.width,this.height);
  }
  //update position of the store to create motion
  update(){
    this.x += this.xSpeed;
    this.y += this.ySpeed;
  }
}

//function to draw the streak of cubes by pushing cubes onto the cube array and translating them
function drawCubes(gCubeArray,tx,ty)
{
   for (let i=0; i < gnumOfCubes; i++){
    gCubeArray.push(
    new Cube(gboxWidth,gboxHeight,gboxDepth,4)
    )
    gCubeArray[i].display();
    translate(tx,ty);
  }  
}

I used functions, arrays, and object-oriented programming to create this artwork.

Reflection and future improvements

I immensely enjoyed making this art piece. While I had the purpose of creating cubes and having them rotate, I experimented with the transformations and the WebGL mode to finally come up with this work. It was after a lot of experimentation that this work was created and this is the most exciting part of this course – forming a new, different creative piece that you might not have envisioned in the beginning.

In the future, I want to use more classes and functions to further enhance this piece or other works. For example, an entire galaxy of stars could be created in the backdrop while I only created one so that can be added. Moreover, music can be added as well and I also want to experiment with sine and cosine functions in the future.

Week 3: Fireworks

Overview:

For this assignment, I tried to utilize the concepts of object-oriented programming (such as classes and arrays) to create a generative artwork with an element of randomness and interactivity.

Concept:

I was looking at different forms of generative examples on the Internet and got inspired by this generative art created on processing. So, I decided to imitate fireworks by programming the instances of objects (in my case, circles) to follow a specific movement aimed at creation an effect of explosion and dispersion as in the below photo.

I tried to choose bright range of colors to fit the concept of fireworks, and I  also added the trail at the end of the particles to create a slow dispersion effect. For this, I manipulated to opacity of the background, setting it to 90. The user can also interact with it by choosing the origin of the fireworks, which, in turn, changes the background color to different dark shades of red and green.

Code:

Even though this animation may not be that realistic because the particles were following a symmetrical path, I am still proud of how the explosion effect at he beginning and a random dispersion that follows turned out to be. The part of the code that is responsible for these is the update() function that calculates the movement of particles and adds and element of randomness.

Here’s the code for the reference:

//function to calculate the lcoation and movement of circles
 update(){
  
   //after the circles reach the pre-defined boundaries i.e. after the first explosion occurs
   if(this.x>this.xMax || this.y>this.yMax || this.x<this.xMin || this.y<this.yMin){
     
     //user can change the origin of the salute by clicking on the screen
     if(mouseIsPressed == true){
       
       this.x=mouseX
       this.y=mouseY 
       
       //when they click the screen, the background color will also change to random shades of red and green to resemble the sky during the fireworks show
     background(random(0,100),random(0,100),random(0,100),opacity);
     }
     
     //in times when the user doesn't click on the scree, the origin of fireworks will be determined by the randomn() function
     else {
       this.x=random(0,400)
       this.y=random(0,400) 
     }
     
   } 
   
   //make the circles move on a specific manner
   this.x+=this.xspeed;
   this.y+=this.yspeed;   
 }

Future Improvements:

As I’ve mentioned above, one of the improvements for this code to create a more realistic firework imitation would be to make the particles follow not such a strict symmetric path. Also, instead of making them move in the straight line, it would be a good idea to make them move on an arc, accelerate when falling and decelerate when exploding. I tried to incorporate these concepts to this code as well, however I faced few challenges during the process, especially when making the particles fall to the ground imitating an arc-like movement.


Week 3 – Art with Classes

After going through a creative block, I finally managed to create this:

Below is the code for the project:

let stars =[];
let rockets=[];


function setup() {
  createCanvas(600, 700);

  for (let i = 0; i < 100; i++) {
    stars[i] = new Star(random(width), random(height), random(1, 5));
  }
  
  rocket = new Rocket(width / 2, height, 5);
  moon = new Moon(500,100,50);
  
  // Add mouse click event listener
  mouseClicked = function() {
    let x = mouseX;
    let y = mouseY;
    let rocket = new Rocket(x, y, 5);
    rockets.push(rocket);
  }
}

function draw() {
  background(1,22,64);
  
  //Drawing the stars
   for (let star of stars) {
    star.show();
   }
  //Drawing the moon
  moon.show();
  
  //Drawing the rockets
  for (let i = 0; i < rockets.length; i++) {
    rockets[i].update();
    rockets[i].show();
  }
}

//Class making the randomized stars in the background
class Star {
  constructor(x, y, size) {
    this.x = x;
    this.y = y;
    this.size = size;
  }

  //Drawing the stars
  show() {
    stroke(255);
    strokeWeight(this.size);
    point(this.x, this.y);
  }
}

//Making the moon
class Moon {
  constructor(x, y, diameter) {
    this.x = x;
    this.y = y;
    this.diameter = diameter;
  }

  show() {
    //The main body
    noStroke()
    fill(254, 252, 215);
    ellipse(this.x, this.y, this.diameter, this.diameter);
    
    // Adding shadows
    fill(234, 232, 185);
    ellipse(this.x + this.diameter / 4, this.y, this.diameter / 2, this.diameter / 2);
    ellipse(this.x+5 - this.diameter / 4, this.y + this.diameter / 4, this.diameter / 2, this.diameter / 4);
  }
}


//Class making the rocket
class Rocket {
  constructor(x, y, velocity) {
    this.x = x;
    this.y = y;
    this.velocity = velocity;
  }

  update() {
    this.y -= this.velocity;
  }

  //Body of rocket
  show() {
    
    //Flames
    noStroke()
    fill(255,185,0)
    ellipse(this.x,this.y+35,20,60)
    
    //Side fins
    fill(30,144,255);
    arc(this.x,this.y + 36,40,40,PI,0,CHORD)
    
    // Body
    fill(255,0,0)
    ellipse(this.x,this.y,30,80)
    
    //Windows
    fill(255);
    ellipse(this.x,this.y-12.15,15)
    fill(255);
    ellipse(this.x,this.y+6.15,15)
    
    //Front fin
    fill(30,144,255);
    ellipse(this.x,this.y+32,5,30)
    
  }
}


I went through a creator’s block for a couple of days meaning I could not think what I should make for a project. Then one morning, during my CSO class, we watched a case study on a rocket ship: the Ariane 5. This gave me the idea of creating a rocket taking off into space as my project.

I’m especially proud of how my stars and rocket turned out. I always enjoyed looking at the night sky due to the presence of stars above and wanted to make sure the stars in my project would look at least somewhat pretty and I am quite happy with how they turned out. the rocket ship took some experimenting, but I finally settled on this design which gives a more cartoonish look, but I believe was the best one I made.

In the future, I can definitely add more by animating the flames in order to breath more life into the rocket. I also wanted to add sound effects, but I could not find any suitable sound effect for my rocket so ended up scrapping that idea though I am more than happy to revisit that in the future.

Assignment 3: OOP Generative Art

Concept:

I was very intrigued with our discussion last on chaotic pieces of art and as I walked around campus for inspiration for this assignment, I noticed that a lot of things in nature are quite chaotic. For instance, tree branches sprout in no particular order or even cobwebs have no particular pattern to them. I wanted to mimic my work through replicating these chaotic traits in nature.

Usually, I go over the top and add some cool interactivity or motion in my assignments, but this time I wanted to keep it simple and draw a still portrait so the viewer can take their time and digest the piece of art.

Thought Process and Code

For this assignment, I decided to draw a chaotic cobweb. I found the shape at which webs were made quite random and intriguing, hence the reason why. Most of the time, spiders tend to make ordered shapes but sometimes it gets chaotic and completely random. I wanted to mimic that randomness.

My initial instinct was to simply draw a bunch of random lines all over each other and that each line would have a random length and random angle of rotation on the cavas when I draw them.

class Web { 
  constructor() {
    this.string_len = random(init_length/2, init_length);
    this.string_ang = random(init_angle/2, init_angle);
  }
  
  drawLines() {
    line(0, 0, 0, this.string_len);
    translate(0, this.string_len);
  }
}

Hence, I drew this, but the preview that came out was essentially just the screen covered. You couldn’t see any lines all you could see was a blank screen and even when I tried using the noLoop() function, it wouldn’t pause it at the correct frame.

Hence, I thought maybe I should add some initial structure to it, hence I created an InitializeWeb() function which would take in the initial number of lines, length of the lines and angle of the lines (all of which are global variables to which the user can change). This function essentially starts to create a bunch of “string” objects from the Web class to create the overall Web structure.

Like all cobwebs, there’s a focal point, so I translated to the center of the canvas and planned to draw an initial set of lines from the center (at random angles). I would do this by creating new objects called “string” of type Web which would have its length and angle parameters as per the constructor.

function setup() {
    createCanvas(600, 600);
    angleMode(DEGREES);
    noLoop();
}

function draw() {
    background(0, 0, 40);
    translate(width/2, height/2);
    InitializeWeb(init_length, init_num, init_angle);
}

function InitializeWeb(length, num, angle) {
    stroke(255, 80, 80);

    for (let i = 0; i < num; i++) {
      push();
      rotate(random(0, 360));    
      string = new Web(length, angle);
      Spread(string, length, angle);
      pop();
    }
}

Then I would draw the lines using the Spread() function where I continue to spread out lines throughout the canvas.

Ideally, I wanted this function to be inside the class as the variables and manipulations inside the function are to deal with the string object. However, it seems that p5js does not support recursion of functions within class definitions. Hence, I just created this function outside of the class.

Post Edit: I did not realize you could call the functions within a class through the “this” keyword, hence yes, you can use recursion of functions within classes. I was just unaware. In this case, I would use this.spread() as a function within the class rather than just another regular function.

function Spread(string, len, ang) {
  string.drawLines();
  
  len *= shrink_factor;
  ang = random(ang-30, ang+20);
  
  if (len > webbyness) {
        push();
        rotate(ang);
        Spread(string, len, ang);
        pop();

        push();
        rotate(-ang);
        Spread(string, len, ang);
        pop();
    }
}

The idea of Spread() is to recursively draw the lines and i’d continuously shrink the length of the lines by some factor. While the length isn’t bigger than a variable I like to call “webbyness” which is kind of like how thick the web structure is, then it will keep printing lines. Eventually, the canvas would be filled with a web like structure which is what I wanted to achieve.
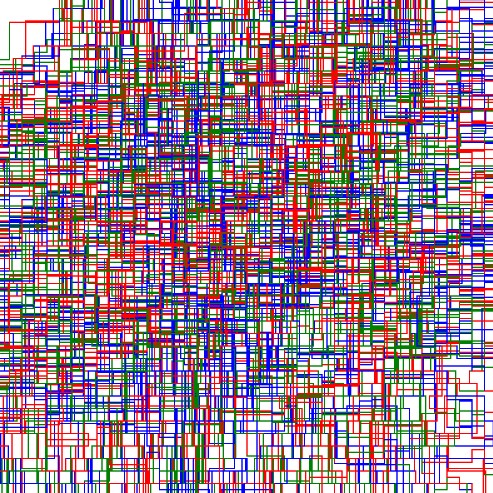
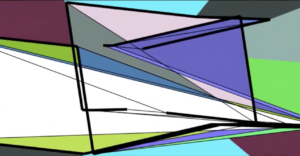
Final Piece:

Concluding Thoughts and Improvements:

Overall, I think the piece looks very chaotic and like I lot of emotion and things are going on in it. It replicates that cobweb like structure and evokes some strange emotion to it even though it’s a still image which actually makes me pretty happy.

I feel that perhaps the density of the webbyness could’ve been evenly distributed throughout the canvas as an improvement.

Also to add some sense of movement if I wanted to, perhaps add some blinking or glistening/fading effects to enhance the emotion and mystery that comes out of my piece.

Week 3: Generative Art using OOP

Concept

For this assignment, I was inspired by the piece we looked in class by Manfred Mohr, titled “space.color.motion”, that showed the projection of higher dimension object in 2D.Link to the artwork: space.color.motion

I did not implement any mathematical functions, simply because I am not aware of them, but I tried mimicking the actions of the shape. It did turn out to be completely different, but the properties of the shapes are somewhat retained in my approach like the overlapping of shapes onto the other and the change in shape. Some properties I added in was the varying opacity of the shape color and the rotation of the shapes.

Code

As part of the requirement for the assignment, I used a class called Shape which has parameters that represent four points for a quadrilateral. These points are random and create a random quadrilateral on the canvas. The display() function creates the quadrilateral and fills in a random color and a random stroke weight to the shape. The color has varying opacity, which I implemented through the .setAlpha in-built function for color. Finally, the rotate_() function rotates the shape with the axis of rotation at position (0, 0).

class Shape {
  constructor() {
    // the shape is a quadrilateral, so require four points.
    // these points are random and one is in the range of 'vary' with respect to one another.
    this.x1 = random(width);
    this.y1 = random(height);
    this.x2 = random(this.x1 - vary, this.x1 + vary);
    this.y2 = random(this.y1 - vary, this.y1 + vary);
    this.x3 = random(this.x2 - vary, this.x2 + vary);
    this.y3 = random(this.y2 - vary, this.y2 + vary);
    this.x4 = random(this.x3 - vary, this.x3 + vary);
    this.y4 = random(this.y3 - vary, this.y3 + vary);
    
    // random color for the shape.
    this.clr = color(random(255), random(255), random(255));
    
    // random stroke weight for the shape
    this.strWeight = random(2, 7);
    
    // changes the opacity of the shape to a random value. Gives a glass-like illusion to the shape
    this.clr.setAlpha(random(255));
  }
  
  display() {
    strokeWeight(this.strWeight);
    fill(this.clr);
    
    // Creating a quadrilateral.
    quad(this.x1, this.y1, this.x2, this.y2, this.x3, this.y3, this.x4, this.y4);
  }
  
  rotate_() {
    // stops the rotation when the mouse is clicked as the angle becomes constant
    if (!mouseIsPressed) {
      angle+=0.00001;
    }
    rotate(angle);

  }
}

I tried to mimic the movement of the edges as in the original, but it proved to be very difficult. I smoothened the movement with the use of noise, and rotated the objects so that we get varied shapes and images.

Notice that the rotate_() function rotates the objects only if the mouse is not pressed. If we press the mouse, the shapes stop rotating and start jittering. The shape changes its shape randomly. This random movement comes from the combination of noise and random functions with a change in the sign of the movement. If the sign is negative, the points would move left or up, and if the sign is positive, the points would move right or down. However, this movement is restricted to certain extent, such that the shapes do not move too far away from the visible part of the canvas. This was implemented with the following limit_point function.

function limit_point(i) {
    // limits the movement of the point. It keeps the shape with in a random range of 100 to 200 pixels of the canvas. In other words, it does not let the corners of the shape go beyond the canvas width or height plus some pixels in the range 100 to 200.
    if ((shapes[i].x1 > width + random(100, 200)) || (shapes[i].x1 < 0  - random(100, 200))) {
      sign_x1 *= (-1);
    }
    if ((shapes[i].y1 > height + random(100, 200)) || (shapes[i].y1 < 0 - random(100, 200))) {
      sign_y1 *= (-1);
    }
    
    // does the same random movement for another point/corner of the shape
    shapes[i].x2 += noise(random(-jitter+93, jitter+88)) * sign_x2;
    shapes[i].y2 += noise(random(-jitter+10, jitter)) * sign_x2;
    if ((shapes[i].x1 > width + random(100, 200)) || (shapes[i].x2 < 0 - random(100, 200))) {
      sign_x2 *= (-1);
    }
    if ((shapes[i].y1 > height + random(100, 200)) || (shapes[i].y2 < 0 - random(100, 200))) {
      sign_y2 *= (-1);
    }
    
    // does the same random movement for another point/corner of the shape
    shapes[i].x3 += noise(random(-jitter+89, jitter+23)) * sign_x3;
    shapes[i].y3 += noise(random(-jitter+45, jitter+48)) * sign_y3;
    if ((shapes[i].x1 > width + random(100, 200)) || (shapes[i].x3 < 0 - random(100, 200))) {
      sign_x3 *= (-1);
    }
    if ((shapes[i].y1 > height + random(100, 200)) || (shapes[i].y3 < 0 - random(100, 200))) {
      sign_y3 *= (-1);
    }
    
    // does the same random movement for another point/corner of the shape
    shapes[i].x4 += noise(random(-jitter+5, jitter+88)) * sign_x4;
    shapes[i].y4 += noise(random(-jitter+76, jitter+34)) * sign_y4;
    if ((shapes[i].x1 > width + random(100, 200)) || (shapes[i].x4 < 0 - random(100, 200))) {
      sign_x4 *= (-1);
    }
    if ((shapes[i].y1 > height + random(100, 200)) || (shapes[i].y4 < 0 - random(100, 200))) {
      sign_y4 *= (-1);
    }
}

This function takes in the index of the shapes array as an argument and limits the points of a quadrilateral with in a random range of 100 to 200 pixels from the edges of the canvas.

The draw function then simply runs all the functions on the shapes created in the setup function.

function draw() {
  background(123);
  
  for (let i = 0; i < shapes.length; i++) {
    
    // displays all the shapes
    shapes[i].display();
    
    // rotates all the shape with respect to (0,0)
    shapes[i].rotate_();
    
    // limit the movement of the points of a shape
    limit_point(i);
  }
}

The background was chosen such that the shapes would pop out and as an aesthetic measure. As part of the interactivity in the project, I added the functionality of adding new shape whenever a mouse click is registered. The shape created has a random position and might not be visible on the canvas right away but is created and is visible when the canvas rotates.

function mouseClicked() {
  // creating a new shape when the mouse is clicked
  shapes[shapes.length] = new Shape();
}

Further improvements

While I was trying to rotate the objects, I tried to rotate them such that all the shapes rotated with a different axis. However, the implementation using the push() and pop() function did not work as expected. This could be one of the improvements I could make in the future.

The inspiration for the project had very smooth movements, while mine is not as smooth. I could work on the smoothness as well.

Weekly Assignment 3

Concept:

For the first time, I had a fixed idea from the beginning of what I wanted to do for this assignment. I wanted to replicate a computer circuit and signals going through and simulate the signals as blood cells going through the veins. I wanted to have a canvas full of randomly generated veins going everywhere and then have each blood cells precisely follow that vein for each veins.

Making Process:

Initially, I created a class of veins and tried to test out printing a single instance of a vein. I needed a function that would create several lines that would consistently build on top of each other to create a single vein going across the canvas. I decided to create an array attribute that stored multiple line parameters(x1,y1,x2,y2) that would add up to create a vein. Each line segment would have a random color between red, green, and blue.

constructor(){
  this.paramArray = [];
  this.initPos = int(random(0,400));
  this.posVar = 0;

...

  let counter = 0;
  if(counter % 2 == 0){
    //storing of initial x value before adding changes and then adding changes
    let tempPosVar = this.posVar;
    this.posVar += (int(random(1,5)) * 10);
    color = this.colorRange[int(random(0,3))];
    this.paramArray.push([tempPosVar, this.initPos, this.posVar, this.initPos, color]);
  }
    else{
      let tempInitPos = this.initPos;
      this.initPos += (int(random(-4,4)) * 10);
      //in case random initPos is 0, to prevent incosistent vein
      if (this.initPos == tempInitPos)
        this.initPos -= 10;
      //push the 5 parameters in the array
      this.paramArray.push([this.posVar, tempInitPos, this.posVar, this.initPos,     color]);
  }
  counter++;
...


After I achieved this, I then proceeded to create an entire circuit of 300 sets of veins going from left to right and top to bottom

Then I worked on the blood class for the cells to follow its assigned vein. This part, I am particularly proud of since planning ahead helped me a lot. Since I knew there was going to be instances of two separate classes, I specifically created the attribute of the coordinates for each lines in a vein stored in an array so that I could pass it on to the blood cell instance. Therefore, in the blood class’s display function I can easily pass on the cell’s coordinates based on the lines’ coordinates.

if(this.lineNum < this.veinRoute.length){
        
  //the actual printing of the cell 
  strokeWeight(0);
  fill(60, 100, 100);
  circle(this.x, this.y, 4);
        
  //The cell movement mechanism: the cell position variable will move towards the end of the current line it is on the vein
        
  //For x position
  if(this.x != this.veinRoute[this.lineNum][2]){
    if(this.x < this.veinRoute[this.lineNum][2])
      this.x++;
    if(this.x > this.veinRoute[this.lineNum][2])
      this.x--;
    }
        
  //For y position
  else if(this.y != this.veinRoute[this.lineNum][3]){
    if(this.y < this.veinRoute[this.lineNum][3])
      this.y++;
    if(this.y > this.veinRoute[this.lineNum][3])
      this.y--;
    }
        
      //If the cell is on the end of the line, move on to the next line of the vein
  else
    this.lineNum++;
  }
      
//If the cell had reached the end of the vein, reset to the beginning of the vein
else{
  this.x = this.veinRoute[0][0];
  this.y = this.veinRoute[0][1];
  this.lineNum = 0;
}

Now that my setup for the whole project has finished, I created an array of vein and blood cell instances. Then I changed the coloring a little to make it aesthetically appealing. Instead of the normal RGB that I am used to, I decided to implement the HSB color mode to differentiate the cell and the veins brightness. This is the following result:

I also added another set of cells going backwards on the veins to populate the circuit a little more.

Challenge:

My challenge at this point was that the cells were all initialized at the same moment, which initially creates a recognizable pattern which is a phenomenon that I didn’t like. The reason why this happens is because I initialize and draw the veins and blood cells at the same time

for(let i = 0; i < 300; i++){
  groupOfVeins.push(new veins(i));
}
  
for(let j = 0; j < 300; j++){
  //do the setup for the veins and create the blood cells based on it
  groupOfVeins[j].create();
  groupOfBloodFor.push(new blood(groupOfVeins[j].paramArray, true));
  groupOfBloodBack.push(new blood(groupOfVeins[j].paramArray, false));
}

...

for(let j = 0; j < 300; j++){
  groupOfVeins[j].display();
  groupOfBloodFor[j].display();
  groupOfBloodBack[j].display();
}

At this point, I consulted with Professor Ang and he gave me the advise of a) create and print each vein and cell one by one, b) try to involve less fixed numbers and create a pattern that can be randomized each run therefore creating a new result for each run. So I worked with the first task and successfully made a function that initialize the veins one by one instead of doing the whole thing at once using an array. I also slowed this process using the frameCount variable to show what exactly is going on.

Then I applied changed for suggestion B where I set colors for horizontal veins as red and vertical veins for blue. I also set a random parameter that changed the range of the veins each run which somewhat makes a new pattern each time it runs

if(frameCount % 75 == 0){
  if(counter < maximumNumber){
    initialize();
  }
  else{
    counter = -1;
    resetCanvas();
  }
  counter++
}

...

function initialize(){
  groupOfVeins.push(new veins(counter));  
  groupOfVeins[counter].create();
  groupOfBloodFor.push(new blood(groupOfVeins[counter].paramArray, true));
  groupOfBloodBack.push(new blood(groupOfVeins[counter].paramArray, false));
}


Finally I made a version where the color of the veins would be black so only the cells would be seen which makes it look like a swarm of fireflies dancing in the dark

Reflection:

Overall through this project, I was able to learn new things about OOP using p5js especially regarding using attributes and passing them. At first I was somewhat annoyed that each time I had to use the attribute I had to put “this.” in front of the attribute name to use it which caught me aback the first hour but later on I was so glad that p5js was very lenient with passing attributes of one instance for another of different class. I also learned how to use the HSB color scheme which added the sprinkle on top of my project’s aesthetics.

This was also an assignment where I liked each variation of my work since each variation kept its uniqueness which all looked cool to me in different ways. This ended up making my documentation super long but in the end I thought it was a good thing for me try different things on this project.

Week 3 – OOP(s) Moon

Concept & Inspiration:

This code creates a graphical representation of a moon with an orbit. The code defines a class called “Moon” that creates an instance of a moon with given x, y coordinates, width, and height. The class has a method called “draw” which draws the moon on the canvas. The code also defines a class called “Square” which creates a square with given x, y coordinates, size and color. This class also has a method called “draw” which draws the square on the canvas.The code uses an array “squares” to store instances of the square class and uses a loop to draw multiple squares in an orbit around the moon. The squares are positioned using the cosine and sine functions to make them move in a circular motion.The code also allows for the creation of stars by making an array “stars” and using a loop to draw 50 small circles on the canvas. The stars can be displayed by clicking on the canvas.The function “setup” initializes the canvas, sets the frame rate and creates the instances of the moon and squares.The function “draw” displays the moon and squares on the canvas. The function “mouseClicked” changes the display of stars when the mouse is clicked on the canvas.

This code captures the essence of a celestial body inspired by the rings of Saturn. The inspiration for this code came from an image of the moon surrounded by clouds, which gave the illusion of it having its own set of rings. With a creative and imaginative approach, the goal was to bring to life a moon with an animated orbit. The picture of the image is shown below.

Code:

let star = false; // when there are no stars
let stars = []; //making an array for storing stars
class moon{ // class for making a moon
  constructor(xm, ym, wm, hm,cm) {
    this.xm = xm; // x coordinate of moon
    this.ym = ym; // y coordinate of moon
    this.wm = wm; // width of moon
    this.hm = hm; //height of moon
  }
  
  draw() {
    // drawing the moon itself with craters 
    fill("lightgrey");
    ellipse(this.xm, this.ym, this.wm, this.hm);
    noStroke();
    fill("#adadad");
    ellipse(this.xm + 20, this.ym-10, this.wm/5, this.hm/4);
    ellipse(this.xm -15, this.ym+10, this.wm/5, this.hm/4);
    ellipse(this.xm -10 , this.ym-20, this.wm/5, this.hm/5);
    ellipse(this.xm +15 , this.ym+12, this.wm/5, this.hm/5);
  }

}
class Square { // making a class for squares for the orbit 
  constructor(x, y, size, colors) {
    this.x = x; // x coordinate 
    this.y = y; // y coordinate 
    this.size = size; // size of squares
    this.colors = colors; //color of square
  }

  draw() { //drawing a square 
    strokeWeight(1);
    fill(this.colors);
    rect(this.x, this.y, this.size, this.size);
  }
}

let squares = []; //array of squares to store them 
let angle = 0;
let angleStep = 5;
let radius = 1;
let xoffset = 0;
let yoffset = 0;


let moon_obj = new moon(200,200,75,75,100,200); //making a moon with the help of a moon class


function setup() {
  createCanvas(400, 400);
  frameRate(50);
  //making the orbit with squares which are very tiny and using sin and cos functions to make them move in a particular motion
  for (let i = 0; i < 1000; i++) {
    let x = width/2 + radius * cos(angle);
    let y = height/2 + radius * sin(angle);
    let size = 2;
    let colors = (random(200), random(200), random(255));
    squares.push(new Square(x, y, size, colors));
    
    angle += angleStep;
    radius += 0.01;
    
  }

  // to make stars which appear upon clicking on the canvas
  for (let i = 0; i < 50; i++) {
    stars[i] = {
      x: random(0, width),
      y: random(0, height)
    };
  }
}

function draw() { // displaying my creative idea of a moon with an orbit 
  if(star==false)
  {
     background(0);
  
  for (let i = 0; i < squares.length; i++) {
    squares[i].x = squares[i].x + xoffset + sin( frameCount*0.01+i*0.1);
    squares[i].y = squares[i].y + yoffset + cos(frameCount * 0.05 + i * 0.1);
    squares[i].draw();
  }
   moon_obj.draw();
  }
  
  
  else // if clicked displaying moon as imagined by many
  {
     background(0);
  moon_obj.draw();
fill("white");
  for (let i = 0; i < 50; i++) {
    ellipse(stars[i].x, stars[i].y, 1, 1);
  }
  }
 
 
}


function mouseClicked() {
  
  if(star==false)
  {
    star =true;
  }
  else
    star =false;
}

Reflection / Future Improvements:

The project was really fun to work on as I learned how to deal with classes and arrays. Making the entire thing function was hard and took a lot of time to understand the concept better. The code creates a beautiful representation of a moon with rings similar to that of Saturn. The code uses classes for the moon and the rings to make it organized and reusable. The rings are created using a series of small squares that are animated in an orbital pattern around the moon. The use of sin and cos functions adds a touch of realism to the motion of the rings. Additionally, the user can toggle between a starry night sky or a moon with rings with a single mouse click.

However, there are a few areas for improvement in this code. First, the color scheme of the moon and the rings could be made more dynamic by using random colors or a gradient effect. Second, the stars in the starry night sky could be made better to make it look more realistic. Lastly, the motion of the rings could be made more dynamic by adding an acceleration or deceleration effect. These improvements would enhance the overall look and feel of the code and make it even more visually appealing.

Week 3 – (OOP) Emotions

Inspiration & Thought Process:

During the class discussion facilitated by Saamia and Yerk, we discussed various emotions and how they can be depicted through art. As they displayed the brush strokes on the canvas, I could sense the chaos and anger that the artist was attempting to express. In class, I argued that digital art could not accurately represent emotions, and thus I disregarded the idea of attempting to recreate a similar artwork. However, while looking for inspirations on the internet I came across this picture:

As soon as I encountered this task, the entire classroom discussion came to mind and I realized I had to challenge myself to determine if digital art could effectively convey emotions just as traditional art can. The challenge then became choosing which emotions to depict. After careful consideration, I chose to depict chaos and sadness, as these emotions best reflected my state of mind over the past four days. The chaos in my project symbolizes the numerous assignments and tight deadlines I was facing, which contributed to a sense of being overwhelmed. Meanwhile, the sadness in my project represents my feelings of homesickness and illness, both of which were constantly present in my thoughts. I wanted to bring these emotions to life in my project, to provide a visual representation of my innermost thoughts and feelings.

Work Process and Code:

To begin, I had to brush up on the basics of Object Oriented Programming and familiarize myself with the syntax differences in p5js compared to other languages. It took me almost two days to figure out the best way to depict my emotions. I conducted various experiments, trying out both emotions separately in different p5js files and adjusting different elements to see what worked best. For the chaos aspect, I created a “Circle” class that took in the x and y coordinates, as well as the diameter, of the circles as parameters. This class also had a display() function that filled the circles with random colors with each iteration of the draw() loop, and then created a circle at the specified location with varying diameters. The update() function in the Circle class updated the x and y coordinates of the circles randomly, based on a specified speed, to display chaotic behavior. In the setup() function, a for loop was used to append a large number of Circle class objects (150 in this case) to an array passing random x coordinates, y coordinates and diameters. The code for the Circle class looked like this:

class Circle //circle class
{
  constructor(x, y, diameter) //pass three parameters to the constructor
  {
    //update the variables that define size and position
    this.x_cord = x;
    this.y_cord = y;
    this.diameter = diameter;
    this.speed = 10;
  }

  display() 
  {
    noStroke();
    fill(random(255), random(255), random(255)); //random colored circles e  every iteration of the draw loop
    ellipse(this.x_cord, this.y_cord, this.diameter, this.diameter); //circles
  }

  update() 
  {
    //update the x and the y value randomly between speed value left and right (or up and down)
    this.x_cord += random(-this.speed, this.speed);
    this.y_cord += random(-this.speed, this.speed);
  }
}

The task of depicting the second emotion proved to be more challenging than the chaos emotion. Initially, the representation of rain appeared flat and the background lacked a gloomy atmosphere. After several hours of research and watching YouTube videos, I discovered the “map()” function, which allowed me to effectively depict the rain droplets as I desired. The process of using Object-Oriented Programming was similar to that of the Circle class. Another array was used to store objects of the “Drop” class. The constructor of the Drop class ensured that each drop had a random x value within the canvas, while the y value of the raindrops was randomly placed above the canvas to create the illusion of actual rain. The “z_coordinate” variable influenced the depth, size, and speed of each raindrop. If the drop was closer to the screen, it appeared thicker, longer, and faster compared to drops that were farther away from the screen. The Drop class looks like this:

class Drop 
{
  constructor() 
  {
    this.x_cord = random(width);
    this.y_cord = random(-500, -50); //this will start at various different locations above the canvas
    this.z_cord = random(0, 20); //this is to add depth effect to the rain
    this.len = map(this.z_cord, 0, 20, 10, 20); //length of the drop will be corresponding to the depth of the drop
    this.yspeed = map(this.z_cord, 0, 20, 1, 20); //the depth will also influence the speed of the drop
  }

  fall() 
  {
    this.y_cord = this.y_cord + this.yspeed; //falling
    let grav = map(this.z_cord, 0, 20, 0, 0.2); //more depth will be less speed
    this.yspeed = this.yspeed + grav;

    if (this.y_cord > height) //when the drops go out of canvas
    {
      this.y_cord = random(-200, -100); //respawn them by changing their y coordinates to above frame
      this.yspeed = map(this.z_cord, 0, 20, 4, 10); //map their speed again depending on the depth
    }
  }

  display() 
  {
    let thick = map(this.z_cord, 0, 20, 1, 3); //thickness also depends on the depth of the rain drop. more depth means less thick drop
    strokeWeight(thick);
    stroke(200, 200, 0);
    line(this.x_cord, this.y_cord, this.x_cord, this.y_cord + this.len); //rain drops are basically lines of different lengths
  }
}

Finally, I combined both classes into one p5js file, included suitable royalty-free sounds, and implemented the feature where clicking anywhere on the canvas changes the song and the emotion. I struggled to create a gloomy background for the second emotion, so I searched the web for an image and set it as the background. To ensure all assets were loaded before the start of the drawing loop, I utilized the preload() function. The final result appears as follows:

CLICK IN THE CANVAS TO CHANGE EMOTION

Reflection:

My viewpoint on representing emotions through digital art underwent a significant transformation after completing this task. I feel like I was able to accomplish most of what I wanted to convey. I am particularly pleased with how the rain droplets turned out, as they required a lot of effort to create a convincing depth effect. I faced some challenges with the audio, where one sound would not stop when the other started playing, but it was eventually resolved. For future assignments, I hope to improve by creating my own original background, instead of using a pre-existing image. I also intended to include a joyful emotion, but I was unable to create a rotating sun with precisely angled triangle rays. Maybe with more practice, I would be able to do that as well. In the future, I plan to continue working on this project to add more emotions such as scared and surprised.