Final Project – Progress

p5JS game

I have started working on the p5js game. This game will involve a view similar to that of temple run or subway surfers, and obstacles will be on your path and the player/skater will have to move side to side (and eventually) jump over them. This week, I have managed to set up the basic stage design as well as some scaling properties for the background to make it appear like the player is moving.

I have not yet been able to create the sprites for the player so a placeholder circle is being used.

Arduino

I managed to also set up the serial communication from the accelerometer to the p5js and get some basic movement going. When I have the prototype for the game ready to go, I will attach the Arduino with the sensor to my penny board and calibrate it for the controls.

Todos

  1. Create/find sprites for the player
  2. Finish the game logic
  3. Finish the game design (sound/score/restart)
  4. Pressure pad for jump control
  5. Figure out how to block wheels on the penny board

Progress video

MY6 (final project progress)

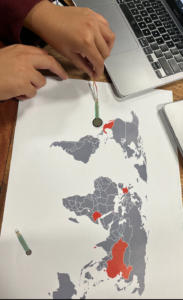
For our final project, we have decided to take this opportunity to showcase 6 different current events around the world, that we believe should have more exposure in the media. Through this, we would like the people affected by these issues to be the focus of how these events are presented in the media.  To do this we will use p5js to display a world map with the 6 countries these issues are happening in highlighted, which will be projected onto a surface that will use Arduino to trigger videos and images in p5js. We have selected the counties, and the events, along with the videos and images. We hope that through these videos the lives of the people affected by these issues are the focus, followed by the images which are headlines of these events in the news articles.

Example of Video:

Example of Image:


Technical Difficulties:

So far, we have a map that has the six countries highlighted, we are able to make an image appear of the news article, however, our first issue is embedding a video into p5js, either through a link or downloaded and uploaded as a media file. Next, we have set up a sensor in Arduino, which we know works and is able to read values, however, when tried to make the sensor trigger the image (as we don’t know how to use a video) it does not read the values. We have used “webSerial_handshake_simpler” example provided by the professor, to test the sensor as well as log the rVal (reading of the sensor) which works, however, in trying to get it to do the same to the background with our map it does not work and does not trigger the image either.

Here are two videos demonstrating the two issues.

Our fail:


working example:

Finally, we would like along with the force sensor to trigger p5js to zoom into the map and then play the videos and present the headlines (this will be triggered by matching the cut out of the country onto the country on the map which will be projected onto a paper surface that the sensors are under [image of the model included]) which is our third and final major issue.

p5js Code:

arduino:

#define FORCE_SENSOR_PIN A0 // the FSR and 10K pulldown are connected to A0

int sensor = analogRead(A0); 

void setup() {
  Serial.begin(9600);
  // start the handshake
  while (Serial.available() <= 0) {
//    Serial.println("0,0"); // send a starting message
    delay(300);            // wait 1/3 second
  }
}

void loop() {
  // wait for data from p5 before doing something
  while (Serial.available()) {
    int left = Serial.parseInt();
    int right = Serial.parseInt();
    if (Serial.read() == '\n') {
 
      delay(1);
      Serial.print(sensor);
    }
 int sensor = analogRead(FORCE_SENSOR_PIN);
  Serial.print(sensor); // print the raw analog reading
   
  }
}


credit for p5js world map: https://editor.p5js.org/Kumu-Paul/sketches/wq3Uh5dBp


Final Project Progress (Dev and Zaeem)

SAGA-GT Car Game

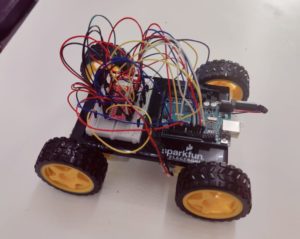
We are building a remotely controlled car that will feature both autopilot mode and manual driving mode. The user will have the choice to decide which mode they want to choose to drive the car.

User-controlled: using arrows keys through p5js, we will make a mini-game in p5js or a real obstacle course if we have time after completion of this mode.
Follow a track or the user: using infrared sensors, we want to make the car move independent of input from the user by following a line on the track.

Arduino Components 

  • Arduino Uno (we are going to move it to the MEGA board)
  • 2 IR Range Sensor
  • 4 Wheels
  • 4 Motors
  • 1 ultrasonic sensor
  • 1 LDR
  • 2 Motor drivers
  • Battery DC
  • Acrylic Sheet
  • Battery Holder

Implementation

We started by taping the motors using double sided tape and sticking it to the acrylic sheet. Then we connected the wheels to the motor and wired it to the motor driver. We manage to fit all the pins on the Arduino Uno and after couple hours of figuring out the wiring we got both the motor driver on the breadboard. Then came the challenging part of getting the pins defined correctly in the code and using the example code to build up on our car driving code.

We made the car so that it can move in all directions, using two motor drivers and four motors (4 Wheel Drive). This allows the user to control the car’s movement direction using arrow keys on P5.js through Serial Communication with the Arduino connected to the car. We have the manual driving mode working now and the car can be controlled manually from the p5.js interface with the arrow keys.

The p5.js is serially transmitting a direction flag (integer) that is indicating the driving direction and the Arduino is reading this flag and using switch statements to make the car move. These switch statements control the motors’ speeds and rotation directions.

We decided to manually control the movement of the car – without the IR controller – because this is the most functionally important part of this project. We spent the weekend understanding how the motors work and what possibilities there are coding features for motors in Arduino. We are now confident enough in our basic understanding of motors to start finalizing the project.

Here is a video of the car driving:

Manual car driving Demo


Here is the p5js sketch we made:

let dir = 0;
let direction = 0;

function setup() {
  createCanvas(640, 480);
  
  textSize(18);
}

function draw() {

  if (!serialActive) {
    text("Press Space Bar to select Serial Port", 20, 30);
  } else {
    text("Connected", 20, 70);
  }
  switch(direction) {
  case 0:
    dir = 0;
    break;
  case 1:
    dir = 1;
    break;
  case 2:
    dir = 2;
    break;
  case 3:
    dir = 3;
    break;
  default:
    // code block
  }
  
  print(dir);
}

function keyPressed() {
  if (key == " ") {
    // important to have in order to start the serial connection!!
    setUpSerial();
  }
  else if (keyCode == UP_ARROW) {
    direction = 0;
  }
  else if (keyCode == LEFT_ARROW) {
    direction = 1;
  }  
  else if (keyCode == RIGHT_ARROW) {
    direction = 2;
  }  
  else if (keyCode == DOWN_ARROW) {
    direction = 3;
  }
}

function readSerial(data) {
  ////////////////////////////////////
  //READ FROM ARDUINO HERE
  ////////////////////////////////////

  if (data != null) {
    //////////////////////////////////
    //SEND TO ARDUINO HERE (handshake)
    //////////////////////////////////
    let sendToArduino = dir + "\n";
    console.log(sendToArduino)
    writeSerial(sendToArduino);
  }
}


Here is the Arduino code:

//Motor controls
const int ain1Pin = 3;
const int ain2Pin = 4;
const int pwmAPin = 5;

const int ain1Pin_2 = 13;
const int ain2Pin_2 = 12;
const int pwmAPin_2 = 11;

const int bin1Pin = 8;
const int bin2Pin = 7;
const int pwmBPin = 6;

const int bin1Pin_2 = 9;
const int bin2Pin_2 = 2;
const int pwmBPin_2 = 10;

int dir = 0; //0 - forward, 1 - right, 2 - left, 3 - reverse
bool reverse = false;

void setup() {

  //setting all motor controls to output
  pinMode(ain1Pin, OUTPUT);
  pinMode(ain2Pin, OUTPUT);
  pinMode(pwmAPin, OUTPUT); 

  pinMode(ain1Pin_2, OUTPUT);
  pinMode(ain2Pin_2, OUTPUT);
  pinMode(pwmAPin_2, OUTPUT); 

  pinMode(bin1Pin, OUTPUT);
  pinMode(bin2Pin, OUTPUT);
  pinMode(pwmBPin, OUTPUT);

  pinMode(bin1Pin_2, OUTPUT);
  pinMode(bin2Pin_2, OUTPUT);
  pinMode(pwmBPin_2, OUTPUT);

  Serial.begin(9600);

  // start the handshake
  while (Serial.available() <= 0) {
    Serial.println("0,0"); // send a starting message
    delay(300);            // wait 1/3 second
  }
}

void loop() {

  while (Serial.available()) {

      if (!reverse){
          digitalWrite(ain1Pin, LOW);
          digitalWrite(ain1Pin_2,HIGH);
        
          digitalWrite(ain2Pin, HIGH);
          digitalWrite(ain2Pin_2,LOW);
        
          digitalWrite(bin1Pin, HIGH);
          digitalWrite(bin1Pin_2,LOW);
        
          digitalWrite(bin2Pin,LOW);
          digitalWrite(bin2Pin_2,HIGH);
      }

      else {
          digitalWrite(ain1Pin, HIGH);
          digitalWrite(ain1Pin_2,LOW);
        
          digitalWrite(ain2Pin, LOW);
          digitalWrite(ain2Pin_2,HIGH);
        
          digitalWrite(bin1Pin, LOW);
          digitalWrite(bin1Pin_2,HIGH);
        
          digitalWrite(bin2Pin,HIGH);
          digitalWrite(bin2Pin_2,LOW);
      }
    
      
      dir = Serial.parseInt();

      //completing the "handshake"!!!!!!!!!!!!!!!!!!!!!
      Serial.println(dir);
       
      if (Serial.read() == '\n') {
          switch(dir) {
          case 0:  
            reverse = false;
            analogWrite(pwmAPin, 255);
            analogWrite(pwmAPin_2, 255);
          
            analogWrite(pwmBPin, 255);
            analogWrite(pwmBPin_2,255);
            break;
          case 1:
            analogWrite(pwmAPin, 255);
            analogWrite(pwmAPin_2, 0);
          
            analogWrite(pwmBPin, 255);
            analogWrite(pwmBPin_2,255);
            break;
          case 2:
            analogWrite(pwmAPin, 255);
            analogWrite(pwmAPin_2, 255);
          
            analogWrite(pwmBPin, 255);
            analogWrite(pwmBPin_2, 0);
            break;
          case 3:
            reverse = true;
            analogWrite(pwmAPin, 255);
            analogWrite(pwmAPin_2, 255);
          
            analogWrite(pwmBPin, 255);
            analogWrite(pwmBPin_2,255);
            break;
          }
      }
  }

  //GO THROUGH THE KEYPRESSED IN DRAW LOOP OF P5JS

}

Plans

At first, the P5js sketch will have an initial menu screen with the two modes for the user to choose from. If the user chooses the autopilot mode, the car will be able to move around and avoid obstacles (obstacle detections) and also be able to drive automatically on a predefined course/ path (by following a black tape on the course using IR sensors). We plan to build a driving course to accompany our car for this project. The user use this course for “test-drives”.

We plan to add wireless transmission using the XBEE shield and chip we checked out as per the Professor’s suggestion. The Arduino connected  with the computer will be in Serial Communication with p5js and will send out signals to the Arduino connected with the car to maintain the p5js to car communication. We also plan on adding motion sensors to the car to gauge braking distance – we will add a simply braking functionality too.

In summary:
  • Add wireless Transmission feature
  • Line follower (Auto driving feature): Add 2 infrared sensors
  • Glue the motors to the board and and align the wheels properly
  • Screw the Arduino firmly to the board
  • Create the driving course
  • Work on the P5.js interface


Exercises – Hind & Maimuna

Exercise 1

The ellipse was controlled on the horizontal axis with the potentiometer.

void setup() {
  Serial.begin(9600);
  while (Serial.available() <= 0) {
    Serial.println("0,0"); // send a starting message
    delay(300);              // wait 1/3 second
  }
}
void loop() {
  while (Serial.available() > 0) {
    // read the incoming byte:
   int inByte = Serial.read();
    int sensorValue = analogRead(A0);
    Serial.println(sensorValue);
  }
}

https://editor.p5js.org/hindyounus727/sketches/B7U2fCaNp

Exercise 2

The LED brightness was controlled by the mouseX value, and is constrained in case it passes the canvas width.

int lightValue = 0;

void setup() {
  Serial.begin(9600);
  pinMode(2, OUTPUT);
  pinMode(5, OUTPUT);
  while (Serial.available() <= 0) {
    Serial.println("0,0"); // send a starting message
    delay(300);              // wait 1/3 second
  }
}
void loop() {
  while (Serial.available() > 0) {
   int lightValue = Serial.read();
   analogWrite(5, lightValue);
  }
    // read the incoming byte:
   int inByte = Serial.read();
    int sensorValue = analogRead(A0);
    Serial.print(sensorValue);
    Serial.print(",");
    sensorValue = analogRead(A1);
    Serial.print(sensorValue);
    Serial.println();
}

https://editor.p5js.org/hindyounus727/sketches/SoQkb_ztQ

Exercise 3

void setup() {
  Serial.begin(9600);
  pinMode(2, OUTPUT);
  while (Serial.available() <= 0) {
    Serial.println("0,0"); // send a starting message
    delay(300);              // wait 1/3 second
  }
}

void loop() {
  while (Serial.available() > 0) {
    // read the incoming byte:
   int inByte = Serial.read();
    analogWrite(2, inByte);

    int sensorValue = analogRead(A0);
    Serial.print(sensorValue);
    Serial.println();
  }
}

https://editor.p5js.org/mz2934/sketches/kUwzGxtQ5


Serial Communication Exercises-Maimuna And Hind

Exercise 1

p5.js

Arduino

void setup() {
  Serial.begin(9600);
  pinMode(2, OUTPUT);
  while (Serial.available() <= 0) {
    Serial.println("0,0"); // send a starting message
    delay(300);              // wait 1/3 second
  }
}

void loop() {
  while (Serial.available() > 0) {
    // read the incoming byte:
   int inByte = Serial.read();
    analogWrite(2, inByte);

    int sensorValue = analogRead(A0);
    Serial.print(sensorValue);
    Serial.println();
  }
}


Exercise 2

p5.js

Arduino

int lightValue = 0;

void setup() {
  Serial.begin(9600);
  pinMode(2, OUTPUT);
  pinMode(5, OUTPUT);
  while (Serial.available() <= 0) {
    Serial.println("0,0"); // send a starting message
    delay(300);              // wait 1/3 second
  }
}
void loop() {
  while (Serial.available() > 0) {
   int lightValue = Serial.read();
   analogWrite(5, lightValue);
  }
    // read the incoming byte:
   int inByte = Serial.read();
    int sensorValue = analogRead(A0);
    Serial.print(sensorValue);
    Serial.print(",");
    sensorValue = analogRead(A1);
    Serial.print(sensorValue);
    Serial.println();
}


Exercise 3

p5.js

Arduino

void setup() {
  Serial.begin(9600);
  pinMode(2, OUTPUT);
  while (Serial.available() <= 0) {
    Serial.println("0,0"); // send a starting message
    delay(300);              // wait 1/3 second
  }
}

void loop() {
  while (Serial.available() > 0) {
    // read the incoming byte:
   int inByte = Serial.read();
    analogWrite(2, inByte);

    int sensorValue = analogRead(A0);
    Serial.print(sensorValue);
    Serial.println();
  }
}

Serial Communication Exercise- Yunho and Kashyapa

Exercise 1

N/A

Exercise 2
let serial; // variable to hold an instance of the serialport library
let portName = "COM3"; // fill in your serial port name here
let xPos=0;
let yPos=240;
let onOff=0;
let val;

function setup() {
  createCanvas(640, 480);
  serial = new p5.SerialPort(); // make a new instance of the serialport library
  serial.on("list", printList); // set a callback function for the serialport list event
  serial.on("connected", serverConnected); // callback for connecting to the server
  serial.on("open", portOpen); // callback for the port opening
  serial.on("data", serialEvent); // callback for when new data arrives
  serial.on("error", serialError); // callback for errors
  serial.on("close", portClose); // callback for the port closing

  serial.list(); // list the serial ports
  serial.open(portName); // open a serial port
}

function draw() {
  background(255);
  val = map(mouseX, 0, width, 0, 255);
}

// get the list of ports:
function printList(portList) {
  // portList is an array of serial port names
  for (let i = 0; i < portList.length; i++) {
    // Display the list the console:
    print(i + " " + portList[i]);
  }
}

function serverConnected() {
  print("connected to server.");
}

function portOpen() {
  print("the serial port opened.");
}

function serialEvent() {
  // read a string from the serial port
  // until you get carriage return and newline:
  let inString = serial.readLine();
  serial.write(val);
}

function serialError(err) {
  print("Something went wrong with the serial port. " + err);
}

function portClose() {
  print("The serial port closed.");
}

/*
Arduino code
void setup() {
  Serial.begin(9600);
  pinMode(2, OUTPUT);
  pinMode(5, OUTPUT);
  while (Serial.available() <= 0) {
    Serial.println("0,0"); // send a starting message
    delay(300);              // wait 1/3 second
  }
}
void loop() {
  while (Serial.available() > 0) {
    // read the incoming byte:
    int inByte = Serial.read();
    analogWrite(5,inByte);
    Serial.println();
  }
}
*/
Exercise 3
let serial; // variable to hold an instance of the serialport library
let portName = "COM7"; // fill in your serial port name here

let velocity;
let gravity;
let position;
let acceleration;
let wind;
let drag = 0.99;
let mass = 50;
let windVal;

function setup() {
  createCanvas(640, 360);
  noFill();
  position = createVector(width/2, 0);
  velocity = createVector(0,0);
  acceleration = createVector(0,0);
  gravity = createVector(0, 0.5*mass);
  wind = createVector(0,0);
  
  serial = new p5.SerialPort(); // make a new instance of the serialport library
  serial.on("list", printList); // set a callback function for the serialport list event
  serial.on("connected", serverConnected); // callback for connecting to the server
  serial.on("open", portOpen); // callback for the port opening
  serial.on("data", serialEvent); // callback for when new data arrives
  serial.on("error", serialError); // callback for errors
  serial.on("close", portClose); // callback for the port closing

  serial.list(); // list the serial ports
  serial.open(portName); // open a serial port
}

// get the list of ports:
function printList(portList) {
  // portList is an array of serial port names
  for (let i = 0; i < portList.length; i++) {
    // Display the list the console:
    print(i + " " + portList[i]);
  }
}

function serverConnected() {
  print("connected to server.");
}

function portOpen() {
  print("the serial port opened.");
}

function serialEvent() {
  // read a string from the serial port
  // until you get carriage return and newline:
  let inString = serial.readLine();
  print(inString);
  if (inString.length > 0){
    windVal = map(inString, 0, 1023, -3, 3);
  }
}

function serialError(err) {
  print("Something went wrong with the serial port. " + err);
}

function portClose() {
  print("The serial port closed.");
}

function draw() {
  background(255);
  
  wind.x = windVal;
  
  applyForce(wind);
  applyForce(gravity);
  velocity.add(acceleration);
  velocity.mult(drag);
  position.add(velocity);
  acceleration.mult(0);
  ellipse(position.x,position.y,mass,mass);
  
  if (position.y > height-mass/2 - 25){
    serial.write(255);
  }
  else serial.write(0);
  
  if (position.y > height-mass/2) {
      velocity.y *= -0.9;  // A little dampening when hitting the bottom
      position.y = height-mass/2;
    }
}

function applyForce(force){
  // Newton's 2nd law: F = M * A
  // or A = F / M
  let f = p5.Vector.div(force, mass);
  acceleration.add(f);
}

function keyPressed(){
  if (keyCode==LEFT_ARROW){
    wind.x=-1;
  } 
  if (keyCode==RIGHT_ARROW){
    wind.x=1;
  }
  if (key==' '){
    mass=random(15,80);
    position.x=width/2;
    position.y=-mass;
    velocity.mult(0);
  }
}

/*
Arduino code
void setup() {
  Serial.begin(9600);
  pinMode(2, OUTPUT);
  while (Serial.available() <= 0) {
    Serial.println("0"); // send a starting message
    delay(300);              // wait 1/3 second
  }
}
void loop() {
  while (Serial.available() > 0) {
    // read the incoming byte:
    int inByte = Serial.read();
    analogWrite(2, inByte);
    int WindPower = analogRead(A0);
    Serial.println(WindPower);
    
  }
}
*/

Arduino & P5js communication exercise – Yunho & Kashyapa

EX1

The work didn’t get saved by mistake.

EX2

let serial; // variable to hold an instance of the serialport library
let portName = "COM3"; // fill in your serial port name here
let xPos=0;
let yPos=240;
let onOff=0;
let val;

function setup() {
  createCanvas(640, 480);
  serial = new p5.SerialPort(); // make a new instance of the serialport library
  serial.on("list", printList); // set a callback function for the serialport list event
  serial.on("connected", serverConnected); // callback for connecting to the server
  serial.on("open", portOpen); // callback for the port opening
  serial.on("data", serialEvent); // callback for when new data arrives
  serial.on("error", serialError); // callback for errors
  serial.on("close", portClose); // callback for the port closing

  serial.list(); // list the serial ports
  serial.open(portName); // open a serial port
}

function draw() {
  background(255);
  val = map(mouseX, 0, width, 0, 255);
}

// get the list of ports:
function printList(portList) {
  // portList is an array of serial port names
  for (let i = 0; i < portList.length; i++) {
    // Display the list the console:
    print(i + " " + portList[i]);
  }
}

function serverConnected() {
  print("connected to server.");
}

function portOpen() {
  print("the serial port opened.");
}

function serialEvent() {
  // read a string from the serial port
  // until you get carriage return and newline:
  let inString = serial.readLine();
  serial.write(val);
}

function serialError(err) {
  print("Something went wrong with the serial port. " + err);
}

function portClose() {
  print("The serial port closed.");
}

/*
Arduino code
void setup() {
  Serial.begin(9600);
  pinMode(2, OUTPUT);
  pinMode(5, OUTPUT);
  while (Serial.available() <= 0) {
    Serial.println("0,0"); // send a starting message
    delay(300);              // wait 1/3 second
  }
}
void loop() {
  while (Serial.available() > 0) {
    // read the incoming byte:
    int inByte = Serial.read();
    analogWrite(5,inByte);
    Serial.println();
  }
}
*/


EX3

let serial; // variable to hold an instance of the serialport library
let portName = "COM7"; // fill in your serial port name here

let velocity;
let gravity;
let position;
let acceleration;
let wind;
let drag = 0.99;
let mass = 50;
let windVal;

function setup() {
  createCanvas(640, 360);
  noFill();
  position = createVector(width/2, 0);
  velocity = createVector(0,0);
  acceleration = createVector(0,0);
  gravity = createVector(0, 0.5*mass);
  wind = createVector(0,0);
  
  serial = new p5.SerialPort(); // make a new instance of the serialport library
  serial.on("list", printList); // set a callback function for the serialport list event
  serial.on("connected", serverConnected); // callback for connecting to the server
  serial.on("open", portOpen); // callback for the port opening
  serial.on("data", serialEvent); // callback for when new data arrives
  serial.on("error", serialError); // callback for errors
  serial.on("close", portClose); // callback for the port closing

  serial.list(); // list the serial ports
  serial.open(portName); // open a serial port
}

// get the list of ports:
function printList(portList) {
  // portList is an array of serial port names
  for (let i = 0; i < portList.length; i++) {
    // Display the list the console:
    print(i + " " + portList[i]);
  }
}

function serverConnected() {
  print("connected to server.");
}

function portOpen() {
  print("the serial port opened.");
}

function serialEvent() {
  // read a string from the serial port
  // until you get carriage return and newline:
  let inString = serial.readLine();
  print(inString);
  if (inString.length > 0){
    windVal = map(inString, 0, 1023, -3, 3);
  }
}

function serialError(err) {
  print("Something went wrong with the serial port. " + err);
}

function portClose() {
  print("The serial port closed.");
}

function draw() {
  background(255);
  
  wind.x = windVal;
  
  applyForce(wind);
  applyForce(gravity);
  velocity.add(acceleration);
  velocity.mult(drag);
  position.add(velocity);
  acceleration.mult(0);
  ellipse(position.x,position.y,mass,mass);
  
  if (position.y > height-mass/2 - 25){
    serial.write(255);
  }
  else serial.write(0);
  
  if (position.y > height-mass/2) {
      velocity.y *= -0.9;  // A little dampening when hitting the bottom
      position.y = height-mass/2;
    }
}

function applyForce(force){
  // Newton's 2nd law: F = M * A
  // or A = F / M
  let f = p5.Vector.div(force, mass);
  acceleration.add(f);
}

function keyPressed(){
  if (keyCode==LEFT_ARROW){
    wind.x=-1;
  } 
  if (keyCode==RIGHT_ARROW){
    wind.x=1;
  }
  if (key==' '){
    mass=random(15,80);
    position.x=width/2;
    position.y=-mass;
    velocity.mult(0);
  }
}

/*
Arduino code
void setup() {
  Serial.begin(9600);
  pinMode(2, OUTPUT);
  while (Serial.available() <= 0) {
    Serial.println("0"); // send a starting message
    delay(300);              // wait 1/3 second
  }
}
void loop() {
  while (Serial.available() > 0) {
    // read the incoming byte:
    int inByte = Serial.read();
    analogWrite(2, inByte);
    int WindPower = analogRead(A0);
    Serial.println(WindPower);
    
  }
}
*/


Serial Communication Exercises

Marium and I worked together in order to complete these tasks.

Exercise 1 – make something that uses only one sensor on Arduino and makes the ellipse in processing move on the horizontal axis, in the middle of the screen, and nothing on Arduino is controlled by processing

We made it so whenever the potientometer is rotated, the ball moves along the horizontal axis, in the middle of the screen.

Processing code:

let serial; // variable to hold an instance of the serialport library
let portName = "/dev/cu.usbmodem14501"; // fill in your serial port name here
let xPos=0;
let yPos=0;
let onOff=0;
function setup() {
  createCanvas(640, 480);
  serial = new p5.SerialPort(); // make a new instance of the serialport library
  serial.on("list", printList); // set a callback function for the serialport list event
  serial.on("connected", serverConnected); // callback for connecting to the server
  serial.on("open", portOpen); // callback for the port opening
  serial.on("data", serialEvent); // callback for when new data arrives
  serial.on("error", serialError); // callback for errors
  serial.on("close", portClose); // callback for the port closing
  serial.list(); // list the serial ports
  serial.open(portName); // open a serial port
}
function draw() {
  background(255);
  ellipse(xPos, yPos, 50, 50); // draw the circle
}
// get the list of ports:
function printList(portList) {
  // portList is an array of serial port names
  for (let i = 0; i < portList.length; i++) {
    // Display the list the console:
    print(i + " " + portList[i]);
  }
}
function serverConnected() {
  print("connected to server.");
}
function portOpen() {
  print("the serial port opened.");
}
function serialEvent() {
  // read a string from the serial port
  // until you get carriage return and newline:
  let inString = serial.readLine();
 
  //check to see that there's actually a string there:
  if (inString.length > 0) {
    let sensors = split(inString, ","); // split the string on the commas
    if (sensors.length== 2) {
      // if there are three elements
      
      xPos = map(sensors[1], 0, 1023, 0, width); // element 0 is the locH
      yPos = height/2; 
      // yPos = map(sensors[1], 550, 250, 0, height); // element 1 is the locV
    }
  }
  serial.write(onOff);
}
function serialError(err) {
  print("Something went wrong with the serial port. " + err);
}
function portClose() {
  print("The serial port closed.");
}

Arduino code:

void setup() {
Serial.begin(9600);
while (Serial.available() <= 0) {
Serial.println("0"); // send a starting message
delay(300); // 
}
}
void loop() {
while (Serial.available() > 0) {
// read the incoming byte:
int inByte = Serial.read();
int sensorValue = analogRead(A0);
Serial.println(sensorValue);
}
}

Exercise 2 – make something that controls the LED brightness from processing

We made it so when the mouse hovers on the left side of the canvas, the LED is dim and then the far right of the canvas is the brightest. It works in a gradient, so the point in the middle of the canvas is semi-bright.

Processing code:

let serial; // variable to hold an instance of the serialport library
let portName = "/dev/cu.usbmodem14501"; // fill in your serial port name here
let xPos = 0;
let yPos = 0;
let onOff = 0;
let brightness = 0; 
function setup() {
  createCanvas(640, 480);
  serial = new p5.SerialPort(); // make a new instance of the serialport library
  serial.on("list", printList); // set a callback function for the serialport list event
  serial.on("connected", serverConnected); // callback for connecting to the server
  serial.on("open", portOpen); // callback for the port opening
  serial.on("data", serialEvent); // callback for when new data arrives
  serial.on("error", serialError); // callback for errors
  serial.on("close", portClose); // callback for the port closing
  serial.list(); // list the serial ports
  serial.open(portName); // open a serial port
}
function draw() {
  background(255);
}
  
// get the list of ports:
function printList(portList) {
  // portList is an array of serial port names
  for (let i = 0; i < portList.length; i++) {
    // Display the list the console:
    print(i + " " + portList[i]);
  }
}
function serverConnected() {
  print("connected to server.");
}
function portOpen() {
  print("the serial port opened.");
}
function serialEvent() {
  // read a string from the serial port
  // until you get carriage return and newline:
  let inString = serial.readLine();
  
  brightness = mouseX;
  let mapped = map (brightness, 0, 640, 0, 255);
  serial.write(mapped);
}
function serialError(err) {
  print("Something went wrong with the serial port. " + err);
}
function portClose() {
  print("The serial port closed.");
}

Arduino code:

int ledPin = 5;
void setup () {
  Serial.begin(9600);
  pinMode(5, OUTPUT);
  while (Serial.available() <= 0) {
    Serial.println("0,0"); // send a starting message
    delay(300);              // wait 1/3 second
  }
}
void loop() {
  while (Serial.available() > 0) {
    // read the incoming byte:
   int inByte = Serial.read();
    analogWrite(ledPin, inByte);
    Serial.println("0");
  }
}

Exercise 3 – take the gravity wind example below and make it so every time the ball bounces one led lights up and then turns off, and you can control the wind from one analog sensor

We found this exercise the most difficult. We took it step by step by first ensuring we have all the important elements for serial communication, including changes in the index.html. Then we worked on getting the LED to light up when the ball bounces and then turn off. Then we worked on the wind part and controlling with the potentiometer.

Processing code:

let serial; 
let portName = "/dev/cu.usbmodem14401"; 
let velocity;
let gravity;
let position;
let acceleration;
let wind;
let drag = 0.99;
let mass = 50;
let bounce;
let xPos=0;
let yPos=0;
let onOff=0;
// for port connection and handshake 
function setup() {
  createCanvas(640, 360);
  serial = new p5.SerialPort(); // make a new instance of the serialport library
  serial.on("list", printList); // set a callback function for the serialport list event
  serial.on("connected", serverConnected); // callback for connecting to the server
  serial.on("open", portOpen); // callback for the port opening
  serial.on("data", serialEvent); // callback for when new data arrives
  serial.on("error", serialError); // callback for errors
  serial.on("close", portClose); // callback for the port closing
  serial.list(); // list the serial ports
  serial.open(portName); // open a serial port
  
  // get the list of ports:
function printList(portList) {
  // portList is an array of serial port names
  for (let i = 0; i < portList.length; i++) {
    // Display the list the console:
    print(i + " " + portList[i]);
  }
}
function serverConnected() {
  print("connected to server.");
}
function portOpen() {
  print("the serial port opened.");
}
function serialEvent() {
  // read a string from the serial port
  // until you get carriage return and newline:
  let inString = serial.readLine();
  //xPos = map(inString, 0, 1023, 0, width);
 
  //check to see that there's actually a string there:
  if (inString.length > 0) {
    xPos = map(inString, 0, 1023, 0, width);
  }
  serial.write(onOff);
}
function serialError(err) {
  print("Something went wrong with the serial port. " + err);
}
function portClose() {
  print("The serial port closed.");
}
  
  // code for the actual bouncing, wind, etc. 
  
  noFill();
  position = createVector(width/2, 0);
  velocity = createVector(0,0);
  acceleration = createVector(0,0);
  gravity = createVector(0, 0.5*mass);
  wind = createVector(0,0);
  bounce=map (mass,15,80,.80,.80);
}
function draw() {
  background(255);
  if (!keyPressed){
    
    console.log(xPos);
    velocity.x*=bounce;
  }
  
  wind.x = map(xPos, 0, width, -1, 1);
  
  applyForce(wind);
  applyForce(gravity);
  velocity.add(acceleration);
  velocity.mult(drag);
  position.add(velocity);
  acceleration.mult(0);
  fill(255);
  ellipse(position.x,position.y,mass,mass);
  
  
  if (position.y > height-mass/2 - 40) {
    if (velocity.y > 1) {
      serial.write(255);
    }
    
    if (position.y > height-mass/2) {
      velocity.y *= -0.9;  // A little dampening when hitting the bottom
      position.y = height-mass/2;
    }
  }
}
function applyForce(force){
  // Newton's 2nd law: F = M * A
  // or A = F / M
  let f = p5.Vector.div(force, mass);
  acceleration.add(f);
}
function keyPressed(){
  if (keyCode==LEFT_ARROW){
    wind.x=-1;
  }
  if (keyCode==RIGHT_ARROW){
    wind.x=1;
  }
  if (key==' '){
    mass=random(15,80);
    position.y=-mass;
    velocity.mult(0);
  }
}

Arduino Code:

void setup() {
  Serial.begin(9600);
  pinMode(5, OUTPUT);
  while (Serial.available() <= 0) {
    Serial.println("0,0"); // send a starting message
    delay(300);              // wait 1/3 second
  }
}
void loop() {
  while (Serial.available() > 0) {
    // read the incoming byte:
   int inByte = Serial.read();
   analogWrite(5, inByte);
    int sensorValue = analogRead(A0);
    Serial.print(sensorValue);
    Serial.println();
  }
}

Video 

https://youtube.com/shorts/fyPlnoR_qQQ