I want to create some sort of contraption fitting for the era of Zoom classes. When the user places their head on a pillow, an Arduino sensor will detect if a certain distance is crossed. At that point, there will be some sort of timer activated on Processing that will allow the user to nap for three minutes and sound an alarm. It would be pretty cool to also use a speech to text library from Processing to also record the transcript of the Zoom class so the user can make sure they didn’t miss anything when they wake up. I’m not sure how technologically feasible this is as it would depend on the accuracy of the speech processing library but it would be nice to have some sort of giant alarm that sounds if the user’s name is said in class.
2. Some sort of drawing game. What you draw on Processing is connected to a grid of LEDs/neopixels that correspond to what you draw.
3. Some sort of data visualization web piece using P5.js and Arduino. The user can filter the visualization on P5.js and see the effects on the analog piece (led output).
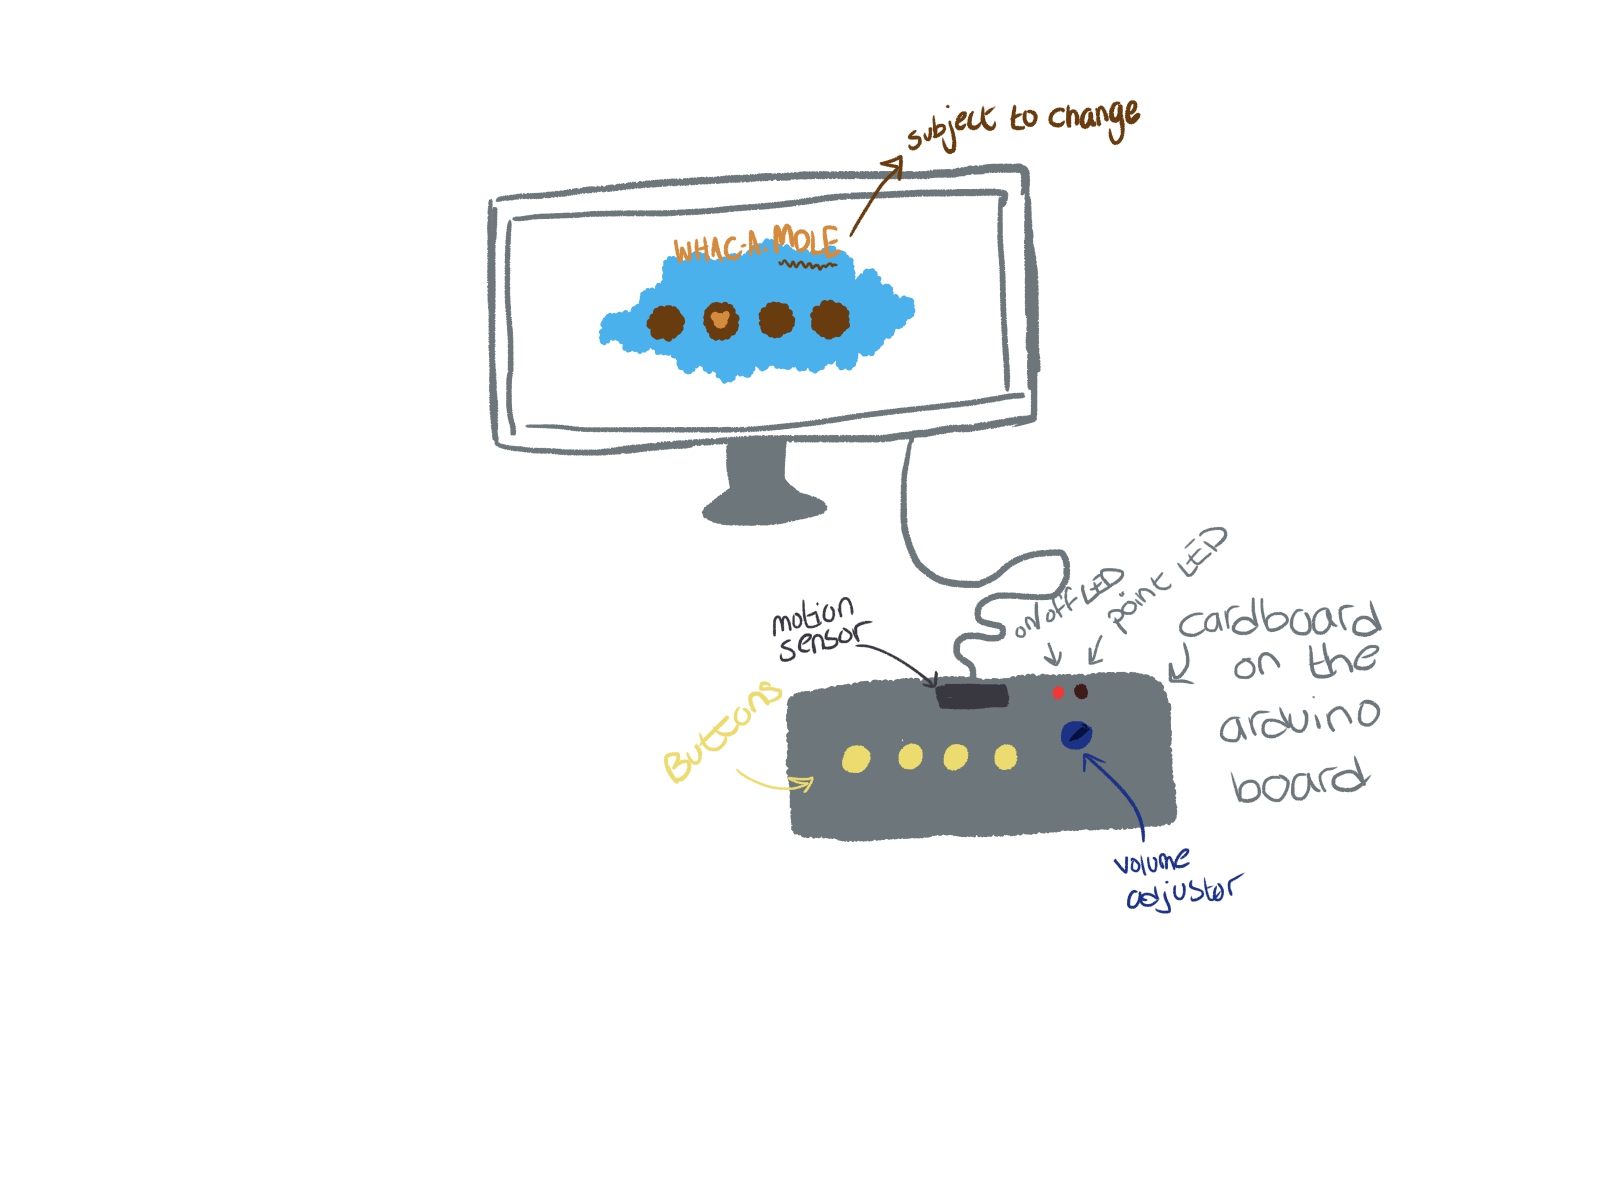
My idea for the time being is making a WHAC-A-MOLE game with a twist of my own using ardiuno and processing together where you use a controller to play the game.
The controller will require the following tools:
4 buttons > for the main menu + hitting/whacking the moles
motor sensor > so that when it does not detect a movement in a duration of time the game would close
LED > to indicate if the game is on or off + another LED that lights if you got the point
potentiometer > to adjust the volume of the game
The game would be a normal WHAC-A-MOLE, but I will draw the setup of the game on my own. I will probably look into more ways I could take this game to another level.
Recreate a piano game using both processing and Arduino. I would like to create a piano interface that would be visually available on the screen of the computer through processing. The input from the user would be through the Arduino where pushing differing buttons will play different notes and the potentiometer will allow accessing different parts of the piano. The visual part of the piano would also change according to the position of the potentiometer.
Specific Features:
I would like to implement two main modes for the game.
The first mode would be a free piano play. Basically, this game mode will allow the user to explore through the piano. Record what is played and edit a final composition.
The second mode would be more like a game where the user will have to play the notes according to what the screen displays. Basically, the game will consist on notes(balls) falling on specific notes to which the user must push a specific button to resemble he/she playing that specific note. The game will also include lives which will be recorded by led lights on the Arduino. The user will lose a life if he/she pushes the incorrect button or fails to push it on time.
This idea was inspired from a game called Smule on the iPad/iPhone
For the final project, what I’m thinking of is to create some sort of interactive design, so that a person has control over what’s written and displayed on the artwork. Essentially, creating a project, where I would incorporate Web Camera, Arduino, and Processing.
I want to make the project to be the reflection of a person standing behind the webcam so that the content of the artwork is you. So to say, the project will reflect the shape of a person in different geometrical figures and will follow your direction, positions that you change from time to time, and so on. I feel that it would be great to make some sort of distorted mirror of the user’s reflection, which will make the project both entertaining and captivating.
I have attached the video below for the reference.
For the final project, I want to create a game that will help improve a player’s mental health. In this game, a player should destroy objects to maintain the stress level of the character and simultaneously by releasing their stress by hitting 3D buttons. Moreover, this game requires concentration which is proved to be helpful in combating mental health problems.
[UPDATE]
The finalized concept for the project
I modified the idea I had a few days ago, but the goal stayed the same – create a project that will help to cope with stress. Stress is one of the most common problems people face in their daily lives, and as a student before final exams, I realize it especially strongly.
This time it won’t be a game but a way to create a work of art while releasing the stress. The algorithm of creating an art piece will be following:
Choose the word that causes your stress. It could be just “stress,” “assignment,” “Calculus” or I would’ve written “C++” last semester. Write it, and it will appear on the screen.
Now the most fascinating part begins: you will hit this word! Obviously, not the word itself, but the latex stretched over the frame. Behind it, there will be a distance sensor to understand where you hit this time and display your actions on the screen.
Each hit will be seen as a spot in a certain color and a certain place. It will be possible to change the color of the spots by pressing the buttons on the Arduino, as well as the intensity of the applied color with a potentiometer.
Also, there will be few songs to choose from to hit the word that causes your stress with even more satisfaction.
I am thinking of doing these colored spots using generative art to make each piece even more unique.
The process of hitting will probably help to reduce the stress, and the result like the unique artwork will help to elevate the mood.
Arduino
The Arduino program will receive inputs from buttons, potentiometer, and ultrasonic distance sensor, and will send them to Processing. Distance sensor will determine the distance to the hand hit through the latex.
Processing
The Processing program will receive data from Arduino, and use it in the art piece creation, by adding colored spots of different intensity on the chosen word. Pressed buttons’ colors will determine the colors used in Processing, potentiometer readings will change the intensity of the color. The distance values will affect the location of spots appearing on the screen.
Exercise 1: make something that uses only one sensoron arduino and makes the ellipse in processing move on the horizontal axis, in the middle of the screen, and nothing on arduino is controlled by processing;
Arduino:
const int knobLed = A0; //sign up variable

void setup() {
  Serial.begin(9600); //set the baud rate
  Serial.println("0"); //start of the handshake, start the call-response pattern
  pinMode(A0, INPUT);
}

void loop() {
  while (Serial.available()) { //whenever there is anything available in serial buffer, do
    if (Serial.read() == '\n') { //whenever there is new line, it means that all info came correctly
      int sensor = analogRead(knobLed); //read from potentiometer
      delay(1);
      Serial.println(sensor); //send info to the processing
    }
  }
}
Processing:
import processing.serial.*; //import library
Serial myPort; //create serial object
int xPos=0;
int yPos;

void setup() {
  size(960, 720);
  yPos=height/2;
  printArray(Serial.list()); //printing array
  String portname=Serial.list()[1]; //choose the correct port number!
  println(portname);
  myPort = new Serial(this, portname, 9600); //set the baud rate
  myPort.clear(); //clear the buffer
  myPort.bufferUntil('\n'); //wait until new line
}

void draw() {
  background(255);
  ellipse(xPos, yPos, 30, 30);
}

void serialEvent(Serial myPort) { //whenever receives incoming serial message, this function is called
  String s=myPort.readStringUntil('\n'); //read the string until new line character
  s=trim(s); //safeguard to trim extra characters (whitespaces)
  if (s!=null) { //check to make sure it's not null
    println(s);
    int value = int(s);  //sending value s
    xPos=(int)map(value, 0, 1023, 0, width);
  }
  myPort.write("\n"); //other side of the handshake, send back over to arduino
}
Exercise 2: make something that controls the LED brightness from processing;
Arduino:
float brightness;

void setup() {
  Serial.begin(9600); //set the baud rate
  Serial.println("0"); //start the handshake
  pinMode(5, OUTPUT);
}

void loop() {
  while (Serial.available()) {
    brightness = Serial.parseFloat(); //receive brightness info in a string from processing
    if (Serial.read() == '\n') { //whenever there is new line, it means that all info came correctly
       analogWrite(5, brightness); //change the brightness of LED accordingly
       Serial.print("\n"); //send  new line to processing
    }
  }
}
Processing:
import processing.serial.*;
Serial myPort; //create serial object
float brightness; //variable to send to arduino

void setup(){
  size(960,720);
  printArray(Serial.list());
  String portname=Serial.list()[1]; //choose the correct port number!
  println(portname);
  myPort = new Serial(this,portname,9600); //set the baud rate
  myPort.clear(); //clear the buffer
  myPort.bufferUntil('\n'); //wait until new line
}

void draw(){
  background(255);
  ellipse(mouseX,mouseY,30,30);
  brightness = map(height-mouseY, 0, height, 0, 255);
}

void serialEvent(Serial myPort){ //whenever receives incoming serial message, this function is called
  println(brightness);
  myPort.write(int(brightness)+"\n"); //other side of the handshake, send back over to arduino
}
Exercise 3: take the gravity wind example and make it so every time the ball bounces one led lights up and then turns off, and you can control the wind from one analog sensor;
Arduino:
const int knobLed = A0;
const int led1 = 3;
int onOff = 0;

void setup() {
  Serial.begin(9600); //set the baud rate
  Serial.println("0"); //start the handshake
}

void loop() {
  while (Serial.available()) {
    onOff = Serial.parseInt(); //receive onOff info from processing
    if (Serial.read() == '\n') { //whenever there is new line, it means that all info came correctly
      int sensor = analogRead(knobLed); //read from potentiometer
      delay(1);
      Serial.println(sensor); //send info to processing
            if (onOff == 1) {
              analogWrite(led1, 255);//turn on LED
            } else {
              analogWrite(led1, 0); //turn off LED
            }
    }
  }
}
Processing:
PVector velocity;
PVector gravity;
PVector position;
PVector acceleration;
PVector wind;
float drag = 0.99;
float mass = 50;
float hDampening;

import processing.serial.*;
Serial myPort; //create serial object
int knob;

void setup() {
  size(640,360);
  noFill();
  position = new PVector(0, 0);
  velocity = new PVector(0,0);
  acceleration = new PVector(0,0);
  gravity = new PVector(0, 0.5*mass);
  wind = new PVector(0,0);
  hDampening=map(mass,15,80,.98,.96);

  String portname=Serial.list()[1]; //choose the correct port number!
  myPort = new Serial(this,portname,9600); //set the baud rate
  myPort.clear(); //clear the buffer
  myPort.bufferUntil('\n'); //wait until new line
}

void draw() {
  background(255);
  if (!keyPressed){
    wind.x=knob;
    velocity.x*=hDampening;
  }
  applyForce(wind);
  applyForce(gravity);
  velocity.add(acceleration);
  velocity.mult(drag);
  position.add(velocity);
  acceleration.mult(0);
  ellipse(position.x,position.y,mass,mass);
  if (position.y > height-mass/2) {
      velocity.y *= -0.9;  // A little dampening when hitting the bottom
      position.y = height-mass/2;
    }
}

void applyForce(PVector force){
  // Newton's 2nd law: F = M * A
  // or A = F / M
  PVector f = PVector.div(force, mass);
  acceleration.add(f);
}

void keyPressed(){
  if (keyCode==LEFT){
    wind.x=-1;
  }
  if (keyCode==RIGHT){
    wind.x=1;
  }
  if (key==' '){
    mass=random(15,80);
    position.y=-mass;
    velocity.mult(0);
  }
}

void serialEvent(Serial myPort){ //whenever receives incoming serial message, this function is called
  String s=myPort.readStringUntil('\n');  //read the string until new line character
  s=trim(s);  //safeguard to trim extra characters (whitespaces)
  if (s!=null){ //check to make sure it's not null
    println(s);
    int values[]=int(split(s,',')); //sending value s
    knob=(int)map(values[0],0,1023,0, width*.01);
  }
  if (round(velocity.y) < 0) {
    myPort.write(1 + "\n");
  } else {
    myPort.write(0 + "\n");
  }
}
Make something that uses only one sensor on arduino and makes the ellipse in processing move on the horizontal axis, in the middle of the screen, and nothing on arduino is controlled by processing
For this exercise we used the potentiometer to control the movement of the ellipse
Arduino
//Exercise 1

const int pinPont = A0;

void setup() {
  Serial.begin(9600);
  Serial.println("0");
}

void loop() {
  while (Serial.available()) {
    if (Serial.read() == '\n') {

      //read the values of the potentiometer
      int sensor = analogRead(pinPont);
      delay(1);
      //print the value
      Serial.println(sensor);
    }
  }
}
Processing
//Exercise 1
import processing.serial.*;
Serial myPort;
int xPos = 0;
int yPos;

void setup() {
  size(960, 720);
  printArray(Serial.list());
  String portname=Serial.list()[3]; // "/dev/cu.usbmodem101"
  println(portname);
  myPort = new Serial(this, portname, 9600);
  myPort.clear();
  myPort.bufferUntil('\n');
}

void draw() {
  background(255);
  yPos = height/2;
  ellipse(xPos, yPos, 30, 30);

}

void serialEvent(Serial myPort) {
  String s=myPort.readStringUntil('\n');
  s=trim(s);
  if (s!=null) {
    //read value from Arduino (potentiometer)

    println(s);
    int value = int(s);

    //map the value to a position in range of the width
    xPos=(int)map(value, 0, 1023, 0, width);
  }
  myPort.write("\n");
}
Exercise 2
Make something that controls the LED brightness from processing.
For this exercise, we used the x value of the position of the mouse to control the brightness of the LED.
Arduino
//Exercise 2

int ledPin = 5;

float brightness;

void setup() {
  Serial.begin(9600);
  Serial.println("0");
  pinMode(ledPin, OUTPUT);
}

void loop() {
  while (Serial.available()) {
    //get the brightness value from processing
    brightness = Serial.parseFloat();

    if (Serial.read() == '\n') {
    //turn on the LED with the given brightness
      analogWrite(ledPin, brightness);
      Serial.println(brightness);
    }
  }
}
Processing
//Exercise 2
import processing.serial.*;
Serial myPort;
int xPos = 0;
int yPos;

int brightness;

void setup() {
  size(960, 720);
  printArray(Serial.list());
  String portname=Serial.list()[3]; // "/dev/cu.usbmodem101"
  println(portname);
  myPort = new Serial(this, portname, 9600);
  myPort.clear();
  myPort.bufferUntil('\n');
}

void draw() {
  background(255);

  //map the mouseX position to the range of birghtness of the LED
  brightness = int(map(mouseX, 0, width, 0, 255));

  yPos = height/2;
  ellipse(mouseX, yPos, 30, 30);
}

void serialEvent(Serial myPort) {
  String s=myPort.readStringUntil('\n');
  s=trim(s);

  //write brightness so that Arduino can use it
  myPort.write(brightness+ "\n");
}
Exercise 1
Make something that uses only one sensor on arduino and makes the ellipse in processing move on the horizontal axis, in the middle of the screen, and nothing on arduino is controlled by processing
For this exercise we used the potentiometer to control the movement of the ellipse
//map the value to a position in range of the width
xPos=(int)map(value,0,1023,0,width);
}
myPort.write(“\n”);
}
Exercise 2
Make something that controls the LED brightness from processing.
For this exercise we used the x value of the position of the mouse to control the brightness of the LED.
Arduino
//Exercise 2

int ledPin = 5;

float brightness;

void setup() {
  Serial.begin(9600);
  Serial.println("0");
  pinMode(ledPin, OUTPUT);
}

void loop() {
  while (Serial.available()) {
    //get the brightness value from processing
    brightness = Serial.parseFloat();

    if (Serial.read() == '\n') {
    //turn on the LED with the given brightness
      analogWrite(ledPin, brightness);
      Serial.println(brightness);
    }
  }
}
Processing
//Exercise 2
import processing.serial.*;
Serial myPort;
int xPos = 0;
int yPos;

int brightness;

void setup() {
  size(960, 720);
  printArray(Serial.list());
  String portname=Serial.list()[3]; // "/dev/cu.usbmodem101"
  println(portname);
  myPort = new Serial(this, portname, 9600);
  myPort.clear();
  myPort.bufferUntil('\n');
}

void draw() {
  background(255);

  //map the mouseX position to the range of birghtness of the LED
  brightness = int(map(mouseX, 0, width, 0, 255));

  yPos = height/2;
  ellipse(mouseX, yPos, 30, 30);
}

void serialEvent(Serial myPort) {
  String s=myPort.readStringUntil('\n');
  s=trim(s);

  //write brightness so that Arduino can use it
  myPort.write(brightness+ "\n");
}
int left = 0;
int right = 0;

int light1 = 0;
int LED1 = LOW;

void setup() {
  Serial.begin(9600);
  Serial.println("0,0");
  pinMode(2, OUTPUT);
  pinMode(5, OUTPUT);
}

void loop() {
  while (Serial.available()) {
    //    right = Serial.parseInt();

    //get whether LED should be turned on from Processing
    light1 = Serial.parseInt();

    Serial.println(light1);

    if (Serial.read() == '\n')
    {

      if (light1 == 1)
      {
        LED1 = HIGH;
      }
      else
      {
        LED1 = LOW;

      }
      digitalWrite(5, LED1);

      //get the vvalues from the potentiometer
      int sensor = analogRead(A0);
      delay(1);

      //      delay(1);
      Serial.println(sensor);

      //      Serial.print(',');
      //      Serial.println(sensor2);

      //Serial.println(LED1);
    }
  }
}
Processing
import processing.serial.*;
Serial myPort;

PVector velocity;
PVector gravity;
PVector position;
PVector acceleration;
PVector wind;
float drag = 0.99;
float mass = 50;
float hDampening;
boolean light;

int valueCapacitor;

void setup() {
  size(640,360);
  noFill();
  position = new PVector(width/2, 0);
  velocity = new PVector(0,0);
  acceleration = new PVector(0,0);
  gravity = new PVector(0, 0.5*mass);
  wind = new PVector(0,0);
  hDampening=map(mass,15,80,.98,.96);
  printArray(Serial.list());
  String portname=Serial.list()[3];
  println(portname);
  myPort = new Serial(this,portname,9600);
  myPort.clear();
  myPort.bufferUntil('\n');
}

void draw() {
  background(255);


  if (!keyPressed){
    wind.x= valueCapacitor;
    velocity.x*=hDampening;
  }


  applyForce(wind);
  applyForce(gravity);
  velocity.add(acceleration);
  velocity.mult(drag);
  position.add(velocity);
  acceleration.mult(0);
  ellipse(position.x,position.y,mass,mass);
  if (position.y > height-mass/2) {
      velocity.y *= -0.9;  // A little dampening when hitting the bottom
      position.y = height-mass/2;
    }

   if (position.y == height - mass/2){
     light = true;
   }
}

void applyForce(PVector force){
  // Newton's 2nd law: F = M * A
  // or A = F / M
  PVector f = PVector.div(force, mass);
  acceleration.add(f);
}

void keyPressed(){
  if (keyCode==LEFT){
    wind.x=-1;
  }
  if (keyCode==RIGHT){
    wind.x=1;
  }
  if (key==' '){
    mass=random(15,80);
    position.y=-mass;
    velocity.mult(0);
  }

}

void serialEvent(Serial myPort) {
  String s=myPort.readStringUntil('\n');
  s=trim(s);

  if (s!=null) {
    int value = int(s);
    valueCapacitor = (int)map(value, 0, 1023, 0, width*.01);
  }

  // we need to use velocity,y so that the light turns off when it is not moving
  // if we use position, the blinking is delayed
  if (round(velocity.y) < 0) {
    myPort.write(1 + "\n");
    println(1);
  } else {
    myPort.write(0 + "\n");
    println(0);
  }
}
I worked with Armaan for the 3 exercises involving serial communication.
Exercise 1: Make something that uses only one sensor on Arduino and makes the ellipse in processing move on the horizontal axis, in the middle of the screen, and nothing on Arduino is controlled by processing.
For this exercise, we made the ellipse move in the middle of the screen using a potentiometer. I did this exercise in class with Shreya and it hardly took any time then, but it took some time to revise the concepts and get things right when I worked with Armaan on the weekend.
Arduino Code:
void setup() {
  Serial.begin(9600);
  Serial.println("0");
}

void loop() {
  while (Serial.available()) {
    if (Serial.read() == '\n') {
      int sensor = analogRead(A0);
      delay(1);
      Serial.println(sensor);
    }
  }
}
Processing Code:
import processing.serial.*;
Serial myPort;
int xPos=0;
int yPos=0;

void setup(){
  size(960,720);
  printArray(Serial.list());
  String portname=Serial.list()[1];
  println(portname);
  myPort = new Serial(this,portname,9600);
  myPort.clear();
  myPort.bufferUntil('\n');
}

void draw(){
  background(255);
  ellipse(xPos,height/2,30,30);
}

void serialEvent(Serial myPort){
  String s=myPort.readStringUntil('\n');
  s=trim(s);
  if (s!=null){
    println(s);
    int value=int(s);
    if (value >= 0){
      // changing the x position of the ellipse using the potentiometer
      xPos=(int)map(value,0,1023,0, width);
    }
  }
  myPort.write("\n");
}
Exercise 2: Make something that controls the LED brightness from Processing
For this exercise, we made use of the x coordinate of the mouse to control the brightness of the LED. This was fairly easy after completing the first exercise.
Arduino Code:
int brightness = 0;

void setup() {
  Serial.begin(9600);
  Serial.println("0");
  pinMode(3, OUTPUT);
}

void loop() {
  while (Serial.available()) {
    brightness = Serial.parseInt();
    if (Serial.read() == '\n') {
      analogWrite(3, brightness);
      int sensor = analogRead(A0);
      delay(1);
      Serial.println(sensor);
    }
  }
}
Processing code:
import processing.serial.*;
Serial myPort;
int xPos=0;
int yPos=0;
int brightness = 0;

void setup(){
  size(960,720);
  printArray(Serial.list());
  String portname=Serial.list()[1];
  println(portname);
  myPort = new Serial(this,portname,9600);
  myPort.clear();
  myPort.bufferUntil('\n');
}

void draw(){
  background(255);
  ellipse(xPos,height/2,30,30);
  // controlling a variable called brightness using the mouse value
  brightness = int(map(mouseX, 0, width, 0, 255));
}

void serialEvent(Serial myPort){
  String s=myPort.readStringUntil('\n');
  s=trim(s);
  if (s!=null){
    println(s);
  }
  myPort.write(brightness + "\n");
}
I think this was the hardest exercise, because it was difficult to exactly determine the conditions when the LED had to be switched off. But then, we managed to handle this problem by using the y-position and y-velocity of the ball. Also, controlling the wind using the potentiometer was tricky. Eventually, we ended up the current value generated by the potentiometer and the previous value generated by the potentiometer and then sending them both to Processing. Processing would then compare the two values and decide if the ball had to move with the wind, and in case it did, decide the direction in which the wind was blowing (and the ball moving).
Arduino Code:
int brightness = 0;
int previousValue = 0;
int onOff = 0;

void setup() {
  Serial.begin(9600);
  Serial.println("0");
  pinMode(3, OUTPUT);
}

void loop() {
  while (Serial.available()) {
    onOff = Serial.parseInt();
    if (Serial.read() == '\n') {
      int sensor = analogRead(A0);
      delay(1);

      // sending the current and previous values to processing
      Serial.print(sensor);
      Serial.print(",");
      Serial.println(previousValue);

      // setting the previous value equal to current value
      previousValue = sensor;

      // turning the LED on or off based on signals from processing
      if (onOff == 1){
        analogWrite(3, 255);
      }
      else{
        analogWrite(3, 0);
      }
    }
  }
}
Processing Code:
PVector velocity;
PVector gravity;
PVector position;
PVector acceleration;
PVector wind;
float drag = 0.99;
float mass = 50;
float hDampening;

import processing.serial.*;
Serial myPort;
int wind_speed;

int xPos=0;
int yPos=0;
boolean onOff=false;

void setup() {
  size(640,360);
  printArray(Serial.list());
  String portname=Serial.list()[1];
  println(portname);
  myPort = new Serial(this,portname,9600);
  myPort.clear();
  myPort.bufferUntil('\n');

  noFill();
  position = new PVector(width/2, 0);
  velocity = new PVector(0,0);
  acceleration = new PVector(0,0);
  gravity = new PVector(0, 0.5*mass);
  wind = new PVector(0,0);
  hDampening=map(mass,15,80,.98,.96);
}

void draw() {
  background(255);
  if (!keyPressed){
    wind.x=wind_speed;
    velocity.x*=hDampening;
  }
  applyForce(wind);
  applyForce(gravity);
  velocity.add(acceleration);
  velocity.mult(drag);
  position.add(velocity);
  acceleration.mult(0);
  ellipse(position.x,position.y,mass,mass);
  if (position.y > height-mass/2) {
      velocity.y *= -0.9;  // A little dampening when hitting the bottom
      position.y = height-mass/2;
    }
}

void applyForce(PVector force){
  // Newton's 2nd law: F = M * A
  // or A = F / M
  PVector f = PVector.div(force, mass);
  acceleration.add(f);
}

void keyPressed(){
  if (keyCode==LEFT){
    wind.x=-1;
  }
  if (keyCode==RIGHT){
    wind.x=1;
  }
  if (key==' '){
    mass=random(25,80);
    position.y=-mass;
    velocity.mult(0);
  }
}

void serialEvent(Serial myPort){
  String s=myPort.readStringUntil('\n');
  s=trim(s);
  if (s!=null){
    println(s);
    int values[] = int(split(s,','));

    if (values.length == 2){
      // moving wind towards the right if the current value is greater than the previous value
      if (values[0] > values[1]){
        wind_speed = 20;
      }
      // moving wind towards the left if the current value is lesser than the previous value
      else if (values[0] < values[1]){
        wind_speed = -20;
      }
      // setting wind speed to 0 if both values are equal
      else if (values[1] == values[1]){
        wind_speed = 0;
      }
    }
  }

  if (round(position.y + mass) >= height && round(velocity.y) != 0){
    // sending a value of 1 if the ball touches the ground and is supposed to go back
    myPort.write(1 + "\n");
  }
  else{
    // sending a value of 0 if the ball doesn't touch the ground or touches and then stays on the ground (rest position)
    myPort.write(0 + "\n");
  }
}
For our final project, we came up with around 5 ideas of how we could incorporate Arduino and Processing to make something cool and interesting! We still haven’t zeroed down on what to choose because we feel that we need to discuss it first with Professor Aaron to see which one is the perfect balance of feasibility and creativity but the following list is ordered according to which one we are looking forward to from our most to our not so much.
A First Person Racing Game
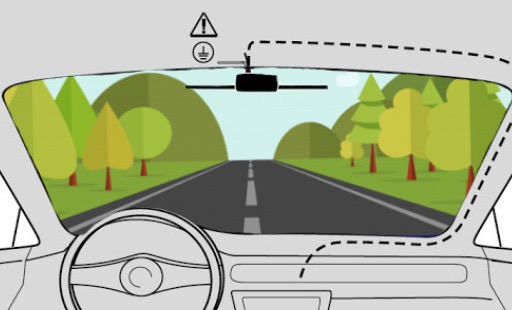
This is the one project that we are most excited about. For this project, we intend to use Arduino and Processing to create the experience of racing a F1 car for the user. We intend to use the Arduino as an input and output piece in which we could use the buttons, distance sensors, potentiometers to drive the car around and also use the DC motor and wheels to construct a car-like object on the screen which would replicate the car that will be made on our processing interface. We plan on using the processing as a platform to welcome the users into the game and display the screen in such a way that they are inside a car and are driving it (see picture below). The upcoming scenery seen through the window screen in the car can keep changing to create the illusion of a race.
A prospective interface for the game
We were also thinking of converting this into a spaceship game in which the player rides a spaceship and avoids meteorites and is again, a first person experience!
A Horror Game
In our horror game, we thought of using the photo-resistor in Arduino to work in tangent with a flashlight that we imagined our character would be using to explore our horror landscape in processing. We also thought of using the LED lights to signal if there are ghosts nearby (red lights to indicate this) or batteries for the flash light (green lights for this). This idea was inspired from Five Nights at Freddy’s basically.
A Pin Ball based game
Basically, a game that works the classic pin ball game we all know and love except that the buttons are on arduino and the interface is in processing. We could then use the potentiometer to control the switches on either side to hit the ball.
An “Episode” based RPG interactive movie/game
This one is more like a movie than a game in which we first plan on making separate room-like compartments using cardboard and then using Arduino and Processing to tell a story. This story would involve interactivity in which lets say the user presses a button to lit up a room and then that signals processing to inform the user of this other room that he can check out and we can craft a story using this.
Minigame Collection
This is basically a collection of minigames in which we plan on including games like Smack the Mole and a memory game in which you have to remember the sequence of LED lights and a bunch of other minigames.