Week 11- Reflection

“All design is subject to constrain. Constrains arise both from what the design is required to do (including yser needs or desires) and how this might be achieved (usually technical feasibility or business viability).

-Pullin

With the reading of this week’s Design Meets Disability  it is has been clear and clearly put how design is job that should be taken quite seriously in terms of serving others. He argues that designing for disability can invigorate design practices and inject different ways of thinking into the design community. Designing for disability encourages designers to consider a diverse range of perspectives and experiences. This can lead to innovative solutions that benefit not only individuals with disabilities but society as a whole. It challenges designers to think beyond traditional norms and consider a wider spectrum of user needs. This comes with the consideration of taking our time to think of others in order come up with something everyone can be satesfied with without disregarding anyone.

I do agree with the writer in this part, people who might think of themselves as different have the right the allow themselves to be included. A kids show called Bluey is an example of trying to include everyoneNot only being  a show for kids to enjoy, but also something for mothers AND dogs to watch. Many episodes are directed towards the appreciation of a mother’s hardwork by comforting her and telling her that her love is seen and she too deserves it. As for dogs, the show is desinged using specific colours that fits the vision of how the dogs view the world. Since dogs don’t see the colours we humans do, it was still applied for them to view and enjoy the colours too.

Week 11: Elora and Saiki Assignment

Assignment 1: Move Ball With Potentiometer

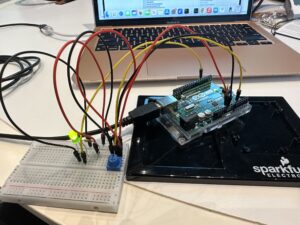
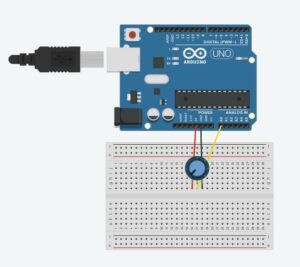
I attached a picture of our setup below:

I took the P5JS sketch we used in class and made a few changes, seen here. First, we created the ellipse. When writing the parameters, we made the x value alpha, because the sketch already set alpha as the value that is reading the Arduino board. In order to read Alpha, we had to make sure we mapped the potentiometer range to the range of the P5JS screen. So when you turn the potentiometer, the x value changes, making the ellipse move backwards and forwards. See the important code snippet below:

ellipse(map(alpha, 0, 1023, 0, width),height/2,60);

Assignment 2: Control LED Brightness From P5JS

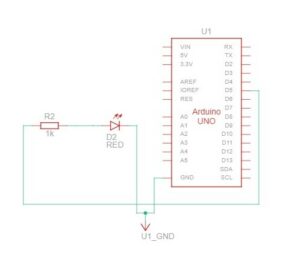
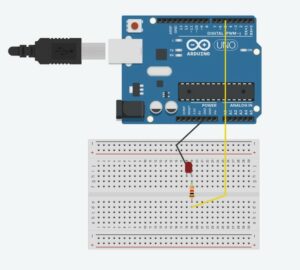
We took the same P5JS sketch from the slides and altered it, seen here. Here are the changes we made:

let value = map(mouseX,0,width,0,255);
right = int(value);

We created a new variable called value and then mapped the width of the P5JS screen to the LED values, so that as you moved your mouse horizontally across the screen, the LED brightened and dimmed. We used pin 5 because it supports PWM. The LED connected to Pin 5 was the “right” one in the code we used in class, hence why used “right” above to connect the LED and the P5JS bit above. We also had to go into the Arduino code that we had used in class and changed a bit of that as well.

digitalWrite(leftLedPin, left);
analogWrite(rightLedPin,right);
// digitalWrite(rightLedPin, right);

As you can see, we commented out the digitalWrite regarding the right pin and replaced it with analogWrite so that the LED didn’t just turn on or off, but actually got dimmer and brighter on a spectrum.

Assignment 3: Make The LED Turn On When The Ball Bounces

Here is our video. Here is the link to our sketch.

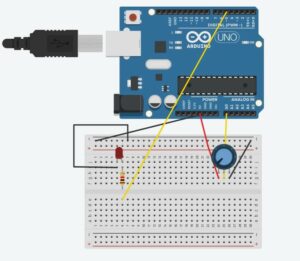
We combined the Gravity Wind example from the slides with the other P5JS sketch from the slides and changed a few things, seen below:

ellipse(position.x,position.y,mass,mass);
  if (position.y > height-mass/2) {
      velocity.y *= -0.9;  // A little dampening when hitting the bottom
      position.y = height-mass/2;
    
    right = 1;
    }
  
  else {
    right = 0;
  }

We went to the part of the code where the ball hits the ground, and made it so that the Arduino read the LED as “right,” and the LED turned on (1) and off (0) depending on whether the ball was touching the ground or not.

On a side note, we also made sure that whenever you pressed n, that was how a new circle appeared. Because when we combined the two sketches, it had already been written that pressing the space bar makes the serial bar pop up.

if (key=='n'){
   mass=random(70,80);
   position.y=-mass;
   velocity.mult(0);

Assignment 4: Control Wind With Potentiometer

Last but not least, we made the ball move left and right with the potentiometer by adding this bit of code.

wind.x = map(alpha,0,1023,-1,1);

We mapped the values of the potentiometer onto the wind values already established in the code. So that when we turned the potentiometer right, the ball went right (1) and left (-1) when we turned the potentiometer left.

Khaleeqa’s Exercises (W/ Kwaaku)

EXERCISE 01: ARDUINO TO P5 COMMUNICATION

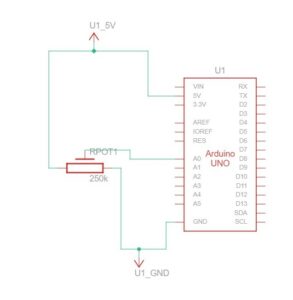
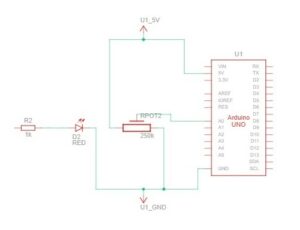
Make something that uses only one sensor on Arduino and makes the ellipse in p5 move on the horizontal axis, in the middle of the screen, and nothing on Arduino is controlled by p5.

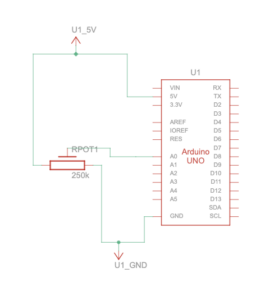
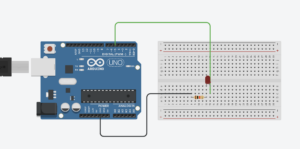
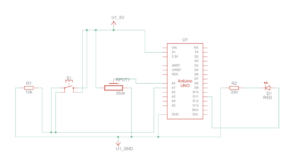
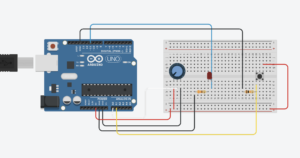
SCHEMATIC AND MODELLING:

P5 CODE:

let circleX = 0;
function setup() {
  createCanvas(640, 480);
  textSize(18);
}

function draw() {
  background(255);
  stroke(0);
  
  fill("pink");
  circle(map(circleX,0, 1023, 0, width), height/2, 50);
  
  if (!serialActive) {
    text("Press Space Bar to select Serial Port", 20, 30);
  } else {
    text("Connected", 20, 30);
  }
  
}

function keyPressed() {
  if (key == " ") {
    // important to have in order to start the serial connection!!
    setUpSerial();
  }
}

// This function will be called by the web-serial library
// with each new *line* of data. The serial library reads
// the data until the newline and then gives it to us through
// this callback function
function readSerial(data) {
  ////////////////////////////////////
  //READ FROM ARDUINO HERE
  ////////////////////////////////////

  if (data != null) {
    circleX = int(trim(data));
    
  }
  print(circleX);
}

ARDUINO CODE: 

void setup() {
  // Start serial communication so we can send data
  // over the USB connection to our p5js sketch
  Serial.begin(9600);

  // We'll use the builtin LED as a status output.
  // We can't use the serial monitor since the serial connection is
  // used to communicate to p5js and only one application on the computer
  // can use a serial port at once.
  pinMode(LED_BUILTIN, OUTPUT);

}

void loop() {

  int sensor = analogRead(A0);
  delay(5);
  digitalWrite(LED_BUILTIN, HIGH);
  Serial.println(sensor);
    
  digitalWrite(LED_BUILTIN,LOW);
}

PROTOTYPE:

IMG_4402

EXERCISE 02: P5 TO ARDUINO COMMUNICATION

Make something that controls the LED brightness from p5.

SCHEMATIC AND MODELLING: 

P5 CODE:

let value = 0;

function setup() {
  createCanvas(640, 480);
  textSize(18);
}

function draw() {
  background(0);
  stroke(255);
  fill(255);
  
  if (!serialActive) {
    text("Press Space Bar to select Serial Port", 20, 30);
  } else {
    text("Connected", 20, 30);
  }
}

function keyPressed() {
  if (key == " ") {
    // important to have in order to start the serial connection!!
    setUpSerial();
  }
}

// This function will be called by the web-serial library
// with each new *line* of data. The serial library reads
// the data until the newline and then gives it to us through
// this callback function
function readSerial(data) {
  if (data != null) {
    //////////////////////////////////
  //SEND TO ARDUINO HERE (handshake)
  //////////////////////////////////
    value = int(map(mouseX, 0, width, 0, 255));
  let sendToArduino = value + "\n";
  writeSerial(sendToArduino);
  print(value);
    
    
  }

  
}

ARDUINO CODE: 

int ledPin = 5;

void setup() {
  // Start serial communication so we can send data
  // over the USB connection to our p5js sketch
  Serial.begin(9600);

  // We'll use the builtin LED as a status output.
  // We can't use the serial monitor since the serial connection is
  // used to communicate to p5js and only one application on the computer
  // can use a serial port at once.
  pinMode(LED_BUILTIN, OUTPUT);
  pinMode(ledPin, OUTPUT);

  digitalWrite(ledPin, HIGH);
  delay(1000);
  digitalWrite(ledPin, LOW);

  // start the handshake
  while (Serial.available() <= 0) {
    digitalWrite(LED_BUILTIN, HIGH); // on/blink while waiting for serial data
    Serial.println("0,0"); // send a starting message
    delay(300);            // wait 1/3 second
    digitalWrite(LED_BUILTIN, LOW);
    delay(50);
  }

}

void loop() {


  // wait for data from p5 before doing something
  while (Serial.available()) {
    Serial.println("0,0");
    digitalWrite(LED_BUILTIN, HIGH); // led on while receiving data

    int value = Serial.parseInt();

    if (Serial.read() == '\n') {
      analogWrite(ledPin, value);
    }
  }
  digitalWrite(LED_BUILTIN, LOW);
  

}

PROTOTYPE:

IMG_4403

EXERCISE 03: BI-DIRECTIONAL COMMUNICATION

Take the gravity wind example and make it so: every time the ball bounces one led lights up and then turns off, and you can control the wind from one analog sensor.

SCHEMATIC AND MODELLING: 

P5 CODE:

let velocity;
let gravity;
let position;
let acceleration;
let wind;
let value = 0;
let drag = 1;
let mass = 50;

function setup() {
  createCanvas(640, 360);
  noFill();
  position = createVector(width/2, 0);
  velocity = createVector(0,0);
  acceleration = createVector(0,0);
  gravity = createVector(0, 0.5*mass);
  wind = createVector(0,0);
}

function draw() {
  background(255);
  stroke(0);
  fill(0);
  if (!serialActive) {
    text("Press Space Bar to select Serial Port", 20, 30);
  } else {
    text("Connected", 20, 30);
    
    applyForce(wind);
    applyForce(gravity);
    velocity.add(acceleration);
    velocity.mult(drag);
    position.add(velocity);
    acceleration.mult(0);
    ellipse(position.x,position.y,mass,mass);
    
    if (position.y > height-mass/2) {
        velocity.y *= -0.9;  // A little dampening when hitting the bottom
        position.y = height-mass/2;
        value = 1;
      }
    else {
      value = 0;
    }
    
  }
  
  
}

function applyForce(force){
  // Newton's 2nd law: F = M * A
  // or A = F / M
  let f = p5.Vector.div(force, mass);
  acceleration.add(f);
}

function keyPressed(){

  if (key==UP_ARROW){
    mass=random(15,80);
    position.y=-mass;
    velocity.mult(0);
  }
  if (key == " ") {
    // important to have in order to start the serial connection!!
    setUpSerial();
  }
}


// This function will be called by the web-serial library
// with each new *line* of data. The serial library reads
// the data until the newline and then gives it to us through
// this callback function
function readSerial(data) {
  ////////////////////////////////////
  //READ FROM ARDUINO HERE
  ////////////////////////////////////

  if (data != null) {
    
    if (int(trim(data)) >= 511) {
      wind.x = 3;
    }
    else {
      wind.x = -3;
    }

    //////////////////////////////////
    //SEND TO ARDUINO HERE (handshake)
    //////////////////////////////////
    let sendToArduino = value + "\n";
    writeSerial(sendToArduino);
  }
}

ARDUINO CODE: 

int ledPin = 5;

void setup() {
  // Start serial communication so we can send data
  // over the USB connection to our p5js sketch
  Serial.begin(9600);

  // We'll use the builtin LED as a status output.
  // We can't use the serial monitor since the serial connection is
  // used to communicate to p5js and only one application on the computer
  // can use a serial port at once.
  pinMode(LED_BUILTIN, OUTPUT);
  pinMode(ledPin, OUTPUT);

  // start the handshake
  while (Serial.available() <= 0) {
    digitalWrite(LED_BUILTIN, HIGH); // on/blink while waiting for serial data
    Serial.println("0"); // send a starting message
    delay(300);            // wait 1/3 second
    digitalWrite(LED_BUILTIN, LOW);
    delay(50);
  }

}

void loop() {


  digitalWrite(LED_BUILTIN, LOW);

  // wait for data from p5 before doing something
  while (Serial.available()) {
    digitalWrite(LED_BUILTIN, HIGH); // led on while receiving data

    int value = Serial.parseInt();

    if (Serial.read() == '\n') {
      if (value == 1) {
        digitalWrite(ledPin, HIGH);
      }
      else {
        digitalWrite(ledPin, LOW);
      }
      
      int sensor = analogRead(A0);
      delay(5);
      Serial.println(sensor);
    }
  }
  digitalWrite(LED_BUILTIN, LOW);
  

}

PROTOTYPE:

IMG_4406

Project Proposal Idea

Concept

For my project, I’m working on a Human Following Robot – you know, something straight out of a sci-fi movie, and Wall-E definitely comes to mind. The whole idea is to create this robot buddy that can autonomously follow people around, kind of like a helpful sidekick. It hit me after watching Wall-E, and I thought, why not bring a touch of that magic into real life?

So, here’s the plan: I’ll be using sensors to catch someone’s presence and their moves. Think about it like a buddy who always walks by your side, adjusting its position as you go. No need for a remote or anything – it just picks up on your vibe and tags along. The key components here are these cool sensors – they’re like the robot’s eyes and ears, helping it figure out where you are and what you’re up to.

Week 11 – Reflection Assignment

The writer of Design Meets Disability delves into using design to make the needs of disabled people more fashionable. However, they fail to take into account that not every disabled person wants to make their disability their entire personality. While some of the designs he showed were stunning, they may be too “out there” for someone who doesn’t want to make a big deal of their disability. I know a couple of disabled people who would actually be uncomfortable with the idea that their disability would be used as a fashion statement. That being said, there is nothing wrong with making it a fashion statement for those who willingly choose to do so. I would also like to point out that the writer made it seem that the “normal” products for disabled people were not good enough. In reality, most people can’t afford to get designer prosthetics or hearing aids. They should not be made to feel like they’re getting the short end of the stick.

I particularly liked how the writer mentioned how hearing aid companies are trying to make their products more invisible by making them smaller and hidden. On the other hand, eyeglass companies are trying to make their products more out there to show off as a fashion statement. I never noticed this contrast before but it was quite interesting to realize. I think that perhaps because glasses are more commonly worn than hearing aids that they’re more widely accepted and people are more comfortable with wearing them publicly instead of keeping them hidden like hearing aids. Furthermore, the writer also delves into modern technologies that value simplicity and accessibility. I found this to be very different compared to his original view where he wanted disability products to be less simple and more fashion-forward. As someone who is into fashion, I would want nothing more than to make a statement unless it comes in the way of my comfort and accessibility. While some of the designs he showed were gorgeous, some like the hand prosthetic looked less functional and more just a fashion statement.

Disability Meets Design (Week 11 Reading Response)

Pullin’s “Design Meets Disability” represents a good cross-section between, disability, fashion and design. In my opinion, he presents a story that goes beyond basic usability to embrace the core ideas of inclusion and empowerment, particularly when viewed through the lens of inclusivity and disability. In his book Pullin deftly demonstrates how assistive technology—like glasses, hear wear, and prosthetic limbs (leg wear)—has transformed into fashion statements. It’s amazing to see how design innovation has transformed these items from basic needs to unique expressions of identity and personal style to the point where today, spectacles are a fashion statement, unlike when they were only meant for individuals with disabilities like bad eyesight. Pullin discusses the significance of designs being both functional and aesthetically pleasing. He demonstrates how important it is to make things both visually appealing and accessible to those with disabilities. It’s similar to saying, “Hey, these things can look great AND they can help you!” Pullin emphasizes how a combination of good design and utility may change public perceptions of disability aids, increasing their social acceptance and appreciation.

Pullin discusses how keeping functionality without sacrificing simplicity can benefit those with disabilities. He illustrates how many people, regardless of ability, can profit from this type of design. He provides illustrations of universally usable, basic designs that improve the quality of life for those with impairments. It also emphasizes how crucial it is to pay attention to individuals with disabilities when creating these designs, as frequently we assume we know what is best for them based on presumptions and the stigmas society has attached to them. Therefore, I believe it is crucial to draw attention to these minute details that, not only benefit us but also those who are the primary beneficiaries of these designs.

This reading challenged me to consider creating not just an “interactive” design, but a GOOD interactive design that can improve everyone’s quality of life, particularly for those who are disabled. It’s not only about making things function; it’s also about making them user-friendly, simple and fashionable.  I learned that good design considers everyone’s needs and can change how we see and accept things like disability aids. It’s about making the world more inclusive and thoughtful for everyone.

Week 11 – Assignment (Rujul and Mariam Al Khoori)

Exercise 1: ARDUINO TO P5 COMMUNICATION

Using the potentiometer the ellipse is moved across the screen while also changing its opacity.

P5.js Sketch:

// variable to control x-coordinate
let x = 0;
function setup() {
  createCanvas(640, 480);
  textSize(18);
}
function draw() {
  // sets background
  background(255);
  stroke(0);
  // draws ellipse on canvas
  fill(0,255,0,map(x, 0, 1023, 0, 255))
  ellipse(map(x, 0, 1023, 0, width), height / 2, 100, 100);
  
  // checks if serial communication has been established
  fill(0)
  if (!serialActive) {
    text("Press Space Bar to select Serial Port", 20, 30);
  } else {
    text("Connected", 20, 30);
  }
  
}
// sets up serial connection
function keyPressed() {
  if (key == " ") {
    // important to have in order to start the serial connection!!
    setUpSerial();
  }
}
// This function will be called by the web-serial library
// with each new *line* of data. The serial library reads
// the data until the newline and then gives it to us through
// this callback function
function readSerial(data) {
  ////////////////////////////////////
  //READ FROM ARDUINO HERE
  ////////////////////////////////////
  if (data != null) {
    x = int(trim(data));
  }
  
}

Arduino Sketch:

void setup() {
  // Start serial communication so we can send data
  // over the USB connection to our p5js sketch
  Serial.begin(9600);
  // We'll use the builtin LED as a status output..
  pinMode(LED_BUILTIN, OUTPUT);
}
void loop() {
  // gets sensor reading
  int sensor = analogRead(A0);
  delay(5);
  // indicates data transfer
  digitalWrite(LED_BUILTIN, HIGH);
  // sends data to p5
  Serial.println(sensor);
  
  // indicates data transfer
  digitalWrite(LED_BUILTIN, LOW);
  
}

VIDEO – Exercise1


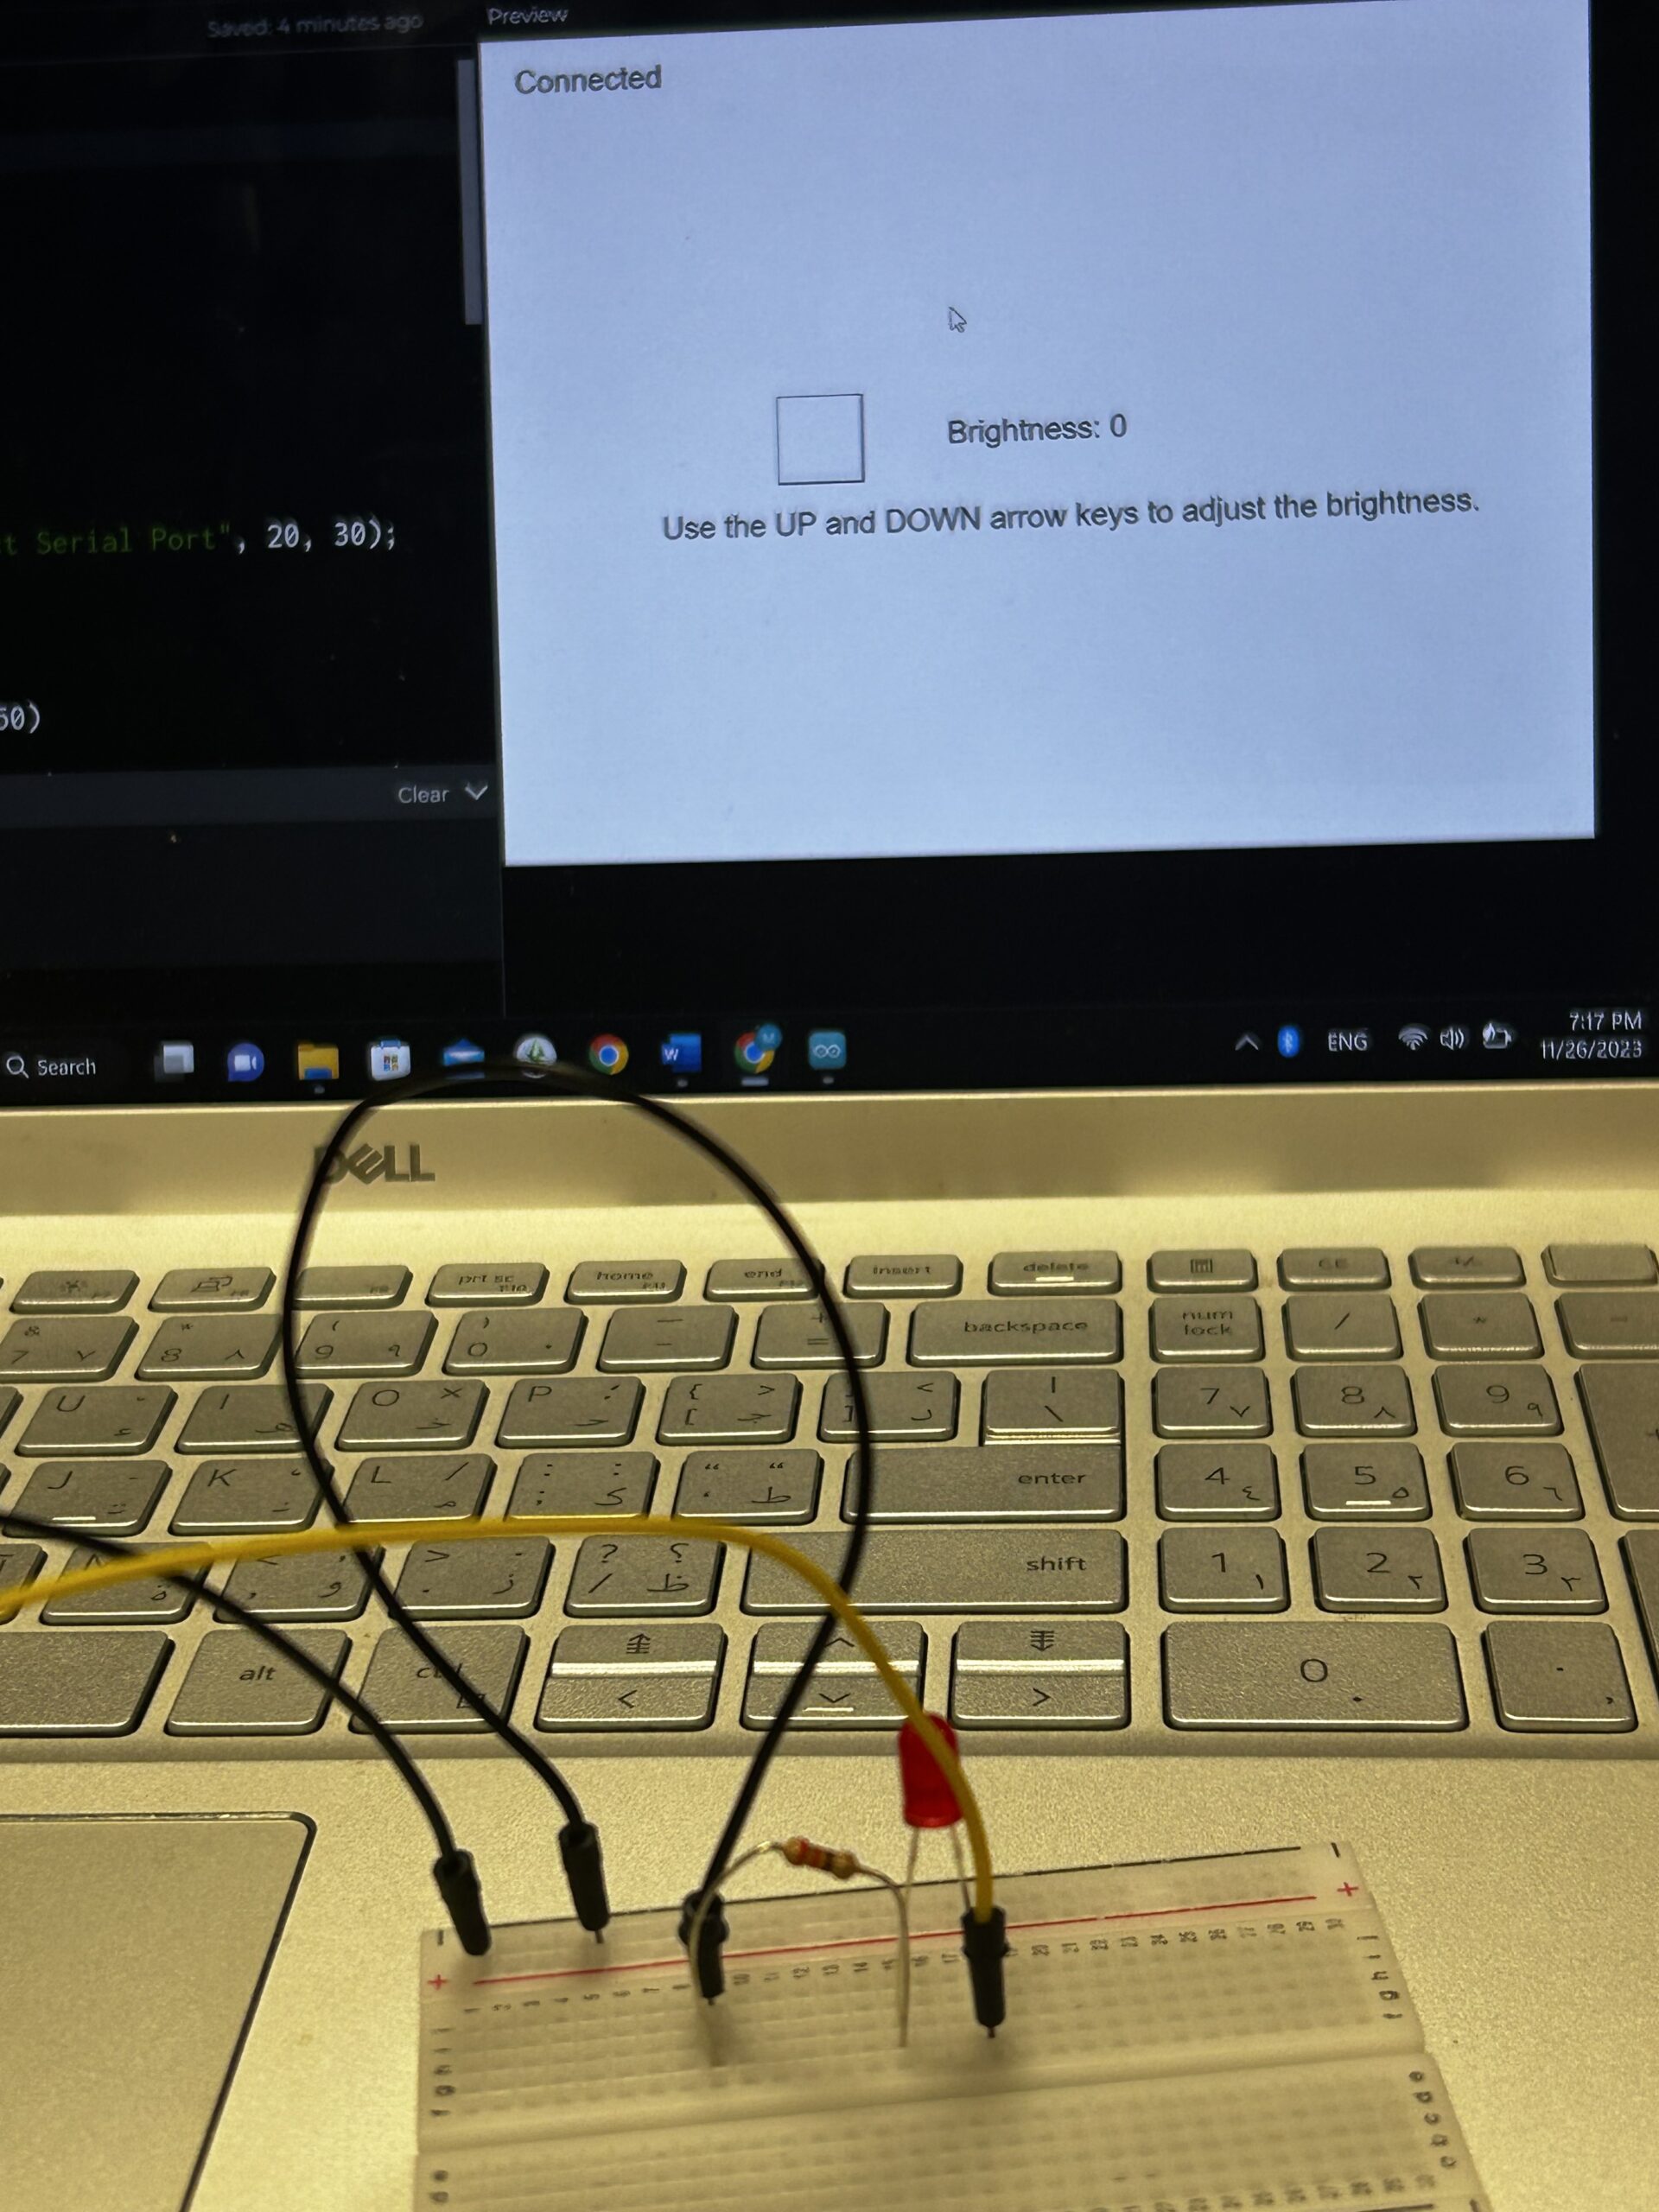
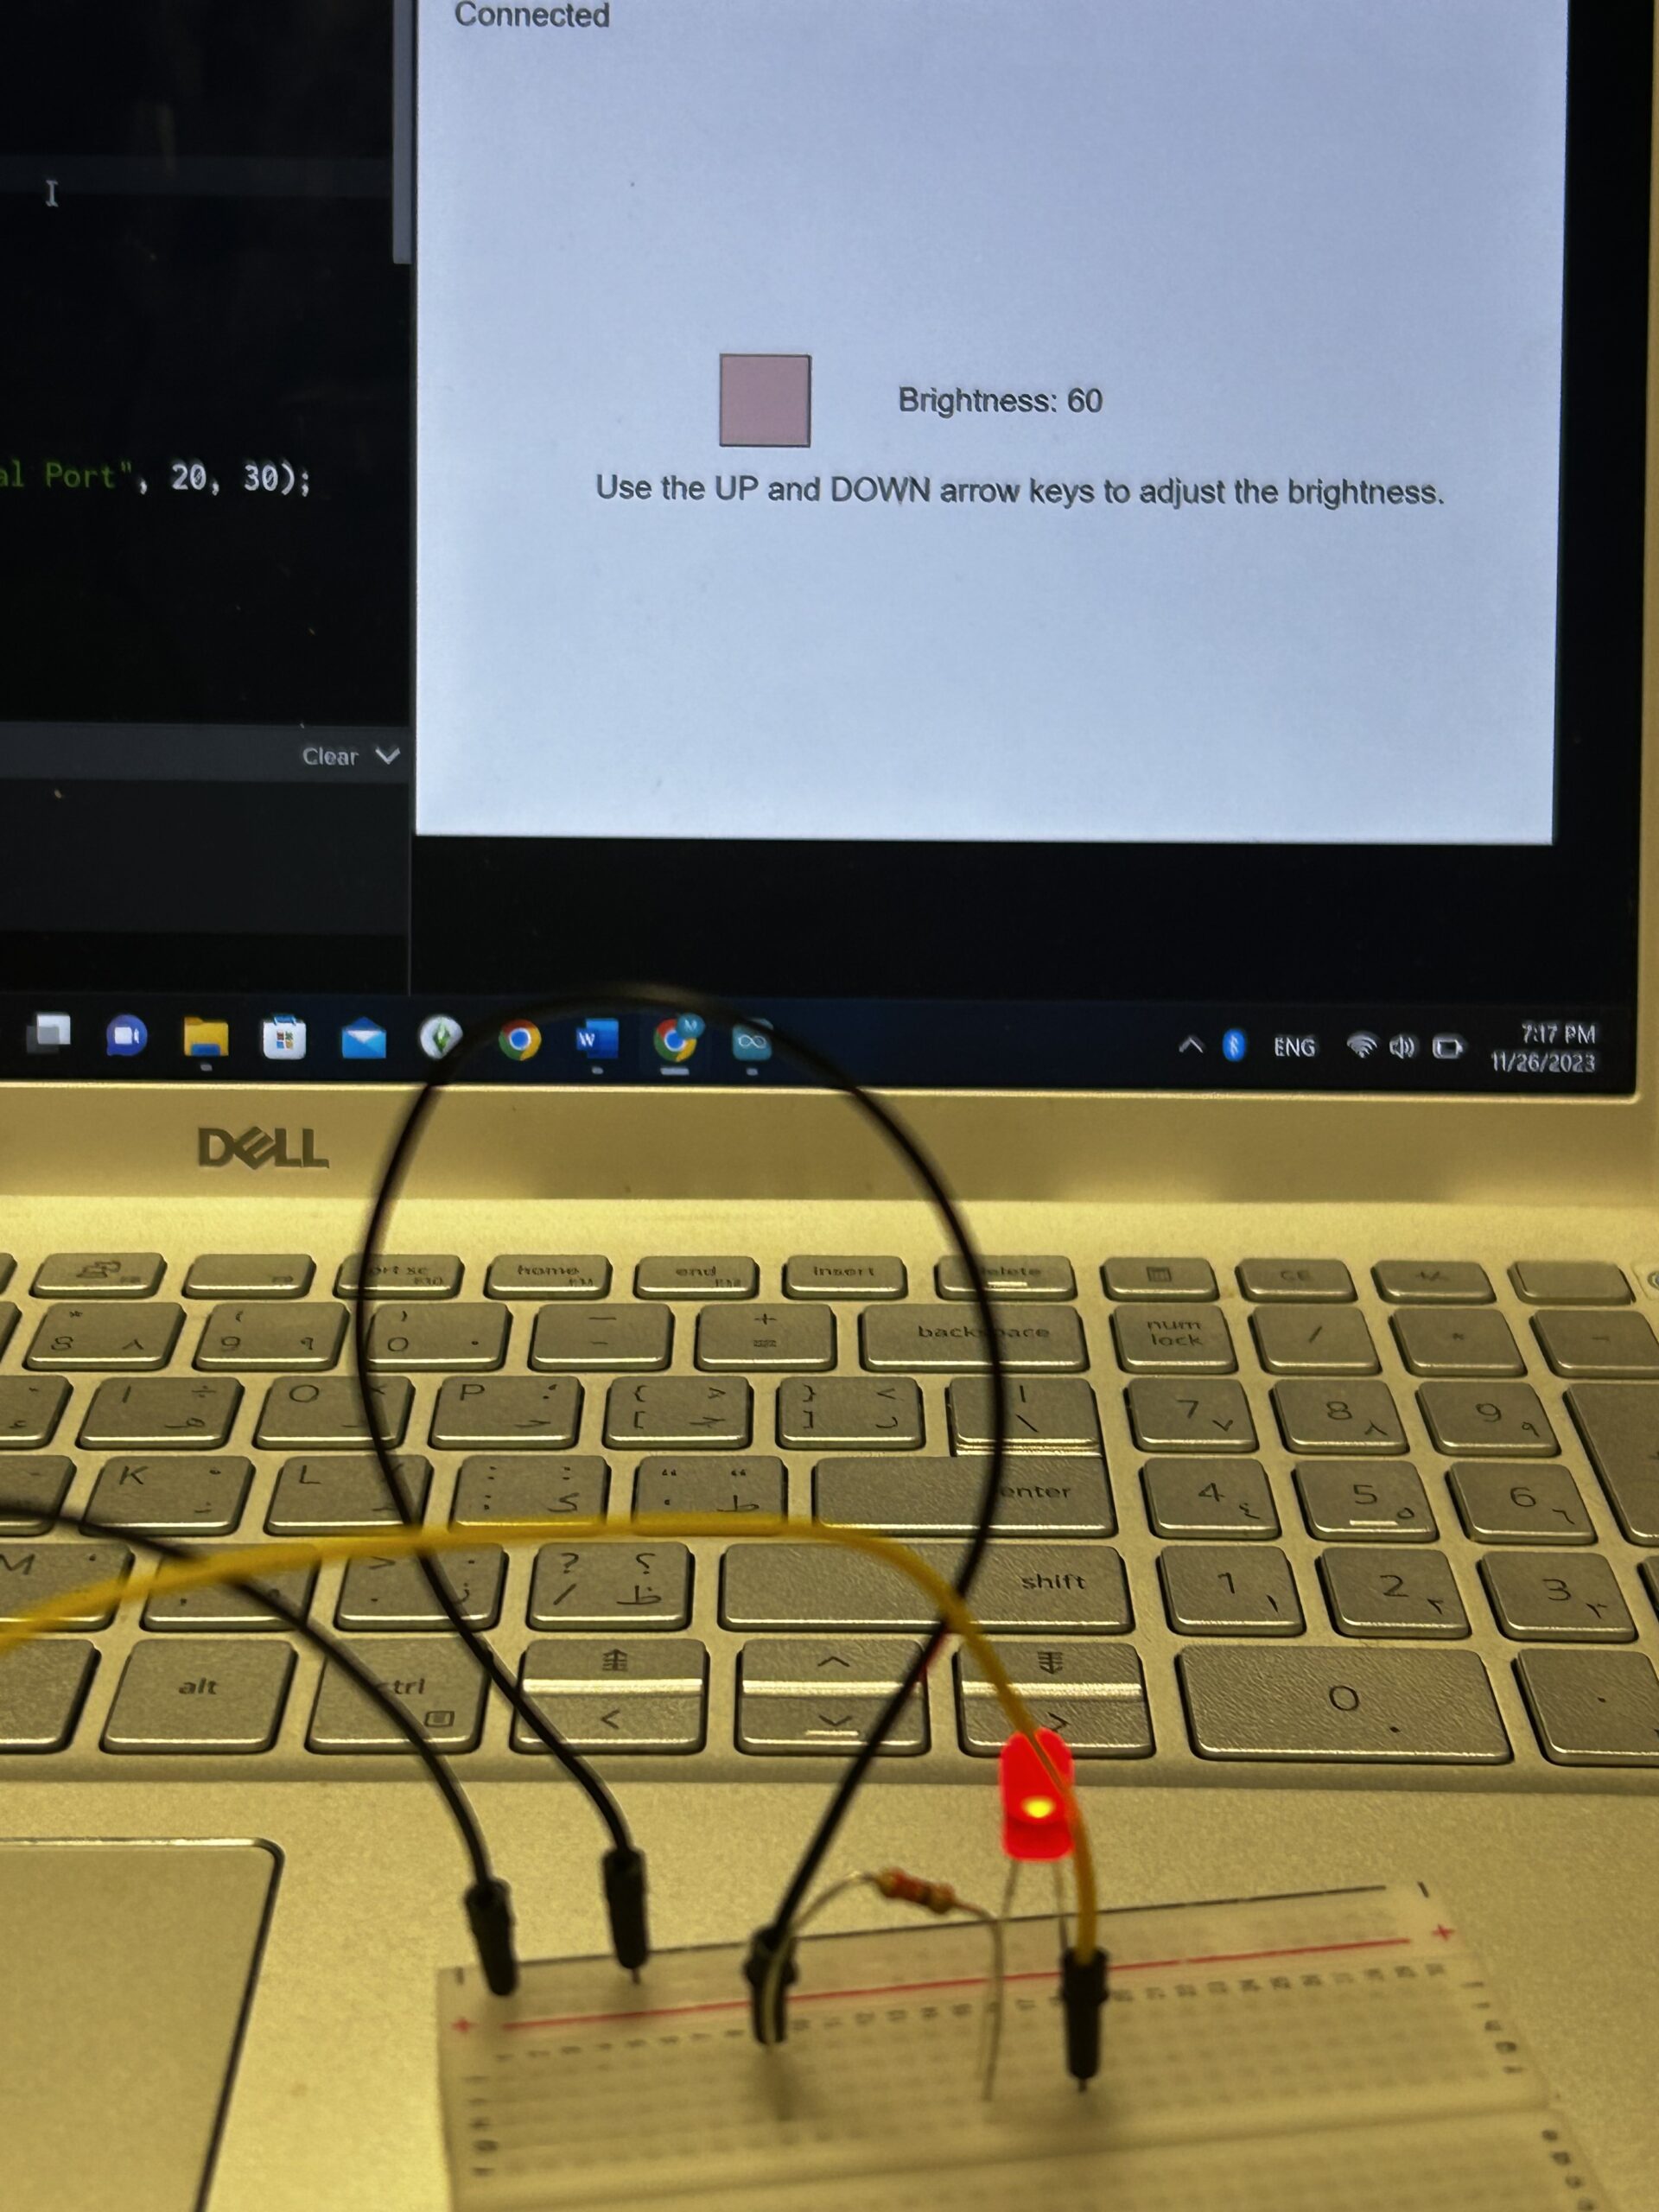
Assignment 2: P5 TO ARDUINO COMMUNICATION

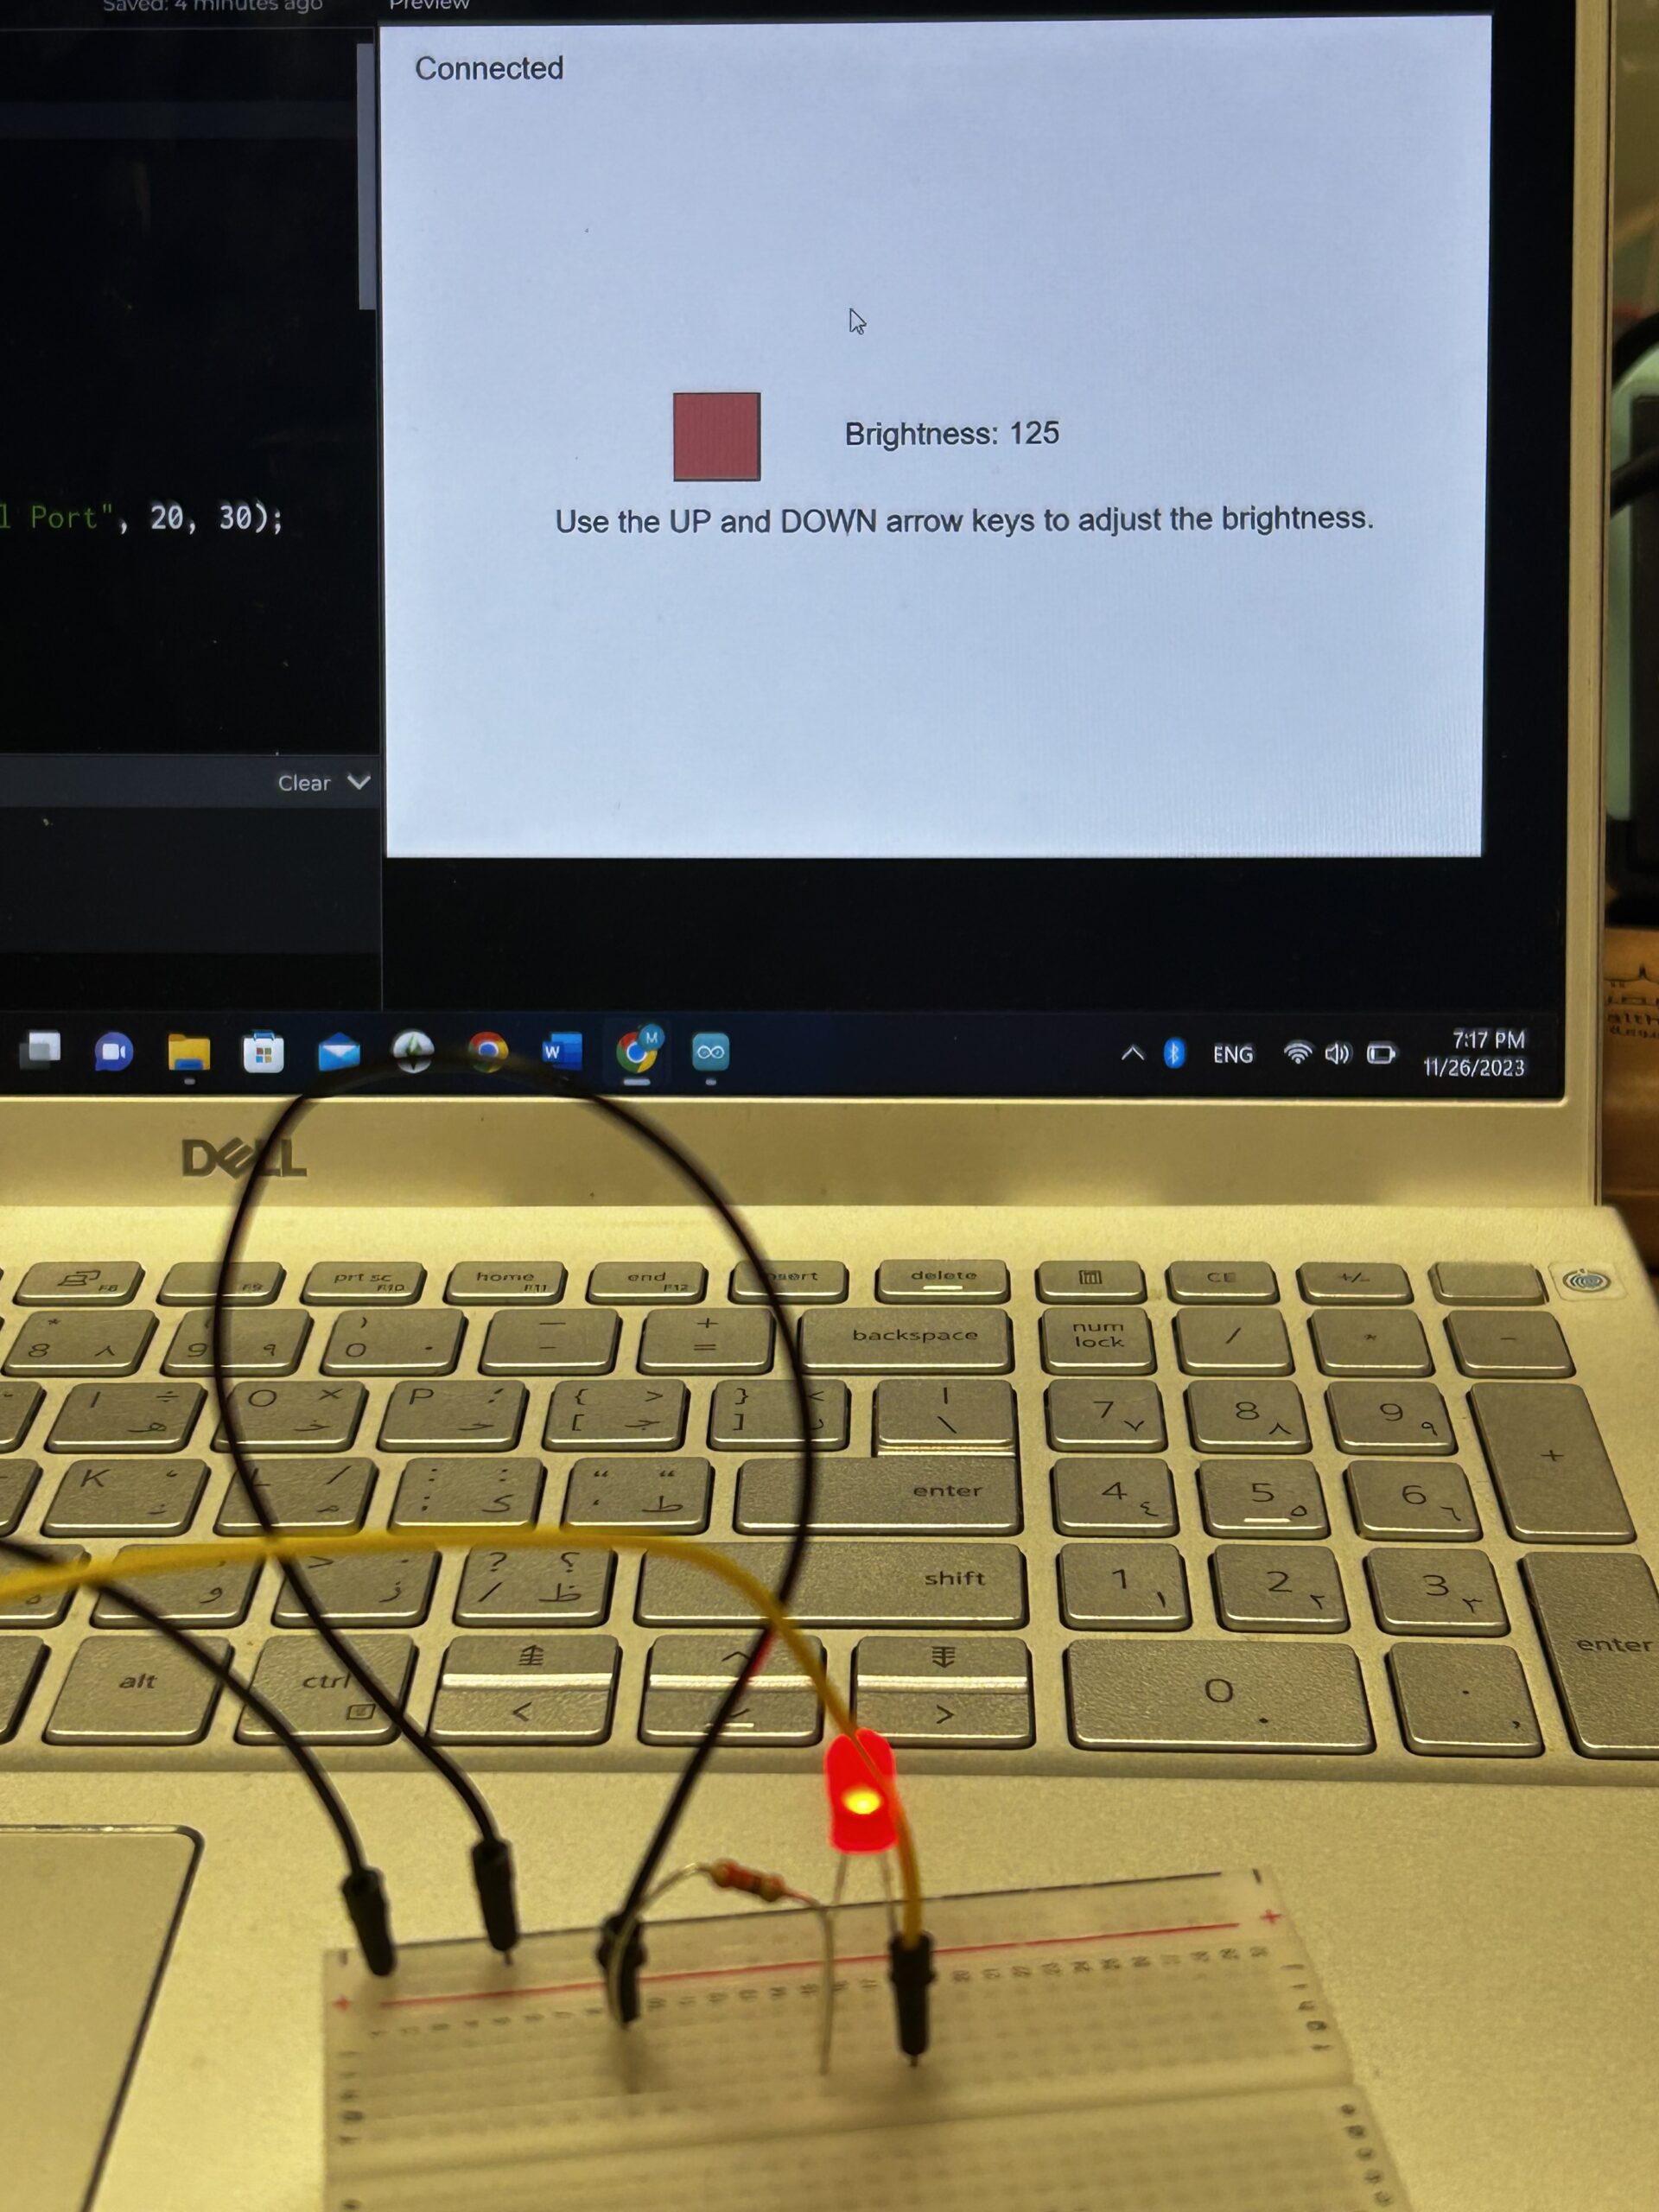
Brightness of the LED changes when pressing the UP and DOWN keys.

P5.js Sketch:

let brightness=0;

function setup() {
  createCanvas(640, 480);
  textSize(18);
}

function draw() {
  background(255);
  fill(0);

  if (!serialActive) {
    text("Press Space Bar to select Serial Port", 20, 30);
  } else {
    text("Connected", 20, 30);
  }
  fill(255,0,0,brightness)
  square(width/2-150,height/2-30,50)
  fill(0)
  text("Brightness: "+str(brightness),width/2-50,height/2)
  text("Use the UP and DOWN arrow keys to adjust the brightness. ",width/2-220,height/2+50)

  if (keyIsPressed) {
    if (keyCode==UP_ARROW) {
      if (brightness<255){
        brightness+=5;
      }  
    } else if (keyCode==DOWN_ARROW) {
      if (brightness>0){
        brightness-=5;
      }
    }
  } 
}

function keyPressed() {
  if (key == " ") {
    // important to have in order to start the serial connection!!
    setUpSerial();
  }
}

function readSerial(data) {
  if (data != null) {
    writeSerial(brightness+"\n");
  }
}

Arduino Sketch:

int LedPin = 5;

void setup() {
  // Start serial communication so we can send data
  // over the USB connection to our p5js sketch
  Serial.begin(9600);

  // We'll use the builtin LED as a status output..
  pinMode(LED_BUILTIN, OUTPUT);

  // Outputs on this pin
  pinMode(LedPin, OUTPUT);

  // Blink them so we can check the wiring
  digitalWrite(LedPin, HIGH);
  delay(200);
  digitalWrite(LedPin, LOW);

  // start the handshake
  while (Serial.available() <= 0) {
    digitalWrite(LED_BUILTIN, HIGH); // on/blink while waiting for serial data
    Serial.println("0"); // send a starting message
    delay(300);            // wait 1/3 second
    digitalWrite(LED_BUILTIN, LOW);
    delay(50);
  }
}

void loop() {
  // wait for data from p5 before doing something
  while (Serial.available()) {
    Serial.println("0");
    digitalWrite(LED_BUILTIN, HIGH); // led on while receiving data

    int brightness = Serial.parseInt();
    if (Serial.read() == '\n') {
      analogWrite(LedPin, brightness);
    }
  }
  digitalWrite(LED_BUILTIN, LOW);
}

VIDEO – Exercise2


Assignment 3: BI-DIRECTIONAL COMMUNICATION

The LED glows up when the ball touches the ground. The ultrasonic sensor is used to change the direction of the wind.

P5.js Sketch:

let velocity;
let gravity;
let posit5
let acceleration;
let wind;
let drag = 0.99;
let mass = 50;
let LED=0;
let wind_speed=0;

function setup() {
  createCanvas(640, 360);
  noFill();
  position = createVector(width/2, 0);
  velocity = createVector(0,0);
  acceleration = createVector(0,0);
  gravity = createVector(0, 0.5*mass);
  wind = createVector(0,0);
}

function draw() {
  background(255);
  fill(0)
  if (!serialActive) {
    text("Press RIGHT key to select Serial Port", 20, 30);
  } else {
    text("Connected", 20, 30);
  }
  applyForce(wind);
  applyForce(gravity);
  velocity.add(acceleration);
  velocity.mult(drag);
  position.add(velocity);
  acceleration.mult(0);
  fill(205,104,219); 
  ellipse(position.x,position.y,mass,mass);
  if (position.y > height-mass/2) {
      velocity.y *= -0.9;  // A little dampening when hitting the bottom
      position.y = height-mass/2;
    }
  
  if (position.y==height-mass/2){
    LED=1
  }else{
    LED=0
  }
  
  if (position.x>=width || position.x<=0){
    position.x=width/2
  }   
}

function applyForce(force){
  // Newton's 2nd law: F = M * A
  // or A = F / M
  let f = p5.Vector.div(force, mass);
  acceleration.add(f);
}

function keyPressed(){
  if (key==' '){
    
    mass=random(15,80);
    position.y=-mass;
    velocity.mult(0);
  }
  if (keyCode==RIGHT_ARROW){
    setUpSerial();
  }
}

function readSerial(data) {
  ////////////////////////////////////
  //READ FROM ARDUINO HERE
  ////////////////////////////////////

  if (data != null) {
    let fromArduino = trim(data);
    distance= int(fromArduino);
    if (distance>10){
      wind.x=2
    }
    else{
      wind.x=-2
    }
    
    let sendToArduino = LED+"\n";
    writeSerial(sendToArduino);
  }
}

Arduino Sketch:

int LedPin = 2;
int trigPin = 9;
int echoPin = 10;
long duration;
int distance;

void setup() {
  // Start serial communication so we can send data
  // over the USB connection to our p5js sketch
  pinMode(trigPin, OUTPUT); 
  pinMode(echoPin, INPUT);
  Serial.begin(9600);
  pinMode(LED_BUILTIN, OUTPUT);

  // Outputs on these pins
  pinMode(LedPin, OUTPUT);

  // Blink them so we can check the wiring
  digitalWrite(LedPin, HIGH);
  delay(200);
  digitalWrite(LedPin, LOW);


  // start the handshake
  while (Serial.available() <= 0) {
    digitalWrite(LED_BUILTIN, HIGH); // on/blink while waiting for serial data
    Serial.println("0,0"); // send a starting message
    delay(300);            // wait 1/3 second
    digitalWrite(LED_BUILTIN, LOW);
    delay(50);
  }
}

void loop() {
  // wait for data from p5 before doing something
  while (Serial.available()) {
    digitalWrite(LED_BUILTIN, HIGH); // led on while receiving data

    int LED = Serial.parseInt();
    if (Serial.read() == '\n') {
      digitalWrite(LedPin, LED);
      digitalWrite(trigPin, LOW);
      delayMicroseconds(2); 
      digitalWrite(trigPin, HIGH);
      delayMicroseconds(10);
      digitalWrite(trigPin, LOW);
      // Reads the echoPin, returns the sound wave travel time in microseconds
      duration = pulseIn(echoPin, HIGH);
      // Calculating the distance
      distance = duration * 0.034 / 2;
      Serial.println(distance);
    }
  }
  digitalWrite(LED_BUILTIN, LOW);
}

VIDEO – Exercise3 Wind

VIDEO – Exercise3 LED

Week 11- Serial Communication

Exercise 1: ARDUINO TO P5 COMMUNICATION

Schematic

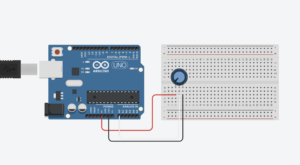
Circuit Diagram 

P5.js Code
We used the same example provided in class, however, we just added this part to the code:

function draw() {
  
  background('#6FA9B0')

  if (!serialActive) {
    fill("rgb(255,255,255)")
    text("Press Space Bar to select Serial Port", 20, 30);
  } else {

    noStroke()
    // draw a circle, alpha value controls the x-position of the circle
    circle(map(alpha, 0, 1023, 0, 640), 240, 50)

  }
}


Arduino

We used the same one provided in class.

Video


Exercise 2: P5 TO ARDUINO COMMUNICATION

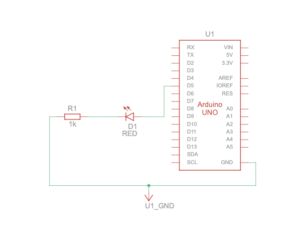
Schematic

Circuit Diagram 

P5.js Code

let brightness = 0; 
let slider;
let img;

//preload images
function preload(){
  img = loadImage('sun.png');
  img2 = loadImage('moon.png');
}

function setup() {
  createCanvas(400, 400);
  //create slider
  slider = createSlider(0, 255, 100);
  slider.position(width/2-50,height/2+25);
  slider.style('width', '80px');
}

function draw() {
  background('#85CCEC');
  image(img,235,130,150,180); 
  image(img2,30,140,100,160);
  
  let val = slider.value();
  brightness = val;
  
  // instructions
  textAlign(CENTER,CENTER);
  textSize(16);
  textStyle(BOLD)
  text("Control the brightness using the slider below!",width/2,100);
  
  //connects serial port
  if (!serialActive) {
    textSize(10);
    text("Press Space Bar to select Serial Port", 100, 30);
  } else {
    textSize(10);
    text("Connected",100,30);
  }


}

function keyPressed() {
  if (key == " ") {
    // important to have in order to start the serial connection!!
    setUpSerial();
  }
}


function readSerial(data) {

  //READ FROM ARDUINO HERE
  
  if (data != null) {
    // if there is a message from Arduino, continue
    
    //SEND TO ARDUINO HERE (handshake)
    
    let sendToArduino = brightness + "\n";
    writeSerial(sendToArduino);
  }
}


Arduino Code

int LED = 5;
void setup() {
  Serial.begin(9600);
  pinMode(LED, OUTPUT);
  // start the handshake
  while (Serial.available() <= 0) {
    Serial.println("Wait");  // send a starting message
    delay(300);               // wait 1/3 second
  }
}
void loop() {
  // wait for data from p5 before doing something
  while (Serial.available()) {
    int brightness = Serial.parseInt(); 
    if (Serial.read() == '\n') {
      analogWrite(LED, brightness); // turn on LED and adjusts brightness
      Serial.println("LIT"); 
    }
  }
}


Video

Exercise 3: BI-DIRECTIONAL COMMUNICATION

Schematic

Circuit Diagram 

P5.js Code

let hit = 0;  // whether the ball hit the ground
let reset = 0;  // whether Arduino sent a reset argument (a button press)

// Ball physics
let velocity;
let gravity;
let position;
let acceleration;
let wind; // wind direction is controlled by Arduino (potentiometer)
let drag = 0.99;
let mass = 50;

function setup() {
  createCanvas(600, 600);
  noFill();
  position = createVector(width / 2, 0);
  velocity = createVector(0, 0);
  acceleration = createVector(0, 0);
  gravity = createVector(0, 0.5 * mass);
  wind = createVector(0, 0);
}

function draw() {
  background('pink');
  applyForce(wind);
  applyForce(gravity);
  velocity.add(acceleration);
  velocity.mult(drag);
  position.add(velocity);
  acceleration.mult(0);
  fill(255)
  ellipse(position.x, position.y, mass, mass);
  if (position.y > height - mass / 2) {
    velocity.y *= -0.9; // A little dampening when hitting the bottom
    position.y = height - mass / 2;
    hit = 1;
  } else {
    hit = 0;
  }

  if (!serialActive) {
    console.log("Press Space Bar to select Serial Port");
  } else {
    // 
    // console.log("Connected");
    if (reset == 1) { // if reset signal is sent and flagged (button press)
      reset = 0; // clear the flag
      
      // reset ball with some random mass
      mass = random(15, 80);
      position.x = width / 2;
      position.y = -mass;
      velocity.mult(0);
    }
  }
}

function applyForce(force) {
  // Newton's 2nd law: F = M * A
  // or A = F / M
  let f = p5.Vector.div(force, mass);
  acceleration.add(f);
}

function keyPressed() {
  if (key == " ") {
    // important to start the serial connection!
    setUpSerial();
  }
}

function readSerial(data) {
  
  //READ FROM ARDUINO HERE
  

  if (data != null) {
    // split the message
    let fromArduino = split(trim(data), ",");
    // if the right length, then proceed
    if (fromArduino.length == 2) {
      reset = fromArduino[0];
      wind.x = fromArduino[1];
    }

    
    //SEND TO ARDUINO HERE (handshake)
    
    let sendToArduino = hit + "\n";
    writeSerial(sendToArduino);
  }
}


Arduino Code

int buttonSwitch = A2;
int potentiometer = A0;
int ledOut = 11;

void setup() {
  Serial.begin(9600);
  pinMode(12, OUTPUT);
  digitalWrite(ledOut, LOW);  // in the case of reconnection while p5 is running
  // start the handshake
  while (Serial.available() <= 0) {
    Serial.println("-1,-1");  // send a starting message
    delay(300);               // wait 1/3 second
  }
}

void loop() {
  // wait for data from p5 before doing something
  while (Serial.available()) {
    int hit = Serial.parseInt(); // receives 1 argument, whether the ball hit the ground
    if (Serial.read() == '\n') {
      digitalWrite(ledOut, hit); // turn on LED if the ball is in contact with the ground (1 -> HIGH) turn off LED if not (0, -> LOW)
      int sensor = digitalRead(buttonSwitch); // read button
      delay(1);
      int sensor2 = analogRead(potentiometer); // read potentiometer
      delay(1);
      Serial.print(sensor); // button
      Serial.print(',');
      if (sensor2 < 512) { // potentiometer; depending whether the value is over or below half, direction of the wind is set
        Serial.println(1);
      } else {
        Serial.println(-1);
      }
    }
  }
}


Video

In Class Exercises

Exercise 1: ARDUINO TO P5 COMMUNICATION

Schematic

Circuit Diagram 

P5.js Code
We used the same example provided in class, however, we just added this part to the code:

function draw() {
  
  background('#6FA9B0')

  if (!serialActive) {
    fill("rgb(255,255,255)")
    text("Press Space Bar to select Serial Port", 20, 30);
  } else {

    noStroke()
    // draw a circle, alpha value controls the x-position of the circle
    circle(map(alpha, 0, 1023, 0, 640), 240, 50)

  }
}

Arduino

We used the same one provided in class.

Video

Exercise 2: P5 TO ARDUINO COMMUNICATION

Schematic

Circuit Diagram 

P5.js Code

let brightness = 0; 
let slider;
let img;

//preload images
function preload(){
  img = loadImage('sun.png');
  img2 = loadImage('moon.png');
}

function setup() {
  createCanvas(400, 400);
  //create slider
  slider = createSlider(0, 255, 100);
  slider.position(width/2-50,height/2+25);
  slider.style('width', '80px');
}

function draw() {
  background('#85CCEC');
  image(img,235,130,150,180); 
  image(img2,30,140,100,160);
  
  let val = slider.value();
  brightness = val;
  
  // instructions
  textAlign(CENTER,CENTER);
  textSize(16);
  textStyle(BOLD)
  text("Control the brightness using the slider below!",width/2,100);
  
  //connects serial port
  if (!serialActive) {
    textSize(10);
    text("Press Space Bar to select Serial Port", 100, 30);
  } else {
    textSize(10);
    text("Connected",100,30);
  }


}

function keyPressed() {
  if (key == " ") {
    // important to have in order to start the serial connection!!
    setUpSerial();
  }
}


function readSerial(data) {

  //READ FROM ARDUINO HERE
  
  if (data != null) {
    // if there is a message from Arduino, continue
    
    //SEND TO ARDUINO HERE (handshake)
    
    let sendToArduino = brightness + "\n";
    writeSerial(sendToArduino);
  }
}

Arduino Code

int LED = 5;
void setup() {
  Serial.begin(9600);
  pinMode(LED, OUTPUT);
  // start the handshake
  while (Serial.available() <= 0) {
    Serial.println("Wait");  // send a starting message
    delay(300);               // wait 1/3 second
  }
}
void loop() {
  // wait for data from p5 before doing something
  while (Serial.available()) {
    int brightness = Serial.parseInt(); 
    if (Serial.read() == '\n') {
      analogWrite(LED, brightness); // turn on LED and adjusts brightness
      Serial.println("LIT"); 
    }
  }
}

Video

Exercise 3: BI-DIRECTIONAL COMMUNICATION

Schematic

Circuit Diagram 

P5.js Code

let hit = 0;  // whether the ball hit the ground
let reset = 0;  // whether Arduino sent a reset argument (a button press)

// Ball physics
let velocity;
let gravity;
let position;
let acceleration;
let wind; // wind direction is controlled by Arduino (potentiometer)
let drag = 0.99;
let mass = 50;

function setup() {
  createCanvas(600, 600);
  noFill();
  position = createVector(width / 2, 0);
  velocity = createVector(0, 0);
  acceleration = createVector(0, 0);
  gravity = createVector(0, 0.5 * mass);
  wind = createVector(0, 0);
}

function draw() {
  background('pink');
  applyForce(wind);
  applyForce(gravity);
  velocity.add(acceleration);
  velocity.mult(drag);
  position.add(velocity);
  acceleration.mult(0);
  fill(255)
  ellipse(position.x, position.y, mass, mass);
  if (position.y > height - mass / 2) {
    velocity.y *= -0.9; // A little dampening when hitting the bottom
    position.y = height - mass / 2;
    hit = 1;
  } else {
    hit = 0;
  }

  if (!serialActive) {
    console.log("Press Space Bar to select Serial Port");
  } else {
    // 
    // console.log("Connected");
    if (reset == 1) { // if reset signal is sent and flagged (button press)
      reset = 0; // clear the flag
      
      // reset ball with some random mass
      mass = random(15, 80);
      position.x = width / 2;
      position.y = -mass;
      velocity.mult(0);
    }
  }
}

function applyForce(force) {
  // Newton's 2nd law: F = M * A
  // or A = F / M
  let f = p5.Vector.div(force, mass);
  acceleration.add(f);
}

function keyPressed() {
  if (key == " ") {
    // important to start the serial connection!
    setUpSerial();
  }
}

function readSerial(data) {
  
  //READ FROM ARDUINO HERE
  

  if (data != null) {
    // split the message
    let fromArduino = split(trim(data), ",");
    // if the right length, then proceed
    if (fromArduino.length == 2) {
      reset = fromArduino[0];
      wind.x = fromArduino[1];
    }

    
    //SEND TO ARDUINO HERE (handshake)
    
    let sendToArduino = hit + "\n";
    writeSerial(sendToArduino);
  }
}

Arduino Code

int buttonSwitch = A2;
int potentiometer = A0;
int ledOut = 11;

void setup() {
  Serial.begin(9600);
  pinMode(12, OUTPUT);
  digitalWrite(ledOut, LOW);  // in the case of reconnection while p5 is running
  // start the handshake
  while (Serial.available() <= 0) {
    Serial.println("-1,-1");  // send a starting message
    delay(300);               // wait 1/3 second
  }
}

void loop() {
  // wait for data from p5 before doing something
  while (Serial.available()) {
    int hit = Serial.parseInt(); // receives 1 argument, whether the ball hit the ground
    if (Serial.read() == '\n') {
      digitalWrite(ledOut, hit); // turn on LED if the ball is in contact with the ground (1 -> HIGH) turn off LED if not (0, -> LOW)
      int sensor = digitalRead(buttonSwitch); // read button
      delay(1);
      int sensor2 = analogRead(potentiometer); // read potentiometer
      delay(1);
      Serial.print(sensor); // button
      Serial.print(',');
      if (sensor2 < 512) { // potentiometer; depending whether the value is over or below half, direction of the wind is set
        Serial.println(1);
      } else {
        Serial.println(-1);
      }
    }
  }
}

Video

Assignment 11 (w/ Rujul)

Assignment 1: ARDUINO TO P5 COMMUNICATION

While controlling the potentiometer the ellipse would move across the screen while changing the opacity of it.

P5.js Sketch:

// variable to control x-coordinate
let x = 0;

function setup() {
  createCanvas(640, 480);
  textSize(18);
}

function draw() {
  // sets background
  background(255);
  stroke(0);

  // draws ellipse on canvas
  fill(0,255,0,map(x, 0, 1023, 0, 255))
  ellipse(map(x, 0, 1023, 0, width), height / 2, 100, 100);
  
  // checks if serial communication has been established
  fill(0)
  if (!serialActive) {
    text("Press Space Bar to select Serial Port", 20, 30);
  } else {
    text("Connected", 20, 30);
  }
  
}

// sets up serial connection
function keyPressed() {
  if (key == " ") {
    // important to have in order to start the serial connection!!
    setUpSerial();
  }
}

// This function will be called by the web-serial library
// with each new *line* of data. The serial library reads
// the data until the newline and then gives it to us through
// this callback function
function readSerial(data) {
  ////////////////////////////////////
  //READ FROM ARDUINO HERE
  ////////////////////////////////////
  if (data != null) {
    x = int(trim(data));
  }
  
}

Edit: https://editor.p5js.org/mariamalkhoori/sketches/f-MgfWbwx

Arduino Sketch:

void setup() {
  // Start serial communication so we can send data
  // over the USB connection to our p5js sketch
  Serial.begin(9600);

  // We'll use the builtin LED as a status output..
  pinMode(LED_BUILTIN, OUTPUT);

}

void loop() {

  // gets sensor reading
  int sensor = analogRead(A0);
  delay(5);

  // indicates data transfer
  digitalWrite(LED_BUILTIN, HIGH);

  // sends data to p5
  Serial.println(sensor);
  
  // indicates data transfer
  digitalWrite(LED_BUILTIN, LOW);
  

}

Results: 

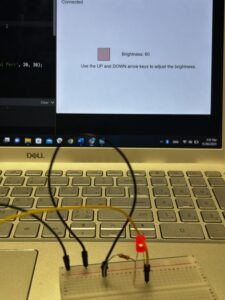
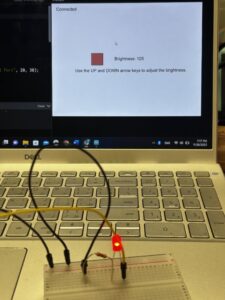
assignment1

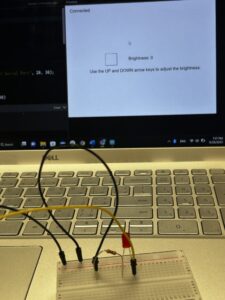
Assignment 2: P5 TO ARDUINO COMMUNICATION

Brightness of the LED changes when pressing the UP and DOWN key buttons

P5.js Sketch:

let brightness=0;

function setup() {
  createCanvas(640, 480);
  textSize(18);
}

function draw() {
  background(255);
  fill(0);

  if (!serialActive) {
    text("Press Space Bar to select Serial Port", 20, 30);
  } else {
    text("Connected", 20, 30);
  }
  fill(255,0,0,brightness)
  square(width/2-150,height/2-30,50)
  fill(0)
  text("Brightness: "+str(brightness),width/2-50,height/2)
  text("Use the UP and DOWN arrow keys to adjust the brightness. ",width/2-220,height/2+50)

  if (keyIsPressed) {
    if (keyCode==UP_ARROW) {
      if (brightness<255){
        brightness+=5;
      }  
    } else if (keyCode==DOWN_ARROW) {
      if (brightness>0){
        brightness-=5;
      }
      
    }
  } 
}

function keyPressed() {
  if (key == " ") {
    // important to have in order to start the serial connection!!
    setUpSerial();
  }
}

function readSerial(data) {
  if (data != null) {
    writeSerial(brightness+"\n");
  }
}

Edit: https://editor.p5js.org/mariamalkhoori/sketches/f7vn6lagB

Arduino Sketch:

int LedPin = 5;

void setup() {
  // Start serial communication so we can send data
  // over the USB connection to our p5js sketch
  Serial.begin(9600);

  // We'll use the builtin LED as a status output..
  pinMode(LED_BUILTIN, OUTPUT);

  // Outputs on this pin
  pinMode(LedPin, OUTPUT);

  // Blink them so we can check the wiring
  digitalWrite(LedPin, HIGH);
  delay(200);
  digitalWrite(LedPin, LOW);

  // start the handshake
  while (Serial.available() <= 0) {
    digitalWrite(LED_BUILTIN, HIGH); // on/blink while waiting for serial data
    Serial.println("0"); // send a starting message
    delay(300);            // wait 1/3 second
    digitalWrite(LED_BUILTIN, LOW);
    delay(50);
  }
}

void loop() {
  // wait for data from p5 before doing something
  while (Serial.available()) {
    Serial.println("0");
    digitalWrite(LED_BUILTIN, HIGH); // led on while receiving data

    int brightness = Serial.parseInt();
    if (Serial.read() == '\n') {
      analogWrite(LedPin, brightness);
    }
  }
  digitalWrite(LED_BUILTIN, LOW);
}

Results:

assignment2
Assignment 3: BI-DIRECTIONAL COMMUNICATION

The LED glows up when the ball touches the ground. The ultrasonic sensor is used to change the direction of the wind.

P5.js Sketch

let velocity;
let gravity;
let posit5
let acceleration;
let wind;
let drag = 0.99;
let mass = 50;
let LED=0;
let wind_speed=0;

function setup() {
  createCanvas(640, 360);
  noFill();
  position = createVector(width/2, 0);
  velocity = createVector(0,0);
  acceleration = createVector(0,0);
  gravity = createVector(0, 0.5*mass);
  wind = createVector(0,0);
}

function draw() {
  background(255);
  fill(0)
  if (!serialActive) {
    text("Press RIGHT key to select Serial Port", 20, 30);
  } else {
    text("Connected", 20, 30);
  }
  applyForce(wind);
  applyForce(gravity);
  velocity.add(acceleration);
  velocity.mult(drag);
  position.add(velocity);
  acceleration.mult(0);
  fill(205,104,219); 
  ellipse(position.x,position.y,mass,mass);
  if (position.y > height-mass/2) {
      velocity.y *= -0.9;  // A little dampening when hitting the bottom
      position.y = height-mass/2;
    }
  
  if (position.y==height-mass/2){
    LED=1
  }
  else{
    LED=0
  }
  
  if (position.x>=width || position.x<=0){
    position.x=width/2
  }
  
    
}

function applyForce(force){
  // Newton's 2nd law: F = M * A
  // or A = F / M
  let f = p5.Vector.div(force, mass);
  acceleration.add(f);
}

function keyPressed(){
  if (key==' '){
    
    mass=random(15,80);
    position.y=-mass;
    velocity.mult(0);
  }
  if (keyCode==RIGHT_ARROW){
    setUpSerial();
  }
}

function readSerial(data) {
  ////////////////////////////////////
  //READ FROM ARDUINO HERE
  ////////////////////////////////////

  if (data != null) {
    let fromArduino = trim(data);
    distance= int(fromArduino);
    if (distance>10){
      wind.x=2
    }
    else{
      wind.x=-2
    }
    
    let sendToArduino = LED+"\n";
    writeSerial(sendToArduino);
  }
}

EDIT: https://editor.p5js.org/mariamalkhoori/sketches/MvolZDB7W

Arduino Sketch:

int LedPin = 2;
int trigPin = 9;
int echoPin = 10;
long duration;
int distance;

void setup() {
  // Start serial communication so we can send data
  // over the USB connection to our p5js sketch
  pinMode(trigPin, OUTPUT); 
  pinMode(echoPin, INPUT);
  Serial.begin(9600);
  pinMode(LED_BUILTIN, OUTPUT);

  // Outputs on these pins
  pinMode(LedPin, OUTPUT);

  // Blink them so we can check the wiring
  digitalWrite(LedPin, HIGH);
  delay(200);
  digitalWrite(LedPin, LOW);


  // start the handshake
  while (Serial.available() <= 0) {
    digitalWrite(LED_BUILTIN, HIGH); // on/blink while waiting for serial data
    Serial.println("0,0"); // send a starting message
    delay(300);            // wait 1/3 second
    digitalWrite(LED_BUILTIN, LOW);
    delay(50);
  }
}

void loop() {
  // wait for data from p5 before doing something
  while (Serial.available()) {
    digitalWrite(LED_BUILTIN, HIGH); // led on while receiving data

    int LED = Serial.parseInt();
    if (Serial.read() == '\n') {
      digitalWrite(LedPin, LED);
      digitalWrite(trigPin, LOW);
      delayMicroseconds(2); 
      digitalWrite(trigPin, HIGH);
      delayMicroseconds(10);
      digitalWrite(trigPin, LOW);
      // Reads the echoPin, returns the sound wave travel time in microseconds
      duration = pulseIn(echoPin, HIGH);
      // Calculating the distance
      distance = duration * 0.034 / 2;
      Serial.println(distance);
    }
  }
  digitalWrite(LED_BUILTIN, LOW);
}

Results:

assignment3LED

assignment3WIND